Chapter 2. Using Window Systems
All versions of Unix work with alphanumeric terminals that handle a single session in a single screen, such as those described in Chapter 1. On most modern Unix versions, you can also use a window system. A window system is software that lets a single screen handle many sessions at once.[5] Window systems use a mouse or another device (such as a trackball) to move a pointer across the screen. The pointer can be used to select and move parts of the screen, copy and paste text, work with menus of commands, and more. If you’ve used a Macintosh or Microsoft Windows, among others, you’ve used a window system. Figure 2-1 shows a typical screen with windows.
This chapter introduces the X Window System, which is called X for short, the most common Unix window system. This introduction should also help you use window systems other than X.
Introduction to Windowing
Like Unix, X is very flexible. The appearance of windows, the way menus and icons work, as well as other features, are controlled by a program called the window manager. There are many different window managers; some have many features and “eye candy,” while others are simple and have just basic features. A window manager can make your desktop look a lot like a Macintosh or Microsoft Windows system, or it can look completely different. Your system may also have an optional desktop environment that provides even more features, such as support for “drag and drop” (for example, printing a file by dragging its icon onto a printer icon). Two popular desktop environments are GNOME and KDE. In this chapter, we show GNOME with the Sawfish window manager, as well as KDE with the kwm window manager. Details of other window managers, including how they make your screen look, are somewhat different—but this chapter should help you use them, too.

Starting X
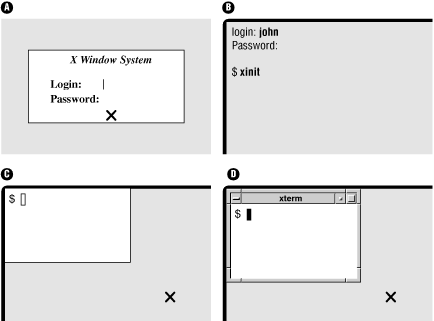
There are several ways to start X and its window manager. This section explains a few common ways. Figure 2-2 shows some steps along a few different paths to starting X. (The large “X” on the figures is the mouse pointer, or cursor, that you may see on your screen.) If your screen is like any of the following, refer to the section noted. If none fits your situation, skim through the next three sections or ask another X user for help.
Figure 2-2A, xdm (or another program, such as gdm or kdm) is running and waiting for you to log in graphically. Start reading at Section 2.2.1.
Figure 2-2B has a standard Unix login session; the X Window System is not running. Start reading at Section 2.2.2.
Figure 2-2C shows X running, but a window manager probably isn’t. (You can tell because the window doesn’t have a frame around it: there’s no titlebar or border.) Read Section 2.2.3.
Figure 2-2D shows the window with a frame (titlebar and border), so X and the window manager (in this example, mwm) are running. You’re ready to go! Skip ahead to Section 2.3.
A. Ready to Run X (with a Graphical Login)
Some terminals, like the one whose screen is shown in Figure 2-2A, are ready to use X. Your terminal has probably been set up to use one of the X display managers called xdm, gdm, kdm, or others; these log you in to your account and usually also start the window manager.
When you start, there’s a single window in the middle of the screen that has two prompts like “login:” and “password:”. The cursor sits to the right of the “login:” line. To log in, type your username (login name) and press RETURN, then do the same for your password. The login window disappears.
If a screen something like Figure 2-1 or Figure 2-2D appears, you’re ready to use X. You can skip ahead to Section 2.3.
If you get a screen such as Figure 2-2C (a single window with no title and no border), read Section C. Or, if you get a blank screen, press and release your mouse buttons one by one, slowly, to see if a menu pops up.
B. Starting X from a Standard Unix Session
If your terminal shows something like Figure 2-2B,
with a standard Unix “login:” prompt (not in a separate window; the
display fills the whole screen, making it look like a terminal),
X isn’t running.
Log in (as Section 1.1.2 in
Chapter 1 explains) and get a shell prompt
(such as $ or %).
Next, you need to start X.
Try this command first:
$ startx
If that doesn’t seem to work (after waiting a minute or so; X can be slow to start), try the command xinit instead. If all goes well, your screen sprouts at least one window. If the window looks like Figure 2-2C, without a titlebar or border from a window manager, read Section C. Otherwise, your window manager is running, so skip ahead to Section 2.3.
Problem checklist
- No windows open. I get the message “Fatal server error: No screens found.”
Your terminal may not be able to run X. Try another terminal or ask a local expert.
C. Starting the Window Manager
Once you have a window open with a shell prompt in it (usually
$ or %), you can start the window
manager program.
If a window manager isn’t running, windows won’t have frames (with titles,
control boxes, and so on).
Also, if you move the pointer outside any window (to the
desktop) and press the mouse buttons,
menus won’t appear unless the window manager is running.
If you have to start the window manager by hand, your account probably
hasn’t been set up correctly.
To make your life easier, get help from an X-pert and fix your account!
If you need to start the window manager by hand, move your pointer into
the terminal window.
At the shell prompt, type the name of your window manager, followed by an
ampersand (&).
If you don’t know your window manager’s name, try the following names,
one by one, until one works (i.e., doesn’t give you a “command not found” error):
gnome-session,
startkde,
wmaker,
afterstep,
fvwm2,
fvwm,
or twm.
For example:
$ fvwm &
[1] 12345
$
In a few moments, the window should have a frame. (For more about starting programs, see Section 2.3.2, later in this chapter.)
Running Programs
A window manager can open windows of its own. But the main use of a window manager is to manage windows opened by other programs. We mention a few window programs here; Section 2.8, near the end of this chapter, has more.
One of the most important X features is that windows can come either from programs running on your local computer, or over a network from programs running on remote computers. The remote computers can run Unix or another operating system. So, if your favorite program from another operating system doesn’t run under Unix but has an X interface, you may be able to run that program on its native OS and display its windows with X on your Unix computer. (Check your program’s documentation; see Section 8.1 in Chapter 8.) Researchers can run graphical data analysis programs on supercomputers in other parts of the country and see the results in their offices. There’s much more than we can explain here. We cover the basics here and in Chapter 6 in Section 6.2, which also has a figure showing how this works. If you’ll do a lot of work with X, you may want a detailed reference that explains X and your window manager.
Setting Focus
Of all the windows on your screen, only one window receives the keystrokes you type. This window is usually highlighted in some way. For instance, the titlebar of the window that receives your input may be blue instead of the default grey color. In X jargon, choosing the window you type to is called “setting the input focus.” Most window managers can be configured to set the focus in one of the following ways:
Move the mouse pointer into a window and click a mouse button (usually the first button; see Section 2.4, later in this chapter). In some systems, you may need to click on the titlebar at the top of the window.
Simply move the pointer inside a window.
Your window manager may be configured to give the input focus automatically to any new windows that pop up.
Terminal Windows
One of the most important windows is a terminal window. A terminal window has a Unix session inside with a shell prompt, just like a miniature alphanumeric terminal. You can have several terminal windows running at the same time, each doing something different. To enter a Unix command or answer a prompt in a window, set the focus there and type. Programs in other windows will keep running; if they need input from you, they’ll wait just as they would on a standard terminal.
Quite a few programs make terminal windows. One of the best-known programs is xterm. Others include GNOME Terminal and konsole. All perform the same basic job: they allow you to interact with Unix from a shell prompt.
Figure 2-2D
and
Figure 2-4
show a single terminal window with a
shell prompt ($).
If you enter a Unix command (such as date)
at the prompt,
it runs just as it would on a terminal that isn’t under the X Window System.
You can also start other X-based window programs (sometimes called X clients) by entering the program’s name at a shell prompt in any terminal window. Although you can start new programs (such as terminal windows, xcalc, and so on) from any open terminal window on your computer, we recommend starting them all from the first terminal window that you open. If you do that, and if your shell has job control (see Chapter 7), it’s easy to find and control all the other programs and their windows.
Here’s an example. To start the calculator called xcalc, enter this command from a terminal window:
$ xcalc &
[1] 12345
$
The shell will put the process in the background—so you get another
shell prompt right away—and will print a process ID (PID) number,
such as 12345.
(Chapter 7 has more information on this subject.)
If you forget to add the ampersand (&) at the
end of the line, then
kill (terminate) the xcalc program
from the terminal window where you started it by typing your
interrupt character (such as CTRL-C).
You should get another shell prompt, where you can re-enter
the xcalc command correctly.
The new window may be placed and get the focus automatically. Or, the window (or an outline of it) may “float” above the screen, following the pointer, until you point somewhere and click the first mouse button to place the window.
You can also start a new terminal window from an existing one. Just enter the program’s name and an ampersand (for example, xterm &) at the shell prompt. Don’t forget the ampersand.
The same method will start other X programs. (Later in this chapter, Section 2.8 lists some standard X programs.)
Window Manager Menus
Your window manager probably has one or more menus, buttons, and dialogs of its own. These let you control the way the window manager works, overall. They may also launch programs, open the help system, and do other useful things that don’t apply to all programs and windows that are currently open (things you can’t do with an individual program’s own menus, that is). For instance, a window manager menu might let you set how many rows of program launching buttons are in the panel or the color of the frame around each window.
Different window managers have different ways to do these things. To find the menus on your window manager, read its documentation or experiment a bit. You might also find that pressing different mouse buttons will open different menus. You may need to hold down the button to keep a menu visible. Move your mouse pointer around to places shown in the following, then try your mouse buttons:
The desktop (outside any of your open windows)
An icon with a logo—for example, the KDE gear with a K over it or the GNOME footprint
A blank part of some standard feature of your desktop—for instance, an empty part of the panel
Any little feature that doesn’t seem to apply to a particular program (that isn’t a program icon and doesn’t have the title of a program or open window)—for instance, the small triangle to the right of the pager shown in Figure 2-1
You probably can add commands to some menus, or more icons to a group of program-launching icons. You might add window manager operations or commands to open other windows. For example, a “New Window” menu item can open a new terminal window for you. A “Calculator” item could start xcalc. Different window managers have different ways to do this. Check your documentation. To add a command, you’ll need to specify either the program name (such as xterm or mozilla) or the absolute pathname of its executable file (such as /usr/X11R6/bin/xterm). The absolute pathname varies system-to-system; you might find it using the command which or type from a shell prompt, like this:
$type xtermxterm is /usr/X11R6/bin/xterm $which xterm/usr/X11R6/bin/xterm
Exercise: exploring your window system
|
Change to your home directory. |
Enter |
|
Open two terminal windows. |
Enter the program name and an ampersand
(such as |
|
Practice setting focus on both new windows and entering Unix commands in each. |
Click on a window and/or move the pointer there.
Enter |
|
Start a clock from one terminal window. |
Enter |
|
Start a calculator from one window and try it. |
Enter |
|
Change the working directory (see Section 3.1.6 in Chapter 3) in only one terminal window. |
Enter |
|
Check the working directory in both terminal windows. |
Enter |
|
Terminate xcalc. |
Set the focus on the xcalc, and either type your interrupt character (such as CTRL-C) or click the close-box (often an X in the top-right corner of the window frame). |
Problem checklist
- When I try to start a window program, I see “connection refused by server” or “client is not authorized to connect to server.”
You may need to run a command like xhost or xauth. These commands have security implications that we can’t cover adequately in this little book, though, so please check with your system staff.
- When I try to start a window program, I see “Error: Can’t open display.”
Your DISPLAY environment variable may not be set correctly or you may need to use the -display option. Ask for help or check X Window System documentation.
- Why are the columns of text in my terminal window jagged?
Some programs, such as ls -l and who, expect your display to use a fixed-width font, where every character is the same width. If your set your terminal window to a variable-width font, the columns won’t line up correctly. We recommend fixed-width fonts, such as Courier, for terminal windows.
Your terminal mode may be incorrect. (This can happen if a program fails or is interrupted.) From a shell prompt, use the reset command, as explained in Section 1.4 in Chapter 1.
Working with a Mouse
Let’s look at basics of using a mouse or other pointing device. We assume that your mouse has three buttons, as mice on Unix systems usually do. (If your mouse has two buttons, you may be able to simulate the missing middle button by pressing both of the other buttons at once. Your X system may need to be reconfigured to work this way, though.) When we say “the first button,” we mean the leftmost button for right-handed users, or the rightmost button for left-handed users. (Under X, a mouse can be set for either left-handed or right-handed users, so the button you use to click on and drag is the button under your index finger.)
Pointer Shape
As you move the mouse pointer[6] from the desktop on to other windows or menus, the shape of the pointer changes. For instance, on some window systems, while the pointer is over the desktop, it’s shaped like a big X. The pointer may change to an hourglass shape to tell you to wait. When you resize a window, the pointer could change to a cross with arrows.
Using a Mouse with xterm Windows
One advantage terminal windows have over plain (nonwindowing) terminals is you can copy and paste text within an xterm window or between xterm windows.
Note
Although this section is specifically about xterm windows, most tips here also apply to other kinds of terminal windows. Check your documentation or just try these and see!
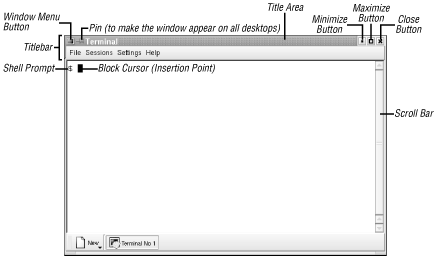
To get started, move the pointer inside an xterm window and be sure it has the focus (if your window manager doesn’t do that automatically). Notice that the pointer changes to an “I-beam” shape as you move it into the window. We discuss this I-beam pointer later in this section. There’s also a block cursor (which is shown in all terminal windows in this chapter—and labeled at Figure 2-4.) The block cursor is the window’s insertion point, where text goes when you type on the keyboard. The block cursor doesn’t follow the mouse.
If your window doesn’t have some previously completed command lines, as in Figure 2-3, type command lines at a couple of prompts; this gives you text to copy. (The mail command, shown in Figure 2-3 and explained in Chapter 6, is a good example, but you can use any command line that you want to rerun from another window.)
The I-beam pointer selects text for copying. Let’s try it. Point to the first character of a command line (not the prompt) and click the first mouse button. Next, move the pointer to the end of the text you want to select and click the third button. The text between the first and third clicks should be highlighted; your xterm window should look something like Figure 2-3. (Problems? If you select the wrong text, you can undo the selection by clicking the first button anywhere in the window. If you accidentally click the second button, this may paste some random text at the block cursor; in that case, you can erase the pasted text with your backspace key.)
Another way to select text is by pointing to the first character you want to copy, then holding down the first mouse button while you drag the pointer across the text. By the time you release the mouse button, the whole area of text should be highlighted.
The instant you highlight text (as you did a moment ago), the text is also automatically copied, so you can paste it somewhere else. (In an original xterm window, there’s no menu with a “Copy” command on it. In most X window programs—the original X programs, at least—highlighting text copies it automatically.)
You can paste text in the window you copied it from or in another window. Let’s choose another open terminal window. With the block cursor at a shell prompt, click the middle mouse button anywhere in the window. (You don’t have to click at the block cursor!) The selected text will be inserted (pasted) into the window at the block cursor, just as if you had typed it in. Press RETURN to run the command; otherwise, backspace over it to get back to the prompt.
You can also select text in a window just by clicking. Point to a word and double-click the first button; the word should be highlighted. Next, let’s select an entire line. Point to any character on a line (a space is OK too) and triple-click the first button to highlight the whole line.
You can select and copy any text, not just command lines. With the mail command, for instance, you can copy a line from the body of the email message.

The same copying and pasting works between xterm windows and between many other (but not all) windows that handle text. Before you paste text into an xterm window, always be sure the block cursor is at the place you want to insert the newly pasted text!
Problem checklist
- When I try to paste text into a terminal window, it doesn’t appear where I want it.
One common mistake is clicking the mouse at a particular point in the terminal window and expecting the text to be pasted there. In most terminal-based Unix applications, you need to move the insertion point (typically, a block-shaped cursor) using keyboard commands or the arrow keys. Before you paste, be sure that the insertion point is at the place you want it.
- I’ve copied text from one window, but it won’t appear when I paste it.
Unfortunately, there are several possible causes, including the following list:
Be sure you’re pressing the second (middle) mouse button to paste. If you have a two-button mouse, pressing both buttons (to act like the missing middle button) can be tough: it takes precise timing.
Some things can erase the clipboard where your text was copied—for instance, opening certain kinds of new windows. Try copying the text again, then pasting it right away.
The window system actually has many clipboards, and some programs don’t check all clipboards to find your copied text. You may be able to paste the text into another window (such as a window-based text editor), then copy the text again and paste it where you want it.
Some programs will let you highlight text, but the text actually isn’t copied and/or pasted unless you use the “Copy” and/or “Paste” commands on the program’s menu.
Can you save some or all of the text you want to copy into a temporary file? If so, you may be able to open that file in another type of window (such as a text editor), then copy from that new window. Also try using a text editor to put just the text you want into the temporary file, then read that file into the program where you originally wanted to paste the text.
Working with Windows
A window manager program helps you control windows. Various window managers do the same kinds of things, with some variation. Let’s start by looking at Figure 2-4, which shows a typical window under KDE and kwm.
The edges of the window can be used to resize the window. The top of every window has a titlebar that includes the window title as well as three buttons.
Using the Titlebar
The titlebar is the top of a window; it has the window’s title, and, usually, some buttons or other features. See Figure 2-4.
The three buttons at the top right corner have boxes inside them.
Click the button with the small square to mimimize the window (make the window as small as possible); this is also called “hiding” the window. With some window manager configurations, a minimized window turns into an icon; on others, the window may have a title button in a list of window buttons at the bottom of a window (or elsewhere). No matter how your window manager treats a minimized window, though, the important point here is that minimizing puts unneeded windows out of the way without quitting the program inside them; it also keeps you from accidentally typing into a window.
You can restore (“show”) a minimized (“hidden”) window by clicking on its icon, its button on the panel at the bottom of the screen, or in several other ways—again, depending on your window manager.
Maximizing a window makes it as big as the program will allow, often as big as the screen. One way to do this—which is different in different window managers, of course—is to click the button on the window frame that has a large square.
Maximizing windows that have graphical applications in them—such as a web browser—works just fine. But it can be a bad idea to maximize terminal windows (and give them more than 80 characters per line), especially if there’s a program running in that window. See the note in Section 2.5.3, later in this chapter.
Clicking the box with a big “X” kills a window. In some window managers, clicking with the third mouse button is a more emphatic kill. (Later in this chapter, Section 2.7 describes this in more detail.)
Note
It’s not always a good idea to click the “X” box on a window frame—especially on a terminal window with a program running inside. Although it may seem to work (because the window closes), the programs running inside the window may not have time to finish their work and exit gracefully.
It’s safer to use the program’s own “exit” command. For instance, if you’re running the Pico editor in a terminal window, use its CTRL-X command. If you have a shell prompt, type exit or press CTRL-D; if the program has a menu or button with which to quit, use it. If there’s no other choice, though, you’re probably safe to click the “X” box on the frame.
The left button opens the window menu; this is explained in Section 2.5.5 later in this chapter.
Moving Windows and Icons
To move a window, start by pointing to the titlebar. Hold down the first mouse button and drag to the new location—then let go of the button.
Resizing Windows
If you have the pointer inside a window and then move the pointer to an edge, the pointer will probably change to another shape—an arrow, for example. If you point to a corner, you may be able to resize both sides that meet at the corner. To resize when you have the arrow pointer, press and hold (typically) the first button, then drag the window border until the window size is what you want and release the button. If you don’t get quite the size you want, just do it again.
Note
If you’re using a terminal window (such as xterm), and a program is already running in that window (not just a shell prompt), note that resizing the window may confuse the programs currently running in it! It’s best to set the terminal window size before you run a program.
Also, remember that standard terminals are 80 characters wide. If you’re editing text in a window with a width that isn’t 80 characters, it can cause trouble later when the file is viewed on a standard terminal.
Stacking Windows
You can have many windows open at once. To get some or all out of the way, minimize them. Sometimes, though, you’ll want several overlapping windows on your screen:
You could log onto the Internet, go to your favorite news website and open ten windows, each with an article you want to read. Then log off the Internet (to free your phone line) and read each window. In that case, it might be easiest to have the ten windows in a stack, and close each window after you’re done—instead of minimizing all windows at the start and restoring them, one by one, as you read them.
You might need several windows visible at the same time—for instance, reading email messages in one window while you edit a presentation in another window, with a web browser open to a company information page in a third window. You may not need to shrink windows to keep them from overlapping. Instead, windows can partly overlap, covering areas of other windows that you don’t need to see.
In X, a window doesn’t always need to be on top of the stack to get the input focus (so you can type into it). If you’ve configured your window manager so the window with the mouse pointer over it gets the focus automatically (without clicking on the window), you can type in a window without raising it to the top of the stack. This is a handy feature of most X window managers.
To bring a window to the top, you can generally either click on its title bar with the first mouse button or use the window manager’s “raise window” command. That “raise window” command is usually either on the window menu (see the following section), on a window manager menu (choose “raise window,” then click on the window you want to raise), or it might be found by clicking on the window frame with the third mouse button. In the same way, your window manager probably has a “lower window” command that moves a window behind the windows it overlaps.
The Window Menu
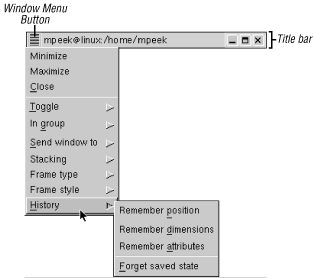
Many window managers let you control each window by its own window menu. There are lots of ways to get a window menu. Here are two: click on the menu button at the top left corner of a frame (as in Figure 2-4, for KDE and the kwm window manager), or click on an icon (for the mwm window manager). Figure 2-5 shows a window menu from the Sawfish window manager. When the menu pops up, you can point to an item and click it.
Let’s look at some of the Sawfish window menu operations:
The Minimize and Maximize operations are explained in “Using the Titlebar,” earlier in this chapter.
Close terminates the window and the program in it. Use this as a last resort. If the program has a separate menu or quit command (for example, entering exit at a shell prompt in a terminal window), use it instead of Close. (See “Quitting,” later in this chapter, for an explanation.)
Send window to lets you move a window to another virtual desktop. When you point to this item, a submenu appears with a list of desktops where the window can be moved.
Stacking opens a submenu that lets you control this window’s position in a stack of windows.
History opens a submenu that tells the window manager how to handle this particular type of window in the future. For example, the window menu in Figure 2-5 happens to be on a GNOME Terminal window. If you have the GNOME Terminal window at a particular spot near the lower-left corner of the desktop, and you choose the Remember position entry on this submenu, then the next GNOME Terminal window you open will open at the same place on the desktop. (Once a window has opened in this particular spot, you can always move it somewhere else.) The Forget saved state entry tells the window manager to forget all of the History settings you’ve made for this type of window.
On the mwm menu (not shown here), a keyboard shortcut follows each command. Other window managers may have keyboard shortcuts but not list them on the menu (they could be listed on a configuration menu somewhere else). With a shortcut, you don’t have to use the mouse to choose commands; you can handle window operations without taking your hands off the keyboard. For example, next to the Minimize entry is the shortcut hint “Alt+F9”, which means that you can minimize this window without a mouse by holding down the ALT (or META) key and pressing the F9 key. Holding the SHIFT key and pressing the ESC key brings up an mwm window menu (and takes it away). If your keyboard doesn’t have all of those keys, the menu can probably be customized to use others. Other window managers may have different keyboard shortcuts—or none at all.
Exercise
If you don’t have two terminal windows open from the previous exercise, please start by opening them.
|
Copy and paste part of a command line. |
Type |
|
Move a window. |
Grab and drag the window by its titlebar. |
|
Iconify a window from the titlebar. |
Use the Mimimize button. |
|
Restore (de-iconify) the window. |
Other Window Manager Features
Your window manager and/or desktop environment may have some other handy features. Let’s look at two. Explore these after you’ve learned more basic operations; they can be real timesavers!
Panel
A panel is a thin bar across the top or bottom of the screen. If you have a panel, it probably has icons you can click to launch a program. It also may have a row of buttons, one for each window that’s either open or minimized (or both); you can use these buttons to open a minimized window or raise an open window to the top of a stack. If you move the mouse pointer over an object without clicking, a “tool tip” box may appear with more information about it. You also can try clicking on these and/or holding down your mouse buttons (try each mouse button, in turn) to see what they might do.
Pagers and Virtual Desktops
Sophisticated window managers can manage multiple desktops on the same physical screen. A pager lets you choose between these virtual desktops. Each virtual desktop is like the desktop you see when you open the window system—but you can open different windows on each virtual desktop. It’s kind of like having two or more separate physical terminals stacked on top of each other, as well as side-to-side, on your desk—each with its own desktop displayed, all driven from the same keyboard and mouse. All virtual desktops appear on the same screen, but only one is visible at a time. If you’re using GNOME or KDE, you may have four virtual desktops available automatically, though that number can be changed.
Think of these desktops arranged in a grid, as Figure 2-6 shows. You can refer to the desktops by saying “the desktop above” or “the desktop to the right”; they may also be numbered. The window manager has commands to let you move a window from one desktop to another (see Section 2.5.5, earlier in this chapter). You also may be able to use the mouse to drag a window “off the edge” of one desktop and onto the next.

If you’re working on three projects, for instance, each project can have its own desktop, where you can put all the windows for that project. The pager lets you choose which desktop you want to see. If your window manager has a panel, each virtual desktop probably has its own panel.
Some icons or windows may appear on all desktops; others may appear on just one desktop. For instance, if your system has a console window where you can monitor system log messages, you might want to see that window from every desktop. (Under the Enlightenment window manager, for instance, this is called making a window “stick” to all desktops. On KDE, clicking the push-pin icon near the top left corner of a window frame does the same thing.) But another window—such as a text editor on which you’re writing a report about a particular project—should be open only on the desktop where you need it.
By the way, many window-based programs—such as web browsers—can open multiple windows. It’s usually more efficient to start the program just once, and put its windows on the desktops where you need them, instead of starting a new instance of the program on every desktop. For example, instead of clicking the Netscape icon to start the browser program running on every desktop, click that icon on one desktop and use Netscape’s “New Window” command to open multiple windows. You then move each new Netscape window to the desktop where you want it. (In case you need to clear all of the windows from one desktop, though, remember to use Netscape’s “Close Window” command instead of its “Quit Netscape” command! Quitting Netscape in this situation would remove all of its windows from all of the desktops.)
Unresponsive Windows
While your window system is running, windows may seem to stop responding to commands or mouse clicks. Some or all of the window contents—but not necessarily the window frame itself—may go partly or completely blank. In this case, either a window or the entire window system may be “frozen” or “hung.”
The best thing to do in a situation like this is to wait a little while. If the window is showing something from a network, such as a web browser showing a web page from the Internet—or, especially, if the window is from another computer across the network—the cause may be a network delay. If you can wait a minute or two (without pressing extra keys or clicking the mouse around; just wait!) and nothing happens, then it’s time to take action. Here are some things to try at that point:
Try to find out whether just one window is frozen, or if all windows (and the entire window system) are frozen.
If you have other windows open, try to use them. For instance, if a text editor is open, try to add a word to the text or use a command from one of its menus. If other windows seem to work normally, you can guess that the problem is only in the one window (or family of windows, from one program) that seems frozen.
If you don’t have other windows open, try to open a new window from the window manager’s menu, icons, panel, etc. Try to minimize and maximize that window, move it around the screen, and so on. If this seems to work normally, the trouble is probably in the original frozen window. But, if nothing seems to work, the whole window system may be frozen.
Next, handle the frozen window or windows:
If just one window is frozen, you’ll probably need to kill it. Click the first mouse button on the “close” box in the window’s title bar; this box is often an X symbol. In many Unix window managers, clicking that box sends a “close” signal to the window, and it may do the trick. If it doesn’t work, click the third mouse button on that box; in some cases, this will send a “destroy” signal to the window. (All this depends on the window manager you’re using!) If several windows are frozen, try these techniques on each window.
If the windows go away, there’s still a chance their Unix processes (the running programs) haven’t gone away. Or, if the windows don’t go away, then there probably are Unix processes left over. So it’s best to check for and kill any leftover processes. In Chapter 7, Section 7.3 explains how.
If the whole window system is frozen, the computer “underneath” it is probably still running well. Start by trying to close the window system normally from its main menu, with whatever command you normally use. If the whole window system is frozen, that probably won’t work.
The next step is to try to kill your entire X Window System server. You can do this by holding down three keyboard keys at once: CTRL ALT BACKSPACE. If you started the window system from a graphical login, you should see another login box; you can log in again. Or, if you started the window system nongraphically, you should see a shell prompt on your screen; you can repeat the same command (xinit or startx, for instance) that you used to start the window system before.
If you can’t close the window system that way, the last resort is to check for and kill the window system’s processes. If you’re using a PC operating system such as Linux or NetBSD, try holding down the three keys CTRL ALT F6; if you’re lucky, you should get a virtual console with a nongraphical “login:” prompt where you can log in and get a shell prompt. Otherwise, you’ll probably have to do a remote login from someone else’s computer to yours—and get a shell prompt that way. Once you have a shell prompt, read the directions in Section 7.3, in Chapter 7; look for processes with names similar to your window manager (such as
gnome-sessionfor GNOME).
If you killed windows, or the whole window system—and you were doing work in any of those windows—any changes you made to a file (in a text editor, for instance) may have been lost. It’s best to reopen the window, or the whole window system, and check for damage while whatever happened is still fresh in your mind.
Other X Window Programs
Following are a few standard X window programs that your system may have:
xbiff: tells you when new electronic mail comes in
xclipboard: helps with copying and pasting text
xmag: magnifies parts of the screen
xman: browses Unix manual (reference) pages
For more information on those programs and the many other standard X programs, see a reference file or book. There’s a list of the X programs that come with XFree86™—and, in general, with other X Releases too—at (as of this printing) http://www.xfree86.org/current/manindex1.html.
Quitting
Like almost everything in X, the way to quit X is configurable. The key to shutting down X is to know which of your programs (your windows or window manager) is the controlling program. When the controlling program quits, any leftover X programs are killed immediately. The controlling program is usually either the window manager or the single terminal window that started your X session.
Find the controlling program for your X session and write it down:
_____________________________ Program to quit last
If your controlling program is a terminal window, we suggest leaving that window minimized from just after you’ve logged in until you’ve shut down all the other X programs. That way, you won’t end your X session accidentally by closing that terminal window too soon.
No matter what your controlling program is, closing it sooner than last means the other windows will be killed quickly and automatically. There’s a chance, though, that programs running in those killed windows—especially if they’re terminal windows—won’t be killed, and will keep running, disconnected from your login session. So it’s best to close the controlling program window last.
To quit the window manager, select the “Exit” or “Quit” command on its main menu.
Here are the steps to shut down X:
Quit all noncontrolling programs (all programs other than the controlling program). If any windows are running programs that have their own “quit” commands, it’s a good idea to use those special commands to quit. For example, if you’re running a text editor in a terminal window, use the editor’s “quit” command, then close the terminal window by entering exit at the shell prompt. (Most terminal windows will close when their shell program exits. If yours doesn’t do this, though, you’ll need to finish by using the terminal window’s own “close” command.)
Using the program’s own “quit” command gives the program time to clean up and shut down gracefully. On the other hand, the Close item on a menu from the window manager can interrupt and kill a program before it’s ready. If, however, a program doesn’t have its own “quit” command, use Close on the window menu.
If any minimized windows are running programs that have their own “quit” commands, restore those windows and use the “quit” command.
Quit the controlling program.
After X shuts down, you may get a Unix shell prompt. If you do, you can log out by entering exit. If you simply get another login box from xdm (as in Figure 2-2A), you’re done.
[5] If you’re using a PC operating system, such as Linux or NetBSD, your system probably also supports virtual consoles. See the Glossary for a definition and more information.
[6] The correct word for this symbol is cursor. But xterm and some other windows also have separate cursors to show where text will be entered. To avoid confusion, we use the word “pointer” for the cursor that moves all across the screen under control of the mouse.