CHAPTER FIVE
PERSPECTIVE AND MEASURING ACCURATELY
There are four basic components artists use to create the illusion of three-dimensional space on a two-dimensional piece of paper: (1) shadows and light, (2) overlaps, (3) perspective, and (4) color variation. We’ve been practicing using shadows and light to make a form look three-dimensional with natural color, and we use the concept of overlaps throughout this book. This chapter focuses on using perspective to make the form and space look three-dimensional. To do this, we’ll create the illusion of depth using foreshortening, which is when a part of a subject’s depth is diminished. Understanding foreshortening is crucial, as is choosing a particular view of a subject. While there are many aspects to the larger concept of perspective, for our botanical purposes, we’ll focus on using circles that become ellipses. The position of the viewer’s eye in relation to an object can change, which creates various foreshortened views. An easy way to start visualizing this is to do the following exercise using a cup.
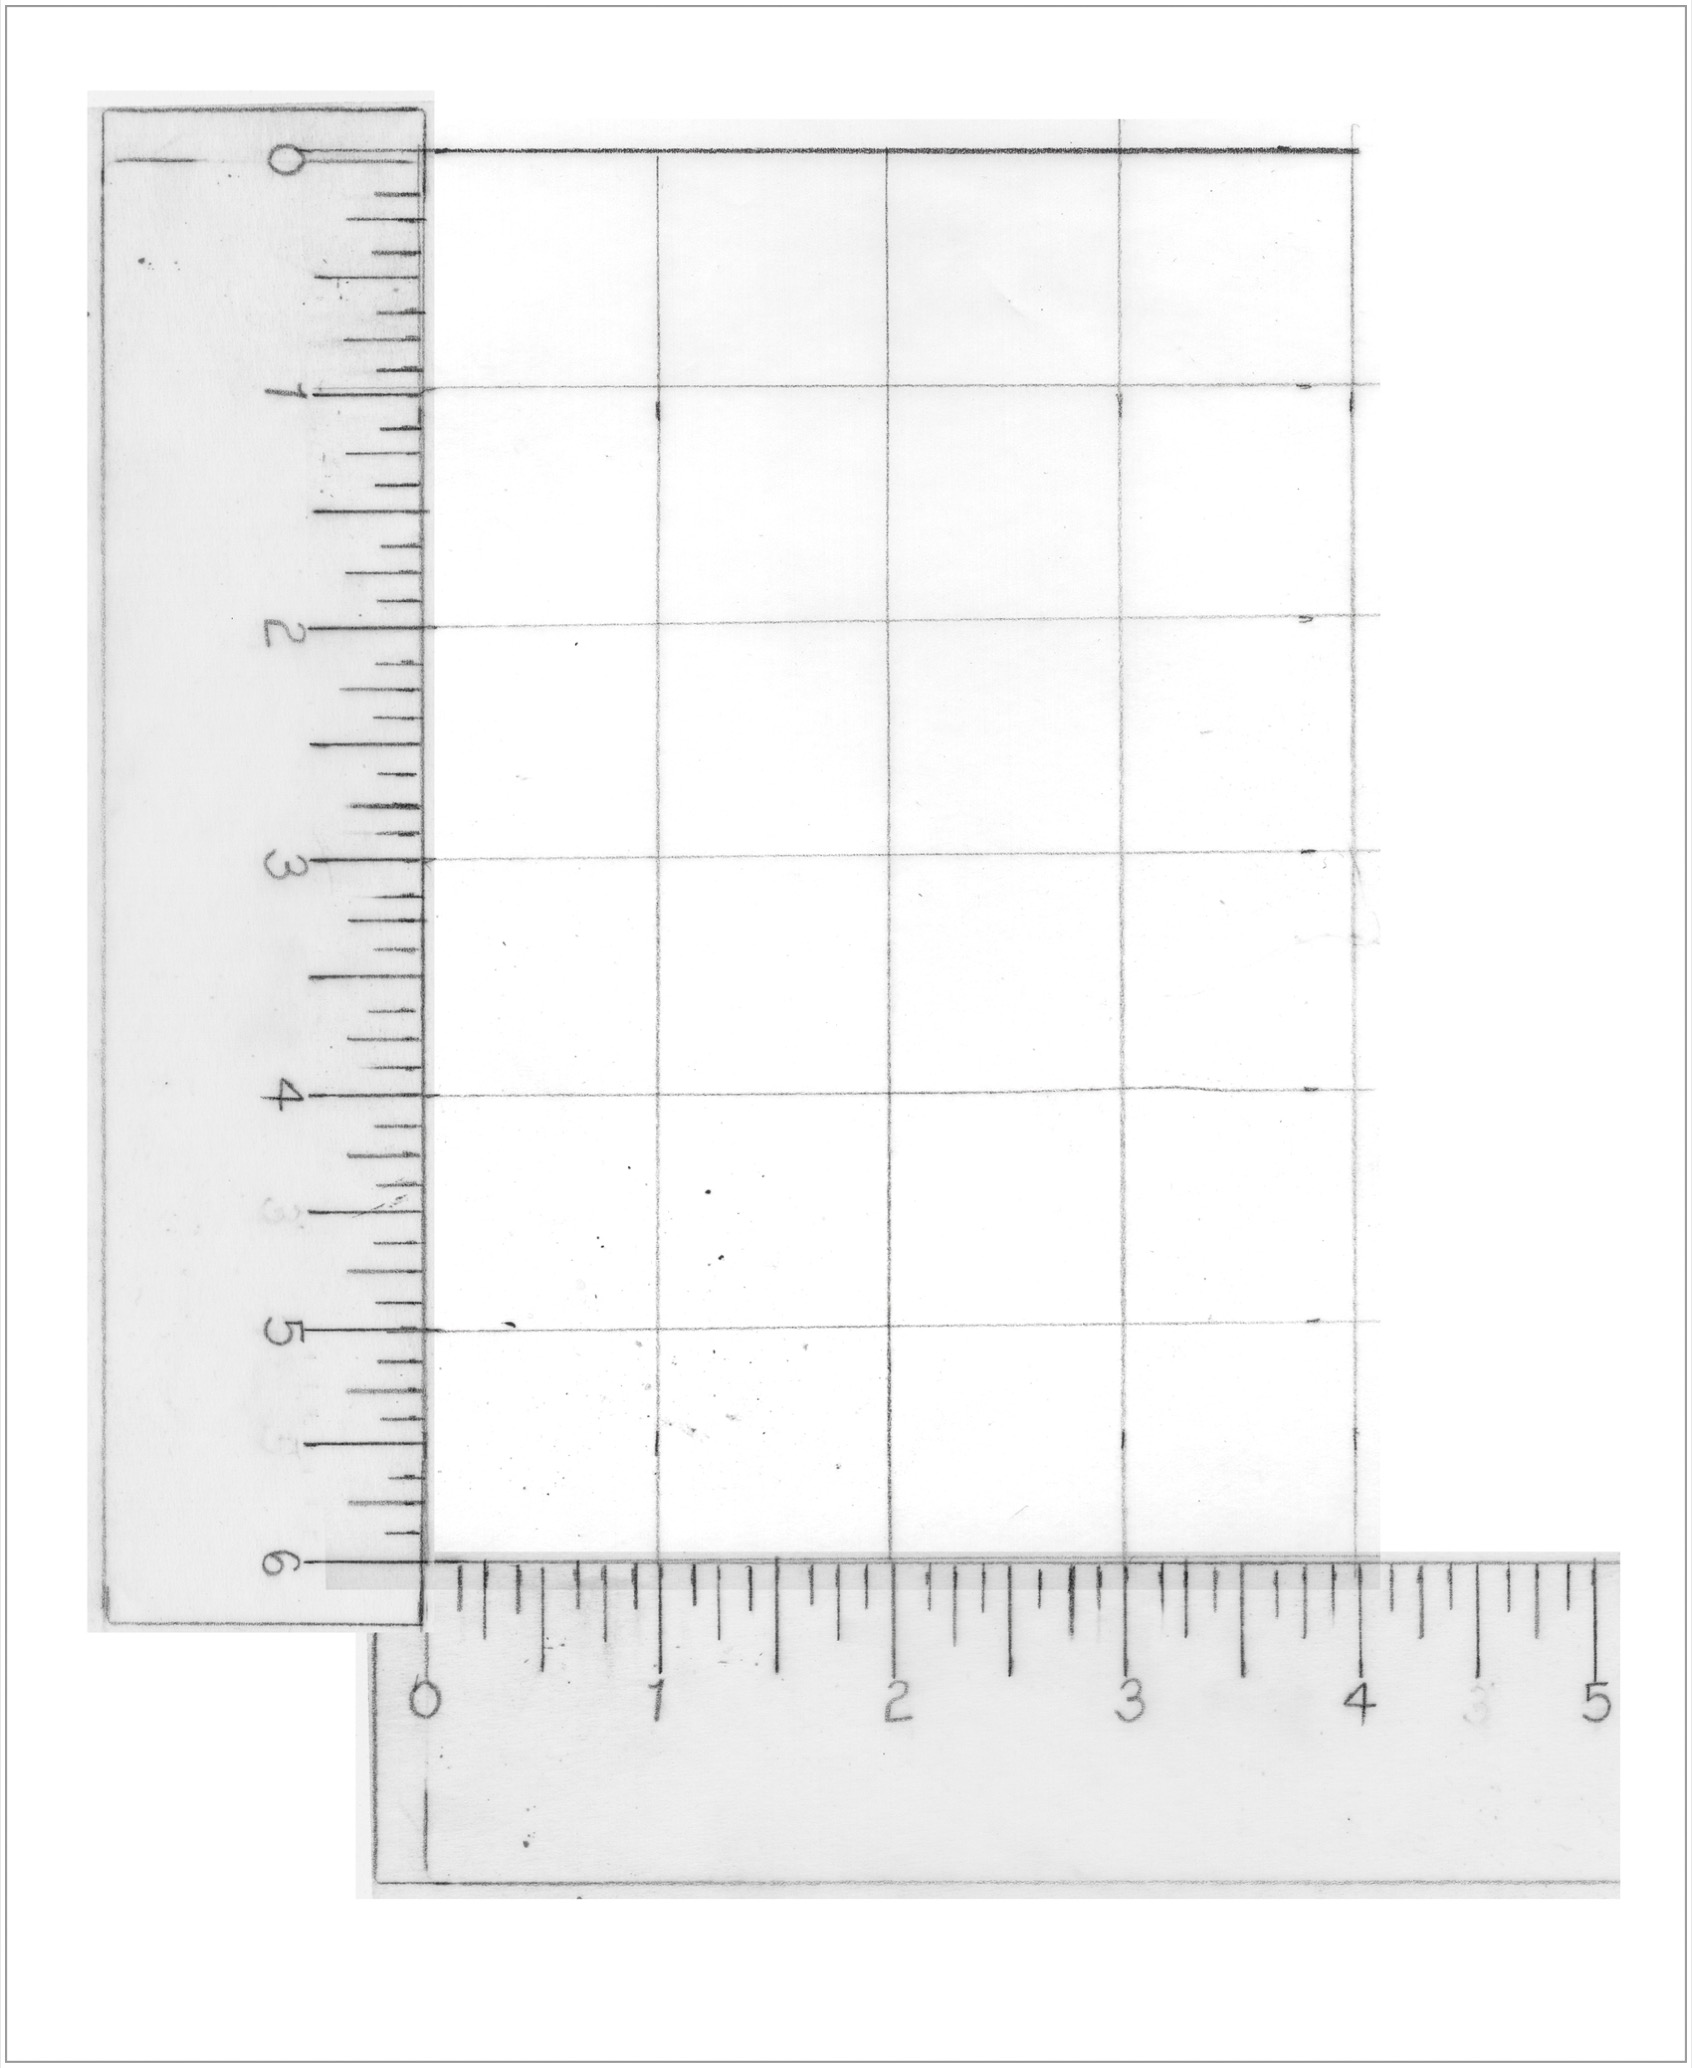
Imagine that there’s a window (or what we refer to as the picture plane) right up against your cup. I’ve created a grid on tracing paper that I can place in front of my drawing to help with measuring. I hold my ruler at a 90-degree angle and make sure it actually touches my subject up against the imaginary window. Because the window is flat, in effect you’ve transformed the three dimensions of the cup into a two-dimensional view. If you measure the height, width, and depth this way, you’ll have a view of the cup in perspective. You can also take a photo to help practice foreshortening, because a photo transforms the three-dimensional world into two dimensions for you. I caution you, though, to not rely on photos for drawing structure and details in your plant, but only as a reference and a guide to help with perspective. Photos can help, but they are also misleading, so please focus on drawing from real three-dimensional subjects.
Perspective on a Cup
To measure correctly, I use a clear ruler that I can hold right up against the imaginary picture plane, right up against my subject. This may seem cumbersome and uncreative, but I find it to be liberating and freeing to check my measurements so that my proportions and sizes are accurate. This way, I don’t have to continually fix and remeasure my drawing when something doesn’t feel right. With a few quick measurements up against the picture plane at the beginning of a drawing, you’ll save lots of time down the road. Nature’s proportions are so lovely, and they often describe the difference between one plant and another, so getting them right is important. In this lesson, we will do some simple measuring and drawing perspectives of a cup on scrap paper. Once you’ve practiced visualizing and drawing the different ways of seeing a foreshortened view, use these simple drawings of your glass to help you when drawing with real plants.

Hold a cup up so that you are looking directly inside it. Measure the height and width of the top rim of the cup. Notice that this is a circle that has an equal height and width. (A)

Start to tilt the cup away from you just a bit. Measure the height and width of the rim again. Notice the width remains the same, but the height is diminished, or foreshortened. You are also beginning to see the outside of the cup. Draw this view. (B)

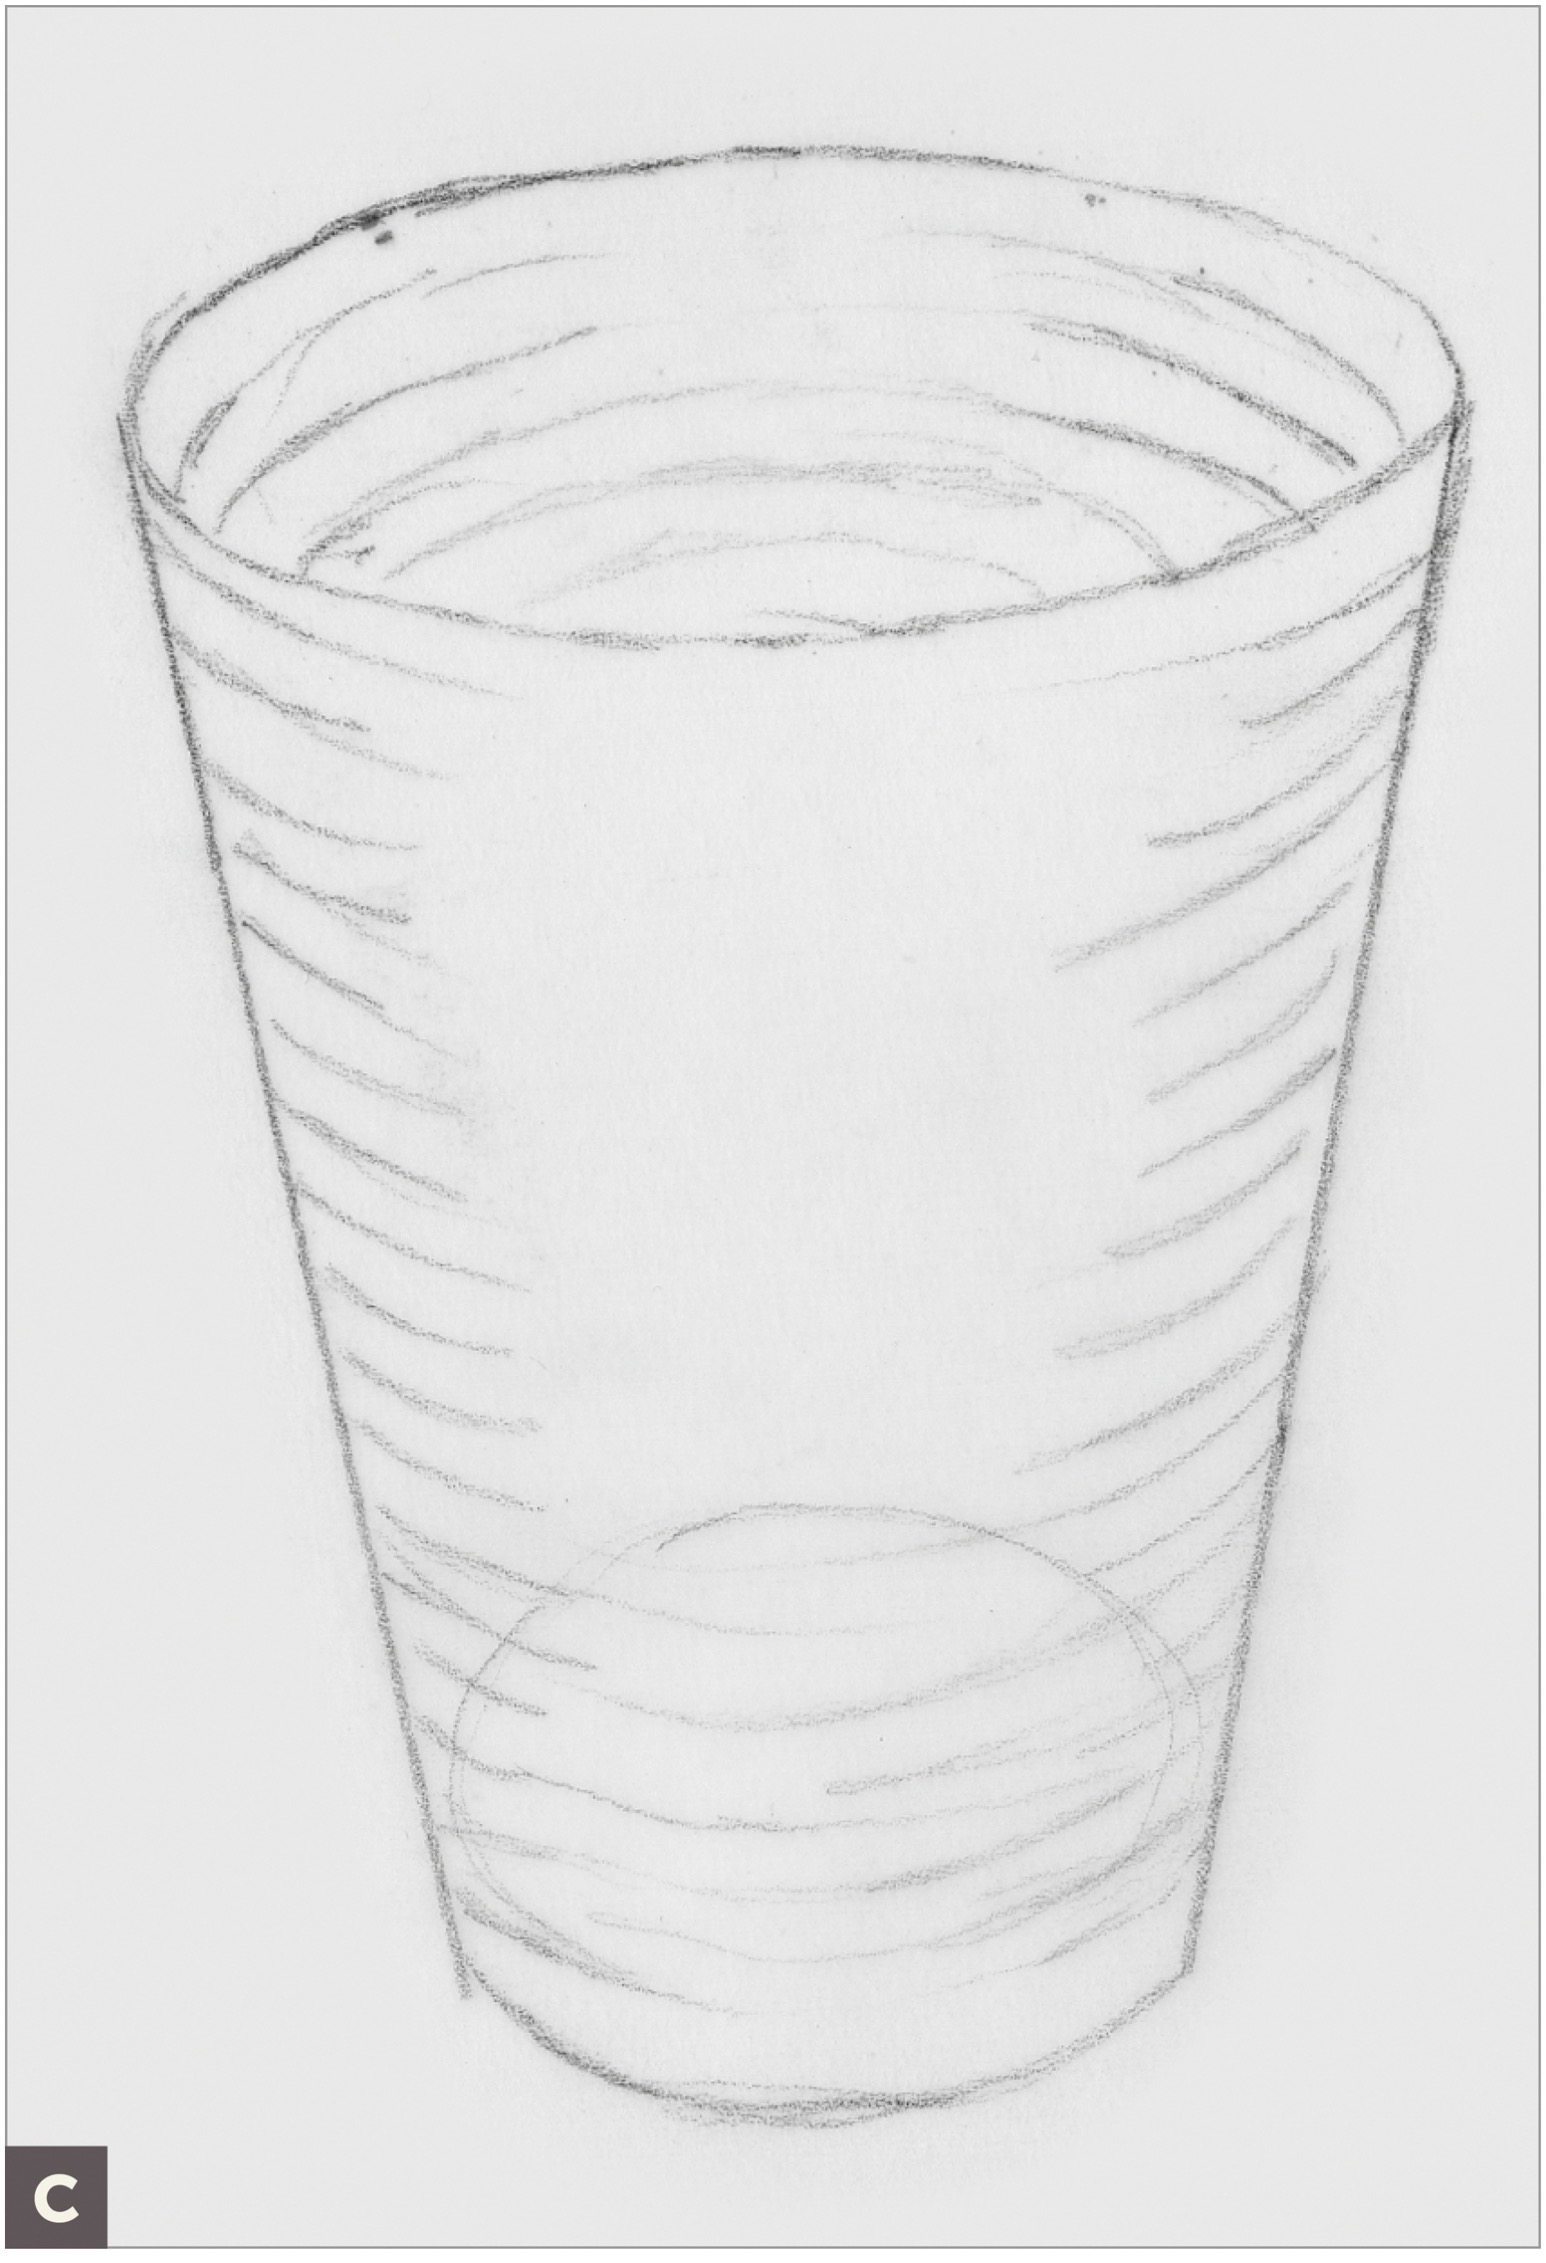
Tilt the cup even farther from you, and notice the rim is now an even more foreshortened ellipse and that you can see more of the outside of the cup.Draw this view. (C)
Hold the cup at eye level. Now the rim of the cup has become a straight line and you see the entire front of the cup. Draw this view. (D)

Rather than holding the cup straight, tilt the axis to about 45 degrees. You will now have a cup in perspective but at an angle, which is useful for creating varied and pleasing compositions, especially with flowers. Draw this view. (E)

Measuring a Cross Section of a Fruit in Perspective
Cross sections make great additions to botanical compositions. A cross section of a fruit forms a round or elliptical shape, which makes it perfect for practicing perspective measuring techniques. In this drawing of a lemon, refer back to the cup drawings in the previous lesson to help visualize the concept.
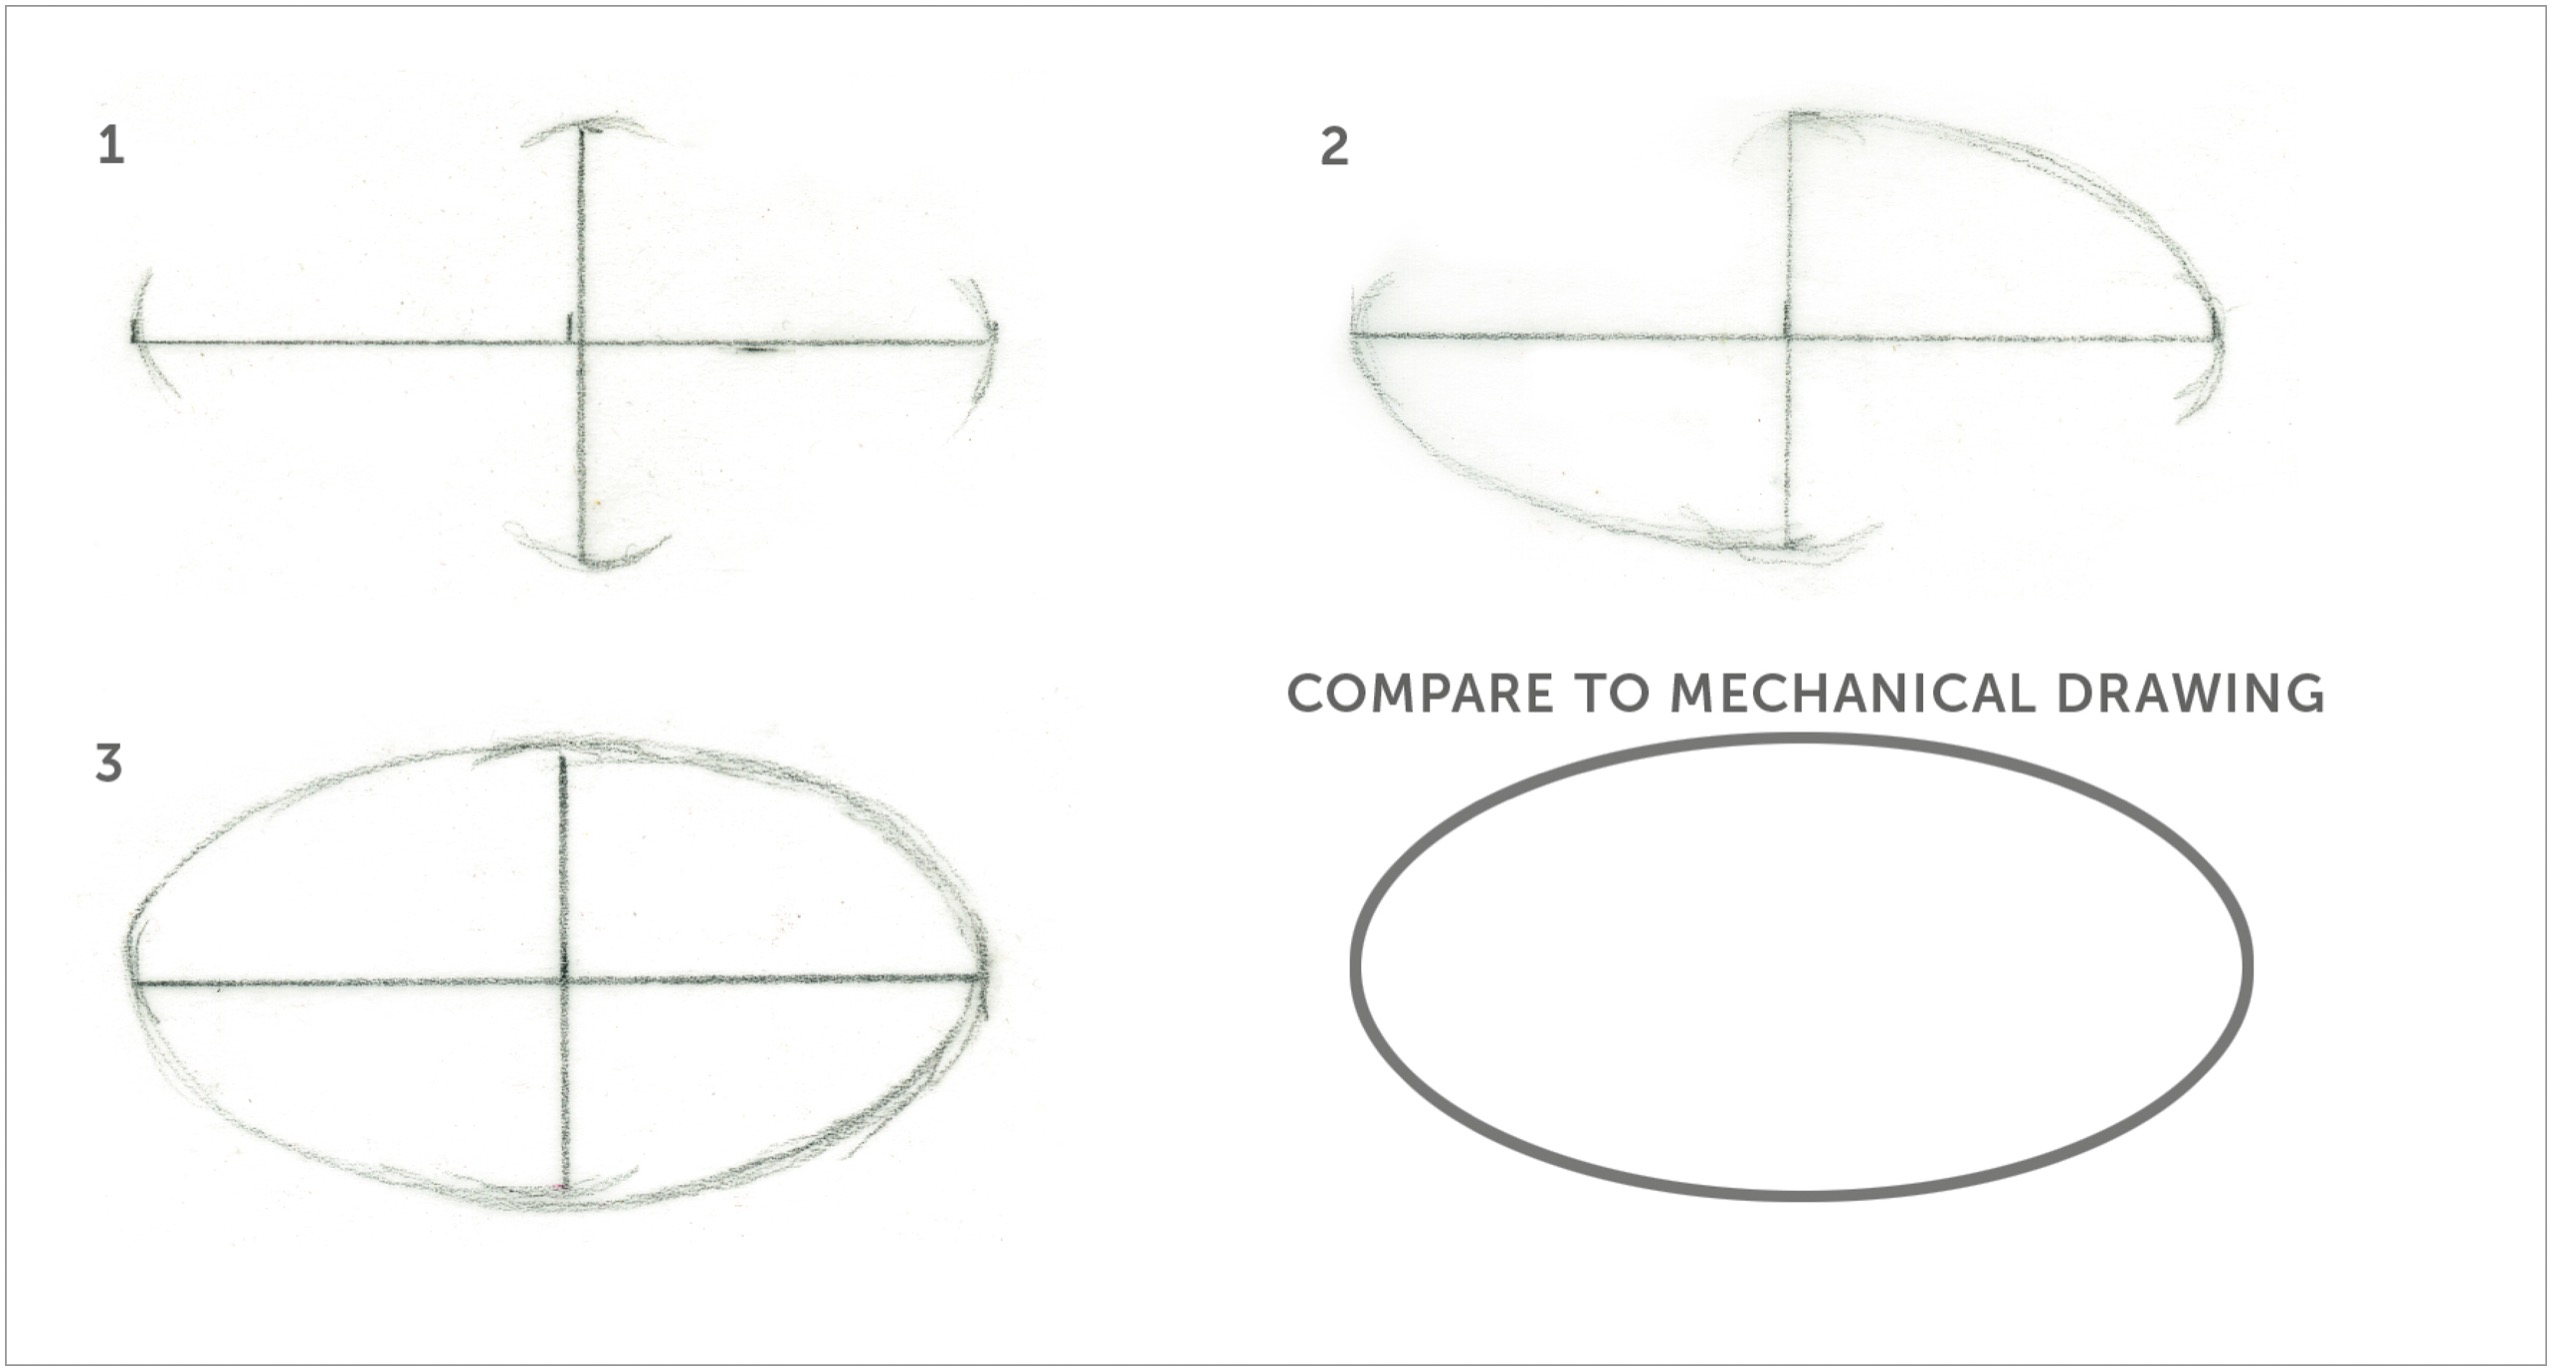
To draw an ellipse that’s rounded and doesn’t have sharp edges, it’s important to draw each quadrant of the ellipse separately, turning your paper as needed so that you’re relaxed when drawing. Using the diagram following as a reference, first draw a vertical height and width line (1), then draw each quadrant of the ellipse. Start by drawing each apex with a curve (2). Then continue to complete each quadrant to draw a continuous curve without any sharp angles (3). Avoid having your ellipse look like the shape of an eye.
Repeat this lesson as many times as you like, changing your view and with different subjects. I recommend trying this with any fruits or vegetables. Use the techniques for adding color that you’ve practiced to complete these drawings, and add details such as seeds and other cut fruit sections to your compositions.
SUBJECT
Lemon or other fruit
ADDITIONAL MATERIALS
• Tracing paper
• Colored pencils to match your fruit’s local color
Cut your fruit in half. You now have a cross section to draw.
Set up the cross section of your fruit using a foreshortened view and measure the ellipse created, remembering to use your imaginary picture plane for placement of your ruler.
On tracing paper, start the drawing with a center axis (an imaginary line in the center of a subject usually emanating out of the stem, where it connects to the fruit or flower) first. Measure and draw the height, width, and depth of the cross section ellipse and the form of the body of the fruit behind it, working lightly with a graphite pencil. (A)
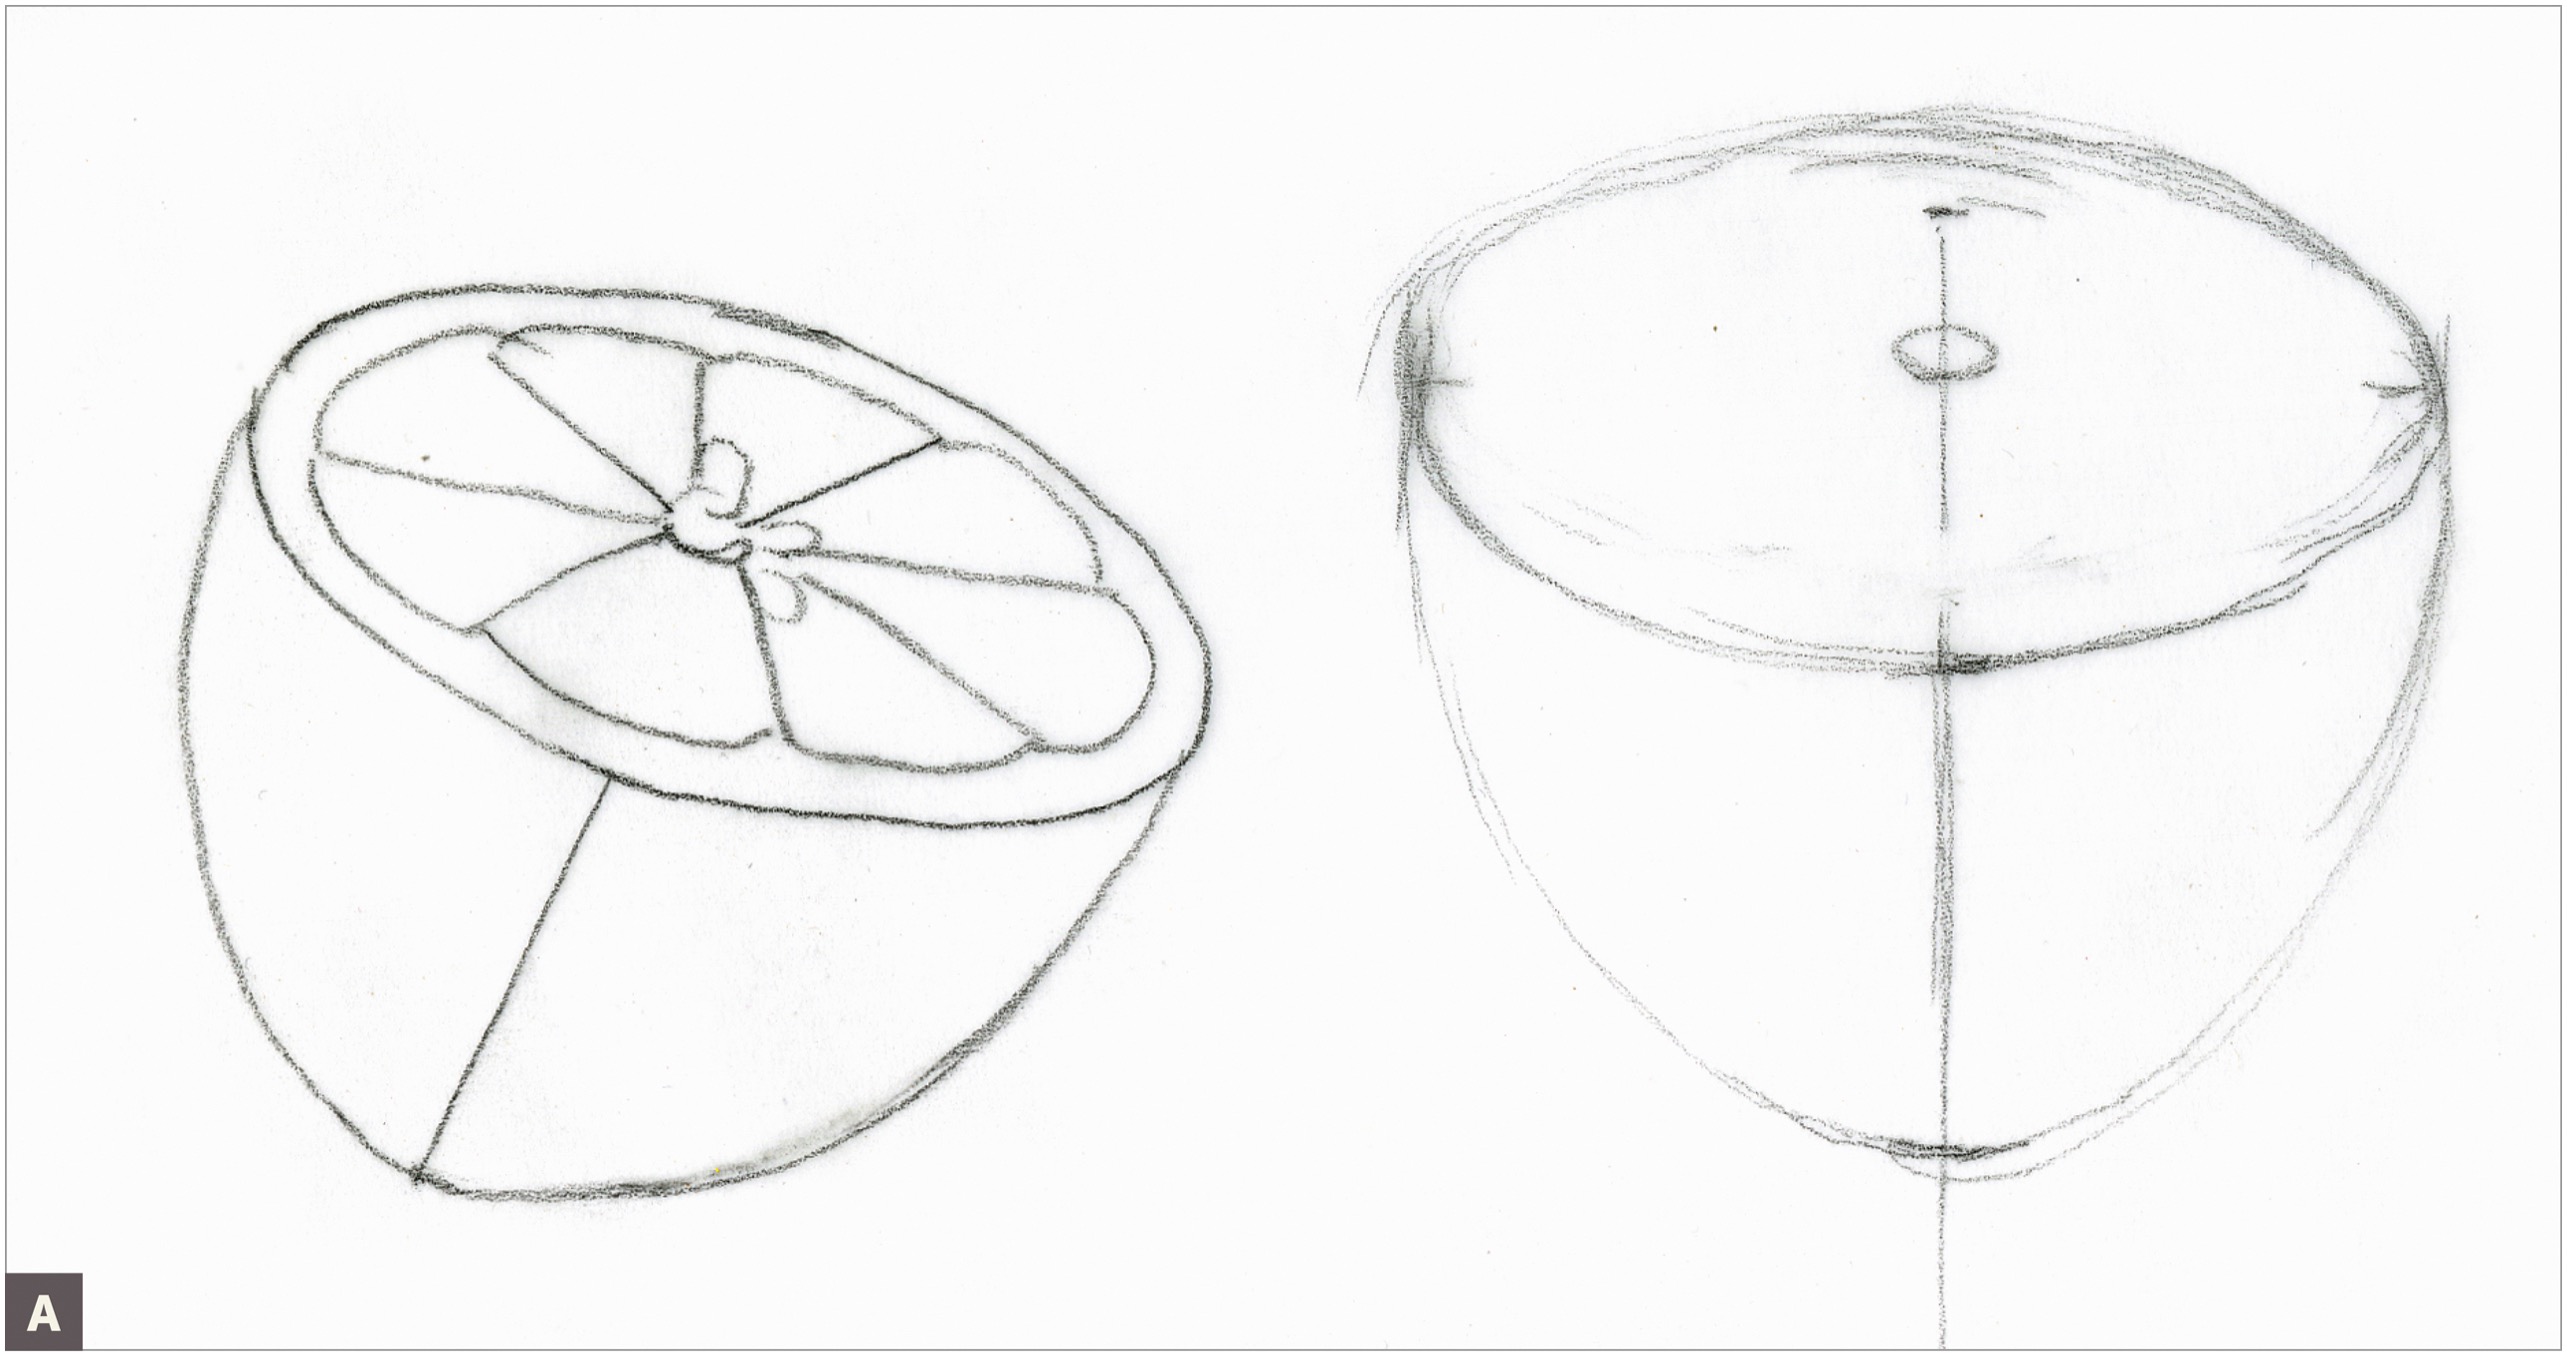
Practice drawing elliptical cross sections on tracing paper. Once you feel confident, draw in the details of your fruit cross section on good paper. Notice how the sections of a citrus fruit all radiate out from the center axis. Follow the steps for drawing a subject in color (see this page) to create a finished drawing. (B)

Drawing a Tubular Flower in Perspective
In this lesson, we continue to use ellipses for measuring a flower with proper perspective. I’ve chosen a pink allamanda, which is a flower shaped like a tube with petals that are joined at the base of the bloom. Use a similar flower if possible. Other subjects that will work fine are daffodils, tulips, campanulas, and lilies.
Look at your flower from various views and do some rough practice sketches to determine the view you want draw. It’s good practice to measure and draw three views before choosing one to draw in detail. To keep my flower stable, I often position it in a frog prong. Repeat this lesson as many times as you want with different flower subjects.

SUBJECT
Cup or small drinking glass
ADDITIONAL MATERIALS
• Red Violet colored pencil #194
• Dark Indigo colored pencil #157
• Middle Purple Pink watercolor pencil #125
• Watercolor brush #2
• Colored pencils and watercolor pencils to match the colors of your flower
COLORED PENCILS
#194
#157
WATERCOLOR PENCILS
#125
Choose a foreshortened view of your flower. Measure it with a ruler on your imaginary window, creating an elliptical view. Lightly draw the flower with graphite pencil. (A)

Use a neutral shading pencil, such as a Red Violet colored pencil, to add cross-contour lines on the inside of the tube and the petals, describing their three-dimensional bending. Add tone to the overlapping petals and in the deep, trumpet-shaped center of the flower with Dark Indigo colored pencil. Also tone underneath the petals on the outside of the trumpet shape. (B)

With Middle Purple Pink watercolor pencil and a #2 brush, make a wash of the lightest local color; wet your paper first so that you keep a gradual change in value, but make sure to leave the highlight empty and add a layer of watercolor, leaving the highlights on the petals the color of the paper by carefully adding a wash from the highlighted area toward the shadow. (C)

Add layers of colored pencil to continue to define the three-dimensional quality and color intensity of the petals. Use cross-contour lines and petal veining by stroking in the direction of these lines to describe the petal veining and surface contour variations. (D)

