
CHAPTER NINE
BITE-SIZE BOTANICAL COMPOSITIONS
Now that I’ve presented step-by-step lessons on all the components of a plant, let’s talk about planning pages or compositions. This starts with creating a compelling focal point. Simply put, this is the spot on which you want the viewer to focus. I let nature be my guide in planning a page. I look at each plant and try to tell a story about it, even if it is only about a small part of the plant. As plants are masters of attraction, there are built-in focal points everywhere! Nature uses color and form to attract pollinators—and that includes us.
Go outside and find a plant that attracts you. Consider what you find most interesting about it. What do you want to stare at? Decide on the most compelling part of the plant and make that your focus. Often this can be an identifying characteristic, such as a flower, unusual seedpod, or leaf arrangement. Any of these elements will usually work as a focal point. I usually start by drawing a focal point. Once I’ve established this, I examine and sometimes take apart my subject to see what else there is to explore. I might cut a fruit in half, crack open a nut, or pull apart a flower. I take delight in my discoveries and invite you to do the same. If you have a personal story about a plant, you can tell that, or do some research to learn some interesting facts about the plant. This is a great way to make decisions on what you want to show in your drawing. In today’s world, it takes only seconds to look up a plant and read about it.
Many of the drawings I included in this book are done on 5 by 7–inch paper. As I’ve previously mentioned, I love this size for small compositions. It isn’t so big that I have to commit a lot of time, and I know I can manage small drawings in my busy schedule. They fit the bill perfectly because they allow me to draw almost every day. Of course, some subjects are bigger, so not appropriate for this small paper, but so many easily fit here. This is one way to keep going with your own practice. Sometimes you will work on larger drawings and compositions, but often this small size is perfect for drawing on a regular or daily basis.
TIPS FOR CREATING A COMPELLING COMPOSITION
Here are some of my favorite tips on making a great page composition. I use all or some of them, depending on what I want to accomplish. Use them as a checklist to help you make decisions as you go.
Start with an interesting focal point.
Render more detail in the foreground.
Render less detail in supporting elements and those farther back in space.
Use more contrast and saturation of color in front, making sure to have your darkest darks and your lightest highlight in the foreground, with fewer finishing details in back.
Use warmer and brighter colors in front, as these colors appear to advance toward the viewer.
Use cooler and grayer colors behind, as these colors seem to recede.
To tell a complete story of a plant, show most of its parts, including leaves and how they are connected to the stem, flowers, fruit or seed capsule, roots, and sometimes a dissection or enlarged parts.
Include text with information about the plant, including common name, scientific name, location where you collected the subject, date, and notes containing interesting facts and questions about the plant.


Plant Process Pages
I think I love my process pages best because they do two things at once—they document my exploration of a plant and they show my drawing process. I used to call these pages sketchbook pages or study pages, but now I think “plant process page” (PPP) sums it up. If you create your own PPPs, you’ll have a safe space in which to explore drawing without worry and judgment. Your page is about studying a plant and practicing drawing techniques, therefore it’s not a “finished piece of art” and not required to live up to any expectations. Yet I promise you it will. Unfinished drawings are so mysterious, they show enough, but not everything, allowing your imagination to fill in the rest. They also provide a great way to keep drawing yet not have to color in every element on a page. It allows for the viewer to see what interests you most, and not focus on a jumble of leaves, for example. Your notes, questions, and discoveries can be recorded on the page, along with the color pencils you used or a new technique you were practicing.

Watermelon Radish
Once you’re comfortable with botanical illustration and you understand how to use a specific light source, you can begin a drawing with a layer of watercolor. Plan your page by putting your subject on the paper to find an interesting composition and to make sure it will fit nicely on the page. Decide if you’ll be adding overlapping elements and plan where to put them.
SUBJECT
Watermelon radish
ADDITIONAL MATERIALS
• Watercolor brush #2
• Watercolor pencils and colored pencils to match the local color of your radish
• Embossing tool (small)
• Wax paper
• Black Verithin pencil
• Cool Grey Verithin 70% pencil

With a graphite pencil, lightly draw a complete watermelon radish composition, including leaves, root, and cut sections. Using a #2 brush, add a watercolor layer of all appropriate colors, leaving highlights that are the color of the paper where needed. (A)

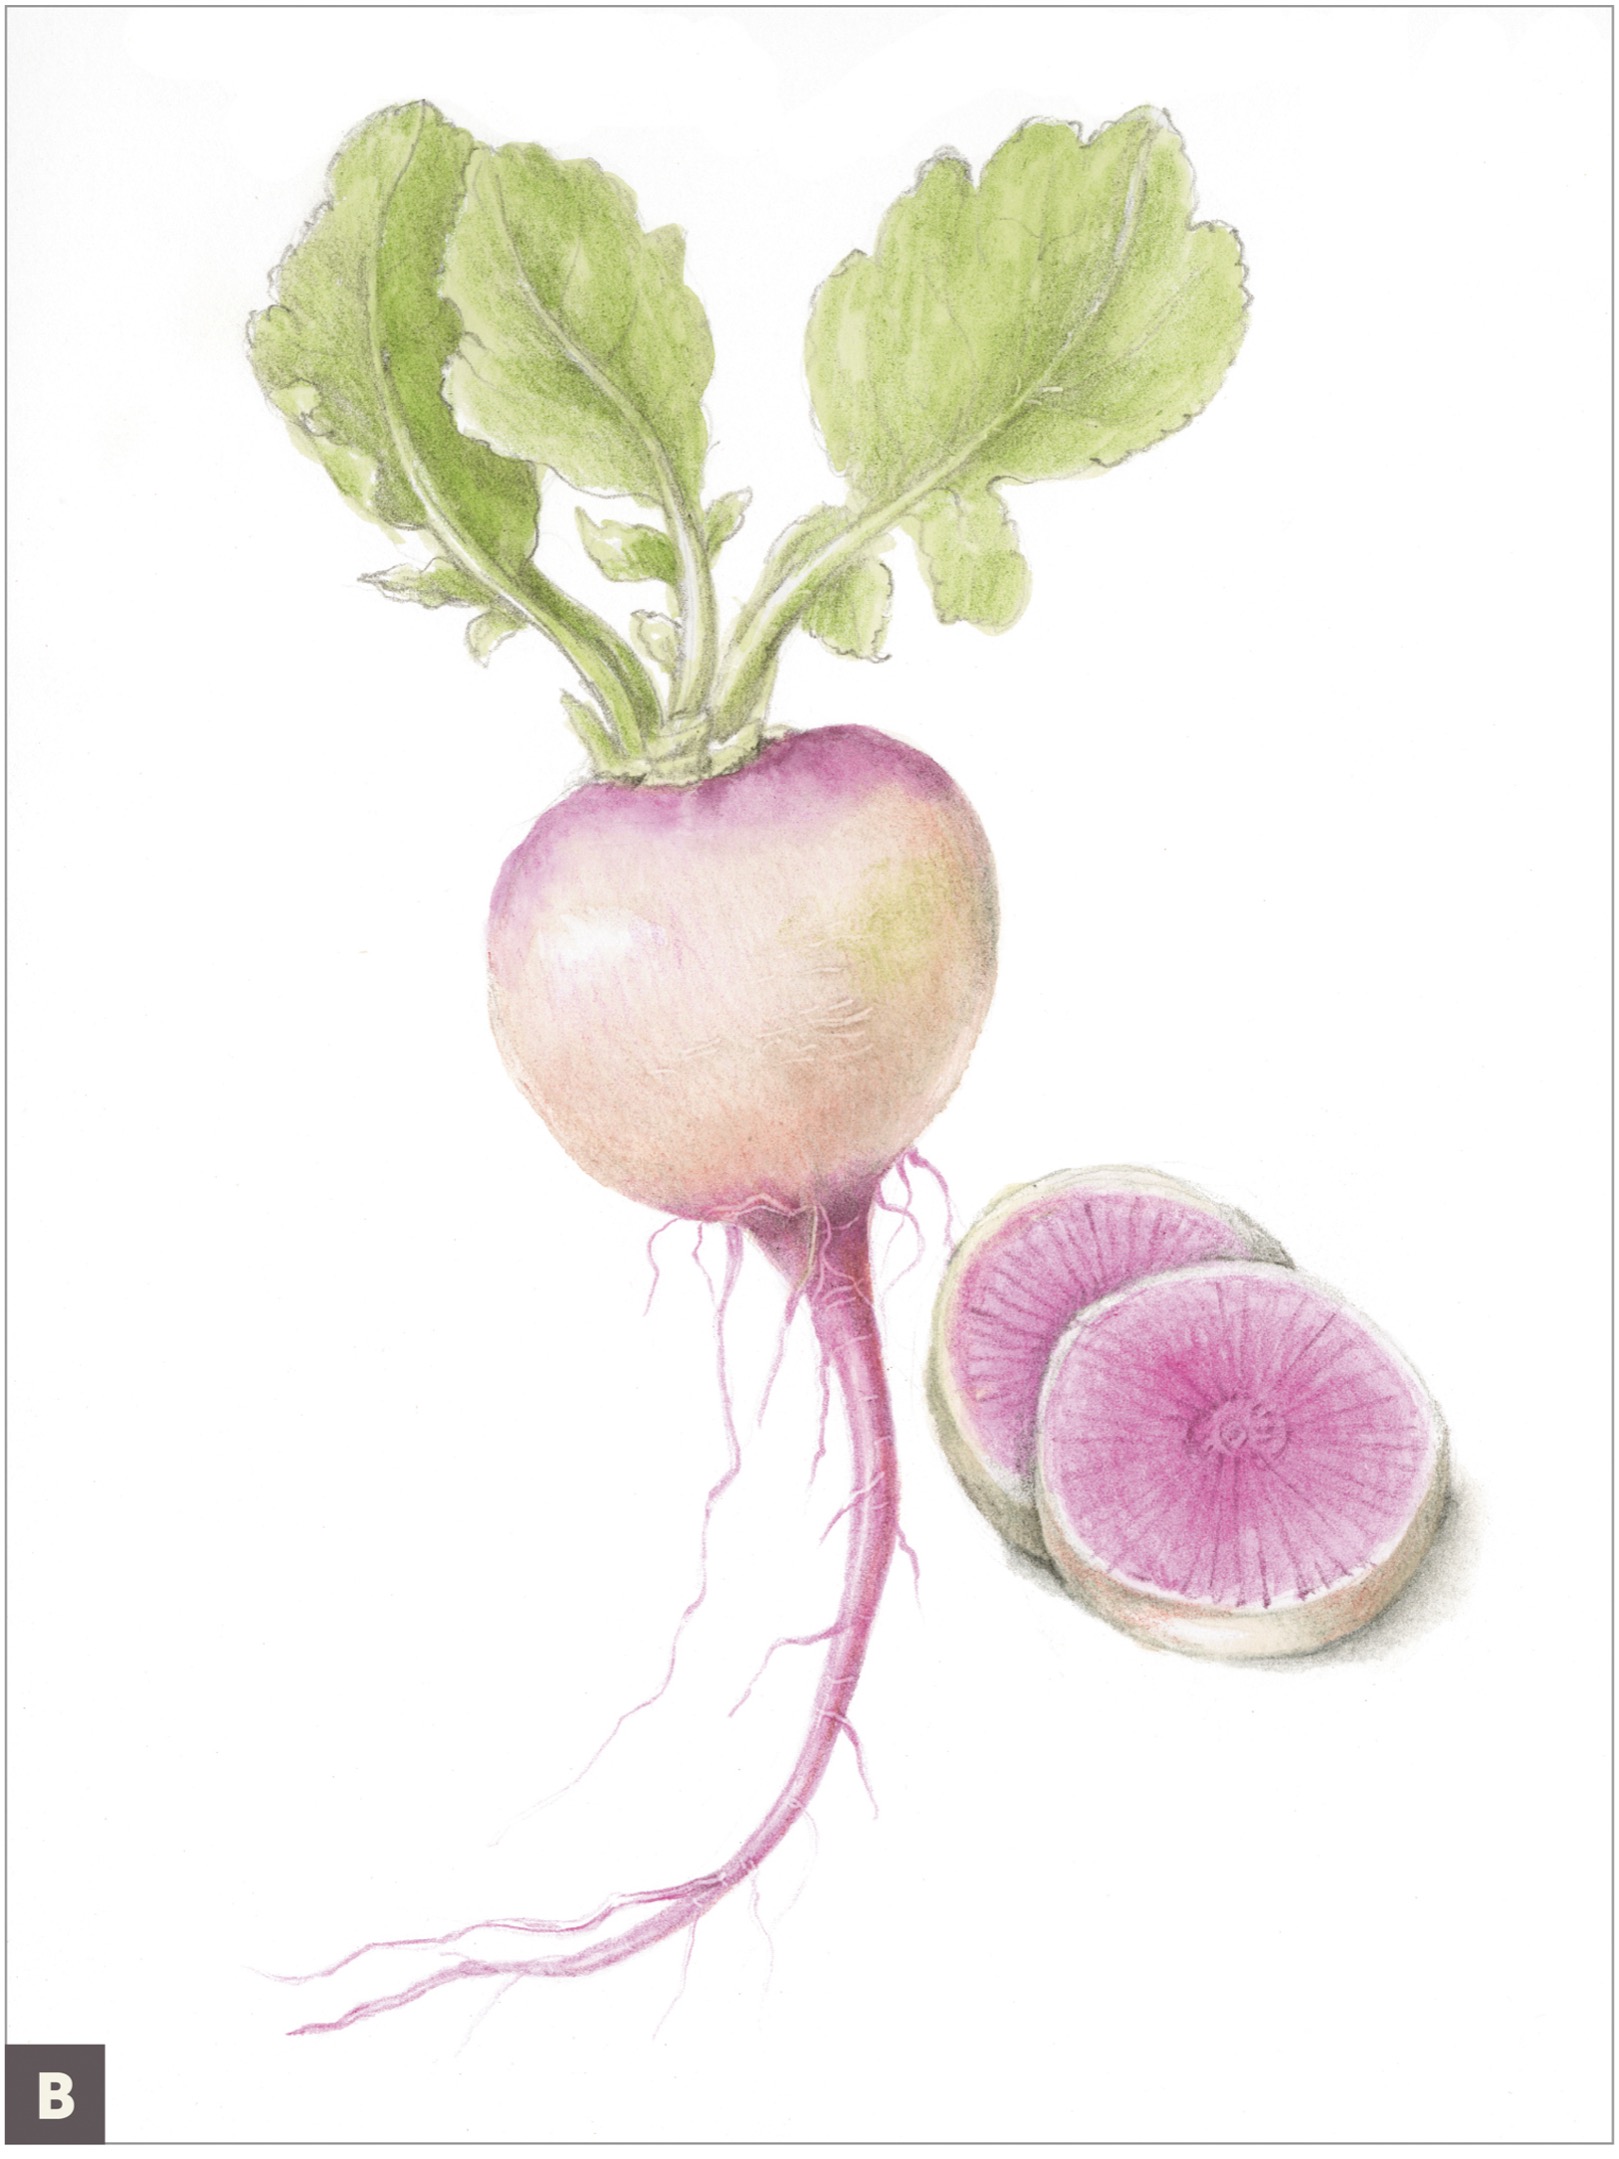
When this layer is dry, decide where overlapping roots and texture will be, and use an embossing tool to draw some root and vein details on the leaves. (B)
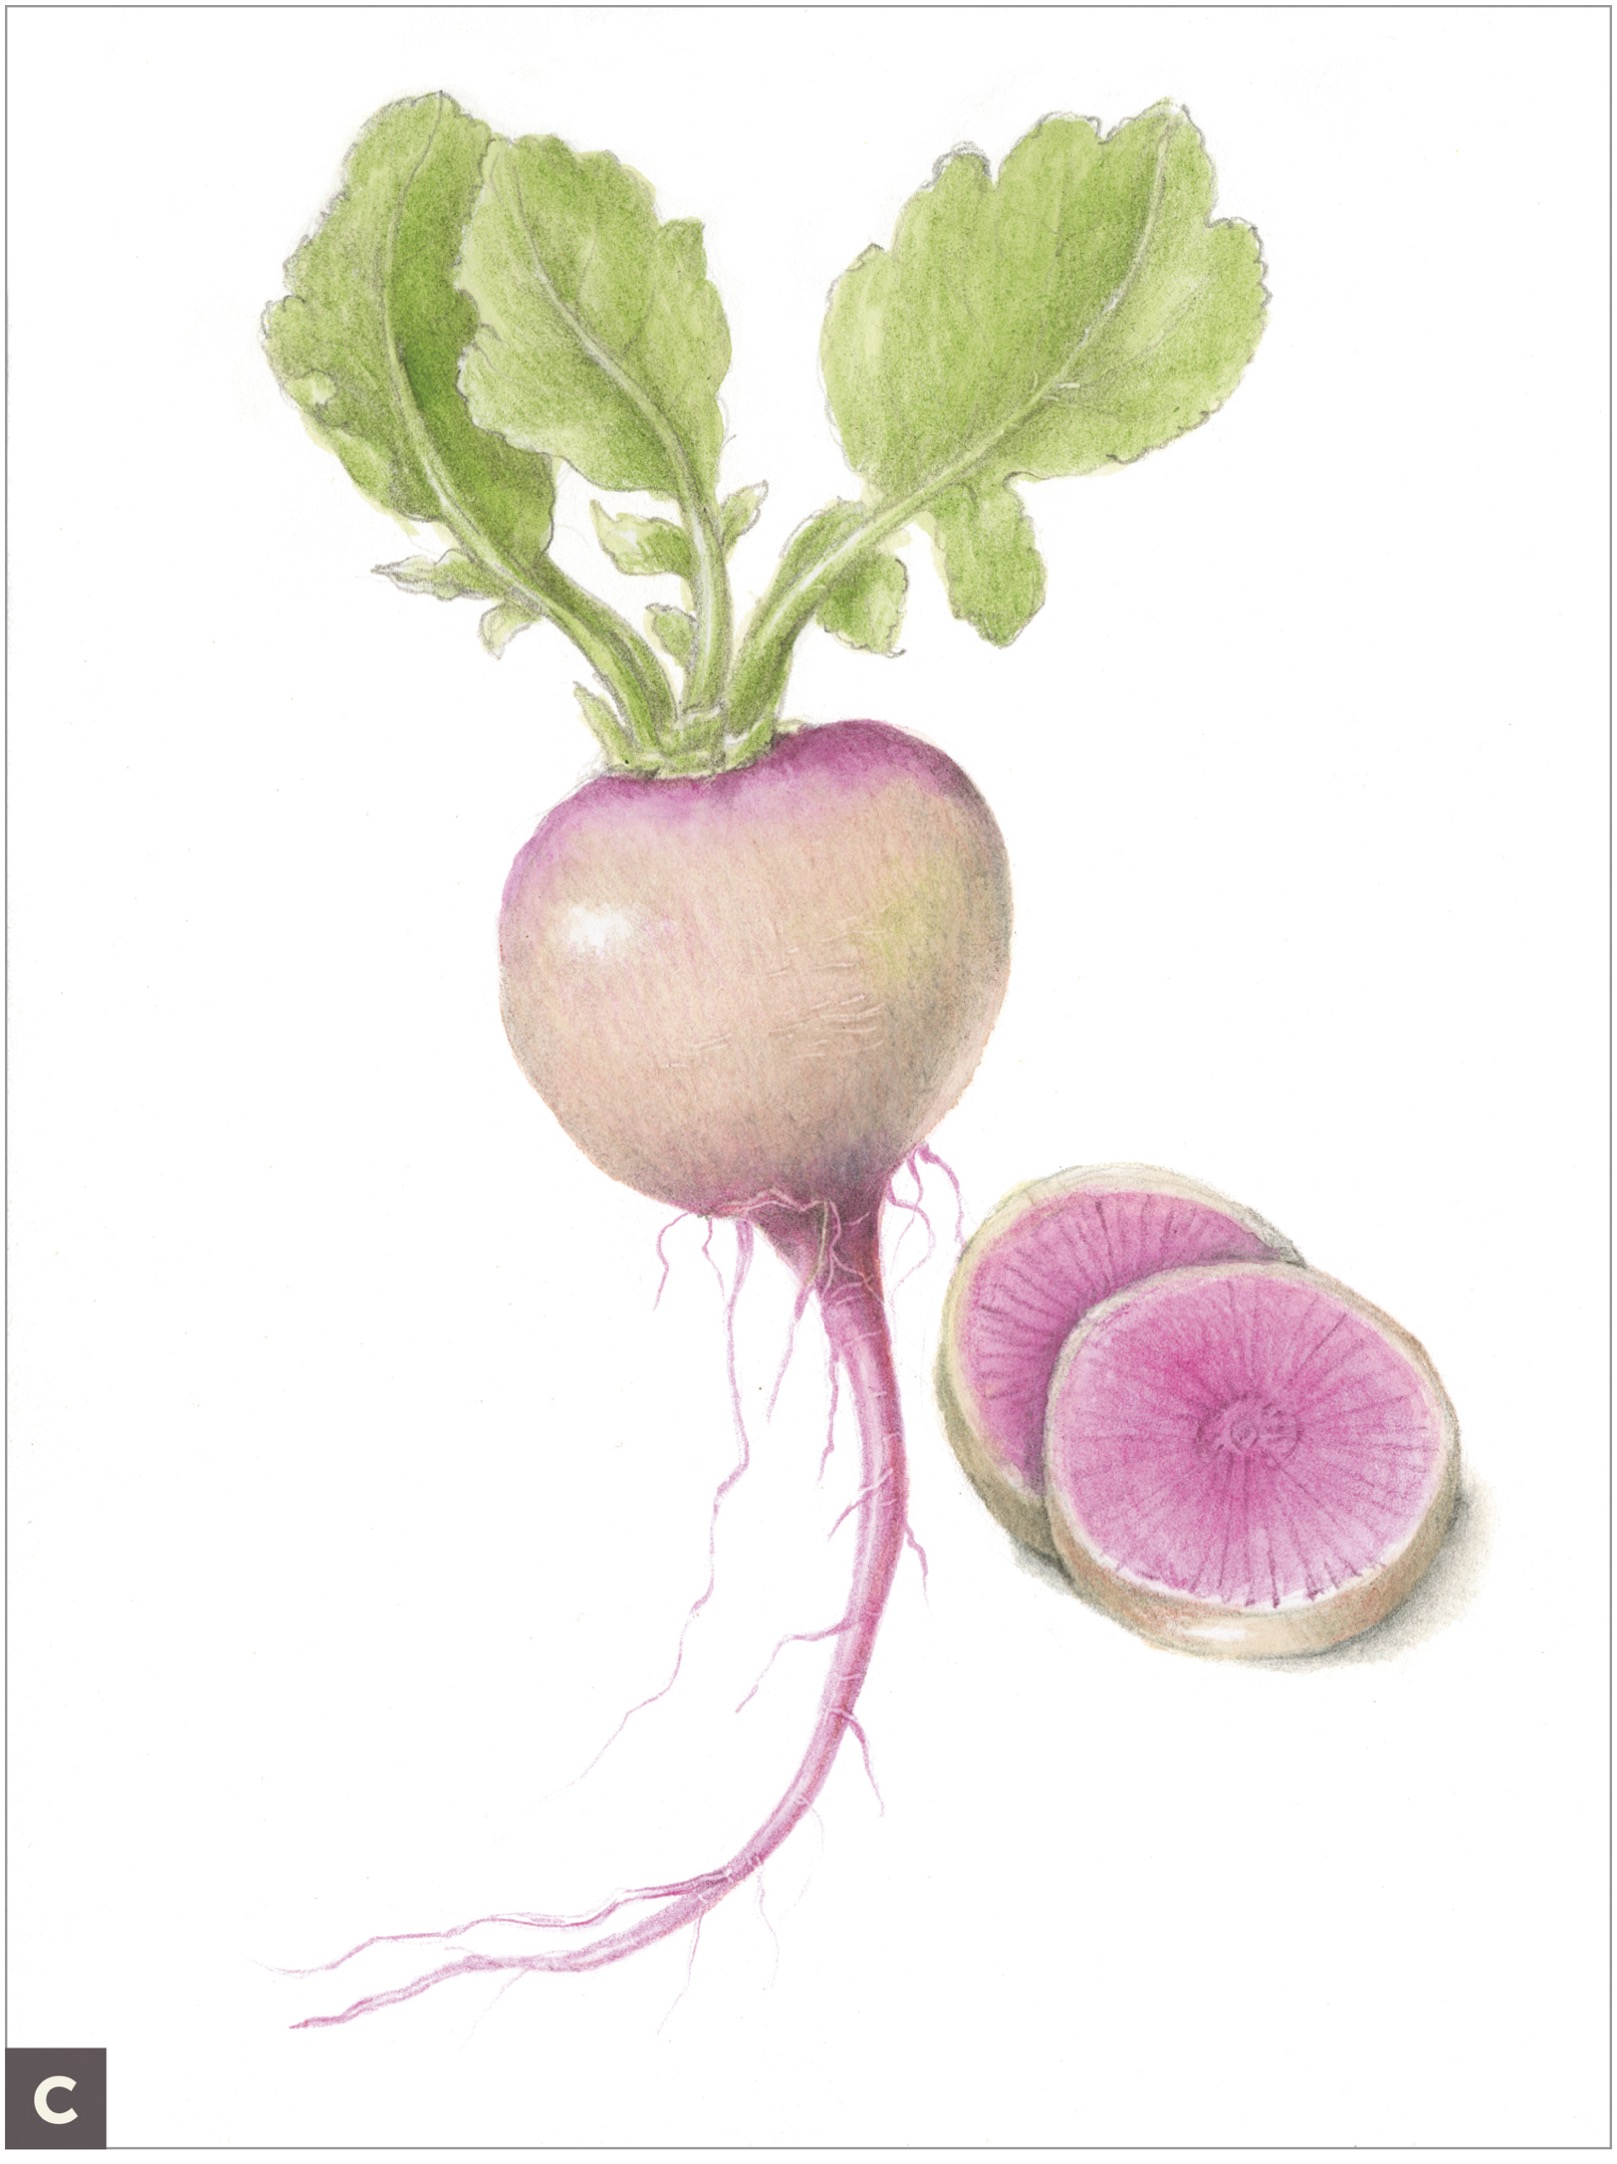
Layer colored pencils on top to create three-dimensional light and shadow areas in appropriate colors, and, of course, burnish as needed, especially around the highlight. (C)
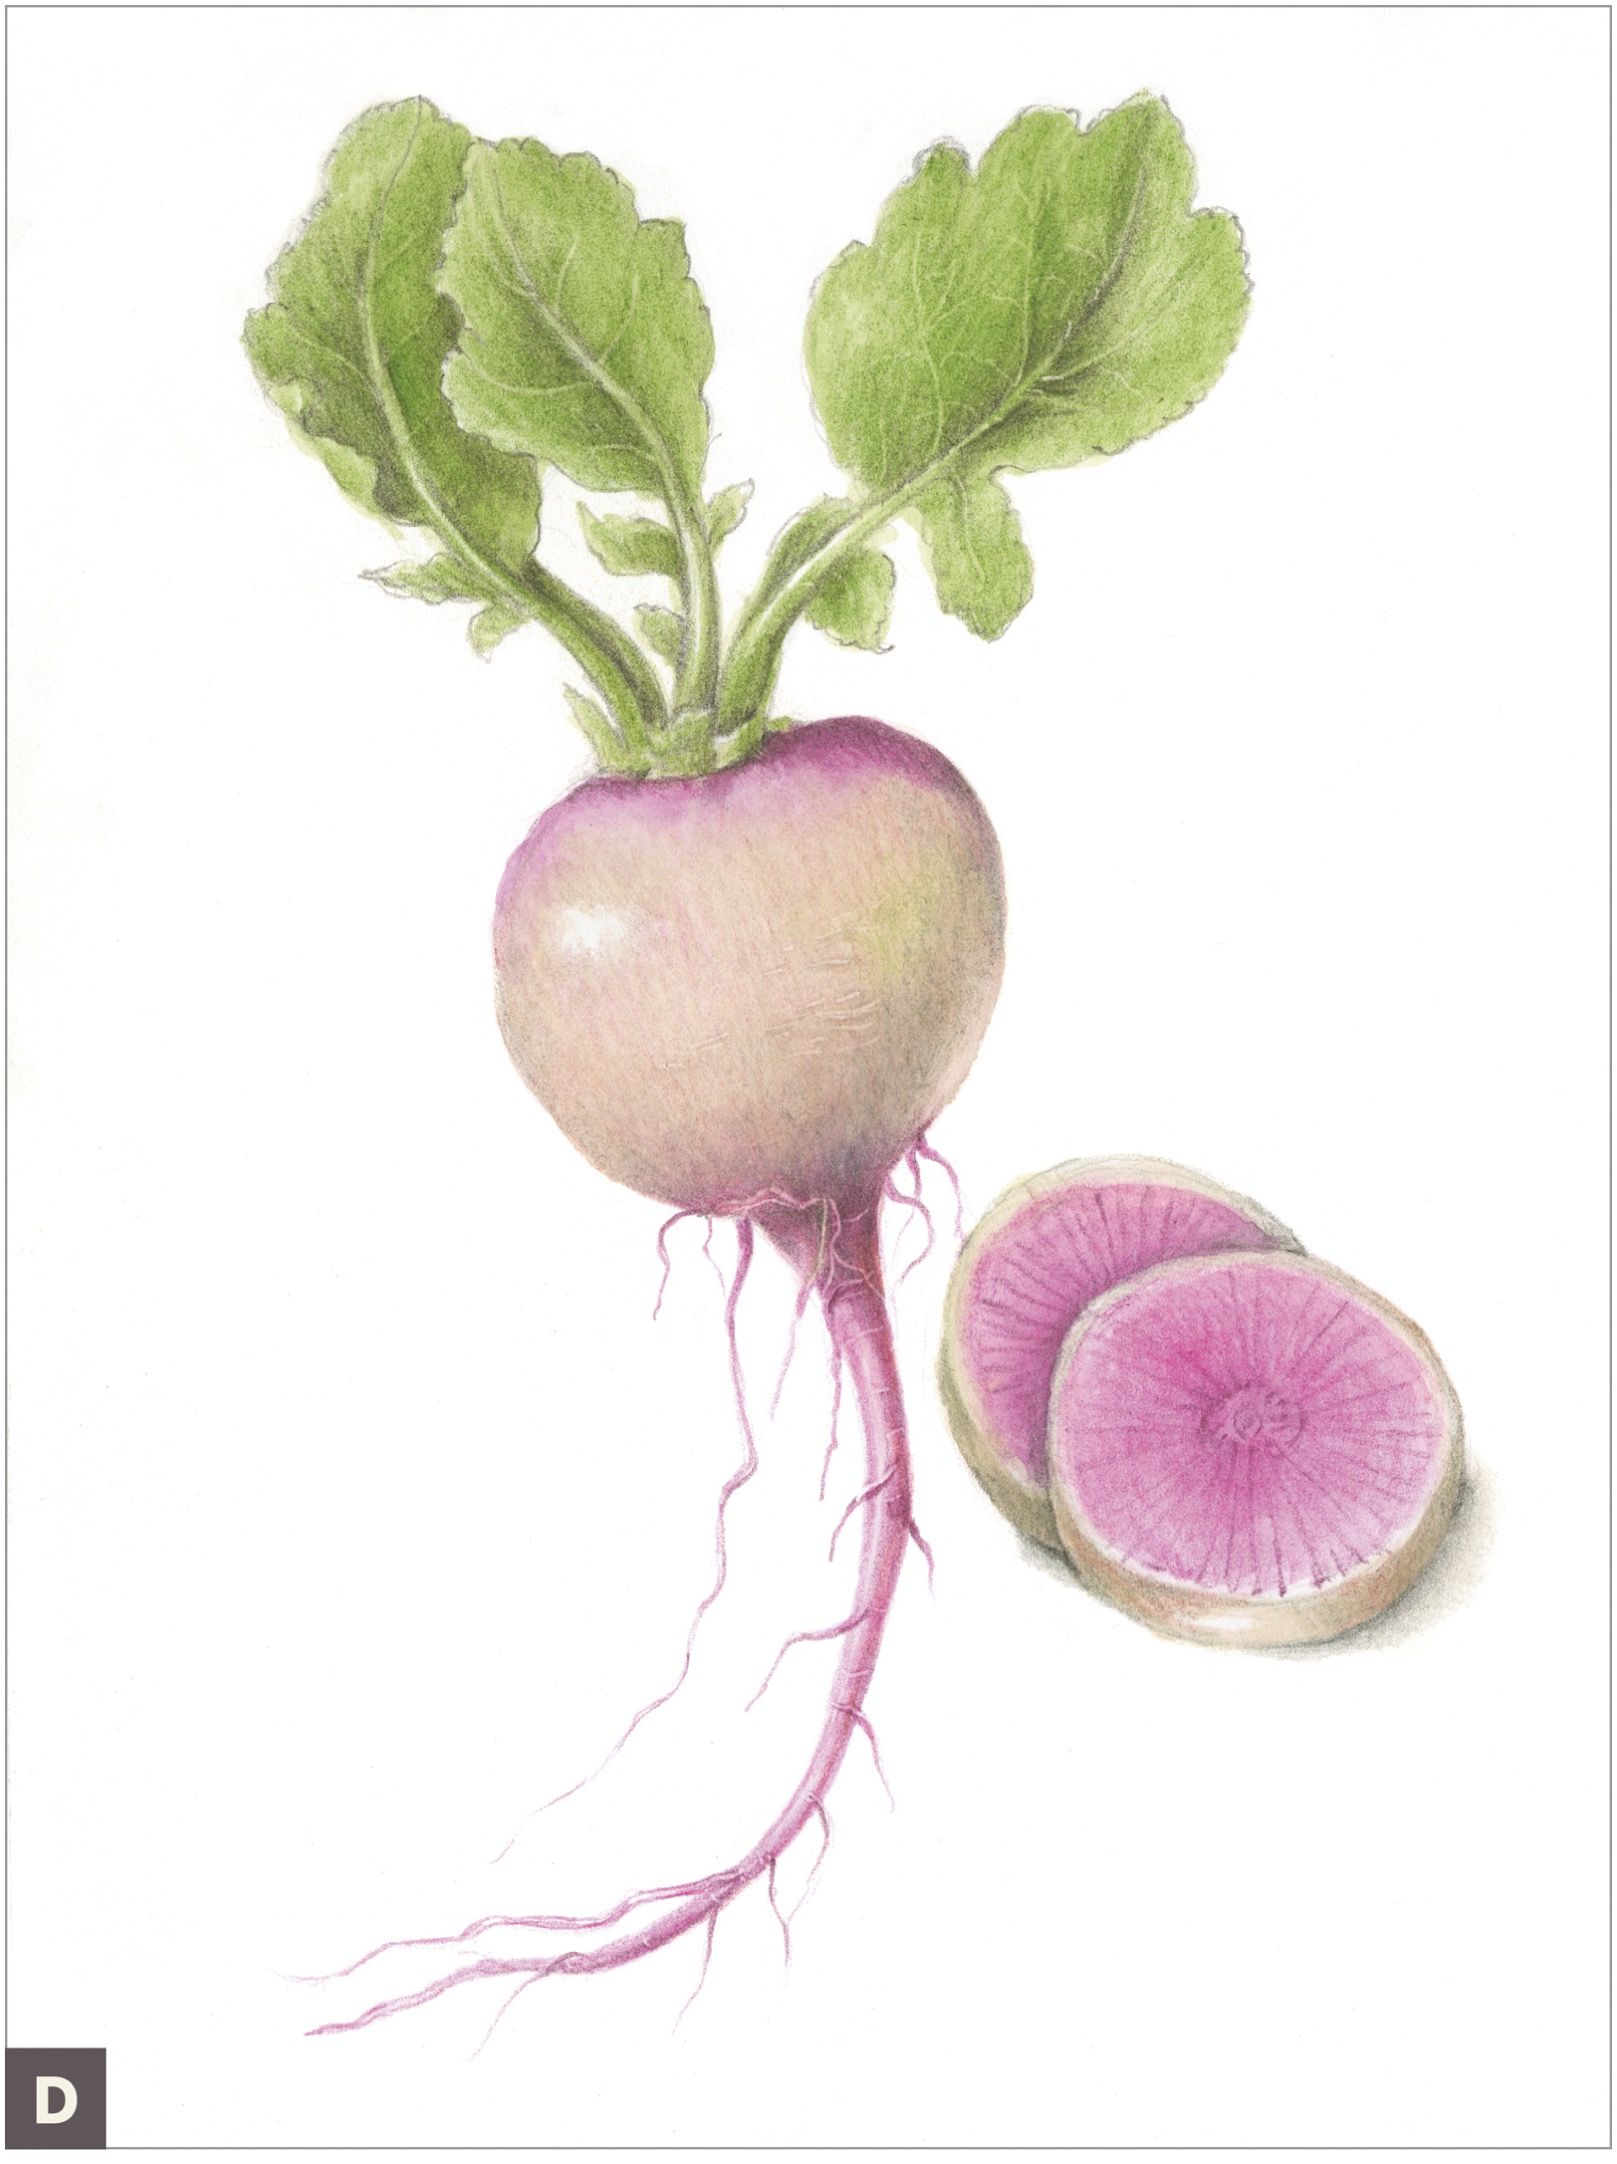
Use colored pencils over embossed areas to emphasize the embossing as needed. (D)
Render the leaves with green, and then use the embossing tool with wax paper to create lighter veins. Accentuate darks and saturated color with colored pencils, and use the Black and Cool Grey 70% Verithin pencils to sharpen edges and details. (E)

Hydrangea (Inflorescence Flower)
An inflorescence is a cluster of flowers on a stem, such as seen in hydrangeas, lilacs, or azaleas. It’s composed of many flowers with smaller stems, each connecting to the larger stem. On a hydrangea, the flowers are actually the tiny round areas in the center of what look like petals, but technically they are the bracts (modified leaves).
Fun fact about the hydrangea: the name derives from the Greek words hydro (water) and angeion (vessel). This refers to the seed capsule, which is very tiny, but nevertheless resembles a pitcher. The color combinations on hydrangea vary greatly, and this particular one has shades of blues and greens, which make for a vibrant subject to draw. The key to creating an interesting composition of an inflorescence flower is to remember that a compelling focal point will bring the viewer into the page. Using precise perspective drawing, strong contrast, and grisaille toning on the whole form and not just each individual flower allows for a dynamic composition. We can use a simple round form as a light-source model for the entire inflorescence. This means that flowers on the shadow side will be darker than those on the top and highlight area. Notice how I also include good overlaps of dark shadows where the flower head meets the leaves. This makes the viewer want to come inside my flower. In the drawing of a rhododendron on this page, I also used this same technique to bring you into the drawing.
SUBJECT
Hydrangea
ADDITIONAL MATERIALS
• Colored pencils and watercolor pencils to match your subject’s local color
• Magnifying glass or other magnifier
Study the entire cluster, and draw thumbnail sketches of the light and shadows on the whole form. (A) (B)

Notice that the cluster has distinct light and shadow areas, not only in each flower but in the form as a whole. (C)

Notice how one flower shape repeats many times from slightly different perspectives. Remove a few flowers and practice drawing several views. Position your ellipses in different directions for this. Also draw some flowers more open than others for variety. (D) (E)

Use a magnifying glass to study the centers and reproductive parts of the flowers.
Practice color variation on individual flowers and then vary your local colors for the entire cluster, using a range of colors and strong darks especially on the shadow side. Making use of overlapping techniques to separate the individual flowers is important here.
Add in leaves following all the usual steps, especially creating good dark shadows so that the flowers feel like they’re sitting on top of the leaves. (F)

Page Composition Study
A detailed composition can tell a story about a plant. In these next bite-size botanicals, I have gathered elements found on or around a fruiting tree. I plan the composition with the elements placed on the page, starting with the main event and adding other elements to fill out the space. In some cases, I leave space on the page to revisit the tree when it might be flowering so I can add it to my composition. Fallen nuts are excellent subjects. They keep their color and shape for a long time and travel well, so they are good companions for drawing on the go. These next two compositions follow the same steps so use them as a template over and over again.
SUBJECT
Fallen nut or other element found on or around a fruiting tree
ADDITIONAL MATERIALS
• Dark Sepia colored pencil #175
• Colored pencils and watercolor pencils to match your subject’s local color
• Watercolor brush #2
• Embossing tool (optional)
• Ivory colored pencil #103
• Verithin pencils
COLORED PENCILS
#175
#103
Scavenge and collect elements from a particular tree to draw.
Write down the name and location of the tree so that you can revisit it later. Arrange the elements in a pleasing composition, planning a focal point.
Measure and draw your subject life-size with a graphite pencil on good paper.
Put on your head light, and add grisaille toning with a Dark Sepia colored pencil.
Choose local colors and build layers with colored pencil and watercolor washes, using a #2 brush for the washes and emphasizing your focal point with good contrast and dark shadows.
Add more layers of colored pencil and watercolor if needed. Use some subtle embossing if appropriate.
Burnish your subject with an Ivory colored pencil, and add details to the highlights.
Add details with sharp colored pencils and Verithin pencils for edges and cast shadows.
OHIO BUCKEYE HORSE CHESTNUT (AESCULUS GLABRA)
I found an Ohio Buckeye tree in New York’s Central Park in early October. The fruits were really interesting and soon started to split open, revealing the nut inside. The leaves have five leaflets and start to turn colors from brown to yellow to green. I have a little room left in the composition, so perhaps next spring I’ll add a flower if I remember exactly where the tree is!


BLACK WALNUT (JUGLANS NIGRA)
In January, there are still many black walnut fruits on the ground in the Hudson Valley where I live, and some are in various stages of opening and drying. I noticed that some of the nutshells seem to have two holes hollowed out in the exact same spot. I’m pretty sure this is the work of squirrels. They know precisely where to bore the hole to get to the sweet nut meat inside!


Avocado (Persea americana)
I love edible subjects, as they are near and dear to my heart and stomach. Avocados are a favorite fruit, and I look forward to picking them directly from the trees when I’m in a tropical environment. It’s amazing how prolifically they grow. This avocado is from a friend’s garden in Hawaii. I wanted to capture the way the fruit hangs on the tree with some leaves. My goal was to make the fruit really shine and show the bumpy surface. I also wanted to focus on a cut-open fruit. When I opened this fruit, I noticed that the nut made a heart-shape indentation in the fruit, so I made sure to include it in the drawing, but I kept it subtle. I also wanted a focus on the large, shiny nut and the contrast of the rich, warm brown color against the yellow flesh of the fruit.
SUBJECT
Avocado (preferably with branch and leaves intact)
Set up a pleasing composition, and draw your avocado life-size with a graphite pencil on good paper.
Develop the drawing of the fruit, leaves, and stem with the usual steps we’ve practiced.
When finished, cut open the fruit to add to your composition. When rendering these parts, be sure to pay attention to the overlapping areas of the fruit in front to create good contrast and an exciting focal point. It’s helpful when planning a composition to be aware of the direction of the elements and avoid angles that might pull the viewer’s eye off the page. Notice how I have positioned my avocado pieces to bring the viewer right back to the main hanging fruit.

Morel Process Page
My first foray into foraging mushrooms occurred a few years ago with morels in the spring. It is truly a magical experience. It takes a while to develop your mushroom eyes, but once you do, you may notice them everywhere. Many times I’ve had this exact experience: I will search methodically for about an hour and find nothing. Then, when I retrace my steps, I’ll start to find morels. It feels as if the mushrooms were hiding and waited until I made myself worthy by searching patiently. As a reward, they suddenly became visible. With this process page, I tell my foraging story and include my favorite recipe.

SUBJECT
Edible morels
Forage patiently with an experienced forager, looking for edible morels.
When you find them, go immediately to your drawing board and draw them. They will stay fresh when refrigerated for a few days while you complete your drawing.
Only after you complete your drawing can you cook and eat them.

SOURSOP COMPLEX COMPOSITION
This PPP of a soursop is part of an exhibition called Out of the Woods: Celebrating Trees in Public Gardens, cosponsored by the New York Botanical Garden and the American Society of Botanical Artists. This juried exhibition has traveled to botanical gardens across the United States and shows much of the highest caliber of botanical art from artists all over the world. I had so much to tell about this tree that I decided to use an informal format that included notes and color dabs. I want to allow the viewer to look and learn, and thus share some of the journey I went on with this plant. Plant process pages allow for this.
I was surprised when they chose my informal process page to be part of this exhibition but was happy to see it there. Though I admire and am in awe of the painstaking techniques that many renowned botanical artists use, taking sometimes three to six months to complete one painting, I personally have the temperament for these less formal drawings. Here is my method for planning this composition.
I created a preliminary process page of the unusual flowers on this tree.
I cut a full branch of a tree that had a large fruit and several flowers and leaves.
I then planned the composition of the cut branch and started to draw the elements.
After completing most of the elements but leaving some areas unfinished, I decided I wanted to add the notes from my original process page on the reproductive parts and other details.
I cut open the fruit, drew it, made a smoothie with it (delicious), and scattered some seeds. I finished by adding a flower with cast shadow to bring attention to this unusual flower.
Last, I added the text and notes to the page.


