Objective 4.3—Upgrade Existing vCNS/NSX Implementation
This chapter covers all or part of the following VCP6-NV exam blueprint topics:
Objective 4.3—Upgrade Existing vCNS/NSX Implementation
In this chapter we cover the steps required to upgrade an existing vCloud Network and Security or NSX for vSphere implementation to NSX for vSphere 6.2. This is a brief chapter as the upgrade process is straightforward. If you can find and click the Upgrade button here and there, you should be fine  .
.
The “Do I Know This Already?” quiz allows you to assess whether you should read this entire chapter or simply jump to the “Exam Preparation Tasks” section for review. If you are in doubt, read the entire chapter. Table 19-1 outlines the major headings in this chapter and the corresponding “Do I Know This Already?” quiz questions. You can find the answers in Appendix A, “Answers to the ‘Do I Know This Already?’ Quizzes.”
1. Which versions of vCNS can be upgraded to NSX for vSphere?
a. vCNS 5.0 and higher
b. vCNS 5.1 and higher
c. vCNS 5.5 and higher
d. vCNS 5.5u3 and higher
2. How is vCNS upgraded to NSX?
a. Connect to the Networking and Security home page using the vSphere Web Client. Select the Upgrade option in the Installation view. vCNS downloads the vCNS to NSX for vSphere upgrade bundle.
b. Connect to the Networking and Security home page using the vSphere Web Client. Go to the vShield Manager view and select the upgrade option. vCNS downloads the vCNS to NSX for vSphere upgrade bundle.
c. Connect to the vCNS’s home page and upload the vCNS to NSX for vSphere upgrade bundle.
d. Connect to the vSphere Web Client and deploy the OVF for the vCNS to NSX vSphere upgrade.
3. What is the first step that should be done to the NSX Manager appliance after vShield Manager is upgraded?
a. Power up the NSX Manager.
b. Create a new admin password.
c. Increase the allocated memory to 8 GB.
d. Change the number of vCPUs to 4.
4. Which component is upgraded next after vShield Manager is upgraded?
a. The NSX Controllers
b. The NSX VIBs in the ESXi hosts
c. The NSX Edges
d. The logical switches
5. How are virtual wires upgraded from vCNS to logical switches in NSX?
a. From the NSX Manager home page, select the Upgrade option. You are asked if you want to upgrade virtual wires to logical switches.
b. From the Networking and Security home page, select the Installation view. From the Host Preparation tab click the Update option.
c. From the Networking and Security home page, select the Logical Switches view. For each virtual wire listed, select the Action menu and choose Upgrade Version.
d. From the Networking and Security home page, select the Installation view. From the Management tab, click the Action menu in the NSX Controllers and select Upgrade Logical Switches.
6. What versions of NSX for vSphere can be upgraded to NSX for vSphere 6.2?
a. NSX for vSphere 5.5 and higher
b. NSX for vSphere 6.0 and higher
c. NSX for vSphere 6.0.4 and higher
d. NSX for vSphere 6.1 and higher
7. Which is a VMware recommendation that should be followed before upgrading an older version of NSX for vSphere to NSX for vSphere 6.2?
a. Take a snapshot of NSX Manager.
b. Power off NSX Manager.
c. Delete the NSX Controllers.
d. Place the ESXi hosts participating in NSX in maintenance mode.
8. How are logical switches upgraded to version 6.2?
a. From the NSX Manager home page, select the Upgrade option. You are asked if you want to upgrade virtual wires to logical switches.
b. In the Networking and Security home page, select the Installation view. From the Host Preparation tab click the Update option.
c. From the Networking and Security home page, select the Logical Switches view. For each virtual wire listed, select the Action menu and choose Upgrade Version.
d. From the Networking and Security home page, select the Installation view. From the Management tab, click the Action menu in the NSX Controllers and select Upgrade Logical Switches.
9. Before upgrading NSX Controllers to version 6.2, you notice one of the NSX Controllers is not connected to NSX Manager. What should you do next?
a. Ensure that All NSX Controllers are in a connected status.
b. Upgrade the other NSX Controllers. Once the NSX Controller connects to NSX Manager again you may upgrade it.
c. Delete the NSX Controller and upgrade the other NSX Controllers.
d. Select the NSX Controller and use the Update Controller State option from the Action menu.
10. How are distributed logical routers upgraded?
a. From the NSX Manager home page, select the Upgrade option. You are asked if you want to upgrade logical routers.
b. From the Networking and Security home page, select the Installation view. From the Host Preparation tab click the Update option.
c. From the Networking and Security home page, select the NSX Edges view. For each Logical Router Control VM, select the Action menu and choose Upgrade Version.
d. From the Networking and Security home page, select the Installation view. From the Management tab, click the Action menu in the NSX Controllers and select Upgrade Logical Routers.
If you have an existing vCloud Network and Security (vCNS) installation, you may upgrade it to NSX for vSphere. vCNS is the predecessor of NSX for vSphere and only supports network function virtualization (NFV). With vCNS, it is possible to deploy logical switches (called virtual wires), Edges, and some security with the vShield App, Data Security, and some partner integration. Except for Data Security and partner integration, all other vCNS features can be upgraded to NSX without losing their configuration.

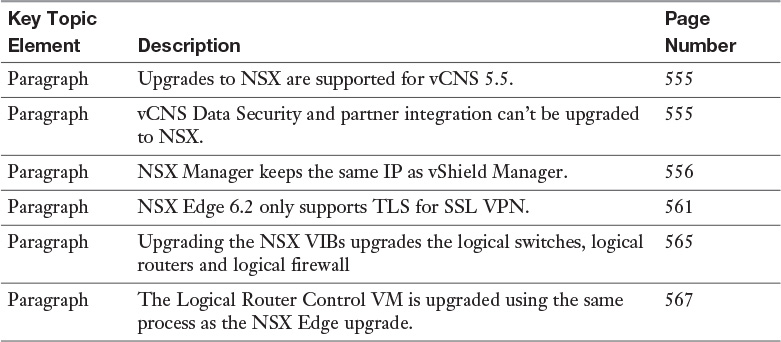
Upgrades to NSX are supported for vCNS 5.5. Older versions of vCNS must be upgraded to vCNS 5.5 before upgrading to NSX.
Note
This chapter assumes that all upgrades are done manually.
Table 19-2 shows the tasks to upgrade vCNS to NSX.
vCNS Data Security and vCNS partner integration can’t be upgraded. vCNS Data Security must be uninstalled and NSX Data Security installed. If the third-party product is supported by NSX, partner integration must be reregistered with NSX after the upgrade and the partner service redeployed. Verify with the solutions provider to validate NSX compatibility and any additional requirements that may be needed.
Upgrading vCNS to NSX Manager has no impact on the data plane. However, no vCNS changes can be made during the upgrade process, and it is strongly recommended that it be performed during a maintenance window. Also, vCenter must be running version 5.5 or higher, and vShield Data Security must be uninstalled.
To upgrade to NSX Manager from vShield Manager, perform the following steps. It is a good idea to take a snapshot of vShield Manager before starting.
Note
You should do some benchmark testing before the start of the upgrade (or any changes to production environments) and validate by testing against the benchmark after you are done.
Step 1. Download the vCNS to NSX for vSphere upgrade bundle from VMware.
Step 2. Log in to the vShield Manager home page, https://[vShield_MGR_IP_or_FQDN]/. You can also access this page from vSphere Client in Home > Solutions and Applications > vShield.
Step 3. In Settings & Reports, go to the Updates tab, as shown in Figure 19-1.
NSX Manager retains the same IP as vShield Manager.
Step 4. Click Upload Upgrade Bundle.
Step 5. Select Choose File and select the file you have from step 1.
Step 6. Click Upload File and click OK in the pop-up window warning you that vShield Manager will be updated with data from the file.
Step 7. After the upload completes, click Install followed by Confirm Install. Now sit back, relax, and enjoy the show.
vShield Manager reboots and comes back as NSX Manager.
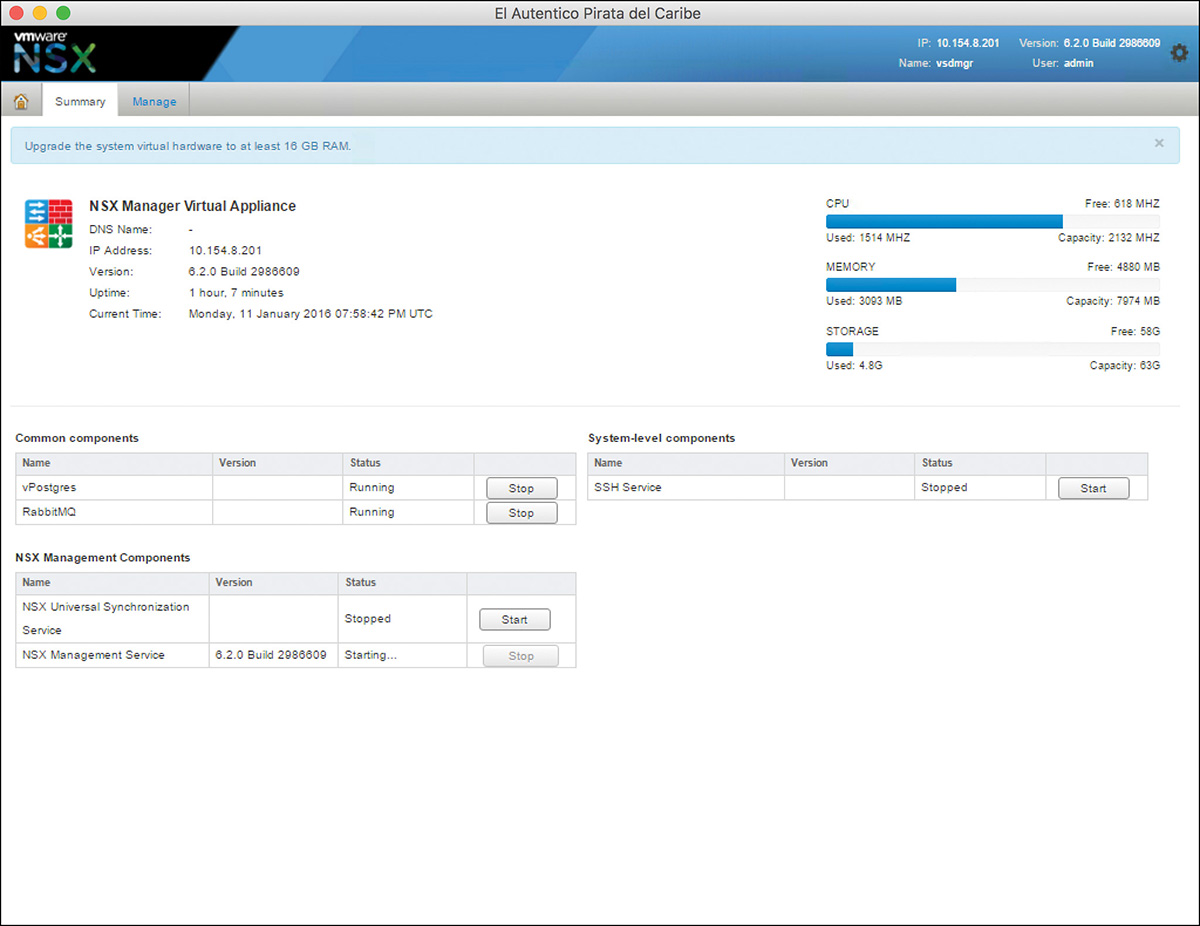
Step 8. After NSX Manager is powered up, log in to the NSX Manager home page, https://[NSX_MGR_IP_or_FQDN]/, and go to the Summary tab to confirm the NSX Manager version, as shown in Figure 19-2.
You might want to update DNS to point the old vShield Manager IP to the NSX Manager FQDN.
Step 9. If you enabled SSH in vShield Manager, start SSH in NSX Manager from the Summary tab.
Step 10. Shut down NSX Manager.
Step 11. Log in to the vSphere Web Client where the NSX Manager Appliance is running and go to Hosts and Clusters.
Step 12. Find the NSX Manager Appliance, and increase the vCPUs to 4 and the memory to 16 GB.
Step 13. Power up NSX Manager.
Don’t forget to delete the vShield Manager NSX Manager snapshot once you are done with the upgrade.
After you upgrade vShield Manager to NSX Manager, you want to upgrade the vCNS VIBs to NSX VIBs. This step impacts the data plane, thus you should do this upgrade during a maintenance window.
The upgrading to the NSX VIBs requires the removal of the vCNS VIBs. To upgrade virtual wires to logical switches, follow these steps:
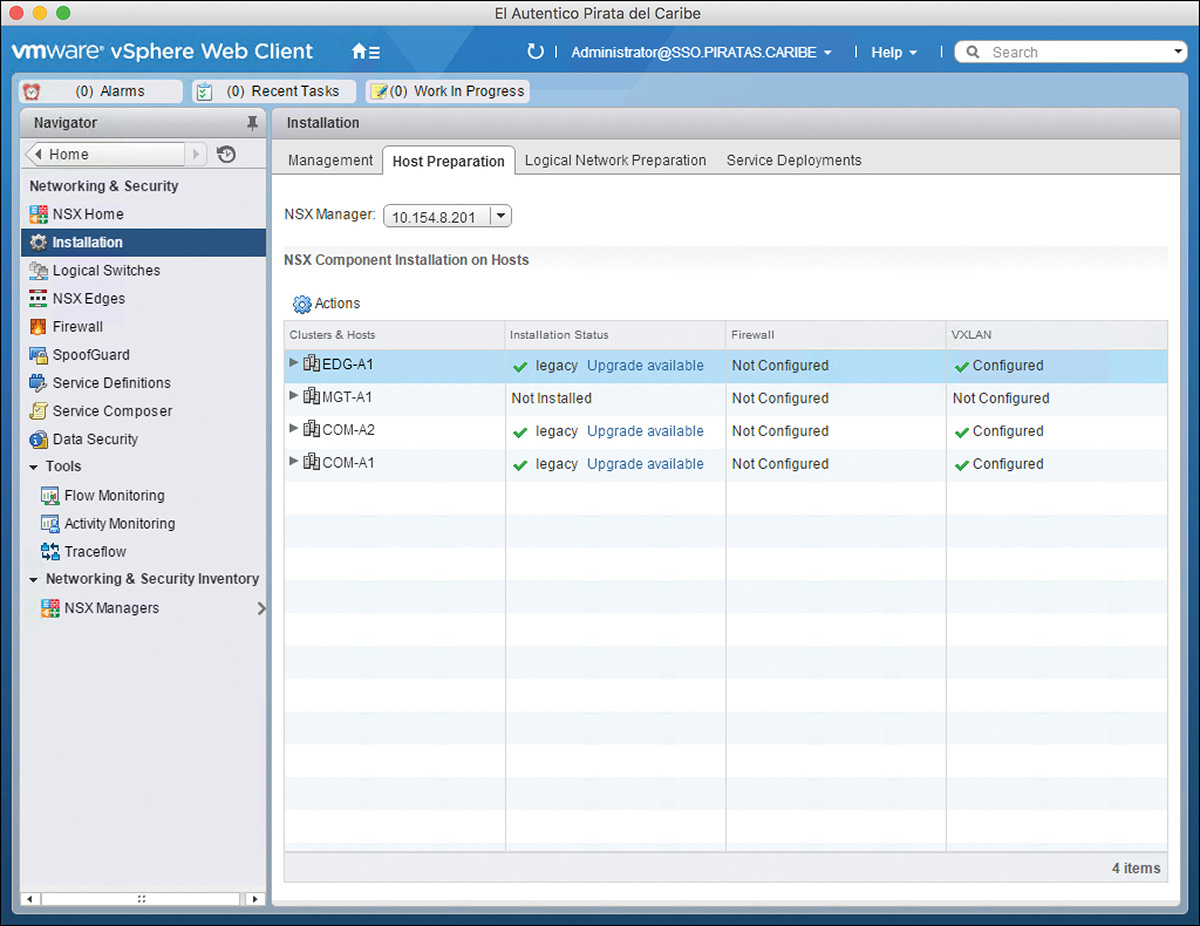
Step 1. Log in to the vSphere Web Client, and go to the Networking and Security home page.
Step 2. Select the Installation view and click the Host Preparation tab.
Step 3. Select the Update option for each cluster, as shown in Figure 19-3. All clusters that have virtual wires show the Update option.
a. A reboot is required for ESXi hosts with the Update option. vCNS virtual wires will become logical switches.
b. Clusters without virtual wires have the Install option. If you want to prepare these clusters for NSX, click Install. No host reboots are required.
Step 4. Wait for the Installation Status to have a check mark in each cluster.
Now is a good time to deploy the NSX Controllers. We covered the deployment of NSX Controllers in Chapter 4, “VXLAN, NSX Controllers, and NSX Preparation.”
Once you have upgraded the logical switches, you can upgrade the vShield App firewall policies to the DFW. Like the logical switch upgrade, you are updating the VSIP VIB in the ESXi hosts.
To upgrade the vShield App firewall rules to the DFW, perform the following steps:
Step 1. In the Host Preparation tab, look for the message to update the firewall.
Step 2. Click Upgrade.
Step 3. After the upgrade, head over to the Firewall view and inspect the DFW rules.
A few things to keep in mind when verifying the DFW rules:
There is a section for each data center, portgroup, and virtual wire (now logical switch) configured in the vShield App.
The Applied To field matches the section. For example, a Virtual Wire section has all its rules applied to the Virtual Wire logical switch.
Portgroup sections go above Virtual Wires sections, which go above Data Center sections, which go above the default rule.
Any rules with Source ports have the Source ports listed in the service.
New applications, with the Source ports, are created for user-defined applications.
New applications, with the Source ports, are created for each application in an application group.
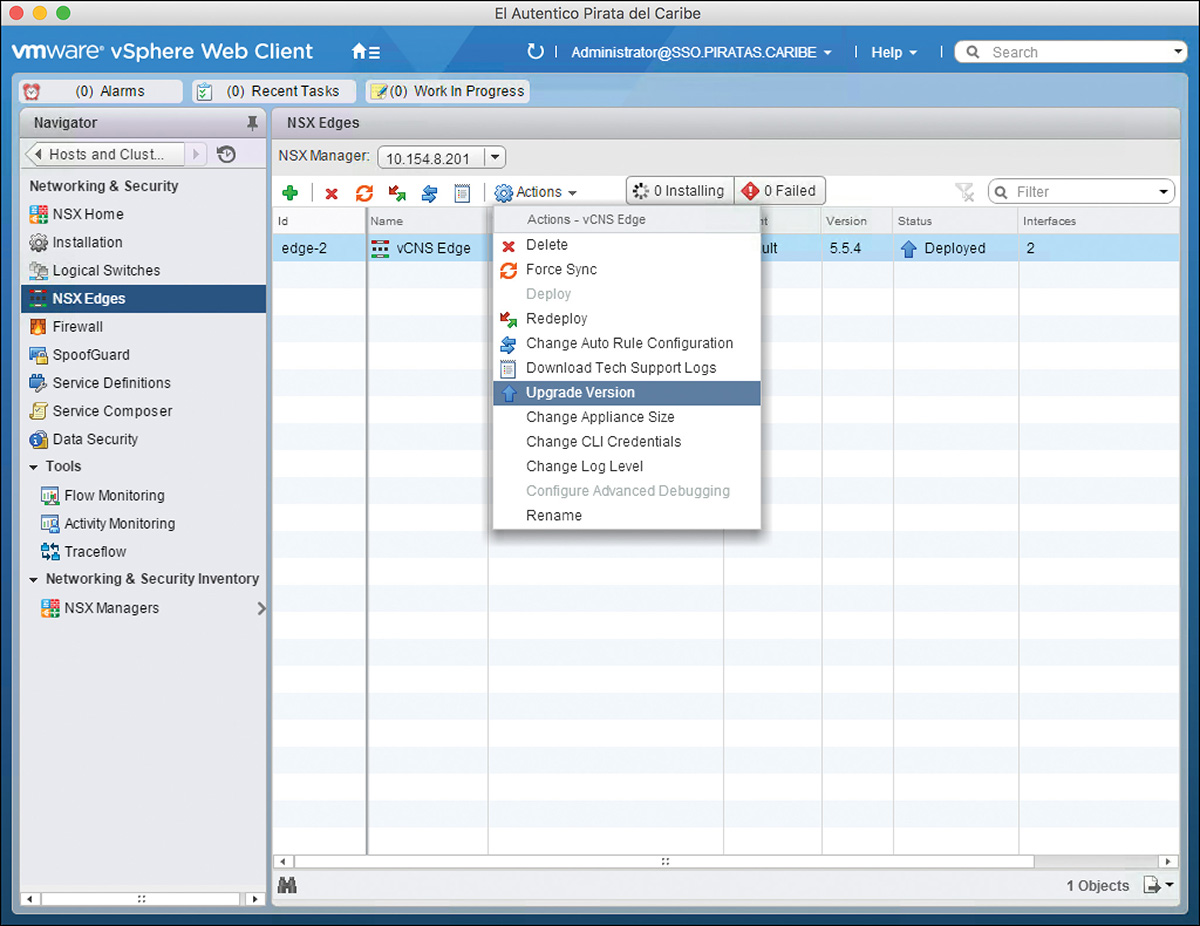
Upgrading the vCNS Edge to the NSX Edge is easy and straightforward. All you are actually doing is upgrading the Edge version from 5.5.
To upgrade to the NSX Edge, follow these steps:
Step 1. Go to NSX Edges view.
Step 2. For each Edge, click the Actions menu and select Upgrade Version, as shown in Figure 19-4.
Step 3. Wait for the upgrade to finish and confirm the Version column reads 6.2.1.
The last upgrade that needs to take place is the Universal Service Virtual Machine (USVM). The vShield Endpoint is now called the USVM. To upgrade the USVM, follow these steps:
Step 1. Go to the Installation view.
Step 2. Select the Service Deployments tab.
Step 3. For each vShield Endpoint, click the arrow next to Upgrade Available.
Step 4. In the pop-up window, select the Data Store and Network to connect the USVM.
Step 5. Click OK and wait for the upgrade to complete.
If you have an NSX 6.0.x or NSX 6.1.x installation, you can upgrade to NSX 6.2. This upgrade is similar but slightly simpler than the upgrade from vCNS. Almost all NSX components can be upgraded except Data Security and the SSL VPN client. You must manually deploy a new Data Security appliance. The old SSL VPN client gets uninstalled the next time a user connects to the NSX Edge 6.2 and the new NSX 6.2 SSL VPN client gets installed.
The SSL VPN version of NSX 6.2 Edges only accept TLS.
The following list outlines the tasks that need to be performed to upgrade to NSX 6.2. Note that these tasks must be done in the order listed.
Step 1. Upgrade to NSX Manager 6.2.
Step 2. Upgrade NSX Controllers to 6.2.
Step 3. Upgrade Host Clusters to 6.2.
Step 4. Upgrade NSX Edges to 6.2.
Step 5. Upgrade USVM to 6.2. We covered this step in the vCNS to NSX upgrade section of this chapter.
Step 6. Reinstall Data Security. We covered this step in Chapter 17, “Additional NSX Features.”
Upgrading NSX Manager 6.2 has no impact on the data plane; however, no NSX changes can be made during the upgrade process, and it is strongly recommended that it be performed during a maintenance window. Also, vCenter must be running version 5.5u3 or higher, and vShield Data Security must be uninstalled.
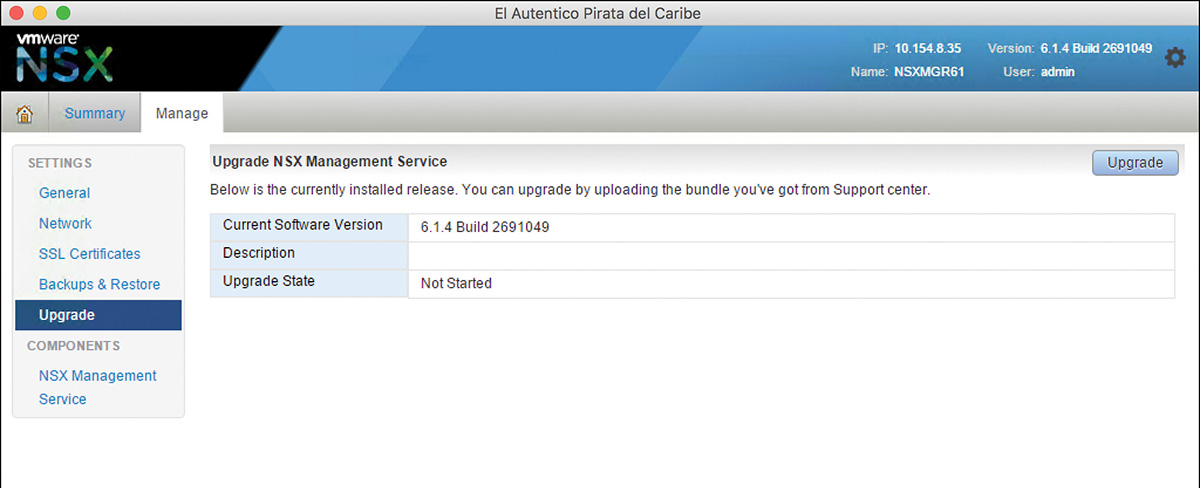
To upgrade to NSX Manager 6.2, perform the following steps. Like the upgrade from vCNS, it is a good idea to snapshot the current NSX Manager before starting.
Step 1. Download the NSX Manager upgrade bundle from VMware.
Step 2. Log in to the NSX Manager home page, https://[NSX_MGR_IP_or_FQDN]/.
Step 3. In Manage, go to the Upgrade view, as shown in Figure 19-5.
Step 4. Click Upgrade, select Choose File, and select the file you have from step 1.
Step 5. Click Continue.
Step 6. In the next window, confirm the upgrade, choose whether you want SSH to be enabled, and click Upgrade.
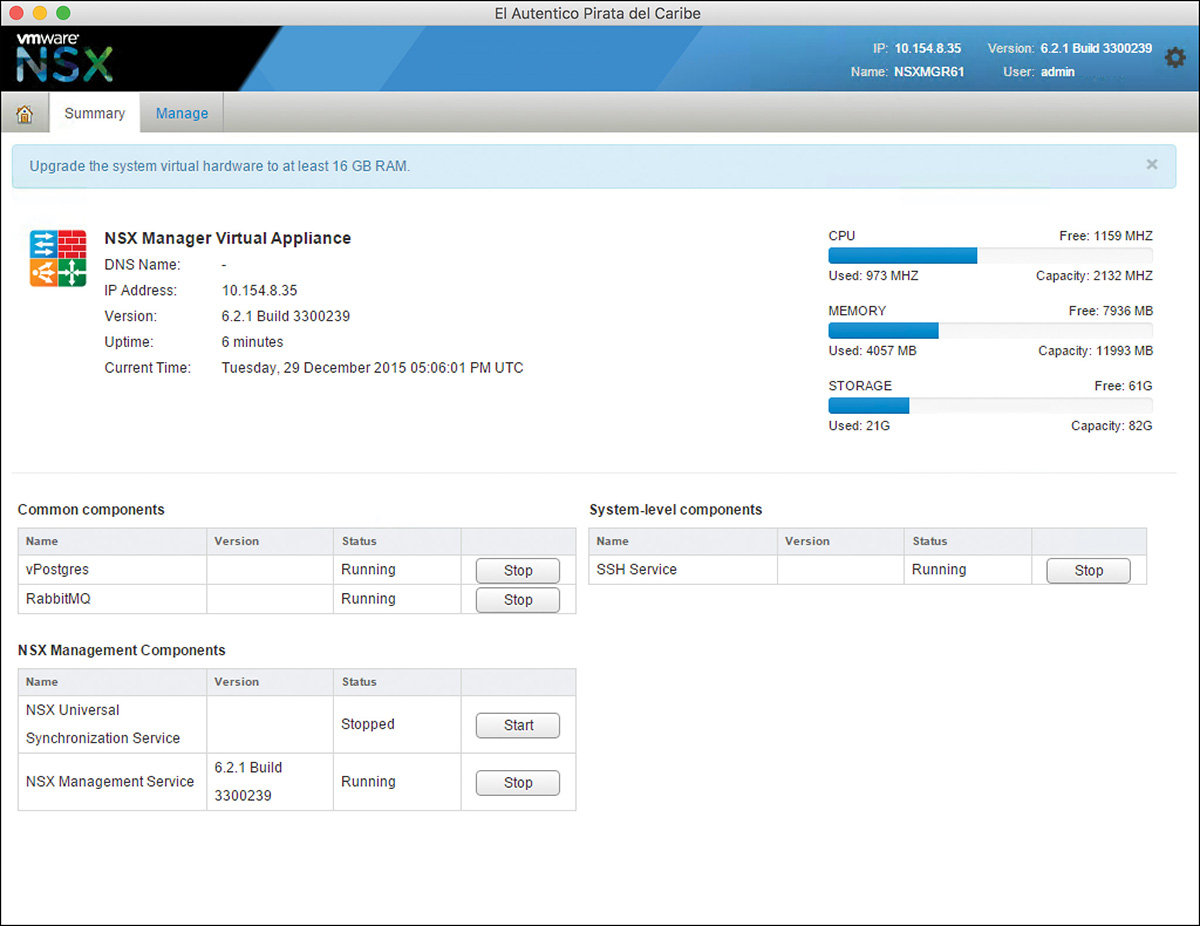
Step 7. After the upload completes, NSX Manager reboots with the new version, as shown in Figure 19-6.
Step 8. Shut down NSX Manager.
Step 9. Log in to the vSphere Web Client where the NSX Manager Appliance is running and go to Hosts and Clusters.
Step 10. Find the NSX Manager Appliance, and increase the memory to 16 GB.
Step 11. Power up NSX Manager.
Step 12. Log out of the vSphere Web Client and go to https://[vCenter_IP_or_FQDN]:5480/ to restart the vSphere Web Client and force the NSX-Plugin to be upgraded.
If running the vCenter Server Appliance, ssh to vCenter and type the following commands:
/bin/service-control --stop vsphere-client
/bin/service-control --start vsphere-client
Don’t forget to delete the NSX Manager snapshot once you are done with the upgrade.
Next, you need to upgrade the NSX Controllers. Before you upgrade the NSX Controllers, make sure the following are true:
All NSX Controllers are connected to NSX Manager.
All NSX Controllers are part of the NSX Controller cluster.
NSX Manager won’t upgrade the NSX Controllers if even one NSX Controller is not connected. Just like the NSX Manager, it is a good idea to take a snapshot of the NSX Controllers before starting the upgrade.
The NSX Controllers are rebooted after the upgrade is downloaded to them, but they are rebooted one at a time. Nevertheless, you should assume the control plane will be impacted during the upgrade, and you should schedule this upgrade during a maintenance window.
To upgrade the NSX Controllers, perform the following steps:
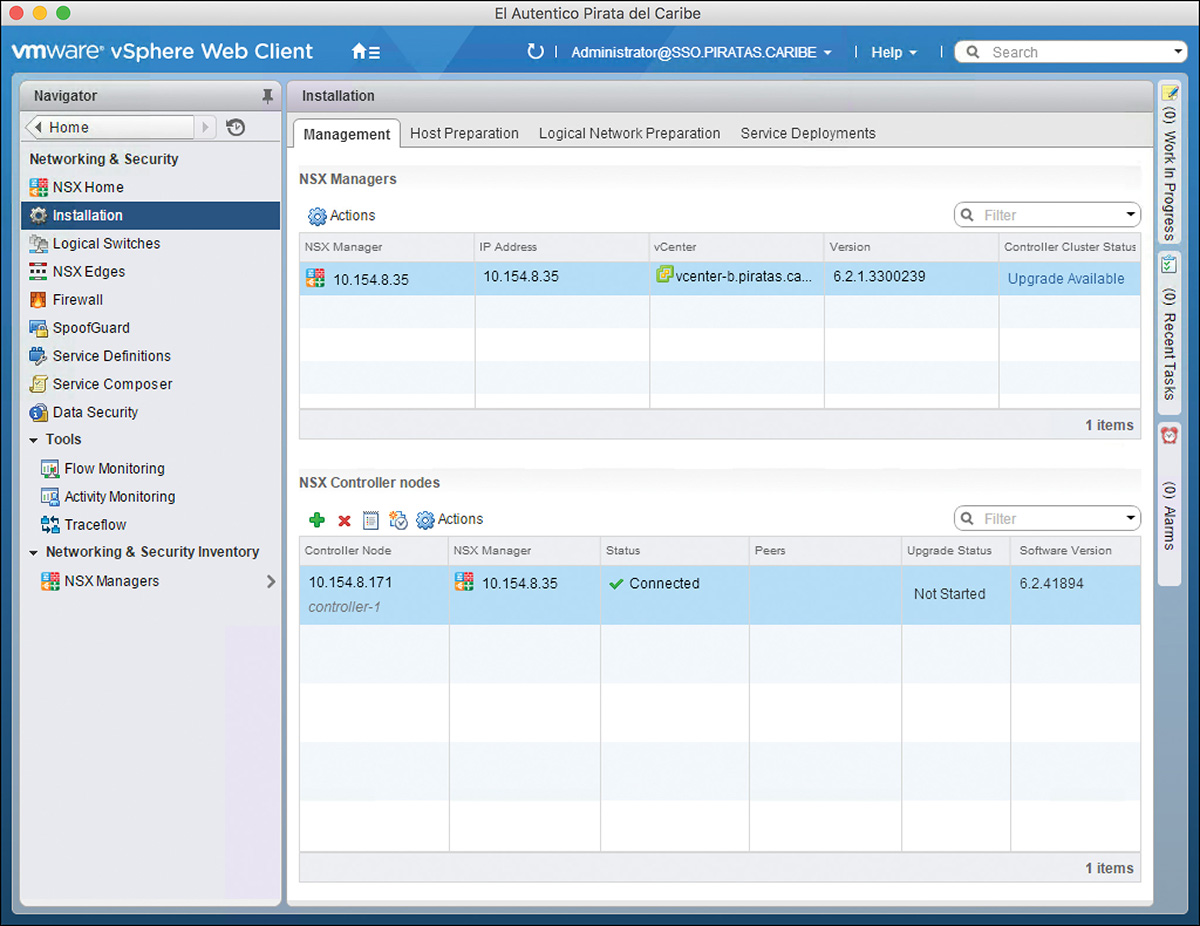
Step 1. From the Networking and Security home page, select the Installation view.
Step 2. Go to the Management tab and locate the NSX Manager.
Step 3. In the Controller Cluster Status column, click Upgrade Available, as shown in Figure 19-7.
Step 4. Answer Yes in the pop-up window asking whether you want to upgrade the NSX Controllers.
Step 5. After all NSX Controllers have rebooted, the NSX Controller in the Controller Cluster Status column will be gone, and the NSX Controllers all have a status of Connected.
You can remove the snapshot of the NSX Controllers.
The next upgrade is the NSX VIBs in the ESXi hosts. The upgrade involves removing the existing VIBs and installing the new ones. This requires the ESXi hosts to be rebooted. But don’t worry, NSX Manager tries rebooting the hosts for you. If the cluster has DRS configured, powered on VMs are migrated before the ESXi host reboots. Otherwise, the reboot is halted until the host is placed in Maintenance Mode.
Upgrading the NSX VIBs in the ESXi hosts upgrades the entities that run in kernel: the logical switches, logical routers (data plane), and the logical firewall.
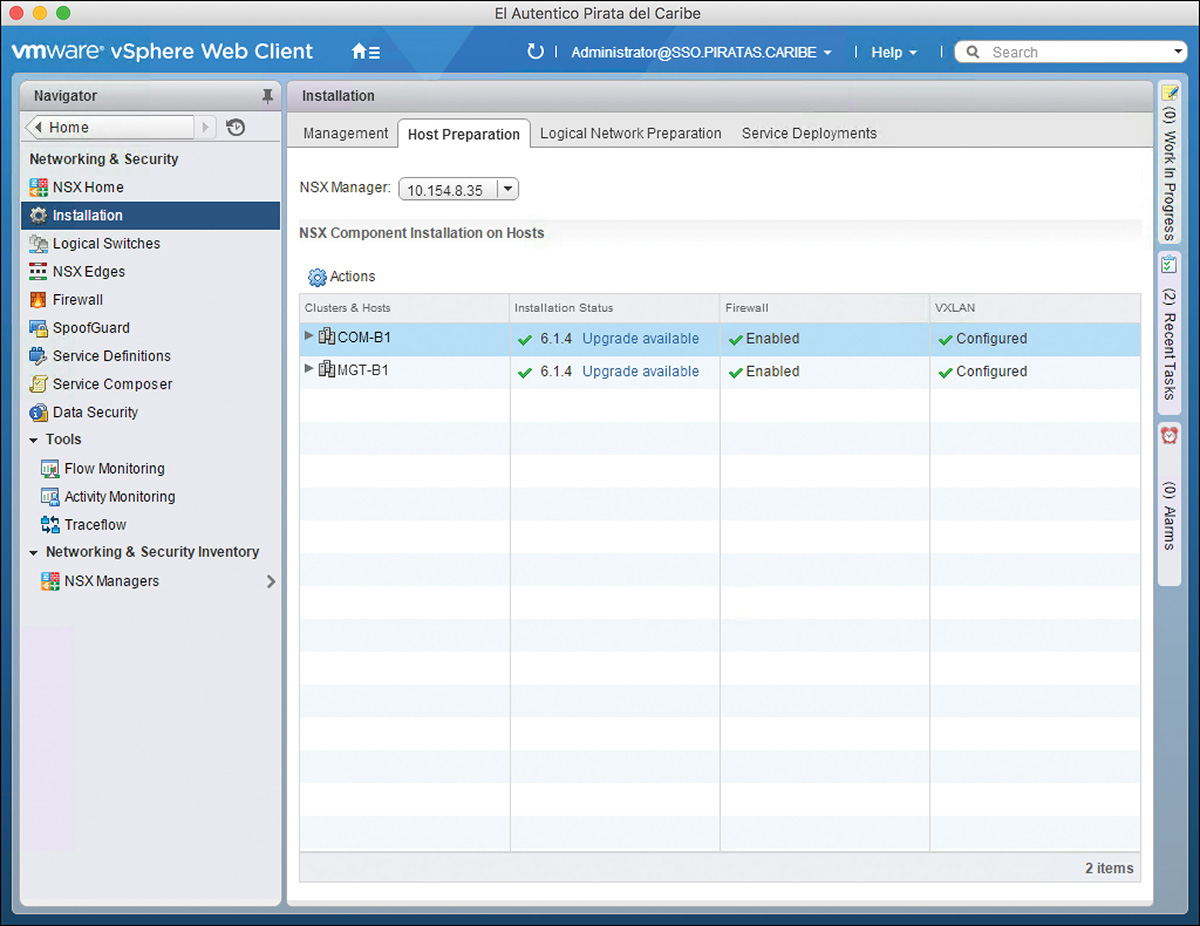
To upgrade the host clusters to 6.2, follow these steps:
Step 1. In the Installation View, select Host Preparation.
Step 2. For each cluster, click Upgrade Available in the Installation Status column, as shown in Figure 19-8. This might take some time, as the ESXi hosts need to be rebooted.
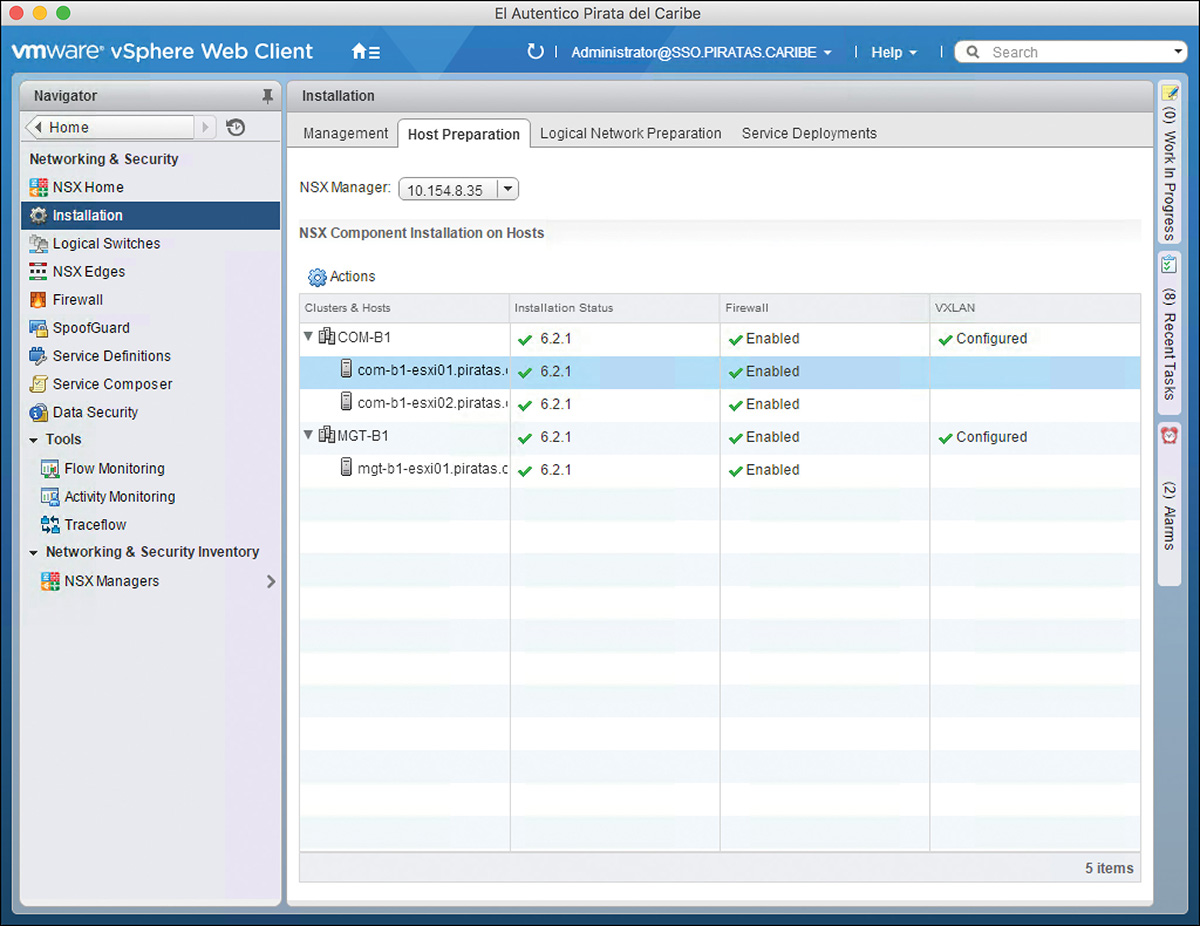
Step 3. After the hosts have rebooted, the Installation Status column should show the NSX version, as shown in Figure 19-9.
Upgrading might not be the best word here. What actually happens when you upgrade the NSX Edge, the NSX Manager deploys a new NSX Edge, version 6.2, and pushes the same configuration as the old Edge. The new NSX Edge has the same VM name as the old one. You should expect a brief service disruption, thus plan on making these upgrades during a maintenance window.
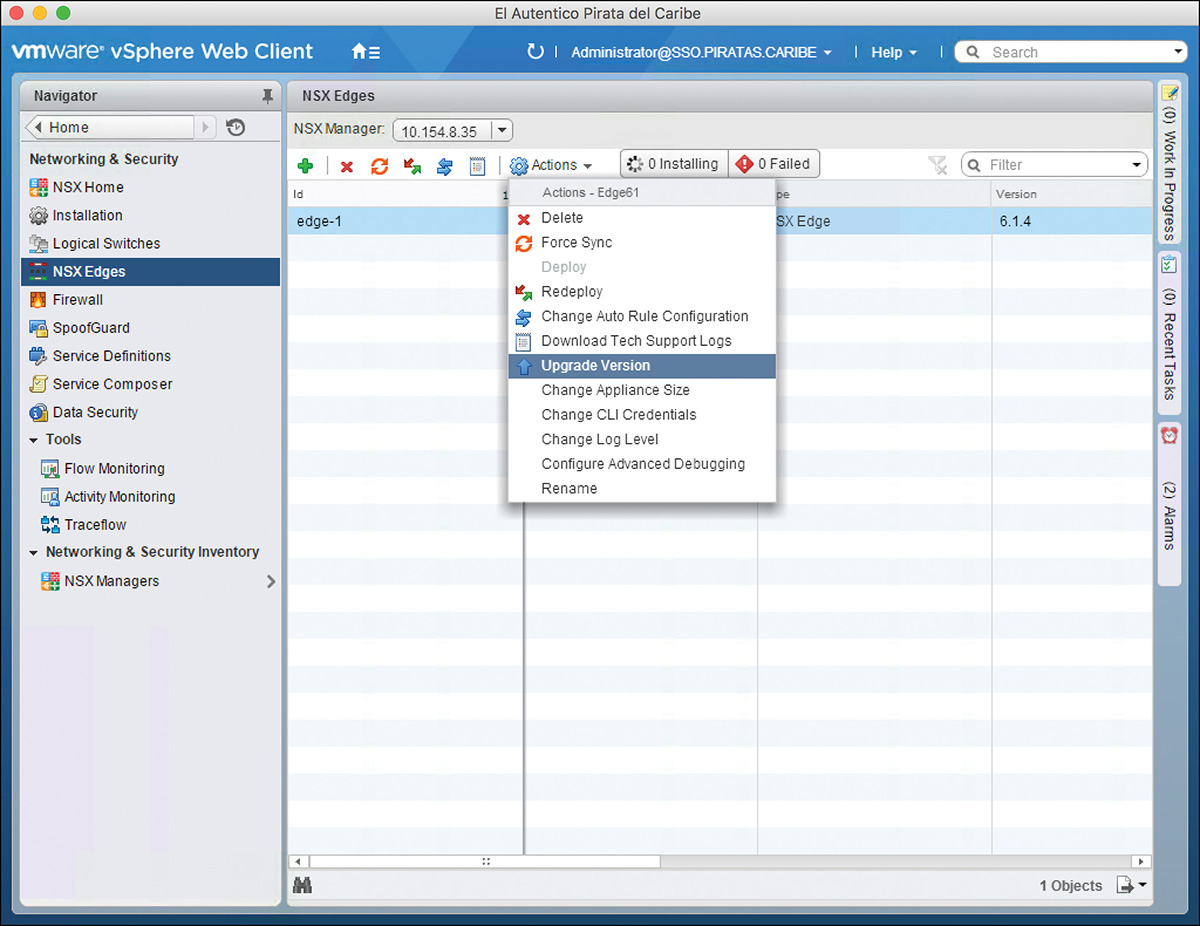
To upgrade to NSX Edge 6.2, follow these steps:
Step 1. In the NSX Edges view, select the NSX Edge to update.
Step 2. In the Actions menu, select Upgrade Version as shown in Figure 19-10.
The upgraded NSX Edge should take a few minutes to deploy.
To upgrade the Logical Router Control VM follow the same process as upgrading the NSX Edge.
Review the most important topics from inside the chapter, noted with the Key Topic icon in the outer margin of the page. Table 19-3 lists these key topics and the page numbers where each is found.
Define the following key terms from this chapter, and check your answers in the glossary: