Living in New England, I’ve always found the first and last frost dates make summer—that is, the gardening season—seem so short, but the seed catalogs that arrive in January reassure me that spring really is coming—eventually. I spend hours poring over the descriptions and photographs of each seed variety as I plan the perfect garden. I look back on the previous years’ notes to avoid making the same mistakes, try to show a little restraint filling out the order forms, and then sit back and wait for my seed orders to arrive.
I love starting my own seeds. It allows me to grow varieties I might not find locally, cuts costs (unless I go crazy with the catalogs), and ultimately adds to my pride in the final harvest. It also enables me to plant my flower beds the way I most love to see them—in utter profusion, with colors and shapes repeating throughout the gardens. Double all of the above when I save my own seeds from one year to the next.
I always try to get seeds started—and in the ground—as early as possible. I am fortunate that I have a bright, sunny breakfast room where I have successfully started seeds for years, but I recently erected a small, unheated greenhouse that provides more space and better light as the seedlings grow. I have never had to rely on “grow lights,” and although I do occasionally use a small nighttime heater in the greenhouse, I try to keep things there as low-tech as possible.
Seedlings that have outgrown their soil blocks and require more space are repotted in folded newspaper pots.
Over the years, my New Year’s resolutions to shed extra pounds have helped me amass a tower of plastic trays from low-cal TV dinners. The trays are just deep enough for sprinkling tiny seeds that need to be thinned and transplanted to larger pots later on, and they also make great waterproof trays to use underneath pots. They are narrow enough to fit on my windowsills and help convince me that some of those diet dinners were not totally wasted, but they just aren’t deep enough to grow seedlings to maturity.
Whether I start my seedlings in TV dinner trays, in commercial plastic “cells,” or in peat pots available at garden supply stores, I always start them early enough that they require repotting into larger pots (at least once) before the weather is warm enough to plant them in the ground. Like most gardeners, I save 4" pots from purchased plants, but I always need many more pots than I have stored because what I thought was restraint back in January usually turns into a plague of seedlings by the end of March.
When it got to the point where the cost of larger pots began to outweigh the benefit of starting my own seeds, as compared to just buying seedlings from the local nursery, I began to explore a couple of methods to produce a virtually unlimited supply of inexpensive pots for starting and transplanting seedlings.
Biodegradable newspaper pots are great for repotting tiny seedlings that need more growing room. When the weather is warm enough to move the plants into the garden, I simply tear away the bottom of each pot to give the roots easier access to the soil and sink them into the ground. Because the seedlings are planted pot and all, there is less root shock, a higher survival rate, and no storage issues. I also get to feel pretty smug about recycling paper. Newspaper pots will hold up for about six to eight weeks in trays on the counter and will rot into the soil once planted in the garden, which also adds some bulk to the soil as they decompose.
I especially like being able to write the name or variety of each plant right on the side of the pot with a permanent marker. The writing does fade eventually, so I sometimes write the information on popsicle sticks and tuck one into each pot.
I use The New York Times to make my pots—not because I really believe that I grow smarter, stronger plants but because I know that the Times is printed with soy-based inks. Most organic gardening sources recommend using sheets of newspaper as a mulch layer, claiming that toxic inks have long since been eliminated from the printing industry, but I still recommend finding out what kind of ink your local papers are printed with, just to be sure.
I make my newspaper pots in two styles: One is folded flat like the nifty drinking cups they taught us to make in Girl Scouts and is easy to store until I need them. The other style is rolled around a form and takes up considerably more storage space but makes a stronger pot that stands up straight on its own.
Newspaper pots need to be placed in waterproof trays, with some water in the trays so the paper can wick moisture from below, rather than from the soil. As the seedlings develop, in addition to watering, I use a spray bottle to keep the pots and the top of the soil evenly moist. Check water daily, but avoid overwatering, which can cause plants to damp off (die from fungal disease).
In addition to whatever regular plant trays I have saved over the years, I use TV dinner trays, old baking sheets with 1"-high sides, and some inexpensive boot-storage trays underneath the pots.
When I use a heated plant mat (or the old, stained heating pad I found in the back of the linen closet) to speed germination, I always set the pots in a fairly thick plastic tray to help diffuse the heat, so it doesn’t fry the plants’ roots.
FINISHED SIZE: ABOUT 7" (18CM) ACROSS TOP, 2½" (6.5CM) AT BASE, AND 5" (13CM) HIGH
• 1 full (unfolded) sheet of newspaper for each pot
• Dull butter knife (for sharply creasing folds)
1 prepare newspaper sheets and make first fold
Fold each full, opened sheet of newspaper in half lengthwise. Place the newspaper’s folded edge at the bottom; then fold the upper right corner down to the left to meet the lower edge, and crease the fold.
Fold the left half of the paper behind the triangle you just created, and crease the fold.
Fold the upper part of the rectangle you folded to the right in Step 2 (the triangle that remains visible) over the first triangle you made in Step 1. Turn the piece so that there’s a single fold at the bottom edge of the triangles and separate edges at the top.
Fold the lower left corner over to just touch the right edge of the triangle, and crease the fold.
Fold the lower right corner across to the left edge, and crease the fold.
At the upper edge, fold half of the top triangles forward, and crease the fold.
Fold the remaining top triangles backward, and crease the fold.
Use masking tape to hold the folds in place, if needed. To make each pot stand upright, open it up and spread the opening sideways, then crush the bottom slightly. Once the pots are side by side in trays, they’ll stabilize each other.
These pots will hold tomato seedlings until the weather is warm enough to transplant them to the garden. I try to fit the pots as close together as possible on a waterproof tray to minimize their drying out and to enable them to support each other.
FINISHED SIZE: ABOUT 2½" (6.5CM) IN DIAMETER AND 4" (10CM) HIGH
• 1 full (unfolded) sheet of newspaper for each pot
• Two-piece push-up, adjustable measuring cup with clear cylinder and sliding plunger (available at most cookware stores or online (search for “push-up measuring cups”—see also Sources for Supplies on this page)
Fold each sheet of newspaper in half lengthwise, twice. The folded pieces should measure 6" wide x 22" long (15 x 56cm). To streamline the rolling process, assemble a stack of folded sheets before you begin.
2 roll folded sheet around cylinder
To make each pot, start by pulling the measuring cup’s plunger back so that only about 1" (2.5cm) remains inside the clear cylinder. Position the paper with its long folded edge at the bottom of the clear cylinder and the paper’s “open” edge extending a couple inches above the cylinder’s upper edge. Begin rolling one short edge of the newspaper around the cylinder, firmly enough to hold the shape but not so tight that you won’t be able to remove it later.
Tape the side edge of the rolled paper in place with masking tape.
4 fold in rolled paper’s bottom edge
Fold in the paper above the cylinder’s edge.
Turn the cup upside down, and press the plunger firmly to crush the paper you folded in Step 4.
6 slide finished pot off cylinder
To remove the pot from the cylinder, you might have to twist it slightly if you rolled it too tightly. If you plan to write the seed information on the side of the pots, do so before filling and planting them.
As you fill the pots with soil and seedlings, place the pots close together on a waterproof tray so that they can support each other.
Most gardeners are familiar with the compressed peat discs that expand into planting cylinders when watered. Soil blocks are similar, except that they do not expand. They are made by mixing up a moist batch of material and molding it into blocks or cylinders. The blocks are then placed on a tray and seeds are planted in them. Gardening catalogs sell pricey gadgets to make your own soil blocks, and there are web sites that describe DIY tools that make several soil blocks at once.
In an effort to avoid constructing another tool, I tried using a potato ricer, melon baller, citrus squeezer, and various ice cream scoops to form soil blocks, lumps, and cylinders. They all did a good job of compressing the soil into cakes and blocks, but they did not release the blocks very easily, though lining these tools with coffee-filter paper did help.
I also found some vintage hors d’oeuvre makers equipped with plungers that worked well, but they are not readily available, unless you get lucky at a garage sale. I’ve had the best results with a simple two-part measuring cup.
Soil blocks are usually made from a combination of peat moss or coir (coconut fibers) and compost or potting soil. Some mixtures also include fertilizer and other garden additives. Although the blocks look fragile when first formed, they hold together well and strengthen as the seeds you plant in them germinate and the plants’ roots grow and add structure to the soil.
Once the roots have filled a block and are visible at the edges, it is time to repot the entire block. Commercially made soil-blocking tools are usually offered in graduated sizes so that the smallest block will drop right into a well at the center of the next size block. Convenient as this system looks, owning two or three of these tools can get pricey, so I don’t mind repotting in the conventional way.
Like the newspaper pots, soil blocks need to maintain moisture at all times, or they will dry out and your seeds will fail to sprout. Make sure to place them in a waterproof tray, and check them daily.
• Peat moss or coir and soil or compost (you can generally use 4 parts peat, 2 parts soil/compost, and 4 parts water)
• Fertilizer granules, lime, or other soil additives (optional)
• 1"-diameter (2.5cm), two-part measuring cup
• Sieve (see this page)
Use the sieve to remove any lumpy debris from the peat moss (or coir) and soil (or compost). Then mix all the dry ingredients.
Add enough water to form a mixture that clumps and holds together when squeezed in your hand.
Pull the measuring cup’s plunger back until less than 1" (2.5cm) of it remains inside the cylinder. Scoop up a generous amount of the mixture with the cup, packing it tightly against your hand. Then use the plunger to push the mixture out of the cylinder and onto the plant tray.
Place the blocks close together (a little closer together than in the facing illustration) so they will help hold each other upright, until they develop some roots and structure. Plant the seeds in the soil block, with only a couple of seeds per block and at the depth specified on the seed package. The seed packet will give different info depending on what the seeds are for. Cover the soil blocks with plastic wrap to retain moisture until the seedlings emerge, and make sure to water them daily.
No matter how much we enjoy gardening, it is still hard work, so I am always on the lookout for simple ways to minimize the drudgery. Using seed tapes is one of the best ways I know to reduce backache and bruised knees at the start of gardening season. Tapes make short work of planting seeds like carrots and lettuces, and reduce the need for thinning seedlings later on. They also guarantee perfectly spaced seedlings and plants because it is easier to control spacing when sitting at a table than when bending over a garden or perching on your knees. With seed tapes, you know exactly how much space to allow in the garden, which makes it easier to plan.
I tend to be impatient when I plant seeds directly in the ground, so I am always amazed by how many seeds there really are in a packet when I take the time to make the tapes. I suspect that I get better yields with seed tapes than I do with direct planting because I pay closer attention to the way I space the seeds on the tapes.
Some seed companies offer seed strips for sale, but they are simple and inexpensive to make, and I especially like the feeling that I am gardening on a cold winter day. Whether you buy or make seed tapes, the principle is simple: The seeds are glued onto strips of thin paper with water-soluble glue, which dissolves when the strips are planted and watered.
• 1½"-wide (4cm) strips of newspaper, paper toweling, or toilet tissue
• Water-soluble glue, or cornstarch or flour mixed with water
OPTIONAL: Squeeze bottle with wide tip, small tweezers, bulb-type seed planter
Precut lots of strips of paper while your hands are dry and glue-free. While it is tempting to make really long strips, shorter ones are easier to handle and require less space to lay flat for drying. I use newspaper, cutting my strips 1½" (4cm) wide and the length of a standard sheet (about 22" [56cm]).
If you use toilet paper or inexpensive paper towels, cut the strips twice as long or wide, glue the seeds along one half, and then fold the other half over the seeds to cover and add extra strength to the tape. Premium-grade paper towels may not break down quickly enough to allow the seeds to sprout, so save your money, and just buy the least expensive store brand of paper toweling.
Mix the flour or cornstarch with enough water to form a paste that is thin enough to work with but thick enough to stay put. If you use cornstarch, mix it with cold water; then bring the liquid up to the boiling point for a minute. Let it cool before using it, and seal any extra in a container with a tight-fitting lid.
Use a toothpick or a small artist’s brush to dab the glue onto the paper strips, or slightly thin out the mixture with water and put it into a squeeze bottle to apply it to the strips. The advantage of using a toothpick or brush is that the wet tool makes it easy to pick up the seeds, one at a time, and place them on the strip. If you use a squeeze bottle, make a series of glue dots, and then drop the seeds on top. Leave a little space at the end of each strip to label it with the seeds’ name, variety, and the date.
I sometimes use an old pair of tweezers to place the seeds on the tape, and then I tap them into the paste with my fingertip—and keep a damp paper towel nearby to wipe my fingers periodically. For tiny seeds, I use a special type of small sowing tool that has a bulb on one end that you squeeze to release seeds (available in gardening catalogs). I can fill it with a whole package of seeds and then dependably release them one at a time.
Once the strips are totally dry, roll them up and store them in a plastic bag, along with the empty seed package, which will provide information on row depth and spacing when you get to the garden. You can also make row markers or plant tags for particular seeds and place those in the bags as well. A pretty package with seed tapes and markers makes a nice gift for gardening friends, so think about making extras once you get started.
To plant the tapes, just scratch away some of the surface soil, lay down the strips, and mist them with water to get things started. Then cover them with a thin layer of soil, so they are planted at the depth recommended on the seed packet.
Most seedlings require protection from frost, wind, and harsh sunlight once they move outside. At my house, they also need indoor protection from a cat that likes to munch fresh greens and take his afternoon nap stretched out on top of the seedling trays occupying his favorite windowsill.
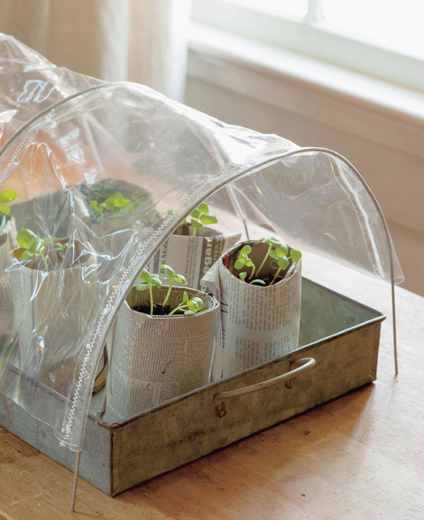
To solve the cat problem, I constructed mini-hothouses that have the added advantage of holding moisture close to the soil instead of letting it evaporate into the room. I also use these hothouses to protect young seedlings that I place next to my raised beds when the weather warms a bit and I am overrun with plants inside.
These little hothouses are easy to store when the seedlings no longer need protection. I just tie them all in a bundle and store them flat in a box. I have been using the same ones for years.
These hothouses require only minimal sewing skills and a sewing machine. The instructions below are for a hothouse that will fit an average flat (in which seedlings are sold), which is 10" x 20" (25 x 51cm).
Once I move seedlings outside, I use the mini-hothouses to protect them from unexpected frost and damaging wind.
OTHER METHODS for PROTECTING TENDER SEEDLINGS
Over the years, I have tried lots of methods to protect tender seedlings from the weather since I aim for earlier and earlier planting. Even though plastic grocery bags will never decompose, they generally do not remain intact for the long run, and I wouldn’t bother putting the effort into making mini-hothouses with them. In a pinch, though, I have secured plastic bags over sticks and peony rings (used for supporting peonies) to protect seedlings and tender plants. They aren’t pretty, but they do the trick when the evening weather report predicts frost.
We have dollar stores everywhere now, and often they have exactly what I need to improvise protection for seedlings. I once found some clear plastic umbrellas that made terrific cloches, or protective plant coverings. I poked some holes and made some slashes in them for ventilation and to offer some resistance to the wind, and then pushed the handles into the ground. They were big enough to group multiple plants underneath them, and they worked great for a couple of years. Unfortunately, once a spoke is bent or broken, there isn’t much left of an umbrella. But, at bargain-store prices, they are well worth having because they can accommodate larger plants, are easily anchored in the ground, and collapse for storage.
Another solution for protecting seedlings issued from a bacteria problem we had in our old well that caused us to rely on bottled water for quite some time. As a result, I collected a lot of gallon water jugs before we got the problem solved; and, with the bottoms cut out, these jugs make quick cloches for individual plants. They are easy to anchor to the ground by catching a notched stick through the handle, then pushing the stick into the ground. Because most jugs are not really clear, they filter the sunlight, which minimizes burning the plants. When the bottomless jugs are not in use, I just run a cord through all the handles and hang them from a rafter in the barn (you won’t need the jugs’ caps).
With the bottom cut away, a plastic one-gallon (3.8 liter) water jug makes an excellent cloche. I usually anchor these jugs in place with a notched or forked stick.
In the years before I had a little greenhouse, I found that a clear shower curtain liner provided easy, inexpensive shelter for plants. Modeled after the mini-hothouses described on this page, a larger hoop house is inexpensive to construct and easy to store.
Even now that I have the greenhouse, I still use the hoop house because it makes a perfect shelter for hardening off seedlings, that is, acclimating them after moving them from indoors to outside. The frosted plastic diffuses some of the light, holds in the heat, and allows the air to circulate.
• Frosted shower curtain or liner
• Four 8'-long (2.4m) lengths of ½" (12mm) PEX pipes, (sold in building-supply stores’ electrical department)
• Eight 12" (30cm) lengths of 1" (2.5cm) PVC pipe (sold in building-supply stores’ plumbing department)
• Eight 1" (2.5cm) pipe caps or corks
OPTIONAL: Eight 12" (30cm) lengths of galvanized wire, drill and bit to accommodate wire
1 stitch channels in shower curtain
Machine-stitch a channel at each end of the shower curtain and two equally spaced channels across the curtain’s midsection by folding the plastic and stitching ½" (12mm) from the fold.
Insert an 8' (2.4m) PEX pipe through each of the stitched channels.
Either glue a pipe cap over or insert a cork into one end of each piece of PVC so that the pipes will not fill up with dirt when you poke them into the soil.
4 position first row of pvc anchor pipes
Lay the curtain flat on the ground, and mark the position of the channels in a straight line at one side edge. Hammer one piece of PVC into the ground (capped end first) to correspond to the location of each of the four channels. Then insert the ends of the PEX pipes into the PVC pipes.
5 position second row of pvc anchor pipes
Decide how high you want your hoop house to be, which will determine how far away to position the second row of PVC anchor pipes. The two rows of PVC should be parallel to each other and straight. Hammer the second set of PVC pipes into the ground, and then arch the PEX pipes as you insert each one into its second PVC anchor.
If you live anywhere that’s windy in the spring (like the hill we live on), keep your hoop house from blowing away by wiring the PEX and PVC pipes together. After inserting each of the PEX pipes and double-checking the placement of them all, drill through both pipes, and secure them with a twisted wire. The wire is easy to remove at storage time, and it keeps the house connected even on the gustiest days.
I use the longest dibble in this group for planting long rows of beans and peas; the shorter one is useful in tight spaces. The handle at the top of the single dibble makes it easy to push the tip deeply into the soil.
Planting occupies most of my time and energy during the early spring and establishes the garden agenda for the coming season. When the ground has warmed up just enough for planting and the leafy, lush garden of my dreams is still weeks—maybe months—away, time is a luxury I won’t enjoy once the weeds wake up to spring.
An orderly, neat garden is not only a pleasure to see but also easier to care for than one haphazardly planted. That said, I spend a lot of off-season time planning the layout of my gardens, but, at planting time, I always find empty beds a little deceiving. They are never as large as I remembered them, and the seed and row spacing recommended on seed packets always seems excessive. Of course, once plants begin to mature and fill in, it is easy to see why such spacing was recommended, and I am usually pleased that I did not give in to the temptation to squeeze in a few more rows or seeds. I find that by using dibbles (tools that make small, uniform holes in the soil) to space seeds and stakes, and strings to space even rows, I am less likely to start crowding things into the beds just because I bought too many seeds or couldn’t bear to eliminate extra seedlings.
Whether you begin with seeds or seedlings, you still have to make a hole in the soil to get things started. Dibbles, or dibs, as they are also called, have been used for centuries to speed up the process and produce a uniform-sized hole. A commercial bulb planter is a sort of dibble, too, though most dibbles just displace the soil, rather than removing a clod of earth, as the bulb planter does.
As you can see in the photograph at left, I have a long, multi-tipped, straight dibble that allows me to make a line of 35 holes at the same time. I use a rectangular, multi-tipped block dibble to plant small seeds in a patch (see the photo on this page). On both dibbles, all the equally spaced holes are the same depth, so it makes planting seeds fast and easy, and minimizes the amount of thinning needed later on.
Because seedlings, however, generally need to be spaced much further apart than seeds and require a larger hole to accommodate their roots and soil, I use single-tipped dibbles rather than multi-tipped dibbles for transplanting them. I made some of my single-tipped dibbles from dowels and wooden rods, but I have also utilized a chinois pestle that I found at a garage sale. Both single- and multi-tipped dibbles are easy to make (instructions follow).
I use a pair of 12" (30cm) wooden grade stakes from the hardware store or lumberyard (often used to establish the grade of the land or mark off areas) to help me plant straight rows in the vegetable garden. Making planting guides is easy: Drill a hole through each stake near its top end, cut a piece of string the length of what will be your longest row plus 12" (30cm), and thread and tie one end of the string through the hole in each of the stakes. To store the stakes, just wind the string around the pair until you’re ready to use them. When you get to the garden, put the first stake in the ground at the starting point of a row, unwind the string as needed, and place the other stake at the far end of the row. You can easily move one or both stakes to straighten a row or shift its placement.
• 12"–14" (30–36cm) section of dowel, closet rod, or old tool handle (½" [12mm] diameter or larger)
• Medium-grit sandpaper or sanding block
OPTIONAL: Flat piece of wood for top handle (as shown on the top dibble on this page), screw, wood glue, 2 yards (2m) of rawhide lacing (for grip), superglue, drill, and bit
Using the jackknife and, always stroking away from your body, taper one end of the dowel to a rounded point. This will reduce the resistance when you poke the dowel into the soil.
Use the sandpaper or sanding block to smooth the dowel’s tapered end.
If you want a handle on top of the dowel, drill a hole through the handle and a corresponding hole into the dowel’s un-tapered end. Screw the handle onto the end of the dowel, adding some wood glue between the two surfaces before fully tightening the screw.
When I don’t add a handle to the top of the dibble, I like the feel of a rawhide grip in my hand. It only takes a few minutes to add this feature, which makes the dibble much easier to hold. You can make your grip simple and wrapped or fancy and knotted, as explained at right.
1 hide rawhide’s beginning end
If you want, you can start the wrapped grip by making the rawhide’s beginning end nearly invisible: Drill a ¼"-deep (5mm) hole in the dowel about 4"–5" (10–13cm) from the top end. Squirt a little superglue in the hole, tuck the end of the lacing into the hole, and let the superglue dry before you begin wrapping.
Begin wrapping the grip by laying 2" (5cm) of the lacing along the dowel about 4"–5" (10–13cm) from the top end, positioning it towards this top end (if you bypassed Step 1 and are starting with a free length of lacing, position the lacing’s short end towards the top of the dowel). Then fold the lacing back over itself to begin wrapping back from the bottom to the top. Wrap tightly, taking care that the lacing lies flat and untwisted, and covers the beginning tail. Wrap until you’re about 2" (5cm) from the top of the dowel. At this point, you can drill another ¼" (5mm) hole, trim the excess lacing, and hide its second end as you did the first (see Step 1). Alternatively you can add a loop handle (see Step 3), or just tie a knot close to the dowel and trim the excess rawhide.
Adding a loop handle to the grip makes it easy to hang the dibble on a hook wherever you want to store it—and also offers one way to resolve how to handle the lacing’s end. To add a loop handle, drill a hole through the dowel about 2"–3" (5–8cm) from the top end. Then after you have wrapped the grip, slip the end of the lacing through the hole, make a loop, and secure it with a knot large enough to keep it from slipping back through the hole. Then clip the rawhide close to the knot. You can also add a dot of superglue to the knot to hold it securely.
Begin with a length of rawhide lacing 2 yards (2m) long (note that, if you want to use a knot other than a square knot, you may need more than 2 yards [2m] of rawhide; make a test wrap with your chosen knot, so you can calculate how long the lacing needs to be). Place the dowel in the middle of the lacing, with half the rawhide’s length extending on each side of the dowel.
Cross the left-hand strand over the right-hand strand and pull the top strand through to make the first half of a square knot; then tighten the strands against the dowel.
Cross the right-hand strand over the left-hand strand to complete the knot. After finishing each knot, you can either wrap the strands around the dowel, crossing at the back (and making sure the lacing lies flat and untwisted) to return to a single column of knots along the same side, or you can work a second column of square knots on the opposite side. Make sure to line up the knots and snug them together as you wrap.
This large rectangular dibble measures 9" x 14" x 2" (23 x 36 x 5cm) and makes 24 holes simultaneously, which is perfect for planting radishes and other vegetables that can be clustered. The optional handle on top makes the tool easier to manage.
• Wooden board at least 2" (5cm) thick and approximately 9" x 14" (23 x 36cm)
• Drill with 9/32" (7.00/7.50mm) bit*
• 5/16" (8mm) wooden dowel pins (generally 2¾" [7cm] long)*
OPTIONAL: Screen-door handle, small tomato paste can or block of scrap lumber, screwdriver, screws
* Note: Match the size of dowel pin you use to a drill bit that’s slightly smaller than the pin to ensure a snug fit. Dowel pins are sometimes sold in chair-repair kits, which include the appropriate drill bit.
1 mark placement for dowel pins on board
Decide on the spacing of the dowel pins, and use a ruler to measure and mark the holes you need to drill. Placing the dowel pins 1"–1½" (2.5–4cm) apart seems to work well for most seeds.
It is important that the holes are all drilled perpendicular to the board and at the same depth so that the dowel pins are all the same length once they are pounded into the holes. If you have a drill press, this is easy to do. If not, you can control the depth of the holes by using a block of scrap lumber to stop the drill from boring each hole beyond a certain point (see the drawing below). I have also found that a 6-oz. (170g) tomato-paste can makes a fine drill stop and helps keep the drill perpendicular to the wood. Before beginning, make a couple of test holes in a piece of scrap lumber to be sure the holes are the correct depth and width for your dowel pins.
After drilling all the holes, use the mallet to tap a dowel into each hole. The dowel pins should fit snugly, so they stay put.
4 attach optional handle to dibble
This type of dibble is much easier to manage with a screen-door handle centered and screwed on top.