I made the rectangular planter at left with a two-part cardboard box mold (see this page); I made the two round ones with two-part plastic flowerpot molds (see this page).
I made the rectangular planter at left with a two-part cardboard box mold (see this page); I made the two round ones with two-part plastic flowerpot molds (see this page).
Local garden centers abound with cement lawn ornaments, from gnomes to birdbaths to exotic lanterns. Some of these items are very expensive, and most are fairly unimaginative. When you make your own ornaments, you can assess your needs and spaces, and let your imagination run wild while creating exactly what you need in the sizes and shapes that will work in your garden.
Of all the craft materials I have used, cement tops the list as one of the most liberating, durable, versatile—and messy! There are three basic mixtures that can be made from cement (all of which involve mixing in water, too): Cement can be mixed with sand alone to produce durable, smooth-surfaced pieces. It can also be mixed with sand and small stones (aggregate) to make concrete, which yields more textured results than plain cement. And if you add bulking ingredients like peat moss, perlite, or vermiculite instead of stones to cement, the mixture becomes what is called hypertufa (also cast or fake rock), which makes pieces that are much lighter in weight than cement or concrete, with interesting, sometimes stonelike textures.
Learning to work with hypertufa is especially important if you’re interested in making planters and troughs, which you’ll want to be light enough to move (both before and after filling with soil and plants) and somewhat porous, so they hold moisture in the soil while also allowing the plants to breathe. In fact, gardeners have long favored the natural, lightweight, porous rock called tufa for troughs and planters, but it is expensive and difficult to find, which is probably why hypertufa was developed as an inexpensive substitute.
Once you begin working with these mixtures, you’ll be amazed by the variety of things you can make—not only troughs and planters but also candleholders, luminaries, and lanterns; feeders, baths, and houses for birds; stepping-stones; garden sculpture and furniture; and, if you’re really ambitious, even a fish-pond, in-ground sundial, life-sized sculpture, or permanent sand castle. Do a web search for cement or hypertufa, and you’ll find countless web sites offering ideas, recipes, and inspiration.
Whenever you work with cement or hypertufa, you’ll pour the mixture into—or pat it over—a mold of some sort and then let the mixture set and cure. The mixture will, in turn, take on the shape and surface of the mold used to hold or support it while it dries.
Innumerable objects can serve as molds, among them, plastic flowerpots and bowls, cardboard boxes, and large cardboard tubes called Sonotubes, which construction workers use for pouring the footings of buildings. And, if you take a walk through your garage or basement, you’ll find lots of other good possibilities for molds. Plastic, cardboard, and Styrofoam objects generally make nonstick molds that are the easiest to work with. Wooden (usually plywood) molds that are well greased (see Release Agents on this page) and that come apart easily are a good choice for large projects or pieces that you want to make again and again (you can screw, duct-tape, or bungee-cord these plywood forms together, so they are easy to dismantle and remove from the finished cast piece).
Look for molds with straight or slightly tapered shapes, without any undercuts—that is, without ridges or sides that jog in and out, which would trap the mold inside the piece. Far worse and more frustrating than cracking a piece by removing the mold too soon is not being able to remove the mold at all!
Because cement mixtures take on the surface texture of the mold, plastic molds (like flowerpots, waste baskets, kitty-litter boxes, and dishpans) will produce pieces with a shiny, smooth surface, while cardboard molds yield relatively smooth, matte-finish pieces. If your mold has a textured surface, your piece will mirror that surface when dry. Of course, whether the resulting surface of the piece is smooth, matte, or textured, you can wire-brush and/or further texture it after it has completely dried and cured.
Although some people use Styrofoam to build entire molds, I find it messy to cut and not especially strong for most projects. I do, however, use it to make inserts for feet at the bottom of trough molds (see this page), meaning that the planter and its feet are cast together.
In terms of the molds’ durability, wooden forms will last the longest. Plastic flowerpots and other plastic molds will last for dozens of uses, Styrofoam and Sonotube molds can be reused a couple of times, but cardboard boxes are strictly a one-off mold.
Simple sand also makes a good mold for basic curved pieces. The sand can be pushed into a mound and the cement packed over the mound to form a downward-turning cast (like for the large leaf ornament on this page), or it can be hollowed out in a depression or pit to cast an upward-turning form (like for the fairy house roof on this page). The side of the cast in contact with the sand becomes the right side of the completed piece (so the finished leaf turns upward and the finished roof slopes downward). In addition to actually serving as a mold itself, sand can also act as support for a delicate or large separate mold (like a large gourd). The mold is inserted into the sand to keep the mold from cracking from the weight and moisture of the cement.
The key thing to keep in mind when working with sand as a mold is to make sure that it’s thoroughly wetted before you start. Otherwise the sand will draw the moisture out of the mixture too quickly, which can cause the cast piece to crack when it cures. If you don’t want the cast piece to have a sanded texture, simply line the mound or pit with a sheet of plastic.
Take a look around your house and you’ll likely find multiple ordinary objects that can serve as molds. A texturing roller can add interest to a smooth surface.
A walk-through any home improvement store will flood you with ideas for molds: 24"-diameter (61cm) shower pans, plastic footing forms, metal flashing, garbage-can lids, snow saucers, dishpans.
Similarly, houseware, craft, and thrift stores might offer chocolate molds, candle and soap molds, and cookie cutters that make nice additions to larger projects. You can even cast those egg-shaped hosiery containers for some giant eggs to decorate a birdbath.
If you don’t mind the expenditure, faux bois (false wood) molds and surface-texturing rollers can add elegant wood graining to your projects and are available from specialty catalogs. An abundance of molds for edgings and garden ornaments is also available on the Internet (see Sources for Supplies on this page).
release agents—an essential ingredient!
Without some kind of a release agent, you may not be able to remove a piece from its mold when it has cured and shrunk a bit. So, with the exception of cardboard, use a release agent on all your molds to make sure that you can remove them easily, without straining the piece or your patience. Petroleum jelly (the cheap, no-brand kind) works well, as does cooking spray and rancid cooking oil; and some people use WD-40, linseed, and other oils with good success. My current favorite release agent is solid vegetable shortening (I buy a big can every year for holiday baking and save the previous year’s partial can for greasing molds).
I also rely on heavy-duty plastic garbage bags to encase molds that I want to protect. I just put the mold inside the plastic bag and smooth it out, eliminating as many wrinkles as I can so that the bag itself does not get trapped in the cement and become difficult to remove from the finished piece.
WORKING WITH CEMENT AND HYPERTUFA
One of the best things about working with cement and hypertufa is that it is relatively inexpensive and doesn’t require any exotic supplies to get started. Whatever you don’t have on hand can be purchased at the local hardware or home improvement store. The list below should get you started:
• Release agent (solid shortening, petroleum jelly, cooking oil)
• Mixing container: mortar box, plastic barrel, Odjob Mixer
• Molds (see this page)
• Dowels for drainage (or large nails or corks)
• Scraping and sculpting tools, wire brushes
• ½" (12mm) plywood boards to support and move projects
• Spray bottle for misting pieces as they cure
• Plastic bags and table coverings
• Goggles, dust mask/ventilator, and sturdy rubber gloves
Reinforcing materials (like wire mesh, “six-pack” plastic, rebar, or plastic lattice)
Before working with any of the ingredients, you should be wearing eye protection, a dust mask or ventilator, and sturdy rubber gloves. Cover up and avoid breathing the dust that rises when mixing this stuff because it irritates the eyes, lungs, and skin. If you wear contact lenses, always remove them, and wear glasses under your safety goggles. After mixing the dry ingredients thoroughly with water, you can ditch the goggles and mask, but wear the rubber gloves whenever working with any cement mixture to save your hands because cement is extremely drying.
First and foremost, you need some kind of a mixing trough or vat. Hardware stores sell large plastic mortar boxes and many gardening catalogs offer “Odjob Mixers,” plastic barrels with interior baffles that are perfect for mixing enough concrete or hypertufa for a large trough or several stepping-stones. You can use a wheelbarrow for larger amounts, but don’t be tempted to try batches bigger than you have the muscle to mix by hand. Whatever you use for a mixing container, be sure to wash it out as soon as you are through, or it will be encrusted and useless the next time you need it.
For most projects, I use a plastic mortar box and an old garden hoe for mixing. For very large projects (like my sidewalk), I do have an electric mixer, but it is not worth dragging it out of the shed and cleaning it afterwards to mix small batches.
Because the dry ingredients need to be clump-free before mixing them, I use a large sieve (see this page) to sift the dry ingredients, and usually toss any lumps or sticks from the peat moss into my mulch pile. The cement should flow freely from the bag. If it doesn’t, it may have gotten wet and should not be used; but if there are just a few small lumps, use the sieve to remove them.
Most cement and hypertufa recipes simply refer to so many “parts” per ingredient, which is fairly nonspecific, but a part is simply defined by whatever scoop or cup you use for measuring: One part equals one scoop or cupful.
I always try to mix more than needed for a single project, and, for most projects, I use a 2-quart (1.9-liter) plastic food container as a scoop to measure my ingredients. So, while some sources, for example, suggest allowing 4–6 gallons (18–27 liters) of dry mixed ingredients for a large planter, I generally use 6 scoops of each ingredient, which translates roughly into 12 quarts (11 liters) each of portland cement, peat, and vermiculite (see Recipes on this page). At the start, my best advice is to buy large bales and bags of all the materials, mix more than you think you will need, and have extra molds ready to make use of any extra mixture. Take notes as you mix and work, and once you have an idea of how much each project uses, it will be easier to gauge the ingredients for future projects.
I save scoops, plastic jars, and containers to use for scooping up and pouring the mixture into the molds. The term pouring more accurately describes the process for cement than hypertufa, which involves scooping and packing, rather than pouring, the mixture into or onto the molds. In addition to the differences between pourable cement and packable hypertufa, the size and kind of mold you use will also make a difference in how you fill it. For example, since you won’t be able to pack a gourd mold, the mixture has to be somewhat pourable. On the other hand, if you’re using the exterior of a plastic flowerpot as the mold, the mixture has to be stiff enough to pack on and stay in place.
SUPPORTING AND MOVING PROJECTS
A sturdy ½" (12mm) plywood board placed underneath all molds (whether or not they have a bottom) makes it easy to fill them on a messy worktable and then transfer them out of the way to begin curing. The plywood should be large enough to hold the molds with a couple of inches to spare all around.
To move larger pieces, make sure the boards are strong enough and that you have a second person to help. Otherwise, just fill the mold somewhere out of the way where you can leave it to cure because once the mix has just started to set up, you can’t safely move pieces without cracking them. If you try to work and cure on the same table, the work area becomes cluttered with finished pieces, which can be damaged; and it is almost impossible to do a thorough cleanup.
When hypertufa and concrete reach a semi-set stage, they can be carved and refined. I have a bucket full of chisels, scrapers, stiff wire brushes, and scraps of hardware cloth (wire mesh) that I drag across square edges to soften them. Some people use vegetable graters or carpenter’s rasps, and I’m sure you’ll improvise some tools of your own. Cement mixtures are very hard on tools, so don’t expect the tools to be sharp and ready to use for anything else after using them on cement.
I use an old wooden ruler or a narrow board for scraping surfaces flat so that pots (for example) sit straight and true. I use a soft kitchen bowl scraper to smooth inner surfaces and edges that will show, and I also have a metal ceramics scraper with one smooth edge and one toothed edge to use for texturizing surfaces.
It’s always a good idea to provide drainage holes as you make pots and planters to avoid waterlogging the plants you will put in them. I keep an assortment of dowels and large nails ready to insert in pot bottoms as I make them. You’ll need a masonry bit for your drill if you prefer to add holes later (or if you forget to put in the dowels). Hypertufa can also be cut with a saw if you need to, but that doesn’t do much for the saw’s teeth, so plan ahead, and avoid the issues of drilling and sawing whenever possible.
One of my favorite troughs is an early effort that probably wasn’t packed tightly enough or may have had too much perlite or not enough portland cement and, thus has been repaired a couple of times. I cut strips of copper flashing, rounding off the corners and, with a concrete drill bit, drilled through the copper and the trough to secure the strip across each crack with long masonry screws. The best time to repair a crack is before it has worked its way through the wall and broken off completely.
Portland cement is the main ingredient used in mixing cement, concrete, and hypertufa. It is combined in various proportions (see Recipes on this page) with sand and aggregate/stones (for concrete mixes) and peat moss, vermiculite, and perlite (for hypertufa recipes).
Portland cement is readily and cheaply available at hardware and home improvement stores and is usually sold in 94-lb. (42.7kg) bags (1 cubic foot)(0.028 cubic meter), in either grey or white. The white is less common than the grey and usually costs more, but there is no functional difference between the two colors, unless you decide to use dyes or pigments, in which case, the white is the better choice.
Some people use the terms cement and concrete interchangeably, but cement is actually one of the ingredients used in making concrete, which also includes an aggregate (gravel). Cement and concrete are not the same thing, nor are they interchangeable. When buying cement, make sure the bag is not rock hard. If it is, that means that it has already started absorbing moisture and should not be used.
Sand is inexpensive and can be bought wherever cement is sold. It might be labeled builder’s sand, sharp sand, mortar or brick sand, or simply sandbox sand; and while the size of the grains may vary from type to type, any of these sands will be fine for mixing cement, concrete, and hypertufa. If you typically change the sand in your child’s sandbox each year, you might want to recycle last year’s sand for cast projects by sifting it to remove any debris.
If you live near the ocean, do not be tempted to use beach sand for making troughs and planters because the salt will leach out over time and kill your plants (and don’t use beach sand for making a birdbath either—birds don’t like salty water!). For non-plant projects (like a garden ornament or candle holder), however, the salty sand should be fine, and the beach debris may even add a little design interest. And, of course, beach sand can be used as a mold for sand casting.
Hypertufa recipes include varying amounts of perlite, vermiculite, and peat moss (sometimes along with sand) to bulk up the mixture, which, in turn, lightens its weight. These ingredients can all be bought in bulk from garden suppliers and home improvement stores. Perlite and vermiculite can be used interchangeably, differing mainly in how they affect the mix’s color. While perlite is white, vermiculite is greyish and a bit sparkly and may slightly darken the mixture as well as add a bit of shine. Perlite is more readily available than vermiculite, but use whichever one you can find.
To add strength and prevent cracking, most troughs and large projects (like sculpture, furniture, stepping-stones, and pedestals for birdbaths or sundials) should have some kind of reinforcement, either added to the mixture itself or placed in the base or walls of the piece when the mixture is poured. To add a strengthener to the mixture itself, choose between fibermesh (loose polypropylene filaments) or a liquid acrylic strengthener.
To add a reinforcing layer while you pour the mixture, use wire or chicken wire, rebar, hardware cloth (wire mesh), fiberglass scrim (cloth), or galvanized diamond mesh. The plastic holding six-packs of soda cans together, Sheetrock tape, scraps of vinyl trellis, and coarse nylon mesh fabrics also make workable reinforcements. Whatever material you decide to use, cut it to fit the project, making sure it sits at least 1" (2.5cm) from all sides, so it won’t poke through the project’s walls. (The products mentioned above are available either at home improvement centers, masonry suppliers, or online; see also Sources for Supplies on this page).
Cement and hypertufa can be colored with powdered or liquid colorants manufactured specifically for cement. Add dry pigment to the dry ingredients, and add the liquids as part of the water content. You can also paint or stain your finished, cured projects with acrylic paints, special water- or acid-based stains, and cement paints. Color embedded in the surface itself tends to fade less than color painted on afterwards, but sometimes one method might be more practical or effective than the other.
To kill the greyish tones of the cement, you can add some color right from the start. On the other hand, if you just want to add details or embellishment, painting later allows you greater flexibility. If you paint a partially cured surface with watered-down acrylic or latex paint, the pigment and the water content will be absorbed as the piece continues to cure so that the color will penetrate deeper than if painted on a dry surface. And any color will last longer if the surface is sealed with a cement sealer.
For fishponds or other objects that must be totally nonporous and watertight, you can seal cured projects with a product like Quikcrete Acrylic Fortifier and Cure & Seal or Thoroseal. Most projects, however, do not require or benefit from waterproof-sealing. You should, nonetheless, seal stained or dyed surfaces to preserve the color over the long term.
Working with cement mixtures is usually an outdoor project because most of us just don’t have enough space or adequate ventilation to work inside—and it’s a messy business! Ideally, it’s best to work with these materials in the spring or fall when the gardens are less demanding and the weather is cooler. Try to choose a shady spot so that the mixture doesn’t dry out too quickly and you are not so hot and sweaty that the dust clings to every pore.
In the interest of saving your back, always do as much work as you can on tables to avoid bending and lifting from the ground. Cover two sturdy tables with heavy plastic (like plastic drop cloths or contractor-grade trash bags), and use one table for a work surface and the other for holding heavy projects while they cure. If possible, place the holding table in a protected space where it can remain for several weeks to a month (away from heavy rain which can pit the surface of partially cured cement). If you don’t have a protected space, place a large board over your work or place your work under a table.
You’ll also need a source of running water—both to mix ingredients and to hose down the messy work area afterwards—so make sure your hose will reach the work area before setting up the tables and lugging out the supplies.
Cement and hypertufa projects need to cure as slowly as possible, and the best way to guarantee this is to keep them covered with plastic. You can use large garbage bags, dry cleaning plastic, or plastic tarps to cover them. Don’t skimp on coverage, or you are likely to have weak, cracked projects that dried out before they cured.
Make sure to have all of your molds lined up and ready to go before you start mixing the ingredients, while your hands are still clean. I always have ready more molds than I estimate needing because I often have mixed extra material and can at least fill egg cartons or Styrofoam cups to make feet to add to finished pots.
If you make extra pot feet, poke a dowel or long nail into each one, so you can cement them into drilled holes in the bottom of pots later on. You can also fill cookie cutters or small chocolate or candle molds to create decorative details to apply to finished pots with mortar mix or epoxy—and you can fill a couple of plastic TV dinner trays (those without dividers) to use as bases for mosaic plant markers (this page). Whatever you do, just don’t throw the extra cement away!
Besides adding cast cement/hypertufa feet, you can also attach rocks, bricks, small flowerpots, glass balls, or whimsical figurines as feet to the bottom of your pots with glue or strategically drilled holes and wooden pegs. Adding feet to your pots and troughs helps drainage and can also reduce stains on your patio surface.
Over the years I’ve collected many recipes for cement mixtures from books, my own experiments, friends, and web sites. When evaluating these recipes, keep in mind that some ingredients tend to be heavier than others and that their proportions in the mixture will affect the weight and appearance of the finished piece. The end results can range from rough, natural stonelike surfaces to smooth cement. Obviously, the less peat, perlite, or vermiculite you use for hypertufa, the more the pieces will resemble standard cement, which is heavier and less porous than hypertufa.
CHOOSING THE RIGHT RECIPE: For pots and troughs where weight is an issue, I use hypertufa. For casting leaves and stepping-stones, I prefer a plain cement/sand mix because, even with reinforcement, hypertufa tends to be more fragile. Plain cement also allows the texture of the leaves or other details to show more clearly and, for stepping-stones, is longer-lasting underfoot. I only use concrete as a base for mosaic.
AMOUNT OF MIXTURE RELATIVE TO ITS YIELD: Mixing six times my favorite hypertufa recipe will make a large 18" x 12" x 8" (46 x 30 x 20cm) trough and a couple of smaller pots. That amount is also about all I can easily mix in a mortar box. Specifically, that means mixing 6 parts each of cement, peat, and vermiculite, with a part, for me, being the 2-quart (1.9-liter) plastic food-container scoop I mentioned in Measuring and Scooping on this page. Take notes as you mix your first few projects to get an idea of how much mix will complete how many projects—and how much mixture you are easily able to handle.
POT FEET CAST IN AN EGG CARTON
Each of these extra feet was cast with a deeply embedded 3" (8cm) common nail to use for attaching it later to a pot or trough.
ADDING COLORANTS AND/OR STRENGTHENERS: You can add about one ounce of powdered pigment per gallon of dry mixed ingredients to any of these recipes. If you decide to use fibermesh (see Strengthening Agents on this page) for strength, add a handful of it to the dry ingredients. Fluff and separate the fibers before adding them, mixing well after each small addition.
If you use a liquid dye or an acrylic strengthener, add it with the water. The dye or pigment that you buy, if it is specifically for use with concrete, should give exact proportions to use. Too much colorant can weaken a mixture, so follow the manufacturer’s guidelines. You can substitute a cup or two of liquid acrylic strengthener for all or part of the water.
The following recipes are those I use most often and should provide you with a good starting point. If you do a little research, you’ll find that hypertufa recipes vary greatly in whether or not they use sand and in the proportion of the other ingredients to the cement. The hypertufa recipe below is the one I always go back to because it is lightweight, well textured, and reliable.
Adding too much water will weaken any cement mixture, while adding too little will make it crumbly and hard to work with (though the latter is often correctable by slowly adding more water). As a rule of thumb, start by slowly adding 1 part water for each part cement until the mixture reaches the desired consistency.
For most cement/sand mixtures (like the one I use for stepping-stones), the mixture should look like thick cake batter and be pourable, which makes it quick and easy to fill molds.
Cement and hypertufa pots in a variety of shapes and sizes, footed and not, are perfect for alpines, rock gardens and colorful annuals.
For hypertufa, the mixture should look more like stiff cookie dough—thick enough to allow only a little water to escape between your fingers when you squeeze a handful of it. If water runs down your arm, the mixture is far too wet; and if it barely holds together, the mixture is too dry and will be difficult to work with and prone to cracking and splitting. You can always add a little more dry or wet ingredient to correct a mixture, but don’t start adding so much that it throws off the basic proportions of the mix. Once the mixture seems “just right,” let it rest for a few minutes, and then check it again before you begin and readjust it if necessary.
As you pack or pour the mixture into the mold, be sure to release any air bubbles. To prevent having any gaps in the mixture—especially in the walls of a piece, which can give birth to a crack or separation later—periodically tap the mold against the table or whack the side of the mold with your hand or a tool.
Smooth or level the mixture in or on the mold as needed, and wipe up any spills. If at all possible, immediately move the poured pieces out of the way on their plywood support boards, but do not try to move them once they have begun to set. Cover each mold snugly with a garbage bag or sheet of plastic taped or tied in place. The more slowly pieces cure, the stronger they will be, so it is never a good idea to let them dry out quickly. The initial curing will take place in the first couple of days, but most pieces will not be fully cured for several weeks and will actually continue to strengthen as time goes by.
PLANTER MADE WITH PLASTIC FLOWERPOT OR BOWL AS MOLD
The simplest way to create a pot is to pack the hypertufa mixture either into a greased plastic flowerpot or bowl or onto its greased exterior. Both methods are explained below.
• Hypertufa, using 10–12 quarts (9.5–11.4 liters) of each ingredient (see Recipes on this page)
• 1 plastic flowerpot or bowl, up to 12" (30cm) in diameter (beginners are likely to find larger sizes difficult to manage)
• Release agent (see this page)
• 3–4 dowels, cut to 3"–4" (8–10cm) long
• Folded hardware cloth, rasp, or stiff wire brush (optional)
• ½" (12mm) plywood, large enough to support each pot
• Plastic covering for work area
• Goggles, mask, and rubber gloves
See also Sources for Supplies on this page and Tools and General Supplies on this page.
Note: Before starting this project, read Working with Cement and Hypertufa on this page.
Cover the work area with plastic, assemble all materials, and use the release agent to heavily grease either the inside or the outside of the pot or bowl, depending on whether you want to use Method 1 or 2, which produce different effects and are explained in Step 3. This is your mold. Place the mold on a piece of ½" (12mm) plywood to facilitate moving it from the worktable later, positioning the mold with a greased interior right-side up and the mold with a greased exterior wrong-side up.
Put on your goggles, mask, and rubber gloves, and leave them on until all of the dry mixing is done—then keep on the gloves. Use a coarse sieve to remove any lumps from the dry ingredients. Mix the dry ingredients thoroughly, using a hoe and then your hands, and adding the cement last. You will probably need to add 10–12 parts water to the dry ingredients, but add the water slowly until the mixture resembles thick cookie dough. When you squeeze a handful, it should hold together without sending water running down your arm.
3 method 1: pack mixture inside flowerpot or bowl
This method yields a pot with a smooth exterior and a hand-smoothed interior (both of which can be further refined after the pot has cured). With the mold placed right-side up on the plywood (and its interior well greased), start packing the mixture evenly over the bottom. Use your fist to pound and punch out any air bubbles in the mixture; then continue applying the mix to the inside walls. The mixture on the bottom and walls should be about 1" (2.5cm) thick—although larger pots should have slightly thicker (1 ½"–2" [4–5cm]) bottoms and walls.
Finishing up: When you reach the top of the mold, round off the edge of the hypertufa to simplify scraping and shaping it later on (see “Leveling and texturing” in Method 2 below). Then use a plastic bowl scraper or your gloved hand to smooth out the interior surface.
Insert three or four dowels through the mixture at the bottom of the pot, cover the work with plastic, and set it aside for 24 hours. (Because the dowels are short and go through the entire bottom thickness, they will stay put without any additional support.)
method 2: pack mixture on outside of flowerpot or bowl
This method produces a pot with a smooth interior and a hand-smoothed exterior, and, as with Method 1, both surfaces can be smoothed and further refined after the pot has initially cured.
This hypertufa pot was formed on the outside of a 12"-diameter (30cm) plastic mixing bowl, so I could hand-texture its gently sloped sides. I also added feet to the pot using a Styrofoam cross (see this page) on top of the mold when I formed the pot’s base. I sprayed the partially cured pot with dark wood stain, which it absorbed as it finished curing.
With the pot or bowl mold placed upside down on the plywood (and its exterior well greased), begin patting the mixture around the mold, starting at the lower edge. Since this lower edge will eventually be the top edge of your hypertufa pot, make sure the mixture is thick, even, and sturdy enough around this edge to resist cracking or breaking later. Continue packing the mixture against the sides of the mold, making these walls 1"–1½" (2.5–4cm) thick. Then use the flat of your hand or a scraper to even out the thickness of the sides. Finally apply the mixture to the top of the mold (actually its upturned bottom), which can be slightly thicker than the walls, or about 1¾" (4.5cm) thick.
Leveling and texturing: Drag a piece of wood or a sturdy ruler across the top of the pot to make sure it is flat and level since this will eventually be the bottom that your new pot sits on. If you want to cast your pot with feet, add a Styrofoam cross to the top of the mold and then pack the mixture into each of the four recesses (see the illustration in Step 2 on this page).
If you want to texture the outside of the pot, do it now. Use your bare hands to create the texture (see the pot at left) or use any tools that will leave an imprint or interesting surface. You can also embed tiles, marbles, seashells, and similar small objects into the surface. Finally poke three or four dowels through the mixture on the bottom of the pot for drainage. Cover the piece tightly with plastic, and set it aside to cure for 24 hours.
Whether you applied the mixture to the inside or outside of the mold, do not try to remove the mold or the dowels until the piece has cured for 24 hours; and then remove the mold and dowels carefully. Next use a piece of folded hardware cloth (see this page) or a rasp or stiff wire brush to refine and finish the surface texture. Mist the piece with water, cover it again with the plastic, and let it cure for a week or two. After uncovering the cured pot, let it cure another week or two before planting it, but fill it daily with water during this final curing period to leech out the lime from the hypertufa (most plants do not do well with excess lime, and, unless leeched out now, the lime will continue to seep into the soil later).
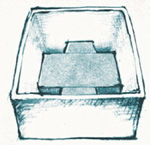
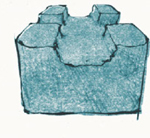
PLANTER MADE WITH TWO-PART CARDBOARD-BOX MOLD
Troughs and large planters are probably the most popular hypertufa projects because they are so impressive when finished—especially for gardeners who have been ogling expensive troughs and planters at the garden center!
Cardboard boxes make excellent molds because they come in a variety of sizes, can be torn away easily from the partially cured project, and are usually free and abundant. Pairs of boxes, with a smaller box set inside a larger one, make excellent two-part molds for large planters because the distance between the inner and outer boxes maintains an even thickness for the planter’s walls. The larger the planter you plan to make, the stronger the boxes should be in order to resist the weight of the wet cement.
• Hypertufa, using 10–12 quarts (9.5–11.4 liters) of each ingredient (see Recipes on this page)
• 2 nesting cardboard boxes, about 2" (5cm) different in size (e.g., 18" x 12" x 8" and 14" x 8" x 6" [46 x 30 x 20cm and 36 x 20 x 15cm])
• Enough sand, bricks, or rocks to fill smaller box
• Wire mesh, 2" (5cm) smaller than length/width of larger box
• 3–6 dowels or sturdy sticks (at least 3" (8cm) long)
• Two-by-four of lumber, about 10" (25cm) longer than height of large box to pack hypertufa
• Stiff wire brush, hardware cloth, or rough rasp
• ½" (12mm) plywood, large enough to hold the mold
• Plastic covering for work area
• Goggles, mask, and rubber gloves
OPTIONAL: Styrofoam; serrated knife; additional wire mesh; dry pigment; strengthening agent (see this page)
See also Sources for Supplies on this page and Tools and Supplies on this page.
Note: Before starting this project, read Working with Cement and Hypertufa on this page.
Cover the work area with plastic, assemble all the materials, and place the cardboard-box molds on the ½" (12mm) plywood to facilitate moving them later. If you want to use wire mesh to reinforce the bottom of the planter, cut it to fit the bottom of the larger box minus 1" (2.5cm) on all sides so that it doesn’t extend to the box’s edges, where it might poke through the walls of the cast piece.
It’s also a good idea to wrap several bands of duct tape around the larger box to help it resist the weight of the cement mixture, which could cause the box’s walls to bow excessively (there’s no need to duct-tape the smaller box since you’ll fill it with bricks and sand in Step 5).
If you want your planter to have feet, cut a cross shape from Styrofoam to fit in the bottom of the larger box/pot, as shown below.
Put on your goggles, mask, and rubber gloves, and leave them on until all the dry mixing is done—then keep on the gloves. Following the directions in Step 2 on this page, mix the ingredients, making the mixture the consistency of cookie dough. If you plan to add any optional dry pigment or fibermesh reinforcer, mix it in thoroughly with the dry ingredients, and then begin adding the water. If you’re using a liquid pigment or strengthener (see this page), remember that it counts as part of the water.
If you’re casting feet for your planter, pack the mixture into each of the four corner depressions in the Styrofoam cross you placed at the bottom of the mold in Step 2, using your fist or the end of a two-by-four to do the packing. Once you’ve packed the feet (or if you are not casting feet at all), pack a generous 1" (2.5cm) layer of the mixture over the bottom of the whole mold.
Place any (optional) reinforcing materials like wire scrim or plastic six-pack soda holders on top of the layer of mixture. Then tightly pack in another 1" (2.5cm) of the mixture over the first layer, covering the reinforcement. The bigger the piece, the more important the reinforcing.
In order to provide drainage holes (instead of having to drill them later in the cured piece), insert three to six dowels into the bottom of the casting and then position the smaller/inner box inside the larger one, on top of the mixture. Make holes in the inner box so the dowels can extend inside it or, better yet, make the holes in the inner box first and then insert the dowels through the box and the base mixture below. Make sure the inner box is equidistant from all sides of the outer box. Fill the inner box with sand, bricks, or rocks to prevent it from shifting or collapsing.
6 pour mixture in space between boxes
Begin packing the mixture between the two boxes to form the sides of the planter, packing as tightly as possible to remove any gaps or air pockets that would weaken the piece. To do this, use a two-by-four, which you can grip firmly and can easily fit between the two boxes.
If the outer box seems to be sagging from the weight of the cement, prop up some cement blocks or other supports around it to help maintain its shape. You will also be able to refine the box’s original shape later with careful scraping.
4–5 REINFORCE PLANTER AND MAKE DRAINAGE HOLES
To reinforce the planter, lay several plastic six-pack holders or wire mesh on top of first layer of mixture before packing in the second layer. Poke dowels through the mixture in the bottom of this box. When removed later, they will provide drainage holes.
When the sides are well packed and as high as you want them, tightly cover the entire project with a large plastic bag or tarp, and set it aside to cure for 24 hours. If you need to move it on its plywood support, you will probably need a second person to help.
8 partially remove cardboard boxes
After 24 hours, the planter will have begun to cure, but it will still be fairly fragile, so proceed carefully: Remove the bricks and sand from the inner box, and then remove the inner box itself. The boxes will be soft and soggy and should be easy to remove. You can peel away the sides of the outer box, but do not attempt to remove the bottom of the outer box or the Styrofoam cross until the piece has cured for at least another day.
At this point, you can start scraping and shaping the planter’s sides: Use a piece of folded hardware cloth, wire brushes, or a rough rasp to round off the squared corners, inside and out. Also smooth and round off the upper edge, and try to taper the lower edge a little before misting the piece lightly with water. If you want to add fancy carving or pierced details, this would be the time to do it. Then wrap the piece in plastic to cure for another 24–48 hours.
9 remove styrofoam cross and refine bottom edges
After two days, gently turn the piece over—ask someone to help if possible because it will be bulky and fragile. Peel away the rest of the cardboard box, and carefully remove the Styrofoam cross. You may have to pry it off in pieces, but be careful not to disturb or weaken the feet. Twist the dowels gently to remove them, and make sure their holes go all the way through the base.
Now you can finish scraping and refining the planter’s lower edge and the feet. When you are satisfied with the planter’s overall shape, give the whole thing a good brushing with a stiff wire brush to soften the surface, add more texture, and remove any remains of the cardboard boxes. The brush is apt to remove raised bits of peat or perlite, which will add to the planter’s more natural, stonelike appearance. You can also texturize the surface by carving into it, but be careful not to put too much pressure against the walls, or you might crack them. Make sure the dowel holes are still open and free of debris.
Mist the planter lightly with water, cover it again, and let it sit, undisturbed, for about a week. After that, you can loosen the covering, and let it continue to cure slowly. It will begin to feel hard and dry in a couple of days (depending on the weather), but it is not yet fully cured. Uncover the piece, and fill it daily with water for a couple more weeks to leech out the lime in the hypertufa, which can harm your plants (the water will drain out of the holes you made in the bottom of the planter). It usually takes about a month for a planter to be fully cured and ready for soil and plants.
6 PACK MIXTURE BETWEEN TWO BOXES
Use a two-by-four to tightly pack hypertufa mixture between boxes to form the planter’s walls.
This millstone is part of the stone wall in my woodland garden. The ferns took it upon themselves to start growing through the stone’s empty center.
The millstone can be placed upright in a stone wall or used as a stepping-stone. When I use these cut-out stepping-stones in walkways, I usually plant the centers with “step-able” thyme or Irish moss. Stepping-stones can be embellished by arranging a mosaic in the mold bottom (like the bottle-cap effect on this page) or by adhering tiles to a finished, cured piece. I especially like imprinting cement by lining the mold bottom with leaves that have distinct veins that will leave a deep impression in the stone surface. When I use millstones in stone walls, sometimes I leave the surface smooth, and other times I try to reproduce the marks that a stonecutter might have made with chisels.
• 5" (13cm) slices of 15"-diameter (38cm) Sonotube, 1 slice for each millstone*
• Square plastic flowerpot with 4"-diameter (10cm) bottom
• Basic cement mixture (about 3 quarts [2.8 liters] cement to 9 quarts [8.5 liters] sand; see Recipes on this page)
• 13"-diameter (33cm) circle of metal mesh or other reinforcement material, with center cut out to fit 4" (10cm) pot
• Release agent (see this page)
• Plastic covering for work area
• Stones or bag of rocks, to weigh down flowerpot
• ½" (12mm) plywood, large enough to hold mold
• Goggles, mask, and rubber gloves
See also Sources for Supplies on this page and Tools and General Supplies on this page.
Note: Before starting this project, read Working with Cement and Hypertufa on this page.
* Keep in mind that you can follow these instructions to make an ordinary stepping-stone (without a hole in the center) by skipping Step 2. As alternate molds, consider trash-can covers, shower pans, Styrofoam cutouts, and rings of aluminum flashing. Some garden catalogs and web sites offer multipart molds that look like flagstone, brick, or bluestone. You can also pour cement directly into shapes you dig out of the ground, but be sure to thoroughly wet the dug-out ground and surrounding area since dry ground would otherwise absorb the water from the mixture.
Cut a 5" (13cm) slice of Sonotube for every millstone you want to make, working outside since this is a messy job. Grease the inside of the Sonotube ring with a release agent, and place the ring on the ½" (12mm) plywood. Tape the ring’s outer edge to the board to keep it from shifting and to minimize leakage.
To mimic a classic millstone with a cutout center, grease the outside (but not the bottom) of a square plastic flowerpot with a 4"-diameter (10cm) bottom; then fill the pot with stones or a bag full of sand, tape a folded piece of duct tape underneath, and place it in the center of the Sonotube ring.
If, instead, you want the stone to have an interesting surface texture without the cutout center, arrange a couple of well-veined leaves or fern fronds on the bottom of the Sonotube ring, and skip the flowerpot.
SETUP FOR CASTING A MILLSTONE WITH CUTOUT CENTER
Secure the bottomless Sonotube ring to the plywood with duct tape, and position the plastic flowerpot at the center, with a large, folded duct-tape loop underneath to stabilize the pot (if you placed the tape on the sides of the pot instead, the tape would get covered by the cement and leave an imprint on the stone’s surface).
Put on your goggles, mask, and rubber gloves, and leave them on until all the dry mixing is done—then keep on the gloves. Follow the general directions in Step 2 on this page to mix the ingredients, using enough water to make the cement mixture the consistency of thick cake batter. Slowly pour the mixture into the mold. If you have placed a square flowerpot in the center, hold it steady, so it does not shift as you begin to pour the mixture around it. If you placed leaves or ferns in the bottom of the mold for texture, use a small cup to drizzle the mixture over this material first to anchor it, before filling the ring with the mixture.
When the ring is filled about halfway, insert the metal mesh or other reinforcement material that you’re using. Then finish filling the ring with a second layer of the mixture. Use your hand or a two-by-four piece of lumber to whack the side of the ring to dislodge any air bubbles in the mixture. Then cover the piece, and allow it to cure for 24 hours.
Carefully remove the ring and the plastic pot. Use a rasp or another scraping tool to refine the edges, as needed. Mist the piece lightly with water, and cover it tightly with plastic to cure for a couple of weeks before installing and walking on it.
I always use a cement mixture for casting leaves and include some kind of reinforcement (like wire mesh) to strengthen these nearly flat, open pieces. This leaf is about 20" (51cm) long and 14" (36cm) wide.
Elephant ear, rhubarb, and large hosta and pumpkin leaves can all be cast for birdbaths and feeders, splash pans for downspouts, and beautiful garden ornaments. I use somewhat smaller squash and grape leaves for roofs for the whimsical “fairy houses” tucked under the plants in my shade garden (see this page). The size of the leaves you have available determines what you can cast with them, but, whatever their end use, pick leaves with simple shapes and pronounced veining that will imprint the surface of the wet cement—and do not pick the leaves until you are ready to use them.
It’s important to decide in advance how you’ll use the leaves and make any adjustments or additions necessary while casting. For example, when I cast large leaves, I almost always include a spike in the casting to anchor it in the garden or to sit it atop a post; and when I cast a roof for a fairy house, I make sure there is an anchoring knob of cement on the underside of the leaf so that the cast roof will stay put on top of the house. It is generally easier to incorporate findings or hardware right into the cement as the piece is being cast than to start drilling and adding spikes or knobs to the completed piece.
• 1 large, well-veined leaf, with stem trimmed close to leaf
• Packed mound of moist sand, large enough to support leaf plus several inches around it
• Thick batch of basic cement mixture (about 3 quarts [2.8 liters] cement to 9 quarts [8.5 liters] sand for large leaf; see Recipes on this page)*
• Release agent (see this page)
• Scraps of wire mesh or other reinforcement material
• ½" (12mm) plywood board, large enough to hold mound of sand without it spilling off edges
• Plastic covering for work area
• Goggles, mask, and rubber gloves
OPTIONAL: Large-headed spike to embed in piece for later mounting (10" [25cm] or 12" [30cm] galvanized log-cabin spikes work well)
See also Sources for Supplies on this page and Tools and General Supplies on this page.
* While some people use hypertufa for casting leaves, I prefer a smoother cement mixture, which produces sturdier cast leaves with more pronounced veining and texture.
Note: Before starting this project, read Working with Cement and Hypertufa on this page.
On plastic-covered plywood, pack a mound of moist sand large enough to support the entire leaf with an extra 1" (2.5cm) or so of sand extending beyond the leaf. Lay the leaf on top of the sand with the back veined side facing up towards you. Lightly spray the back of the leaf with cooking oil to facilitate removing it later on. If you don’t want the sand’s texture to appear on the edges of the cast leaf, cover the sand with plastic wrap or a plastic bag before positioning the leaf. (Alternatively, if you want just the very edges of the cast leaf to have a sandy texture, don’t cover the sand, but do extend the cement you pour over the leaf in Step 2 just beyond the leaf’s edges into the sand around it.)
Put on your goggles, mask, and rubber gloves, and leave them on until all of the dry mixing is done—then keep on the gloves. Follwing the directions in Step 2 on this page, mix the cement and sand with just enough water to hold the mixture together when you squeeze a handful tightly. Begin packing the mixture over the leaf so that it’s about ¾"–1" (2–2.5cm) thick and tapering only slightly towards the edges so that they are not too fragile.
To prevent such a large, relatively flat piece from cracking, next add a layer of small, overlapping pieces of wire mesh to reinforce the piece, positioning the mesh several inches in from all edges; and then cover the wire mesh completely with another ¾"–1" (2–2.5cm) of the mixture. Pay special attention to the point where the stem meets the leaf, making sure to apply enough material to avoid this weak spot—especially if you want the cast leaf to hold water.
3 insert mounting spike (optional)
If you want the large cast leaf to be elevated in the garden, sitting atop a post, for example, rather than lying flat on the ground, you can cast the piece with a firmly attached mounting spike. To do this, first poke the spike through a 3" (8cm) square of metal mesh so that the mesh rests against the head of the spike. Next place the mesh, spike-head-side down, on top of the first 1" (2.5cm) of cement mixture (along with the reinforcement material for the rest of the leaf), and then bury it completely by applying the second 1" (2.5cm) layer of mixture over the leaf. It usually looks most natural to position the spike near the point where the stem joined the leaf. Note that this can be a weak point if you bump into the projecting spike before the cement has set firmly, so use caution.
After adding the second layer of mixture over the leaf, cover the project with plastic, and allow it to dry for 24–36 hours. Then carefully turn the piece over, and begin peeling the leaf away from the cement.
Depending on how pronounced the veins are, the leaf might peel off cleanly. If not, use a craft knife, knitting needle, or a pointed stick to trace the veins and clean out any stubbornly clinging bits of leaf, and gently brush the surface to remove the debris. Any debris that doesn’t come out easily will eventually dry and can be brushed away. At this point, take a good look at the casting’s surface while you can still make some changes to it by scraping or smoothing it. If you want, you can also use a craft knife to enlarge the veining and make it stand out. Use a scraper or rasp to refine the edges of the leaf, if necessary. Cover the leaf, and let it continue curing for another day. Then do any final scraping or surface texturing. You can also drill through the leaf with a masonry drill bit if you want to add a small detail (like a cast bird or flower) or if you plan to screw it onto a mounting post to raise it high above the plants. Mist and cover the leaf tightly for a week or so, and then loosen the covering to let it continue drying for several weeks or as long as possible. If your leaf will be used as a birdbath, fill it daily with water during the final weeks of curing to help leech out the lime. When it is fully cured and dry, consider coating it with a sealant (see this page).
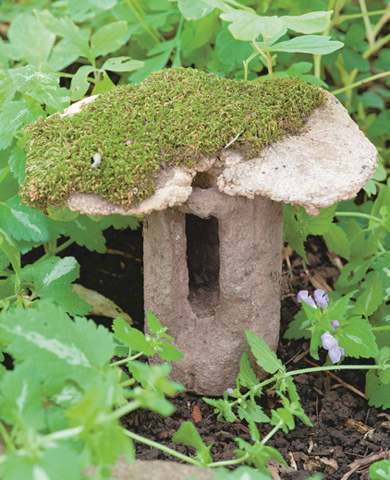
Moss placed on the cast-leaf roof of this fairy house has continued to grow and spread, helping the fairy house blend into the plants surrounding it.
Crickets and other garden insects, rather than fairies, seem to inhabit the little houses I have tucked into corners of my shade garden, but I like the whimsy and possibilities for magic that these houses add to the beds. Moss, lifted from the surrounding ground and placed on the roofs, has thrived with little more than an occasional watering and marries the houses to the garden.
The fairy house is constructed like my planters (see this page), except that instead of two cardboard boxes as a two-part mold, I use a pair of cardboard tubes in different sizes. (I usually keep a couple of tubes on hand when pouring large projects just in case I have extra mixture.)
• 5"–6" (13–15cm) length of 3"-diameter (8cm) cardboard mailing tube (for outer container) and equal-length paper-towel tube (for inner one)
• 1–2 cups (236–472ml) of cement or hypertufa mixture (see Recipes on this page)
• 6"–7" (15–18cm) squash, grape, or hosta leaf for roof
• Sand to support leaf casting
• Goggles, mask, and rubber gloves
See also Sources for Supplies on this page and Tools and General Supplies on this page.
Note: Before starting this project, read Working with Cement and Hypertufa on this page.
Place the larger tube on the plywood board, taping the tube in place with a couple strips of duct tape. Center the cardboard paper-towel tube inside the larger tube.
Put on your goggles, mask, and rubber gloves, and leave them on until all of the dry mixing is done—then keep on the gloves. Following the general directions in Step 2 on this page, mix the cement or hypertufa to resemble cookie batter. Then pour/pack the mixture between the two tubes, using a dowel to help pack it down and release any air pockets. Cover the tubes with plastic, and set them aside.
Prepare a bed of moist sand with a depression (rather than a mound) in the top to hold the leaf in an upward curve. Lay the leaf on the sand with the veined side facing the cement, and spread an even coating of the mixture to cover it. Remember, if the cement mixture spreads off the leaf, it will pick up some of the sand, which might add a little interest to the cast leaf’s edges.
To help the roof stay put when you install it on top of the house mound up some mixture at the center of the leaf so that it forms a small knob about 1" (2.5cm) high. Cover the leaf and knob completely with ½" (12mm) of the mix. Cover the roof with plastic, and set it aside to cure for a day or two.
Carefully peel the cardboard tube away from the outside of the house, and remove the inner tube if you can (and don’t worry if you can’t!). Peel the leaf away from the roof. Place the roof on top of the house, and set it in the garden. Moss is optional.
Dried gourds make terrific molds for both cement and hypertufa. The best gourds to work with are those with hard, thick shells. But if the gourds you are working with—whether you grow and dry them to use the following year, or purchase them dried from a grower’s web site (see Sources for Supplies on this page)—are not thick-shelled, they will likely crack, allowing the mixture to run out the bottom, unless you support the gourds in a bucket of sand!
• Large dried bottle, birdhouse, or canteen gourd (avoid gourds with narrow necks)
• Cement or hypertufa mixture (see Recipes on this page)
• Bucket of sand deep enough to surround gourd
• Plastic covering for work area
• Goggles, mask, and rubber gloves
See also Sources for Supplies on this page and Tools and General Supplies on this page.
Note: Before starting this project, read Working with Cement and Hypertufa on this page.
Cut a 2"–2 ½" (5–6.5cm) hole in the bottom of the gourd to remove all of the seeds and fibers inside. Give the gourd a good shaking before you cut it to loosen up the seeds and fibers inside, and then use your fingers, a pair of long tweezers, or toast tongs to pull out whatever doesn’t just pour right out the hole.
Place the gourd (top down/hole up) on a couple of inches of sand in the bottom of the bucket, and then carefully fill the space around the gourd with enough sand to support it entirely.
3 fill gourd with cement mixture
Put on your goggles, mask, and rubber gloves, and leave them on until all of the dry mixing is done—then keep on the gloves. Following the general directions in Step 2 on this page, mix the cement or hypertufa recipe to the consistency of thick brownie batter so that when you scoop it through the opening in the gourd, it will be fluid enough to settle into any curves and fill out the shape. If the mixture is too wet, it won’t set properly, and it could cause the gourd itself to leak or crack, even with the sand reinforcement. If your gourd has a narrow or curved neck, pay extra attention to filling it slowly, and use a chopstick to gently push the mixture into the space. Firmly tap the side of the bucket a couple of times to help the mixture settle evenly. If you plan to stack several gourds to form a cairn as shown at right, you can cast the top ones with large-headed nails protruding from their bottoms. Embed the head of the nail in a small piece of metal mesh to prevent it from dropping down inside the casting and add it last, after filling the gourd shell. Add a little more mix on top of the mesh to secure it.
Cover the bucket with plastic for a day or two; then remove the gourd from the sand, and peel away the gourd. If you want to stack several of these gourd casts, use a masonry bit to drill holes for the nails to drop into and then assemble.