The Tools of Lighting: Seeing the Power
Lighting is really just electricity made visible, so we will start by trying to understand what electrical power really is. Then we will follow the flow of electricity through the theater, past the dimmers and the control console, through cables and plugs, and into the instrument itself, where it will change to visible light inside the lamp. Then we will bounce off reflectors, pass through lenses and color media, and finally land on the stage and provide illumination for the show.
The Birds and the Bees: Where Does Power Come from?
What is electricity?
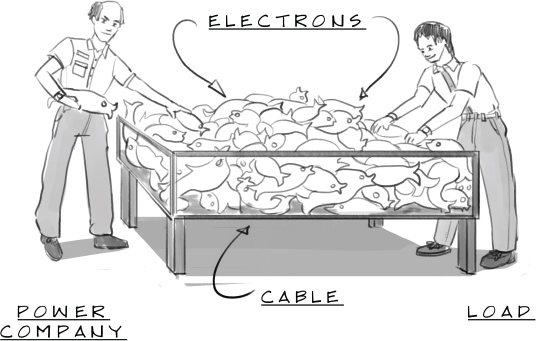
Okay, an analogy: when I lived in Seattle, we used to go down to the fish market where all the tourists hang out and buy fresh fish. The shops had these long tanks full of fish, and whenever somebody wanted one, the sales guy would reach in with his bare hands, yank one out, and toss it over the heads of some surprised tourists right into the hands of another guy by the cash register, who would wrap it and sell it, singing in Sicilian the whole time. It was pretty impressive, but even more impressive when you consider that is how electricity works. Imagine a long tank full of fish. I mean, really full. Imagine a tank so full that you could not put one more fish into it. Absolutely jammed. Now imagine that the sales guy down at one end reaches in and pulls one fish out. With one fish removed, there is room for another fish. Now imagine that there is a fisherman who pulls up to the other end of the tank with his catch of the day. He sees that there is room for one more fish in the tank, so he dumps a fresh one in. Only he does not stop there. He keeps trying to force more fish into the tank. No matter how hard he pushes, though, he will not be able to get another fish in the tank until the sales guy down at the other end pulls one out. The fisherman keeps trying, though, and every time the sales guy pulls a fish out, the fisherman succeeds in getting a new one in. Sometimes, the fisherman pushes so hard that, when the sales guy reaches into the tank, he comes up with not one fish, but two, or three. In fact, if the fisherman pushes really, really hard, the sales guy might be overwhelmed by fish when he reaches into the tank.
This is electricity.
Fig. 22. How electricity works
Confused? Of course! Okay, the fish are electrons, and they are swimming around inside the fish tank, which is a cable. The fisherman is the source of the electricity, which means that he is the power company. The sales guy is the load—the thing that is using the electricity. He could be a stereo, a toaster, a clothes dryer, or a theatrical lighting instrument. It does not matter. A load is a load. The load (the sales guy) is pulling electrons out of the cable. He is using electricity. (The guy at the cash register singing in Sicilian does not figure into this analogy. I only put him in for local color.)
This analogy breaks down in one important place. Power requires a round-trip ticket—a circuit. There must be a complete path from the power source to the load and back again to make a circuit, and there must not be any breaks along the way. That’s why, if you look at any electrical plug, there are always at least two prongs. One sends the power into the load (the “hot” line), and one takes it back to the power company (the “neutral” line)2. I could improve the analogy, I guess, by having the sales guy throw the fish back into the ocean for the fisherman to catch and bring back to the market, but let’s not split hairs.
If the circuit is broken at any point, no power will flow, no matter how hard the fisherman pushes or the sales guy pulls. The simplest way to break a circuit is something we do every day—turn a light switch off. Turning the switch off creates a physical break in the circuit and interrupts the flow of power. Imagine sliding a wall across the fish tank, preventing the fish from swimming from one end to the other.
There are actually two different ways that the electrons can complete their trip back to the power company. The first is by following the neutral line back to the power company. The second is by going to “ground.” The planet we are on is itself a giant electrical device with its own electrical field that is connected to all the power companies in the world.3 If an electron can escape an electrical system and connect with that electrical field, then it can almost instantly find its way back to the power company and start a new trip. Typically, this is not a good thing, because as soon as the electrons start escaping the system and flowing into the ground, electricity will flow unimpeded through the system, which can and will fry your equipment.
So how do you prevent the electrons from escaping the system? By wrapping each piece of the system in something that does not conduct electricity, like rubber, plastic, or concrete. If electrical power comes into contact with something that does conduct electricity, like water, then the electrons will gleefully jump out of the system, swim through the water, and connect with the earth. If that water happens to be inside your body, that flow of electrons will (at best) hurt you or (at worst) kill you.
In other words, if you unwrap a live electrical cable and grab ahold of it (DO NOT DO THIS), the frolicking electrons will jump out of the system and pass through your water-filled body on their way to the party at ground. They will have a festive road trip. You will be electrocuted.
More in a minute about how to protect yourself from gleeful electrons, but let’s get back to that fish tank.
There are three terms that we use to describe how the fish move through the tank, or how the electrons move through the cable. The wattage is how many fish (electrons) the sales guy (load) can pull out at a time, and it is a function of how big he is. All loads, whether they be lighting instruments or toasters, are rated in watts. A big load pulls more electrons than a small load. A five-hundred-watt lamp pulls more fish than a two-hundred-watt lamp.
The voltage is how hard the fisherman (power company) is trying to push fish into the tank. Voltage describes how much pressure is being put on the electrons in the cable and, in turn, on the load. All power sources, from the power company to a AAA battery, are measured in volts. If the voltage is too high and the load is not strong enough to deal with it, it may be overwhelmed, as the sales guy could be overwhelmed by the fisherman pushing too hard. When this happens, the load may burn out. All lamps will burn out sooner or later, but higher voltage shortens their working life. If the voltage goes really high, the load will burn out instantly.
Every load is designed to work with a particular voltage. In the United States, the power company is pushing around 115 fish, uh, volts, so lamps sold for use in this country are designed accordingly. In Europe, the power company is pushing around 220 volts, so the lamps must be built to handle more power. This is also why you have to take a voltage adapter with you when you travel with appliances that are made only for use in the United States. The adapter sits between the power company and your hair dryer and takes some of the pressure off.
The third term describes how quickly the fish are moving through the tank. This is amperage. The cable (the tank) is rated by how many amps it can handle at one time. If the voltage goes up (the power source is pushing harder), so will the amperage. Likewise, if the wattage goes up (the load is pulling harder), that also forces the amperage up. No matter how far up the wattage goes, the power source will just keep throwing more electrons into the cable as fast as the load pulls them out. This can lead to an overload situation, where the power company and the load are pushing and pulling so hard that the cable itself is in danger of being damaged. This can result in the cable breaking down, and it is a major cause of fires. That is one reason why we have circuit breakers and fuses. These two devices work differently, but they basically do the same job: they monitor the flow of power, and if the flow of power gets too high, they shut down the system by breaking the circuit. We will talk more about fuses and circuit breakers in a minute, but for right now just remember that fuses and circuit breakers, like cables, are rated in amps.
To review: loads are rated in watts (w), power sources are rated in volts (v), and devices that carry, switch, or monitor electricity are rated in amps (a).
These three terms—wattage, voltage, and amperage—are related to one another by a simple formula known as the “West Virginia” law. It says: Wattage equals Voltage times Amperage, or W = V × A.
Let’s try a few problems. Say you have some 100 w lamps plugged into a circuit with a 15 a fuse (a common size in most houses). How many of the lamps can you plug into the circuit before the fuse blows? Fill in the formula (remember, the power company in the United States provides 115 volts):
W = V × A = 115 v × 15 a = 1725
You can put 1725 watts into the circuit, so you can plug in seventeen 100-watt lamps with a few watts to spare. The eighteenth one will trip the fuse.
How about trying it from the other direction? Say you have three 250 w lamps and you want to know what size cable you need. First, add up the loads:
3 × 250 w = 750 w
Now, solve the formula for amps. (Time to remember your tenth-grade algebra. Divide both sides by volts):
W = V × A
W/V = A
Fill it in:
750 w/115 v = A
Do the math:
A = 6.5217391304
Yeesh! Save me from that kind of number. Of course, you can round off your answer to find you need a 7-amp cable, but you still have to carry a pocket calculator around to do the long division (at least, I do).
Or, you can do the whole problem an easier way.
You can still use the West Virginia law, but with a slight change. If you are in the United States, just assume that the power company is putting out 100 volts. It will make the numbers come out a little high, but that is okay, since it will make us a little more conservative. Look what substituting 100 volts does to the problem above:
A = 750 w/100 v = 7.5
When you divide by 100, all you have to do is move the decimal two places to the left, and you are done. Now your answer says that you need a 7.5 a cable, which is a little bigger than before, but we can call the difference a safety margin. So, we now know that, rather than bothering with the formula at all, we can just add up all of our loads and move the decimal place two spaces to the left to get our answer. Try it again. Let’s say that you have two 500 w lamps and you want to know how big a cable you need.
Add up the loads:
2 × 500 w = 1000 w
Now, move the decimal over two places to the left. Your answer is 10 amps—1,000 watts equals 10 amps.
So, if you know how many watts you have, just move the decimal over two places and you will know how many amps you need. Likewise, if you know how many amps you have, just move the decimal two places to the right to find out how many watts you can plug in. You can also just say “hundred” after you say the amperage, that is, if you have an 18-amp cable, you can plug in 18 “hundred” watts.
Of course, like any kind of mathematical formula, this one gets much easier after you work with it for a little while. Besides, lighting is standardized, so there are some amounts that you will get used to. For example, most stage cable is 20-amp cable, so you can plug 2,000 watts into it. Or how about this one? Many stage lights are 500 watts, so that means they need 5 amps apiece. Are you with me? Great!
Last one: Suppose you are doing a show in a hotel ballroom and the hotel electrical guy tells you that he will put a 30-amp power strip out in the room for you to plug your lights into. You call the lighting rental company, and they say that they have lots of 500 w instruments and how many do you need? Using the “West Virginia” rule, figure out how many instruments you can plug in that power strip.4
Enough math! (Don’t worry, it comes easy with a little practice.)
Protecting Yourself: Circuit Breakers and Fuses
Time for another field trip. This time, we are going to a circuit breaker panel. When you open up the front panel, you will be greeted by one or two rows of black switches. If the installer did his job properly, there will be a list on the inside of the door saying what each switch is controlling.
If you are as old as I am, you may remember when houses had fuse boxes, which served the same purpose. Rather than a row of black switches, you would see a row of round knobs with little glass windows in front. We’re going to talk about fuses a bit more later, but it’s safe to say that, if you are living in the twenty-first century in the United States, then the power flowing into your house is going through a circuit breaker panel.
So why are there circuit breakers in the electrical system? Two reasons.
First, a short circuit. As I mentioned before, electricity must follow a complete path from the power company to the load and then back to the power company, either through the neutral or through the earth. A short circuit means that the wires going toward the load somehow get connected, or “shorted,” to the wires moving away from it, thereby cutting the load out of the circuit entirely. This means that there is now an uninterrupted path from the power company, through the cables, and right back to the power company—without any of the power being “used” by a load. This can happen if a cable gets damaged, or if you stick a paper clip into both sides of an electrical outlet. (Safety note: do not do that either.) Electrons are like Ferraris on the Autobahn—they do not pay attention to speed limits. When a short circuit is created, the jubilant electrons start whipping through the circuit at light speed, causing an unrestricted, almost infinite, flow of power. If the circuit is not cut off, right now, you are in danger of the wires heating up and catching fire. A circuit breaker is built to monitor the flow of electricity, and if the flow of electricity suddenly skyrockets, the circuit breaker will “trip,” switching the circuit off immediately. Whew.

The second thing reason you need a circuit breaker is an overload—when you have too many things plugged into one circuit. Remember our West Virginia formula? The bigger your load, the more amps will flow through the circuit. Circuit breakers are designed to keep a close eye on the flow of power through the wire. If it drifts above the rated limit on the circuit breaker, the switch will turn off, breaking the circuit and preventing damage.
As I mentioned, electrical systems used to rely on fuses to provide this protection, but they were a bit awkward, because when a fuse “blows,” it has to be replaced. A circuit breaker just needs to be reset once you have removed the cause of the problem.
Fuses do have one slight advantage, which is why you will still see them in use in a few places, like in your car. Fuses react more quickly to short circuits, making them a bit safer, particularly at very low and very high voltages. However, they are not as precise as a circuit breaker, which can be designed to trip at an exact voltage.
Some kinds of theatrical equipment (like dimmers or control consoles) have both fuses and circuit breakers. The fuse protects against short circuits (when you need a fast cutoff), while the circuit breaker watches for overloads (because it can monitor them more precisely).
If you have a licensed electrician working on your house or theater, ask him to call you when he opens up the circuit breaker panel. Do NOT open the panel yourself. There is more than enough power in there to kill you.
When the cover is off, look up at the top for one or more soda can-sized tubes. Those are the main fuses for the electrical system. They are designed to blow really, really fast in extreme situations, like lightning hitting the power pole down the street.
If you do get someone qualified to open the panel, have a look inside. A breaker panel is like a freeway interchange. It is a way to split up the incoming traffic into lots of different, smaller roadways.
There are three big wires coming into most breaker panels (four or five if you are looking at a large industrial panel). These are the red hot line, the black neutral line (sometimes called the “common” line), and the green ground line. (In large panels, there are sometimes additional “hot” lines.) The hot line brings the power in, and the neutral line takes it out. We’ll get to the ground line in a minute.
The hot line, which can be upwards of 200 amps (quick: how many watts?5), runs right down the center of the panel. Sticking out from it are a number of “exits,” little metal tabs that are connected to one side of all the circuit breakers. The circuit breakers are smaller (15–30 amps), so each circuit can only handle a small portion of the available “traffic.” The power leaves the hot line, passes through the breaker, goes out of the panel, travels through the walls of your house, and finally hooks up to one side of an electrical outlet. When you go into your bedroom and plug in your clock radio, the plug takes the power and sends it up to the clock, where it passes through a bunch of electronics and makes those little numbers change. Then the power goes back down through the cord, into the other side of the outlet, and back to the breaker panel. All of these returning lines are collected together at a long metal strip, where they are attached to the neutral line that is heading back to the power company. As long as the breaker in the panel and the clock radio in your bedroom are on, there is a complete circuit from the power company, into your house, through your clock radio, back to the panel, and out to the power company. Just one big power commute.
You also might notice a few breakers that are double-size, that is, twice as big as the rest. These breakers take up two “exits” from the power freeway, and they are there to provide power for some of the big power eaters in your house, like your hot water heater, or the dryer. You might also have a really big breaker that shuts off the whole house.
Protecting Your Equipment: Surge and Spike Protection
Circuit breakers and fuses are not the whole protection story. If you have electronic devices like computers, stereos, televisions, and so on, you should also include two other kinds of protection in your system: surge protection and spike protection.
While the level of power coming from the power company is pretty reliable, there are inconsistencies, and sometimes the power will float a little above or below 115 volts. Circuit breakers guard against fluctuations in amperage, not voltage, so they won’t guard against this problem. Surge protection guards against these changes in voltage, which can damage electonic equipment. If you have a lot of really critical electronic equipment, you should explore power conditioners, which take whatever is thrown at them and put out a steady, precise 115 volts. This is unnecessary for most of us, but critical computer installations, sound studios, and other highly electronic environments should invest in them.
Besides these small fluctuations, there might also occasionally be a large, fast jolt of power caused by a lightning strike or some other momentary problem in the power grid. These “spikes” can go as high as 10,000 volts, if only for a fraction of a second, and they can easily take out a computer, so a spike protector is a good investment.
Surge and spike protectors usually come bundled together in the same device and often are built into a multi-outlet power strip. Their quality and reliability varies, however, so spend some dough and get a good one. It does not make sense to trust a five thousand-dollar stereo to a ten-dollar spike protector.
Protecting Both You and the Equipment: Grounding
Remember how I said that electricity could get back to the power company by going through the ground? In fact, electricity prefers this route because it is the fastest and easiest way to get home. Hence, electrical system designers go to great lengths to prevent electrons from catching the express train. Enter grounding.
Electricity runs through your theater in copper wires, which are wrapped in rubber sheathing to make an electrical cable. That cable, in turn, runs through metal conduits and junction boxes as it makes its way to every light and power outlet. Now let’s say that the rubber sheathing on a cable gets old and breaks open, exposing some bare wire. And let’s say this bare wire brushes up against one of those metal junction boxes. Instantly, at the speed of light, the power from that cable travels throughout the building, turning every conduit and junction box into a living, breathing viper of electrical venom. As soon as you or anyone else touches any piece of metal in the system, the electrons scream with joy, jump into your body, and do very nasty things to your heart. Like stop it.
It is for this reason that every electrical system has a wire attached to a long pole that has been driven down deep into the earth. This is the ground wire, and it can save your life.
Remember, electrons are looking for the fastest, easiest way out of the the system, so when that bare wire comes into contact with the electrical junction box, the electrons make the jump to light speed and enter the metal side of the box. Fortunately, that box is connected to the ground wire, which is directly connected to the pole driven into the earth. The electrons jump to the wire, then travel deep down into the earth and join their friends in the earth’s electrical field, rather than joining their friends in your bloodstream and killing you dead.
By offering an easier way to get to the ground than through your body, the ground wire keeps you alive and well. Thank you, ground wire!
That’s also why a modern electrical socket will almost always have a third pin: it’s connected to the ground wire. If your appliance has a three-pin plug, that means that a short circuit inside your equipment will be harmlessly shunted through the third pin on the plug, onto the ground wire and down into the earth.
Of course, the short circuit will still trip the breaker. Nothing can (or should) prevent that, but at least you will be spared the brief intrusion of hundreds of volts of electricity into your body.
It is for this reason that you should never, ever cut off the ground wire on a piece of electrical equipment, even if you are trying to use an older two-pin outlet. Get an adaptor for your three-pin plug that allows you to connect to the screw in the center of the wall outlet. That will maintain the ground and possibly save your life.
Highways and Byways: Outlets and Plugs
We can get this one out of the way in a hurry, and a good thing too. Boring.
Plugs and outlets go together, so let’s deal with both at once. In the modern American theater, there are three types of plugs. The first one—the Edison plug—is the one you see in your house. It is easy to plug in, commonly available, and cheap. It lacks toughness, however, and it cannot handle a huge amount of power, so it is limited to smaller uses, like toasters and televisions.
Most theater applications use one of the other two kinds of plugs. If you are using rental equipment, it is important that you get all of one kind, because they are not compatible. The first is the stage pin plug, also called the three pin or stage plug. Stage pin plugs are tough, durable, and can handle lots of power. I highly recommend taping stage pin connectors together with gaffer’s tape. Do not use duct tape or masking tape—it will melt, and then you’ll have gooey glop all over your pretty black plugs.
The third and, in my opinion, best kind of plug is the twist-lock plug. These are durable, can handle large amounts of power, and best of all, they do what the title says: they twist and lock into place, so they will not come apart. No taping required.
One caution about twist-locks: they did not come onto the market with the same degree of standardization that Edison and stage pin plugs did, so there are several different kinds of twist-lock out there. If you are renting or buying instruments to use along with your existing equipment, make sure the plugs match. You may have to take one of your plugs down to the supply company to be certain. It is easy to get cynical about these kinds of compatibility problems until you realize how amazing it is that all the electrical outlets in all our different houses fit all the electrical plugs on the ends of all the different clock radios that are sold all over the country. Now that is something to be happy about. I can deal with the occasional odd twist-lock.
One final note about plugs and outlets: the end of the cable where the prongs of the plug stick out is called the male end. The end that has the holes that the prongs stick into is called the female end. That is what they are called—I didn’t invent it, and I don’t want to get any letters about it.

Fig. 24. Different kinds of electrical plugs
Taming the Beast: Dimmers and Control Consoles
As useful as electricity is, sometimes you want a little less of it. In fact, sometimes you do not want any of it at all.
There have been a lot of schemes over the centuries to make lights dim up and down onstage. Back when they used candles to light the stage, some clever entrepreneur invented little cans that slipped down over the candles to partly cut off the light. When gas lighting came in, technicians invented complicated mechanisms called gas tables that routed gas to little burners all over the stage. Most of the gas-lit theaters burned down, and now you know why.
Dimmers
Today, through the miracle of science, we have solid-state, electronic dimmers called SCR dimmers to do the job. (That’s Silicon Control Rectifier, and aren’t you glad you asked.)
When I wrote my first book about technical theater in 1992, the conventional wisdom was that SCRs were lighter, smaller, and easier to control than their predecessors, but they would soon give way to something better. After all, SCRs were far from ideal: they still took up a lot of space, gave off a lot of heat, and, most disturbingly, made a lot of noise.
Keep in mind, this was 1992, before the Internet, cell phones, or laptop computers were in common use. I didn’t even have a pager in 1992. Considering the scale of technical innovation that has swept the world in the last twenty-five years, a major breakthrough in dimming technology would look like a no-brainer.
The fact is, it hasn’t really happened. Although the major manufacturers have all come up with other technologies, these remain specialty items that are only used for specific applications. Thirty years after they became mainstream technology, SCRs are still king of the theater.
The R in SCR means rectifier, a type of very fast electronic switch.
Although AC power is switching direction quickly, it doesn’t do it instantaneously. The effect can be shown by a sine-wave graph, where the ebb and flow of power can be clearly seen. The flow of power in the positive direction steadily decreases until it hits zero, whereupon the power begins to flow in the negative direction. The negative flow increases until it hits the maximum amount of power, then begins to decrease until it hits zero. Power then begins to flow back in the positive direction until the maximum is reached, and the cycle begins again.
In order to decrease the amount of power flowing through the circuit, the SCR shuts off every time the power crosses the zero point, then turns on again after the appropriate amount of time has passed. The amount of time it stays off determines how much the power is reduced. So, for example, if the dimmer is set at 50 percent, then the SCR switch stays off for 50 percent of the wave. The lower the dimmer setting, the longer the SCR stays off.
This process reduces the amount of power flowing in the circuit without wasting any of the electricity. Lower dimmer settings simply use less power. This was a grand step forward from the older resistance dimmers, which simply reduced the amount of power flowing to the lights by converting the extra power into heat.
SCRs are also not load-dependent. In other words, they basically function the same no matter how much of a load is plugged into them. Earlier dimmers had to be loaded up to capacity to work properly, forcing electricians to fill the pits of theaters with “ghost loads” of lighting instruments that were plugged into the circuits but never seen by the audience.
The problem with the SCR is that jagged edge on the waveform. Because the wave of power shoots up suddenly, it actually can cause the filaments in the lights to rattle, a phenomenon that electricians call “filament hum,” or, for the musically inclined, “lamp sing.” In addition, the dimmers themselves will hum, due to the jagged waveform’s effect on various parts of the circuitry. In a noisy theater, particularly one with music playing, you won’t hear it. But, in a quiet, dramatic scene, the filament noise can be clearly heard, particularly if the dimmers are at half-power, where the noise is most pronounced. In a highly reflective concert hall, it can cause major problems. The noise from the dimmers themselves effectively prevents system designers from putting the dimmers anywhere in the theater. They must be stowed away in a room of their own.
Filament hum effectively reduces the life of the lamps, particularly PAR lamps, because the wires in the filament are being shaken every time the power dims down.
The jagged waveform also creates problems for certain kinds of loads, especially fluorescent lights, neon, metal-halide, and any kind of motor, so plugging any of these into an SCR dimmer is not a good idea. Sometimes people ask if they can plug any of these items into an SCR circuit if the dimmer is always kept at full. The answer is no, it’s still not a good idea. You might get away with it, but an SCR circuit has an electronic device called a choke, which is actually there to help smooth out the power, but which creates an unnatural waveform that can damage circuitry. Bottom line: an SCR dimmer should only be used for an incandescent light. If you need a non-dim circuit to plug in any of these other items, you should install a non-dim module in your dimmer rack. This module will provide the clean power that your motor or nonincandescent light needs, while still allowing you to turn it on and off with your lighting control board.
Besides filament hum, another reason that everyone wants to see a next-generation dimming solution is that everyone wants to get the dimmers out of the dimmer room. Think about it: if you could attach the dimmer directly to the lighting instrument (or even build it right inside it), then you would no longer have to have all that complicated cabling running from the dimmers up to the circuits. You could simply provide generic power outlets everywhere, plug the lights in wherever it was convenient, and then use a control network (or better yet, a wireless connection) to control the dimmer right there at the light. Less copper wire, lower installation cost, more flexibility, everybody is happy.
Various attempts have been made over the years to design a dimmer that overcomes this noise problem, and there have been successes, most visibly with sine-wave dimming,6 a technology that reduces the height of the entire wave, rather than cutting it into little bits. Besides overcoming the noise, sine-wave dimmers create less heat, extend lamp life, and adapt to different voltages while being lighter and more efficient. They will also improve your social life, increase your income, and make you famous.
Seriously, they are a vast improvement over SCRs, and you can buy them right now, from several different lighting companies. The problem, as always, is cost. As of this writing, sine-wave dimming is still going to separate you from a considerably bigger pile of cash than SCRs, and for general theatrical usage, it is still a hard case to make. SCRs are, simply put, good enough for most people. Without a huge demand for something better, neither sine-wave nor any other kind of dimming has found the kind of large-scale market that would make it cheap enough for theaters.
The main market for these superquiet dimmers continues to be concert halls and other acoustically sensitive spaces, where the cost is justifiable.
The rest of us theater shlubs, with tears in our eyes, give a deep sigh and order another rack of SCRs to install in our dimmer rooms, where their noise and heat can be comfortably contained.
Control Consoles
In most lighting setups, the dimming is handled in two different pieces: the dimmers themselves sit in a closet backstage, while a control console sits in the light booth and tells the dimmers what to do. If you are renting dimmers, they might come in two separate units—the dimmer pack and the controller—or as an all-in-one dimmer/controller combination; but in a permanent installation, they will be in two different places.
Dimmers are rated in watts. The most common size is 2400 watts, often abbreviated as 2.4K. You will also find 1K (1,000-watt) dimmers. Dimmer racks tend to come in multiples of six, like 48 or 96.
Control consoles organize the dimmers into control channels, so that designers can keep track easily of what goes where. Consoles are often listed by how many channels they can control.
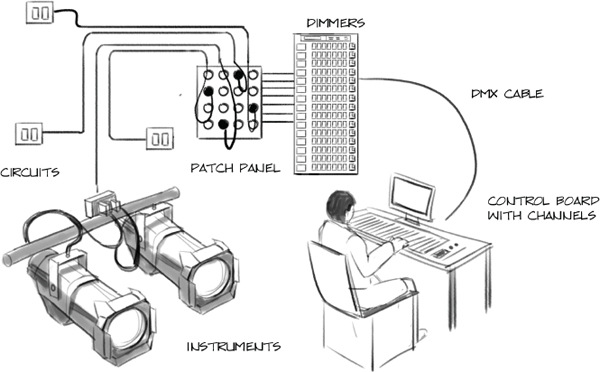
Time to Plug It in
Okay, so you have some lighting instruments, you have a theater, you have some dimmers, and you want to plug it all together and make it work. Great. What now?
Well, the next part is kind of like that children’s game, the one that goes: “The hip bone’s connected to the thigh bone. The thigh bone’s connected to the knee bone,” and so on. It goes like this:
The instrument is connected to the circuit.
The circuit is connected to the dimmer.
The dimmer is connected to the channel.
The channel is connected to the master fader.
From the top: a theater is full of circuits. A circuit is an outlet, a place to plug the instrument in. A theater might have only a few, or it might have hundreds. These circuits are connected to a cable that travels through the walls of the theater back to a panel in a room somewhere, not unlike how the cable from your clock radio travels back to the circuit breaker panel in your house. The panel in the theater, however, is slightly different. It’s called a patch panel, because it is here that circuits are “patched” together with dimmers. Most theaters have more circuits than dimmers, so you use the patch panel to determine which dimmers will send power to which circuits. Some fortunate theaters are wired dimmer per circuit, which means that there is a dimmer permanently plugged into each circuit. In this case, there is no patch panel. The rest of us, however, must slog through patching.
Fig. 25. What is plugged into what
There are several kinds of patch panels, but they all serve the same purpose: they let you decide which dimmers are going to control which circuits. You may decide to let all the odd-numbered dimmers control all the lights on stage left while the even-numbered dimmers control the lights on stage right, or you may decide to have all the dimmers that end in “0” control special effects, or whatever. Every designer has his own system. If you are using a rental system, the patching is done by plugging the cables from the instruments right into the side of the dimmers themselves. In-house patch panels sometimes look like those big telephone patch panels that old-time operators used to use, or sometimes they are rows of little sliders that you slide across to make connections, but the principle is the same: you take a cable that leads to a particular circuit and plug it into whatever dimmer you want to control it. Of course, you should be keeping track of what you are doing. Here’s one example of a chart, called a hookup chart, that stores all of the information.

In a larger theater, or in a theater that is wired dimmer per circuit, you will end up with a lot of dimmers, maybe even hundreds. For this reason, most computerized control consoles have another level of organization—the channel. Whereas dimmers are physical components that fade lights up and down, channels are virtual organizing tools that only exist inside the control board’s brain. A designer will use a channel to control one or more dimmers. For example, let’s say you have a large group of instruments set up to look like sunlight flooding through a window. They are all the same color, and you know you are going to want to bring them all up and down together. They are plugged into circuits all over the place and controlled by a whole bunch of dimmers. By assigning them all to the same channel, you only have to remember one number. Every time you bring up that channel, all the dimmers will bring up all the instruments at the same brightness. Magic.
Channels do not have a wattage limit like dimmers do. Because channels are entirely virtual, they can handle as many dimmers, or as many lighting instruments, as you like.
It’s worth noting that if you are using a very old system or a very simple modern one, you may find that there are no channels. The sliders on the control console might be connected directly to the dimmers, with no channels at all. This situation is rapidly disappearing, however.
The final step in the control process is the master fader. Every control console in the world—computerized or made out of yak skins—has a master fader that controls all the dimmers or channels. Fade the master down, and all the lights fade out. This is the best way to create a blackout on stage.
Many control consoles have a blackout switch, which turns all the lights off with a flick of a tiny switch. I suppose light board manufacturers include it for those people who want really quick blackouts, but for my money, it is not much faster than just slamming down that master fader. Plus, it has “problem” written all over it. Brush against it, and the stage goes black. People are always calling rental companies to say that their rental board does not work, only to find out that the blackout button was down. If I were in charge of worldwide theatrical lighting, I would ban blackout switches. My advice? Tape it over. Next time you take your board in for service, have them remove it.
Manual Control Consoles
The control console sits in the light booth and communicates with the dimmers through a thin control cable. The power that is flowing to the dimmers never goes through the console itself. The console is not controlling the power, it is controlling the dimmers, and the dimmers are controlling the power.
As I mentioned earlier, the moment-to-moment operation of lighting is organized into cues. Every time a new cue comes along, it may mean that dozens of dimmers are all moving at the same time. On a manual console, there is a slider for each dimmer, but unless you have dozens of fingers, you’re not going to be able to move them all at the same time. That’s why, on manual boards, we use presets.
Let’s say that your theater has thirty-six dimmers (a fairly common number). Your control console will have thirty-six sliders on it to allow you to control each of the dimmers individually. Underneath those thirty-six sliders, though, there are thirty-six more sliders, identical to the first set. Down to the side, there will be a big slider marked “X” on the top and “Y” on the bottom. As long as the big slider is up, the top row (the “X” row) of sliders is controlling the dimmers. If it’s down, then the bottom row (the “Y” row) is controlling the dimmers. This big slider is called a crossfader.

Why bother with all these sliders?
Well, if the top row is on, then you can set up a new group of dimmer readings (a new cue) on the bottom row. Then, when the time comes, you can slide the crossfader from the top to the bottom, thereby gradually shifting control from the top group of sliders to the bottom group and changing all the dimmer levels simultaneously. Then, when the bottom line is on, you could reset the sliders on the top one and, at the appropriate moment, fade back to it. This kind of a board is called a “two-scene” preset, and it is the foundation of how we control lighting equipment. Back before computer control came into operations, it was not uncommon to see five- or even ten-scene preset boards that would allow an operator to work several scenes ahead of the action on stage.
Memory Consoles
There are times when it’s a good idea to remove the human element. This is one of those times.
When computerized lighting consoles first appeared in the 1970s, they were pretty much just a way to automate the manual preset boards I talked about earlier. The computer would remember the levels of each of the cues, so you didn’t have to set all those sliders every time. It also remembered how fast you wanted the cue to happen and recorded it. If you wanted to change a level, you could call up that cue, either “live” on the stage or “blind” on a computer screen, and edit it. Pretty cool, at least at the time. (We were young. Remember, this was when mail was something you got at the post office, not something that appeared in a heads-up display on the inside of your eyeglasses.)

Fig. 28. A two-scene preset lighting control board
Times have changed. With the advent of huge dimmer racks, moving lights, multimedia, show control, and complex cueing, memory boards have developed into sophisticated control systems in a dazzling variety of styles, uses, and prices.
Every control board is good for something and none of them is good for everything, so let’s take a moment to cover some basic concepts that span most or all control consoles.
Cue Stacks
At its most basic level, a cue is an event that happens during a show. Usually, a cue happens when you push the GO button, but some boards have multiple ways of initiating an action. Some boards also accept input from other show-control sources, so a cue may be triggered by an external command.
Many boards use the word “cue” to refer to a list of channel levels. By convention, cues are numbered, starting with cue 1. On the first pass, most programmers will number the cues using all the whole numbers: 1, 2, 3, and so on. As the show develops, they may want to insert cues between these numbers, so the will number the inserted cues with decimals: Cue 1.5 would happen between cue 1 and cue 2, for example. Programmers may also decide to create certain cues with different numbers, like creating a cue 999 that brings all the lights to a low intensity for a lamp check.
Besides dimmer intensities, a cue may contain other commands, like sending new information to moving lights or external effects.
Cues are organized in a cue stack, which is a list of cues along with information about how they are timed and organized. It’s called a “stack” because it shows up on the screen as a vertical list, which looks like a bunch of cues all stacked up. The cue stack is run with the GO button, which runs the next cue in the sequence. Other controls for the cue stack include PAUSE, BACK, and GO TO. That last one can take you anywhere in the show and is used constantly in rehearsal, to back up or jump ahead.
By default, cues run in numerical order, from smallest to largest, but it is possible to force cues to run out of sequence.
Besides the cues themselves, a cue stack might also contain any of the following timing information:
Fade Times
Every cue has a number that describes how fast it will be run. If a cue is a crossfade from one set of levels to a new set, then there will be two times: an “Up” time and a “Down” time, so that you can control the outgoing levels and the incoming levels separately.
Wait Times
A cue can be told to wait for a certain amount of time before it runs. This is useful if you want to trigger several cues at once, but you don’t want them all to start at the same time.
Autofollows
This function is used if you want a cue to start immediately after the previous cue has completed. It’s also called “linking” cues. Very useful for a dramatic finish to a scene, where you want all the lights to fade down to just a single spotlight on our heroine, and then a slow fade to black as we wonder if she is really going to take that poison.
More complex boards may have more than one cue stack, allowing you to keep multiple processes—media control, moving lights, conventionals, effects, and more—separate.
Faders
In order for a cue to run, it has to be loaded into a fader. All consoles have at least two faders, so that you can do a crossfade: one cue fading up and one cue fading down. Most consoles, however, have multiple faders, so that you can run multiple things at one time. Want to have a beautiful sunset unfolding on the cyc while a scene is playing inside a house? Create the sunset cue and load it into one fader, while all of your cues inside the house—lights turning on and off, gentle shifts of focus from one side to the other—are running in the second fader.
Submasters
Sometimes, you want to pluck a group of channels and control them separately from everything else. This is particularly true when you are running a show live, with little or no preprogramming. Building submasters allows you to bring up groups of lights at any time, regardless of what the faders are doing. In fact, submasters overrule the faders. Running an awards show? Build a submaster with the lights for the podium. Any time a presenter steps up, you bring up the podium submaster, and bingo, no one’s ever talking in the dark.
Presets and Sequences
Many boards will allow you to create preset “looks” that can be called up to create a cue. This gives the designer a quick and dirty way to put a certain look onstage, after which she can mess with it. Some boards also allow you to create a series of looks, known as a sequence. Again, this is a way of storing pieces of a design so they can be called up at any time.
As we will see in Chapter 11, every moving light uses a passel of different DMX channels to control all its settings and features. Furthermore, every light is different. It would be a huge waste of mental energy if you had to remember that channel 24 is the green dichroic filter in one light, while 163 is the zoom feature in another. Moreover, we really want to use big, round numbers when programming lights, like 0 to 100, not the 0 to 255 numbers that are native to DMX. When we are setting that green filter, we want to set it at 50 percent without having to figure out that means DMX level 127.
Any control console that is designed to handle moving lights will be preprogrammed with the various DMX profiles from all the commonly available lighting instruments. As new instruments come out, their profiles are created and made available to all users of a console. If you are using a Martin MAC 250, you can pull down a menu on the lighting controller and select the Martin MAC 250 profile. From that point forward, whenever you want to change that instrument, the console will provide a fixture-specific interface that will let you grab ahold of that green filter and move it until you’ve got the Shreky look you crave.
HTP versus LTP
Considering the number of different ways that a channel can be addressed by a control console, including cues, presets, submasters, effects, etc., it’s not surprising that sometimes (often, in fact) a particular channel will be addressed simultaneously by two different controllers. In the sunset example I used before, you might have some beams of light streaming through the window that are programmed into the sunset as well as the interior room light.
When a control console is faced with two different levels for the same channel, it has to make a decision about what to do. In essence, there is a competition happening between two different levels, and the control board has to pick a winner. It does this in one of two ways, and these two ways represent two different philosophies of lighting control.
Usually, when we are controlling the intensity to a light, we want the highest of the competing channel levels to be sent out. For that award show, we might have put the podium lights at a dim glow during a dance number. As the number is ending and the last of the cues in the dance sequence are fading out, the award presenter is heading toward the podium. Accordingly, we push the podium submaster up. Now the computer has to choose between the lower channel levels that were written into the dance cues and the brighter presenter levels that are written into the submaster. In this case, we definitely want the submaster levels to win, which is why our board is set to HTP, or “Higher Takes Precedence,” which is almost always the right choice with competing intensity information. If we call up a cue or submaster or preset, we want to see those levels, regardless of what lower levels might be coming from some lower levels. If a control console is designed exclusively or primarily for lighting intensities, then HTP is the way to go.
Control consoles also control other things, however, including moving lights. Let’s go back to that award show, where we have a bunch of moving lights that are creating a fan of green light beams during the musical number. As we shift focus back to the presenters, we want those moving lights to slide up onto the set and make a nice, pretty backdrop of purple patterns.
In addition to our submaster with the podium lights on it, we’ve also got a preset with the moving light positions and colors for the purple set wash.
So basically, we want the lights to forget whatever color and direction information they had before and follow the new information we are sending.
In this case, HTP might be disastrous. The numbers for the old colors might be higher than the one for the new colors, which would mean that the lights don’t change color. The rest of the parameters—pan, tilt, zoom, iris, and so on—might be higher or lower than the new positions, sending the lights into a patchwork of new placements.
The solution is a different mode, known as “Latest Takes Precedence,” or LTP. In an LTP scenario, the console discards any old settings as soon as it gets new ones. If a lighting console is designed exclusively or primarily for moving lights, then LTP is the way to go.
A lot of control boards these days are hybrids, designed for both conventional lighting and moving lights. In this case, the operator can usually select which mode they want to use for which channels. If certain channels are designated as moving light controllers, the board will helpfully default to an LTP mode for those channels.
Tracking versus Cue-Only
Things change. As soon as you create cues and record them in your console, you will need to edit them.
Let’s say that you have just created a series of cues for your production of Katie, Bar the Door, the well-known log cabin drama. As the first act rolls along, the action shifts around the stage, and, being the good designer that you are, you have created cues that gently follow the action from the tattered sofa to the rustic table to the humble four-poster bed in this one-room cabin.
On the table sits a hurricane lantern, which is actually an electric lamp that provides the apparent source of light for the room. It’s a lovely lamp, but too new-looking, so the propmaster sprays it down with a little paint overnight. Great stuff, except now it’s not bright enough any more. No problem, you’ll just turn it up in the cue. Actually, you’ve got twenty-two cues in the act, so you’ll have to turn it up in all of them, one at a time. Bring the cue up, make the change, record it, repeat nineteen more times. Ack, what a waste of time… .
Fortunately, you’ve got the tracking function turned on for your console. All you have to do is make the change in the first cue and then let the console do the rest. It will search forward through the rest of the cues and make the same change in every cue until it finds a cue where you have previously set a different level, where it will stop.
If you are working with a tracking console and you want to make a change to just one cue, without tracking the changes through subsequent cues, then you just put the console into “Cue Only” mode, which will only make the change in the current cue.
Remote Focus Unit (RFU)
It is often useful for an electrician to be able to control the lighting console from somewhere other than the booth. In this case, a remote focus unit (RFU) is highly useful. An RFU is a handheld controller that communicates with the main console and can perform rudimentary functions like bringing up individual channels or running cues. As smartphones have proliferated, many manufacturers have created RFUs for the iPhone and Blackberry phones, allowing them to control the consoles through Wi-Fi connections.
Rack-Mount Playback Consoles
For permanently installed lighting systems, like architectural and theme park systems, a full-size console is only brought in for the initial installation and programming part of the process. Once the show is finished, there is no need to dedicate a large, expensive console to run it. Hence, many manufacturers have created rack-mounted versions of their boards, designed to just sit there and run the show, day after day. The Congo Light Server by ETC is a good example. The shows can still be edited, of course, by hooking up a mouse, keyboard, and monitor to the rack-mount console, but these machines are really designed to run a show for a long period of time without changes.
DMX512
Back in the early 1980s, a whole host of companies was designing and manufacturing stage lighting control consoles and dimmers, and all of them faced the same challenge: how to send reliable information from the control consoles, typically placed in a control room with a view of the stage, to the dimmers, which were stashed backstage. The problem was that all of those companies did it differently. The most common approach was a constant, low-voltage signal put out by the control console. As the operator moved the slider up, the control voltage would increase. The dimmer would respond accordingly, going up and down as the control voltage went up and down. Even this simple approach, however, was handled differently by different companies. Strand’s voltage went from 0 to +10 volts, for example, while Kliegl went the other way, from 0 to –10 volts. There was a booming business in adaptors that allowed one brand of console to talk to a different brand of dimmers, and a lot of grumpy customers who wondered, “Why can’t they all just get along?”
Around this time, the world of electronics had been badly bruised by several high-profile disputes over formats, including the VHS versus Beta debate in video and the Apple versus Microsoft war over computer operating systems, so the time was ripe for some respected voices in the theater industry to suggest an industry-wide standard for control signals. Some companies were worried about giving up market share if their proprietary standards were thrown out, but in the end, the dominant stage lighting companies realized what audio, video, computer, and other equipment manufacturers have realized throughout the history of technology: standardization is good. Having common standards allows for new products that would never see the light of day if everyone had to develop complete proprietary systems. Customers are a lot happier because they don’t have to buy all their gear in one place. Everybody wins.
The result was the adoption, in 1986, of DMX512, a standard protocol for control of lighting equipment. In the beginning, DMX, as it is generally known backstage, was only envisioned for control consoles sending information to dimmers. For this reason, it is unidirectional—that is, information only travels one way on a DMX line. Control consoles can talk to dimmers, but the dimmers can’t talk back. This was primarily a cost-saving decision, as it meant that users would only need a computer brain on one end of the line—the controller end. Dimmers could be “stupid”—that is, they didn’t think about the information they were sent, they just did what they were told. Later on, as the cost of computer chips came down, system designers began to long for two-way communication, but more about that in a minute.
DMX is a way of sending out 512 channels of information at once. Each one of those channels carries a single piece of information, a number from 0 to one hundred.7 Each of the devices on the network listens to a single channel of information and does whatever that channel tells it to do. In the case of a dimmer, it sets its own level based on the number it sees on its assigned DMX channel.
What Is Digital Multiplexing?
DMX stands for digital multiplexing. The protocol is digital because it sends numbers (digits) down the wire, instead of the continually shifting voltages of the analog world. Digital information is much more robust than analog, which means it doesn’t get messed up as easily when it travels over cables. Multiplexing means that a single piece of wire is used to send multiple streams of information. Multiplexing is a very common technology—you use it every time you pick up the telephone.
When you pick up the phone in London to talk to your spouse in Minneapolis, your conversation is carried over a single piece of wire that stretches across the ocean (or gets turned into a radio signal and bounced off a satellite). You do not, however, get sole use of this piece of wire. If this were the case, we would need thousands, if not millions of wires stretching across the Atlantic Ocean to allow all the people there to talk to all the people here, all at once. What is really happening is that you are sharing the wire with other conversations. The computer operating the phone line sends a fraction of a second of your conversation over the phone, then switches you off and turns on the next conversation for a fraction of a second, then switches that one off and turns the next one on, and so forth. When you are standing in London, talking to Minneapolis, you are actually not connected all the time. Although you can’t hear it, your conversation is actually being turned on and off very quickly to allow other people to use the same piece of wire for their conversations. No one is aware of the line sharing because the switching happens very quickly, thousands of times a second. This phenomenon is called multiplexing.
In the case of DMX, multiplexing allows hundreds of sliders on a lighting controller to talk to hundreds of dimmers, all at once, because all those connections are multiplexed. Without multiplexing, you would have to run an individual wire from each slider to each dimmer, and that’s a lot of copper.
Plugging DMX in
DMX was designed to be “daisy-chained.” In other words, you run a cable out the back of the control board to the closest thing you want to control, then you run a cable from that unit to the next one, and so on. DMX-compatible devices will have a plug marked DMX IN and a second one marked DMX OUT or, in some cases, DMX THRU. All DMX cables should go from an OUT (or THRU) plug to an IN plug. The DMX standard supports up to thirty-two different devices in one chain. (A rack of dimmers counts as one device, regardless of how many dimmers it contains.)
Choosing Channels
DMX puts out information on a number of different channels—512 of them, in fact. This works just like your television set, where you use the channel selector to decide which channel to watch. For a DMX device, you have to tell it which one of the 512 channels to watch for its information. This is usually done either by punching in numbers on a small keyboard or by setting tiny switches, known as DIP switches, on the device. For units that require more than one channel, you set the starting channel on the device, and the device itself figures out the rest.
DMX beyond 512 channels
When the designers of DMX were deciding how many channels to support on their line, they picked a number that was both electronically convenient and high enough to handle an enormous dimmer rack: 512. Hence, the name DMX512. Once the standard was in place, however, equipment designers realized that it was useful for lots of different things that needed to talk to a controller, including smoke machines, special effects and, most significant, the rapidly proliferating automated lights. All these different technologies started eating up DMX channels like a golden retriever going through a bag of liver treats.
Automated lights were the prime offender. These complex machines need a lot of information to be happy. Besides the intensity of the light, they may also want to know color, direction, shutters, zoom, and focus, as well as information about other mechanical devices and preprogrammed effects. Check out this example from the High End Systems Cyberlight:
Channel
1: Pan (coarse adjustment)
2: Pan (fine adjustment)
3: Tilt (coarse adjustment)
4: Tilt (fine adjustment)
5: Color wheel position
6: Amount of Red
8: Amount of Blue
9: Static litho (gobo)
10: Rotating litho (gobo)
11: Rotate mode
12: Zoom
13: Focus
14: Iris
15: Special effects
16: Frost
17: Shutter
18: Dimmer
19: Motor speed
20: Control commands
And the Cyberlight isn’t even the hungriest intelligent light. A sophisticated instrument might need as many as forty different channels of information. Install a dozen of these data hoggers, and 512 doesn’t look like such a big number anymore.
The solution was to run more than one set of 512 channels, or more than one universe. A high-quality lighting controller may have the capability of running two, three, even four different universes of 512 channels. Generally, a lighting technician will assign these universes in some kind of logical way: Universe A for the dimmers, Universe B for the automated lights out front, Universe C for the ones over the stage, Universe D for special effects, for example. Each universe requires its own cable, so the back of the lighting control console will have one DMX OUT plug for each universe.

Fig. 29. An example of DMX universes
DMX over Ethernet
Using several different universes can help you gain more channels, but that means a lot of DMX cable, which is not cheap, strung all over the theater, not to mention other pricey bits of gear, like DMX splitters. To make life even more complicated, a sophisticated system might have several different controllers that are all “talking” at once to various devices. One lighting controller might be running dimmers, while another is handling automated lights, both of which need to send signals to a video controller, fog machines, and a lightning machine. That’s a lot of connections and a lot of potential headaches.
A number of schemes have been developed to bring all this gear together on an Ethernet network—the same thing that brings your Internet signal to your desktop computer. Ethernet can handle about forty times as much data as DMX, which means you can send all those DMX universes on one cable. Plus, the computer network industry is a lot larger than the theatrical lighting network, so all the equipment that Ethernet networks need—routers, switches, cable, plugs, and so on—are much cheaper and more easily available than DMX gear. If you are doing a permanent installation, building contractors are quite familiar with Ethernet networks and the “Category 5” wiring (known to the geeks as “Cat-5”) that it uses. Ethernet also has a number of tricks built in to overcome physical obstacles, like wireless broadcasting and the ability to send signals over standard phone lines. Finally, the truly geeky among us love the idea of being able to control a lighting system remotely. For all these reasons, larger lighting installations often have internal Ethernet networks, just like the network in your school or office.
So, do you want to put your lighting data on an Ethernet network? For small- to medium-sized, straightforward installations, the answer is no. Considering the robustness and plug-and-playability of DMX, you don’t need anything fancier. Yes, it would be cool to control your lighting console from a sidewalk café two states away, but dude, seriously, you and I and six other nerds at LightingGeeks.net are the only people who really think so.
For large, complicated systems, particularly those with multiple controllers, the answer is an absolute, unqualified maybe. It will depend on many issues that are specific to your installation, such as the brand and type of your equipment, the particular needs of your facility, and the skill of your operators.
Wireless DMX
It is possible to run DMX without any wires at all. In this case, the one-way nature of DMX is an advantage, along with the relatively low amount of data and the fact that the data is sent continuously.
Wireless DMX is a nice thing to have if you have a large performance venue, if you are outside, or if your lights are on a moving platform, like a parade float or a scenery wagon. If you’ve got lights way up on top of a building, it’s really nice if you can avoid running a DMX cable all the way up there. If your lights are on a parade float, you can’t really have it dragging a control cable down the street.
To use wireless DMX, you run a cable from your control console to a wireless transmitter. The wireless receiver is plugged into the lighting equipment at the other end (on the building, on the parade float, and so forth). Once the equipment is assigned a DMX address, it can scan the data stream that is coming in over the wireless connection and find the data for its own address. In that way, DMX information from the control console can be fed to equipment almost anywhere.
The Real Workers: Lighting Instruments
At last, something that puts out light!
Contrary to what you’ve been told all your life, all of those metal things hanging up there above the stage are not called lights. Light is what comes out of them. The things themselves are called lighting instruments, or simply, instruments. People do call them lights now and then (even I say “bring up the lights!”), but I recommend the term instrument when you talk about them individually.
Inside the instrument is a glass and metal assembly that actually puts out the light. Contrary to what you’ve been told all your life, this is not a bulb. This is a lamp. The glass part of it, exclusive of the metal base and the filament, is the bulb. The whole thing is a lamp.

Fig. 30. A fresnel with barn doors
Lighting instruments are usually mounted on pipes. The standard mounting clamp is called a C-clamp, because it looks like the letter C. The C-clamp is attached to an upside-down U-shaped yoke, which straddles the instrument and attaches on either side. To turn the instrument left and right, you loosen the bolt on the side of the C-clamp. In newer instruments, there is a little handle you can grab onto, but on older ones, you have to put a wrench on it. Be careful! It’s easy to twist that little sucker right off, and then the clamp will be frozen forever.
To move the instrument up and down, loosen the bolts that hold the yoke to the instrument itself. Newer units have handles; older ones have bolts. Regardless of what you are working with, the tool of choice (and one of the things that all show people should own) is an eight-inch adjustable Crescent wrench.
On the front of the instrument, there is a color frame holder. It’s nothing complex—just a slot in front of the lens. Some instruments have a little spring-loaded flap that you have to pull open to slide the frame in. Other instruments only have a slot on three sides, so be careful that it is pointed the right way when you hang the instrument. The open side should point up, or the color frame will fall out.
Conventional lighting instruments mostly fall into two categories.
Soft-Edged Instruments
Everyone has seen the image of the crisp, hard-edged spotlight piercing the dusty air to light the emcee downstage, and a lot of people believe that all stage lights look like that. A lot of them do, but many do not. When you are using many instruments to light a stage, you do not always want that sharp, clear stab of light. As a matter of fact, more often than not, you want the lights to blend together as seamlessly as possible, forming a smooth wash of light. For this kind of application, a soft-edged light is the instrument of choice. By far the most common kind of soft-edged light is the fresnel (pronounced “fur-nell”), named after the distinctive ridged lens invented by Augustin Fresnel, a French physicist who spent his life developing a number of important optical formulas and preparing the way for the theory of relativity. You can always tell a fresnel from any other kind of instrument by rubbing your hand over the outside of the lens. A fresnel lens will have ridges in it. Anything else will be smooth. Actually, Fresnel developed his famous lens for lighthouses.
Besides its impressive pedigree and unusual lens, the fresnel has a number of other positive features. It is a cheap way to get a lot of light onstage, and its beam has a nice soft edge that blends with the light from other instruments. The fresnel beam is also adjustable in size, from a large circle to a small one. Making the beam larger is called flooding it; making it smaller is called spotting. These adjustments are made by sliding the lamp closer to or farther away from the lens.
Fresnels come in many sizes, but the two most common in the live theater are six-inch and eight-inch (the number refers to the diameter of the lens). Film sets use many of fresnels as well, in larger diameters. A fresnel is great for lighting stages where you still might need to isolate smaller areas. Sometimes, though, you have a large expanse, like a drop or a cyc, and you need a large, smooth wash of light. For these uses, the best choice is a strip light, also known as a border light. Strip lights are long, narrow metal enclosures with rows of lamps set into them. They provide large amounts of unfocusable light, usually in several colors. A strip light may have one circuit of red, one of green, and one of blue, for instance. Since the lights are soft focus, it all mixes together on the drop, creating one solid color. By varying the mixture, the designer can change the color on the drop. This is how designers create sunsets, for one thing. They light the top of the cyc with various shades of dark blue, while lighting the bottom with everything from red to orange to lavender. With a computer board or a skilled human operator, those colors can be changing and blending continuously, giving the audience a visual treat. When the sun finally goes down, you could turn on the stars that are sewn into the cyc and then … whoops, sorry. Got carried away.
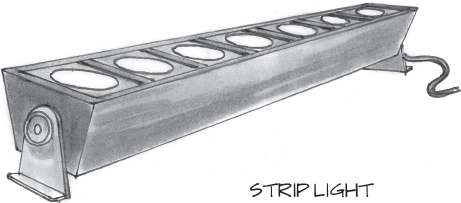
Fig. 31. A strip light
There are two other types of soft lights you might run into. First, you may encounter scoops, which are just what they sound like, big ice cream scoop–looking things with a large lamp in them. Because they have no lens and no optics to speak of, they are cheap, but the light that comes out of them is difficult to control. They are best used to light large areas (in a single color) or as work lights.
Finally, there’s the instrument that has changed the face of rock and roll: the PAR can. Basically an automobile headlight mounted in a metal can, the PAR can (it’s written in all caps because it’s an abbreviation—parabolic anodized reflector—and no, you don’t need to know that) is bright, intense, and durable. It is not a subtle instrument. It cannot be focused, spotted, or given any kind of sharp edge. Even so, many theater and dance designers have been lured to it by the intensity of the beam. It makes great sunlight, among other things. As I said before, most rock-and-roll shows are packed with PAR cans.
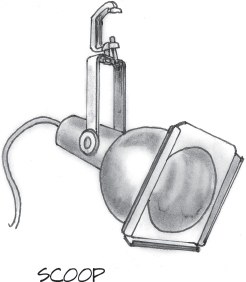

Fig. 33. A PAR can
With all soft-edged instruments, it is good to remember that the light from them is more difficult to control than that from hard-edged instruments. This can be significant if, for instance, you are using them in a front-of-house position, where it is important to keep the light off of the proscenium arch, or if you need a tightly focused pool of light. A small piece of equipment, like barn doors, which fit into the color filter slots on the lighting instruments, can help you control the light better. Barn doors have two or four little wings that can be swung in front of the lens, masking off part of the light. This masking does not produce a sharp edge, but it will get a lot of light off of the scenery, the audience, or whatever. (If you are hanging fresnels pointing anywhere near an audience, barn doors are a necessity.) If possible, all fresnels should be hung with barn doors. One good time not to use barn doors: if you are hanging the instruments on battens that have scenery moving next to them, barn doors are notorious for catching draperies, corners, moldings, and just about anything else that goes by. I swear, they reach out and grab them.
Hard-Edged Instruments
When you need to have greater control over the light, the instrument of choice is usually an ellipsoidal reflector spotlight, also called an ellipsoidal. The ellipsoidal is sometimes referred to as a Leko, but this is actually a “Kleenex” word—a brand name that has become the general term for something. Like Kleenex, Jell-O, and Muzak, these words have entered the dictionary in a way that brings great joy to the original manufacturer. People will know what you mean if you say “Leko,” but I recommend that you use the more general term ellipsoidal, both for the sake of clarity and in fairness to all of the other fine manufacturers of stage lighting equipment.
Ellipsoidals are actually capable of being either hard- or soft-edged, and, all things being equal, I would usually prefer to use them over the more finicky fresnels. All things are not equal, however, because the ellipsoidals, with their more complex optics, are considerably more expensive to own and rent than their soft-edged counterparts.
Not that an ellipsoidal is some kind of rocket science. An ellipsoidal reflector spotlight is so called because (are you sitting down?) it has a reflector shaped like an ellipse. This style of reflector has the useful property that it focuses the light more precisely, making it easier to manipulate. From there, a slightly more complex lens system collects the light and sends it out the front.

Fig. 34. An ellipsoidal with a top hat
One way that light is manipulated in an ellipsoidal is with shutters, little metal blades that push in from the side of the instrument and cut off part of the beam. Using the shutters, you can give the beam a sharp edge that, for instance, follows the line of a drape, the bottom of a flat, or the edge of a podium. Ellipsoidals are also designed so that you can slide in a template, a piece of metal with a design cut out of it. The template, or pattern, or gobo (short for “go-between”), allows the instrument to act as a sort of shadow projector, projecting whatever shape is cut out of the metal. Templates are a great way to get creative with lighting. You can cut your own simple patterns out of pie plates, or you can select from the constantly growing selections offered by several different companies. Ask your dealer for a catalog. Remember, though: if you are going to use templates, you must have an ellipsoidal spotlight. Fresnels cannot handle templates.
I mentioned earlier that an ellipsoidal is capable of being either hard-or soft-edged. This is possible because an ellipsoidal has all of its lenses mounted in a movable barrel that can be slid back and forth. If you want to make your ellipsoidal more “fuzzy”—that is, get rid of the sharp line—just “run the barrel” forward or backward until you like it. Likewise, if you are inserting a template and you want the image to sharpen up, run the barrel back the other way.
Ellipsoidals are referred to by two numbers: the diameter of the lens and the focal length. The focal length is the distance between two mystical points in the optical system, and the only thing you need to know is that the longer the focal length, the narrower the beam that comes out the front.
There is also a class of ellipsoidals called zoom ellipsoidals. These handy instruments have an adjustable focal length, so you can make fairly radical changes to the size of the beam without hanging a different instrument. Why not use them all the time and have more flexibility? There are two trade-offs: cost (predictably, zooms are more expensive) and amount of light—zooms tend to be less bright than the fixed focal length units, because they waste some light inside the instrument.
Besides these workhorse instruments, you’ll find several other types of lighting instruments in the theater.
Follow spots come in many shapes and sizes, but there are some things that are common to all of them. Follow spots are designed to put out a bright, crisp circle of light, much like an ellipsoidal (in fact, you can bolt a handle onto the back of an ellipsoidal and have yourself a low-tech follow spot). The size of the circle of light is determined by the iris, which is operated by a sliding handle on the top or the side. A spotlight will also have shutters that shut off the light by sliding in plates from the top and bottom. Many spots can also dim the light out gradually with a douser, two plates that swing in from the sides to block out the light gradually. These controls—the iris, the shutter, and the douser—are often right next to one another. On most spots, they are on the top.
A follow spot will generally have a number of different color frames that may be pushed in one at a time or together to put a color filter in front of the light. These color frames are controlled by a series of levers on the side of the follow spot. Pushing one color frame in knocks the previous one out.
Finally, many spots have a lever, called a trombone, that you can push back and forth to adjust the focal length, just like a zoom ellipsoidal. Pull it back to shorten the focal length and produce a wider beam, and forward to do the opposite. Unlike the iris, shutter, and douser, the trombone is a “set it and forget it” control that the operator will only need to mess with once.
Different-sized theaters need different-sized follow spots. In order to determine which spot you need, you need to know the throw distance. This is the distance from the follow spot to the stage. Thirty feet is quite short—a good distance for a converted ellipsoidal or a “club” spotlight. These spots use lamps similar to those in regular lighting instruments. Some of them even use MR-16 lamps, the low-voltage slide projector lamp I mentioned before.
As spots get bigger, the light sources start to change. For throws approaching one hundred feet, use a metal-halide, or HMI lamp. This highly specialized lamp has no filament. It produces light by forcing electricity to jump a tiny gap, sort of like a miniature arc welder. It packs a real wallop, though, and it is often used for rock and roll. If you go to a rock concert and see follow spots mounted on the truss directly above the stage, they are probably HMIs. They make excellent spots for clubs, fashion shows, and theater as well. An HMI spot comes with a twelve-pack–size piece of equipment that sits on the floor under the spot. This is called a ballast, and it is required to keep the lamp burning, so make sure you do not forget it when you rent the spot. One caution about metal-halide: once you turn it on, do not turn it off until the end of the show. HMIs will not restart if they are hot, so if you turn it off at the beginning of intermission, forget about getting it back on for the second act. You must let it cool for a couple of hours before you can use it again.

For extra long throws (two hundred feet and up) in large theaters or stadiums, technicians use another type of spot. This kind of spot uses an arc like the HMI, but the arcs are much bigger, and the light is much brighter. There are two varieties: the carbon arc spot and the xenon arc spot. Both of these spots require permanent installations and external venting to accommodate their large size and noxious fumes. Carbon arc is a much older technology and is gradually disappearing. It requires a fair amount of skill to operate because the light is produced by arcing the light between two carbon electrodes, called trims. These trims slowly burn away, increasing the gap between them. If the gap gets too big, the arc will stop and the light will go out. If it gets too small, the trims will fuse together and the light will go out. If the gap is only slightly too big or too small, then the light will smoke, flicker, and look terrible. It requires a skilled operator to maintain the proper amount of space between the two trims. In addition, the trims only last about forty-five minutes to an hour, so right in the middle of the show, they have to be replaced with fresh ones, called “retrimming.” It used to be that rock-and-roll shows had a period of about a minute built right into the show when all the spots could be shut down to retrim.
There is a general trend in theatrical equipment toward making things easier to use, and the carbon arc spot is a welcome casualty of this movement. Replacing it is the more sophisticated xenon arc spot. The concept is the same: force an arc to jump across a sizable gap and it will produce light. The xenon arc, however, is enclosed in an airless glass envelope, and the electrodes do not get used up in the process. Xenon lamps do occasionally have to be replaced or adjusted, but the adjustment happens every few years, not every few minutes.
Moving Lights
Let’s say you’re a rock star. Let’s say that you are a really, really big rock star. Let’s say that you are the band Genesis in 1981, with a number one album on the British pop charts and a massive tour coming up. You have a reputation for putting on huge, innovative concerts, so you are always looking for the next cool thing. After all, you are one of the bands that popularized the use of lasers in live concerts, so people have come to expect a lot of visual spectacle.
And then one day, an American sound mixer and electrical engineer named Jim Bornhurst asks you to join him in a barn somewhere north of London. Nailed to the rafters is a large, odd-looking light. Bornhurst turns it on and shows you how it can instantly change colors, which is unusual but not shocking. Lots of people are working on that. But then Bornhurst hits another switch and the beam of light begins to move. It sweeps from side to side, up and down, throwing beams of light into every crevice in the darkened barn. You’ve seen a lot of cool lighting effects, but in 1981, this is the first time you’ve seen a light that could move automatically.
So what do you do?
You order a whole bunch of them, that’s what. Genesis agreed to pay for the construction of the first fifty-five units for a concert in Barcelona, nine months later. Bornhurst worked for a Texas-based company called Showco, and you can imagine the mood in their shop when they found out they were committed to produce fifty-five totally innovative Vari*Lites,8 including new systems for control, power, and data distribution, in nine months, for one of the biggest bands in the world. On the plane home, Bornhurst upped the ante by telling his team that the current color-changing system wouldn’t work and they would have to start designing from scratch. No stress!
Almost unbelievably, Showco came through and provided lights for one of the most famous concerts in entertainment technology history: the Genesis Abacab concert in Barcelona on September 25, 1981. On that night, the moving light was born, and theater lighting would change forever.
The first Vari*Lites were shrouded in mystery. For many years, they could not be purchased, only rented, and they came with their own technicians. On tour, local stagehands were shooed away from the lights, and they were never opened in public. Because of their popularity, however, it wasn’t long before other companies—among them High End Systems, Martin, and Clay Paky—released competing products. Together, they changed the visual image not only of rock and roll but also of theater, industrials, fashion, award shows, and even architecture. Today, there are dozens of different moving lights, and no large-scale event is complete without them.
Bornhurst did not invent any of the specific technologies in the Vari*Lite, any more than Henry Ford invented the internal combustion engine or the rubber tire. Like Ford, Bornhurst and his team took a string of recent innovations—like dichroic filters, stepper motors, and compact arc lamps—and engineered a practical, robust device that, quite simply, changed the look of live entertainment forever.
Many people refer to these lights as “intelligent” lights, but that is a bit of a misnomer. The real intelligence still lies with the designer and the operator. The light can be programmed to move, change color, and do a lot of other tricks at the push of a button, so “automated light” is a better description—but folks in the trade call them “moving lights,” so that’s what we’ll use. Many people just say “movers.”
Even though moving lights originated in rock and roll, it didn’t take long for them to invade the rest of the performing arts—not only because of the dynamic effect of moving light beams, but also because a single moving light could do the work of several different lights during the course of a show, allowing a designer to use one unit instead of many.
One obstacle to moving lights being accepted by the rest of the industry, however, was noise. The powerful lamps required cooling fans, which, along with the motors that moved the lights, were clearly audible during quiet shows. Design advances have led to quieter units that are suitable for theatrical drama, but they are still not silent, so you won’t see them during a string quartet concert anytime soon.
Let’s look at some of the features of the moving light.
The Lamp
In the beginning, all moving lights used a high-intensity discharge (or HID) lamp, also known as a short arc or metal halide lamp. An HID lamp does not have a filament like a conventional fixture. Instead, it creates light by making electricity jump across a tiny gap inside a glass envelope filled with an exotic mixture of gases. It’s like having a tiny arc welder inside a glass bulb.
HID lamps are much more efficient than regular incandescent lamps, which translates into brighter light for the same amount of energy. An HID lamp turns about 25 percent of the electricity into light, which doesn’t sound great until you consider that an incandescent lamp wastes 90 percent of its electricity on heat. A 2000w HID lamp will produce the same amount of light as two 5000w incandescent lamps, and the lamp will be physically smaller than either of them.
The smaller-sized lamp means that the HID light source is closer to the holy grail of lighting instrument designers—a “point source” of light. If all the light emanates from a relatively small point, it becomes easier to focus that light into a hard-edged beam. These lamps also have a higher color temperature than standard incandescent or tungsten-halogen lamps, putting out a cool white light that is closer to real sunlight.
So, what’s the catch? There are several.
Not surprisingly, the first one is cost. HID lamps are more expensive to manufacture, as they must stand up to very high pressures and temperatures (up to 1000 degrees F). They also require special circuitry, known as a ballast, to start up and maintain that arc of light. Most moving lights have the ballast built into the base of the unit, but some require an external box that sits next to the unit. Finally, they are impossible to dim. Some recent advances have produced dimmers that will take the intensity down part of the way, but HIDs always require a mechanical dimmer—a metal flap that closes down over the light—to make them go all the way to black. HID lamps also don’t like to be turned off and turned on again, or “restruck” as the electricians say. Once an HID lamp is off, it wants to stay off until it cools completely, which can take up to twenty minutes. It is possible to “hot-restrike” some lamps, but both the lamp and the ballast have to be designed to do that.9 If you see “HR” at the end of the lamp part number, that generally means the lamp can “Hot-Restrike.”
The ability to hot-restrike is occasionally useful, though, if only to recover from a mistake. I once did a low-tech effect for a children’s dance show where the choreographer had all the kids walk in through the aisles of the theater. We were doing the show in a ballroom that had a mirror ball, so I bounced an HID follow spot off the mirror ball, while two hundred children floated down the aisle to a mysterious-sounding overture. All those drifting shafts of light looked great for the rehearsal, but, just before the show started, one of the parents became concerned about the hot spot light, so he turned it off “just to be safe.” Unfortunately, the lamp could not be restruck before the show, and the effect was lost. I was standing backstage when the children came through, and a four-year-old little girl tugged on my sleeve. I looked down into her enormous, sorrowful eyes as she asked, “But where was the magic light?”
If our lamp had been able to hot-restrike, it would have saved us both some tears.
Not all moving lights have HID lamps. Some moving lights do come equipped with tungsten-halogen lamps for clients who want true dimming, an instant-on source, or just the warm color temperature that tungsten provides.
Finally, some smaller moving wash lights have LED light sources, which are nowhere near as bright as the HIDs (or even the tungsten-halogen) and cannot be focused into a sharp beam. They have a massive advantage when it comes to efficiency and lamp life, though, as I discuss in a minute.
Regardless of the type of lamp, make sure to check the voltage before you buy or rent a unit. Many moving lights can only be run on 208 (or higher) volts. Of course, you remember that standard power in the United States is 110 volts, so you can’t plug these higher voltage instruments into your regular lighting circuits. If you use the higher voltages, you must have an electrician create a separate circuit to plug them in. This is not difficult or expensive, but it does require a professional electrician. Do not try to rewire your electrical system, no matter how many how-to websites you have read.
Even if your moving light is 110 volts, I don’t recommend plugging it into a normal lighting circuit, because that circuit is probably controlled by a dimmer. If the dimmer is accidentally dimmed below full power, the resulting clipped power wave could damage your moving light. The best solution for a moving light is to have your electrician create a dedicated circuit specifically for that unit or swap out your dimmer for a “non-dim” unit.
Pan and Tilt: Moving Yoke versus Moving Mirror
Pan means to move the light horizontally. Tilt means to move it up and down. The original Vari*Lite achieved these movements with two motors, one mounted in the base that spun the yoke in a circle and one mounted in the yoke to tilt the light up and down. This arrangement, not surprisingly, is called a moving yoke or a moving head. This scheme offers tremendous freedom of movement, allowing the beam to sweep 360 degrees horizontally10 as well as tilt up to 300 degrees. It’s an expensive way to go, however, requiring big motors and a complicated yoke mechanism. One way to build a less expensive unit is to leave the lamp where it is and just use a small mirror to direct the beam. This moving mirror instrument can move the beam a lot faster than the moving yoke: a 180-degree turn in half a second, as opposed to two seconds for the moving yoke. The trade-off is less range of motion, as the mirror cannot make a full circle or achieve the same amount of tilt. Typically, a moving mirror can pan about 170 degrees and tilt about 90 degrees. Some people, particularly in Europe, call these units scanners.
Many fixtures use two settings—rough and fine—for pan and tilt (for a total of four numbers). The operator will adjust the rough pan and tilt first to get the light in the right general area, then use the fine pan and tilt for a final adjustment. Using two numbers for each axis allows for a higher resolution and more precise placement.
The process isn’t perfect, however, so moving lights must occasionally be homed. A moving light has a home position that it uses as a reference point for all its movement. Generally, the technician will program all the lights to point to the same spot on the stage as their home position. This allows him to quickly check if the lights are correctly aligned simply by hitting the home button on the lighting controller. Any light that is not hitting that magic place on the stage is in need of some adjustment.
Color Changing
The cheapest, easiest way to create colored light is to put a colored piece of plastic in front of it. In the theater, we do this every day. We call those little pieces of plastic gels because they used to be made from a gel-like substance derived from animal byproducts trucked in from slaughterhouses. Too much information?

Fig. 36. Moving head versus moving mirror
Anyway, the original animal gels produced great colors, but they didn’t last long in front of hot lighting instruments, so they were eventually replaced by sheets of various kinds of plastics. Someone forgot to tell the guy who comes up with unofficial names for theatrical devices, however, so the term gel has hung in there for the same reason that we still “dial” the phone, even though no one uses rotary phones any more. If you want to look good to a techie, call that piece of colored plastic a filter.
A plastic filter works pretty well when placed on the front of a lighting instrument, although it will eventually fade out, especially if the light is left on for long periods. If you need more than one color, you can attach a color-changer to the light, the simplest of which is just a string of filters on a scroll. A motor rolls the scroll until it reaches to the color you want and presto—color.
When building the Vari*Lite, however, Showco needed a way of changing colors very quickly—preferably in a fraction of a second—and they wanted to be able to fade smoothly from one to another. A scrolling gel changer wouldn’t change fast enough, wouldn’t fade smoothly, and would probably fly off the spinning unit anyway. The solution was to use a color-mixing system with several color filters placed inside the unit.
Even a plastic filter, however, cannot stand up to the inferno inside a lighting instrument. When placed next to a standard theatrical lamp, a plastic filter will shrivel like a senior prom wallflower when the captain of the football team asks her to dance. It will simply melt away. Fortunately, Bornhurst was an avid photographer and knew a lot about optics, so he turned to a new kind of glass called a dichroic filter.
A dichroic filter has the unique ability to allow certain frequencies of light to pass through while it reflects the rest. Previous to the Vari*Lite, dichroics were only used in high-tech scientific applications, but Bornhorst thought he would give them a try in rock and roll.
Dichroic filters
A dichroic filter operates the same way as an oil slick on water. When light strikes the oil, some of that light is reflected directly off the top surface of the oil. Other frequencies, however, pass through the oil and bounce back off the bottom surface where the oil meets the water. Different frequencies of light produce different colors, which is why you see all those different colors on the surface of an oil slick.
Dichroic filters are made by laying down different layers of glass and various kinds of optical coatings in a super-clean, air-free environment. Depending on the type, thickness, and order of the coatings, optical engineers can “tune” a filter to allow certain frequencies through while reflecting the rest. Plastic filters change a light’s color by absorbing all the unwanted frequencies; dichroic filters do it by reflecting the unwanted frequencies. Because no light (and therefore no heat) is absorbed in the dichroic filter, the resulting beam of light is very clear and saturated, and the filter stays cooler. Plastic filters heat up because they absorb a lot of light (and therefore heat), which causes them to fade or, in extreme cases, melt.
All this sharp color and heat resistance comes at a steep price, however. Dichroic filters are many times more expensive than plastic and are only cost-effective when the same filter will be in use for a long time. Therefore, you won’t be seeing the end of plastic filters for conventional lighting anytime soon. If you can get through a run without burning through your plastic filters, or by changing them a few times, then dichroics don’t make sense.
Despite their cost, there are some theatrical applications for dichroic filters outside of moving lights. These include long-term installations (particularly if the lights are on all day, like a museum or a theme park) or any application where high heat is a problem. For example, the Waterworld show at the Universal Studios Hollywood theme park uses them for lights that sit next to flame and pyrotechnic effects, where plastic filters would burn up.
You can order dichroics through your theatrical supply company; they are generally identified by the same filter numbers as normal plastic filters. Keep in mind that they are generally custom-made, so allow extra time to order.
After a lot of experimentation, Bornhurst and his colleagues came up with a color-changing system in which three dichroic filters were “graduated”—that is, they faded from clear on one end to full-color on the other. By altering which part of each filter was in front of the light beam, the unit could mix the colors in varying amounts, producing an incredible range of sharp, supersaturated colors that could be changed in a fraction of a second. This type of mixing is known as CYM color mixing, because the three colors are Cyan, Yellow, and Magenta.
Today, the various kinds of moving lights change colors in two different ways, but they both involve dichroic filters. Some units use the CYM system, which can give you any color in the rainbow, whereas other lower-budget units use a color wheel, loaded with preselected colors. In this case, you have to preselect and install your colors before you turn the unit on, and then you are stuck with what you have. Most lower-end units come with filters already installed in the color wheels, and some of those can’t be changed. Check the specs before you buy!
Many units also offer color correction, which slides a filter in front of the light to match it to other kinds of sources, such as tungsten lights. This feature is used mostly in television and film.
Mechanical Effects
The features of moving lights differ depending on the style of light. Some units are wash or flood units, designed to give a soft-edged wash of color, similar to a fresnel. Others are spot units, which act like ellipsoidal spotlights. There are also beam units, which give narrow beams of lights similar to AirCraft Landing lights (ACL), as well as moving PARs, which are—you guessed it—PAR cans on moving yokes. Depending on the style, the light may have various kinds of mechanical effects built in.
Both wash and spot units often have a zoom feature, which makes the beam larger and smaller. Spot units allow you to cut and shape the beam of light in other ways as well. They have beam shapers, which are lenses inside the light that shape the light and can rotate continuously, creating some cool effects. There are also dousers, which are flaps that close down over the entire light at once. Dousers can be used for a strobe effect, which is just what it sounds like—a quick flash of light. Strobe effects are rated by cycles per second: an 8 Hz strobe can flash eight times per second.
Some lights also have an iris, which allows you to close down the beam of light into a smaller circle.
Spot fixtures also have templates or gobos, which may be mounted in a wheel or in individual holders. Generally, the ones in the individual holders can be rotated, while the ones in the wheel cannot.
More expensive units will have other effects too, including the prism, which creates weaving shafts of color, and the light cone, which is just what it sounds like: a way to make a cone of light with a dark center.
As I said before, HID lamps cannot be electrically dimmed, so moving lights also have a mechanical dimmer. This is a metal flap that slips into the light beam and decreases the intensity. Because the flap is farther away from the lamp, it does not create a hard-edge shadow like the shutter. It just decreases the amount of light that gets out the front of the unit.
Control
All moving lights available on the market today use the DMX512 standard for control. This standard allows any DMX-compatible lighting controller (virtually all of them) to control a moving light. Here’s how that works.
Every moving light has a list of things that can be controlled. That list includes all of the things already mentioned: pan, tilt, color, templates, and so on. Each one of these parameters requires one or more channels of DMX. For example, the Elation DesignBeam 1200 uses DMX channel 1 to adjust panning. You can feed the unit any number from 0 to 255 on channel 1, and it will translate that number into a pan position.11 Sending 0 will turn the unit all the way counter-clockwise, and sending 255 will turn it all the way clockwise. The numbers from 0 to 255 correspond to 256 different pan positions. Like many lights, the DesignBeam has both a rough adjustment and a fine adjustment; the fine one is on DMX channel 2. Using the fine adjustment gives you 256 positions between each one of the rough positions, making it possible to fine-tune the position of the light.
Bottom line, the DesignBeam uses two DMX channels to send pan information from the lighting controller.
Every moving light has a DMX profile, a list showing which channels are used for what control function. This profile is unique to each style and brand of light. Here, for example, is the DMX profile for the Elation DesignBeam 1200:
DMX channel function:
1 Pan (rough)
2 Pan (fine)
3 Tilt (rough)
4 Pan (fine)
5 Color Wheel Position
6 Color mixing—Cyan
7 Color Mixing—Magenta
8 Color Mixing—Yellow
9 Color Temperature
10 Gobo Wheel 1
11 Gobo Wheel 1, Indexing and Scrolling
12 Gobo Wheel 2
13 Rotating Effect
14 Focus
15 Shutter/Strobe
16 Dimmer
17 Frost
18 Color Mixing Speed
19 Pan/Tilt Speed
20 Color Macros
21 Lamp on/off
As you can see from this list, the Elation DesignBeam uses twenty-one of the 512 DMX channels, but they don’t have to be the first twenty-one channels. When you set up the unit, it will ask you for a starting channel or address. Whatever channel you enter will correspond to channel 1 on the list just presented. The DesignBeam will then use that channel and the next twenty for its information. So, if you enter channel 150 as the starting channel, the unit will use channels 150 through 170 as its twenty-one channels.
You could, in theory, have more than one unit assigned to these same channels, but it would then receive all the same information, including position, color, effects, and so on. This is rarely what you want, however, so each unit usually has a unique set of channels.
Every unit on the market has its own profile, and keeping track of it is a tedious business, so many lighting controllers (especially the ones that are specifically designed for moving lights) are preprogrammed with a fixture library containing the profiles of commonly available moving lights. When you start programming, you just select “Elation DesignBeam 1200” from the fixture library and set a starting channel, and the lighting controller translates all these numbers into a simple on-screen interface where you can easily control the light. Because there are so many different things to control, moving lights are rarely controlled “live.” A lighting designer will always program the looks ahead of time and then let the computerized controller play them back.
Some moving lights have wireless DMX receivers, which means that you don’t have to run control cables at all. This is a sweet thing, as long as your theater does not have any major sources of wireless interference.
Finally, some advanced moving lights will accept DMX over Ethernet and will have a place to plug in a network cable. Many electricians are hesitant to plug Ethernet cables into the lights because they are not as robust as DMX cables, and I am inclined to agree. The most robust solution is to run the control information over Ethernet to a Ethernet-DMX router and then run a DMX cable from there.
Renting or Buying a Moving Light
If you have decided to take the plunge and add moving lights to your show or your permanent stock, here is a general guide to making a decision. Whatever you decide, make sure you see the light in operation before you rent or buy. Visit your dealer and watch a demonstration, but don’t stop there. Get the dealer to open up the unit so you can look inside to get answers to these questions:
• What is your budget? Moving lights can cost as much as a small automobile, so the first thing to do is get a general idea of what you can spend and what is available. Call a lighting distributor and get some examples of retail prices at the upper end (Vari*Lite, High End), the lower end (Elation, American DJ), and in between.
• What is the intended use? If you are setting up a nightclub, you probably don’t care as much about lamp noise or being able to swap out colors and gobos, for example. If you are using the lights for theatrical dramas, then those things are important. Determine what you will use the lights for most often, so you can talk to the dealer about what features will matter to you.
• Is this a permanent installation or temporary? If you are putting the lights up somewhere and leaving them, you won’t care as much about portability or road cases.
• Who will maintain the units? With all their moving parts, moving lights can require a lot of maintenance and adjustment. Make sure that you know who will do this. If you have trained technicians on staff, you can look at the more complex units. If not, then you will want to look for a unit that is easier to maintain. Some units have modular designs that make it easier to swap out parts. Ask the dealer to open up the unit and let you look in. Ask them how hard it is to change lamps, color filters, and gobos. Ask about keeping all the mechanical parts properly aligned. If possible, talk to technicians who don’t work for the manufacturer to get an unbiased opinion. If you are looking for the lowest maintenance, look at the LED units.
• How will the lights be controlled? Do you have an existing lighting controller that will be used to control these lights? Does it have enough channels available? Do you need to rent or purchase a dedicated controller for the lights? You will probably need to run DMX cables to the lights, so take some time to figure out where those cables will go. Check Chapter 6 for more details about using this technology.
• Where will the power come from? As I said earlier, you need to pay attention to what voltage you have available and where you are going to plug in the unit. Make sure you know what kind of plug you want as well.
Other Types of Lights
The Magic of LEDs
If there is one technology that has changed the world of lighting, it is the light emitting diode, or LED. The LED first appeared as those little red number displays in pocket calculators, but, over time, the march of technology has created LED lamps that can go in everything from your reading lamp to a five-story video billboard in Times Square.
Compared to a standard incandescent bulb, an LED bulb is astoundingly efficient. One 12-watt LED lamp can do the same job as a 60-watt incandescent lamp for up to twenty-five times longer, without producing substantial heat. Although the LED bulbs may be more expensive up front, the cost savings over time has made it downright silly to use incandescent bulbs in homes and offices.
But in the theater, the picture is not quite as clear. Let’s compare the technologies.
Incandescent bulbs have been making light the same way ever since Joseph Swan invented them in 1880.12 Electrical power is sent through a wire filament, which has been placed inside a glass bulb, causing the filament to heat up. The air has been sucked out of the globe (or replaced with an inert gas), so the filament glows brightly without burning. The process creates far more heat than light, unfortunately, and some incandescent lamps waste up to 95 percent of the electricity.
LEDs work by passing electrons between two types of material, one of which is charged positively and one of which is charged negatively. The positive side has extra electrons bouncing around, while the negative side has empty “holes” where electrons will fit nicely. When a positively charged electron crosses the boundary and meets a negatively charged “hole,” the electron slips into the hole, making the atom complete. Atoms, as it turns out, like to be complete, so, when this happens, they let out a tiny sigh of relief in the form of a tiny packet of light, known as a photon. Billions of electron/hole interactions create billions of photons, and poof, we have visible light.
It is also acceptable to regard LEDs as simply “magic,” which I do.
Besides using less power, LEDs have a number of other advantages. They tend to be lighter weight than standard units, plus they are more robust. You can bang an LED unit around a bit more than a standard one, which is why they have become popular in places like theme park rides and parade floats.
What is perhaps most interesting to theatrical people, however, is the fact that LEDs can change color. Although some LEDs are designed to put out a particular color, the most useful ones, known as RGB LEDs, can instantly change to any color in the rainbow. That’s right, throw away your color filters! Just plug a DMX cable into an LED unit, and your control board can tell the lighting instrument what color to be. Not only that, but LEDs can be dimmed, so the control board can tell the unit how bright to be. Throw away your dimmers!
Well, not exactly. Not yet, anyway.
For our theatrical purposes, the biggest difference between the incandescent light and the LED is that the incandescent light emanates from a single point—a tightly wound filament—whereas the LED light is created from a wider surface that is harder to focus. Thus, it is challenging for the LED to create a strong shaft of light or a pattern.
Secondly, although LEDs are much more efficient, they still can’t create a powerful beam that “punches” through and creates truly bright light.
Finally, though you can definitely create a wide range of colors, LEDs are still not good at creating a pure, white light that looks good on human skin.
The bottom line, then, is that LEDs are useful for situations where throw distances are not too long, precise color control is not important, and you don’t need the punch of a bright beam or a pattern. Hence, they have been embraced for small rock venues, clubs, and other specialty uses, but they have yet to take over the live stage.
Nevertheless, the lure of a maintenance-free, low-power lighting instrument is quite strong, so theatrical lighting manufacturers will continue to expand their offerings. This is one area of theatrical lighting that is bound to advance rapidly.
Sodium and Mercury Vapor
I have always had a deep appreciation for the 1973 oil crisis. During America’s campaign to use less power, most cities switched from fluorescent street lighting to sodium vapor or mercury vapor. Almost overnight, travelers flying over cities saw them change from bright white to soft orange and green. A definite improvement.
While these instruments were a boon for our streets (and our electric bills), they are a horrible thing to inflict on a theater. The reason is simple: they take too long to turn on. When you flip the switch, you see a tiny glow in the heart of the lamp right away, but it takes forever for that little flicker to become usefully bright. It can take up to fifteen minutes for the lamp to come to full bright. This is acceptable in a streetlight or even in a gymnasium, but not in a theater.
You may be stuck with some of these lights if you are doing a show in a gym or a cafeteria, so take note of them. You may have to rig another set of houselights unless you want the audience to sit in the dark for five or ten minutes after the curtain call.
Special Effects Lighting
Ultraviolet or “Black” Light
For many years, ultraviolet, or “black” light was out of fashion, considered by most to be an outdated refugee from the seventies, when it was used primarily to illuminate black light posters of Elvis and Gollum. It actually has many uses in the theater, however, not the least of which are puppetry and strip joints. Black light will cause some colors, most notably neon shades of green, yellow, and orange, to shine brightly. It also makes white fabrics glow in the dark. Very dark fabrics, such as navy blue and black, will not reflect black light at all, making anything covered by these colors disappear completely. Hence, puppeteers sometimes use it to bring focus down to a brightly colored puppet, while making a darkly dressed puppeteer invisible. Designers of strip-joint lighting (if there are such people) install it because it doesn’t show skin blemishes, yet it highlights what there is of the dancers’ costumes.
There are also special paints and makeups that can only be seen under black light. This is useful if you want an image to fade away and reveal another image inside it. The next time you ride “The Haunted Mansion” at any of the Disney parks, look for paintings that turn into skeletons as the lights fade down. That is ultraviolet paint at work.
Black light comes in fluorescent tubes, which can be put into an ordinary fluorescent light fixture. You can also get stand-alone fixtures, which put out considerably more light (and cost a lot more). Either way, the bulbs put out very little visible light and provide almost no illumination by themselves. What light they do provide comes from the reflections off other surfaces. Black light is also very annoying to look at for any length of time (as any stripper can tell you), so I don’t recommend putting it anywhere the audience will be staring straight into it.
Strobe Lights
Any time you see a light that is flashing on and off very quickly, going from completely on to completely off instantly, you are probably looking at a strobe light. The light from a strobe is caused by a tiny arc of electricity from one pole to another. There is no filament to warm up or cool down, so the flash is instantaneous. Strobes are useful whenever you want an instantaneous flash of light, or a quickly flashing, “moviola” type of effect. One of the most interesting uses I’ve seen was an imitation “supernova” in a planetarium. (That one was a big strobe light.) A strobe also makes a great lightning effect, either by itself or inside a specially prepared lighting instrument.
Safety Alert! When using a strobe, you should warn your audience ahead of time. Some people, notably epileptics, can suffer severe physical reactions after seeing a flashing strobe. Put a notice in the lobby of your theater warning the audience that a flashing strobe light will be used during the show. What you lose in surprise, you will gain in audience comfort and happiness.
As I said earlier, a lighting instrument adapted for a strobe and fitted with a lightning-shaped shadow projection makes a great lightning bolt that you can project on the cyc, but if you don’t have the time and expertise, there are other solutions.
If you are lucky enough to live somewhere that has great thunderstorms (I really miss them out here on the West Coast), watch one go by some time. You don’t have to stand in a field and get electrocuted; just turn off the lights and look out the window. Look at the world around you when a bolt of lightning happens. What kind of light is it? A flash from a lightning bolt is instantaneous, much faster than an incandescent light. Try turning a room light on and off as fast as you can. See what I mean? An incandescent light, like the ones in your house, takes time to warm up and cool down, so it will never flash like lightning. Up until recently, the only way to really make convincing lightning was with a lightning box, which was basically an arc welder in a case. With the development of better strobes, however, you no longer need to go to the trouble and expense of having a lightning box. Strobes can be controlled with DMX (see earlier in this chapter), so they can be reliably and safely run from the lighting console. Note that you will need a real theatrical strobe, like the Dataflash from High End Systems, and not a disc jockey–style strobe from the corner party store. But let’s go back to that storm.
What else do you notice? You may notice that the light is bluish, and that it often seems to flash several times, sometimes from several different directions at once.
All these things can be recreated on stage. The best lightning effect is several large strobes coming from different directions, fired very quickly, one after another. You can get away with two, as long as you fire them off several times in a row at irregular intervals. Put some light blue filters in front of the lights to get the proper color. Sound complicated? Well, it can be, but persevere. Get two big strobes and put them on opposite sides of the stage. Set them to fire for different lengths of time and at different speeds. The irregular combination of flashes will really sell the effect. Most important, get rid of as much normal stage light as you can while the lightning is flashing.
If you can’t get strobes, here’s a really low-tech solution: if you have worklights backstage, try flashing them for the lightning effect. Worklights usually have very small bulbs, so they come on more quickly than stage lights. If you turn down the rest of the stage lights, you might get away with it.
Several lighting companies make metal patterns that can be inserted into lighting equipment to make a projected “lightning bolt” on the sky, but I would counsel against using them, unless you have the aforementioned strobe-light adapter for your equipment. As I said, incandescent lights don’t flash quickly enough to imitate lightning. Rather than trying to project the lightning bolt itself, concentrate on the effect of the lightning on the ground.
Flames, Water Ripples, and Other Lighting Tricks
As I said in the scenery chapter, silk and a fan can be used for believable fire effects, but you can also get more high-tech. To create the look of flickering flames on a wall, you can use gobo rotators or film loops, both of which slide into the gobo slot on your ellipsoidal spotlight. Gobo rotators are just what they sound like—a small motor that rotates a gobo. It is usually possible to put one gobo in the regular slot where it stays still while you rotate the other one with the motor. Depending on the choice of gobos and color media, you can get flame effects, water ripples, or really stoney disco effects. If you have more dough, you can also rotate the gobos in an intelligent lighting fixture to create this effect.
Film loops are a continuous metal strip, cut out with a flame or water pattern. The motor pulls the film across the gate in the ellipsoidal, where the light comes through. When combined with a stationary gobo, this makes the most believable flame effect.
Of course, the absolute best water ripple effect is the low-tech version. Put a big pan on the floor with about a half inch of water in it. Put a mirror in the bottom of the pan. Shine an ellipsoidal into the pan and tap the pan gently to make ripples. The ripples will bounce off the mirror and be projected up onto the set. Ah, romance.
Color My World: The Joy of Filters
The last thing the light beam sees when it leaves the instrument and heads out on its trip to the stage is a color filter.
Terminology time: color is produced by stripping away a part of the light. To the physicists, this is called “subtractive mixing.” To us, it means that filters do not add color to a light beam—they take it away. If you put a red filter in front of a beam of light, that filter will strip away all the light that isn’t red. It is sort of like that old joke: how do you make a sculpture of an elephant? Just get a piece of rock and carve away everything that does not look like an elephant.
The first color filters that appeared were actually made out of gelatin, an animal byproduct. The term gel has persisted to this day, even though filters are now made out of various types of high-tech plastic. Likewise, the piece of metal that holds the filter is often referred to as the gel frame. Since we are in search of accuracy here, let’s give them their proper names: the color filter and the color frame.
Color filters are available from lots of different companies. Filters are always referred to first with the name of that company and then with a number. For instance, Lee 120 is a dark blue filter put out by the Lee company. RoscoLux 27 is a primary red from Rosco Laboratories. GAM 385 is a light amber put out by Great American Market, and so on. All of these colors have names as well, but those names mean about as much as the names people give paint or lipstick. “Steel Blue,” for example, is a color that everyone carries, but Rosco’s Steel Blue is a different color than Great American’s. There are thousands of colors available from many different manufacturers, and they are all unique. Each company puts out sample books (persistently called “gel books”), and lighting designers spend a lot of time experimenting and keeping track of what is available. In the end, most designers develop a palette of favorite colors that they use whenever they design a show. This list of favorites is part of what gives each designer her distinctive style. As you learn more about lighting, you may also develop favorites. You may learn, for example, which colors look good on your own skin, and then you can really drive designers crazy by insisting that they use them.
Color is sold (you cannot rent it) in large sheets, usually about eighteen-by-twenty-four inches, which will give you six pieces for a six-inch ellipsoidal or fresnel, or four pieces for an eight-inch fresnel or a PAR 64. Excess scraps can be taped together with Scotch tape to make more pieces if you’re strapped for cash.
Absorbing all those frequencies means absorbing a lot of heat, which can cause the filter to fade, warp, and even melt over time. Darker colors must absorb more frequencies, which means absorbing more heat, which means they fade faster. Dark blues are particularly short-lived.
It’s a good idea to poke some holes in the color filters to let hot air pass through them. Make short, quarter-inch-long cuts with a razor blade or, to be truly cool, buy a pounce wheel from a fabric store. A pounce wheel is a little spiked wheel that you can roll over the filter to make a series of tiny holes. (The costume shop uses it to mark fabric, but do not steal theirs unless you want the crotch in your next costume sewn shut.) Do not worry about white light sneaking through the holes—unless the holes are huge, the light beams will mix together and hide any white light.
If your show is going to be running for a long time, you might want to invest in glass dichroic filters, the same kind of filters that are inside moving lights. Because dichroic filters reflect the unwanted frequencies instead of absorbing them, they remain cooler and last longer. In point of fact, they are almost eternal. All this eternity comes at a price, though. Dichroic filters are anywhere from five to ten times as expensive as plastic filters, so they are really only worth it if the cost of maintaining your filters is more than the cost of buying dichroics in the first place. Because of this equation, dichroics tend to show up in semi-permanent applications, like theme parks and architectural lighting.
To install color in a lighting instrument, get a color frame for the instrument you are coloring. (Make sure it’s the right one—color frames from different manufacturers are frustratingly incompatible.) Using the frame as a guide, cut a piece the right size. Open up the frame and insert the color, making a filter sandwich. Most color frames have a small hole punched in them so you can insert a brass paper fastener through the whole assembly to keep it from coming apart as you carry it up the ladder. Otherwise, put some tape around the edges to keep it together. Slide the color frame into the little shelf on the front of the instrument. It does not matter which side of the filter faces front.
Besides color filters, lighting companies also make a line of diffusion filters. These highly useful filters look just like color filters except that they are white and frosty, sort of like the glass in your bathroom window. They are designed to spread out the light in various ways. Some of them just soften the light a little bit, getting rid of shutter lines and hard edges, while others spread the light out over a large area. Some diffusion filters only spread the light out in one direction. This is useful if, for example, you are trying to spread the light across a drop. You can combine diffusion with a color filter in the same frame, but be sure to put some holes in both filters so the heat can get out (otherwise the filters may melt together). Diffusion comes in lots of varieties, so play around.
Color filters are especially fun to use with templates. Try cutting two different color filters in half and taping them together in a single frame. This is called a split color, and it can do fun things with an intricate pattern.
This may be stating the obvious, but since I have seen people try it, I must tell you not to try putting color into the slot where the template goes. It will melt faster than you can say … too late, it’s gone.
Putting It in the Theater: Lighting Positions
There are probably instruments hanging all over your theater, in a number of different lighting positions. The batten (remember? the long horizontal pole hanging over the stage) that instruments are hanging from is called an electric. Electrics are numbered starting at the proscenium arch and moving upstage, so the closest one to the proscenium is called the first electric. Out over the audience, the lighting positions are called beams, or sometimes coves (particularly if they are built into the ceiling). Any vertical lighting position, whether out front or backstage, is called a boom. Beams are horizontal, booms are vertical. Still with me?
Depending on the theater, there are lots of other kinds of lighting positions that have names peculiar to individual theaters. For instance, there was a set of short booms in the auditorium at San Francisco State that happened to be located over a set of speakers. They were always referred to as the speaker box lights. There was probably more than one student who went to his first professional job looking for the “speaker box” position. That term, however, was unique to that particular theater.
Many theaters have lights in a small position to the side of the apron, pretty much where our speaker box position was, and that position goes under a number of pseudonyms: side coves, juliets (because of its resemblance to the famous balcony), and often box booms. That last one is relatively common and is descended from the old Broadway theaters. When the theaters were built, the architects included box seats in the side wall of the auditorium for the gentry to sit above the madding crowd. These boxes were well to the side, almost over the stage itself, and they didn’t have much of a view. They did, however, give the audience a great view of whoever sat in them, which was more the point. As time went on (and the price of theater tickets went up), people became more interested in seeing the show than being seen by the audience, and that, combined with a greater emphasis on lighting, caused the boxes to be overtaken by lighting equipment. Today, any lighting boom in that position, regardless of whether or not there was ever seating there, may still be called a box boom. Incidentally, if you ever buy Broadway show tickets that are labeled “restricted view,” they might be selling you seats alongside the lighting booms in the old boxes.
Take a look at the diagram if you need to get oriented.
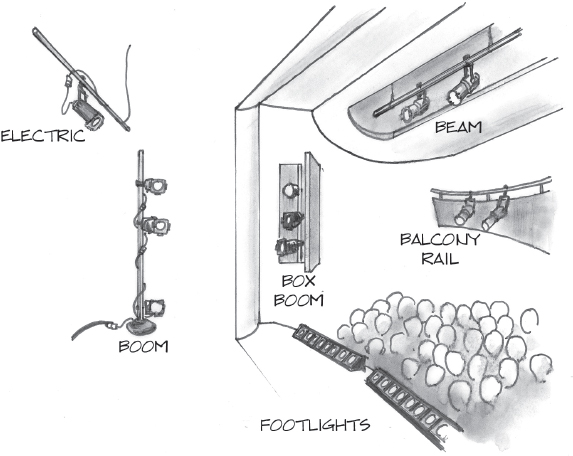
Fig. 37. Common lighting positions
2Purists will note that electrons are actually flowing in both directions in an alternating current system; but, for the purposes of a useful explanation, there is no harm in imagining that the electricity is flowing in one direction only.
3Again, physics teachers worldwide are having a heart attack reading this because it grossly oversimplifies the situation, but it’s close enough for this discussion.
4Using the simplified formula: W = 100 volts × 30 amps = 3,000 watts, so 3,000/500 = 6 instruments.
5It’s 20,000 watts, if you use the 100-volt trick.
6Sometimes called “Pulse Width Modulation” or PWM dimming. Some companies market a version known as IGBT, or “Insulated Gate Bi-Polar Transistor,” which is similar.
7In fact, DMX sends a number from 0 to 255, but modern lighting controllers translate that 0–255 scale into the 0–100 scale that we are used to. For example, if you enter 50 percent into the controller, it will translate that into the 0–255 scale and send the number 127 over the DMX network. If you are dealing with automated lights, the manual will often list both numbers, the 0–100 “level” and the 0-256 “value.” Unless your controller is specifically designed for automated lights, use the 0–100 “level.”
8According to legend, the name was coined by Genesis manager Tony Smith.
9An electronic ballast can do it; a magnetic ballast cannot.
10All moving yoke lights can turn in a complete circle, but some can go even farther. The pan number listed in the specifications tells you how far the unit can turn before it has to stop and go back the other way. The Morpheus Panabeam actually has a continuous spin mode that allows it to keep turning indefinitely.
11As I said previously, for output levels, most control boards will translate 0–256 into 0–100. For all other controls, however, the control board will stick with 0–256.
12Actually, there are more than twenty people who are credited by historians with “inventing” the incandescent light bulb. In general, the honor goes to Swan, who was the first person who actually installed workable lighting systems in homes and public buildings. Thomas Edison has been credited with the invention mostly because his lab greatly improved the longevity of the bulb and made it commercially viable. He also had better marketing.