Strawberry semolina spliffs (aka znoud el sett or lady’s arms)
Makes 6 very generous portions (or 8 slightly less generous but perfectly sufficient portions)
Global markets and imports mean that what grows when is no longer as clear-cut as it used to be. At Honey & Co we try to use what is in season locally. In the United Kingdom strawberries mean summertime, but the delicate fruit cannot survive Israel’s fierce summer sun, so the season there is in the dead of winter. Every January my mum would splash out and buy some of the first strawberries to make my birthday cake. A month later they would cost a fraction of the price, available to buy everywhere, including the side of the road, but those first few berries were precious. I wanted to recreate one of my childhood favorites, a bowl of semolina pudding with a generous teaspoon of strawberry jam in the middle, but felt that it needed a lighter touch if we were to serve it in summer. So here is a very grown-up version of semolina and strawberries. Serve the spliffs hot with cold berry salad on the side for the best results.
For the casing
1 small packet (or 6–8 sheets) of filo pastry, about 200g
100g unsalted butter, melted
For the filling
250g/ml milk
75g/ml heavy cream
60g granulated sugar
seeds from ½ vanilla pod or 1 tsp vanilla extract
50g semolina
10g cornstarch
For the strawberry compote
250g strawberries
100g granulated sugar
For the strawberry salad
1 small pint of strawberries
3–4 sprigs of mint
½ tsp ground sumac
½ tsp granulated sugar
1 tbsp olive oil
Line a small tray (about 7 inches × 4 inches) with baking parchment. If you only have a larger tray don’t worry; just use part of it. There are two ways to line the tray depending on whether you are feeling scientific or laid-back. If you are feeling scientific: cut a 7 inch × 8 inch rectangle of baking parchment and fold in half so that it is 7 inches × 4 inches; open it out again and put one half in the base of the tray with the other half hanging over the side (the scientific bit comes later). If you are feeling more relaxed about things: simply line the tray with a large piece of baking parchment.
Place the milk, cream, sugar and vanilla in a small saucepan over a medium heat and stir to start dissolving the sugar. Combine the semolina and cornstarch in a small bowl, then gradually add to the vanilla milk, whisking all the time. Cook for 2–3 minutes, whisking continuously, until the mixture thickens and large bubbles start to form. Quickly pour the thickened pudding onto the prepared tray. If you are taking the scientific approach, pour the semolina into the tray, then fold the overhanging parchment over to cover it. If you are taking the more relaxed approach, pour it onto the lined tray, spread into a rectangle about the thickness of a slice of bread and cover the surface directly with baking parchment or cling film (to stop it forming a crust). Leave to cool in the fridge for at least 40 minutes to set entirely.
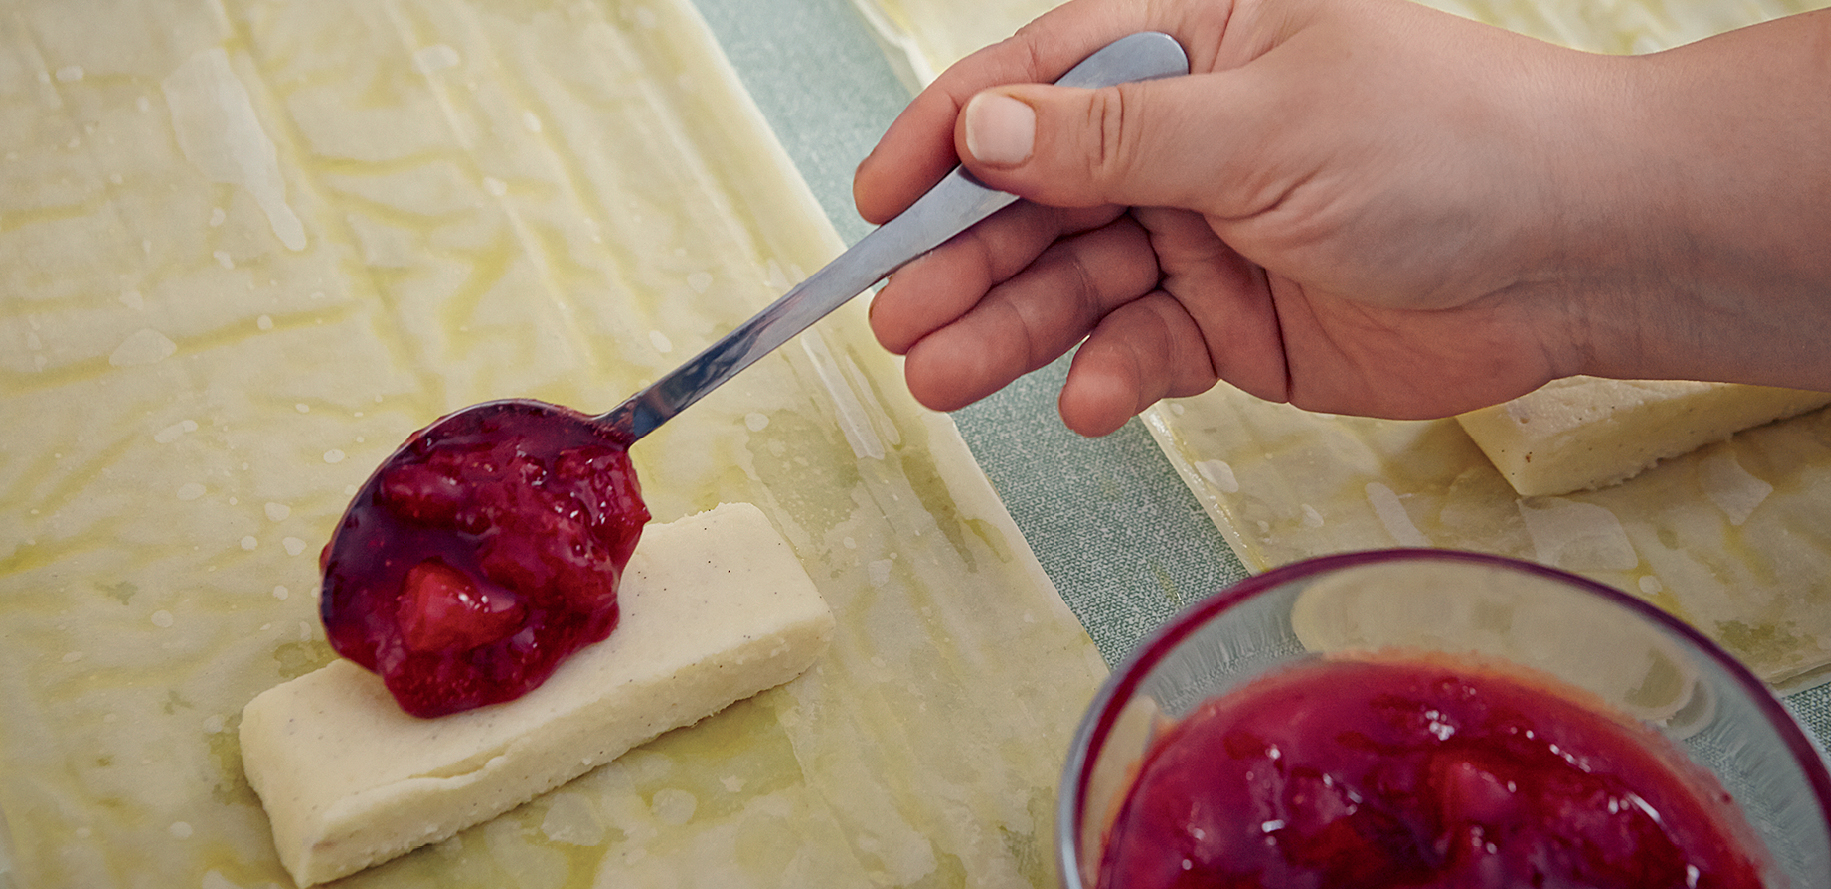
Cut the semolina into six fat fingers (or eight more dainty ladylike fingers, depending on how many you are feeding), each about 4 inches long. Store the semolina fingers in the fridge until needed (they can be kept overnight if you want).
To make the compote, remove the green stems from the strawberries and cut into large dice. Place in a large frying pan (you want a good-sized surface exposed to heat), sprinkle the sugar all over and set on a very high heat. Liquid will ooze out of the strawberries. Bring to the boil, stir well and continue to boil for 4–6 minutes or until the strawberry liquid starts to thicken. Pour into a small bowl and cool in the fridge until required (this will keep in the fridge for a couple of days, if you wish to prepare it in advance).
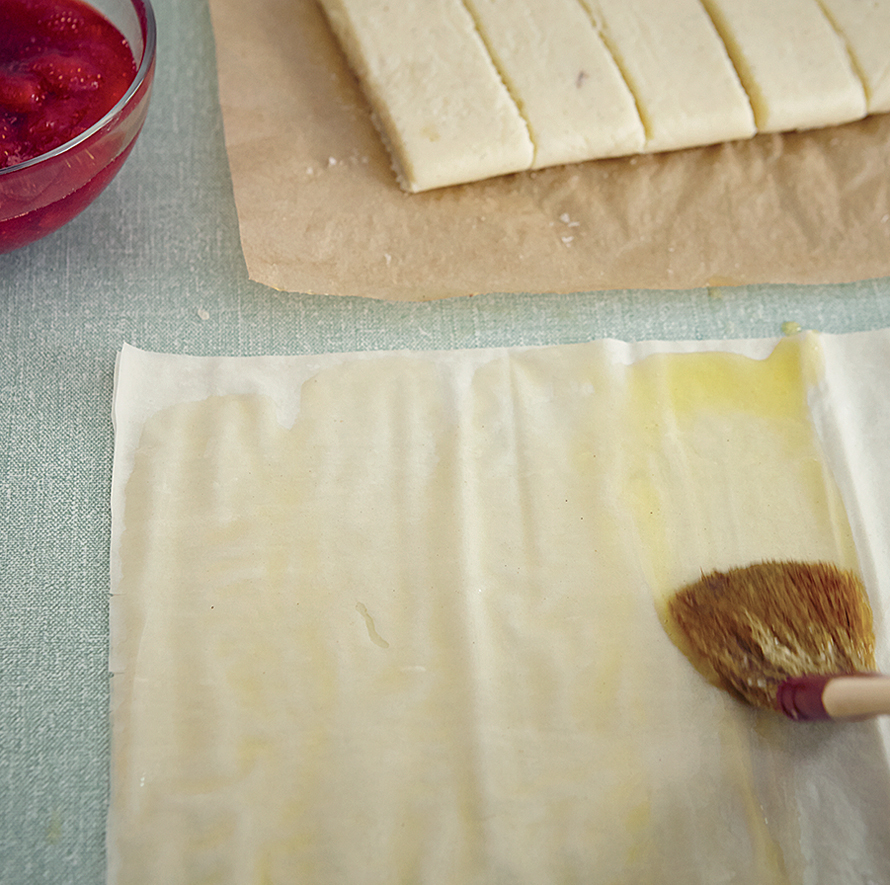
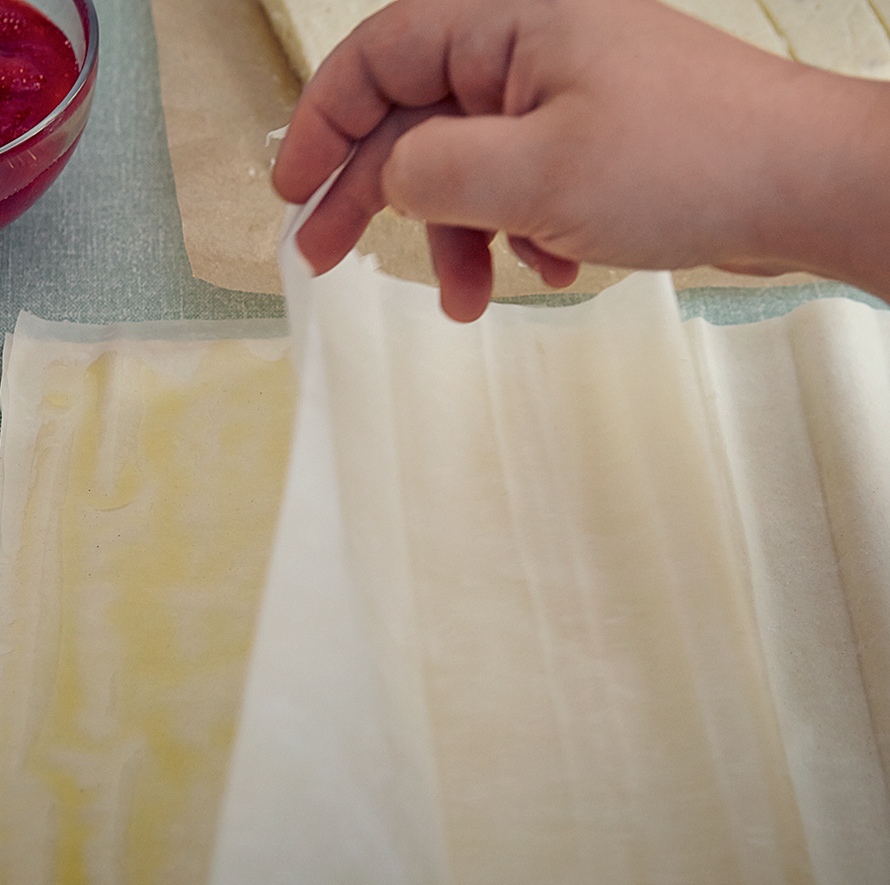
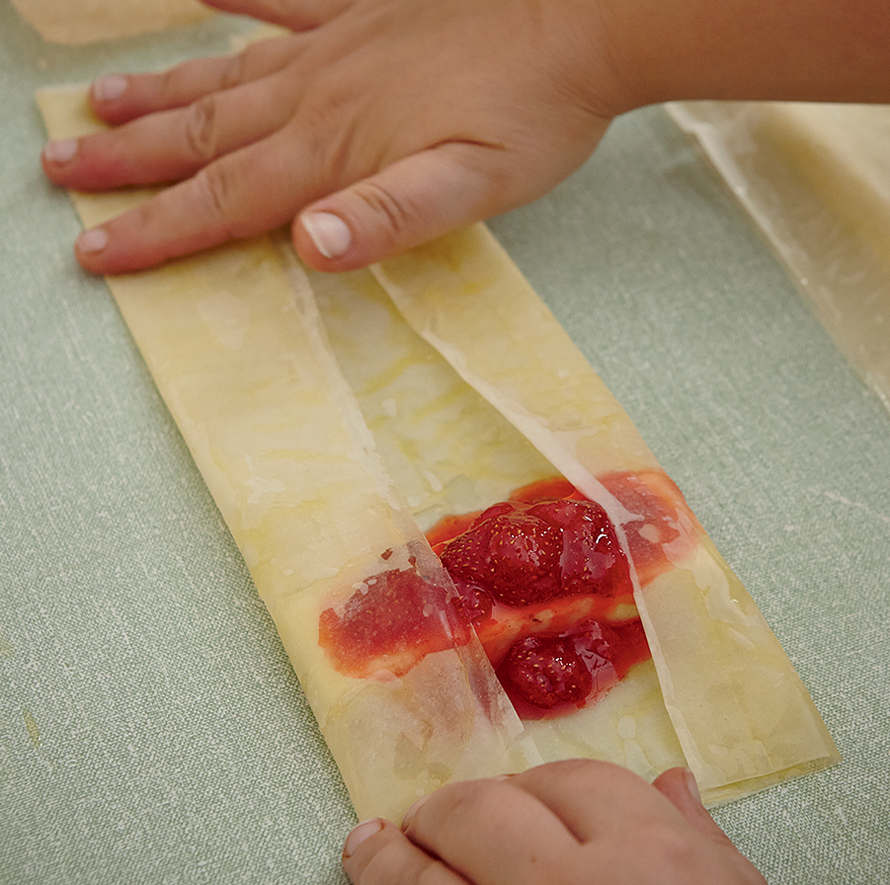
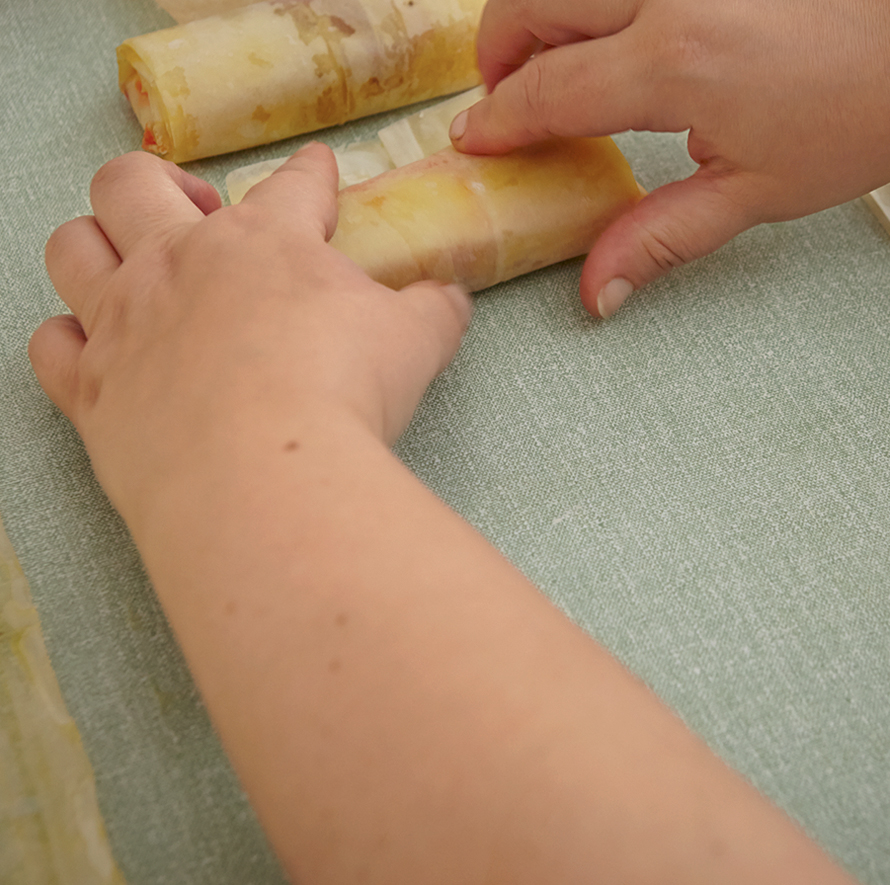
Lay the filo pastry sheets out on the workbench. Brush each one with butter and fold in half. Place a finger of semolina pudding on each sheet about 2 inches from one of the shorter edges and top each one with a spoonful of strawberry compote. Fold the long sides in to cover the ends of the semolina finger, then roll up like an eggroll to create logs. Brush the tops with some more butter and place on a baking tray. The spliffs will keep like this for up to 2 days in the fridge, or you can bake them straight away if you prefer.
Preheat the oven to 400°F/375°F convection. While it is warming up, make the strawberry salad. Remove the green stems from the strawberries, quarter them and place in a bowl. Pick the mint leaves and rip them up, dropping the shreds into the bowl. Add the sumac, sugar and olive oil and mix well.
Bake the spliffs for 10 minutes or until golden brown. Serve hot, one per person, with the fresh strawberry salad.


Hazelnut milk pudding
Makes 6 glasses of pudding
Milk pudding, or malabi as we know it best, is the most common dessert in the Middle East. In Turkey they use rice flour to thicken it; elsewhere they use other starches, including cornstarch. I was talking to Itamar in the office one day about introducing a Honey & Co version and was saying we wanted something a little richer and more complex. I saw Giorgia’s ears prick up at the mention of a hazelnut version, and when I mentioned warm chocolate sauce, she literally jumped over to us, nodding her head in excitement (she is Italian and Nutella is her favorite food). The milk pudding is lovely just as it is without the addition of chocolate, but for those of you feeling the need for indulgence, make the quick chocolate sauce too. At the restaurant we serve it in a little jug on the side, allowing the guest to decide whether or not it will join the party in the glass.
For the pudding
100g whole hazelnuts (skin on)
200g/ml half-and-half
500g/ml whole milk, plus about 100g/ml to top up
30g granulated sugar
50g honey
70g cornstarch
For added texture and crunch (optional)
40g currants, soaked in 100g/ml boiling water
50g blanched roasted hazelnuts (roasting notes here), roughly chopped
For the chocolate sauce (if you feel like it)
100g dark chocolate
80g/ml heavy cream
30g/ml whole milk
1 tsp hazelnut oil, if you like
To make the milk puddings, you need a hazelnut infusion. Preheat the oven to 400°F/375°F convection. Roast the nuts for about 15–18 minutes until very dark but not burnt. Smash them up a little, then add to the half-and-half and milk in a saucepan and set on a medium heat. Mix in the sugar and honey and bring to the boil, then remove from the stove and set aside. Allow to infuse for at least 1 hour and up to 24 hours. The first hour should be at room temperature, but after that transfer to the fridge.
Strain through a fine sieve into a bowl or measuring jug, making sure to drain the nuts completely to capture all the liquid. You can now discard the hazelnuts; it may seem harsh, but they have served their purpose and won’t have any flavor left in them. In contrast, the milk they have left behind will be lovely and nutty. Measure how much liquid you have (some will have been lost while infusing) and top up with fresh milk to make 700g/ml.
Put six nice glasses (or dessert bowls) on a tray, ready to be filled as soon as the pudding is cooked (it sets really quickly).
Mix about 100g/ml of the hazelnut infusion with the cornstarch in a small bowl. The cornstarch will go hard and seize up at first, but be persistent and stir until it forms a smooth paste, adding a little more of the cold hazelnut milk if needed. Put the remaining infusion in a small pan and bring to the boil. When the first bubbles appear, whisk in the cornstarch paste in a slow, steady stream and keep whisking until fully combined. The mixture will thicken and become gloopy. Continue whisking until bubbles start to appear again (they will look like massive molten lava eruptions), then quickly remove from the heat and pour about 100g into each of the waiting glasses (or bowls). Set the glasses in the fridge as soon as they have been filled, in order to cool the puddings quickly and achieve the best texture. They will take a minimum of 2 hours to set completely and can be kept in the fridge for up to 48 hours.
If you are making the chocolate sauce, now’s the time. Break the chocolate into pieces and place in a bowl. Put the cream and milk in a small pan, bring to the boil over a high heat, then pour over the chocolate and whisk until it has melted entirely. If you are adding the hazelnut oil, mix it in now.
I like to serve the puddings with warm chocolate sauce alongside to pour over them at the table before sprinkling with chopped hazelnuts and drained currants. The hazelnuts add crunch, the currants add moisture and sharpness, and the chocolate sauce is pure indulgence.

Quince trifle
Makes 6 individual trifles or 1 large trifle
My wife is an extremely competent pastry chef and baker, but I do believe she prefers trifle to any other dessert. Even the simplest shop-bought mass-produced trifle in a plastic cup can give her the greatest joy. Me? I like a trifle as much as the next guy, but it’s the quince here that really rocks my boat. Working and living together, there are plenty of things we don’t agree on, and there’s always plenty to argue about. However, this dessert is a good place for us to put our differences aside.
For the quince
2 quince, cored and diced but the skin left on (500g)
250g granulated sugar
½ cinnamon stick
2 cardamom pods, crushed
500g/ml water
juice of 1 lemon
For the ginger custard
200g/ml milk
3 cardamom pods, crushed
50g granulated sugar
2 egg yolks
25g all-purpose flour
½ tsp ground ginger
Toppings (if you like)
diced sponge cake (the vegan loaf cake here works really well here) or crushed ginger snaps to sprinkle
heavy cream for pouring
Put the quince dice in a saucepan with the sugar, spices, water and lemon juice and bring to the boil on a high heat. Skim off any foam that forms on the top, then reduce the heat to medium and cook at a constant simmer for 5 minutes. Ladle out 250g/ml of the cooking syrup and set aside to use for the jelly. Reduce the heat to very low and continue cooking the quince in the remaining liquid for about 20 minutes until the fruit has turned dark orange and the poaching syrup around it has become really thick and sticky. Spoon the quince pieces into the trifle bowl(s) to cool. (You should end up with about 80g in each bowl if making individual trifles.) You can use the remaining syrup to make a lovely quince Bellini with sparkling wine, or use it as a cordial.
To make the quince jelly, add the water to the 250g/ml of poaching liquid set aside earlier (to make up to 400g/ml). Pour into a small pan and warm over a medium heat for a minute or two, taking care not to boil, then remove from the heat. While the quince liquid is warming, soak the gelatin leaves in plenty of cold water until softened, then lift out, squeeze to remove any excess water and add to the now warm liquid in the pan. Stir until all the gelatin has dissolved, then pour over the quince cubes to cover. (If you are making individual portions and want to be scientific about it, pour about 60g/ml of jelly into each bowl.) Place in the fridge for at least 4 hours to cool and set (see gelatin notes here). You can leave the trifle preparation at this stage for up to 2 days.
Put 150g/ml of the milk with the crushed cardamom pods and sugar in a pan and bring to the boil slowly over a medium heat. Combine the remaining milk with the yolks, flour and ground ginger in a small bowl. When the first bubbles start to appear on the surface of the milk, slowly pour in the yolk mixture, stirring continually. Keep stirring and cook until the custard thickens and bubbles start to appear again. Remove from the heat and pass through a sieve into a bowl. Cover the surface with cling film (touching the custard so that it can’t form a skin) and chill in the fridge for at least 30 minutes.
To serve, top the jelly / jellies with the thick custard and, if you are going to town, sprinkle with the diced sponge or crumbled ginger snaps. Then let people pour cream all over for themselves before eating.

Chocolate, coffee & cardamom cake
Makes a 9 inch round cake
Enough for 10–12 as dessert
Gluten-free
This recipe is our version of one we found in a booklet by Australian Women’s Weekly. Their cakes are exactly the kind you want to eat, and their recipes are always reliable. Adding coffee and cardamom to the chocolate cake gives this a distinctively Middle Eastern twist. It is somewhere between a cake and a pudding, and works as an excellent solution when you need something gluten-free. You will have to plan ahead, though, as this cake really needs to rest for at least 24 hours before serving.
6 eggs
100g dark brown sugar
400g dark chocolate, chopped
250g/ml heavy cream
1 tsp ground cardamom
1 tbsp Turkish coffee powder (or freshly-ground coffee beans, as finely ground as you can)
2 tbsp cocoa powder to dust (if you wish)
whipped cream to serve (if you like)
Preheat the oven to 375°F/350°F convection. Butter a 9 inch round cake tin and line with baking parchment, set in an ovenproof tray with a rim and fill the tray with two fingers (about 1 inch) of hot water.
Use the whisk attachment in a mixer to whisk the eggs and sugar together until you have a strong sabayon; they should look really fluffy and hold a ribbon shape on the surface. Reduce the mixer speed to low. Melt the chocolate until smooth and warm (see notes on melting chocolate here). Whisk into the eggs in a steady stream and keep whisking to combine. Fold in the heavy cream, ground cardamom and coffee powder until fully incorporated and beautifully smooth. Pour into the cake tin.
Place the tray containing the tin and the water in the center of the oven. Bake for 15–20 minutes until the cake begins to rise and develop a crust. Turn the oven off and leave the cake inside for 10 minutes, then carefully remove. Take the tin out of the water bath and chill in the fridge overnight.
The next day, carefully remove the cake from the tin and dust the top with cocoa powder, if using. I like to serve this with a large dollop of whipped cream and a small cup of Turkish coffee. The cake will keep well in the fridge for up to a week, and is best cut with a knife dipped in boiling water to get a clean, smooth cut.