Finalizing the Garden Layout Plan
We have looked in some detail at how to develop the elements on the ground plane, or garden “floor”, to produce a preliminary garden layout plan. We have also already looked briefly at some of the strategic vertical features. In this chapter we will consider more closely how to give a three-dimensional structure to the garden through the selection of vertical and overhead features. Once the practical and visual roles of each feature have been identified, you will be able to determine the form that these features will take, what they will be made of and how they will be built.
While weighing up the advantages and disadvantages of each design choice, you may want to adapt your preliminary garden layout plan to allow for these new features as you work towards finalizing your garden layout plan. You will also need to be more specific about your choice of materials and the precise design of each area or item as well as considering their impact on the environment. Use locally sourced materials where possible.
After considering materials used for garden surfaces and structures, garden accessories should be taken into account, reviewing the range of items available for use as garden ornaments, furniture, lighting and children’s play equipment. Any garden accessories that you choose should blend in with the rest of your design. You will need to indicate their design-style, size, and colour on your garden layout plan.
While this garden layout may also give a general indication of your planting proposals, detailed planting plans are not usually finalized until the final garden layout plan has been accepted. Frequently at this stage the garden designer (or the client) will change his or her mind and decide to alter the original scheme. As any changes would probably have an effect on the proposed borders, the planting plan is usually carried out as a separate drawing (which is covered in the next chapter).
Vertical features are a crucial element in all gardens. On entering a garden, perhaps from the house or through a garden gate, the eye needs time to focus on the changed scene. It searches momentarily for a strong vertical feature on which to concentrate while adapting to the new location, adjusting rather like an automatic camera. The vertical feature may be a building, a large pot, a sculpture, or even a striking tree. Without something on which to focus, the eye will wander, and the “picture” may be meaningless. This is particularly true of gardens that rely solely on plants, for they rarely provide that strength of outline. Vertical features are vital in holding the different elements of your design together.
The vertical plane is made up of many different materials, varying from hard, architectural elements, such as buildings, walls, fences and pergolas, to tree trunks, hedges and other shrub masses. All these different components can be used to perform specific roles in garden design.
Vertical features, such as walls, fences or plants, can be used as physical and visual barriers to delineate where one space ends and another begins, whether defining site boundaries or simply separating one internal space from another. The higher the feature, the smaller the enclosed space will feel.
The height of the vertical plane affects what can be seen from various points in the garden, directing and screening views within the garden and to the surrounding landscape beyond.
The presence of vertical features will affect the exposure (the amount of sun and wind that a garden receives) by modifying extremes of climate. Walls, fences and hedges and other shrub masses can be placed strategically to act as windbreaks or to provide shade.
Vertical features, from low walls to planted areas, can be used to determine the route people will take through the space, in the same sort of way that the presence of water can influence movement through a garden.
Vertical features can act as an extension of the house, both through continuing the major lines of the force, such as the house walls, and by the repetition of materials. They can also be designed to unite the house with the surrounding landscape—for instance, by echoing the outline of surrounding buildings or hills.
Structural features should be built for a purpose, but there is no reason why they should not be objects of beauty in their own right. In selecting vertical elements, choose from the range of textured and coloured materials to complement your design and help to create the desired character of the garden, but always try to maintain a natural effect. Too many textures and colours can look artificial and self-conscious.
If you are selecting new vertical features, several factors will help guide your choice. You will need to establish the following:
– The height of the feature
– The space available
– The time scale (a yew hedge will require several years’ growing time before it can be an effective barrier, whereas a mixed native species hedge, for instance, will grow more quickly and will provide a better wildlife habitat)
– How the material will integrate with existing features
– Whether it will fit within the budget allocated for the feature
– The sustainability of the feature or material
– Can it be sourced locally?
– Will it benefit wildlife?
The walls of the house, or of neighbouring houses adjoining a garden, are often the most dominant vertical features in the site, particularly if there are no trees. If the walls are attractive they can be left exposed, and the same type of material can be used in other parts of the garden (for the vertical pillars of an arbour, for instance), helping to unite house and garden. However, using climbers to clothe the walls can attract many nesting birds and other wildlife.
In some city gardens, particularly small ones, tall house walls can be oppressive. This may be the case where the site is bounded on one or more sides by the walls of neighbouring houses, often consisting of a large expanse of one material, such as brick. One way of “breaking up” or distracting from the expanse is by painting on or adding a “dummy” window or doorway. If you use this trick (or trompe l’oeil) you can enhance the illusion considerably by the careful siting of other garden features, such as a path leading up to the painted doorway. As the wall will probably belong to your neighbour, do ask their permission before beginning any work. To avoid any disputes, all agreements should be put in writing.
Most gardens require some form of vertical boundary to establish the extent of ownership. It may help at this point to refer back to your site appraisal. If you have an existing boundary, you will need to integrate it into your proposed design. Look carefully around the perimeter of the garden and consider the following:
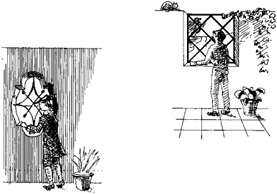
The door and windows are trompe l’oeil features. Slightly larger than life, they reduce the apparent size of the end wall.

Careful planting around a trompe l’oeil can help to add credibility to the illusion.

This false “pavilion”, on a bare brick wall, is softened by planting.
– Does the boundary provide privacy where you need it?
– Do you like the materials that have been used, and are they in keeping?
– What parts of the boundary, if any, would you like to expose or conceal, perhaps to frame or to screen particular views?

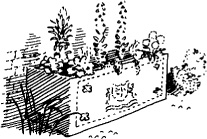
With open boundaries, the garden seems small in comparison to the scale of the surrounding landscape.
First impressions are important, and the entrance to the garden, or a garden within the garden, should always make a clear statement as to what is to be found within, even if the statement is itself a deception designed to create an unexpected revelation. When low gates are needed to exclude dogs or keep in children, they should make a simple statement of their purpose and be designed to that end. Trying to decorate an obviously utilitarian feature always creates an air of distraction and unnecessary fuss, with results that can often appear quite ludicrous.
The material from which the gates are made is equally important. All too frequently, as soon as an opening is created, the immediate reaction is to fill it with a wrought-iron gate, but often this is not the best solution. Elaborate wrought or cast iron can only be seen to advantage against a plain background such as sky, grass or water. Anything more complex, such as plantings, or even trees and shadows, immediately sets up confusion between the two images so that neither can be seen properly. In such a situation a simple pattern of vertical bars is the only solution, since it gives an air of proportion and stability to the background detail.

Entrances and gateways should be designed to communicate the intended message.

The elaborate ironwork of the gate cannot be seen properly against the background of the garden—a plain, understated backdrop is needed.

A simple pattern of vertical bars allows the house and garden to be viewed through the gate without the risk of visual confusion.
Often, a better solution is to use well-made wooden gates, either constructed of plain uprights set more closely at the bottom than the top (to add visual weight and exclude rabbits or other pests) or entirely solid. Unusual gates can be made from recycled materials, giving character to a garden. Avoid being too whimsical—there is much to be said for a solid door that reveals nothing until it is opened, since the pleasures of the imagination are often greater than those of reality.
Garden Walls
Walls are the most permanent enclosures used for gardens, and because of their expense, the workmanship involved and the protection they afford, they are often the most treasured. Apart from providing a surface for plants to grow up against, they may also provide warmth and shelter for more tender specimens.

To create an element of surprise, use a solid door which reveals nothing until it is opened.
Walls are often constructed of brick, although stone or even concrete block walls may be appropriate in certain settings.
Walls may also be used as garden dividers and may be freestanding or retaining. It is most important when deciding on garden walls to match, or in some way echo, the colour, texture and style of any existing walls.
The coping (the top course of masonry on a wall) is made up of either the same material as the rest of the wall or a special coping material. A carefully detailed coping course can make an impressive difference to the finish of a wall.
Garden walls can be divided into two types: freestanding and retaining. Freestanding walls can be used both as boundaries and as internal partitions. They can reduce the effects of noise or wind and can screen views. Retaining walls are used to retain or hold back soil, either where there is a change in level or where raised beds are required. The height of a wall will influence the amount of enclosure provided. Consider the following as a general guide:

The height of a wall determines the amount of enclosure it provides.
– Walls higher than eye level, used to form a complete visual and physical barrier, such as boundary walls, should be built to a height of 1.8 m (6 ft.).
– Walls to partially enclose an area, such as a “garden room” or space within the garden, should be 1.2 m (4 ft.) high.
– Low walls acting as a barrier between one space and another, sometimes doubling as extra seating areas or as a base for railings, should be 0.5 m (1.6 ft.) high.
– Retaining walls, used to create changes in level and to hold back soil, may vary in height. A structural engineer should advise on the construction of walls over 0.6 m (2 ft.) in height.
To support the weight of the wall, both freestanding and retaining walls need to be constructed solidly on strong foundations. Retaining walls have an added sideways pressure exerted by the retained soil. The necessity for strong construction is one reason why walls tend to be expensive.
To suit the rest of the garden, walls may be designed in a number of ways—straight or curved, stepped or slanted, rough or smooth, solid or open. A buttressed wall will generate an interesting ground pattern and introduce a sense of rhythm. A smooth-faced boundary used on both sides emphasizes the length and minimizes the width of an enclosure, while one with a rough surface, perhaps allied to slight recesses and projections, will have the reverse effect. A wall of open-work construction, such as a pierced brick screen, allows views to other parts of the garden or its surroundings, whereas a solid wall provides a complete visual barrier.
As well as being used to enclose spaces, walls may be used to support climbers and wall plants or to protect plants from exposure, particularly from wind and sea spray. Brick walls, which retain heat, are often used in temperate climates to protect tender plants and nesting birds.

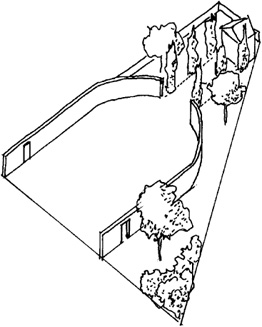
For sites of awkward shape, false boundaries can be created to detract from the real boundary.
Buttressing can give rhythm as well as strength to a wall.

Smooth-faced side walls emphasize the length of a site.
Rough-surfaced side walls emphasize the width.
Your choice of materials for important vertical features will have a significant impact on the character of the garden. You may wish to refer to the glossary, which defines many of the materials available.
Walls can be constructed of many materials, usually stone, brick, concrete or timber. These materials may be used in a variety of designs to complement the design of the garden or, particularly in the case of boundary walls, to blend in with regional styles. When building new walls always try to match their colour and texture to existing structures using, where possible, the best quality of material for the purpose. It is much better, for instance, to have a well-made close-board fence, perhaps mounted on a low brick plinth, than to build an insubstantial wall on inadequate foundations that will blow over in the first gale.
Brick is a very versatile small-scale material for use in garden design. There are many different types of brick available, but if the whole or part of the house or property is built in a particular type of brick, it is usually best to continue with the same type if it is available. This often necessitates seeking out good-quality, clean, secondhand bricks. If the house is not built of brick, introducing a brick pattern within the rest of the material can break up a monotonous space.
Brick walls can vary in thickness and in the pattern in which they are arranged (referred to as the “bond”). Some regions have traditional bond designs, which are often determined by local conditions.
The colour, texture and strength of the brick itself must also be considered. Facing bricks are often used to finish a wall, the interior being made of less expensive breeze blocks. Engineering bricks, which are darker in colour (from being fired for longer), give greater strength, as they do not absorb as much water. Bricks can have a smooth finish or can be wire cut, with a dragged finish. A coping of weather-resistant bricks, such as engineering bricks, should be used to finish the top of a wall to prevent water from penetrating the walling below.
Brick walls can be finished with a course of bricks on edge, and tiles can be used to create a “lip” or overhang that will help rainwater to drain off without damaging the wall. Compared with stone walls, which can be built to follow the curves of a landscape, brick and concrete block walls are more rigid, although they can be stepped for changes of level.
Stone will vary according to your region, and your local stone will probably be the most appropriate. If it is limestone or sandstone and can easily be quarried, the stones may be similar enough in size so as to be coursed (with the stones fitting easily together in layers). Other stones, from fields or seashores, will vary in size and can be used in a random fashion. (Since it is illegal to collect stones from some beaches, it is better to buy them from commercial sources.) Traditionally, stone walls were built dry, without mortar to hold them together. If you have a local builder who is skilled in dry-stone walling, this can be very effective, but, as many walls are now constructed from reconstituted stone, mortar jointing is more common. Random stone walls look most authentic when finished with a top course of stones on edge, or stones roughly shaped to an angle (or batter).
Concrete block walls, although less beautiful than natural stone or brick walls, are also worth considering because they are considerably cheaper. They may be rendered and brushed, or imprinted in a variety of ways to imitate brick or stone. Alternatively they can be clothed in evergreen climbers. Concrete blocks are usually used to build retaining walls, which can then be faced in natural stone or brick, or rendered.
Steps that mark changes of level in a garden should be designed with great care so as to be attractive, comfortable and sympathetic in scale and material to the part of the garden in which they are to be sited. Variations in step design are endless, varying from simple straight flights of steps to elegant curving staircases, complete with landings for viewing and highly ornamental balustrades.

Your choice of materials for steps should be in keeping with the site and meet practical requirements.
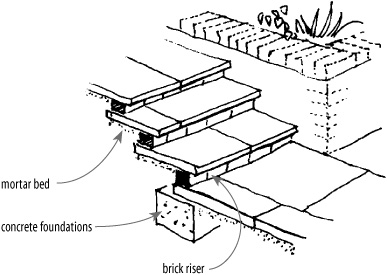
The choice of material to construct steps is diverse. Risers need to be constructed of some solid material, such as stone, brick, concrete or timber, but treads may consist of a loose material, such as gravel or wood chippings. Any loose material will gradually tend to sink and will need topping up every few years. Where growing conditions are right and the stairs will not be subject to heavy wear, grass treads may also be suitable.
Steps may run at right angles or parallel to a change in level. They can change direction as they progress, as in a curving flight of steps, or can change direction partway up the slope, using an intermediate landing. Steps may be recessed, either fully or partially, into a higher level, or project out onto a lower level as a freestanding structure. In the latter case they may need a handrail to provide a safety barrier in the absence of side walls. When designing steps, consider these points:
– To help you get the proportions of steps right, use the following reliable formula: twice the riser height plus the tread depth should equal 680 mm (2.2 ft.).
– Risers should always be the same height, except in very informal situations, such as when using rocks or tree trunks as steps.
– Avoid exceeding fourteen steps in any one flight without the break of a landing.
– A slight projection of the riser material, such as brick or stone, will enhance the visual effect.
Usually made out of the same material as steps, ramps are often necessary in a garden, both for easy circulation for the less able and also for ease of movement with a wheelbarrow or mower. If space allows, a ramp can be included within the step area. Crucial in the design of any ramp is the angle of the slope-this should be as gentle as space allows and, for safety, no more than a one-in-twenty slope. For details, see Chapter 2.
Fences are generally less costly to build than walls, at least in the short term. They create a more instant enclosure than hedges, and for this reason they are often used to provide temporary as well as permanent enclosures. In the long term they can be more expensive; even if treated with preservative, the base of timber fence uprights are liable to rot and need replacing after eight to ten years.
Fences can be designed in a number of ways to suit the location and purpose. They can be designed and built as solid structures, or they can be built more loosely to allow views, light and wind through and to provide a surface for climbing plants to ramble through or over. Whether fences are used for boundaries or for internal divisions, their design should be in keeping with the locality, whether urban or rural. You should take into account both practical and aesthetic considerations:
– What is its function?
– How long will it last?
– How much will it cost?
– What maintenance will it require?
– Is it well proportioned?
– Is it simple and unfussy?
– Does it reflect the local character?
– Is the material sustainable and can it be sourced locally?
There are many kinds of fence, but do avoid larchlap, the most frequently used (probably because it is the cheapest), which is made from thin interwoven slats of wood, generally supported by inadequate posts that are 100 mm (4 in.) square. What is cheap to begin with becomes expensive when it has had to be replaced on several occasions, and it is therefore better to pay more at the outset for something reasonably permanent. A close-board fence of overlapping vertical planks with three, rather than two, arris rails and concrete supports firmly set in the ground is a good choice, since only the lowest board, in contact with the soil, will need replacement.

A well-constructed closeboard fence of pressure-treated timber is far superior to fencing consisting of flimsy panels of interwoven slats.
It is quite possible, however, to invent fences of your own that can be made to order by a local carpenter. Many kinds of arrangements, where slats or boards are used alternately on both sides of the supporting cross members, can be useful since light and air can pass through to a greater or lesser degree, depending on the spacing. These are particularly appropriate in exposed situations, as they do not present such a solid barrier to the pressure of the wind. If a neighbour has installed a larchlap fence, staining or painting the offending item matt black where it projects into your garden can make it seem to disappear.

Examples of alternating fencing which could be custom-made to order.
Sometimes a chain-link or galvanized mesh fence, hidden by plantings, may be all that is required, but in this case careful thought must be given to its colour. The “green” generally sold for gardens is an impossible colour, far too artificial to be seen in any natural surroundings. Olive, brown or black are better alternatives, being easily camouflaged against the shadow patterns of trees and shrubs. Ivy or other climbers can be grown through the chain link fence, eventually creating a “fedge” that is impenetrable, wildlife-friendly and aesthetically pleasing.

Ivy, especially large-leaved cultivars, can very effectively turn a chain-link fence into a dense, evergreen and narrow “fedge”.
Timber can be used both for urban and rural fencing. It is constructed in a huge range of styles and materials, from rustic wattle hurdle and chestnut paling, to elaborately crafted structures with white pickets and finials. In an urban situation, timber looks good stained or painted to blend in with existing features, while in a country setting, fencing should provide a link with natural surroundings. The positioning of the uprights will depend on what is to be kept in or out, but an imaginatively designed fence can be a great asset in a garden. All woodwork must be pressure-treated before use. Bamboo fencing can provide an ideal screen for oriental-style gardens, and many recycled materials can also be used effectively.

Natural materials like bamboo or rustic poles can be used to creates screens of varying heights and densities.
Metal fencing is often effective in urban situations, particularly where ironwork has been used locally for railings, street furniture, lighting and so on. Antique wrought-iron railings are sometimes obtainable from an architectural salvage yard, or steel reproductions of old styles can be used. Good-quality ironwork fencing tends to be considerably more expensive than timber fencing, but it is generally more durable. It does, however, require regular painting with bituminous paint to guard against rust.
Log-filled gabions have recently become a popular method of creating a high but impenetrable wall. They carry the advantage of doubling as a home for insects.
Trellis is a type of fencing consisting of a network of crisscrossing wooden slats, or occasionally steel slats, usually attached to a frame. It is manufactured in units of varying sizes and styles but can also be tailor-made to fit the exact dimensions of a site and complement the rest of the design. When choosing trellis for your garden you should first establish the desired degree of visibility through the trellis panels, particularly the size of the aperture between the slats.
Trellis can be used as a decorative feature in its own right (also known as treillage) or simply to provide an inexpensive support for climbing plants. It can therefore be very useful for screening purposes, whether between different parts of the garden or to extend the height of an existing boundary wall. If you intend to cover a trellis in plants, you will need to select panels of strong construction and provide robust supports, such as thick posts concreted into the ground. For extra durability and to prevent the timber from rotting, posts can be inserted into a copper tube that is then bedded into concrete. Ensure that the timber has been treated with preservative. The trellis can also be stained or painted, but this requires more upkeep—and remember that any plants may hamper future maintenance.

Trellis is usually supplied in panels. To install it, it should be raised slightly off the ground and screwed to supporting posts concreted into the ground.

When designing any fencing or trellis work, it is important to consider where the supporting posts should be sited. Try to position posts either side of a foreground feature, such as a bench—rather than having one post bisecting it.

Each of these six trellis infill panels will need the lowest rail supported in the centre—as shown in the detail (above).

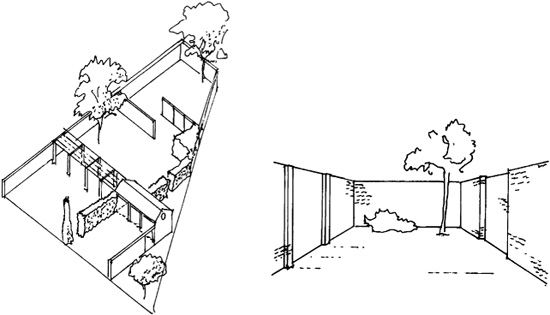
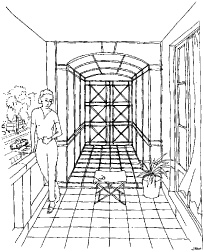
As an alternative to trellis panels, simple screens can be constructed out of timber or ironwork. In this contemporary garden the screen acts as a division between two areas, but allows light through to the rear of the garden.
In a large garden, if you want to create a hidden or unobtrusive division, you could consider using a ha-ha, a ditch-type feature that was popular with many garden designers in England in the eighteenth and nineteenth centuries. Originally used as a device to divide the garden from surrounding parkland to prevent the intrusion of deer or farm stock, a ha-ha is a boundary in which a wall—or sometimes a fence—is sunk in a ditch and is therefore invisible from the garden, while still excluding intruders.
Increased production of iron rails and wire netting led to a decline in the popularity of the ha-ha, but the principle can be adapted for use in modern gardens. Although expensive to construct, a ha-ha need not be very long, the ends of the ditch being concealed and the view framed up by hedges or plantings. If you choose this solution, it is important to create a foreground of plain grass, paving or gravel, since any form of ornament will only detract attention from the view.

Section through a ha-ha showing the sunken wall and ditch.

The ha-ha prevents livestock from entering the garden.

View from the garden over the invisible, sunken ha-ha.
The more decorative aspects of planting design will be dealt with in Chapter 4, but at this stage you will need to consider the structural role that plants have to play in the design of your garden, defining spaces and directing views in a similar way to walls and fences. The scope for different kinds of “living” boundaries is enormous, varying from strategically placed trees that imply, rather than dictate, a division of space, to dense, impenetrable hedges. Until it is established, it may be necessary to use wire or other netting to protect a young and newly planted hedge from marauding rabbits or deer, which are attracted to any young foliage, even that of poisonous plants such as holly or yew.

The height of your proposed border planting may greatly influence the degree to which spaces are enclosed.

Begin to think about the structural planting in terms of its purpose in the design. Ask yourself the following questions:
– What degree of enclosure is needed?
– How high should it be?
– For what portion of the year is the planting needed?
– How much space is available for establishing the structural planting?
– How can it benefit wildlife and bolster the garden’s ecosystem?
– What maintenance will be required?
Having considered the practical elements, ask yourself what style of planting would complement the house. If the house is tall and imposing, the plants should also be substantial. If it is long and low, a tall fastigiated (conical or tapering) tree could look out of place.
Often a green wall, an extension of the building into the garden, is desired. For this, it is necessary to choose a plant with a neat, close habit of growth which will not only accept being clipped into an architectural shape but will also retain that shape for a full twelve months (since constant clipping is a time-wasting activity). Some shrubs clip neatly and make a good dense hedge but need frequent cutting to keep them in order, while others, such as box and yew, need only a yearly cut.

The hedge acts as “wings” and helps link the house to the surrounding landscape.

The hedge is used as a green wall to screen the utility area from the garden.
Where space allows, you may want to consider hedges that can be left to grow naturally without clipping. They can provide a native habitat for wildlife.
Where a tall narrow screen is needed and a hedge would take too long to grow, pleached trees (the branches of which entwine or interlace) are often the answer. In effect, these provide a hedge on stilts. The trees must be pruned every year to keep them neat, and it is best to use types with an even habit of growth, reasonably flexible wood and no thorns.
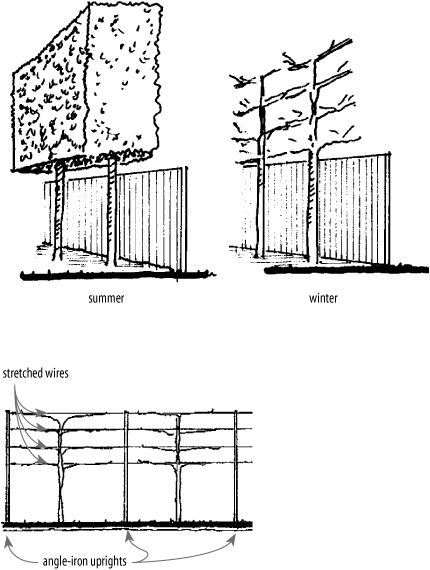
Before planting the trees, a framework must be constructed. Angle iron uprights, drilled to take heavy gauge wires, are concreted into the ground at intervals of 2–2.5 m. The wires are then threaded through the holes in the uprights and stretched taut by strainers at the end of the wires.
If you are growing them next to a fence 2 m (6.6 ft.) in height, you should use trees with clear 1.75 m (5.7 ft.) stems, above which the lateral branches will spread out in even, entwining rows until the desired height is reached.
If you require a tall screen and you have the space, you can plant a tree screen. Many are far too large in scale and too greedy to be suitable in most gardens, but some fastigiate (or conical) trees, planted perhaps 1.5 m (5 ft.) apart and lightly trimmed front and back, will make a tall screen with a lot less effort than pleaching. Like hedges, trees for pleaching or screening must be planted in very well-prepared ground and be fed and watered regularly.

A screen of deciduous trees can provide an effective barrier in the summer without shading out the garden in the winter.

Fastigiate trees are most suitable for tree screens—they can be planted close together and trimmed to shape.
If the hedge or screen is to provide a background to decorative planting, such as a flower border, it must be light absorbent and recessive in character in order to give a foil to the shapes and colours placed in front of it. Yew is ideal for the purpose since it is dark in colour and has a close matt texture when clipped.

Hedges can be used as a backdrop for decorative planting. A well-chosen hedge will provide a neutral foil to accentuate the colour and shape of the plants.
When the hedge is simply making a division of space or concealing some element, such as a vegetable garden, it can be decorative in its own right, perhaps with coloured foliage, flowers or fruit, and of varying degrees of formality. Tapestry hedges, made up of a mixture of different species such as holly, field maple, privet and beech, can be interesting, but as the different species vary in growth rate, clipping can be a problem.
Most hedges will need regular clipping during the growing season, the number of times being dependent on their speed of growth. Privet (Ligustrum) grows quickly and will need clipping every six weeks or so during the growing season, whereas yew (Taxus), box (Buxus) and native hedges grow more slowly, only requiring clipping two or three times per year. A tapestry hedge will need to be clipped often to contend with the fastest-growing of the species.

Shaped or topiary hedges lend structure to the garden.

Some plants can be used as a “natural” hedge without the need for regular clipping.

A tapestry hedge is made up of several types of plants.
Hand-held electric, battery- or petrol-driven hedge trimmers are widely used and give high-quality results; they are much easier and faster to use than traditional hand shears. Check that their weight will suit the user. (Be sure to allow space for a narrow path at the back of the hedge to accommodate ladders and other clipping tools.)

Hand-held rechargeable electric hedge trimmers are useful for lower-growing hedges such as box.
The overhead plane is created by elements such as pergolas, arbours, tree canopies and umbrellas or awnings. Its main role in the garden is to influence the amount of light entering a space, but it also affects the apparent scale, helps link the garden to the house and gives privacy.
If your garden is rather gloomy, receiving very little sunlight during the day, you will want to limit any overhead elements as much as possible and place vertical features with great care to avoid shading out what little sunshine the garden receives. If, on the other hand, you have a garden that receives a lot of sunshine, you will need to think carefully where to place the overhead plane so that those using the garden will have some relief from the heat and brightness of the sun at appropriate times of day and year.
Apart from their practical role, overhead features can add greatly to the aesthetics of a garden by creating interesting shadow patterns on the ground, from the dramatic lines cast by pergola crossbeams to the moving, dappled shade of sparsely foliaged trees.

Dramatic shadow lines are created by pergola cross-beams.
The presence of overhead features greatly influences how we perceive the size or scale of the garden and is thus largely responsible for its atmosphere. The highest overhead plane is, of course, the sky, which is constantly changing. Even the presence of low cloud or mist lowers it and thereby affects the scale and atmosphere of a place.
Overhead features can give a garden atmosphere. This “awning” has been inexpensively created by training a vine through high wires.
If you want to create an intimate atmosphere—in the entertaining area of a garden, for instance—you could lower the overhead plane, perhaps with an arbour or a large umbrella. Conversely, if a tall tree creates an oppressive feeling, you can open up the canopy by removing some of the overhanging branches or thinning them out. To avoid “bleeding” it is best to do this work in winter when the sap is not rising, but to ensure you achieve the desired finished effect, any branches to be removed should be marked with coloured string or paint before the leaves drop.
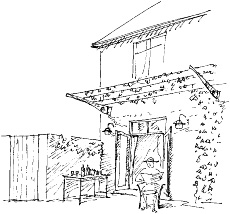
The overhead plane can be used to link the garden to the house by repeating materials and continuing the line of an indoor ceiling, perhaps in the height of an awning, to provide continuity between the indoor and outdoor space.

The line of the indoor ceiling is repeated in this slatted awning, which gives dappled shade on the terrace area.
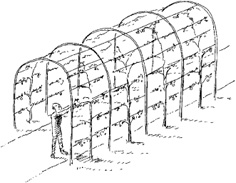
A pergola is a covered walkway designed to provide shade over a frequently used path during the summer months. It must, by definition, lead from one point to another—from a terrace to a tennis court or summerhouse, for instance. When used correctly it should help to integrate the overall space. The view seen through it should entice one to make the journey, and a focal point such as a tree, statue or urn will help to draw the eye and encourage its use.

The urn at the end of the pergola acts as a focal point to entice one through.
For a contemporary house or one of very plain design, uprights of simple steel tubing set in concrete blocks below ground level can be effective, while Victorian and Regency gardens lend themselves to tunnels of wrought-iron hoops to support climbing roses or clematis. It must be remembered, however, that metal structures have to be repainted at intervals, which can be a problem if they are covered with climbers. In hot countries, metal structures may retain heat and burn the plants that are growing on them.

A pergola constructed of freestanding metal arches may be made away from the site and simply installed in foundation blocks.
Proportions are important. Ideally the structure should be wider than it is high, or at the very least should form a perfect square—one that is much higher than it is wide always looks uncomfortable, especially when supporting plant growth on top. Pergolas can be constructed in tunnel form, where the arches are set not more than 1 m (3.3 ft.) apart, but usually the spacing of uprights along the length of the pergola is one-quarter more than the spacing across the walk, which is conducive to easy strolling. If the uprights are particularly large, say 500 mm (1.6 ft.) square, the spacing can be wider, but it must not exceed a reasonable distance for the lengthwise crossbeams. Normally the beams across the path are heavier, making the walk effectively a series of arches, and are linked lengthwise by lighter woodwork over which the plants can scramble. If the pergola or walkway is extensive, it may help to “break” it occasionally by leaving a gap, allowing the user temporary relief from the tunnel-like effect. Climbers may be used to great effect, but should be chosen carefully so that they do not encroach on the space, attacking people walking through. If climbers tend to hang down from above, wire or sheep netting can be fixed on top of the crossbeams to carry the plants across horizontally. After a few weeks the wire will have weathered and will no longer be noticeable.

In hot countries, pergolas can provide welcome shade over a walkway.

A pergola used as a covered connection to the car port.

Pergolas need a point of destination, leading, for instance, to a summerhouse, tennis court, conservatory or garage.

Twin steel-tube scaffold poles are linked at the head by a timber “capital” with two pockets.

Scaffold poles can form strong, light, pergola columns. When used in pairs they look stronger than when used singly. They may be used across or along the pergola.
A hooped or arched pergola, with tension wires, is suitable for training espaliered fruit trees. Space the arches about 1 m apart.

A clear 800 mm below the beams allows for trailing and hanging climbers to grow without interfering with people walking underneath.

When designing a pergola always ensure adequate width and height.

Try to avoid these typical defects in pergola construction.

Pergola with robust columns of stone, brick or timber. The spacing of uprights along the length of the pergola is normally one-third more than the spacing across it.
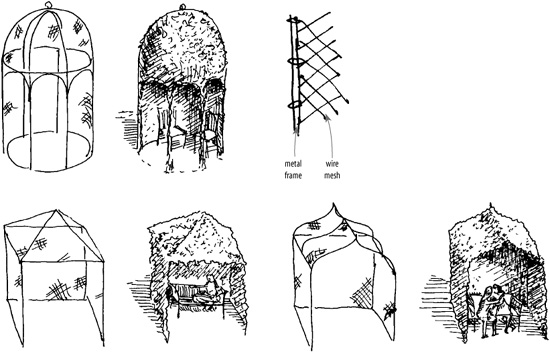
An arbour provides shade to a static area, such as a terrace, where one can sit and enjoy some relief from direct sunshine. It should not be confused with a pergola. Again, as it has a strong structural element, the materials used should relate to adjoining buildings and the general style of the garden. For the same reason, the construction must not appear flimsy. The weight and sideways pressure exerted on it by mature climbers can also be considerable.

The basic framework for an arbour can be quite straightforward. However, with additional trelliswork and infill panels, it may be modified to suit the owners’ needs and their surroundings.
Arbours may be constructed in a similar way to pergolas, perhaps with back and sides infilled with trellis, or vertical slats, possibly arranged in alternately slatted fashion to give greater protection while still allowing light and air to enter. The roof crossbeams may also be closer together, since shade for sitting needs to be denser than that over a walkway.

This timber arbour makes use of an existing old wall for some of its support.

This arbour is created by wires stretched between two buildings. Tensioning turnbuckle wire strainers hold the cable taut. They are available from yacht chandlers and specialist suppliers. The wire can span long distances and support vines.
Arbours can be constructed out of mesh stretched between metal framing. If desired, the arbour can be completely covered with a suitable climber, totally obscuring the metal framework.
A more solid garden building may be required for use on cold bright days and for protection from wind. There are many types available commercially, but before making any decisions, examine the garden itself. Are there any unused outbuildings which, with alteration (such as glazed doors or new and larger windows) might be adapted to suit your purpose? Such a solution may well be cheaper and more satisfactory than building or buying something new.
Look into any building proposals carefully, and try to discover any hidden problems, either of construction or maintenance, since the superficially attractive may prove to be badly made, poorly proportioned or impractical to use. As with all other elements that make up a total design, the appearance must suit the style of the garden and its surroundings.

Disused outbuildings may be able to be adapted as garden rooms.
It may be wiser to adapt an outbuilding than to dispose of it altogether.

However, it could have been kept and easily adapted for another use.
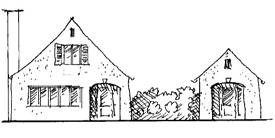
New garden buildings are more successful when they look as though they were built at the same time as the main house.

Choose the styling of your garden buildings with care. This Chinese-style kiosk looks most odd in this European country garden.
The siting of trees in a design is as important as any other element. Trees capture space and, by doing so, shelter a garden and provide it with a sense of security. They should be chosen and positioned with great care.
Before deciding on a particular species you should think carefully about the effects you want to create with different forms, foliage, colours and so on. Consider how a rounded or domed tree, such as a hawthorn (Crataegus prunifolia) or maidenhair tree (Ginkgo biloba), might look in the space, then try a tall slim vertical shape, such as a columnar Irish yew (Taxus baccata ‘Fastigiata’). Each of these will create a different effect, and the outline shape, seen perhaps when leafless in winter, should always be the first consideration. Avoid reaching for your catalogue until this has been decided, or you will be overwhelmed by choice.

The outline shape of a tree is the first thing you should consider when making your selection. Do not forget to anticipate how the ultimate size of a tree will affect the space that it occupies.
The character of a tree varies enormously, depending on whether it is evergreen or deciduous. The colour, size and texture of leaves, trunk and bark; the ultimate height, breadth and growth rate; the density of the canopy and how well the light penetrates through—all of this needs to be taken into account.
Once the surfacing and structural elements of a garden have been established, there are many supplementary items, used to furnish the garden and enhance its layout, which need to be finalized. These may be vitally important for making a particular design statement or allowing an area to function in a certain way, or they may simply provide the finishing touches to a design.
If you leave the choosing of ornaments to the end of a project, you may find that there is little left in the budget to do justice to these elements. This is a mistake, because ornaments, if used, should be an integral part of the total scheme; they should be carefully chosen at the same time decisions are made about the hard landscaping so that they complement other features.
What you choose need not be new, elaborate or expensive. Indeed, ornaments and objets d’art that may have been collected over the years will give a garden individual character—similar, perhaps, to the house interior. A simple approach is often best. It is not what you use but how you use it that is important. There may even be old statues or urns already in the garden, which could be restored to create an important focal or talking point.
Large objects, particularly when placed high in relation to normal eye level, give a feeling of drama and aspiration very suited to an extrovert garden, while those that are small or placed below eye level are more appropriate to creating a feeling of introversion in a scheme.
Simply because a garden is small, it does not follow that everything in it must be small; carried to an extreme, this could suggest a garden for dolls rather than humans! A bold feature, well chosen and placed, can give an air of grandeur to even the most modest space, providing that its general character is suitable to the position.
Searching for a particular object can be fun, and over the past few years a number of specialist salvage companies have sprung up, carrying out a thriving trade in old chimney pots, doors, pedestals and so on, recycling the unwanted objects of others. Local auctions, house sales or junk shops can be worth investigating. Garage sales, car boot sales and flea markets often provide interesting items at reasonable prices.
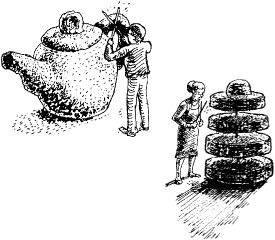
Chimney pots, with their bold shapes and slender outlines, can look very good either alone or in groups, as can large drainpipes set at varying levels, particularly in a modern garden. Old sinks, complemented with rocks or stones, are now much sought after as planters for a selection of alpine plants.
Old sections of sculptured ornaments from demolished buildings, broken columns and lengths of cornice may find a place in the more romantic garden, perhaps set low among the natural sculpture of dramatic foliage.
Often easier to obtain are the many reproductions—some excellent, others much less so—of antique ornaments that are widely available. Provided they are cast from fine original pieces, as many of them are, both lead and reconstituted stone items are very satisfactory and, when weathered, almost indistinguishable from the originals. They are, indeed, better in some respects since they have not had to endure a century or two of exposure to the climate, and if they should be stolen they are easily and relatively cheaply replaced.
The new appearance of reconstituted stone items can be tempered by brushing them over with yoghurt (which encourages moss) mixed with soot if a darker colour is desired. Manure water will have much the same effect but is less than pleasant to apply.
Reproductions that are cast or moulded in plastic are often finished with crude detailing and so are best avoided.
Natural objects such as interesting bits of driftwood and sections of tree trunk can look effective if placed in an appropriately wild or naturalistic setting. Ideally, every garden should contain a small pile of rotting-down wood as a home for all manner of creatures, helping the natural ecological balance to combat pests and disease. “Wild” stones and boulders can be bought from garden centres, which is a better option than removing them from environmentally sensitive areas.

Rocks and boulders can look effective in a naturalistic setting.

An untidy pile of logs provides hiding places for many garden creatures.
In addition to the more usual types of garden ornament already mentioned, many other items can add a personal touch to your garden. For easy reference, these are listed here in alphabetic order.
Balls and finials are basically ornaments for gateposts, the ends of walls or the corners of buildings. The simplest, and often the best, are variations on the theme of the stone ball, but pineapples and closed urns with lids to keep out the weather can also look attractive. Eagles and heraldic beasts can look pretentious and are best avoided. A finial on a well-designed column can make a striking object and terminate a vista or form the centrepiece of a large circular feature.

The uniform shape of stone balls is an effective contrast to the informal shapes of plants.
Balustrades are used to create a safety barrier at the edges of retaining walls, terraces and steps. Reconstructed stone rails or copings of classical design are easy to purchase, as are cast iron ones. A lighter effect can be achieved by creating your own designs and having them made up in wrought iron by the local blacksmith.
Birdbaths and feeders, provided they are kept clean and constantly supplied with food and water, can bring a lot of life and interest to the garden. Placed in an open position, well away from trees or hedges where cats can lurk, they can be very decorative in themselves, although the design and the material used must accord with the character of the garden. The level should be above the spring of a cat, and there should be a strong overhang to discourage marauding squirrels. Providing water for birds also reduces the risk of their attacking foliage in search of moisture.

This simple bridge of two planks has a balustrade for safety.
Bridges are practical necessities for crossing stretches of water or streams and must be designed primarily for safety. However, their design should also suit the character of the garden, both in style and in scale. Although they can be highly ornamental, especially when reflected in water, bridges tend to look ridiculous unless they serve some functional purpose, such as linking one part of a garden to another.
Cisterns made in lead, or occasionally cast iron, were originally used to collect rainwater, for which purpose they are still admirable, and are far more attractive than a plastic water butt. Filled with soil, they are also good for planting, since they allow ample room for the roots of permanent plants. Fibreglass imitations of lead cisterns are available, but these do not weather down to the matt texture of natural lead.
Old lead cisterns make ideal planters.
Clair-voyées are essentially grilled openings made in the garden boundary, whether wall or hedge, to give a view out onto the countryside beyond. Unless the view is of sky, or a very distant landscape, it is best to have a plain grill in upright wood or metal bars, since any elaborate pattern will tend to clash with whatever detail lies beyond. A squared trellis can be equally effective, and concrete screen-blocks of simple design can look good in a modern garden setting. Sheets of plate glass can been used, but birds may injure themselves trying to fly through these.
Clair-voyées, traditional and contemporary, provide views out to the surrounding landscape.
Dovecotes are an interesting addition to a large garden, particularly if stocked with some of the more unusual varieties of doves or pigeons. Since they tend to breed rapidly, it is best not to provide too much accommodation, so that the surplus stock is encouraged to move elsewhere. Like other animals, birds need proper feeding and attention, and they can create problems with their droppings and occasional forays into the kitchen garden.
Flower pots of the ordinary terracotta variety, in various sizes, can be grouped on steps, at the corners of terraces and beside seats to very good effect. Some may contain permanent plants (brought out from the greenhouse or conservatory in the summer), while others can hold bedding plants or lilies that may be exchanged for something else when they have finished blooming. If possible you should try to have a small space where things that are finished, or not yet ready, can wait. Generally speaking, the simplest and most traditional designs are best, but if the pots are to stay year-round, they must be made from frost-proof clay. However practical, plastic pots do not look attractive on display, although they can be placed behind clay pots in large displays, allowing only the plants to be seen.
Mirrors, used with care, can magically extend the apparent size of a small garden, but they should always be set at a slight angle to the viewer-it is disconcerting to suddenly meet oneself face to face! They must also be protected from the weather and be placed so that soil cannot be splashed up onto them. Birds often injure themselves trying to fly through the mirror. To avoid this, a mirror fixed in an arch or doorway can be placed behind a metal gate or frame, making it less attractive to birds and more realistic to the viewer.

Mirrors can be used to give the illusion of extended space. Make sure that they are well sited, and that the edges are obscured.
Sundials, although hardly useful, are both decorative and popular, forming an excellent centrepiece for a formal garden. They range from grand and complex armillary spheres to simple columns topped with a plate and gnomon (the rod or pin that indicates the time by the position of its shadow).
Topiary is essentially living sculpture. Generally made from box or yew, both of which are long lasting but need only a once- or twice-yearly clip, topiary specimens can represent almost anything, the limiting factors being the time they take to grow and the ability of the gardener. They are often supplied grown through a light frame of bamboo and wire to get the main proportions right; you can then gradually add finishing touches as fancy dictates. It must be remembered that however architectural in form, they are still plants and require feeding, watering and cultivation.
Topiary specimens can represent almost anything.
Treillage (trelliswork) is generally used as a decorative feature to give character and interest to a large blank wall. Since the treillage itself is a feature, any planting against it should be restrained—vigorous climbing plants can quickly obscure the design and destroy the effect (and often the treillage itself, since it tends to be rather fragile). Ready-made treillage is now available in metal and can be fixed to a wall to give a variety of effects.
Treillage can be used to create a false perspective as on the side wall of this terrace.
Trompe l’oeil, the painted scenes meant to trick the eye, have been used to create the illusion of space for many hundreds of years (there are some famously fine examples at Pompeii). A trompe l’oeil scene must be undertaken by a good artist, since a bad painting can completely ruin a garden. Although a wide wall painted with an extensive landscape view can look fine, even a blank archway in the wall of a small garden, painted to show a path to another garden enclosure, can add an extra dimension. The painting should be sited in a place that affords protection from the rain.

A trompe l’oeil can add an extra dimension to a small garden.

A false perspective is enhanced by the positioning of the topiary balls.
Urns and vases are generally important objects in their own right, the plant material used to fill them being mostly secondary decoration. They may be of stone (or, more frequently, of reconstituted stone), marble, lead, bronze or cast iron, generally standing on plinths to give them greater importance. Flanking steps or doorways, at the end of a walk or along the edge of a terrace, they are invaluable, but the design and material must always match the position. If they are of a material that must be painted, it is best to choose a neutral colour, such as grey, grey-blue or dark bronze-green. Decorative urns are often best left unplanted to avoid a conflict of interest.
For many people, one of the great pleasures of having a garden is that it provides a place to sit outdoors, whether to lounge and relax or to dine. To do this in comfort, garden furniture is essential, and the more inviting the furniture and the view of the garden from it, the more a garden will tend to be used.

A bench positioned at the end of a path acts as a focal point and provides a pleasant viewpoint of the garden.
As always, you need to think of function first, deciding what is actually needed and where you should position your furniture. Consider the following points:
– From where can the best views of the garden and its surroundings be seen?
– Would these areas provide an appealing place to sit?
– Who is likely to use this seating, and how many people might use it at the same time?
– What are the dimensions of the terrace? For dining, what type of table will you need, and how many chairs will be required on a regular basis?
– Would an occasional seat, carefully placed at the end of a path (and also acting as a focal point in the design), allow you to enjoy your garden from a specially selected viewpoint?
– Will the furniture need to be stored inside during the winter?
From a practical point of view, there are basically two types of garden furniture: permanent, which may remain out all year, and temporary, which comes out only when required. Temporary furniture is most useful where space is limited, provided there is somewhere convenient to store it when it is not in use.
Permanent furniture, which needs to be weather-resistant, is usually constructed of materials such as stone, wrought iron, cast iron, timber or plastic. Temporary furniture can be of any material (usually cane, canvas or plastic), as long as it is light enough to be easily transported and stored.

If you intend to move furniture around, choose items that are not too heavy.
Choose furniture to match the style and location of the garden. White plastic furniture suits the atmosphere of a seaside balcony.

The same furniture in a cottage garden would be out of keeping with the place.
Once you have established what type of furniture is needed in the garden and where it is going to be placed, you can start to consider the design of each item. There is now a vast range of garden furniture available to suit most styles and budgets. As a general rule, opt for simple, well-made products that blend into the garden as you will be less likely to tire of them in the long run. There are many furniture makers who copy classic designs such as the Lutyens bench, and others who supply a comfortable and often lightweight contemporary range. Whatever design you choose, make sure that it complements the style of your garden and its surroundings. White plastic patio-style tables and chairs may not look out of place on a yacht or on the balcony of an apartment in Spain or Florida, but they would ruin the carefully planned effect of a cottage garden in a romantic, natural setting.
Comfort is another important factor. Many seats, particularly those made of wrought or cast iron, will benefit from the addition of cushions. These should be made out of tough, washable fabric and brought indoors or under cover when not in use.

Some garden seating can be very uncomfortable.
If you already have some old garden furniture that is suitable for your needs, you may consider having it repaired, cleaned up and repainted. This is often preferable to buying newer furniture of inferior craftsmanship. Remember also that you can design your own seating. You do not have to be a master carpenter or stone mason to create simple sawn log seats, suitable for a woodland garden, or to place a slab of stone on two sections of an old column to create a simple bench, ideal perhaps for a small country garden. Painted garden furniture, especially seating, will need an occasional scrub or wash to keep it clean.

An octagonal tree seat provides a shady place to sit.
For permanent seating, you may also consider furniture that is built in to the hard landscaping of the garden, such as a seat wall or a bench incorporated into a decked area. Built-in seating can be particularly effective where space is limited.
Hardwood seats generally look best if they are allowed to weather naturally, but if stained or painted, choose a dark, neutral colour such as grey, dark brown, very dark green, or even a deep blue to blend in with the rest of the garden. Ironwork usually looks best painted black. For more striking effects, brighter colours such as orange, yellow or red can look effective, particularly in a contemporary setting. Beware of using white as a colour. Far from being safe and neutral, white is a glaring colour that always demands attention.
The same rules apply to choosing colours for temporary furniture (often of cane or plastic). When selecting canvas chairs or fabric-covered cushions, note that natural canvas will tend to blend in gently with other features, while patterns and stripes are less easily absorbed. If colour is desired, it is usually best kept plain and carefully related to the colours already used in that part of the garden.
Sometimes, if the garden is in full sun, a large garden umbrella may be needed. The designs modelled on those found in outdoor cafés in Italy are large enough to shade four or six people, giving a feeling of privacy in overlooked town gardens. Contemporary designs are now available from some yachting sail manufacturers seeking a new outlet for their product.

Umbrellas can provide privacy as well as shade in gardens that are overlooked.
Barbecues can be built into a terraced area or may be freestanding. If you would prefer a permanent structure, be very careful about where you site the barbecue. The prevailing wind (and any other freak winds!) can play havoc with the smoke produced, sometimes rendering the terrace unusable while cooking is in process. Freestanding models can be moved out of the wind and are often more practical.
A fire pit is usually a low, freestanding metal brazier or bowl made to hold and burn logs outside, giving warmth to people seated around it. Sometimes a fire pit is a fixed item, built of stone or brick, perhaps with a low wall to be used as seating surrounding the pit area. It can be built to specification by a local metal worker, and in some cases a metal fire pit can double as a barbecue. If a glass top is used as a cover it can also function as a low table. Unless fire pits can be covered, they should be cleaned out and stored inside during the winter.

A typical metal fire pit has either a fine wire cover or a glass cover that can serve as a table.
Children love to play outside, and it is often possible to allocate a particular area of the garden, perhaps visible from the kitchen window, as a play area, always remembering that children soon grow up and that this particular area may need to be reintegrated into the main garden layout in five or ten years’ time. A sandpit, for instance, might convert to a pond or water feature when the children are older.
With small, simple items it is better to try to design your own and integrate them into your garden layout plan. An existing tree, provided the branches are sound, might make an exciting climbing frame, or an old garden building could be adapted as a playhouse.
These can give many happy hours of play and are fairly easy to construct out of timber or brick. A sunken square or circular area is often best, and a low surrounding wall of three or four brick courses can double as a seating area. A light, removable or folding wooden cover will help keep the sand clean and prevent it being soiled by cats and other animals. Sand is readily available from most builders’ merchants and may need replacing annually.

A sandpit can later be converted to a pool.

A children’s playhouse is later transformed into a summerhouse.
An unused garden building, perhaps once a coal shed, may well convert into a playhouse, complete with a scaled-down door, door knocker or bell, curtains at the windows, and possibly the children’s names or an imaginary house name clearly written outside. Children love to indulge in games of fantasy and will be able to do so in the safety and privacy of their own space.

A mature tree might be adapted as a tree house.
You may be fortunate in having a mature tree that can be adapted as a tree house or as a fixture for a swing or climbing rope, but check that all the branches are sound before proceeding. Sometimes, instead of being removed, a fallen tree can be put to use for climbing games.
Climbing frames, complete with swing and slide, can give hours of fun. There are several manufacturers who produce natural timber frames that merge well into a garden layout, but these tend to be expensive. You may, with a little ingenuity, be able to adapt some existing feature to serve the same purpose. Children usually love these custom-made facilities, and they are more fun and easier to live with than the brightly coloured objects usually offered commercially.
Most gardens will benefit from some form of lighting, whether for security, to discourage intruders, for access, to define steps and pathways or for aesthetic effect. Lighting can dramatically enhance a garden at night, highlighting special features, such as a statue, a tree or the texture of ground cover, while allowing other features to recede.
The choice of fittings will depend on the effect required but may vary from a single fixture—illuminating a terrace, for instance—to a complex scheme employing many different types of fittings, including uplighters, path lights, underwater lights, spotlights and so on. Similar to interior light fittings, garden lights can be a decorative feature in themselves, or they can be discreet and designed to be concealed. When developing a lighting scheme, it is vital to establish early on in the design process how you want your lighting to function. Often, cables will need to be laid and buried during the construction of the garden and certain fittings, such as recessed step lights, installed as part of the building process.

An uplighter emphasizes the form and foliage of a shrub.

Low-level downlighters cast pools of light, accentuating surface texture.
There are several lighting techniques that can be used alone or in combination to create the desired effects. With all types of lighting, use a qualified electrician to install watertight sockets, cables and fixtures, according to the safety regulations in your area.
Uplighting is created by placing a light source directly underneath features and is particularly effective when used with shrubs and trees with an interesting internal structure, such as intertwining branches. The effect created is dramatic, especially when used in winter through bare stems and branches.
Spotlighting is used extensively in gardens to highlight the detail of a particular feature, such as an intricately carved urn. For maximum shadow and detail, position the light source to one side of the feature rather than directly in front of it. This form of lighting is most effective when the light source is hidden. When choosing spotlights, note that the spread of the beam is variable as is the intensity of the light source. Often a pinpoint beam works best because, when correctly positioned, the area lit can be limited to the feature.
Silhouette lighting is a dramatic yet subtle form of lighting used to define the outline shape of features with strong form, such as well-defined plants. The object is lit from behind, usually from below, and the light source is hidden.
Path lighting and step lighting are usually achieved by using downlighters. These cast pools of light onto the ground, accentuating the surface texture. Path lighting is primarily functional, but it should be carefully designed so that it does not detract too much from other features. When used for entrances and drives, it should be soft and welcoming. Path lighting may be concealed so that it is not apparent during the day, or you can use decorative lights of different design and finishes—often of mushroom or globe shape—that are a feature in their own right. For step lighting, the light source may be attached or built into the supporting wall, the underside of the step or the step itself. For all step lighting a diffuser should be used to direct light downwards onto the tread of each step.

Step lighting built into the supporting wall can be a useful safety feature.
Underwater lighting can bring a pool to life at night. In a still pool, backed by a wall, the flickering shadows cast by the movement of fish can animate the garden in a way that would be impossible during the day. Underwater lighting is also effective for highlighting fountains and waterfalls, especially when used in conjunction with spotlights.
Moonlighting provides an effect that simulates the soft glow of the moon and stars. It is achieved by using several fittings fixed high above the ground, usually in trees, to cast diffuse, dappled light onto the ground below. It is particularly effective in rural gardens where excessive lighting can detract from the enjoyment of the moon and stars.
In most countries, elaborate security lighting systems are available, many with built-in sensors activated by body warmth and movement. The sensor does not distinguish between animals and humans, and it can be alarming to find the garden illuminated in the early hours of the morning, even if the intruder is only an innocent cat or fox. These sensored systems are easily installed and can be very useful to light up a path from garage to front door or around the house to a rear entrance. The systems can now be purchased from some hardware stores, but an experienced electrician is often needed to fit them to the best advantage. Care must be taken to position the light bulb away from any timbers or other inflammable material.

One drawback of security lights is that they cannot distinguish between humans and animals.
Security lights should be chosen to complement the style of the house and should be positioned with care.
A simple fixture beside a doorway is often sufficient for both security and ease of access. Try to choose a fitting with clean simple lines in a style that is suitable for the architecture and locality, rather than opting for a utilitarian model. It may take time to find an appropriate fitting, but it is worth making the effort as the wrong lighting can often spoil an otherwise carefully planned scheme.
Think carefully about the positioning of the fitting. It should be neither too high nor too low and should not shine directly into the eyes of anyone approaching. Unless you need a great deal of light, a fairly low wattage or energy-saving bulb may be all that is necessary.

Avoid spotlighing objects from across the garden.
Gardens can be dramatically enhanced by lighting schemes, but equally, if badly used or overused, artificial lighting can be crude and garish. Moveable spotlights are highly versatile fittings that can be placed anywhere in the garden, provided their cables are long enough. The most useful versions are either mounted on spikes for easy insertion into soil, or incorporate a simple clip for fixing to items above the ground, such as trees and fences. These discreet spotlights, which are normally finished in black, are easily concealed. They can be used for all kinds of lighting effects, from uplighting to silhouette lighting. The advantage of moveable spotlights is that they are easily relocated to take advantage of seasonal changes and plant growth.

Night lighting of garden features and plants can have some interesting effects, depending upon where the light is coming from.
While for security and access lighting it may be essential to have artificial light permanently in place, for aesthetic effects you can create a magical atmosphere by using natural flame from candles, flares or torches. For most outdoor settings, candles will need to be encased in lanterns, which may be of any material—glass, paper, metal and so on—to blend in with the rest of the garden design.
Designing the lighting for a contemporary garden starts with identifying on the plan which features could be affected. Projection and visuals (see Chapter 5) will help you to imagine how the scheme will work.

There are a number of important practical considerations that may influence costs and your choice of materials and accessories. Before making final decisions about the garden layout plan (whether on the horizontal or vertical plane), you need to consider how you will access and prepare the land, whether the soil is in the right condition and how services (such as water and electricity) will be brought onto the site.
An obvious point, but one frequently overlooked, is how you or the contractor will get into the garden in order to carry out the work. Can the garden only be reached by going through the house? For large items, such as classical columns or mature trees with wide root balls, access simply may not be feasible through the house or a narrow side alley. In towns the only realistic access for large items may be by hired crane over the roof. There may be restrictions on parking, making unloading difficult. It is worth considering access problems early on, as this may have a direct bearing on feasibility and cost.
Normally, before any work can begin, some site clearance is necessary. This will depend on the state of the site and the work proposed. It may mean simply removing a tree or a shrub and applying weed killer, or erecting a temporary protective fence around trees and shrubs that you want to preserve, or it may mean bringing in earth-moving equipment. An area may need to be set aside for a bonfire. This should be in the open to avoid scorching any existing trees, and the local regulations on burning rubbish will need to be investigated.

If heavy machinery is required for site clearance, ensure that access to the site is sufficient.

Build bonfires in open areas to avoid scorching trees.
If topsoil is to be removed, this should be done first and the topsoil stacked separately from the subsoil beneath it. If excavating for pools or ponds, ground shaping may be necessary. This will all be done in subsoil, the topsoil only being returned after grading work is finished. The depth of topsoil required depends largely on what is to be grown. Grass or lawn requires a minimum depth of 50 mm (2 in.), while shrubs need a minimum of 250 mm (10 in.).
Care must be taken to prepare the soil for the planting areas. It should be thoroughly dug over and all pernicious weeds removed or sprayed off. If the soil is impoverished, humus should be incorporated to improve the texture; nutrients may also be needed. The rate of plant growth will be greatly affected by the soil structure, so extra care taken at this stage will pay dividends later.
Water is one of our most precious resources, and many gardeners are beginning to take responsibility for using it economically and wisely. The extraction of freshwater from rivers has serious effects on the creatures and plants that rely on freshwater ecosystems, but by adopting a responsible approach at the outset of planning the garden, the extent to which we waste this resource can be greatly reduced.
If there is a drainage problem in the garden, there is no point in replanning the garden without first taking some positive action. If the site is waterlogged, a drainage system may need to be installed. When the house was being built or during subsequent levelling and grading, the soil may have been compacted by heavy machinery. It may simply be a question of aerating the soil, or there may be a more serious inherited problem of subsoil dumped over free-draining soil, disguised with only a thin layer of topsoil. The compacted soil may need to be spiked with a fork and have fine grit incorporated to help break it up.
Your builder should be able to advise you on which system to use, and it should be installed early on when the ground work is being prepared, while machinery and access are available.
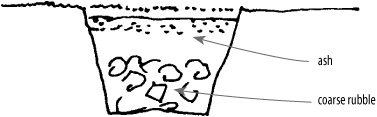
A soakaway is a hole that can be dug under a damp spot to drain the water off the surface and down into the ground below. The hole should be approximately 1 m (3.3 ft.) square and 1 m deep and filled first with coarse rubble, then with a layer of ash, and finally backfilled with topsoil before replacing the turf.

A soakaway
A French drain
French drains are steep-sided trenches filled with coarse stone or gravel. They act as water-conducting channels, or temporary drains, which eventually become blocked by a gradual accumulation of silt and soil. French drains are used in preference to open ditches on the sides of paths or driveways to control any seepage.
Tile drainage is a more extensive drainage system, in which clay tile drains are laid underground with the outlet going to a ditch or watercourse. They can be laid in a single line or, for more thorough drainage, in a herringbone pattern. Gradients of the laterals should not be greater than 1:250, with the main drain similarly graded to the outfall. The depth and spacing at which these tile drains should be laid will depend on the type of soil, closer spacing being required for thinner sandy soils.

Underground tile drainage systems
A herringbone pattern allows for thorough drainage

Tile drainage

Drainage using perforated plastic pipe
If your house requires a septic tank for sewage (or an oil tank for fuel), you will need to consider its position with regard to access for vehicles and the route of any pipes leading to and from the tank before you finalize your garden layout design.
Most plants require regular feeding and watering to help their roots become established and to encourage them to grow quickly. Imagine a prolonged period of hot dry weather during which your plants may need to be watered once or twice daily. Have you included sufficient garden taps, irrigation points or trickle irrigation to give thirsty plants a thorough watering? Using a watering can is time-consuming, and too often results in the foliage being given a light overhead sprinkling rather than a thorough watering that reaches down to the roots.
Water points should be sited at suitable positions around the garden, perhaps with one near the house and another at the opposite end. The pipes for these will need to be tapped into the main supply and will also need to be laid beneath the soil surface. Install more points than necessary, as it is easier to do this at the outset than to disturb the garden by digging up the ground and laying pipes at a later stage.

“Spaghetti” lines (top) and drip lines (bottom) help to conserve resources by delivering small amounts of water to individual plants.
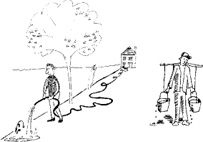
Water points should be sited at convenient locations around the garden.
You may also wish to include some form of irrigation, such as a surface drip system to moisten soil around plants, or a pop-up underground system that will spray lawns. In areas such as roof terraces or basements where much of the planting may be in containers, “spaghetti” or drip line irrigation can be moved around easily.
Rainwater contains more air and nutrients than piped water, and using it in the garden helps to conserve resources. A system of water butts and rain traps, linking and overflow kits can be strategically placed to serve many irrigation requirements.

This tank stores ‘grey’ water from the household and pumps it through a delivery pipe to a tap. It can then be used for garden irrigation, or even for some water features.

Water butts can be connected to provide water to different parts of the garden. If they are to fill up reasonably equally, they need to be fairly level with one another.
To avoid unnecessary transpiration the most effective times for watering plants, including areas of grass and lawns, are early in the morning and in the evening.
To reduce the reliance on watering systems, every garden owner should consider using plants whose water requirements are compatible with the conditions in the natural climate. For areas of minimal moisture or where drought commonly occurs, a more sustainable system such as xeriscaping (using drought-tolerant plants, such as cacti) should be considered.
In areas where monthly rainfall is inconsistent and where you cannot assume that your plants will naturally receive the required water, a sprinkler system should be considered. By throwing an arc or jet of water, a large area can be covered in one application. Sprinklers can be very wasteful, and should only be used on plants that really need the water, which may mean planning the garden layout to locate needy beds and lawns where water access can be most efficient. Sprinklers can use as much water in an hour as a family of four would use in one week.
If gaining access to water is a problem, you may consider sinking a borehole (see page 107).
The method of irrigation will depend on location, budget and the needs of your particular garden. Usually there are irrigation specialists who will be happy to advise and quote on a suitable system, but if your garden is small you may simply need to enquire at a good garden centre to see what is most suitable. There are several main systems to consider.
The first option is water taps, from which you can conveniently fill a watering can or run a hose with a sprinkler attachment. These should be carefully sited so that they are accessible from each part of the garden, not just from the terrace or back door. By using a watering can, you can direct the water solely to the needy plant, so there is little waste. However, the cans can be heavy and time-consuming to carry, especially for the elderly or disabled.
A sprinkler system usually involves tapping into the main line. The system can be broken down into zones where you can have a variety of different watering options, perhaps one zone for potted plantings near a terrace, a second zone for the lawn and a third for the perennial border. These zones are broken up into areas that need the same frequency of watering as well as a similar delivery method (for example, pop-up sprinkler heads, soaker hoses, bubblers or sprays). A central timer can be installed and set to manage all of the various zones through the use of programmed rotating watering.
Another option is a trickle irrigation system, consisting mainly of a perforated hose that can emit a small amount of water over a prolonged period. Connected to the water taps and coupled with an automatic timer, this will allow you to have watering control even during long absences from your garden. The hose is often black (sometimes made of recycled tyres) and can either be dug in below ground or laid on the soil surface and moved occasionally to give greater coverage.

Pop-up sprinklers are mainly used on grassy areas. Although they distribute large volumes of water, they can be programmed to treat specific segments within a 360° circle.
To avoid using too much water, divide the garden into different irrigation zones depending on the plants’ needs.
Automatic pop-up irrigation systems are usually used in gardens with large areas of plants and lawn, often in hot, dry countries where water is at a premium. They tend to be wasteful, but may be programmed to use less water.
A further option is a system connected to a well or borehole within your property. This system is sometimes expensive to install, but the running costs are cheaper. You should seek professional advice locally if you are considering this option.
Recycling “grey” water from domestic use—with the exception of water from washing machines, dishwashers or any water that has been used to wash pets or nappies (diapers) or that may contain bleach, disinfectants or household cleaners—allows the reuse of small quantities of water through out the year, saving it from disappearing into the sewer or septic tank system. As it may contain bacteria, grey water is not recommended for food crops. To collect the water, you can connect a diverter and water butt to the waste pipe in an upstairs bathroom, or fit a more complex system to siphon it off. Make sure the system adopted will comply with the rules set by your local water authority.
Electricity may also be needed in the garden, either for lighting, for operating water pumps or for running barbecues. The cables to the power points should be protected in armoured casing and marked and buried below the level of the topsoil where they cannot be easily damaged by spades or other tools. Always ask a qualified electrician for advice.
The suggestions in this chapter are not meant to be comprehensive, and there is always room for the innovative use of different materials in a garden setting. Once you have decided on the precise design of your garden and taken into consideration any practical factors, you are ready to finalize and draw up your garden layout plan. This plan completes the hard landscaping proposals (both horizontal and vertical) for your garden.
The plan must be accurately drawn so that you will be able to use it in a practical way, both to set out the design on the land and to estimate the materials required for the hard-landscaping elements of the construction. To calculate quantities of materials, measure the area and depth (or volume) of the material, then multiply these figures to find the amount. Alternatively, take the area and depth dimensions to your local builder’s merchant and ask them to calculate the required quantity for you.
Final Garden Layout Plan (Model Plan)
The preliminary garden layout plan (page 142) has been developed to give more information about vertical features, such as the shrub belt on the left and the wall on the right, which are both used to screen areas of the garden. Decisions about materials to be used for horizontal features have been firmed up. In labelling your plan, give as much description as space allows.
Sketch view of arbour with the hill and gravel gardens in the foreground.

Detailed construction drawings of the arbour back up the layout plan, indicating the dimensions and fixing details of the uprights and cross-beams. This information will also be helpful in costing the feature.
Drawing up the Final Garden Layout Plan |
The garden layout plan may be drawn in pencil or ink. Technical drawing pens or disposable fine-line pens will give a more professional finish, particularly if you vary the line width by using different nib sizes. Draw the more important or dominant features such as the house or the garden boundary with a wider line, then a thinner line for less dominant items. If you use a pencil, keep it well sharpened. |
1. Fix the preliminary garden layout plan to the drawing board, and attach a second sheet of tracing paper over it (on which you will work up the final garden layout plan). Take care with the layout, arranging the plan slightly to the left of the sheet, leaving enough space above, below and at the sides to allow for any notes or labelling. You will require an information panel on the right-hand side with a title block at the bottom of this, together with a north point and scale. 2. Look at the ground plane elements on the preliminary plan, starting at the terrace or another critical point that links house and garden. Decide on your exact choice of materials and how you will use them (a brick path in a laid basket-weave pattern, for instance). Are you happy with them, or do they need adjusting? 3. Continue doing the same with paths, steps and any other ground plane elements. If you are content with what you have drawn on your preliminary garden layout plan, you will simply need to trace over the previous drawing. Remember that the idea is to communicate the design or pattern of your ground plan elements, not necessarily to produce a work of art. 4. Now draw up any new ground plane elements individually to scale. Imagine you are looking down on them from overhead, and show the outline shape of the feature as well as the design in which the material is arranged (if appropriate). Indicate the latter by detailing to scale only a small area. If bricks or other materials are too small to be drawn to scale on the plan, you can supplement it with separate detail sheets. Alternatively, you could try to indicate your intentions graphically, possibly by magnifying them in a diagram drawn alongside the plan. If you use this technique, make sure that you number or label your details to key them to the plan so that their positions are instantly identifiable. 5. Next draw in all vertical and overhead elements, beginning with the outer or boundary walls, gradually moving inwards to include any trellis, pergolas, arches and so on. Remember that you are viewing the objects from above. Label all vertical features (for example, “Brick wall: 1.8 m in height”, “Hardwood trellis, stained dark blue: 1.2 m in height”). 6. Draw in the canopies of any existing or proposed trees, and indicate with a cross where they are to be planted. Refer back to page 76 for symbols for these. 7. Provide a short descriptive label for each area of border or planting to indicate your broad intentions (for instance, “Scented mixed border for summer interest”). 8. Are there are any elements that need to be shown in more detail, such as a pond or pergola construction? You may not be able to show sufficient detail on your plan drawing, and these should be drawn on a separate sheet. (Make a note of these. Drawing sections and other visuals will be dealt with in Chapter 5.) 9. Once you have completed it, remove the final garden layout plan from the drawing board. The plan will have taken you time to draw and is therefore an important document. Take at least two copies (either dyelines, blueprints or photocopies), and keep the original flat and safely stored as you may need to make amendments to it later if you change your ideas. You may want to colour one of the copies (see page 249) when you have decided on the planting for the garden, which is the next stage in the design process. 10. You should now have an accurate garden layout plan, which can be used either by you for constructing the garden or by the builder to give you a price for the work. The next stage is to decide on the plantings for your new garden. |

This simple layout for a front garden is drawn in black and white. A detailed planting plan will be produced once the layout has been approved by the client.

A detailed layout plan for a front garden gives information on all hard landscaping. Colour applied to the printed plan brings it to life.

The long, narrow garden of this town house has been divided into three main areas. A terrace allows seating at both ends, while the secluded main planted area stems from a circular theme. The pergola near the terrace unites the vertical façade of the house with the horizontal plane of the garden.

Making the most of a small sunken space, steps serve as easy seating at various levels, and an unusual backdrop of sustainable timber cubes provides privacy.

Wide steps cope with a steep change of level, while the back-filled, soil retaining wall is built at a slight angle to allow water runoff, providing good drainage for plants.

An octagon works well in this change of level. Railway sleepers back-filled with gravel help to unite these steps with the surrounding countryside.

Subtle changes of level, combined with a selection of carefully placed recyled pots and artifacts as well as contrasting foliage, distinguish this coastal garden

Steps can be used to change the direction of a path. The combination of gravel, stone overhang and smaller stone off-cuts blend with the local landscape.

In this small shallow pool and bubble fountain, the water level falls just below the stone edging, and the pool base is covered in shingle.

This shallow rill is “musical”; as each break in the flow of water occurs, different stones vary the sound of moving water, providing a cooling yet intriguing effect.

Shallow bog planting by the stone edge of a larger pool allows water creatures easy access, although invasive bog plants will need regular thinning-out if amphibians are to thrive.

Water trickles gently down these stepped stone risers into a natural pond where a small central island encourages ducks to nest without fear of marauders.

In a densely planted garden, an area of quiet simplicity comes as a relief. Tactile swaying grasses surround a timber deck and “dip” pool, giving privacy for sunbathing on the warm sustainable timbers.

A decorative, recycling water feature where wall-mounted stone “shells” trickle water by means of a pump into a shallow pool. Deliberately slightly overgrown and mysterious-looking, it attracts wildlife; wall climbers make a protective habitat for nesting birds.

This old tin bath serves to trap and reuse water. In a hot, dry climate the wooden lid prevents evaporation.

Guttering and a downpipe deliver water into this recycled water barrel. Water drains through a tap, to which a hose could be attached for irrigation.

A dry “stream” made from stone pieces evokes the effect of water. Narrow enough to step over, its curve is repeated in the outline of the hedging and lawn.

The rounded shapes of plants in this garden are a contrast to the unusual vertical sundial. The different shades of green include both matt and light-reflective foliage.
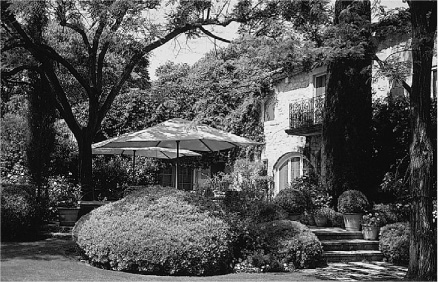
Use of the overhead plane by means of tree canopy, parasol or pergola, makes a garden feel more secluded.

Brick inserts break up this expanse of stone paving. Setting the height of the paving level just below the level of the lawn allows the mower to skim over without damage to the cutting blades.
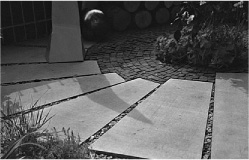
Contemporary and classic materials combine to indicate a strong directional flow. Slate panels (pre-cut to a template), blend with the edging of stone chippings.

In this seating area, a roughened surface prevents slipping, while the plants between pavers create interest and allow for water runoff.

Sustainable seating hewn out of old tree trunks is in character with this garden’s woodland setting, and can be left out in all weathers.

The locally sourced, recycled table, chairs and metal container outside this green-roofed garden shed make an interesting seating area.
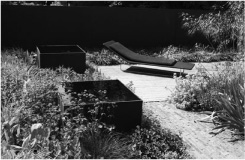
Permeable timber decking and narrow brick pavers indicate the directional flow of this garden floor, while dark-coloured furniture contrasts with carefully arranged planting.

A white rendered wall brings light into a small space. Permeable perforated metal is used for steps and to edge the raised timber deck. The seemingly natural close planting is sourced from local markets and allows no space for weeds.

Here the backdrop and retaining walls are formed from thin rough-hewn slate, contrasting with the carefully balanced and eye-catching seating arrangement.

Three easily accessible compost bins allow for the gradual rotting-down of vegetation. Covering the bins with old carpet speeds up the process and deters airborne weeds.

A green roof planted with drought-tolerant sedums offers insulation, waterproofing and a means of drainage; permeable filter layers underlie the soil or growing medium.

Concrete sewagecarrying pipes have been stacked to make unusual containers, giving height and a purpose to the curved stone steps.

Recycled car tyres delineate the path between salad vegetables and medicinal plants in this eco-friendly garden where water conservation and composting are prioritized.

This turf and wildflower roof keeps the building well insulated. Turf can be supplied ready-grown, or a combination of seed mix and plug plants may be used.

This simple mossy container, lined with black polythene and planted with drought-tolerant sedums, requires minimal watering.