When we first opened Milk Bar, we were more than just Milk Bar: we called ourselves Momofuku Milk Bar & Bakery. We wanted to be both an early morning stop for fresh, crunchy, artisan bread made right and the modern-day Milk Bar with a point of view on sweets. With James Mark, an aspiring master bread baker, at the helm, we made the executive decision that what we really needed to do was to fill our tiny space with huge deck ovens, the kind pro bread bakers use.
Those deck ovens took up all of our precious real estate. We had to wiggle by each other. And they were only ever on and in use for an hour or two a day. We probably made $100 a day off the breads that came out of them, while the little countertop-fridge-turned-pork-bun-station next to it, which took up one-tenth of the space, churned and burned like a true moneymaker all day and all night.
We needed to make a change, both to our space and to our loosely based ideas on what we wanted to be and the food we wanted to serve.
Every busy night, we had blue cheese polenta bread loaves left over, but we stayed late making the steamed bun dough for pork buns. We had to start thinking about our bread program in the same way we thought about our sweet baked goods.
How far could we take that steamed dough recipe? From a classic approach to bread baking, a basic dough can be shaped, proofed, and baked in a number of different ways. In a French kitchen, a baguette and a pain d’épi both come from the same rustic dough. So, why not a steamed bun, a loaf of brioche, and a croissant made from the same dough in the kitchen at Milk Bar?
So we began experimenting. The bun dough was wet but firm, easy to mix and shape—in a word, reliable. We brainstormed our family favorite breads: focaccia, bagels, croissants, cinnamon buns. Then we made them with the steamed bun dough as the starting point. Some of the recipes converged with classic Momofuku flavors, like miso, pork, or kimchi. Others we stuffed with our favorite cream cheese spread or deli meats.
Our bread program finally took off. The deck ovens, however, are long gone. We used the space for more refrigeration for those damn cookies and an additional area to roll out bread or assemble cakes or layer cinnamon bun pies, depending on our production needs at any given time of day. Now that we’ve moved to our Brooklyn kingdom, that old space houses extra soft-serve base and a larger pork-bun-and-pickle station for Ssäm Bar. One day, those few square feet may even turn into a plain old hard bar. But for us, those few square feet of real estate will always be the homeland of the mother dough.


MAKES ABOUT 850 G (2 POUNDS)
The cakes, cookies, or pies may have lured you into this book, but you are about to meet your favorite recipe. This bread dough is always tasty, very forgiving, and can be fashioned into nearly any style or variety of bready item. It takes a very “don’t take yourself so seriously!” approach to bread baking and is the easiest, most versatile recipe in the book—your resulting bagel bombs, volcanoes, brioche, focaccia, and croissants will be proof of that.
Make this dough one day, refrigerate it, and use it the second, third, or fourth day, if need be. Or freeze it for up to 1 week; just make sure to let it come to room temperature before using.
550 g flour
[3½ cups]
12 g kosher salt
[1 tablespoon]
3.5 g active dry yeast
[½ packet or 1⅛ teaspoons]

370 g water, at room temperature
[1¾ cups]
grapeseed oil
1. Stir together the flour, salt, and yeast in the bowl of your stand mixer—do it by hand, using the dough hook like a spoon. Continue stirring by hand as you add the water, mixing for 1 minute, until the mixture has come together into a shaggy mass.
2. Engage the bowl and hook and have the machine mix the dough on the lowest speed for 3 minutes, or until the ball of dough is smoother and more cohesive. Then knead for 4 more minutes on the lowest speed. The dough should look like a wet ball and should bounce back softly when prodded.
3. Brush a large bowl with oil and dump the dough into it. Cover with plastic wrap and let the dough proof at room temperature for 45 minutes.
4. The dough is ready to be used as directed in the following recipes. If you do not plan to use your mother dough the day you make it, you can store it in an airtight container at least twice its size in the fridge for up to 3 days. Take it out of the fridge and let it come to room temperature 30 to 45 minutes before using.
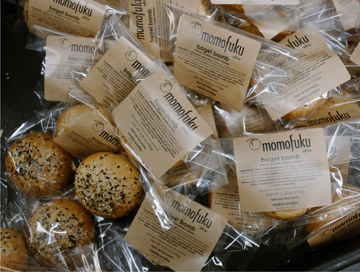
MAKES 8 BOMBS
½ recipe Mother Dough (opposite), proofed
1 recipe Bacon, Scallion, Cream Cheese Plugs (recipe follows), frozen
1. Heat the oven to 325°F.
2. Punch down and flatten the dough on a smooth, dry countertop. Use a dough cutter to divide the dough into 8 equal pieces. Use your fingers to gently stretch each piece of dough out into a mini pizza between 2 and 3 inches wide.
3. Put a cream cheese plug in the center of each dough circle. Bring up the edges of each round and pinch to seal so that the cream cheese plug is completely contained, then gently roll the ball between the palms of your hands to ensure the bomb has a nice, round, dinner roll–y shape. Arrange the bombs 4 inches apart on a parchment- or Silpat-lined baking sheet.
4. Whisk the egg and water together and brush a generous coat of egg wash on the buns. Sprinkle a heavy even coating of the bagel mix all over the bagel bombs—every possible inch, except for the bottoms, should be coated.
5. Bake the bagel bombs for 20 to 30 minutes. While in the oven, the bombs will become a deep golden brown and a few may have cream cheese explosions. Continue baking until you see this happen! Not to worry—serve them as is or use your fingers to tuck the cream cheese back inside the bagel bomb. Bagel bombs are best served warm out of the oven—or flashed in the oven later to warm and serve. If you can’t finish them all right away, once they are cool, wrap them well in plastic and store them in the fridge for up to 3 days.
MAKES ENOUGH FOR 1 RECIPE BAGEL BOMBS
We use Benton’s bacon, the meatiest, smokiest bacon around, in our plugs. If you have the Momofuku cookbook, you know the wonders and glories of Allan Benton, the man behind the smoky cured pork down in Madisonville, Tennessee. His product reigns supreme in punch-you-in-the-face bacon flavor. When he answers the phone himself to take your order, you know you are getting a handmade, superior product from a man who loves his art and keeps it simple—even though he has orders from all over the country to fill that day, many from big-name chefs and restaurants in NYC and beyond. I have been known to swap cookies for moonshine with this adorable man—both of us feeling like we’ve made out like bandits.
50 g bacon, the smokier the better
[1¾ ounces]
200 g cream cheese
[7 ounces]
2 g scallion greens, thinly sliced
5 g sugar
[1 teaspoon]
2 g kosher salt
[½ teaspoon]
Make a meat-free cream cheese plug with your favorite bagel fixin’s. We make a veggie plug with dill and cucumber, too!
1. Cook the bacon in a skillet over medium heat until it’s auburn brown and crunchy. Remove it from the pan and chop it into small pieces; reserve it and, separately, the bacon fat in the pan.
2. Put the cream cheese in the bowl of a stand mixer fitted with the paddle attachment and cream it on medium speed. Pour in the reserved bacon fat and paddle to combine. Scrape down the sides of the bowl. Add the chopped bacon, scallions, sugar, and salt and paddle briefly to incorporate.
3. Scoop the cream cheese mixture onto a quarter sheet pan in 8 even lumps. Freeze until rock hard, 1 to 3 hours.
4. Once the plugs are frozen solid, they are ready to be used, or they can be stored in an airtight container in the freezer for up to 1 month.
MAKES ENOUGH FOR 1 RECIPE BAGEL BOMBS
3 g kosher salt
[¾ teaspoon]
6 g white sesame seeds
[1 tablespoon]
4 g black sesame seeds
[2 teaspoons]
4 g poppy seeds
[2 teaspoons]
4 g dried onions
[1 tablespoon]
2 g onion powder
[½ teaspoon]
1 g garlic powder
[¼ teaspoon]
Mix together the salt, sesame seeds, poppy seeds, dried onions, onion powder, and garlic powder in an airtight container. The mix keeps forever in the pantry, but it is best used within 6 months.
MAKES 4 VOLCANOES
In February 2008, I traveled with Dave to Deauville, France, for the third annual Omnivore Food Festival. The two of us were like fish out of water in this off-season beach town. Straight off the plane from New York and jet-lagged, we were left to our own devices in the tiny, remote town to gather Asian ingredients for a kimchi demo.
We agreed to wake up at 6 a.m. the next day to get breakfast and get going. We met drowsy and confused in the empty hotel lobby and proceeded to sleepwalk through the ghost town until we could smell fresh-baked bread and saw a light on in the only bakery in town. Dave took charge and pointed at nearly everything in the joint, as that’s how we eat when we’re abroad. “I’m full” is not a phrase you’re allowed to use—such is the price of traveling with chef Dave Chang.
We found a bench outside and unwrapped this mound of bread that looked like it had some sort of creamy gravy inside. Still half-asleep, we wrestled the filled bread ball out of the bag and bit in. When you are having a food moment, it’s like tasting food for the first time. Your eyes open wide and then close, as if in slow motion. You chew as if no food with flavor has ever touched your tongue before and what you are eating at that very moment is what will shape all future food opinions you will ever have. That was our 6:05 a.m. February morning in Deauville. Neither of us speaks French, so we decided to call it what it was, a volcano—an explosion of potato, lardons, and cheese like no other. We raced each other to the bakery every subsequent morning that week. And on the plane ride home, we agreed that if and when we opened a bakery, it must serve our very own volcano.
½ recipe Mother Dough, proofed
1 recipe Caramelized Onions
1 recipe Scalloped Potatoes
1 egg
4 g water
[½ teaspoon]
100 g shredded Gruyère cheese
[3.5 ounces (1 cup)]
2. Punch down and flatten the dough on a smooth, dry countertop. Use a dough cutter to divide the dough into 4 equal pieces. Use your fingers to gently stretch each piece of dough out into a mini pizza about 6 inches wide.
3. Divide the onions equally among the rounds, plopping them in the center. Grab the scalloped potatoes from the fridge and cut into four 3-inch squares. Use an offset spatula to wrestle each square of potato gratin out of the baking pan and onto a dough round, directly on top of the onions.
4. Take the edges of each dough round and pinch together to seal so that there is no speck of onion or potato in sight, then gently roll the ball between the palms of your hands to ensure the volcano has a nice, round, dinner roll–y shape. Arrange the volcanoes, seam side down, 5 inches apart on a parchment- or Silpat-lined baking sheet.
5. Whisk the egg and water together and brush a generous coat of egg wash on the buns. Use a paring knife to cut a 1-inch-long X in the top of each volcano. Divide the Gruyère evenly among the volcanoes, stuffing it into the X in each one.
6. Bake the volcanoes for 25 minutes, or until the dough is a deep, golden brown and the Gruyère cheese on top is caramelized. They are best served warm; allow them to cool for at least 10 minutes before digging in. If you’re saving a couple of volcanoes for later, let them cool, wrap them well in plastic, and store them in the fridge for up to 3 days; warm them in the oven before eating.

MAKES ENOUGH FOR 1 RECIPE VOLCANOES
I love caramelized onions. I make them constantly at home and put them in everything from sandwiches to nachos piled high to scrambled eggs. They add a roasted depth of flavor and an unbelievable sweetness.
20 g grapeseed oil
[2 tablespoons]
2 medium Spanish onions, halved and thinly sliced
6 g kosher salt
[1½ teaspoons]
1. Heat the oil in a large heavy-bottomed pan or skillet over medium-high heat for 1 minute, or until it’s very hot but not smoking. Add the onions and let them cook for 2 to 3 minutes without stirring.
2. Toss the onions with a large spoon or spatula while seasoning them with the salt. Lower the heat to medium-low. The rest of the caramelization process happens slowly over medium-low heat for 20 minutes. Work on another subrecipe, pay some bills, kill some time productively—but don’t go too far from the onions. Toss the onions over on themselves every 3 to 4 minutes so they all get their time on the bottom of the pan. The onions will weep and then slowly take on color as they release their liquid. When your onions are the color of a brown paper bag, they are done. Cool completely before using in the volcanoes, or store in an airtight container in the fridge for up to 1 week.

MAKES ENOUGH FOR 1 RECIPE VOLCANOES
1 garlic clove
105 g heavy cream
[½ cup]
85 g milk
[⅓ cup]
½ bay leaf
¼ rosemary sprig
2 g kosher salt
[½ teaspoon]
0.5 g freshly ground black pepper
[pinch]
80 g pancetta
[3 ounces]
2 russet (baking) potatoes
1. Smash the garlic clove with the palm of your hand and remove the skin. Put the garlic in a small saucepan with the cream, milk, bay leaf, rosemary, salt, and pepper and bring to a simmer over low heat, then take the saucepan off the heat, cover, and let steep for 30 minutes. The cream mixture will seem strong and overseasoned, but it will eventually season all of the scalloped potatoes, so don’t freak out.
2. Meanwhile, cut the pancetta into ½-inch cubes. Brown it in a small saucepan over medium heat. You want to caramelize and cook the pancetta slightly, to increase its presence later in the scalloped potatoes. Set aside.
3. Peel the potatoes and slice just thicker than paper-thin slices, about ⅛ inch thick. Submerge them in a bowl of cold water.
4. Heat the oven to 350°F. Pull out a 6-inch square baking pan (if you don’t have one, you can buy a disposable one at the grocery).
5. Layer the potatoes in the pan like shingles, putting bits of browned pancetta between each layer of potato shingles, until you are out of both potatoes and pancetta. Fish out the herbs and garlic clove from the steeped cream mixture with a slotted or regular spoon, and pour it over the potatoes.
6. Bake for 45 minutes, or until the potatoes on top are golden brown and have a milky translucence but have not burned or turned into potato chips.
7. Cool and chill the scalloped potatoes in the fridge for 2 to 3 hours, covered with plastic and with a bowl of leftovers weighting them down and keeping every shingle tight and condensed in the pan.
8. Use in the volcano once cool. To store for later use, take the weights off, wrap the scalloped potatoes especially well in plastic, and return to the fridge for up to 5 days.
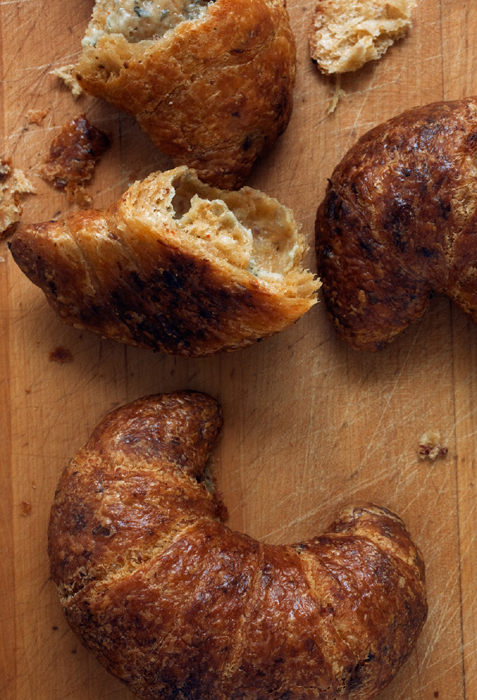
MAKES 5 CROISSANTS
This is the first croissant we ever made and sold at Milk Bar. Deeply stinky and pungent in all the right ways, it is not for the faint of heart. It is a true marriage of funky, barnyardy, stringent kimchi and blue cheese, of our Korean roots to our Italian ones. It is for our soul sisters and brothers.
Making croissants is one of the coolest bread techniques around. You spend time making many layers of bread dough and butter, folding and turning the dough all along. When baked, the croissants get their flakiness and volume from the steam that the layers of butter give off as the dough heats. The steam separates each dough layer ever so slightly, resulting in this massively puffy, impossibly flaky creation. And when you make them with a flavored butter, they’re even cooler!
Though we have simplified the technique somewhat at Milk Bar, in terms of speed and precision, this recipe is still not for softbodies. It takes more time with the dough, more flour, more time with the rolling pin. But it will make you feel like a true pro when the oven timer goes off and you pull these bad boys out.
½ recipe Mother Dough, proofed
105 g flour, for dusting
[¼ cup]
1 recipe Kimchi Butter
200 g blue cheese, crumbled
[7 ounces (1 cup)]
1 egg
4 g water
[½ teaspoon]
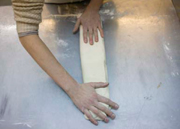
1. Punch down and flatten the dough on a smooth, dry countertop. Dust the counter, the dough, and a rolling pin with flour, and roll out the dough to a rectangle about 8 × 12 inches and even in thickness. Grab the butter pad from the fridge and place it on one half of the dough rectangle. Fold the other half of the dough rectangle over the butter pad and pinch the edges shut around it. Drape with plastic wrap and let rest for 10 minutes at room temperature.
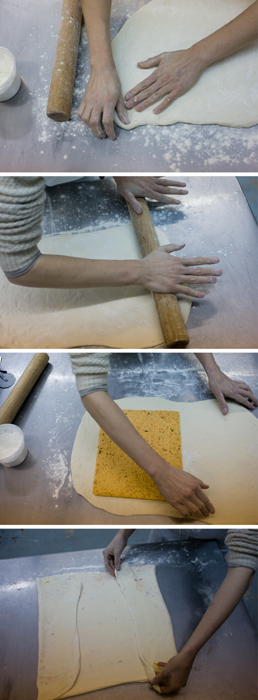
2. To make the croissants, you will need to put 3 “double book” turns into the dough to create enough alternating layers of flour and butter to make the croissants rise and puff in the oven. To make your first double book turn, dust your counter surface, your rolling pin, and the dough with flour, remembering to dust under the dough as well. Roll the dough out again to a rectangle 8 × 12 inches and even in thickness. Be gentle with the rolling pin, making sure not to break into any part of the butter bundle or roll so hard that the butter rolls right out of the dough. (If this happens, push it back in and pull a little dough over the escape hole to patch it up.) Make sure there is not an excessive amount of flour left on or underneath your dough—dust off any excess with your hands.
3. Visually divide your dough lengthwise into quarters. Fold the two outer quarters over to the center axis, or spine, of the rectangle of dough, so they meet in the center. Then close the book, bringing one edge to meet the other with the spine now to one side. (When I’m showing someone how to make a double book turn, I stretch my monkey arms out wide like I’m going in for a big hug, then I fold my arms at the elbow, so my fingers are touching my armpits, and fold my elbows in to touch one another. That is what your dough should look like. Book turn complete.) Wrap it loosely in plastic and transfer it to the fridge for 30 minutes.
4. Repeat steps 2 and 3 twice more to make a total of 3 turns,. Each time you start a turn, make sure to have the open edges, or seam, of your dough facing away from you. Sometimes we write 1, 2, or 3 on the plastic we use to wrap the dough as we are putting the turns into it so we don’t lose count. If you put in one too many turns, it will not hurt your dough; if you skip one, you will end up very disappointed in your softbody croissants.

5. For your last and final roll-out, dust your counter surface, your rolling pin, and your dough with flour, remembering to dust under the dough as well. Roll the dough out to a rectangle that’s 8 × 12 inches and even in thickness.
6. With a paring knife or a pizza cutter, cut the dough into 5 triangles, each 8 inches long from the pointiest tip to the center of the side across it and 4 inches wide at the bottom. You should have 5 triangles (2 upside down and 3 right side up) plus some scrap on the right and left. Divide the blue cheese among the croissants, putting it into the center of the wide bottom end of each triangle. Starting at the blue cheese end, use one hand to begin rolling the dough toward the tip of the triangle while your other hand holds the tip and gently stretches it away. Continue until the triangle is completely rolled up into a crescent shape. Make sure the tip of the triangle is tucked underneath the body of the crescent, or it will unravel in the oven. Roll the scraps up into kimchi croissant knots or make baby pigs in blankets!


7. Transfer the croissants to a parchment-lined sheet pan, arranging them 6 inches apart. Cover lightly with plastic and leave at room temperature to double in size, about 45 minutes.
8. Heat the oven to 375°F.
9. Whisk the egg and water together in a small bowl. Generously coat the top of your croissants with the egg wash, using a brush.
10. Bake the croissants for 20 to 25 minutes, or until they double in size, caramelize on the edges, and have a crusty outer layer that sounds hollow when you tap them. They’re killer out of the oven and delicious at room temperature. If for some strange reason they don’t get eaten immediately, wrap them individually in plastic and keep them refrigerated for up to 3 days. We like to toast our croissants before eating on the second and third days.
MAKES ABOUT 205 G (1 CUP), OR ENOUGH FOR 1 BATCH KIMCHI & BLUE CHEESE CROISSANTS
Growing up, I hated this Korean fermented delicacy. My father would drag me miles away to the Korean supermarket down an alley to buy this stuff. He would bring it home and literally evacuate the house when he broke the seal on the jar. It wasn’t until I started working at Momofuku that I learned that I really love kimchi, and that there are many, many levels of potency throughout the kimchi-producing kitchens in this country. The Momofuku cookbook has a ridiculously tasty kimchi recipe (among others). Or use your favorite brand of cabbage-based kimchi in this recipe.
90 g kimchi
[½ cup]
115 g butter, at room temperature
[8 tablespoons (1 stick)]
2 g kosher salt
[½ teaspoon]
1 g freshly ground black pepper
[¼ teaspoon]
1. Put the kimchi in a hand blender–friendly container and puree it.
2. Put the butter in the bowl of a stand mixer fitted with the paddle attachment and paddle on medium speed for 2 to 3 minutes, until light and fluffy. Scrape down the sides of the bowl. Add the pureed kimchi, salt, and pepper and paddle for another 2 minutes; the liquid from the kimchi will try and separate the butter during this time, but the paddling will keep it in line. When the mixture is light, fluffy, and red, stop and scrape down the sides of the bowl.
3. Turn the butter out onto a piece of parchment. Lay a second piece of parchment on top of it and press down on the butter with your hands to flatten it into a 4 × 6-inch rectangle. Transfer the butter-filled parchment to the fridge to firm up. Wrapped in plastic, the kimchi butter pad will keep fresh in the fridge for up to 1 month.
MAKES 5 CROISSANTS
Have you ever had a turkey croissandwich on an airplane, or in a country club, or at a catered corporate event? The ones made with mass-produced croissants and stuffed with turkey cut in half? We always want to like them, but they’re always so disappointing. So we came up with one we love.
The mustard croissant is very similar to the kimchi croissant in technique, but it is stuffed with meat, cheese, and condiments instead of blue cheese. You can substitute your favorite meat-and-cheese sandwich combo, if you prefer, for the turkey and Swiss.
½ recipe Mother Dough, proofed
105 g flour, for dusting
[¼ cup]
1 recipe Mustard Butter
130 g sliced turkey
[5 ounces]
70 g shredded Swiss cheese
[2½ ounces (¾ cup)]
20 g mayonnaise
[2 tablespoons]
1 egg
4 g water
[½ teaspoon]
1. Follow the recipe for the Kimchi Croissants through step 5, substituting the mustard butter for the kimchi butter.
2. With a paring knife or a pizza cutter, cut the dough into 5 triangles, each 8 inches long from the pointiest tip to the center of the side across it and 4 inches wide at the bottom. Divide the sliced turkey among the 5 croissants, stacking the slices onto the center of the wide bottom end of the triangle. Arrange the Swiss cheese on top of the turkey, using your fingers to form it into nests. Dollop the mayonnaise into the Swiss cheese nests.
3. Starting at the wide bottom end, use one hand to begin rolling the dough toward the tip of the triangle while your other hand holds the tip and gently stretches it away. Continue until the triangle is completely rolled up into a crescent shape. Make sure the tip of the triangle is tucked underneath the body of the crescent, or it will unravel in the oven. Roll the scraps into mustard knots or make baby pigs in blankets!
5. Heat the oven to 375°F.
6. Whisk the egg and water together in a small bowl. Generously coat the top of your croissants with the egg wash, using a brush.
7. Bake the croissants for 20 to 25 minutes, or until they double in size, caramelize on the edges, and have a crusty outer layer that sounds hollow when you tap them. They’re killer out of the oven and delicious at room temperature. If for some strange reason they don’t get eaten immediately, wrap them individually in plastic and keep them refrigerated for up to 3 days. We like to toast our croissants before eating on the second and third days.
MAKES 180 G (¾ CUP), OR ENOUGH FOR 1 BATCH OF TURKEY, SWISS & MUSTARD CROISSANTS
This butter is great on a soft pretzel, a warm sandwich, or a hot dog bun!
115 g butter, at room temperature
[8 tablespoons (1 stick)]
25 g yellow mustard, such as French’s
[1 teaspoon]
8 g sherry vinegar
[2 teaspoons]
2 g Worcestershire sauce
[½ teaspoon]
25 g sugar
[2 tablespoons]
8 g kosher salt
[2 teaspoons]
1. Put the butter in the bowl of a stand mixer fitted with the paddle attachment and paddle, on medium speed for 2 to 3 minutes, until fluffy and light yellow. Add the mustard, vinegar, Worcestershire, sugar, and salt and mix for another 2 to 3 minutes. Scrape down the sides of the bowl and mix for an additional minute. Make the butter pad as described below for the croissants, or store the butter in an airtight container in the fridge for up to 1 month.
2. To make the butter pad, turn the butter out onto a piece of parchment. Lay a second piece of parchment on top of it and press down on the butter with your hands to flatten it into a 4 × 6-inch rectangle. Transfer the butter-filled parchment to the fridge to firm up. Wrapped in plastic, the mustard butter pad will keep fresh in the fridge for up to 1 month.
MAKES 1 (8 × 4-INCH) LOAF
Black pepper brioche makes killer club sandwich bread or savory bread pudding. It also makes a mean sandwich with Thanksgiving or Christmas leftovers.
There are plenty of elaborate ways to form a loaf of bread, and even more intricate ways to form a loaf of brioche, but it all tastes the same, and you’ve already cheated death by using the mother dough, so we’re going to take it easy on the loaf-forming lecture. Take the ice cream scoop you use for cookies and use it to scoop rounds of the dough into a loaf pan.
1 recipe Mother Dough, proofed
1 recipe Black Pepper Butter, at room temperature
1 egg
4 g water
[½ teaspoon]
This is probably the most sacrilegious “brioche” recipe you will ever find. But stop taking yourself so seriously. Paddle the butter into the dough and bake the damn thing and enjoy.
If you’re not a black pepper fan, shame on you. Replace the black pepper butter with any other butter you love. Use caraway seeds in place of black pepper. Or ground cinnamon, etc. Or use the Kimchi Butter or Mustard Butter.
1. Punch down and flatten the dough on a smooth, dry countertop. Put the dough and butter in the bowl of a stand mixer fitted with the paddle attachment and knead on low speed for 2 to 3 minutes, or until the butter has been incorporated into the dough.
2. Using a 2¾-ounce cookie scoop, scoop the dough into a greased 8 × 4-inch loaf pan, 2 rounds wide and 3 rounds long, with 2 extra rounds centered on top. Cover with a piece of plastic and allow the dough to rise until doubled in size, about 1½ hours.
3. Heat the oven to 350°F.
4. Whisk the egg and water together in a small bowl. Using a brush, generously coat the top of your brioche with the egg wash.
5. Bake the bread for 35 to 45 minutes. Choose an inconspicuous angle to insert your instant-read thermometer into the center of the loaf—you don’t want to leave a hole in the top of the loaf. The brioche is baked when it reaches 220°F. If you do not have a thermometer, use a skewer—if it comes out clean, with no signs or spots of doughiness, the brioche is done.
6. Cool the brioche loaf completely in the pan before eating it. (It will finish baking as it cools.) If you can’t eat it all in one sitting, it will keep fresh, wrapped well in plastic, for up to 3 days at room temperature.
MAKES ABOUT 275 G (1½ CUPS)
225 g butter, at room temperature
[16 tablespoons (2 sticks)]
25 g sugar
[2 tablespoons]
12 g kosher salt
[1 tablespoon]
8 g finely ground black pepper
[2 teaspoons]
Combine the butter, sugar, salt, and pepper in the bowl of a stand mixer fitted with the paddle attachment and mix on medium speed for 2 minutes, or until the butter is fluffy, the sugar is dissolved, and the mixture is homogenous. Scrape down the sides of the bowl and mix for an additional minute. Use immediately, or store in an airtight container in the fridge for up to 1 month.
MAKES 1 QUARTER SHEET PAN; SERVES 6
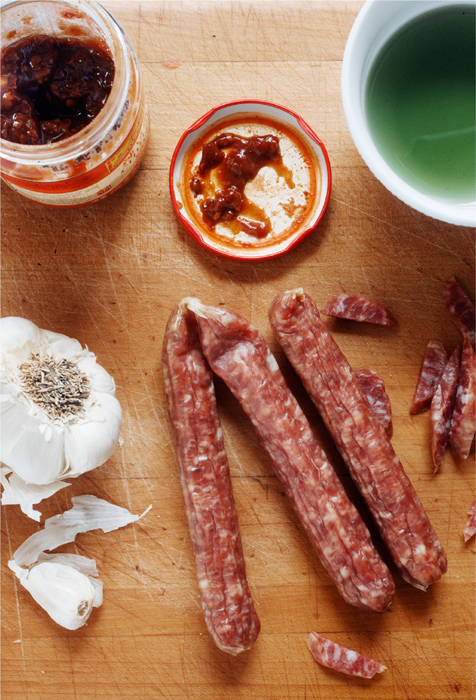
This focaccia is a favorite of many early Milk Bar regulars. It is the brainchild of our beloved James Mark and will go down in our history as the most delicious focaccia man has ever made.
340 g Chinese sausages
[12 ounces]
8 garlic cloves
150 g grapeseed oil
[1 cup]
90 g toban djan
[⅓ cup]
1 recipe Mother Dough, proofed
Feel free to substitute a mixture of shiro miso and a squirt or two of your favorite hot sauce for the toban djan (a Sichuan chile bean sauce). If both Chinese sausage and toban djan freak you out, you can substitute your favorite pepperoni and fresh or dried Italian seasonings in their place.
1. With a sharp knife, cut each Chinese sausage link lengthwise in half. Then slice each half into 12 half-moons. Cut the garlic cloves into thin slices on a bias—the thinner you can get them, the better.
2. Combine the oil, toban djan, sausage, and garlic in a saucepan and cook over medium-low heat for 15 minutes; the oil will turn a deep red color, the Chinese sausage will darken, and the garlic will become translucent. Strain the oil through a fine-mesh sieve into a bowl, saving it for later. Set the sausage aside.
3. Punch down and flatten the dough on a smooth, dry countertop. Stretch the dough out gently by hand until it is slightly longer and wider than a quarter sheet pan.
4. Visualize dividing your dough lengthwise in thirds. Spread half of the sausage and garlic down the center third of the dough. Fold the right third of dough over it. Cover that layer with the remaining sausage-garlic filling, then fold the left third of dough over.
5. Gently lift the dough at both ends and transfer to the baking pan. Cover loosely with plastic and allow it to rise at room temperature until doubled in size, about 45 minutes.
6. Heat the oven to 375°F.