CHAPTER 3
BUILD THE FIRE
SUN SALUTATIONS
Yoga had its origins in India, and as in most ancient and indigenous cultures, the sun held a central place in the life and thought of that early civilization. For thousands of years, the day began—all over the planet—with the worship of the sun. Many of our ancestors in ancient cultures such as the Mayans, Incas, Aztecs, Native Americans, Eskimos, Druids, Romans, Greeks, and most likely dozens of others, had sun temples and sun deities. The sun was the symbol of the great light that the human soul longed to find—whether consciously or not—within. Just think about the importance of the sun in our own culture. For starters, without it, we wouldn’t be here. The sun gives life to everything we know, we have, we eat, we breathe.
So it is no surprise that a short sequence of movements called the sun salutation (surya namaskar in Sanskrit, which translates to “reverence to the sun”) is the way most yoga asana methods begin their practice. There really isn’t a better way to start. The sun salutation does a really good job of warming up the body for a strong asana practice. It serves as a foundation for the subsequent postures, and is just about a complete workout in itself, as it loosens and heats up every joint and corner of the body.
The sun salutations can be modified to accommodate almost anything—a broken leg, a torn rotator cuff, osteoarthritis in a hip, an amputated limb, a hip or knee replacement, a variety of shoulder injuries, sprained or broken ankles, back injuries, or confinement to a wheelchair. They have been used by people of all ages, by all types of athletes, and by people with all kinds of limitations and restrictions. We just tune in to what we are able to do, and then develop a modified program that will work for us. The great thing is that, without exception, everyone can do the breathing! And once we begin to breathe and move and pay attention to what we are doing, the mind begins to quiet, and the symptoms of anxiety, panic attacks, depression, or PTS will begin to subside little by little.
PREPARATION FOR ASANA PRACTICE
The ways we prepare for and enter our yoga practice can determine how powerfully it works for us. Here are several things to keep in mind as you enter the practice.
Eating
To prepare for the practice of the yoga postures presented in this book, it is best not to eat anything, or at the very most, a light snack like toast or an apple or banana, for at least three hours before beginning.
Hydrating
It is also important to be well hydrated going into the practice. Try to drink at least sixteen to twenty-four ounces of water thirty minutes before practice, and then again after practice to rehydrate your body. Unless you forget to drink plenty of water before you start your practice, you don’t really want to drink water or other liquids during practice. Remember, you are trying to build a fire, and what happens when you pour water on a fire? It goes out! Drink beforehand and keep the fire burning while you practice.
Clothing
For ease of movement, wear comfortable workout clothing designed for yoga practice. Nothing too tight but nothing too baggy either, as it will get in your way and possibly be more revealing than you would like.
Flooring
It is ideal to practice barefoot on a clean wood, tile, cement, or bamboo floor using a nonslip yoga mat or just on the floor itself. Do not use anything that will slide around (like a towel or blanket) for a mat, unless you need something under your spine for some of the floor work. In that case, put the towel or small, flat cotton rug on top of the nonslip mat.
Cleanliness
The body and clothes should be clean. You might notice in the first four to six weeks of your asana practice that there may be some unusually strong, strange odors emanating from your body. The asanas are squeezing out toxins and tension (some very old and deeply rooted) and cleansing the cells and organs in ways that sports activities often don’t. But after you have been practicing for a month or so, and if you are following a fairly clean and healthy diet, you will notice that your sweat no longer has much of an odor. The whole process of doing asana is about purification, so you want to be clean, pure, and without odor, especially if you are in a class situation. Remember “clean” has no odor, so slathering yourself with synthetically scented lotions, potions, deodorants, soaps, and shampoos is not the same thing and can make others in class sick. No scented anything—just clean!
Distraction
If you are practicing on your own at home, pick a space where you are least likely to be distracted or dismayed. The more neutral the space, the more likely you will be able to feel content with the moment and attentive to the activities of your inner being. Distractions are part of life, and whether they are internal or external, as you learn to focus and direct your attention in your practice, they will bother you less and become less attractive. Eventually, you will be able to let the interfering thought pass and won’t be drawn in by external sight or sound. But sometimes a distraction is just too big to ignore. If you become distracted or interrupted, and it is guaranteed that you will many times, simply notice that you have been distracted. This is the critical moment. This is when you take hold of your attention, let go of the thought or the distraction, and pull your attention back to your breath. Every time you are able to do this, you become stronger in your resolve to stay grounded and present, and you become healthier and less susceptible to being distracted by sounds, sensations, or painful (or pleasant) memories.
Room Temperature
No air conditioning—being cool may be cool but as far as temperature goes, it defeats the whole purpose of the practice. If you don’t like sweating, this yoga may not be for you. If you can’t sweat for medical reasons, then work easy and breathe easy.
Sweating
Hopefully, by the time you finish doing the repetitions, you will have broken into a sweat. That’s the idea. The particular system of asana practice described in this book is what is called a form of tapas, or detoxification. The word tapas means “to burn.” The idea is that you use the work to start an internal fire, which then burns impurities and clears toxins—both physiological and psychological—from the body through squeezing, sweating, and breathing.
Generally, we associate sweating with huffing and puffing and working hard. In yoga, we learn to work hard, but also to work smart. The breath is even, powerful, and controlled, not panting. The heart rate is even and steady, not pounding. We are statically contracting muscles and focusing on those contractions; remember, although you will be stretching, this isn’t a stretch class. As we move into postures and hold those positions, we are consciously contracting the muscles opposing the stretch. This will make sense once you start to practice. Those strong, conscious, static contractions that happen in stillness are different from the dynamic contractions of moving a limb through a range of motion, like lifting or running or biking. The static contractions, along with the ujjayi breathing, help to keep the sweating mechanism turned on and wring the toxins out of the muscles, ligaments, and tendons, as well as out of the brain!
SUN SALUTATION (POSITIONS 1–9)
The sun salutation we are going to work with here is a sequence of nine positions, and each position or movement flows from one to the next. It is performed, once learned, as a fluid sort of dance, with one breath accompanying each move, and is generally repeated several times. The idea is to use this work to warm up for the rest of your practice.
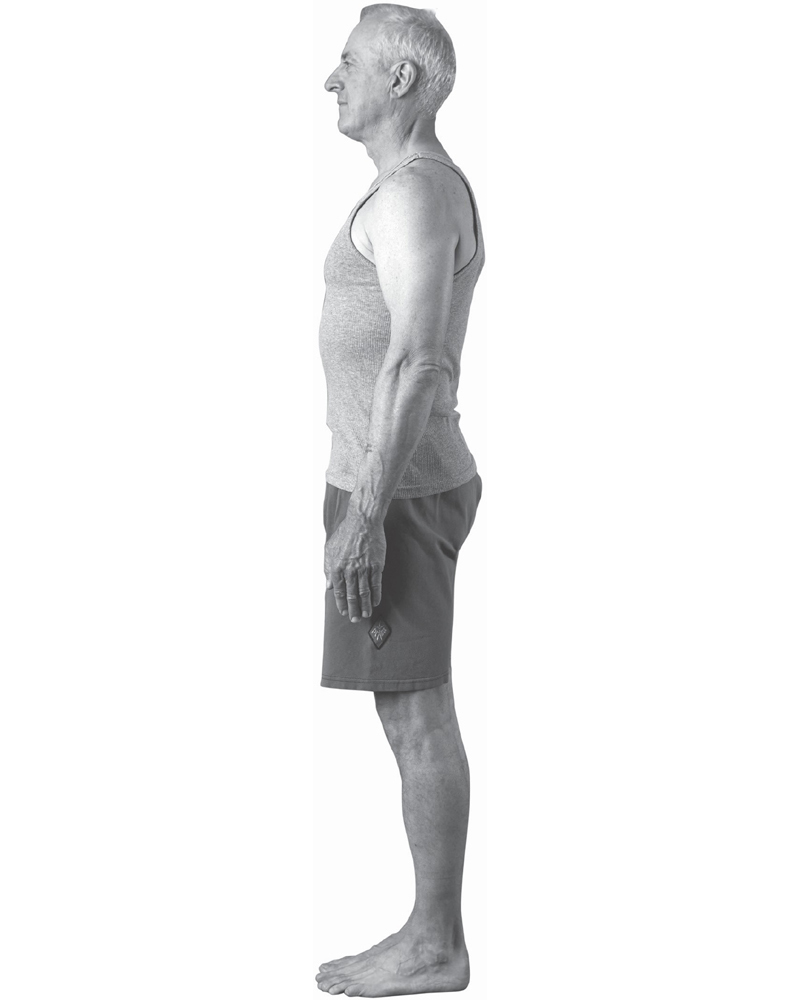
FIGURE 3.1 Mountain Posture
Mountain Posture
Stand at the front of your yoga mat with your feet together and with your arms at your sides. (If that is not possible for reasons of balance or discomfort, then make sure your feet are at least parallel. Press your feet into the earth and feel the earth supporting you. Imagine you can feel energy coming up from the earth through your feet, all the way up through your hips, shoulders, and out the top of your head. Mother Earth—here, now—has your back. It’s a good feeling. Make it a good feeling. Level your pelvis, by dropping your tailbone. Pull your belly in, tighten your thigh muscles, and lift your chest bone (the sternum). Take a moment to focus your eyes on a point in front of you: pick a little spot and look at it. Try to hold this gazing point for a moment or two. Begin the ujjayi breathing. Take a moment to settle in and actually be there.
This is mountain posture, or it could be called attention position. (See figure 3.1.) You will begin and end your practice in this position and frequently return to it between most of the standing postures for the entire standing sequence.
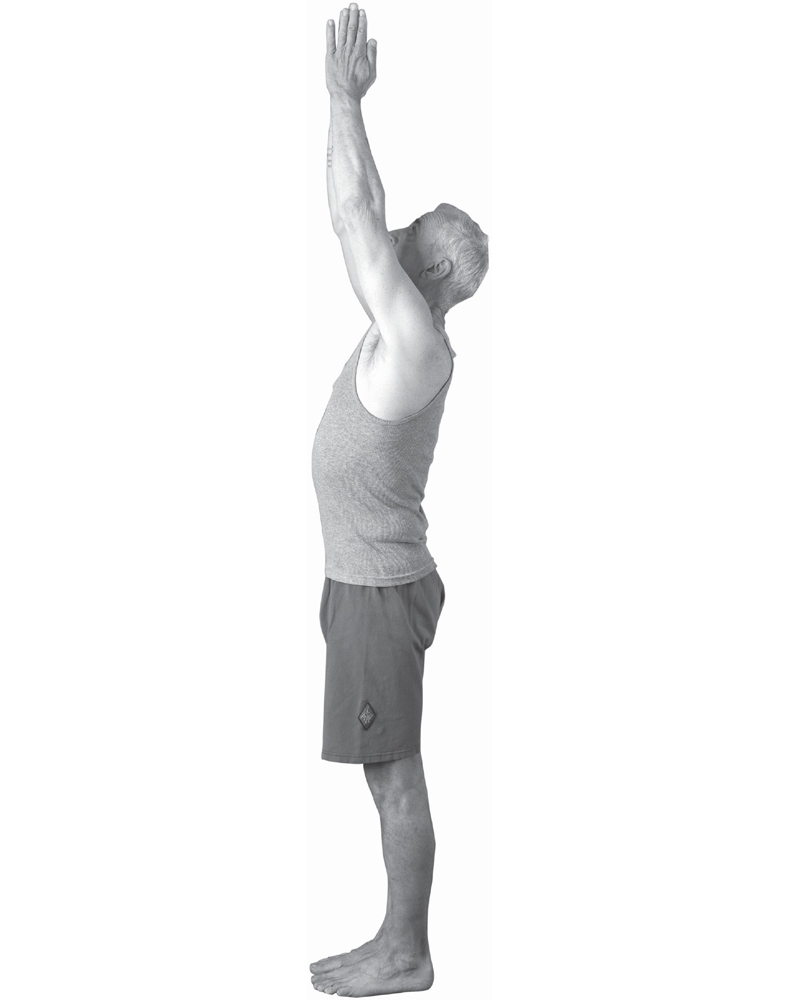
FIGURE 3.2 Sun Salutation, Position 1
Position 1 Mountain Posture with Arms Up
Inhale and raise your arms up over your head, placing the palms together (if possible). Look up. Lift the knee caps by tightening or flexing the thighs (quadriceps). Reach up as strongly as possible, lengthening the torso and lifting the rib cage. Don’t arch the back or lean back.
Note: If you have neck issues or it feels painful to look up, then look straight ahead. Stand straight up and down. Keep your belly pulled in and your tailbone lowered. When contracting, or tightening, your thigh muscle, be careful not to hyperextend the knees; you can soften the knees slightly and still contract the thighs. This lifting of the quadriceps is what I explained earlier as a static contraction—a tightening of a muscle without an accompanying movement in the associated limb. A static contraction is the “hard” or tightened aspect of the posture. It takes energy and requires fuel to accomplish. Thus it creates heat. Static contractions are an extremely important element of the practice and are a key component of generating heat, keeping the fire going, and keeping the sweating mechanism turned on during the practice. This procedure of static contraction will be referred to frequently throughout the book.
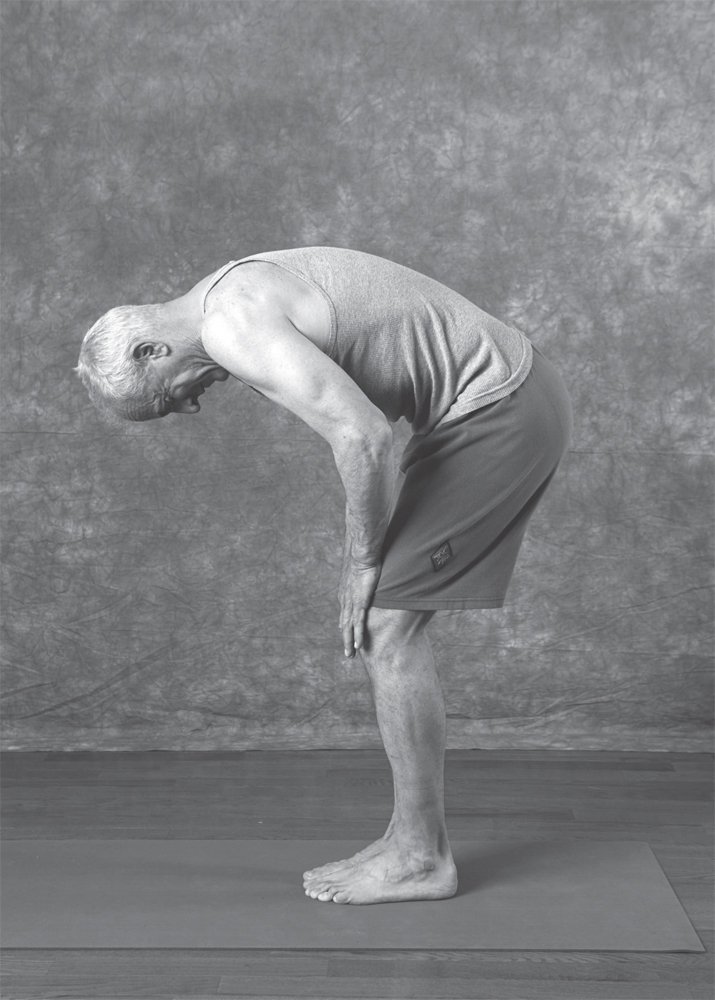
FIGURE 3.3 Sun Salutation, Position 2
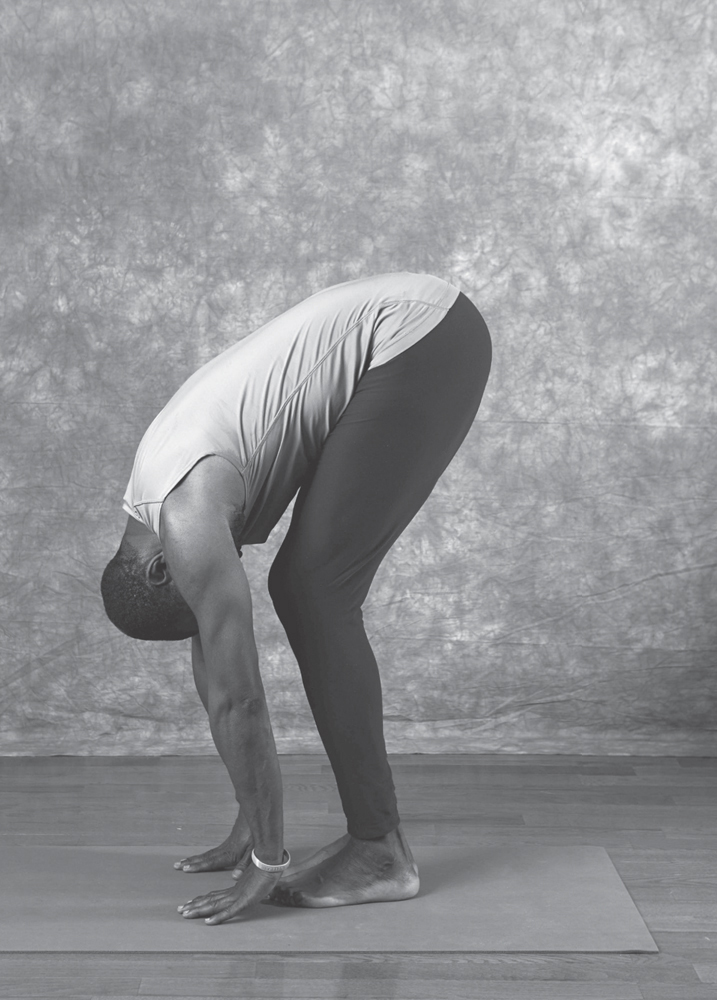
FIGURE 3.4 Sun Salutation, Position 2, Advanced
Position 2 Standing Forward Bending Posture
Exhale, bend forward, bend your knees, and place your hands on your knees (see figure 3.3 or 3.4). Tuck your nose into your knees. If you are really flexible, you can take your hands all the way to the floor for this position. (See the following note as well as figure 3.4.)
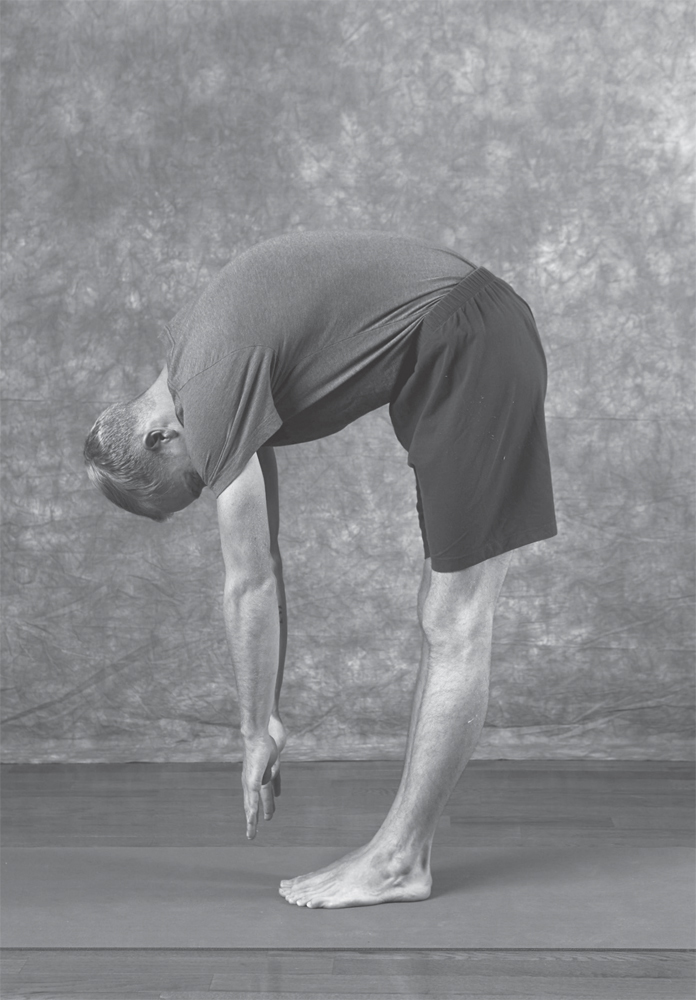
FIGURE 3.5 Sun Salutation, Position 2, Incorrect
Note: In figure 3.5, it is easy to see in the model, who is a runner and has very tight hamstrings, how stressful standing forward bending can be on the lower and middle back. If you look like this when you bend over, and cannot easily touch your toes, then it is critically important that you bend your knees and place your hands on your knees and not try to reach the floor.
Note: Before taking this posture, consider whether you have tight hamstrings, lower-back pain, or any kind of low-back injury. If you do, it is really important to bend your knees as you bend over and that you do not try and take your hands all the way to the floor. Standing forward bends attempted with straight legs can be contraindicated and dangerous if the hamstrings are very tight and/or there are lower back issues!
Position 3 Standing Forward Bending Posture, Head Up
Inhale, lift your chest, extend your spine, and look up, keeping your hands on your knees (or the floor).
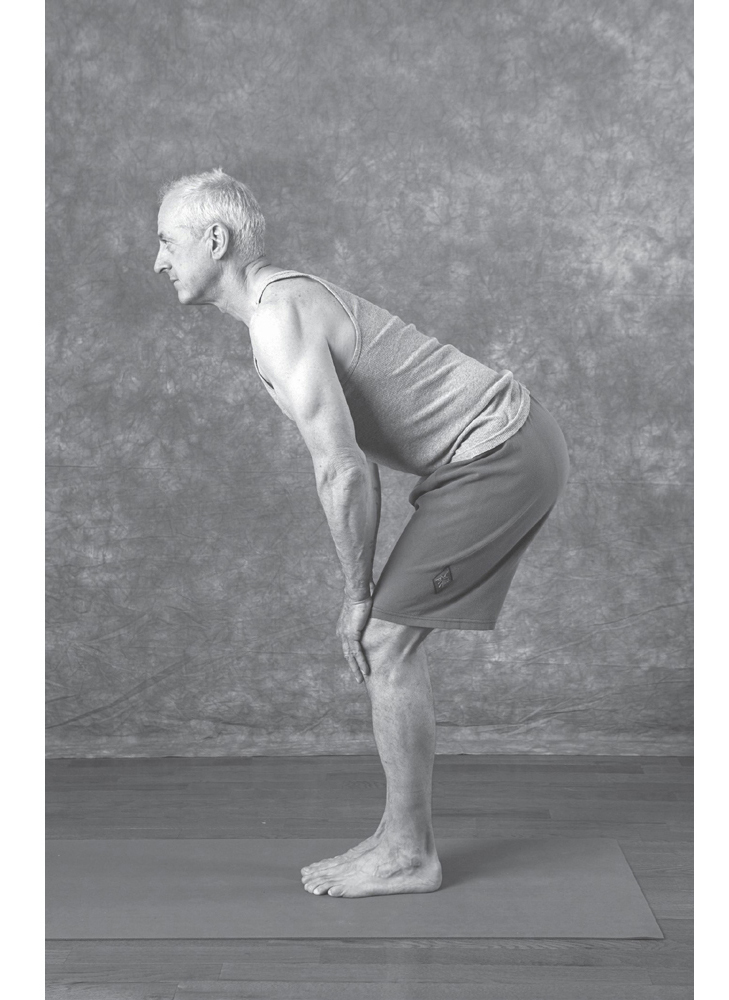
FIGURE 3.6 Sun Salutation, Position 3
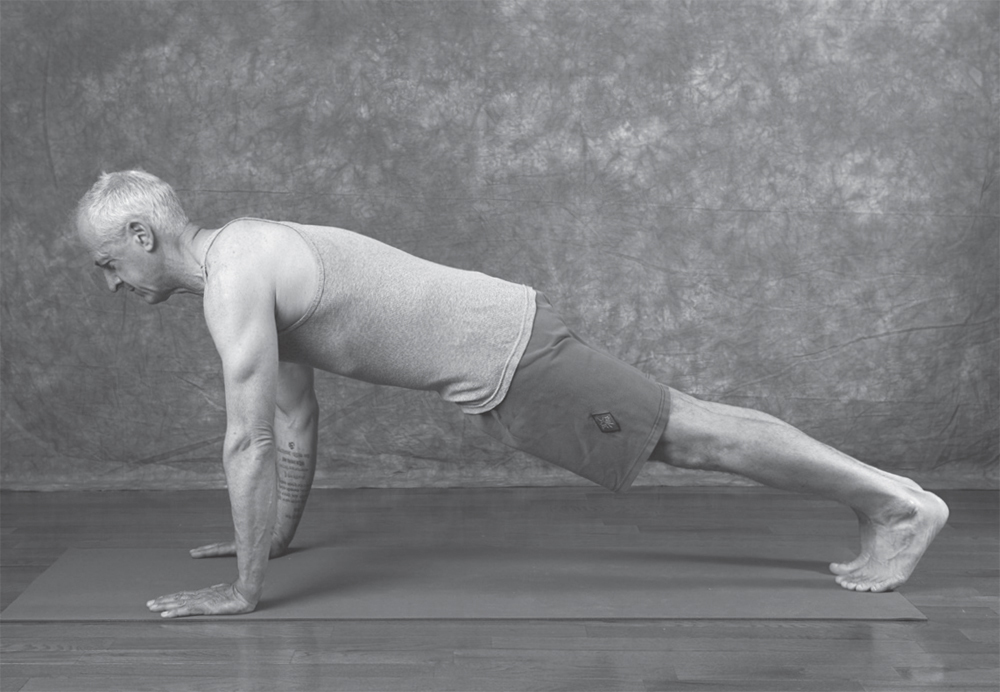
FIGURE 3.7 Sun Salutation, Position 4
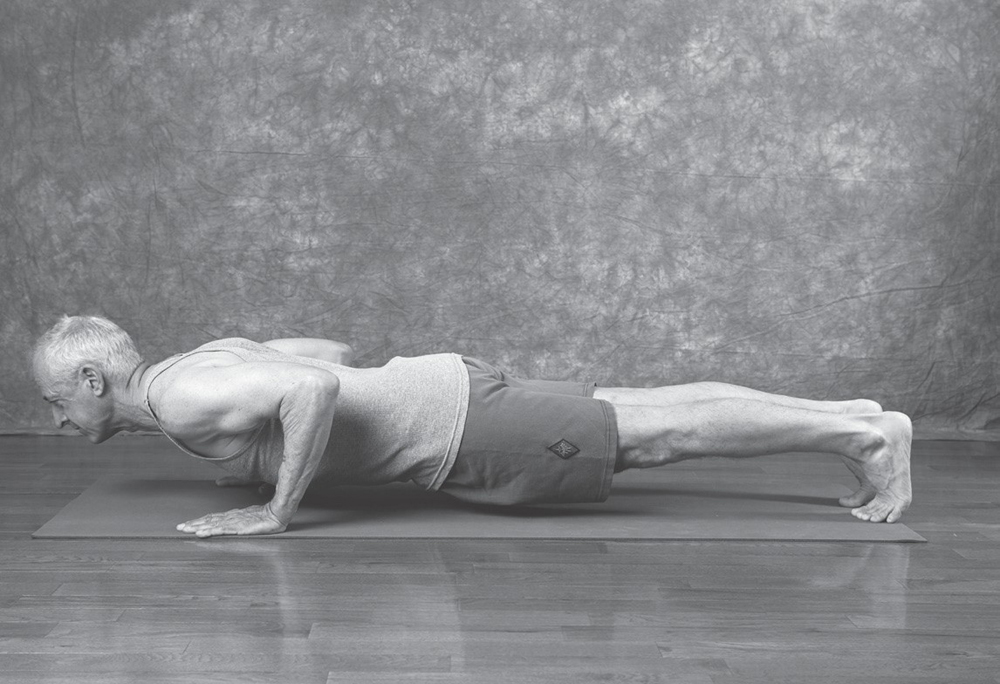
FIGURE 3.8 Sun Salutation, Position 4, Advanced
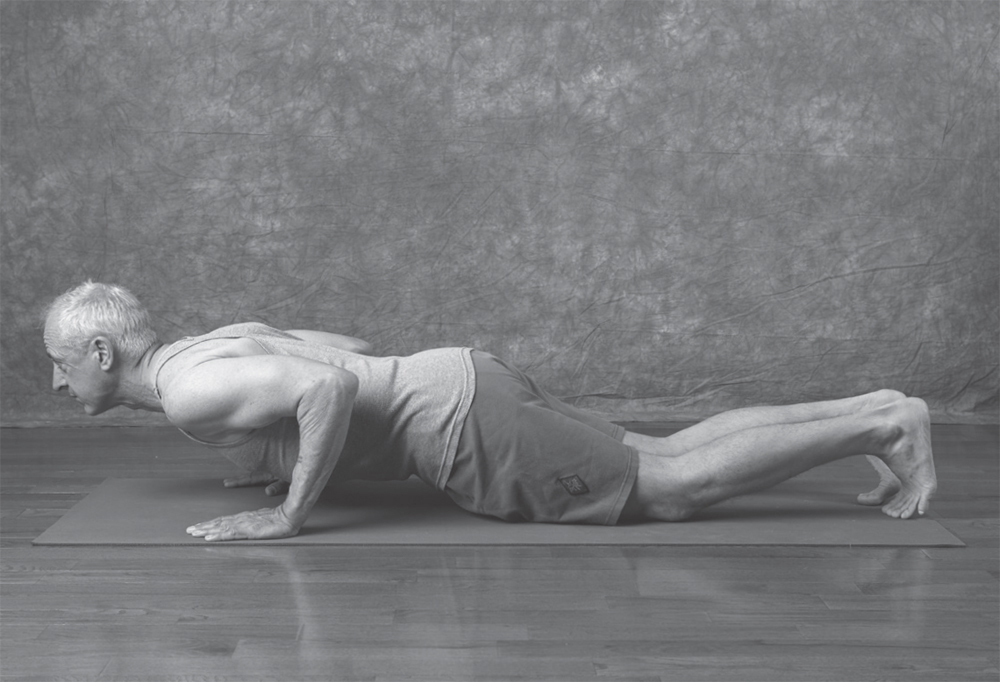
FIGURE 3.9 Sun Salutation, Position 4, Modified
Position 4 Four Limb Stick Posture
Exhale, place your hands on the floor (bending the knees as needed to do so) on either side of your feet, step all the way back, and come into a straight or plank position. (If your hands are already on the floor, just step back to the plank position.
Inhale again, and then exhale and lower your torso into a pushup position (figure 3.8), hovering above the floor, if possible. (If not, just lower yourself all the way to the floor or just lower your knees, as in figure 3.9, slowly building arm strength over the weeks of practice).
Note: Keep your torso steel-straight and your elbows tucked into your sides. Keep your shoulders level with your butt and your elbows. Don’t let your butt sag, but don’t stick it up in the air either. Think plank. If you are strong enough to hold a push-up without sagging in your hips, then you can do this with straight legs; but if you are not, you can modify this posture by lowering your knees to the floor. Keep your head in line with your spine. Gaze straight in front of you.
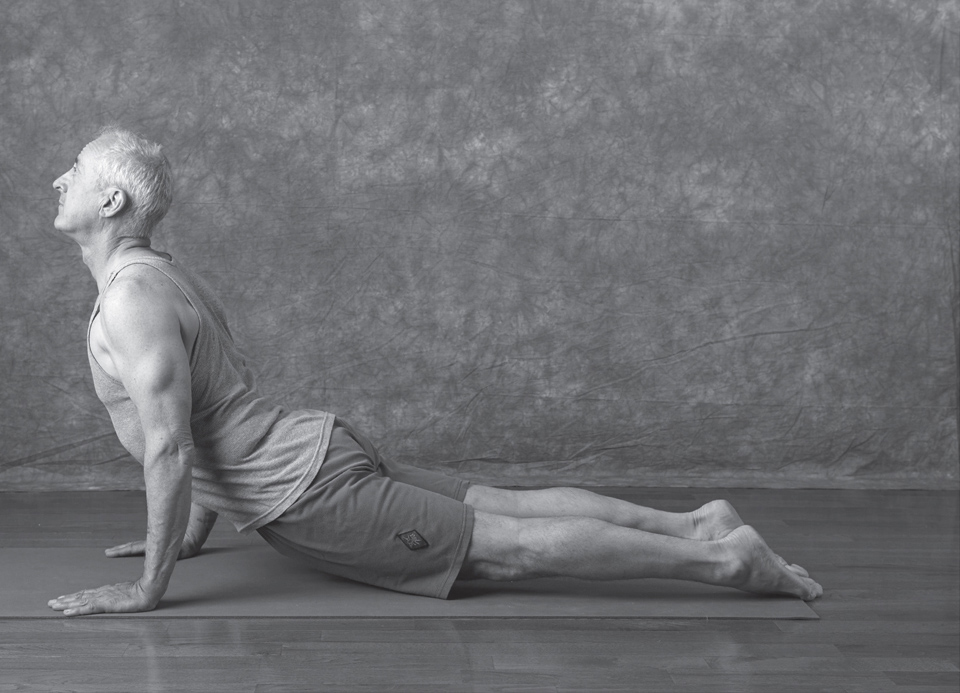
FIGURE 3.10 Sun Salutation, Position 5
Position 5 Upward Facing Dog Posture
Inhale; turn the feet so the toes are pointed (plantar flexion) and the tops of your feet are on the floor. Lift the body all the way up onto the hands and the tops of the feet only, straightening the arms and rolling the shoulders back. Don’t “hang” between your shoulders. Use your deltoids (shoulder muscles)! Look up.
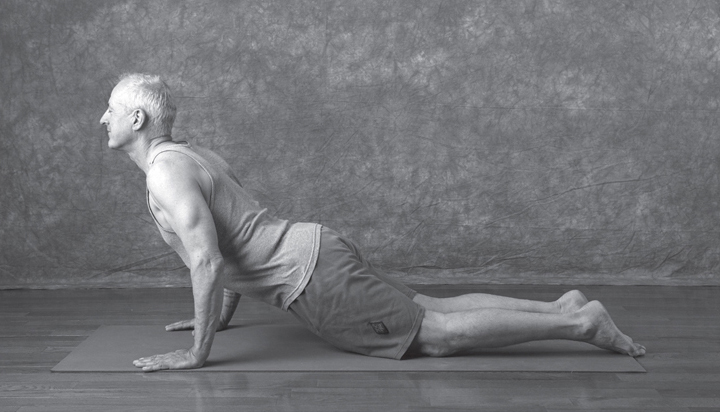
FIGURE 3.11 Sun Salutation, Position 5, Modified
Note: If you have lower-back pain or injury, it is best to use the knees-down modification of this posture, or skip it altogether. If you have limited plantar flexion (find it difficult to point your toes), both versions of this position might be a little uncomfortable, so continue with the knees-down posture until the tops of your feet stretch out a little.
Note: This position can be extremely difficult for a person with tight feet or ankles. It can also create lower back distress if done incorrectly. Do not let your back sag or your shoulders hunch up around your ears. When done correctly, this should not be uncomfortable. If you feel too much pressure in your lower back or on the tops of your feet, then modify the posture slightly by placing your knees on the floor, as in figure 3.11.
Position 6 Downward Facing Dog Posture
Exhale and turn your toes back under (dorsiflex position) with the balls of your feet on the floor. Push up and back into an upside-down V position. Look back between your legs at a point behind you. Let your neck relax and head hang, then tuck your chin slightly toward your chest. Push down on your heels. Pull up on the belly. Your arms should be straight, but be mindful not to let your elbows lock (or hyperextend, which means to press inward). From the front, your arms should look very, very slightly like parentheses ( ), with the elbows slightly wider than the wrists and in line with the shoulders, or just wider than the shoulders. The exact details will depend on your personal physiology.
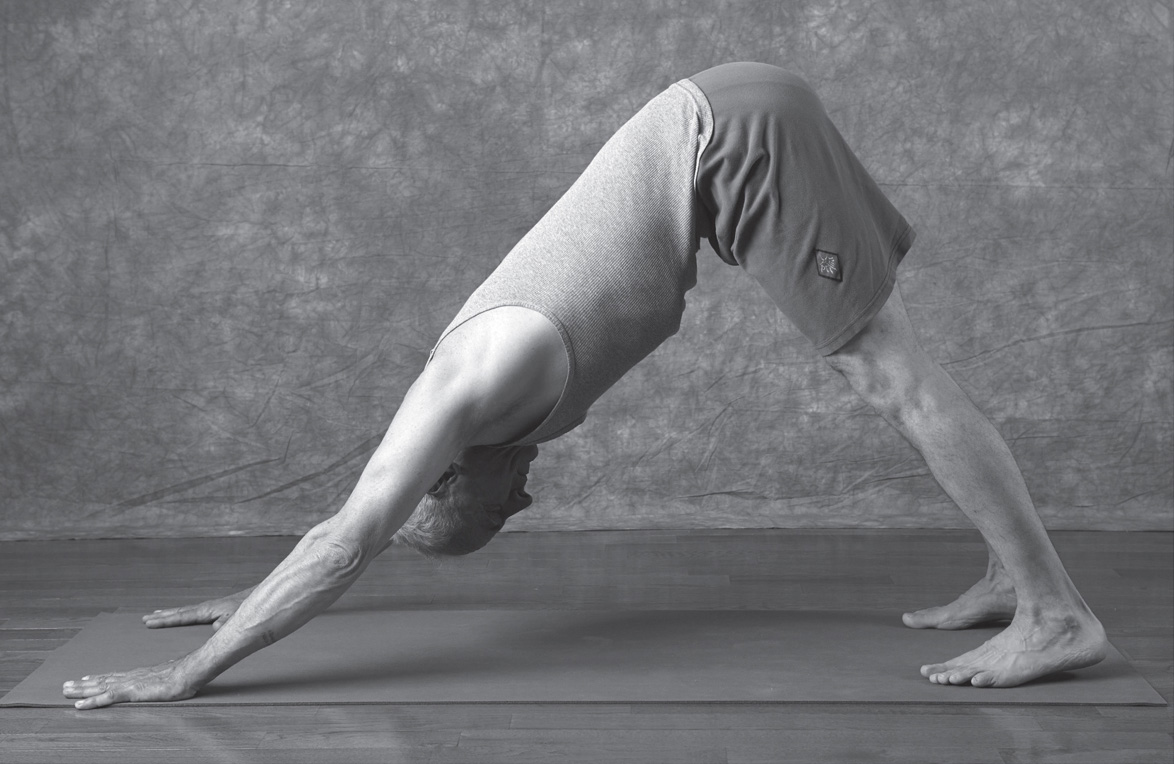
FIGURE 3.12 Sun Salutation, Position 6
Note: Downward facing dog posture (position 6) is an awesome place to hang out. It stretches the hamstrings, the calves, the back, the tendons in your ankles and feet, and strengthens the arms and shoulders. It is an excellent posture for the lower back.
Hold this posture for five complete controlled ujjayi breaths. (A complete breath equals one inhalation and one exhalation.)
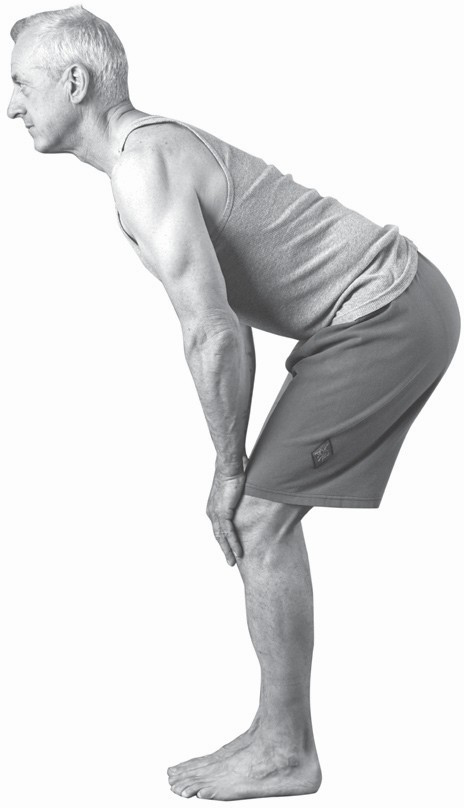
FIGURE 3.13 Sun Salutation, Position 7
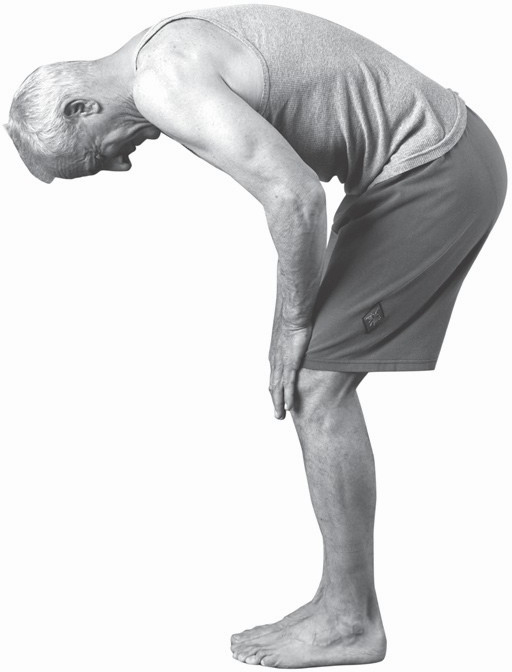
FIGURE 3.14 Sun Salutation, Position 8
Note: If you hop or jump forward from position 6 to position 7, make sure you don’t jump into a squat—it’s hard on the knees! Just bend the knees as much as necessary to land softly.
Position 7 Standing Forward Bend Posture, Head Up
This is the same posture as position 3, which you did on the way down to the floor.
Inhale as you walk or hop your feet back to your hands. Bend your knees slightly and place your hands on your knees (or the floor, if you can) and extend your spine. Lift the head and look up.
Position 8 Standing Forward Bend Posture
This is the same posture as position 2, which you did on the way down.
Exhale as you round your back slightly and tuck your nose toward your chest, keeping your hands on your knees (or on the floor, if you can). Look down.
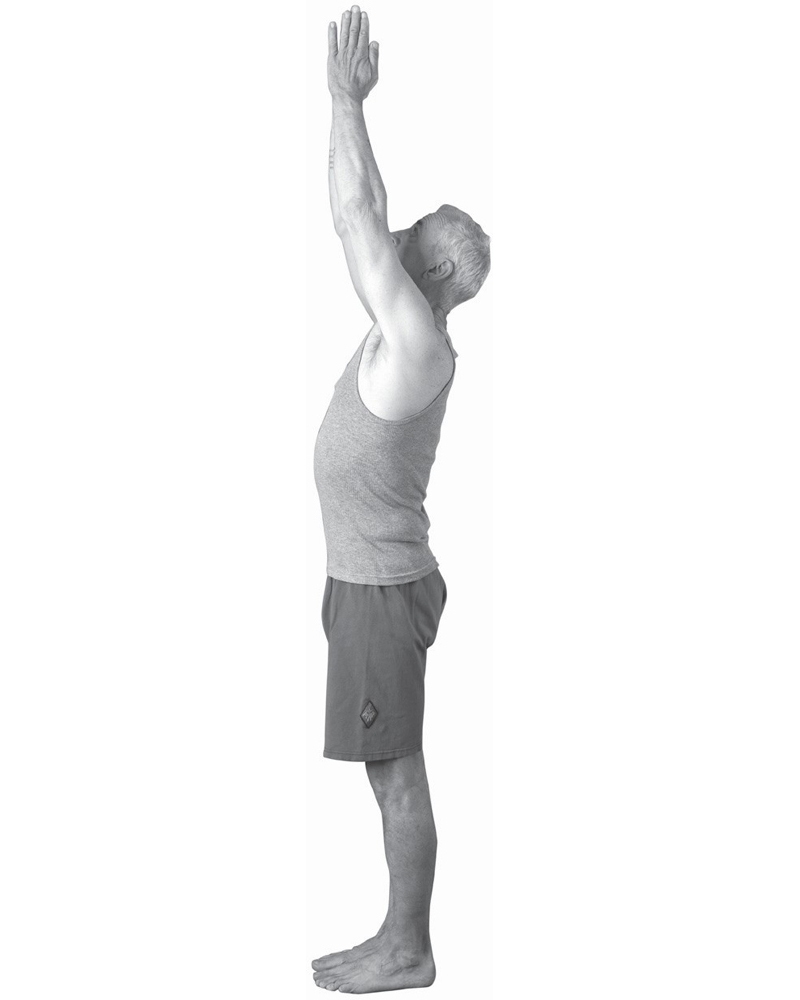
FIGURE 3.15 Sun Salutation, Position 9
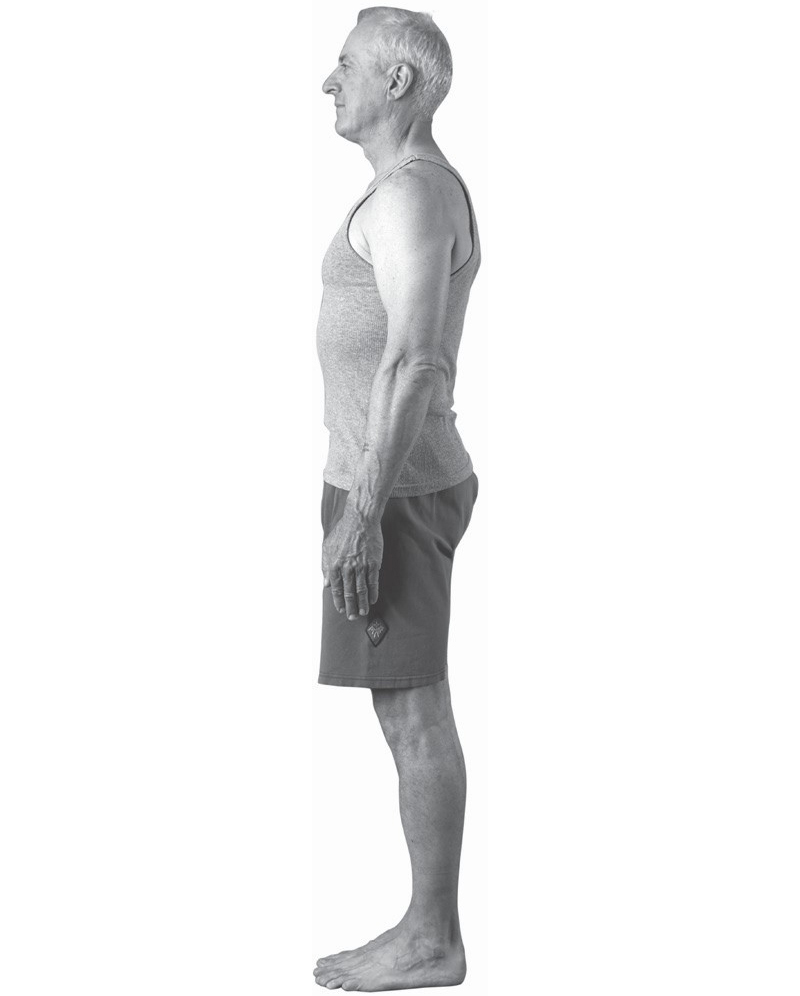
FIGURE 3.16 Mountain Posture
Position 9 Mountain Posture with Arms Up
This is the same as position 1.
Inhale as you come all the way back to standing straight, arms parallel over your head or palms touching. Reach up. Look up at your thumbs or look straight out in front of you. Remember to hold your belly in, level the pelvis, and lengthen the tailbone down.
Return to Mountain Posture (Attention Position)
Exhale and lower your arms back down to your sides.
Note: Finish here for a moment, standing with your feet together, spine straight—natural curves in place. Continue to breathe, being aware of the breath. Make sure your belly is pulled in, your pelvis is level, your thighs are engaged (or contracted, which pulls up the kneecaps), and visualize your shoulder blades melting down your back. Keep your gaze steady. Listen to your breath. Keep it even and controlled. Anchor yourself to the earth. Feel supported and connected to the earth.
Repeat
This completes one sun salutation. When you first start your practice, repeat the entire sequence three times. As you become stronger, slowly work up to between five and ten repetitions each session. Once you learn the postures and movements, each salutation will take a little over a minute, about seventy to seventy-five seconds—so you can’t say you don’t have the time for them. Just learn them and do them and love them.
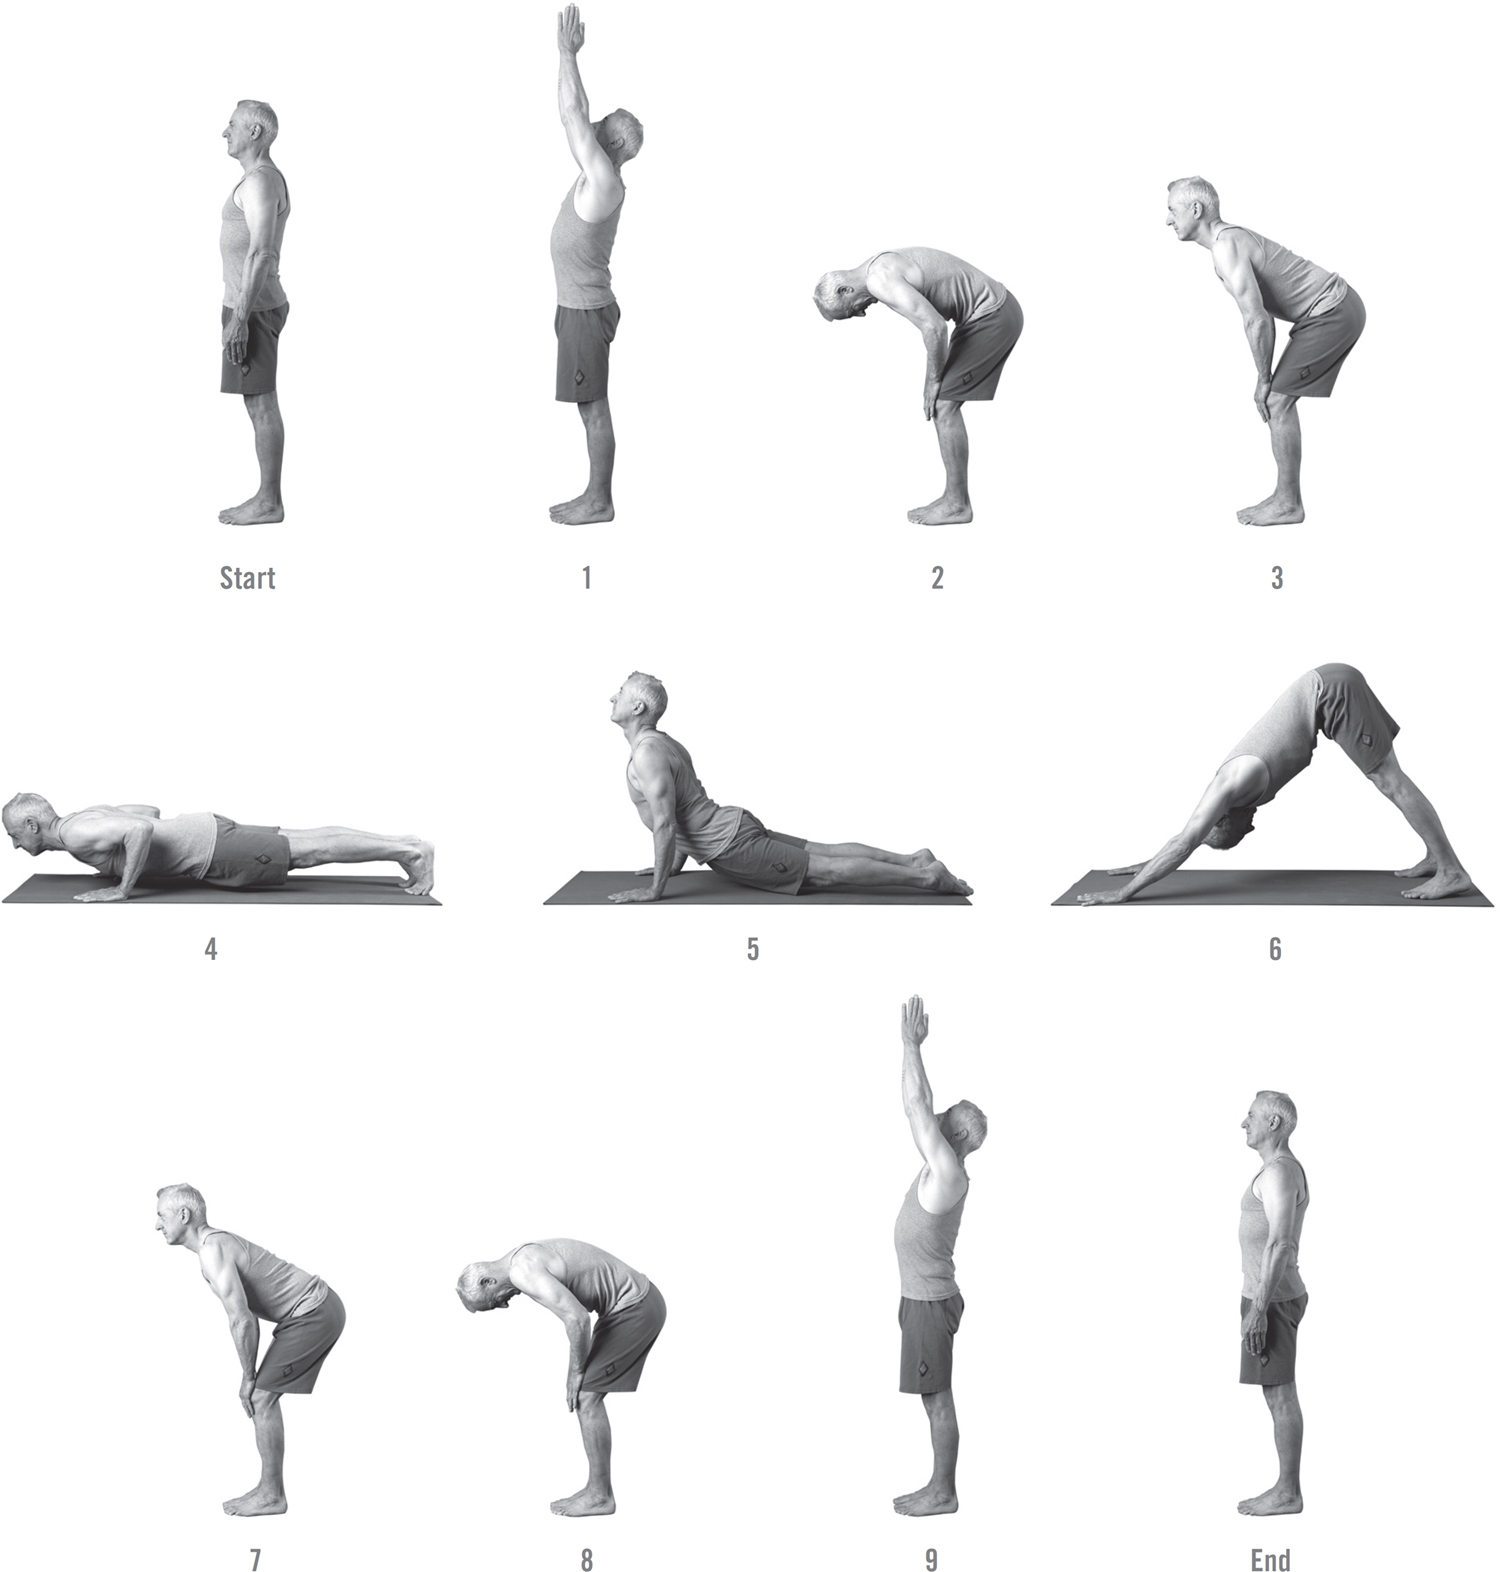
FIGURE 3.17 Sun Salutation Flow
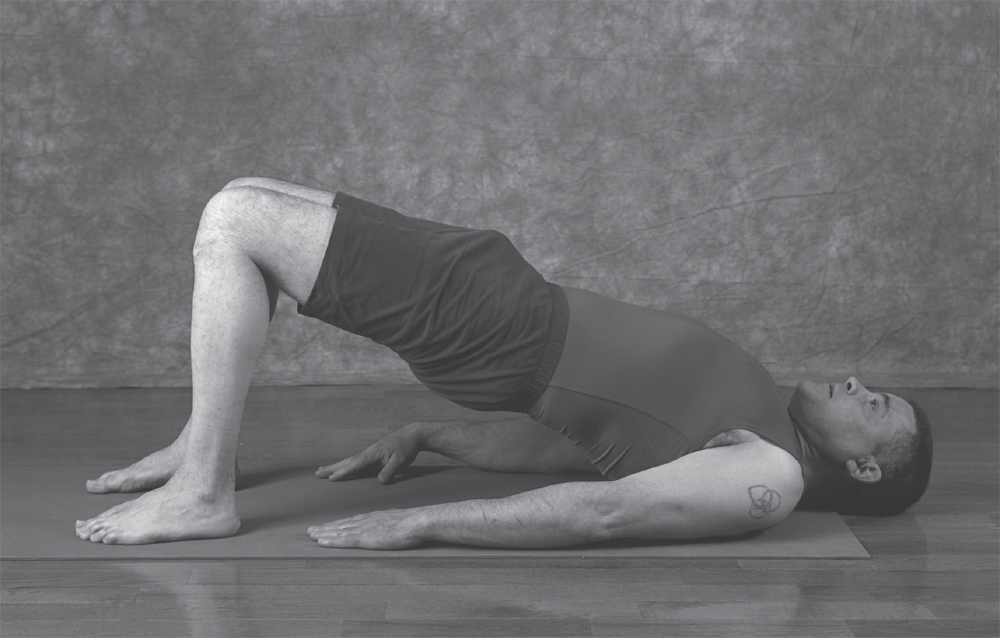
FIGURE 3.18 Bridge Posture
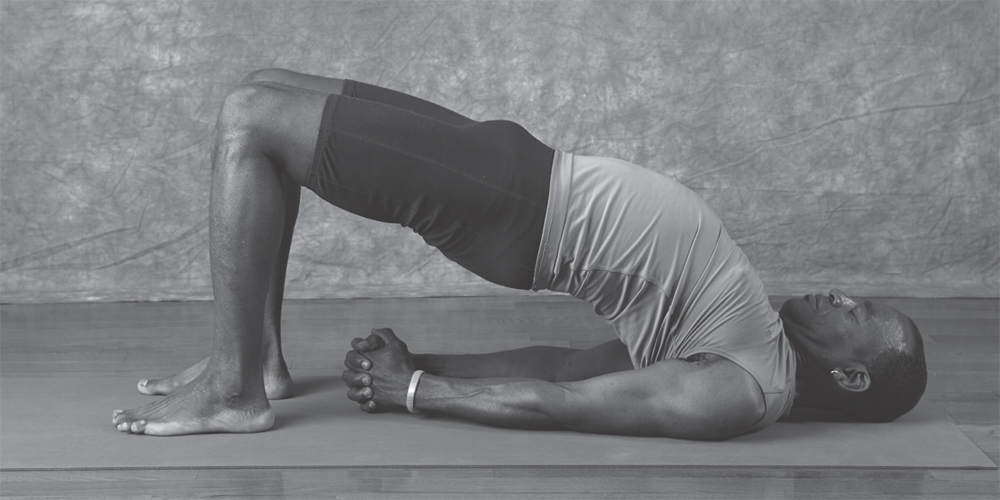
FIGURE 3.19 Bridge Posture, Advanced
CLOSING YOUR SUN SALUTATION PRACTICE
After you have completed your practice of the sun salutations, the following few postures will provide both a slight strengthening and stretching effect for the muscles in the lower back. This should make it possible for you to lie comfortably still in relaxation posture and for the lower back to be relaxed and at ease. If your lower back tends to bother you in general and is still a little cranky after going through this routine, spend a couple more minutes in the knees to chest posture and then return to relaxation posture.
Bridge Posture Lie down on your mat, on your back, and bend your knees. Bring your knees to your chest, then put your feet down flat on the floor in line with your buttock bones. Press your hips up into the air with your arms alongside, palms face down. Take a few breaths here.
Note: If you want to move a little deeper into the posture and stretch out the pecs (the front of your shoulders, pectoralis major), bend your elbows slightly and see if you can clasp your hands together underneath your torso. Squeeze your shoulder blades together and see if you can straighten your arms. Eventually you will have all your weight on your shoulders, upper arms, and the back of your head, and your spine will not be touching the floor.
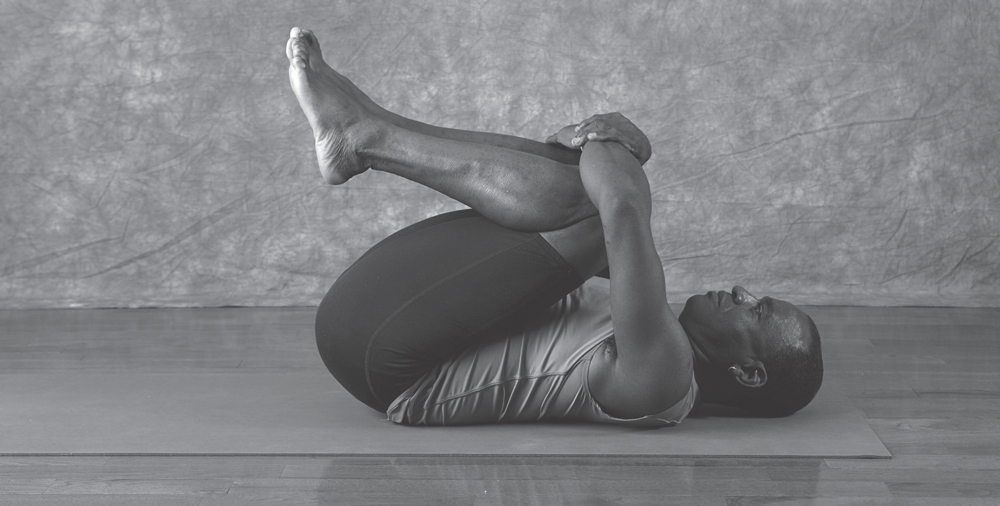
FIGURE 3.20 Supine Knees to Chest Posture
Supine Knees to Chest Posture Release your hands and lower to Chest Posture your hips to the floor, then bring your knees to your chest. Wrap your arms around your shins and give yourself a hug. Then release your arms, but keep your knees pulled to your chest.
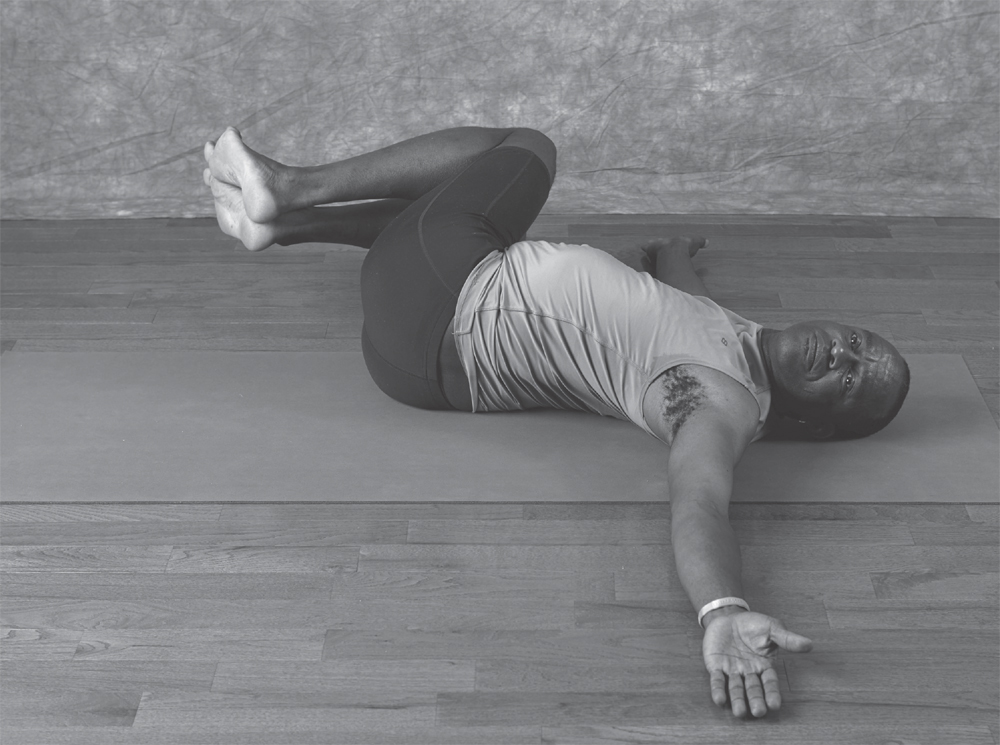
FIGURE 3.21 Supine Knees to Chest Twist Posture
Supine Knees to Chest Twist Posture Reach your arms out to your sides in a T position and roll your knees to your right side, keeping the knees up high toward the elbows. Take a few breaths here, then bring the knees back to center and roll them to your left side. Take a few breaths here as well. Keep your shoulders on the ground as best you can.
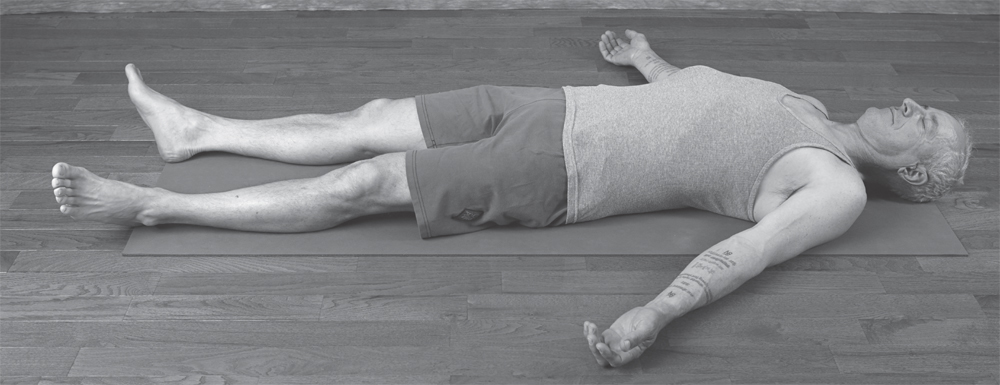
FIGURE 3.22 Relaxation Posture
Relaxation Posture Return your knees to center and stretch your legs out full-length along your mat. Take your feet at least as far apart as the width of your hips, and then let your feet relax and fall open to the sides. Place your arms slightly out from the sides of your body, palms face up, head level. Close your eyes.
If you have chronic lower-back soreness or tightness, this practice should help to loosen the tight muscles and help to heal any injuries or alleviate misalignment. However, if you experience any tightness or discomfort in your lower back when you come into relaxation posture, it may be helpful to place a fairly sturdy pillow, bolster, or folded-up blanket under your knees (see figure 3.22).

FIGURE 3.23 Relaxation Posture, Modified
Important reminder: if your back (or any other part of your body) didn’t hurt before you began your yoga practice, it shouldn’t hurt after your yoga practice. If it does, you are doing something wrong. Go back and carefully read the notes and precautions and work easily until you build strength and endurance in your yoga posture practice and can flow through the postures without creating pain or tension.
See if you can keep your attention on your breathing. Let the breath become quieter and quieter, softer and softer, slower and slower, eventually relinquishing all control of the breath and returning to natural breathing. Stay here as you cool down and drop into relaxation—for at least ten minutes and preferably a few more. You might become so relaxed and your arousal levels may be calmed to such a degree that you actually fall asleep. Good for you! Rest easy. This is an opportunity to have an experience of feeling completely relaxed and at ease, and one that you will come to realize you can duplicate again and again.
As you become more familiar and comfortable with the sun salutations and the idea of linking your movement with your breathing, you will find you are able to glide through this sequence without stopping or putting in extra breaths. You will simply flow from one posture to the next, effortlessly, and then from one sun salutation to the next. Practice the sun salutations until you become comfortable with the movement and the breathing.
Do this practice four or five days a week. Let it become second nature. Just do this much to start. Don’t rush through this to get on to what’s next—it will all come to you in time. Part of your work, remember, is to be present and content with what is. It took awhile for you to build the tightness and stress levels, and it will take awhile to ease them out. Once you have practiced the sun salutations for a few weeks, you should be able to move on to the standing postures in the next chapter.
And one more thing: you might want to congratulate yourself for making the commitment to take the step to actually do this. You are consciously choosing to do something to help yourself either feel or be better. This is a huge step. The moment we take effective action to do things that make us feel better, we are already on the road to healing and recovery.