
WHAT IT TAKES
Time: 1 day
Skill level: Beginner
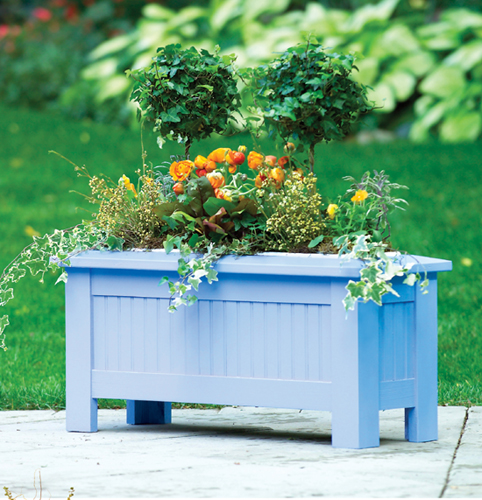
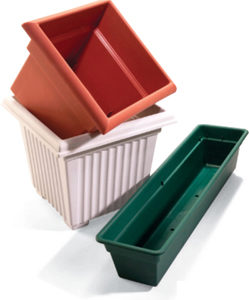
Building an attractive planter is easy with the method shown here. Each starts with a simple plywood box. Then you add a beveled cap, legs and siding to match your house, deck or patio. For extra durability and longevity, these planters are designed to accept standard size plastic liners to contain the moist soil.
The cost of the materials for the planters ranges from $50 to $80, depending on what you choose for siding. You can complete each one in a day. Two power tools—a table saw and a power miter box—make this project much easier. Use the table saw to cut the bevel on the top cap and to rip the leg pieces to width. A power miter box simplifies the task of getting tight-fitting miters on the top cap. You can also use it to make all the square cuts on the ends of legs and trim. Shop for the plastic liners first; if you can’t find the exact size shown here, simply modify the planter dimensions to fit the ones you find. You’ll find a wide variety at any home or garden center.
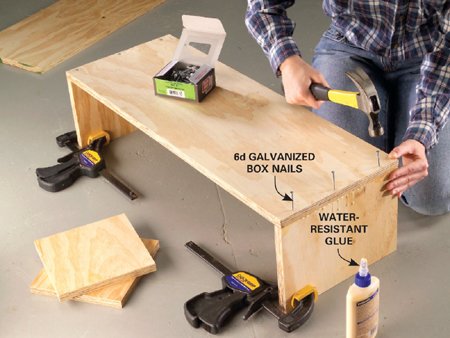
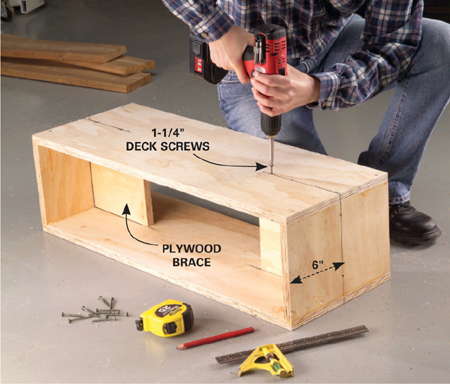
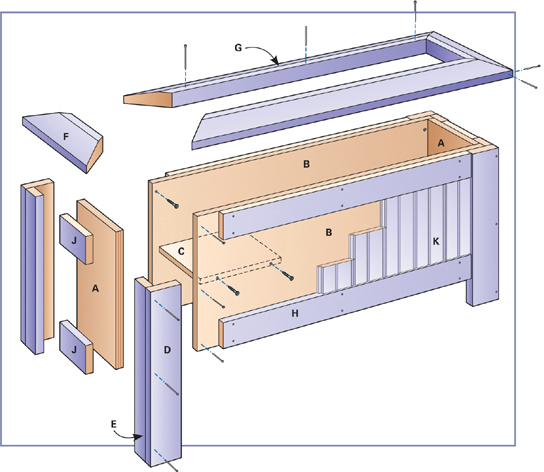
The core of each planter is a box of 3/4-in. CDX or BC plywood. Most home centers and lumberyards will sell you a partial sheet of plywood and cut it into easily manageable sizes for you to haul home. Cut plywood pieces to final size with a table saw, or clamp a straightedge to the plywood and cut it with your circular saw. Assemble the box with water-resistant wood glue and 6d galvanized nails (Photo 1). Add plywood braces inside the long planter to square the box and hold the long sides straight. The braces shown here are centered, but you can shift them down if they obstruct the liner (Photo 2). The other two planters don’t need braces if you make sure they’re square after you assemble them. Check with a framing square and add braces if they’re needed.
Buy your liners first and adjust the planter dimensions if necessary.
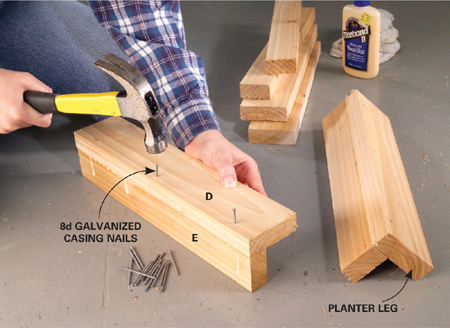
Shown here is 5/4x6 (1 in. x 5-1/2 in. actual dimensions) cedar decking for the legs, but you can substitute other 5/4 decking if cedar isn’t available.
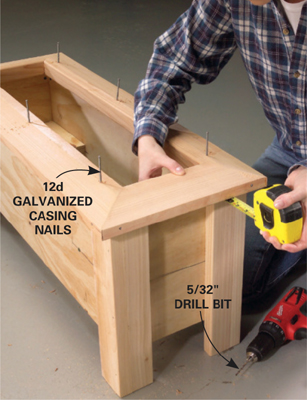
First rip the deck boards to 5-1/4 in. to remove the rounded corners on one edge. Then run the squared edge against the table saw fence when you rip the 3-in.- and 2-in.-wide leg pieces. Cut the pieces to length and glue and nail them together with 8d galvanized casing nails (Photo 3). Sand the saw marks from the board edges before you screw the assembled legs to the box.
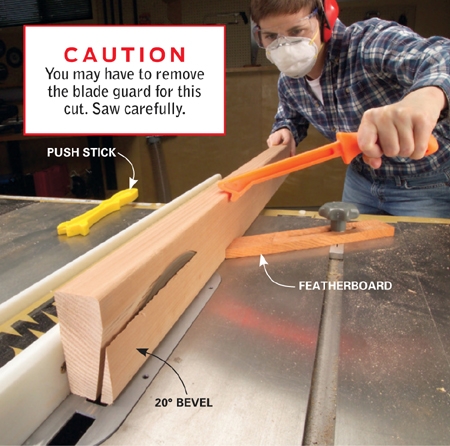
Ripping the bevel on the 2x4 top cap may require you to remove the blade guard. If so, use extreme caution to keep your fingers well away from the blade. Make sure the blade is tilted away from the fence as shown in the photo. Mount a featherboard and use push sticks to complete the cut (Photo 5). Start the cut by pushing with your back hand while holding the board down with a push stick in your front hand. Keep a second push stick within easy reach. When your back hand gets to the rear edge of the table saw, pick up the second push stick and use it along with the front push stick to push the board clear past the saw blade. Keep your attention focused on the saw blade at all times. Shut off the saw and wait for the blade to stop before retrieving the beveled board.
Photo 6 shows how to assemble the top cap pieces into a frame that’s easy to attach to the box. Start by gluing the miters and clamping one long side as shown. Then drill 1/8-in. pilot holes for the nails. Drive a pair of 8d galvanized casing nails from opposite sides at each corner to pin the miters together. Offset the nails slightly so they don’t hit each other.
Mount the frame to the box by centering it with an even overhang all around and nailing it down with 12d galvanized casing nails (Photo 7). Measure and drill 5/32-in. pilot holes for the nails, making sure they’re centered on the top edges of the plywood.
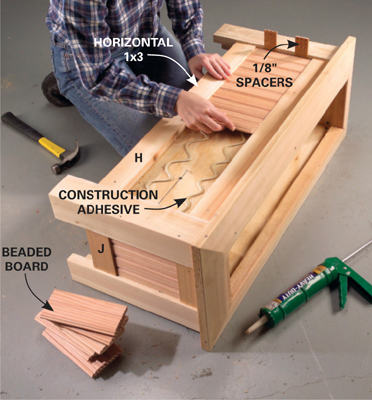
Beaded board is great for a traditional-looking painted planter. For the best-looking planter, plan ahead and cut an equal amount from the first and last boards. Start by nailing the top trim (H) to the plywood box with 4d galvanized casing nails. Use a precut beaded board as a spacer to position the bottom board precisely. When you glue in the beaded boards, make sure to leave a 1/8-in. space at each end to allow room for expansion (Photo 8). Fill the space with caulk before painting.
Figure A
Beaded board planter
Materials List
1 |
2' x 4' 3/4" CDX plywood |
1 |
5/4x6 x 6' deck board |
2 |
2x4 x 6' cedar or pine |
2 |
1x3 x 6' cedar or pine |
14' |
5/8" x 3-1/2" beaded tongue- and-groove |
|
Water-resistant glue |
|
4d, 8d and 12d galvanized casing nails |
|
6d galvanized box nails |
|
1-1/4" deck screws |
|
Plastic liner (to fit 6-1/2" x 29" opening) |
Cutting List
KEY |
QTY. |
SIZE & DESCRIPTION |
A |
2 |
3/4" x 8" x 11-7/8" plywood ends |
B |
2 |
3/4" x 32" x 11-7/8" plywood sides |
C |
2 |
3/4" x 8" x 7-3/4" plywood braces |
D |
4 |
1" x 3" x 15" legs |
E |
4 |
1" x 2" x 15" legs |
F |
2 |
1-1/2" x 3-1/2" x 13-1/2" beveled cap |
G |
2 |
1-1/2" x 3-1/2" x 36" beveled cap |
H |
4 |
3/4" x 2-1/2" x 28-1/2" trim (cut to fit) |
J |
4 |
3/4" x 2-1/2" x 6" trim (cut to fit) |
K |
22 |
5/8" x 3-1/4" x 6-7/8" beaded boards |
WHAT IT TAKES
Time: 1 day
Skill level: Beginner
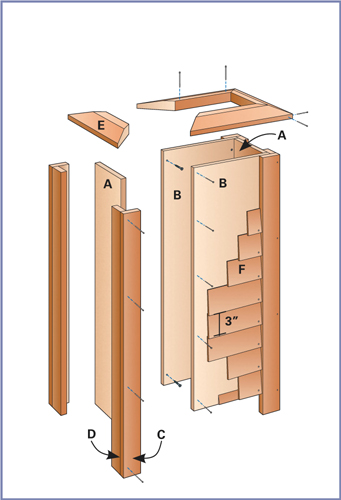
The tall box shown at the beginning of this article is sided with 1/2-in. x 3-1/2-in. cedar lap siding. Simply cut the siding to fit between the legs. Rip a 1-in. strip off the thin edge of a siding piece for a starter. (Rip the leftover to fit at the top later.) Then nail the starter strips along the bottom of the plywood (under the first row of siding) to hold the first piece of siding at the correct angle. Predrill 1/16-in. holes 3/4 in. from the end and 5/8 in. from the bottom of each piece to prevent splitting. Then nail on the siding with 4d galvanized box nails. The top cap on this planter fits flush to the inside edge of the plywood box, which may cause the nails protruding through the inside to interfere with the plastic liner. If so, bend them flat or clip them off using end-cutting pliers. You’ll save measuring time by making a simple spacing jig as shown here. This planter was finished with a clear exterior finish.
Figure A
Materials List
1 |
4' x 8' x 3/4" CDX plywood |
2 |
5/4x6 x 6' deck board |
1 |
2x4 x 8' cedar or pine |
36' |
1/2" x 3-1/2" lap siding |
|
Water-resistant glue |
|
4d, 8d and 12d galvanized casing nails |
|
6d galvanized box nails |
|
1-1/4" deck screws |
|
Plastic planter (to fit 12" x 12" opening) |
Cutting List
KEY |
QTY. |
SIZE & DESCRIPTION |
A |
2 |
3/4" x 12" x 29" plywood ends |
B |
2 |
3/4" x 13-1/2" x 29" plywood sides |
C |
4 |
1" x 3" x 32" legs |
D |
4 |
1" x 2" x 32" legs |
E |
4 |
1-1/2" x 3-1/2" x 19" beveled cap |
F |
40 |
1/2" x 3-1/2" x 9-3/4" siding (cut to fit) |
WHAT IT TAKES
Time: 1 day
Skill level: Beginner
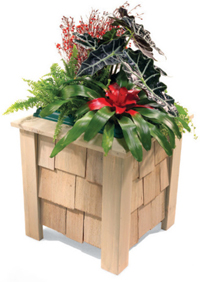
Wood shingles are perfect for a rustic, natural-looking box. And finishing the planter is a snap if you use stain (we used a gray semi-transparent stain). The only drawback to shingles is that you may have to buy a whole bundle, many more than you’ll need to side one planter.
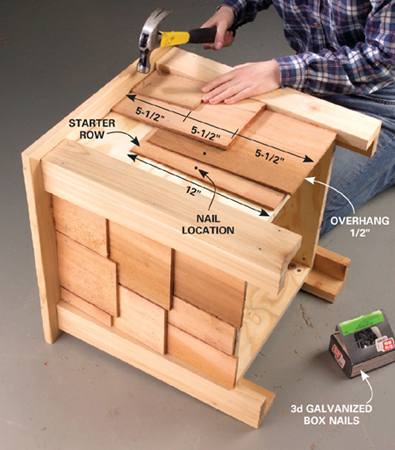
The butt end of shingles is a little too thick for the proportions of this planter. So before cutting the shingles to their final length, trim off about 4 in. from the thick end (assuming your shingles are about 16 in. long). Then cut and install them as shown. Start with a double thickness of shingles on the first row. Then offset the joints by at least 1-1/2 in. from one row to the next. Also stagger the shingles up and down if you like the “shaggy” look. Nail the shingles to the plywood box with 3d galvanized box nails. Position the nails so the next row will cover them. The nails will stick through the inside of the box but won’t interfere with the plastic liner.
Cedar shingles can be stained to extend their life, but they shouldn’t be painted. Cedar shingles need to breathe. When the exterior surface is painted, the backs still absorb moisture, which “pushes” the paint off the shingles.
Cut 4 in. off the thick end of all 16-in. shingles to reduce their length to 12 in. Then cut them to fit and nail them to the plywood, starting at the bottom. Stagger the slots between shingles.
Figure B
Cedar shingle planter

Materials List
1 |
16" x 62" x 3/4" CDX plywood |
1 |
5/4x6 x 8' deck board |
1 |
2x4 x 8' cedar or pine |
1 |
Bundle of cedar shingles (50 or 60) |
|
Water-resistant glue |
|
8d and 12d galvanized casing nails |
|
3d and 6d galvanized box nails |
|
1-1/4" deck screws |
|
Plastic planter (to fit 13" x 13" opening) |
Cutting List
KEY |
QTY. |
SIZE & DESCRIPTION |
A |
2 |
3/4" x 16" x 14-1/2" plywood ends |
B |
2 |
3/4" x 16" x 16" plywood sides |
C |
4 |
1" x 3" x 19" legs |
D |
4 |
1" x 2" x 19" legs |
E |
4 |
1-1/2" x 3-1/2" x 20" beveled cap |
F |
50-60 |
12" cedar shingles cut to fit |