
Now that you have made a quilt top, you might be ready to make some changes in where and how your machine is set up, your ironing workstation, and your cutting surface. This class will provide more in-depth information about setting up a good work area. Then we will venture into making slightly more challenging quilts.
Your table and chair are critical to a comfortable work session. When starting out, you seldom have the perfect sewing cabinet, the right ergonomic chair, and the perfect light. But you can make do with whatever you have available, as long as you observe some basic ergonomic principles.
The standard height of a sewing machine cabinet is 28″–32″. If your machine were in a cabinet, that would be the height of the machine bed. If you will be working with your machine on a table, try to use a table low enough that the bed of the machine is within this range. You can buy an adjustable-height banquet table (avoid the plastic ones, which vibrate too much) and set it at the right height for sewing. These tables are a good investment because you can always adjust them when you need a higher table for a different task.
Special portable tables, such as the SewEzi (pictured), are also available. These are very stable, and they take up little space. Other brands are made by Roberts and Sew Much More.
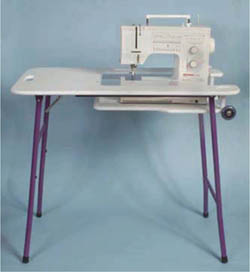
SewEzi portable table
Your machine should be close enough to you that you are not stretching your arms or your neck to see the needle. The needle should not be more than 7″ from the edge of the table. The proper body position for sitting at the sewing machine is very similar to that for playing the piano.
Make sure you can sit directly in front of the needle, not in front of the machine. You also need enough leg-room to be comfortable, and you should be able to pull your chair close enough to work comfortably for several hours.
The chair you choose to sit on while sewing can make the difference between a pleasant sewing session and backaches. It must be comfortable and provide firm support.
Sitting at a sewing machine is much like working at a computer keyboard. When everything is adjusted correctly as shown below, your elbows are at the same height as the keyboard. The line from your elbow to your hand is straight or has only a slight downward tilt of the wrist (a 90° angle, plus or minus 20°). Following these guidelines can nearly eliminate wrist stress when sewing. Try it and see.
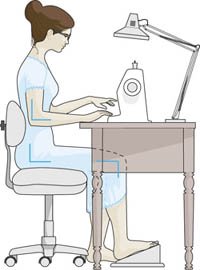
Sitting at your machine pain-free
We would suggest that you invest in a good task light to position by your machine. Full-spectrum, true-color lighting eliminates glare and eye fatigue. We recommend Ott and Daylight lamps, which come in many sizes and styles. A lamp on a flex arm that can be positioned at any angle is very convenient.
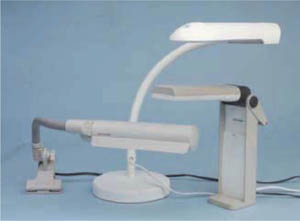
Selection of good lamps for sewing
A cutting table is one of the most important working areas of a sewing room. We spend as much if not more time at the cutting table than we do at the sewing machine. Designing, planning, cutting, and developing projects often takes place at the cutting table. This table needs to be customized to your height and space requirements. The ideal table should be accessible from all four sides, hard-surfaced, and high enough so you don’t have to stoop or bend while working.
The ideal size is determined by the types of projects you undertake. Generally, a table 28″ to 36″ wide and 56″ to 72″ long is sufficient for quilting. Your work should be kept to within 14″ to 18″ of your body on the table surface. Reaching too far can hurt your back and reduce your muscle power. The center of the table width should be between 14″ and 18″ from the edge.
To determine the table’s proper height, stand in the shoes you normally work in, bend your elbow at a 90° angle, measure from the elbow to the floor, and subtract 2″ to 3″. Ideally, you should be able to perform the task without raising your hand above elbow level and without stooping or stretching forward.
Place a rubber or padded mat on the floor in front of the table to reduce circulation problems and fatigue from standing for long periods.
Ideas for making a table work for you include the following:
 If you are using a folding banquet-type table, raise the height either by extending the legs with precut lengths of metal or PVC pipe (a diameter that will just slip over the legs) or by placing wood blocks measuring 4″ × 4″ × the needed height under each leg. Nail a small can on each block of wood to keep the legs in place. Bed risers also work if they provide a height that is right for you.
 A real space saver is a door fastened to the wall at one end and supported on the other end by a dresser or pre-made kitchen cabinet base unit. Or use a door with dressers or cabinet bases for the supports at both ends.
 Create a reversible tabletop with one side laminated for cutting and the other side padded for pressing large pieces.
As you get started, you will likely make do with the iron that you already own. As you progress with your piecing, you will see where specific features really do make a difference in the way an iron performs.
If possible, use an iron with the least number of holes on the soleplate. The more holes, the more likely the fabric is to catch in them and get “scrunched up.” More holes also mean less drying surface. Optimally, you need an iron with just a few holes at the very point of the iron so that when you use steam, the steam comes out of these holes and then is followed by a dry, flat surface that dries the fabric.
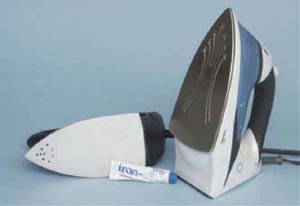
Iron with steam vents only at point
The heavier the iron, the easier it is for you to press accurately. Instead of your having to apply pressure to the iron, the weight of the iron does the work, and all you have to do is glide it over the surface.
Be sure to keep the soleplate of your iron clean. Dye, starch, and fabric finishes can build up on the iron, causing it to drag and to transfer residue onto seam allowances as you press. Try products such as Iron Off, which contain beeswax and silicone, to keep the iron clean and slick. You can also use white vinegar on a soft cloth to clean off the residue.
This question comes up all the time: what is the difference between starch and sizing? You will often be told to use sizing instead of starch, but why? We were curious, so we called Faultless Starch Company in Kansas City to inquire (Faultless is our favorite band). Sizing is a product that gives washed garments that nice new feel that they had on the rack when you bought them. Starch actually stiffens the fabric and allows an iron to create a crease and hold it in the fabric. We prefer starch because when we press a seam, we want a crisp, sharp edge on the right side of the fabric, and for the fabric to lie very flat. This makes the piecing process go much easier and helps in many ways with the machine quilting process at the end.
Use starch when you straighten the grain and with every seam that you press. The accuracy that results makes it one of the most helpful things you can do to achieve perfect piecing.
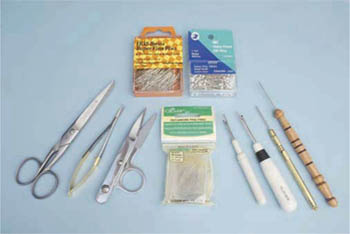
Selection of sewing helpers
At this stage, you will not be cutting much fabric with scissors, but you will need thread scissors or snips. These are generally shorter and have more pointed tips than fabric scissors. Some brands are available with large holes for larger fingers. Thread snips are very handy for machine work. They are spring-loaded so that they are open all the time.
As you go through the piecing lessons, experiment to see if pins work for you. Experienced quilters tend to dislike pinning unless there is no other way to line pieces up. When it’s possible to use alternating, butted seams and finger matching, many quilters feel they get a much more accurate join for the pieces. However, there is no way to join a long border strip to a quilt top accurately without using pins.
If you find you like using pins, the pins you choose can have a big effect on the piecing. Many pins sold as “quilter’s” pins are too thick and create a bump at the seams. The extra-large head does not lie flat and can cause inaccurate stitching because the fabric is not allowed to lie flat against the throat plate of the machine.
We recommend using the finest pins you can find. Clover Patchwork Pins are the finest on the market. Others to try are IBC Fine Silk Pins by Clotilde, and Iris Silk Pins, in either the blue tin or the orange plaid box by Gingham Square.
We recommend that you do not sew over pins. Remove them as you come to them. The extra-fine Clover Patchwork Pins are an exception to this; still, slow down the machine a little just to make sure your needle clears the pin.
Some quilters use a tool to help guide the fabric under the presser foot, especially when they need to hold an area tight to make sure it doesn’t slip as it passes under the presser foot. A stiletto is a very sharp metal point that works very well. You might want to consider an orange stick or bamboo skewer as an alternative.
In the beginning, your seam ripper will be your best friend. When shopping for a good seam ripper, there are a few things to consider. First, check your sewing machine attachment box. The very best seam ripper may come with your machine.
You are looking for the following characteristics:
 A very fine, sharp point to slip easily under a stitch
 A sharp cutting edge to cut the thread
 A comfortable handle, small or large—your preference
At this point, you’re ready to move on to making quilts with more strips and colors.
In this lesson, you’ll delve even further into quilts made with strips and only strips. The two quilts presented here differ greatly in construction techniques and will further your skills and abilities.
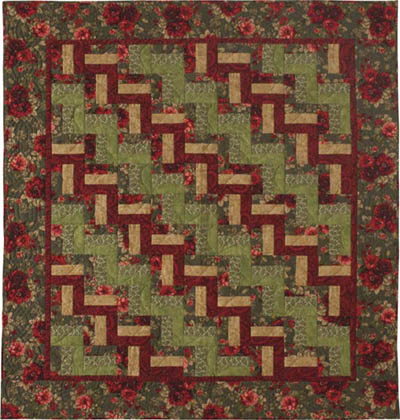
Triple Rail Fence
Quilt top size: 33¾″ × 41¼″ (without borders)
Grid size of strip: 1¼″ (1¾″ cut)
Block size: 3¾″ × 3¾″
Blocks:
50 blocks of Strip Set A
49 blocks of Strip Set B
Layout: 11 rows of 9 blocks each
Yardages for quilt top:**
¼ yard red fabric (Fabric 1)
¼ yard tan fabric (Fabric 2)
¼ yard green fabric (Fabric 3)
¼ yard light green print fabric (Fabric 4)
½ yard large-scale floral print fabric (Fabric 5)
 yard red fabric for inner border
⅝ yard large-scale floral print fabric for outer border
Cut: *
6 strips 1¾″ wide of the red, tan, green, and light green print fabrics (Fabrics 1, 2, 3, and 4)
12 strips 1¾″ wide of the large-scale floral print fabric (Fabric 5)
*To determine how many strip sets you will need, the process is the same as for Woodland Winter page 33). The blocks cut from the strip sets will measure 4¼″ × 4¼″. You will need 50 blocks of Strip Set A. Multiply 50 blocks × 4.25″ = 212.50″. Divide by 42″ (the fabric width): 212.50″ ÷ 42″ = 5.06. Rounding up, you need 6 of Strip Set A. You need 49 blocks of Strip Set B. So, 4.25″ × 49 blocks = 208.25″ ÷ 42″ = 4.96. You need 5 of Strip Set B.
**Each strip is cut 1¾″ wide. To determine yardage, figure 5 strips × 1.75″ = 8.75″. You need ¼ yard, or ⅓ yard including a margin for error. Each fabric is used once except for the large-scale print. It is used in both strip sets, so you will need twice as much of it.
Triple Rail Fence is very similar to the Fence Post quilts you made in Class 130, but there are more colors, two different strip sets, and a more complex layout.
The secret to a good Triple Rail Fence quilt is choosing a large-scale print fabric and four more fabrics that play well together. If you look at the photo closely, you will see that the placement of the fabrics develops the rails. The fabrics on the outsides of the strip sets will be the rails. These can be strong and really stand out, or they can blend into a wider, braided look.
One fabric (Fabric 5) will be every other rail in the quilt.
make a mock-up
We strongly suggest that you make a mock-up of this quilt before sewing the strip sets. Rail Fence is a simple pattern to sew, but the color placement can make or break the quilt. If you mock up the pattern, you will be able to see how the colors play off each other, and make changes if it isn’t working. Better to do this before you sew everything together than to rip out seams. To learn about block mock-ups, refer to Class 150, Lesson Four, page 54.
Notice that each strip has a number and number 5 is used twice.
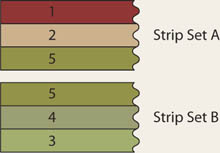
Color placement for strip sets
1. Sewing the strips together for this quilt is no different from sewing the strips for Woodland Winter (page 34). There are just more of them, and 2 color combinations. Lay out the strips beside your machine in this order: 1-2-5-4-3. There will be twice as many 5’s, because they are used in both sets.
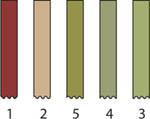
Strips laid out for sewing
2. Starting with the left stack of strips, place a #2 strip on top of a #1 strip and sew them together. Continue until all of stacks 1 and 2 are gone.
3. Press, starch, measure, and correct the strip width by trimming as necessary. Each strip should measure 1½″. Add the #5 strips to the #2 strips. Press, starch, and measure for accuracy. This is Strip Set A and should measure 4¼″ wide down the entire length of each strip set.
4. To construct Strip Set B, repeat the above process, adding #4 to #5, then #3 to #4. You now have 6 strip sets of each color combination.
5. Straighten the end of each strip set to establish a straight and square edge with the internal seams. Measure 4¼″ from this edge, using the seams and ruler lines to keep everything aligned.
tip
As you are cutting the blocks along the length of the strip set, you might find that the angles start to get out of square. If this happens, you need to recut the end to be a 90° angle to the seams. Once this is done, you can resume cutting. Check the angle every three or four cuts.
1. You are now ready to lay out the blocks in the pattern. Using the following illustration and blocks from Strip Set B, start with 1 block with the seams vertical and then another of the same block with the seams horizontal. Repeat with Strip Set A. Repeat this pattern, alternating blocks from both strip sets until you have 9 blocks across.
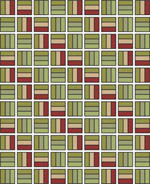
Layout and block positions
2. When beginning Row 2, you will find it easier to establish the pattern by building on a rail. The second block in Row 2 is from Strip Set B. It hooks up with the red rail established in Row 1 when its seams are vertical. The third block is another of the same block, lying horizontally. Now you know that the first block in Row 2 is from Strip Set A, lying horizontally.
3. Once you have the quilt laid out, you can again use the system of picking up all the blocks and stacking them into piles, then sewing all the rows together from those piles, as we did for Woodland Winter, page 35). As you are sewing, you will be able to double-check that the blocks are turned correctly, as the rails begin to form as each row grows and you will see right off when one is turned wrong.
border information for this quilt
The small inner border for this quilt is cut from the red fabric; it is ¾″ wide, finished. The outer border is cut from the green fabric; it is 4¾″ wide, finished.
Congratulations again! You have another great quilt top finished, and we trust that this is becoming easier and making more sense. You are no doubt setting up a system that works for you and keeps things in logical order. We encourage you to establish a system for yourself that keeps you efficient and accurate. This will allow you to sew faster, but precisely and accurately, without confusion and frustration.
We decided to add basic Log Cabin blocks here because they are made from strips only, but not from strip sets. Many of the same principles apply, and there are endless layout patterns for Log Cabin blocks. This is just a brief introduction to sewing very square and precise blocks. If you want to explore this block further once you know how to construct the basic block accurately, you can refer to one of several books available about designing with Log Cabin blocks.
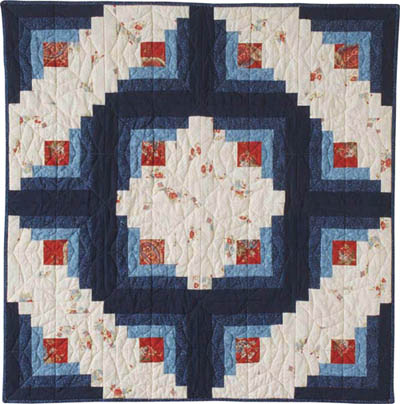
Patriotic Log Cabin
Quilt top size: 32″ × 32″ (without border)
Grid size of strip: 1″ (1½″ cut)
Block size: 8″ × 8″
Layout: 4 rows of 4 blocks each
Yardages for quilt top: See below.
To determine how many strips you will need, you will use a different process than you have up to now. Because you are not constructing strip sets that you will cut into blocks, you must determine how many strips of each color you will need to create each “log.” Note: The light half of the Log Cabin block uses only one fabric, and the dark side uses three fabrics. This is an easy way to start your first Log Cabin quilt, because it keeps the math a little simpler.
Examine the block: it is built from a center square, which is surrounded by strips. The strips are nearly always divided by color, so that one diagonal half of the block is light and the other dark. This color layout lends itself to endless design possibilities.
When constructing the block, the strips are added to the center square, working in “rounds” around the square in a circle. You will most often see blocks constructed starting with the light strips, but you can certainly start with the dark if you prefer. Below is a breakout of the pattern.
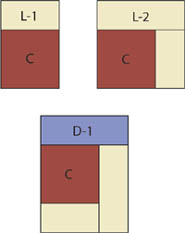
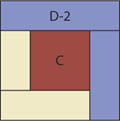
Piecing order for Log Cabin blocks
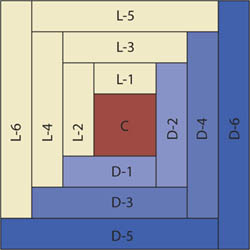
Three “rounds”
You can use the following handy chart to figure the yardage for any Log Cabin block. Just replace the center and log width measurements as needed.
|
|
|
|
|
|
Log width (cut) = 1⅝″ |
|
|
|
|
16 blocks |
Log length (before trimming) |
Color |
Strips needed |
|
Log 1 |
2⅝″ |
Light |
16 × 2⅝″ = 42″ = 1 strip |
|
Log 2 |
3¾″ |
Light |
16 × 3¾″ = 60″ = 2 strips |
|
Log 3 |
3⅝″ |
Dark 1 |
16 × 3⅝″ = 58″ = 2 strips |
|
Log 4 |
4⅝″ |
Dark 1 |
16 × 4⅝″ = 74″ = 2 strips |
|
Log 5 |
4⅝″ |
Light |
16 × 4⅝″ = 74″ = 2 strips |
|
Log 6 |
5⅝″ |
Light |
16 × 5⅝″ = 90″ = 3 strips |
|
Log 7 |
5⅝″ |
Dark 2 |
16 × 5⅝″ = 90″ = 3 strips |
|
Log 8 |
6⅝″ |
Dark 2 |
16 × 6⅝″ = 106″ = 3 strips |
|
Log 9 |
6⅝″ |
Light |
16 × 6⅝″ = 106″ = 3 strips |
|
Log 10 |
7⅝″ |
Light |
16 × 7⅝″ = 122″ = 3 strips |
|
Log 11 |
7⅝″ |
Dark 3 |
16 × 7⅝″ = 122″ = 3 strips |
|
Log 12 |
8⅝″ |
Dark 3 |
16 × 8⅝″ = 138″ = 4 strips |
To figure the yardage for this quilt, you need to know that the center of the block is 2″ finished, 2½″ cut, and that the logs are 1″ finished, 1½″ cut.
To increase the accuracy of piecing, we added an extra ⅛″ to each of the log strips when we cut them, so you will be able to trim them down and make them perfectly straight and square before adding each round of logs. This process is described in the instructions.
1. The center square for this quilt is 2″ finished (2⅝″ cut), and you need 16 of them (16 × 2⅝″ = 42″, or 1 strip). You need this same amount to make the first log of your quilt—that is, 1 strip of the light fabric cut 1⅝″.
2. Now we are going to tally up how many strips you need of each color. For the center, we already know that you need 1 strip. For the light, you need 1 strip, 1½ strips, 2 strips, 2½ strips, 3 strips, and 3½ strips. This equals 13½ strips, or 14 strips total.
3. For the first dark you need 1½ strips and 2 strips, or 4 total. For the second dark you need 2½ and 3 strips, equaling 5½ strips, or 6 strips total, and for the third dark you need 3½ and 3½ strips, or 7 strips total.
So, here is how you figure out yardage for the quilt. For the center you need only 1 strip 2½″ wide; the closest measurement a quilt shop will sell you is ⅛ yard. For the light you need 14 strips cut 1⅝″ wide (14 × 1⅝″ = 22¾″), which would be ⅔ or ¾ yard, depending on whether you want a little extra “just in case.” For the first dark you need 4 strips; 4 × 1⅝″ = 6½″, or ¼ yard. For the second dark you need 6 strips; 6 × 1⅝″ = 9¾″, or ⅓ yard. For the third dark you need 7 strips; 7 × 1⅝″ = 11⅜″, or again ⅓ yard.
Final yardages for quilt top (in simpler form):
⅛ yard red fabric
⅔ or ¾ yard white fabric
¼ yard 1st dark fabric (D-1)
⅓ yard 2nd dark fabric (D-2)
⅓ yard 3rd dark fabric (D-3)
Cut:
1 strip 2⅝″ wide of the red fabric
14 strips 1⅝″ wide of the light fabric
4 strips 1⅝″ wide of D-1
6 strips 1⅝″ wide of D-2
7 strips 1⅝″ wide of D-3
The basic block is constructed by joining the first light strip (L-1) to the center square (C). Rotate the center by 90° and add a second light log (L-2). Then rotate the center again and add Log 3, which will be the first dark (D-1), and rotate the center one more time to add Log 4 (D-2) to the final side. These are the first and second dark strips and the end of Round 1. Continue on, adding L-3 and L-4, then D-3 and D-4. This process keeps repeating until all the desired rounds have been added and the block is square.
1. Place a light strip on top of the center square fabric. Align the edges on the right side, and stitch the length of the strip. Press toward the light log.
2. With a ruler and rotary cutter, measure the size needed for the center square (2½″), and cut the length of the strips into squares. Be careful to align the ruler with the seamline, and double-check that the center square measures 2¼″ from the seam to the raw edge. If it is not exact, trim it to 2¼″.
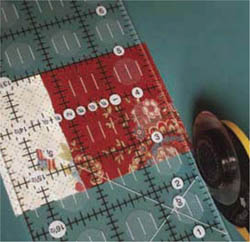
Creating centers and first log
3. Position the unit you just created on top of another light strip, making sure that the log is at the top. The seam allowance should be pressed so that its raw edges feed under the presser foot first. Stitch the first unit in place. Position another about ¼″ down the strip from the end of the first segment, and continue stitching.
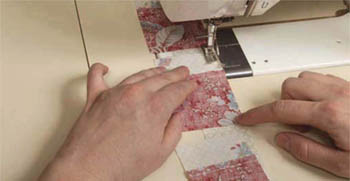
Chain sewing second log
4. Continue this process until the second strip has been added to all the first units. Cut between the units to separate them, leaving a ⅛″ margin on each segment. Press closed to set the seam, then open and press toward the log.
5. At the cutting mat, with the 2 logs pointed up and to the right as you look at the block, measure with a square ruler 1¼″ from the seam allowance of both logs, and trim the extra width away. Turn the block 180° so the logs are now at the bottom and left as you look at the block. Align the 2¼″ lines on 2 sides of the ruler with the seams, and trim the center square if needed.
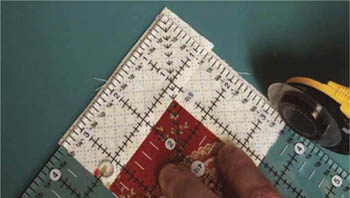
Trimming down first two logs
6. Place the 3-piece units (C, L-1, and L-2) over a strip of D-1 in the same manner as above, always making sure that the last log you sewed on—in this case, L-2—goes into the machine first (or that it is on top). Cut the units apart, and press.
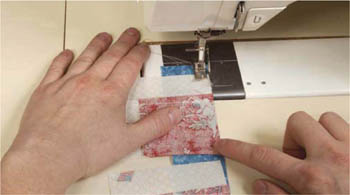
Correct log placement for sewing
7. At the cutting mat, trim the end of the log you just sewed on to be even with the center. To do this, align the 2¼″ line of the ruler with the seam directly across from the edge of the center square that has not been sewn yet. Double-check that you have a ruler line on 1 of the 2 seam allowances that run perpendicular to the left-hand seam. This will keep everything straight and square. Trim away any fabric from Log 1 (L-1), the center, or Log 3 (D-1) that extends past the ruler. You are now ready to complete the first round of the blocks.
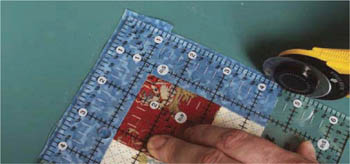
Trimming last logs for Round 1
8. Again, with the last log you added on top, place the block units on the strip for D-4, spacing them ¼″ apart. Cut apart, and press.
9. At the cutting mat, with the 2 dark logs to the top and right side, align a square ruler at 1¼″ on the logs’ seamlines, and trim the top and side. Turn the block 180°. Again, measure the seams at 1¼″, and trim the top and side again.
10. You should now have the first round of logs around the center, and the block should measure 4½″. Continue stitching the units to strips, cutting them apart, pressing, squaring off the ends, trimming the logs to 1¼″ for every set of 2 like-colored logs you add, and squaring the blocks, until you have 3 complete rounds of logs.
These easy instructions are written for a quilt with logs finishing at 1″ wide. You can create a more refined-looking block by working with even smaller logs, down to ½″ wide. To figure the strip width for any other size, take your desired finished measurement, say ¾″, add ½″ for seam allowances = 1¼″, and then add an additional ⅛″ for squaring off the logs = 1⅜″.
Below is a chart of common log widths for Log Cabin blocks, the size strips you would need for the method we used above, and the size the blocks should finish to, using either a center square the same size as the logs or a center that is twice the size of the log width.
|
Finished log size |
Cut size for log strips |
Block size with a center equal in size to the logs (finished size) |
Block size with a center double the size of the logs (finished size) |
|
1½″ |
2⅛″ |
3 rounds - 10½″ |
3 rounds - 12″ |
|
1¼″ |
1⅞″ |
3 rounds - 8½″ |
3 rounds - 10″ |
|
|
|
4 rounds - 11½″ |
4 rounds - 12½″ |
|
1″ |
1⅝″ |
3 rounds - 7″ |
3 rounds - 8″ |
|
|
|
4 rounds - 9″ |
4 rounds - 10″ |
|
|
|
5 rounds - 11″ |
5 rounds - 12″ |
|
¾″ |
1⅜″ |
4 rounds - 6½″ |
4 rounds - 7½″ |
|
|
|
5 rounds - 8½″ |
5 rounds - 9″ |
|
|
|
6 rounds - 9½″ |
6 rounds - 10½″ |
|
⅝″ |
1¼″ |
4 rounds - 6⅝″ |
4 rounds - 6½″ |
|
|
|
5 rounds - 6⅞″ |
5 rounds - 7½″ |
|
|
|
6 rounds - 8⅛″ |
6 rounds - 8½″ |
|
½″ |
1⅛″ |
5 rounds - 5½″ |
5 rounds - 6″ |
|
|
|
6 rounds - 6½″ |
6 rounds - 7″ |
border information for this quilt
There are no borders on this quilt, but feel free to add one or two once you have read Class 180.
