
QUILTING
We really want to emphasize that you are not a quilter until you quilt your own quilt tops! One of the most satisfying experiences in quiltmaking is when the quilting is done, the binding is on, and the quilt is washed, allowing all the texture to come up from the batting. When you lay it on a bed, hang it on a wall, or spread it on a table, the excitement comes from the quilting just as much as from the fabrics you have used.
It is our sincere hope that you will not join the thousands of “toppers” in the quilt world and neatly fold up the new tops you have created, lay them on a closet shelf, and start making even more. There will come a time when you go back to the stack and find that you don’t even like the ones on the bottom anymore.
We also hope that you will take the time to learn to do your own quilting. There is always the lure of the instant gratification you get from sending your quilt tops to a professional quilter. You can continue to sew, and someone else does the quilting for you. This might seem easy at first, but there will come a day when you make a really awesome quilt top and you want it to be yours in every way—from the fabric selection to the binding. That is not the time to start learning how to quilt! If you start learning the very simple basic techniques of machine quilting as you are learning to piece, you will be amazed at how easy it is, and how rewarding it can be to tell everyone, “I made it myself!” Finish the tops as you go and enjoy them! Isn’t the look and feel of a real quilt the reason you started this in the first place?
note
As we have stated before, we do not teach the actual quilting in this book. In our opinion, the best workbook for learning how to machine quilt is Harriet’s book Heirloom Machine Quilting (see Resources, page 112). It has been in continuous publication for over 22 years and is in its fourth revised edition. It is the most thorough and up-to-date book on learning to quilt you can use, so we send you there for the actual quilting instructions.
This class will cover backings and bindings, which aren’t addressed in Heirloom Machine Quilting. At the end of the class, you will find quilting design ideas in Lesson Four.
When choosing a backing (also known as a lining) for your quilt, think about letting it complement the front. It used to be that most backings were solids or muslin, but many backings are now made from prints or even pieced units.
If you’re an excellent quilter, a solid fabric will really show off your quilting. However, if you’re new to quilting, a print will camouflage any uneven stitches or contrasting threads.
The backing fabric must be the same fiber content, quality of cloth, weight, and thread count as the fabrics used for the top. Although a limited number of prints, as well as muslin, are available in 90″ widths or wider for backings, the majority of fabrics used for backings are 45″ wide.
To determine the yardage needed for backing, be sure to add 2″ to 3″ to the size of the quilt top on all four sides. It helps to make a sketch of the quilt top measurements in order to determine what seams might be needed, and whether to make them horizontal or vertical for the best use of the yardage. The illustration below shows various seam configurations to use in calculations. When figuring yardage, don’t forget to subtract the width of the selvages, as they need to be removed before you piece the lengths together. The standard width used to figure yardage is 42″.
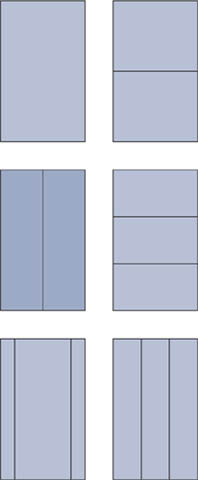
Backing seam placement options
Following are backing yardage guidelines for various quilt sizes.
Quilt tops 40″ wide or narrower require only 1 length of fabric (plus 4″ to 5″) because the fabric is wide enough to accommodate the width of the quilt top.
Quilt tops 40″ wide or wider require 2 pieces of fabric seamed together. If you buy 2 lengths of fabric to back a quilt 60″ long, you need 3½ yards ([64″ × 2] ÷ 36″ = 3.56, or 3½ yards). If the quilt is 44″ wide, and the seams will run horizontally, you would need only 2⅔ yards ([48″ × 2] ÷ 36″ = 2.67 = 2⅔ yards). Quite a savings!
Horizontal seams utilize the width of the fabric with the least left over.
Twin and throw-sized quilts are generally around 72″ wide or square. Using the yardage formula below, we find that 2 widths of fabric are needed. If the quilt is 72″ × 90″ and the seams are vertical, you need 5¼ yards. Horizontal seams would require 3 widths, requiring 6 yards. Therefore, vertical seams would be the best choice.
Full-sized quilts average 81″ × 96″ finished. Again, 2 widths will just be wide enough, requiring 5⅓ yards. Horizontal seams would require 8 yards.
Queen-sized quilts average 90″ × 108″ finished. Three widths of fabric (about 9½ yards) are required for vertical seams, but only 8 yards for horizontal seams. Note: If you choose to use vertical seams, they appear the most balanced if you keep 1 full width in the center. Divide the remaining width equally between the remaining 2 lengths, and sew them on either side of the center panel.
King-sized quilts are generally 120″ × 120″. A full 3 widths, each 3½ yards long—a total of 10½ yards—are needed for the backing, regardless of which direction the seams run, as the quilt is square.
These yardages are just examples based on the specific quilt sizes given. It is easy to figure backing yardage if you simply plug your quilt top sizes into the yardage formula.
tip
yardage formula
An easy formula for yardage calculation is as follows:
Quilt top width ÷ fabric width (minus selvages) = number of lengths of backing needed (round up to the nearest whole number)
Then:
Quilt top length (in inches) × number of lengths needed ÷ 36″ = number of yards to buy
We recommended that you lightly starch your unwashed backing fabric before using it. If you prewash the fabric, starching it is strongly recommended.
Refer to Heirloom Machine Quilting (see Resources, page 112) for complete instructions on layering, pin basting, and quilting your quilt.
Once the layers have been quilted, you are ready to prepare the edges for binding. You will need to first remove the excess batting and backing from the edges, square the corners, and straighten the edges.
There are two schools of thought about preparing to bind a quilt. Some quilters leave the batting and backing in place until the binding has been attached, then trim the excess away. We prefer the more traditional method of trimming the edges of all three layers, then applying the binding. Try both, and choose which you prefer and get the best results from.
1. To trim the edges, use a long, wide ruler and a large square ruler. Starting in a corner, use the square ruler to check for squareness, and trim the edges. Be sure that you align the ruler lines with the seamlines within the body of the quilt.
note
This photo shows trimming off extra width added to final border size as discussed on page 97 (Cutting extra-wide for accuracy).
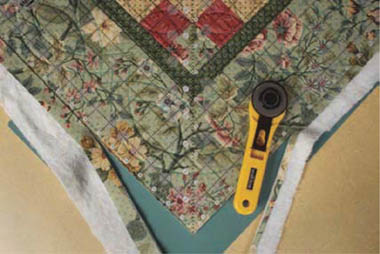
Aligning ruler lines with seamlines in quilt
2. Trim the sides, keeping the border width accurate and aligning with the corner cuts. Repeat this for all 4 sides.
3. Fold the quilt ends in to the center to make sure that all the widths are the same. Repeat for the sides.
4. If the quilting runs right up to the raw edge, you won’t have to add additional stabilization. If the edges are loose, we suggest that you machine baste the edges together (using long stitches) to eliminate the possibility of distortion when sewing on the binding. Note: When basting by machine, be very careful not to stretch the edges as they pass under the foot. A walking foot is a great help in this process.
The quilt top has been pieced, layered, and quilted. All that now remains is to close up the edges, and, at long last, your quilt will be finished, ready to wash and use. It is an exciting step ahead, and one you must not rush through. It’s important that the binding looks as nice as the rest of the quilt. If the binding is sloppy and poorly attached and finished, it detracts from the whole quilt. Your finish work is critical to the look of the finished product.
There are several different options for preparing binding, but for now, we will address the easiest—straight-grain double-fold binding.
note
It is a common belief that bias binding makes a stronger edge for a quilt and will last longer, especially on a bed quilt, because the wear and tear is spread over a diagonal web of threads rather than being positioned along only one or two threads as it is in straight-grain binding. However, bias grain on a straight-edge quilt is stretchy, and, if care is not taken, it can stretch when applied and cause rippling along the edge. The choice between straight-grain and bias binding will be based on personal preference as you gain experience with both later in your quilting adventure. For now, let’s stay with the easiest binding. The quilt tops that you have made throughout this course have straight edges, so there is no real need for bias.
Harriet is a bit unorthodox when it comes to binding grainline. She uses neither straight grain nor true bias, but a bit of both. When fabric is taken from the bolt, it’s generally not on grain without some straightening. Instead of straightening the grain, Harriet cuts her strips from the off-grain fabric. This provides strips that are not perfectly on grain yet not true bias. This gives her the best of both methods, since the grain is slightly off, allowing more threads to take the wear, but the strips not nearly as stretchy as bias binding.
Double-fold binding is made from strips cut from 1¼″ to 2¼″ wide and folded in half. This is also known as French Fold binding. The width of the strip depends on the thickness of the batting used and how wide you want the finished binding to be. If you’re reproducing a quilt from the 1800s, you’ll want your binding to be as narrow as you can possibly work with—generally ¼″ wide or narrower, finished—for authenticity. These strips would be cut 1¼″ to 1½″ wide and sewn on with a⅛″ seam allowance.
A really nice-looking binding for most quilts is about ⅜″ finished, using 2″ cut strips doubled and a scant ¼″ seam allowance. Regardless of the width of binding you choose, remember that once it’s wrapped around the edge of the quilt, it should not be empty, but filled completely with the batting and quilt layers.
Cut binding strips 4 times the desired finished width plus ½″ (or seam allowance needed per the chart below) for seam allowances AND ⅛″ to ¼″ to go around the thickness of the batting. The fatter the batting, the more you need to add here.
|
|
⅛″ seam allowance |
|
¼″ binding = 1½″ cut |
|
|
|
scant ¼″ seam allowance |
|
⅜″ binding = 2″ cut |
¼″ seam allowance |
|
½″ binding = 2¼″ cut |
generous ¼″ seam allowance |
To determine how much binding you need, calculate the perimeter (distance around your quilt). Figure 2 × the length + 2 × the width = the total inches of binding needed. For example, a quilt 60″ × 80″ would require 280″ of binding.
We recommend that you add a minimum of 12″ to this sum to allow for turning corners, piecing strips together, and joining the ends together on the quilt. So how many strips is this? If you do the figuring based on 42″ strips (selvage to selvage), then 292″ ÷ 42″ = 6.95 strips needed. Round up to 7 strips across the width of the fabric times the cut width of the strip. This is how much yardage is needed.
The chart below gives you an estimate of the yardage needed to bind various sizes of quilts with straight-grain binding. These measurements are based on a ½″ finished binding.
|
Estimated yardage for ½″-wide straight grain binding |
|||
|
Quilt Size |
# of 2¼″-wide strips |
Inches of fabric |
Yards of fabric |
|
Wallhanging (36″ × 36″) |
4 |
9 |
¼ |
|
Twin (54″ × 90″) |
7 |
16 |
½ |
|
Double (72″ × 90″) |
8 |
18 |
½ |
|
Queen (90″ × 108″) |
10 |
22½ |
⅝ |
|
King (120″ × 120″) |
12 |
27 |
¾ |
 EXERCISE: BINDING THE EDGES OF YOUR QUILT
Binding is a several-step process: you join the cut strips together, stitch the binding to the quilt front, and then finish by stitching it to the back.
The strips need to be joined with a 45°-angle seam.
1. Keeping the strips double (wrong side to wrong side), position the 45° angle of the ruler on the edge of the strip as shown, then cut. Repeat with the remainder of the strips.
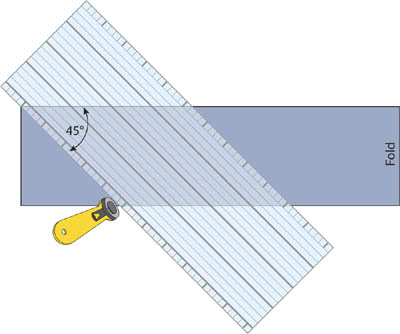
Position 45° angle of ruler, and cut.
2. To join the strips together, line up the edges, offsetting by ¼″, and sew with a ¼″ seam allowance.
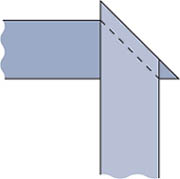
Join strip ends together.
3. Continue joining all the strips together into a continuous length. Press the seams open.
There are several ways to finish the ends when attaching binding. Here is the easiest.
1. Cut and join the strips as explained above. Starch the strips, and press them in half lengthwise, wrong sides together. At one end of the strip, fold a ¼″ seam allowance over to the wrong side, and press. The point from the wrong side of the binding should be on the bottom, as shown in the illustration.
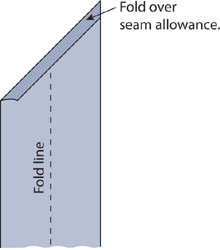
Fold ¼″ seam allowance on 45° angle.
2. With the long fold open, position the binding on top of the quilt top. Start stitching the binding at the point, stitching through only 1 thickness of the binding. Stitch for about 4 inches.
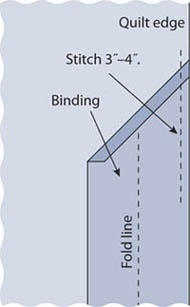
Stitch through one thickness from point.
3. Lift the presser foot and cut the threads. Fold the binding over to double. Start stitching about 1″ below the short edge of the point. Stitch the binding in place, aligning the edges exactly and stopping ¼″ from the corner.
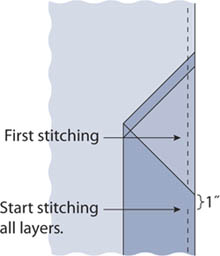
Fold binding over to double.
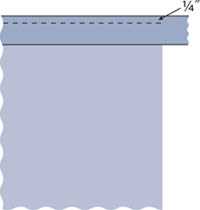
Stitch up to ¼″ (or your chosen seam allowance) from corner.
4. Turn the quilt so that you’re lined up to sew the next side. Backstitch off edge. Fold the binding straight up toward the side you just sewed. Then refold toward the new edge, lining up the second fold with the outer edge of the quilt, and the raw edges of the binding with the raw edges of the quilt.
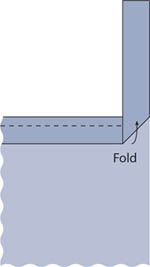
First fold for miter
5. Begin sewing at the outer edge of the quilt; sew through all the layers at the corner. Continue down the edge, repeating the corner treatment.
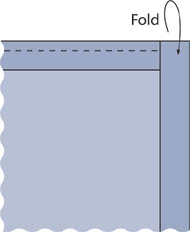
Second fold alignment
6. Once you’ve arrived back at the beginning, tuck the end of the binding into the pocket. Lower the needle into the fabric. Lay the end of the binding strip over the point and single thickness that was the starting point. Cut off the end just before the stitching that started going through all the layers. Tuck the end into the pocket, and finish closing the seam.
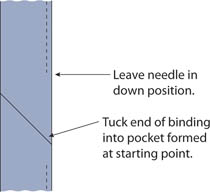
If you blindstitch the binding by hand, we suggest that you use a 40-weight 3-ply hand quilting thread.
1. Wrap the binding around to the back of the quilt, placing the folded edge of the binding on top of the stitching line. You can either pin the binding in place, use binding clips to hold it, or glue it in place with Elmer’s Washable School Glue. If using glue, apply a very small line, and press dry with the iron before hand stitching.
2. Begin the blind stitch by inserting the needle under the edge of the binding right at the fold edge of the binding. Next, put the needle into the quilt immediately across from where it is in the binding. You don’t want to stitch through to the front—just into the batting. Let the needle travel approximately ¼″ through the inside of the quilt before emerging and traveling into the binding, again right at the edge. Continue in this manner.
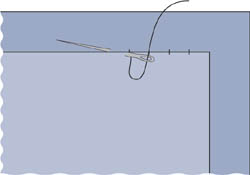
Finish edge with blind stitching.
3. When you reach the corners, you’ll find that the corner (miter) is already formed on the top of the quilt, but you’ll need to coax the miter on the back with your fingers. Fold 1 side down, then the other, creating a neat miter. The fold should be opposite that on the front side, with the bulk evenly distributed on both sides. This creates a flat corner.
You will find that choosing quilting designs is as difficult as choosing fabric, if not more so! It seems that most books and patterns totally ignore this very important step and leave it up to the reader with the dreaded phrase “quilt as desired.”
As a new quilter, you probably don’t yet know how you want to do the quilting. We have added some suggested ways to quilt the tops that you have made from this book. The quilting is very simple and is done mostly in straight lines, using a special walking foot. This is the easiest method to learn, and it can provide a great deal of texture without your having to learn free-motion quilting at this point.
We truly want you to learn to quilt as you progress through this series of books, so we will start simply. As the quilts become more complicated and the designs more complex, the quilting will do the same. This gives you a chance to make the tops to learn on as you go.
The following pages feature line drawings showing the actual quilting lines on the quilts in this book. These are suggested designs to get you started, but don’t hesitate to use your creativity and do your own thing.
Happy quilting!
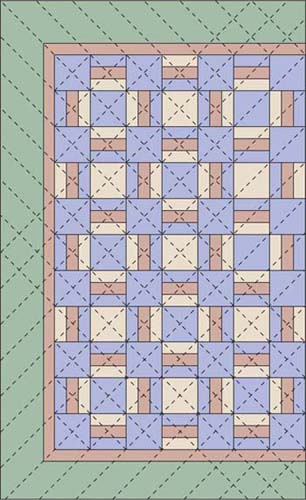
Woodland Winter
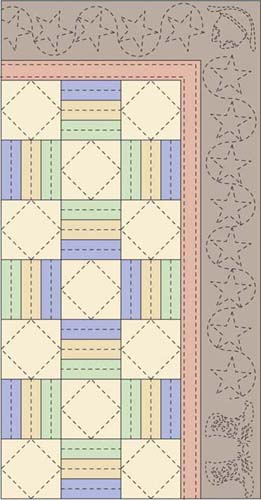
Cowboy Corral
Triple Rail Fence
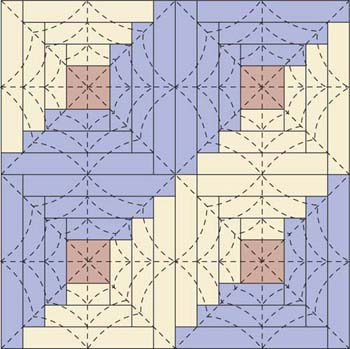
Patriotic Log Cabin
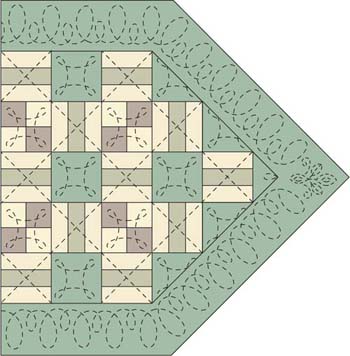
Country Lane
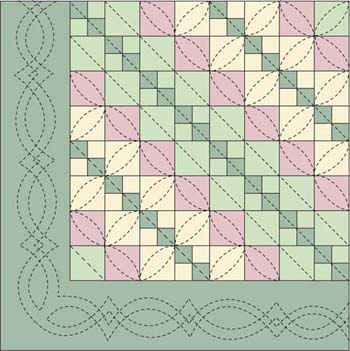
Town Square
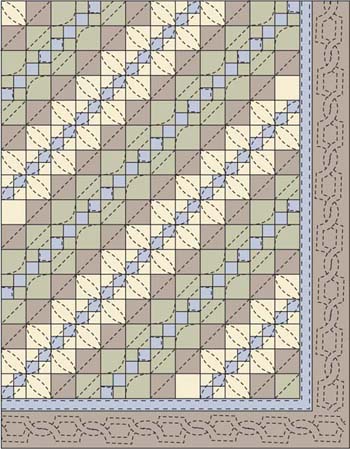
Asian Nights
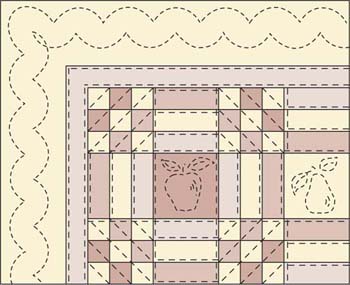
Interlacing Circles
Double Nine-Patch Chain
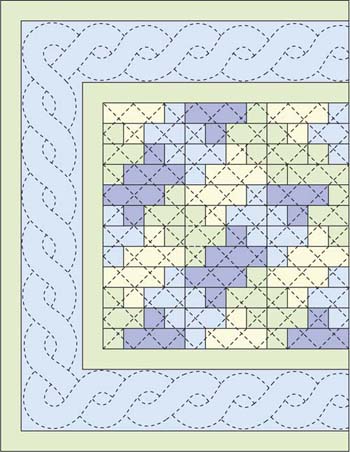
Inlaid Tile table runner
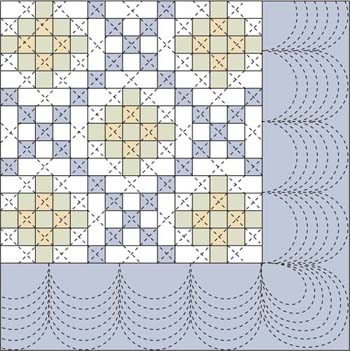
Irish Chain Variation
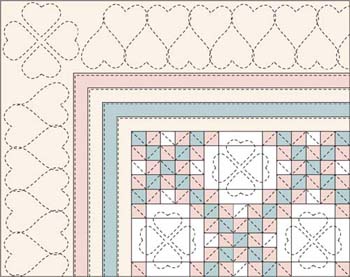
Double Irish Chain
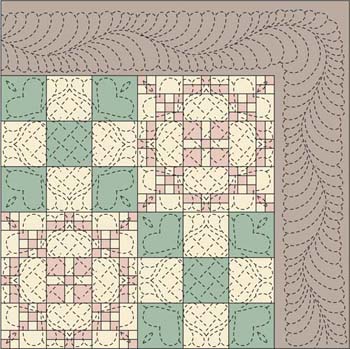
Homespun