The genre of portrait photography is fairly simple to understand. Your focus is to emphasize a person or group of people’s face(s) and image(s) ( Figure 11.1 ). Within the realm of portraiture, there are several subclassifications, but we’ll focus solely on studio portraits, environmental portraits, and beauty photography in order to keep things relatively simple. I find that while each subclassification is inherently different, some lighting techniques can be modified to fit a different category. For example, you can easily photograph a beauty portrait on location with studio strobes and allow for ambient light. While you’re technically shooting an environmental portrait, if your image focuses on beauty photography, then it would still be considered beauty.
What I want you to remember is this: the only difference between genres is what you’re intentionally or unintentionally emphasizing. This is why I urge you to really consider what you’re trying to convey in your image before you press the shutter button.
The lighting setups included in this chapter are designed to focus primarily on the face and nothing else. Why? I want you to take away some basic portrait lighting setups that you can build on in the fashion and commercial lighting sections. I also find that many of the people who purchased Photographing Men were interested in turning their hobby into a career. What better way to start a portrait business than to have a reference of portrait lighting setups that you can easily replicate at home?
Among the many different photography subgenres, you have portrait, fashion, beauty, lifestyle, and glamour photography, which all revolve around photographing people, but each with a distinct focus. For example, portrait photography focuses on capturing a person’s face or identity and can include full-length, three-quarters, or closeup shots. There are a wide variety of lighting setups that you can use to photograph a person, but ultimately, you’re focused on capturing them as they are.
Beauty photography, however, focuses on emphasizing a woman’s beauty in the most alluring way possible. When you think of beauty photography, your brain should automatically recall the images that you see in Sephora or MAC, or behind the Macy’s beauty counter. That doesn’t mean that your subject needs a ton of makeup in order to showcase her beauty! On the contrary, many beauty images require little to no makeup to be considered beauty photography. Your focus should be on highlighting flawless skin, the eyes, and the lips. In most cases, these images are limited to photographing from the shoulder area to the face.
Do not confuse beauty photography with glamour photography. Glamour photography focuses on sensuality or sexuality, while beauty photography focuses on natural beauty and is far less seductive. It’s the difference between a Dior makeup ad and a Playboy spread. Each is unique and serves a different purpose.
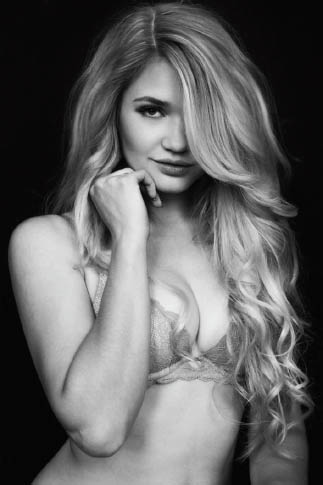
The lighting style for the images in Figures 11.2 and 11.3 took me a bit of time to re-create, even though it’s a simple lighting setup. Why? Because it’s a very soft form of light, and it involves studio strobes, which you can tell by looking at the catchlight in the eyes. However, what’s unique about this lighting setup is that it has a very shallow depth of field. In fact, the depth of field (DOF) in the images is a result of using the maximum aperture value of f/2.8 on my lens. So how did I achieve that using studio strobes?
Let’s start off by noting that my camera settings for this lighting setup are: 1/160, f/2.8, ISO 100.
First, the shutter speed of 1/160 allows me to make sure that I’m able to eliminate all the available light (even though most or all of the lights were turned off in that environment) in the room and solely introduce my artificial light. The main light for this setup is a Phottix Indra 500 with a 59” Phottix Hexa-Para Softbox directly behind my back, as you can see in the diagram in Figure 11.4 . I’m positioned about 4 to 5 feet from the subject and using a Tamron 90mm Macro lens to photograph the subject to focus solely on her face.
FIGURE 11.2
FIGURE 11.3
FIGURE 11.4
My main light is set to its lowest available power, which enables me to open up my aperture to its maximum value in order to achieve a really shallow depth of field. The second light is placed camera left at 45 degrees and slightly behind my subject’s right shoulder, with a diffusion material to light the background. The diffusion material enables me to create a more uniform form of light and eliminate any gradients in the background, as you can see in Figure 11.2 .
The images in Figures 11.5A and 11.6 are my take on a very classic portrait lighting setup. The main light is a Profoto D1 with a 20.5” white beauty dish that is placed at a 45-degree angle in a broad Rembrandt position, slightly off the subject to create dramatic shadows along her face. It’s also far enough away from the subject so that it subtly creates a gradient in the background behind her, as you can see in Figure 11.5 .
FIGURE 11.5A
FIGURE 11.5B shows Figure 11.5A before postproduction
FIGURE 11.6
My fill light is a Profoto D1 with an open silver reflector dish placed at a 45-degree angle at five o’clock from the subject and approximately 4 to 5 feet from her. The light is set to its lowest power setting in order to subtly fill in the shadows on the subject’s right side. If you don’t like how dark the shadows are, simply increase the power of the fill light!
Finally, the last light is a background light to separate the subject from the background and create a subtle gradient, as you can see in the unedited image in Figure 11.5b . The strobe is a Profoto D1 with a 20-degree honeycomb grid. The 20-degree grid allows a larger spread of light than the Profoto 5- or 10-degree grids, resulting in a beautiful but subtle gradient directly behind my subject ( Figures 11.7 and 11.8 ).
FIGURE 11.7
FIGURE 11.8
I’m surprised at how many photographers are wary of using strobes and modifiers over their clients’ heads. I know that, for liability purposes, this can be quite intimidating, but when done correctly and safely, it can yield some beautiful results, like the image in Figure 11.9 . To begin, my two lights in this image are both Profoto D1s. My main light is positioned about 5 to 6 feet directly above my subject. It’s boomed out by a Manfrotto Baby Boom with a sandbag, similar to the one shown in Figure 11.8 . The modifier I’ve opted to use is a 59” Westcott Zeppelin, with a 1-stop inner diffuser and a 1-stop outer diffuser, which creates a very soft, glowy form of light.
FIGURE 11.9
My second light is positioned to fill in any shadows in the image created from the blocking of light due to posing, and it’s set to its lowest power setting and placed at five o’clock from my subject’s face, approximately 4 to 5 feet from my subject ( Figure 11.10 ). It also creates an additional catchlight in the eye. If you focus on the eye, you’ll notice that, because the subject’s head is tilted forward, you can barely see the catchlight from the main modifier.
FIGURE 11.10
The lighting in this image accentuates the patterns and textures of the couch, along with the beautiful beadery of the lingerie, while creating a very soft, flattering light on the subject.
FIGURE 11.11
FIGURE 11.12
Not all window light is created equal. I was lucky enough to photograph this subject in a room with diffused window light ( Figures 11.11 and 11.12 ). This is a very soft, flattering light that defines a woman’s shape beautifully and thus is great for boudoir photography. In this particular setup, the window is 90 degrees (three o’clock) from the subject’s left, or camera right. She’s also about 2 to 3 feet from the background, as you can see in the diagram in Figure 11.13 .
FIGURE 11.13
As with the lighting setup in the “North or South Window Light” section, the window offers north-facing window light and does not have direct sunlight emanating through it, which allows me to eliminate specular light ( Figure 11.14 ). In the event that you want to re-create this image but don’t have a diffused window, consider using a translucent backdrop or thin bed sheet to diffuse the light.
FIGURE 11.14
As you can probably tell by now, I love using super simple lighting setups, and I try to maximize my lighting gear to its fullest potential. The image in Figure 11.15 exemplifies this mind-set. This image was taken with three Phottix Mitros+ speedlights, a Rogue 3-in-1 Grid, and two Rogue Flashbender XL Pros. All of this gear can easily fit inside a backpack or your camera bag.
FIGURE 11.15
The main light is a Phottix Mitros+ placed about 3 feet from the subject’s face, with a 25-degree grid insert. This allows light to focus directly on the center of the subject’s face. The two back speedlights are both positioned and angled equally. Both of the rim lights are modified with a Rogue Flashbender XL Pro system in a strip grid setup set at a 45-degree angle behind the subject on either side ( Figure 11.16 ).
FIGURE 11.16
The resulting image is a vintage-style portrait—a style that works well for both men and women. As I mentioned, all of this gear can easily fit into a small carrying case or backpack for easy traveling.
Lighting doesn’t have to be terribly expensive. You can easily employ window lighting in order to photograph women of all shapes and sizes. In the images in Figures 11.17 through 11.19 , I’m solely using north-facing window light to photograph my subjects. Because sunlight never shines directly through north- or south-facing windows, the quality of light is similar to utilizing a really large softbox. What’s great about that is that because of the relative size of the diffused light compared to your subject, you’ll fill in all the unwanted blemishes long before retouching. This is also the best way to capture a clean and glowy image with mimimal effort.
As you can see in Figure 11.20 , my subject is placed directly in front of a north- facing window, my back is turned to the window, and my camera is pointed into the room. Who would have thought lighting a woman could be so easy?
TIP In the event that your window has direct light coming through it because it’s not a north-facing window, you can easily use diffusion material over the window in order to soften the light quality that emanates in the room.
FIGURE 11.17
FIGURE 11.18
FIGURE 11.19
FIGURE 11.20
For those of you who are interested in breaking into the fashion or beauty photography industry but don’t have access to a ton of gear, fear not. A beauty dish is a really versatile tool that you can use in a variety of different ways. You can use it with a diffuser to soften the light, or you can use it with a grid in order to better concentrate light, like in the images in Figures 11.21 and 11.22 .
FIGURE 11.21
FIGURE 11.22
For this particular setup, I fell in love with the subject’s freckles and I wanted to draw more attention to them. In order to do that, I’ve opted to use a more dramatic form of light. In this case, I’m using a single Phottix Indra500 with a silver beauty dish and grid. The beauty dish allows me to carve out the subject’s cheekbones and jawline. It’s placed at a 45-degree angle, centered on the subject, as you can see in Figure 11.23 .
FIGURE 11.23
The reflector is placed at a 45-degree angle facing upward toward my subject but is slightly off-center, as you can see in Figure 11.24 . The reflector allows me to fill in the unwanted shadows left by the beauty dish so that nothing is falling to deep, dark shadows. (You can see the unedited image in Figure 11.25 .)
FIGURE 11.24
FIGURE 11.25
If dramatic lighting isn’t your style, fear not; you can use a softbox directly behind your subject to create a beautiful high-key portrait like Figure 11.26 .
FIGURE 11.26