
Good chess comes from good habits. Making the jump to master requires taking something that you know is a good trait and turning it into a habit.
You already have several good habits. You might not appreciate them but you do. For example, when you were a beginner you were told that as soon as your opponent makes a move you should look to see whether he made a threat. At first you had to make a conscious effort to do this. But after a while you did it automatically. It had become a habit.
You already know some, if not most, of the traits that masters have made their habits. But you probably don’t take them as seriously as a master does – perhaps because they sound too simple. For instance:
A master always looks for targets.
The easiest way to find the best move in a typical position is to take note of the pieces and pawns that you can attack. You might be able to attack them on the next move or on the move after that or even at some distant future point.
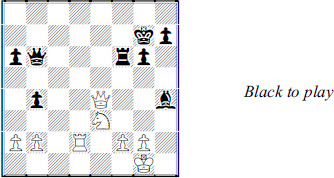
Black’s pieces are somewhat more active than White’s and he has a passed c-pawn as well as a threat, 1 … bxc5.
Yet White’s best strategy should be to ignore all that and attack. The attack should be directed at g7. Why?
What makes g7 a target is that Black has no pieces that can easily defend it, just his king. White, on the other hand, can throw virtually all of his pieces at g7.
White began with 1  g5!. His idea was 2
  g4 followed by either f6 or h6 and xg7 mate.
That’s a very primitive threat. With so much material on the board it might seem that Black can parry it easily.
He can’t. If he plays …  h8 and …
  g8 to secure g7 he makes h7 another high-value target.
That’s what happened in the game, which went 1 … bxc5 2 g4 h8 3 f3 cxd4 4 h3.
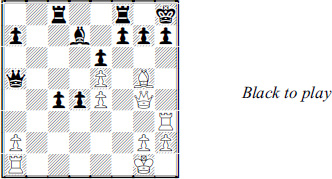
White will play h5 or h4 and threaten xh7 mate. He can answer … h6 with the crushing xh6.
Black tried 4 … f5 so that 5 exf5 xe5 6 h4 xf5 would defend. Or 5 exf6 g6 6 h4 f7.
But he resigned soon after 5 h5! g8 6 xh7+ f7 7 h5+ g8 8 f6!.
Black lost because g7 was weak and because he had no counterplay to distract White from attacking it. He needed to find his own targets. For example, 2 … c3!, instead of 2 … h8, would allow him to meet 3 f6 with 3 … e3+ and 4 … h6. And on 3 ad1 Black has 3 … a4!. His bishop, which can play no role in defense, can attack. The game would become very double-edged after 4 h6 g6 5 f4 f5!.
The moral is: White had a plan, a strong one, as soon as he recognized that g7 was a target. Black failed to recognize targets and lost.
When you were a beginner you probably got into the habit of looking at all the captures available to you when it was your turn to move. The habit of looking for targets is just an extension of this. In addition to “What can I take?” you want to ask yourself “What can I attack in a few moves?”
This sounds too simpleminded to many amateurs. Why look for enemy pieces and pawns that you can’t immediately attack?
This way of thinking blinds the player to opportunities like the following.

Look for the target in Black’s camp before you read any further.
See it? The only member of Black’s army that is not protected is the pawn at g7. It’s easy to overlook because it’s shielded on the g-file by two pieces.
Of course, not every target is worth going after. But here it shouldn’t be hard to grasp that if White can play xg7, he’s doing very well.
Once you identify a target – and determine that it’s worth going after – the next step is to figure out how to get at it. There may not be a way: It’s not always possible to exploit a target.
But in this case White found 1 e6!. He threatens 2 xg4, and 1 … h5 2 g5 is no antidote. After the forced reply, 1 … xe6, came 2 h4!.

White threatens 3 h5 and then 3 …  -moves 4 xg7. If Black tries to protect g7 with his king, it becomes a bigger target. For example, 2 … 0-0 3 h5 e7 4 h6! g6 5 e5! and wins.
Another line would be 2 … f8 3 h5 e7 4 h6 g6 5 g5! followed by d6 and/or a1-a7. And another is 2 … g8 3 f4!.
In the end, Black gave up on defending the target and lost after 2 … d7 3 h5 e7 4 xg7.
Beginners often make a concerted effort to threaten their opponent’s queen simply because it’s so valuable. But queens are valuable because they’re so mobile. They can run away. The best targets are typically pawns because they tend to be stationary. Most stationary of all are squares because, obviously, they cannot move.
But why would a square be valuable enough to become a target? Consider the next example:
At first Black’s only target seems to be the d-pawn. But 1 … xd3 is complicated by 2 e1.
An alternative is 1 … df8, which threatens 2 … xf1. Then if White moves his rook from f1, Black can play … f2 and try to exploit the knight at g2, perhaps with a … g6xh4 sacrifice.
But Black wondered what he would do after 2 xf3. The recapture 2 … xf3 isn’t bad. But when he evaluated 2 … gxf3, he realized that h3 becomes a target.
With the g-pawn out of the way, Black may be able to get to h3 with his queen. That’s why Black found the stunning 1 … b7!.
It is tactically justified by 2 xa7? a8, pinning the doomed knight. But the main point of 1 … b7 is to continue … c8 at the moment when h3 is exposed.
White found nothing better than 2 a1 and then came 2 … df8! 3 xf3 gxf3!.

Suddenly h3 goes from being one of the least significant squares on the board, like a1 or b8, to the most important. White has no satisfactory way of meeting … c8 followed by the devastating … h3+.
He tried 4 e3 but his kingside collapsed after 4 … c8! 5 g4 h5! and he resigned in five moves.
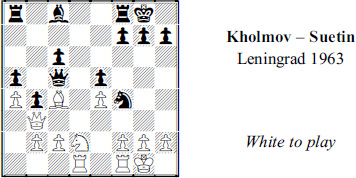
Chess can be a simple game if we forget about positional subtleties and just look for targets. A few pages ago we saw how a plan was just a matter of figuring out how White could get his pieces to attack g7. In the same way, an initiative can be nothing more than a series of threats to different targets. For example:

What matters most here? The players disagree: Black would like to think it’s his extra pawn. White prefers to believe it’s his lead in development.
But development comes with an expiration date. If White doesn’t convert it to another asset, Black will catch up. Then the extra pawn will count more.
White played 1 a3!. The first point is that e7 is a target that loses the game after 1 … 0-0? 2 xe7.
The second point is White has a threat, 2 b6!, since 2 … xb6? 3 xe7 is mate and 2 … axb6 drops the Exchange, 3 xa8.
The tactics become easier to spot when you realize that the rook at a8 as well as the king are vulnerable. For example, after 1 … f6 White plays 2 ab1! and Black meets the b6 threat with 2 … d7.
Now 3 g4 is strong in view of xd7+!. White can punish 3 … f5 with 4 d6+! exd6 5 xd8 or 4 … f8 5 b3! and f7 mate.
Let’s stop for a moment and consider an alternative to 1 … f6. As ugly as it looks, the backward step 1 … f8 defends e7. It stops the 2 b6 threat without incurring a weakness the way 1 … f6 does.
After 1 … f8 White can renew the b6 idea with 2 ab1. He can then meet 2 … b5 with 3 a5 with considerable pressure.
But in the game White had a different idea, exploiting a newly vulnerable Black piece.
Which piece? Well, just look for one that became unprotected as a result of 1 … f8.
That’s right, it’s the rook at h8. Once you see that, it becomes easier to spot ways to attack it, with 2 d5!.
This is based on 2 … xd5 3 b6, again winning the Exchange. But it’s also based on 2 … cxd5 3 c3!, which threatens both 4 xh8 and 4 d6+! xd6 5 xc8+.
For example, 3 … d4 4 exd4 g7 invites 5 d6+! xd6 6 xc8+ d8 7 b5+ d7 8 xd7+ or 7 … c6 8 xb7, winning in either case.
In the game, Black played 3 … f6. But 4 d6+! works one more time, e.g. 4 … exd6 5 xf6 or 4 … xd6 5 xc8+ f7 6 b5! (better than the immediate 6 xb7 c6).
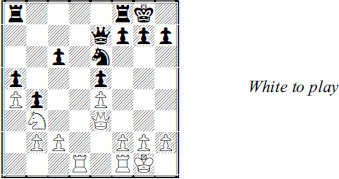
Both attacks and initiatives are fueled by targets. But for the defender, a target means something else: It’s a source of counterplay. A target is the difference between active and passive resistance.
That’s the choice Black faces in the next example and, as often happens, passive defense is losing defense.
White has a basic winning plan of bringing his king to the queenside, say to c3, and pushing the b-pawn. A king and passed pawn generally can outmuscle a lone rook. It’s as simple as two against one.
A master would see that Black can stop that plan with 1 … e7. But he would also realize that cutting off the king that way allows White to win with 2 f2 and 3 b4!, followed by 4 b2, 5 b5 and so on.
Black’s only chance of survival is to create a kingside target for his king. If he can pick off a pawn there and create his own passed pawn, Black may draw.
A typical way to start is 1 … b4 and 2 … f4. But White can anticipate that with 2 f4!.
For example, after 2 … h5 3 f2 g6 4 e3 h4! White could just keep going to the queenside, 5 d3! hxg3 6 hxg3.
Black is slow in exploiting the target, and 6 … b3+ 7 c4 xg3 8 b4 turns out to be a win for White. No better is 6 … h5 7 c3 b8 8 b4 g4 9 d3!.
So let’s go back to the diagram and see if we can speed up Black’s counterplay. The right way is 1 … f4! and then 2 gxf4 f6 and … f5.
Both of Black’s pieces were active after 3 f2 f5 4 g3 b6!. Black’s rook is perfectly placed. It can check at g6 or b3, depending on circumstances.
This was evident after 5 c2 g6+ 6 f2 b6!.

There is no win in 7 e3 b3+!. Or in 7 g3 g6+!.
White can only set a trap with 7 h3. Then 7 … xf4? 8 c4+! and 9 b4! allows him to bring his king to the queenside and win.
But Black avoided this by answering 7 h3! with 7 … b3!. There were no other tricks and a draw was reached soon after 8 g3 b6 9 h4 h5 10 c8 g6+ 11 f2 b6.
How do you acquire the habits of a master? Some master traits may be unattainable. Many masters simply concentrate better than non-masters. Bobby Fischer was not the only GM who boasted of how “beautiful” he thought.
But most good habits of masters can be learned. For example, you can train yourself to ‘always look for targets’ by clicking through games slowly and making a note, mental or written, every time a newly visible target appears.
Positional, rather than tactical, games are more suitable for this. And master games tend to be better study material because too often in amateur games, play becomes chaotic and there are simply too many targets. When you click through a game, or play it over on a board, look at it from White’s point of view. When you’re done, replay it from Black’s perspective. Regardless of who won, you should be able to make target searching part of your chess routine.
Looking for targets is the most important of the good habits of masters. The second most important is:
A master makes his pieces work harder.
Books and teachers are always telling novices: Put your pieces on good squares and good things will happen to them. Even in a position that seems quite equal, getting a bishop, knight or rook to the right square can make a big difference.
There is one White piece that has yet to be developed: the bishop at f1. Ideally, what’s the best square for that bishop?
Masters think like that. When you open up your mind that way you find master-moves like 1 c4!.
The bishop is going to b3, a perfect square. It will not only protect the king position by blocking the b-file but will also create a powerful threat of a4 and xf6/xd7+. In fact, after 1 … d6 the retreat 2 b3! followed by a4 would win the game.
Of course, to play 1 c4 White had to have an answer to 1 … xc4. But it wasn’t hard to find one, 2 xf6, which threatens 3 xd7 mate.
The best Black could do after 2 xf6 was to protect d7, with 2 … c6 or 2 … c6. But he is lost after 3 xg7 xg7 4 xg7.
Masters get more out of their pieces. It’s not because they have more pieces. Or smarter pieces. They have the same pieces you have.
But they get theirs to work harder. A master isn’t satisfied with a bishop that controls a nice diagonal or a rook that dominates an open file or a knight that occupies a central outpost. Their pieces have to do something, not just look good.

If you were to ask yourself, “Which is Black’s best-placed piece” you might answer “The bishop.” It has a nice, clean diagonal. It denies White’s heavy pieces the use of squares such as d2 and e3.
But that’s not enough. If you look for targets, your eyes should focus on the other side of the board. What matters most to Black is the pawns at b2 and c2. They are targets and can come under fire after … a4.
However, Black can’t carry out a queenside raid yet because 1 … a4 2 xa4 xa4 3 b3 xa2 allows White to take off a more valuable pawn, 4 xd6 or 4 g4 and 5 xe6+..
That explains 1 … e7!. The bishop looked nice on g5 but on e7 it does something: It protects the d-pawn and that means 2 … a4! is a powerful threat.
There followed 2 d3 a4! 3 d1 c7!.

One of the threats, … xa5 or … xc2, must succeed. With his queenside in collapse, White threw himself into an attack, 4 g4, threatening xe6+. But he eventually lost after 4 … f6 5 g3 f8 6 b3 xc2.
Because there are so few unoccupied and safe squares in a typical middlegame, it stands to reason that the right square for one piece may be unavailable because it belongs to another. To make his pieces work harder, a master rearranges them. He ‘moves the furniture around’, often with surprisingly strong effect.

Each of Black’s pieces appears well-placed. His knight is splendidly centralized and his bishop controls several key squares. His queen rook commands the open file.
But Black realized that his pieces don’t have targets. If his rook penetrated on the file, 1 … c2?, it walks into 2 g4!. His pieces look nice – but they’re lazy.
That explains 1 … f6! followed by … e4-d5. Then White pawns come under fire on both wings, at a2 and g2 and he can drive the White knight off e5 with … d6.
Things didn’t appear to change much after 2 ac1 e4! until White began to search for a reply to 3 … d5!.
If he protects the a-pawn with 3 a3, then 3 … d5 4 a4?! d6 5 c6? d7 loses material. And 5 c4 allows 5 … xf3 6 gxf3 d5 and … f4, when the underused KR joins the action.
There are other problems with 4 d3?! d6 5 c4 because of the pinning 5 … c7!.
That’s why White went in for the complications of 3 g5 d5 4 h3.
White is relying on tactics, such as 4 … xa2 5 a1 and xa7, or 4 … b4? 5 xd7! xd7? 6 xh7 mate.
But 4 … xc1 5 xc1 h6! kicked one of knights back so that Black can get the upper hand after 6 gf3 b4 7 b3 d6 8 c4 e4.
Instead, White gambled on 6 g6 e8 7 xf8 hxg5 8 c7 xf8 9 xa7. Material is roughly equal.
But as often happens when the queens remain on the board, a rook is no match for two minor pieces because the queen works more efficiently with a knight or bishop than with a rook.

Black was winning after 9 … b8! 10 a3 f4 11 e3 f5 12 c3 b1+ 13 c1 xb2 14 xg5 xa2. But the real winning moves were 1 … f6 and … e4-d5.
When you hear someone say that master chess is ‘more concrete’, what they mean is that variations trump appearances. Another illustration of that: If a piece – even a good-looking one – isn’t pulling its weight, a master looks for a way to get rid of it.

This had been a fairly even game until five moves before, when White forced Black to give up his dark-squared bishop for a knight. White’s bishop on c5 should give him a serious positional advantage.
But there’s a limit to what the bishop can do. White realized that the easiest way to make further progress was 1 xb6!.
A knight will do more on c5 than a bishop because it attacks a6 and b7 (1 … xb6 2 c5).
Then White prepares to invade on the dark squares, not with the departed bishop, but with the queen on d4 or d6 (e.g. 2 … e5 3 d2 and 4 d6).
The game went 2 … a8 3 e5 c6.

Black seems to have everything covered – until White makes a full-board search for targets. Then he notices g7 and finds 4 d4!.
Black doesn’t have a good defense against 5 g4, which threatens xg7 mate and that prompts another weakness, such as 4 … f6 which can be punished by g3 followed by d6 or by d3/g6.
In the end Black desperately sought a trade of queens and lost the endgame after 4 … b8 5 xb8 xb8 6 xa6.
Often, two good habits fit together to produce a good move or plan. Don’t be frightened by the word ‘plan’. Aplan is usually just two or three useful moves that fit together. Here’s an example.
White has the usual kingside pressure that he enjoys in this kind of pawn structure. His bishop and knight cooperate nicely against the target at f7.
But there’s no way to aim another piece at f7. That suggests that either White’s bishop or knight isn’t doing enough. For that reason he switched to 1 g4!.
He threatens 2 h6+ h8? 3 xf7+ and would be happy to see 2 … xh6 3 xh6 (or 3 xh6) and 4 e3.
White would also like to meet 1 … d5, which closes the b3-f7 diagonal, with 2 h6 and see if his majority of pieces on the kingside can overwhelm the Black king.
But there’s a more important explanation for 1 g4 and it was revealed by 1 … xg4 2 xg4.

The elimination of Black’s knight means that two targets have been exposed, at h7 and e7. White can aim at them with h4 and/or e3-h3.
In addition, f7 is still vulnerable if Black uses his KR to defend e7 – 2 … e8? 3 f4! forces 3 … f8 after which 4 e3 and ce1 is unpleasant.
Black does have a target of his own, c3, to shoot at and he can shoot with 2 … c8!. White was only slightly better after 3 g3 e6 4 h4! and then 4 … d5! 5 xd5 exd5 6 h5.
One of the best ways to train yourself to get more out of your pieces is – once again – to reexamine your losses. When you lose a game positionally, or even when you got mated, there was probably a piece (or pieces) that you mishandled. After you resigned you may have concluded that you lost because of, say, an opening mistake or getting a bad pawn structure. But there was almost certainly a lazy piece that cost you. Take another look at those games.
If you’d prefer study material that is less of a threat to your ego, play over games of Bobby Fischer, Anatoly Karpov, Magnus Carlsen, Michael Adams or one of the other grandmasters who rarely seem to have bad pieces – and managed to skillfully dispense with them if they did.
Masters are more efficient with their pieces – and with their calculations. They trained themselves to be that way. A third good habit to acquire:
A master doesn’t calculate more than he has to.
Let’s be honest. The best players can calculate very, very long variations. They can see much farther ahead than you. But masters are also more practical. They know that the longer the variation a person tries to calculate, the more likely he will miss something. The likelihood escalates if he’s tired from calculating other long variations earlier in the game.

Black’s pieces appear so much more vulnerable that White would be justified in trying to find a forced win. Candidate moves such as 1 d7+, 1 d5 and 1 g4 might occur to you.
White focused on another idea, winning the unprotected bishop. He looked at 1 g3 with the idea of 1 … g5 2 d7+.
White wins the bishop after 2 … h6 3 h1+!. Or after 2 … f7 3 xf7+ xf7 4 d5+ and xg5.
But there is a complication. Black can meet 1 g3 with 1 … xg3, based on 2 fxg3?? xe3+.
Still, White didn’t want to give up on a strong-looking move like 1 g3 and he worked out a win: 1 … xg3 2 d7+ h6 3 h1+! g5 4 d5+ f4 and now 5 h3!.
All very neat. But in the end White chose 1 e4! instead.
He had the same goal, winning the bishop. But this is much simpler, and the chance of making a mistake in calculation is much less.
This time the bishop has no good move at all (1 … g5 2 e7+ f7 3 xg5 or 2 … h6 3 g4+).
Protecting the bishop also fails: 1 … g5 2 e7+ f7 allows 3 f5+ followed by a winning rook check at d6 or d8.
Black couldn’t find a defense and resigned after 1 … b3 2 axb3.
Even though he didn’t find a flaw in his calculation of 1 g3, White went with the safer and simpler queen move – because it is safer and simpler.
Masters recognize that they can often get a better read on a position by evaluating it in general terms, rather than calculating.

Black has just captured on c2, offering to trade queens. There is a lot for White to calculate, beginning with 1 xc2 xc2 2 d6 and 1 d1 xd3 2 xd3.
He can also stay in the middlegame with 1 e7+ followed by a queen move such as 2 g3. Even a GM could easily spend half an hour trying to work out all the lines.
But, White wrote, “Here it isn’t necessary to see all the variations. It’s sufficient to evaluate the position.” He went on: “White dominates the center and kingside, and Black’s bishop doesn’t help in the defense.”
He concluded that he should go after the king with 1 e7+ h8 2 g3 and rely on solid moves to provide him with threats.

One of the low-calculation techniques is visualizing. This means looking in general terms at the near future: What good moves are available to you? What are the best squares for your pieces?
At the previous diagram White might have concluded 1 e7+ and 2 g3 was best because he could see ae1-e3 coming up, as well as h4, with prospects of g6+. This went into White’s favorable evaluation of this position.
Calculating is different from visualizing because you have to take your opponent’s moves into consideration. But you can reduce the amount of calculation by just getting a taste of a few sample variations.
For example, White might have looked at 2 … xb2 because it looks the most dangerous. The natural response is 3 ae1. White can see a variation that runs 3 … c1 4 f5 g6 5 d6. Of course, this is only one variation. But if he likes the looks of it, White can feel confident enough to go ahead.
Sample variations are not expected to be conclusive and often they don’t occur in the game. In fact, Black chose 2 … cd8 rather than 2 … xb2. Then came 3 ae1 d2 4 1e3 xb2 but White’s attack was overwhelming after 5 h4, e.g. 5 … d6 6 f5! a8 6 f4 dd8 7 f7 resigns.
Visualizing plays an important role in determining whether you have winning chances in a particular line of play you’re considering. We’ll explore that further in Chapter Six. But here’s a taste:

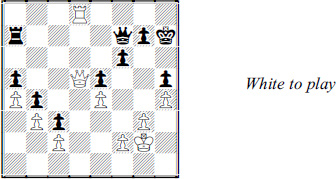
White had this kind of position in mind when he made decisions several moves ago. But why did he think he could win this? After all, the pawns lie on only one wing. Black has doubled pawns but they do a good job of preventing White from creating a passed pawn.
Actually this is a simple win if you visualize what it would be like if a pair of rooks has been traded. Suppose the rooks on c4 and f8 disappear.
In positions like that, Jose Capablanca would say, “White wins in one move.” He was joking: the one move is White king to e8.
In other words, once a pair of rooks is gone, what White needs to win is to attack the only available target, at f7. Black could either lose the f-pawn or advance it, creating a new target at g6. Then it’s just a matter of applying pressure to whatever is weakest.
Play continued 1 dc7! g7 2 c8! xc8 3 xc8.

Thanks to his ability to visualize, Capa-like, a winning future position, White didn’t have to calculate what follows. The game went 3 … d4 4 c4 e5 5 c6 f8 6 f1 e7 7 e2 f8 8 c5 f6 9 c7 e5 10 b7.
White could have chosen other squares for the rook without damaging his winning chances. The next stage was to advance the king towards e8. Play went 10 … g7 11 d3 d6 12 d4 f4 13 d5 f6 14 g3! d2 15 d6 e1 16 b1 c3 (not 16 … xf2 17 f1).
Once the king is closing in on f7, White frees his rook from the defense of his pawns by advancing them to light squares – 17 b3 e5+ 18 d7 g7 19 b7 f8 20 g4 d4 21 f3 e5 22 b5 f4 23 c5 d2 24 c8+! g7 25 e8.

There is no defense to White getting his rook to the seventh rank. On 25 … f6, the easiest way to win is to get White’s king to e6 and sacrifice the rook on f6 for a bishop and a pawn.
In the game Black tried 25 … f5 26 c7+ f6 and White went after the new target at g6 with 26 f8!, threatening c6+. He won shortly after 26 … e5 27 f7 f4 28 xg6.
There are, naturally, bound to be times in a game, particularly a complex game, when you absolutely must calculate. High on the list are situations when you are defending.
Defense tends to require more exact and thorough calculation than attack. On the other hand, when you have the initiative or are simply better developed, you can sometimes rely on a calculating minimum.
White’s advantage in development is minimized by the well-placed Black queen and knight. To White, those pieces are what matters most.
There is a way to deal with them, 1 e3!?. But to play this White has to calculate 1 … xe3 2 fxe3.
White realized it was worth calculating. He saw 2 … g6 3 b3 would give him a sizable edge after 4 c5 or 4 d6 (or after 3 … a6 4 xa6 xa6 6 d7).
But he knew he wasn’t done. He also had to calculate 2 … e6 and he saw that this time his knight should go to f3 because e5 is a target. After 3 f3 a6 4 xa6 xa6 5 xe5 White has a big edge (5 … c5 6 d7!).
Finally if Black meets 1 e3! with 1 … e6 he is losing a pawn to 2 xe6 xe3 3 xf7+.
That’s a lot to see. But it was worth it because to avoid all this Black had to retreat his queen. It was a big concession, as the game went: 1 … e7 2 b3 e6 and now 3 xe6 xe6.
White has a positional advantage because of the queenside targets (a5 and c6). He could restart his calculating machine and consider lines such as 4 b6 g5 and then 5 xc6 f4 (threat of mate on g2) 6 g3 g4 or 6 … ac8.
But it’s just not worth it. White’s advantage has become more obvious since the previous diagram and he deserves an easier time.
He can increase his positional edge – without calculation – by just doubling rooks on the d-file, d2 and fd1. Play went 4 d2! c5 5 d5 c4 6 c5 fc8 7 xe6 xe6 8 fd1.
Then came 8 … c6 9 b5 c3 10 b3! d8.

Amateurs sometimes reach commanding positions like the one White enjoys. But they become frustrated because they haven’t been able to cash in yet. They try to calculate forcing lines like 11 xd8+ xd8 12 h3, which threatens xe5 or xa5.
They may see that 12 … c7 13 c5 looks good for White. But they aren’t sure about 12 … h6 13 xa5 d2! and try to look further and further ahead. And meanwhile their clock is running.
A master knows that keeping command of the position – 11 bd5! xd5 12 xd5 – is what matters most. Then he can take his time probing both wings. Play went 12 … f6 13 g3 h6 14 d3 h7 15 h4 e6 16 g2 f6 17 d6 f7 18 f3.
On the kingside he was looking at 19 h5 followed by f5+ and possibly g6 or d7. Black defended with 18 … h5 19 d3 a7 20 d8 g6 21 d5 f7.
For the first time in 20 moves White should calculate a long variation. Why now? Because 22 xf7 xf7 and 23 a8 d7 24 xa5 d2 or 23 d5 a7 changes the position decisively, one way or the other.
In fact, White is winning in the 23 d5 a7 line if he finds 24 f4! exf4 25 xh5+ g6 26 g4!. It takes a further examination – of 26 … d7 27 d5! xd5 28 exd5 – to prove it.
But the position in the diagram was the last one before the time control. White didn’t have time to calculate 22 xf7!. He kept control of the situation with 22 d3 and eventually found a way to win, 16 moves later.
Reducing calculation to a minimum is a more difficult habit to acquire than the others discussed in this chapter. One training method might help:
After each of your tournament games, try to remember the variations that you calculated. You don’t have to recall every single move. Rather, you should try to recollect the candidate moves you spent significant time on and whether you looked three, four, five or more moves into the future. (You might be able to make this part of a post-mortem analysis with your opponent, or even record it.)
Some time later, go over the game again and see how many variations that you looked at were wastes of time and energy. You’ll probably find that the best moves you played could have been selected with a fraction of the time you spent on them. This can show you how much more efficiently you can think.
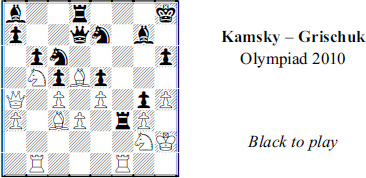
And now for this chapter’s quiz positions.
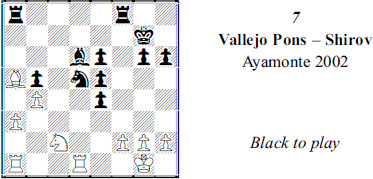
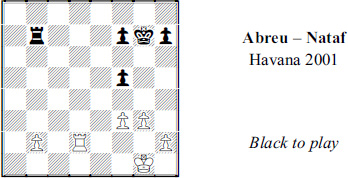
Black can’t be too confident about his material edge in light of his mangled pawns. What is his best policy?

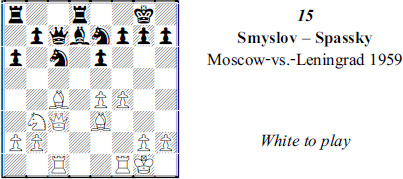
How can White prove he has more than equality?

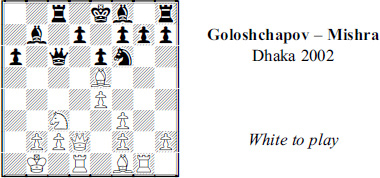
How many potential targets can you identify for White? What should he do?

White is poised to win on the kingside. How does he nail down victory?

White’s positional advantage is clear in view of his better bishop and more concentrated rooks. How can he make progress?

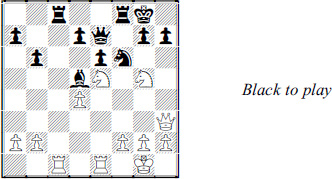
That great knight on c4 and passed b-pawn give Black an edge. How does he win?

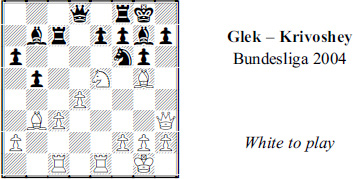
Is this the time for White to calculate or maneuver? And if so, calculate what and maneuver how?

Should White begin calculating variations directed at the kingside? He can defend b3 with 1 d1, for example, and then play 2 d2/3 h6+ or 3 f4.
Should White be thinking of targets or about getting more out of a lazy piece?