
Many amateurs believe that becoming a master is all about what you know. Masters know more technical chess information, like extensive opening analysis, exact endgames, and the like.
That’s an excuse. You can say, “If only I had the time to study and digest that mass of information, I’d make master, too. I’d know what a master knows.” But a master also has an edge over you because of what he senses. That’s much harder to acquire.
For example, a master has a better sense of danger. Giving a simultaneous exhibition he will quickly make luft in one game as he moves on to the next board. It’s not because of what he knows or what he calculated. It’s simply his sense that this was the right time to play h2-h3.
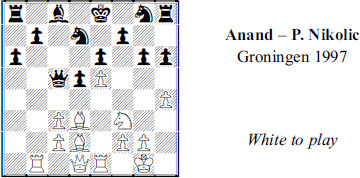
Here’s a similar case.
If an amateur is presented with this position, he might search for a forced mate and start by looking at 1  b8.
b8.
A master would certainly consider it. But once he saw that there’s no quick win he’d be attracted to 1  g2!. When White annotated this game he explained that it was the kind of useful move that a master plays automatically.
How is it useful? It protects the h-pawn, the only potential target for Black. It also eliminates the only tactical dangers, such as a first-rank problem after …  c1+ followed by … c4-f1(+).
A master also has a better sense of when his opponent is running out of good moves. Here Black’s pieces are as well placed defensively as they are going to be. Therefore 1 g2! may force him to weaken his defenses.
That succeeded because instead of a super-passive pass like 1 … b6, he chose 1 … h6?. That created a fatal target at h6, e.g. 2 b8 f6 3 h8! (3 … g6 4 f8).
We call this a sense of danger but we could also call it a feeling or an awareness. You can’t always be certain that playing a particular move is risky. But a master develops a feeling for which positions are too risky to be worth playing.
“You think ‘Such and such a move can’t be played, it is too scary for a human’ “, is the way Garry Kasparov put it. “A human can’t defend such a position in a real game!”
There are other senses that give a master an edge, even against computers. In an endgame, a machine has no way but calculation to determine whether it is close to imposing zugzwang. A master can sense when he’s getting close to it.
But the most important master sense is of timing. A master not only has a better feel for what to do in a position but how urgently it must be done. This tells him what kinds of candidate moves he should be looking at: Sharp and tactical? Or slow and strategic?
It also tells him how much calculation he should be doing. Without that sense, a player may end up wasting time and energy, looking too long at too many moves that are wrong for the position.
Most of all this sense tells him who time favors. If you’re an experienced player, you already have some sense of that. You know, for example, that urgency is demanded when you’ve made a sacrifice.
White has the better development but Black has an extra pawn. That alone suggests that time is on Black’s side. If he’s allowed to coordinate his forces, say with … c7, …  e7-c6, … c5, …
  d7 and … 0-0-0, he will have a big, perhaps decisive edge.
With that in mind, 1 c4! and then 1 … dxc4 2 e4 was right. White gave up a second pawn to create threats (xb7), energize his pieces (b4-d6) and make it difficult for Black to castle into safety.
Black was able to stop b4 with 2 … c3. But that was a stopgap measure because after 3 e3 White was bound to regain one of the pawns and also open up the c-file for his rook, with d4 and e3xc3.
Play continued 3 … c4 4 d4 c5 5 e3.
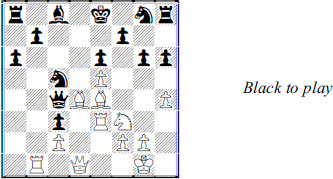
Thanks to 1 c4!, White has made almost all of the progress since the previous diagram. Understandably, Black decided to get rid of one of White’s bishops, 5 … xe4 6 xe4.
Then he played 6 … d7, to meet the threat of 7 b6 xe4 8 d8 mate and to prepare 7 … c6 and … 0-0-0. It doesn’t take a master’s sense to realize that White needs to keep making threats to prevent Black from consolidating. That led him to 7 e3 and play proceeded with 7 … e7 8 xc3 and 8 … d5 9 c5! e4 10 c7.
White is preparing c5, uncovering an attack on the d7-bishop, and a possible Exchange sacrifice. He would win outright after 10 … c6 11 xe7+ xe7 12 c5+ and d6-e7 mate.
And he would be on the road to winning after 10 … d8 11 c5!, e.g. 11 … d5 12 cxb7 c6 13 b8!.
Instead, Black found 10 … b5 and White replied 11 c5.

Black can still defend, with 11 … d5 12 e1 c8! and the outcome would be unclear after 13 a5.
But as often happens, the difficulty in meeting constant threats – “Prolong!” – got to Black. He blundered with 11 … d5? 12 xd7! xd7 13 b4, which costs the queen (13 … f5 14 g4).
This is the simplest kind of timing to appreciate. Time was Black’s ally, and if White hadn’t offered a second pawn (1 c4!) he would have lost in routine fashion. He likely would have lost if he had played quiet moves at any subsequent turn.
This is Morphy chess. But you need to know more than Morphy to make master.
Where a master’s superior sense of timing stands out is when material is equal. Then an appreciation of other factors – particularly counterplay – tells him whether time is a factor and who it favors.
Malaniuk – Alexandrov, Minsk 1997: 1 d4 f6 2 f3 e6 3 e3 b6 4 d3 b7 5 0-0 e7 6 c4 0-0 7 c3 h6 8 e4 d5 9 cxd5 exd5 10 e5 e4 11 e2 xc3 12 bxc3 c8

White has a choice of promising plans but kingside attack stands out. He controls more space there and there are potential targets at g7, h7 and h6.
But how should he attack? There are several ways:
(a) He could maneuver his knight with e1-c2-e3-f5 and play for g4xg7 mate.
(b) Or he could play 13 h3 and follow up with h2 and then h5/g4 followed by a piece sacrifice on h6.
(c) Or he could go line up his light-squared bishop and queen to threaten h7 mate.
There are other options, as well. But instead of trying to calculate them, White needs to get a sense of the time frame. How long White can take for the attack will depend on how quickly Black generates counterplay.
Black doesn’t have immediate threats and he is several moves away from making c3 a target. But he is ready to play 13 … a6!. A trade of bishops would neutralize White’s best attacking piece.
True, White would still stand well. He can play on the queenside with 13 a4. If 13 … a6, then 14 a5, or 14 xa6 xa6 15 xa6 xa6 16 a5, with a slight edge.
But a master wants more. White concluded he had a legitimate chance for more but he didn’t have the luxury of a slow buildup, with 13 h3 or 13 e1. He chose 13 b1! instead.
Black set a trap with 13 … a6 14 c2 g6. This is based on meeting 15 xh6? with 15 … xf1 16 xf8 xg2!, when suddenly he has counterchances.
But rather than try to figure out what happens then after 17 xg2 g4+, White chose the low-calc 15 e1!.

Black is reduced to responding to specific threats, and play went 15 … g7 and then 16 d2 h8.
Thanks to his inducing another kingside weakness (14 … g6) White can just apply forcing or semi-forcing moves until Black’s position disintegrates. There followed 17 e6! and then 17 … f5 18 g4!.
Now 18 … fxg4 would have lost to 19 c2! e8 20 e5! followed by f7 or xg6.
Black tried 18 … c6 and there followed 19 gxf5 gxf5 20 f4 f8 21 g3+ h7 22 h1!. The game ended with 22 … f6 23 h4 d6 24 h3 e7 25 xf5 g8 25 xd6 resigns.
On the other hand, there are times when there is no urgency at all. A master knows when he can attack and take his time time doing it.

Unlike the last example, Black is developed and has a target, at c2 (1 d2?? g5). White’s only advantage is space and the better bishop.
He played 1 c3 so that he could keep the queenside relatively closed (1 … b4 2 c4). Play went 1 … 5c7 2 h4 a5 3 b1.
But then came 3 … a4? and 4 a3!. It may not be immediately obvious but White suddenly has a big advantage. Why? Because Black has no way to open the queenside short of (unsound) sacrifices on c3.
That means White has virtually unlimited time to carry out his own attack. He doesn’t really have to calculate. When choosing a candidate he won’t, in most cases, have to look more than a move or two into the future. He can follow a simple, general plan of safely advancing the g- and h-pawns.
Black tried to batten down the hatches with 4 … f8 5 g4 h8 6 g5 and then 6 … f6.

Black’s pawn move changes the kingside options. It prevents f5-f6 and makes gxf6 possible.
But it does not change the timing. White can try one plan and, if it doesn’t work, switch to another. He can ‘just move around’ without damaging his winning chances.
First he looked at doubling or tripling on the g-file. Play went 7 hg1 e7 8 g3 f8 9 dg1 b8.
But it became apparent that g2 followed by gxf6/ … xf6! will achieve nothing. Black will have ample protection of g7.
No problem. White simply shifted to another plan, eyeing the targets at d6 and b5. The game continued 10 d2 d8 11 a1 a7 12 e6 b6 13 d1!.
White is looking for a favorable opportunity to play gxf6 since now … xf6 hangs the d-pawn. He also eyes e2 and d5xb5.
Black seemed to have everything covered until 13 … e7 14 d3 c6 15 e2 b6?.

White played 16 h5! so he can end the game with f7 and then g6. That idea had been in the air for some time but only works now that Black cannot defend in time with … e8.
The finish was cute. Black played 16 … b8 17 f7! fxg5 with the idea of 18 hxg5 xg5. But White replied 18 g6! h6 19 hxg5 xg5 20 xg5! resigns. Black would be mated after 20 … hxg5 21 h3+ g8 22 dh1 and h8.
The difference between these two games is striking. In the first, Black’s few developed pieces were not active. But there were things he could do (… a6). White had to commit to attack (13 b1!) or look for a more modest plan.
In the second example, Black’s forces were well coordinated. But he had no targets after 4 a3!. White could take his time.
A good sense of time is intuitive. But it’s a more difficult kind of intuition to acquire than, for example, realizing when a standard combination is available because you recognize a pattern. Critical moments don’t fit a pattern.
Nevertheless, there are timing training methods. One that works particularly well with computers is to examine early middlegame positions from a database. You could go to one of the on-line databases, such as Chessgames.com, and look up at the games from a recent international tournament. Then, one game by one, click on each position after say, the 15th or 20th move.
Your aim is to see if you can evaluate urgency. Does time matter to one player more than the other? That is, will one side’s position naturally improve over the next several moves if nothing dramatic happens? Does one side have to use its initiative, lead in development, whatever?
Once you’ve made an evaluation, see what did happen and whether one side or the other acted out of urgency. This will help deepen your sense of when you have to act.
Masters make all sorts of mysterious, aggressive moves in sharp positions. But some of the most mysterious don’t seem to do anything. In a Sicilian Defense, when time seems to be a high priority, a master may spend a tempo to shift the White king from g1 to h1. Or, if castled queenside, from c1 to b1.
He does it to anticipate counterplay. Anticipating future threats is usually better than responding to immediate threats.

This is one of the games that made Vasily Smyslov famous. Great attention was paid to the stunning pawn sacrifices that ripped apart Black’s kingside and the deft strokes that led to mate.
But that was much later. To enjoy the liberty of attack, White first had to secure the queenside, the home of most of Black’s play. He began with 1 a4! and 1 … d7 2 e2!, to discourage … b5 as well as … c4/ … c5.
Black persisted with the … c4 idea and chose 2 … c7. But White ruled that out with 3 c1 b8 4 b3!.
So far White has pushed two pawns, retreated a bishop and placed his rook on a file that is unlikely to be opened. Yet he’s made progress by denying Black his best chances for counterplay.

Black wasn’t done. He took aim at the e-pawn with his unused pieces, 4 … ef6 5 c2 fe8.
After 6 h2 h6 it was evident he had run out of counterplay ideas. But White still wasn’t ready to go on the offensive with 7 f4.
He wanted to eliminate … d4+ and also to delay … a5. So he invested a tempo on 7 h1!, yet another prophylactic move.
Black, a world-class player, had his own sense of timing and realized that White is about to turn to a slow-building offense, with f2-f4, ae1, d3 or f3 and e4-e5!. When only one side can make several moves of improvement – ‘plus-moves’ – the other side is almost always losing.
Black opted for 7 … h7, threatening 8 … xc3 and 9 … xe4. He wanted White to play 8 f3, which interferes with his f2-f4 plan, or 8 d3, which allows 8 … e5.
For the first time in the game, White had to calculate. He concluded that 8 f4! was sound.

He felt 8 … xc3 9 xc3 xe4 10 d3 e3 11 d2 gives him plenty of compensation. Understanding ‘comp’ is another master trait and we’ll explore it in Chapter Eight.
Black accepted the pawn in a different way, 8 … f5 9 f3! xc3 10 xc3 fxe4 11 g4 hf6 12 e6+ h7.
A pawn storm is usually the slowest form of attack. But in the absence of counterplay, White felt it would succeed. It worked perfectly: 13 h4! g8 14 g4! h5 15 g5 g4 16 f5 gf8 17 fxg6+ xg6 18 xg4 hxg4 19 h5+! xh5 20 g7! and White won in a few moves.
Prophylactic moves, like 1 a4, 2 e2, 3 c1, 4 b3 and 7 h1, sometime seem like a waste of time. But by killing counterplay they ultimately gain time for later. They gave White a free hand to finish the attack.
Note that 8 f4 was the turning point in the game. Recognizing those moments is another ability that marks a master.
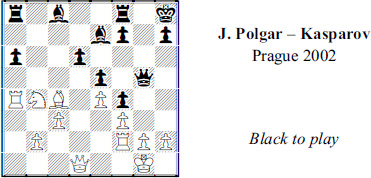
Reflecting on his long career, Boris Spassky said the greatest superiority he enjoyed over his rivals was a particular sense of timing: He had an uncanny feeling for when to mix it up, when to increase tension, when to force matters. “I was the king of critical positions,” he said.

Black seems to have an edge thanks to the knight at d4. White is reluctant to capture it because after … cxd4, the c2-pawn becomes a target. But until White solves the knight problem, he can’t move his queen to a good square and connect rooks.
Therefore, time should favor Black. He can make more useful moves – ‘plus-moves’ like … d7 or … ac8 – than White.
Nevertheless, Spassky felt this was the right time for 1 … xf3+! 2 xf3. The reason is that this gives him a chance to force a more favorable pawn structure with 2 … c4!.
The threat is 3 … c3. A bit of calculation reveals that the defense 3 e3 is as faulty as it looks. After 3 … c5 4 e2 c3! 5 xc3 White is in a mess following 5 … xf2+! 6 xf2 xc3.
So White replied 3 bxc4 and then 3 … b4! 4 c3 e7.

The point of Black’s play was to create a glaring hole at d3 and a target at a4. He can exploit the hole with … d7-e5-d3 and the target with … d7-c5.
He can also exert pressure on the open file, e.g. 5 a3 xa3 6 xa3 d3 and … ad8. And if nothing else, he can regain a pawn favorably with … d7-e5xc4.
None of this would have been available if Black hadn’t seized the moment with 1 … xf3+. Or, rather, if he hadn’t sensed that this was a moment that could be a turning point.
It turned out to be the critical point of the game because White’s position became progressively worse, 5 e2 d7 6 b3 e5.
White saw that the c4-pawn was lost and tried to make the best of it with 7 c5 xc5 8 xc5? – overlooking the crushing 8 … d2! (9 xd2 xf3+). He would have been worse after 8 ad1 xf3+ 9 xf3 b6, intending … c4 or … c6.
Sensing when a position is critical frees a master to look for more candidate moves than he typically would. Normally, a master examines fewer candidates than non-masters. His intuition limits his search by pointing out the one or two moves that are likely to be best.
But his intuition is trumped by his sense that the position demands something more, a game-changing move, a big move.
This position arose in a rapid match. The players didn’t have time to calculate to their normal extent. But after White’s last move, c2-b4, Black could appreciate how precarious his situation was.
It wasn’t the triple attack on the a-pawn that worried him. There’s something that matters more, the d5 square. If White can plant the knight on that ideal outpost, Black’s pieces, particularly his dark-squared bishop, will be stifled.
Black realized he needed a big move. That often means an ‘impossible’ move, one that you would normally dismiss without a glance. Here 1 … d5! was both impossible and very good.
Impossible because White controls d5 four times. Good because at the cost of a pawn Black obtains powerful tactical chances from … c5!.
White looked at 2 exd5 c5 as well as 2 xd5 c5 and 2 xd5 e6. Each has its problems, so White went in for 2 xd5 and then 2 … c5 3 xa8.

Here Black had quite a bit to calculate because there was a real choice. Both 3 … h3 and 3 … g8 threaten mate on g2.
In the post-mortem, the players determined that 4 f1 was the right answer to either move and would have favored White if Black had played 3 … h3? 4 f1 xf2 5 gxh3!.
Black chose 3 … g8! 4 f1 xf2 and eventually won. But if there was one thing that won the game it wasn’t 3 … g8 or 2 … c5. Rather, it was the feeling that Black couldn’t afford to play a routine move such as 1 … a5, 1 … b7 or 1 … e6.
Not every game has a critical moment. Far from it. But there are enough examples in master chess to provide teaching moments. One way to benefit from them is to go through unannotated master games, either with a board or clicking through them on-line. Try to determine in each game whether there was a turning point.
What makes it particularly hard to sense turning points is that there are rarely road signs to identify them. A position may seem ripe for an irrevocable decision. But on closer inspection it might be better to delay it for a move or two.

White noticed a sacrifice, 1 xd6 exd6 2 xf6. He realized that he would immediately get one pawn for the Exchange and might add a second one via 3 xd6 or 3 d5/4 b5.
The timing seems right. White’s pieces are as aggressively placed as they are likely to be. If White plays something else, Black will be able to improve his position, say with … d7, and the chance for xd6 is lost. That makes this a critical moment, right?
Well, not exactly. It’s not clear that White would stand better after 1 xd6 – that is, better than Black is in the 2 xf6 position or better than White was before 1 xd6. That indicates there is no real urgency.
White can improve his position in other ways, such as with 1 h4 and 2 h5. Then he might win by pushing the pawn to h6 or exchanging on g6. If he follows with an advance of the g-pawn, Black’s king may be in serious trouble.
White added it all up and chose 1 h4!. Black thwarted his plan with 1 … h5. But that made 2 xd6! much stronger than a move earlier.
After 2 … exd6 3 xf6 the defense 3 … d7 loses another pawn to 4 d5 and xg6+ (or 4 … h7 5 xf7).
Also 3 … a6 4 d5 f8 is doomed by 5 d3 followed by f3 or e3/h8 mate.
Instead, the game went 3 … f8 4 xd6 c5.

Now 5 d5! is a paralyzing shot that threatens 6 xg6+ (thanks to 1 … h5).
Black was forced into 5 … h7. But that makes his king vulnerable to 6 g4!, e.g. 6 … hxg4? 7 h5 gxh5 8 h6+ and 9 g6 mate.
Black tried for counterplay with 6 … a3 but he was lost after 7 gxh5 c1+ 8 h2 h6 9 xf7! and hxg6+.
Going back, we can see that 1 h4! gave Black an opportunity to lose quickly with 1 … h5?. Better was 1 … c5, when White has to find another winning idea, such as 2 g4 followed by 3 g5 or 2 d2 and 3 h6 – or even 2 xd6 after all. Nevertheless White had improved his chances over the immediate 1 xd6.
When a game ends in victory without a turning point it often has a decisive trend instead. A master sees trends that others don’t. That is, a master is better at recognizing when one side’s winning chances are gradually and steadily improving.
This is not a matter of calculation but rather visualization. The master sees the plus-moves that will improve a position.
Christiansen – Short, Hastings 1979/80: 1 d4 e6 2 c4 f5 3 g3 f6 4 g2 b4+ 5 d2 e7 6 f3 0-0 7 0-0 xd2 8 bxd2 d6 9 e1 e5 10 e4

White wants to open the center because of his superior development and because his rook is lined up against the Black queen, e.g. 10 … exd4? 11 exf5 and 12 xd4 with advantage.
Black is tempted to minimize the opening of lines with 10 … f4 and 11 gxf4 exf4. But that still leaves White with opportunities to blow open the center with e4-e5 or c4-c5.
Black knew from his understanding of pawn structures that it would be much better if he could occupy f4 with a piece, ideally a knight, rather than a pawn. But that would take one and possibly two extra moves to execute and cost one and possibly two pawns.
So Black took a short look into the future, at 10 … f4 11 gxf4 h5!. He saw 12 fxe5 f4! and then 13 exd6 cxd6.

How do you evaluate such a position? There’s too much to calculate to draw a definitive conclusion.
But Black can visualize. He can see that his position will improve once he carries out a series of obvious moves – … c6, … g4, … f6 and … af8.
This makes Black’s position easier to play, and that’s important, as we’ll see in Chapter Seven. White could only stop these moves by changing the position sharply, say with 14 e5 – so that 14 … c6? 15 e6! and 16 d5. But Black should have strong attacking chances if he shifts his queen, say with 14 … f7 and 15 … g6.
White preferred 14 b3 c6 15 d5. Black’s attacking chances grew after 15 … e5 16 xe5 dxe5 17 f1 h4 18 g3 f6 19 e3 h3. He should have won in the complications that followed 20 f5 xf5! 21 exf5 xg2.
Black appreciated that he could create a good trend. But what do you do about a bad trend?
The first step is to visualize the near future. The second is to make sure it doesn’t happen.

Black’s pieces seem active enough to equalize. He has tactics such as 1 c3 a5! (2 b4 a3) to annoy White.
But this is deceptive. The pawn structure favors White considerably. Black faces long-term problems defending the target at a7 and trying to find good squares for his bad c8-bishop.
In short, time is on White’s side. He can play slowly, with 1 f2, to protect his queen so that it will be safe to continue 2 c3. Unless something changes significantly, his pieces will improve. Black’s won’t.
For example, 1 … d7 2 c3 a5 3 a4! xd2 4 xd2 is very good for White. After 4 … b7 5 e7 a8 6 d6 and e5 he is preparing to trade into a good-knight-vs.-bad-bishop ending in which he will double rooks on the a-file.
That’s a trend Black knew he had to stop. He did it with 1 … a6 2 c3:

And now 2 … xb3! followed by 3 cxb3 xd3 gave Black two pawns for the sacrificed Exchange.
In unbalanced material situations like that, it’s the positional plusses that matter. So even though he seems to be ahead in material, Black will be worse in view of his bad bishop.
But he should be able to draw. That’s what happened eventually after 4 a2 xc3 5 b4 a3 6 c2 d3 7 d2 d5! 8 xd5 cxd5 7 f2 b7. Black saved the game because he realized in time that he was on the wrong side of a trend, and he took steps to change it.
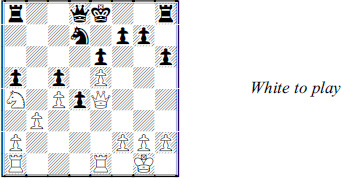
The simplest way to detect a trend is to identify how many progress-making plus-moves each side can make in the near future. Consider this case:

This has all the footprints of a Sicilian Defense in which … a5 followed by … b5-b4 provides Black with counterplay. But he has to be concerned about h4 followed by xf6.
Is Black willing to retake … gxf6 ? Or give up a pawn (… xf6/xd6)? Or meet h4 with … g5 ?
He can avoid all this with 1 … d7. That looks good because the knight can get back into play with tempo (… c5).
But there’s a drawback. Retreating the knight to d7 makes 2 d5 attractive. That threatens 3 xe7+ and 4 xd6. And more significantly it enables White to recapture on d5 with a piece after … xd5, rather than a less desirable pawn.
So Black has to evaluate 1 … d7 2 d5 xd5 3 xd5!. That would leave him with a bad bishop on e7, while White enjoys a nice outpost on d5. Nevertheless, Black chose this and followed up with 3 … c6!.

Black’s 1 … d7 decision makes sense because he can improve his position with … c7 and … c8, followed by … b6 and … c4 or … a4, depending on what’s available.
That makes four plus-moves that White can’t easily stop. To figure out whether they amount to a significant trend, Black has to answer another question. Does White have plus-moves, and if so, how many?
The answer is: Not many. His king would be better off on b1. But his heavy pieces can’t improve much. The only significant way to improve is by a knight maneuver, such as d2-f1-e3.
This gives Black enough of a picture of the future to convince him that 1 … d7! was good. His judgment was confirmed when the game continued by 4 b1 c7 5 c3 c8.

It should be easy to see that Black has made progress since the previous diagram. He would improve further if White began his knight maneuver, 6 d2, because of 6 … g5!.
Then Black will try to trade bishop for knight and drop a knight on c4 with tempo, e.g. 7 … b6 8 b3 xd2 9 xd2 c4 and 10 … b6. White can avoid that with 7 b3 but after 7 … b6 and 8 … c4 he is worse.
How did this happen to White? Simple. Black made progress and White didn’t.
White avoided 6 d2 and preferred 6 h4 b6 7 d3. But Black’s attack has gained so much momentum that he could afford to weaken his kingside with 7 … g5! 8 g3 a4.

Black has ideas to work with such as a knight sacrifice on b2 or c3, as well as … b6, which threatens mate on b2 or a capture on c3. Atypical winning line is 9 c2 xb2! 10 xb2 xc3 11 a4 c5 followed by … c6-b6+ or –a6.
White actually played 9 e2 and resigned after 9 … b5! 10 c2 b4 11 b5 xb2! in view of 12 xb2 bxc3 13 c2 b6.
One of the tricks to spotting a potential trend is visualizing how the rooks will come into action. If one side can make much better use of his rooks and has a free hand to do it, that’s usually a good trend.
In the Christiansen-Short game, Black’s ability to play … f6 and … af8 indicated one. In Short-Kasparov, the possibility of White doubling rooks on the a-file, while Black’s rooks had little to do, showed another. In Hasangatin- Yakovich, the tripling of Black’s heavy pieces on the c-file – while White couldn’t make his lazy rooks do significantly more – was also revealing. Here’s one final example:

Each player has some good things to say about his position. If you can eliminate your opponent’s assets, it leaves you with the only good pieces on the board.
White appreciated that Black’s best piece was his bishop. Black, on the other hand, appreciated the need to eliminate one of White’s best pieces, with 1 … g5. That threatens mate on g2 and would force a trade of queens.
White beat him to the punch with 1 e4! xe4 2 xe4. Black was worried about b3-b4, so he spent a tempo on 2 … a5, leaving us with another position to evaluate.
But this one is easier to judge. White has no open files for his rooks and no easy way of opening a file. However, he can greatly enhance his rooks with ad1-d3-g3. That takes aim at White’s best target, g7.
Black’s rooks don’t seem to have a future. He’d like to trade knights so he can play … a4 but there is no easy way to force a swap.
We can carry the visualization a bit further. Black is bound to castle kingside. But that will make him vulnerable to a heavy piece attack of g3/g4 along with b2-d3-f4-h5.
White’s pieces, particularly his rooks, have a future. This is another way of saying the future belongs to White. He made progress in the game: 3 ad1 g6 4 d3 f8 5 g3 g7 6 h4 h5 and now 7 g5! a7 8 d1!.
The other rook is headed for either f3 or g3. Black was able to temporarily delay him with 8 … a8 9 f4 c6 but then came 10 d3 aa8 11 b2 h6 12 f3.

It’s far from the finish but the difference in rooks ensures that White will be the one making threats for the foreseeable future. The beginning of the end was 12 … f8 13 d2 e4 14 d3 a8 (not 14 … xh4? 15 f4 xg5 16 xf7+ and xg5).
Then came 15 gg3 f8 (here 15 … xe5? loses a piece to 16 f4) 16 g5 h7 17 e7 c6 18 xg6+! h8 (18 … xg6 19 g5 mate) 19 gf6! g7 20 h6+ g8 21 g3! resigns.
Of course, other pieces can improve their positions in the middlegame or early ending. But it is often easier to visualize the bettering of the rooks on each side. And since rooks are the second-most powerful pieces, and the ones that improve the most after move 10, it pays to pay extra attention to them.
Time for some quiz positions:

Who does time favor and what should White do?

White wants to push his g-pawn but preparation is in order. He might consider 1 e3, followed by 2 g3. Or perhaps or 1 d4 or 1 dg1. What else?
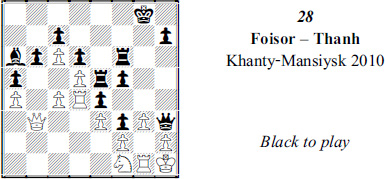
Is time on Black’s side and what can she do?

White seems to have a lead in development but 1 d3 or 1 f4 doesn’t exploit it. Any other ideas?

What should White do?

Black’s last two moves were … d5 and … h4. What does that mean to White?