
•1 Layer Cake*
•2 yards of cream solid
•3 yards for backing
•½ yard for binding
•56″ × 68″ batting
*You will use some of this for the quilt and some for the pillows.
WOF = WIDTH OF FABRIC
Choose 20 Layer Cake squares for the block frames, and from each, cut 2 rectangles 1½″ × 6½″ and 2 rectangles 1½″ × 8½″.
Choose 30 Layer Cake Squares for the scrappy strips, and from each, cut 1 rectangle 2½″ × 10″ subcut the rectangle into 4 squares 2½″ × 2½″
4 strips 6½″ × WOF, subcut into 20 squares 6½″ × 6½″
17 strips 2½″ × WOF, subcut 10 strips into 40 rectangles 2½″ × 8½″ and 7 strips into 20 rectangles 2½″ × 12½*
*Have these squares signed with a permanent fabric marker before or after assembling the quilt.

6 strips 2¼″ × WOF
2 pieces 56″ × WOF
All seam allowances are ¼″.
Press all seams open.
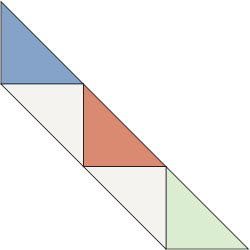
1. Referring to the block assembly diagram, sew 6 print 2½″ × 2½″ squares together to make a 2½″ × 12½″ strip.
2. Sew a cream 2½″ × 12½″ rectangle to the strip from Step 1. This unit should now measure 4½″ × 12½″.
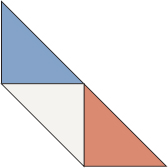
3. Sew a print 1½″ × 6½″ rectangle to the top and bottom of a 6½″ × 6½″ cream square.
4. Sew a print 1½″ × 8½″ rectangle to the left and right sides of the unit from Step 3.
5. Sew a cream 2½″ × 8½″ rectangle to the top and bottom of the unit from Step 4.
6. Sew the unit made in Step 2 to the right side of the unit made in Step 5.
7. Repeat Steps 1–6 to make a total of 20 blocks.
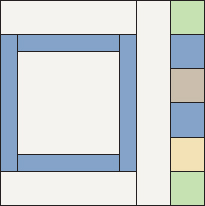
Block assembly diagram
1. Lay out the blocks as shown in the quilt assembly diagram, rotating the blocks to create the scrappy stairsteps.
2. Sew the blocks into rows; press, alternating the direction you press the seams in each row.
3. Sew the rows together; press.
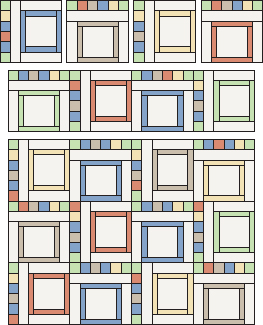
Quilt assembly diagram
1. Refer to Finishing Touches (page 189) to layer and baste the quilt top, batting, and backing. Quilt as desired. To add an extra touch of color to the cream strips, this quilt was hand quilted with red thread.
TIP:If you finish the quilt before having the blocks signed, leave the centers of the framed squares unquilted to allow room for signatures.
2. Refer to Finishing Touches to bind the quilt.
•Layer Cake scraps totaling yard for appliqué and piecing
•¼ yard cream solid fabric for pieced pillow center
•¼ yard small-scale print fabric for inner border and binding
•¼ yard large-scale print fabric for outer border
•¼ yard double-sided fusible web, 17″ wide (I used HeatnBond Lite.)
•20″ × 20″ solid fabric for pillow top underlining
•20″ × 20″ batting
•¾ yard backing fabric
•18″ pillow form
•Temporary fabric spray adhesive
*For any 1 pillow
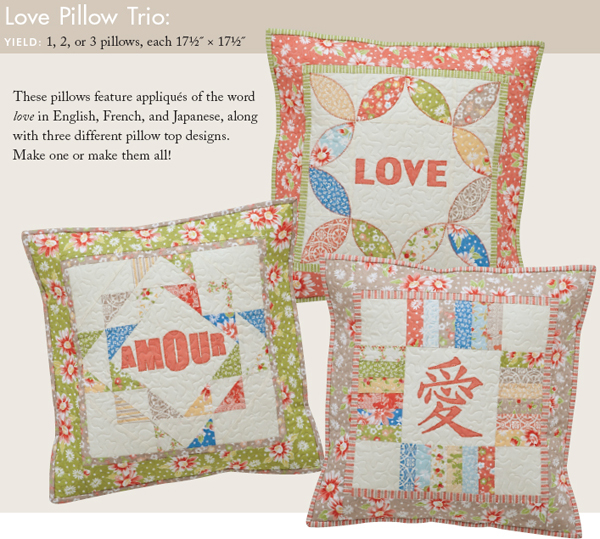
See individual instructions for each pillow version.
All seam allowances are ¼″. Patterns are on page 197. Enlarge 200%.
WOF = WIDTH OF FABRIC
1 strip 6½″ × WOF, subcut into 1 square 6½″ × 6½″ and 4 rectangles 3½″ × 6½″
4 squares 3½″ × 3½″
2 strips 1″ × WOF, subcut into 2 rectangles 1″ × 12½″ and 2 rectangles 1″ × 13½″ for inner border
2 strips 2¼″ × WOF for binding
2 strips 2½″ × WOF, subcut into 2 rectangles 2½″ × 13½″ and 2 rectangles 2½″ × 17½″
2 rectangles 17½″ × 27″
1. Sew a cream 3½″ × 6½″ rectangle to the left and right of the cream 6½″ × 6½″ square. Press seams away from the center.
2. Sew a 3½″ × 3½″ cream square to each end of the remaining cream rectangles. Press seams toward the rectangle.
3. Sew each of these units to the top and bottom of the unit from Step 1. Press seams away from the center.
Patterns are on page 197. Enlarge 200%.
1. Trace the petal pattern onto the paper side of the fusible web 12 times. Cut out each shape approximately ″ from the traced lines. Follow the manufacturer’s instructions to fuse each piece onto the wrong side of a scrap of print fabric; cut out on the lines.
2. Referring to the appliqué placement guide and the pillow photo (page 125), and using the seams as a guide, fuse the 12 petals in place. Finish with a blanket stitch.
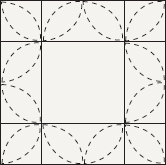
Appliqué placement guide
3. Trace the letter patterns onto the paper side of the fusible web, and cut out each letter approximately ″ away from the traced lines.
4. Fuse the letters onto the wrong side of the appliqué fabric, and cut out on the traced lines.
5.Referring to the pillow photo for placement, center the letters on the pillow top and fuse in place.
6. Stitch around the edges of each appliqué letter with a blanket stitch.
1. Sew a 1″ × 12½″ inner border strip to the left and right sides of the center block. Press toward the border. Sew a 1″ × 13½″ inner border strip to the top and bottom. Press toward border.
2. Sew a 2½″ × 13½″ outer border strip to the left and right sides of the block. Press toward border. Sew a 2½″ × 17½″ outer border strip to the top and bottom. Press toward border.
1. Sandwich the pillow top, 20″ × 20″ batting, and 20″ × 20″ pillow top underlining.
2. Baste them together and quilt as desired.
3. Fold each 17½″ × 27″ backing piece in half lengthwisse, wrong sides together; press. The new size should be 17½″ × 13½″.
4. Align the backing pieces with the back of the pillow top, with raw edges aligned and the folded edges of the backing pieces overlapping in the center.
5. Pin in place and machine baste approximately ″ from the pillow edge.
6. Bind the pillow, and press. Then insert the pillow form.
WOF = WIDTH OF FABRIC
10 squares 2 ″ × 2″, subcut in half diagonally to make 20 triangles
6 squares 2″ × 2″, subcut in half diagonally to make 12 triangles
2 squares 4″ × 4″, subcut in half diagonally to make 4 triangles
1 square 5¼″ × 5¼″, subcut in half diagonally twice to make 4 triangles
1 square 6″ × 6″ for center square
Cut the fabrics for the inner and outer borders, binding, batting, and backing the same as for Love, in English (page 126).
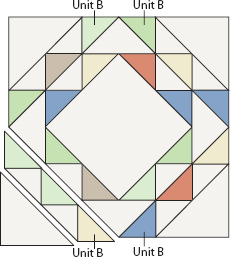
1. Sew a print triangle to the left and right of a small cream triangle, matching short sides as shown. Press toward the print, handling fabric carefully to avoid stretching bias edges. Make 8 of Unit A.
Unit A
2.To 4 of the Unit A’s from Step 1, sew an additional cream triangle and an additional print triangle at an end, as shown. You now have 4 Unit A’s and 4 Unit B’s.
Unit B
3. Sew a Unit A to each side of the 6″ × 6″ square. Press seams away from the center.
4. Position the unit made in Step 3 on point as shown. Sew a medium cream triangle to the top, bottom, left, and right. Press seams away from the center.
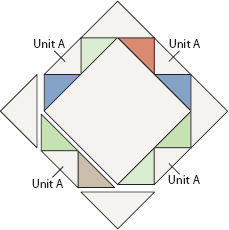
5. Sew a Unit B at opposite sides. Press seams away from the center.
6. Sew a large cream triangle at each corner. Press seams away from center.
7. Follow the instructions for Love, in English (pages 126 and 127) to appliqué the letters A, M, O, U, and R, to attach the inner and outer borders, and to finish the pillow.
4 squares 3½″ × 3½″
1 square 6½″ × 6½″
Cut the fabrics for the inner and outer borders, binding, batting, and backing as for Love, in English (page 126).
1. Sew together 6 print 1½″ × 3½″ rectangles along the long edges to form a large 3½″ × 6½″ rectangle unit. Press seams to the side.
2. Repeat Step 1 to make a total of 4 pieced rectangle units.
3. Sew a pieced rectangle unit to the left side of the 6½″ × 6½″ cream square. Repeat for the right side. Press seams away from the center.
4. Sew a 3½″ × 3½″ cream square to each end of the 2 remaining pieced rectangle units. Press seams toward the rectangle units. Sew each of these units to the top and bottom of the unit from Step 3. Press seams away from the center.
5. Follow the instructions for Love, in English (pages 126 and 127) to appliqué the Japanese symbol for love, to attach the inner and outer borders, and to finish the pillow.
