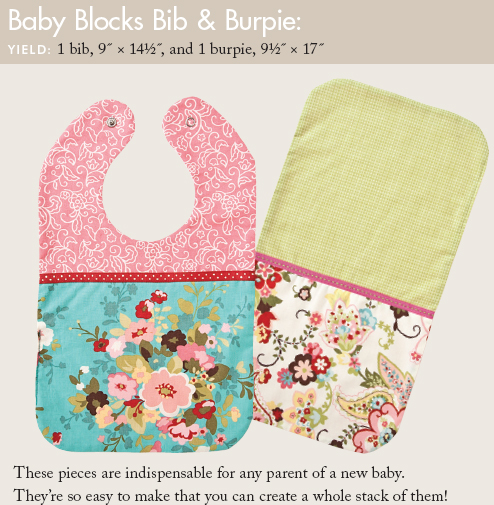
•1 Layer Cake for blocks
• yard light-colored fabric for borders
•1¼ yard 60″ –wide microfiber plush, chenille or flannel fabric for backing
• yard fabric for binding
•42″ × 49″ batting
WOF = WIDTH OF FABRIC
Cut 40 squares 4″ × 4″ from 36 Layer Cake squares.* Subcut each in half diagonally to make 80 half-square triangles for block centers.
From the group of 36 Layer Cake squares, choose 20 Layer Cake squares; from each, cut 2 strips 1¾″ × 5″ and 2 strips 1¾″ × 7½″ for block frames.
From Layer Cake scraps:
50 rectangles 1¾″ × 3¼″ for pieced middle border
2 rectangles 1¾″ × 2¼″ for pieced middle border
* Reserve 4 Layer Cake squares for the bib and burpie; do not cut into them. Cut 4 additional 4″ × 4″ squares from among the other 36 Layer Cake squares.
4 strips 1¾″ × WOF; subcut into 2 strips 1¾″ × 28½″ and 2 strips 1¾″ × 38″ for inner border
4 strips 2½″ × WOF; subcut into 2 strips 2½″ × 37½″ and 2 strips 2½″ × 40½″ for outer border
5 strips 2¼″ × WOF
1 rectangle 42″ × 49″
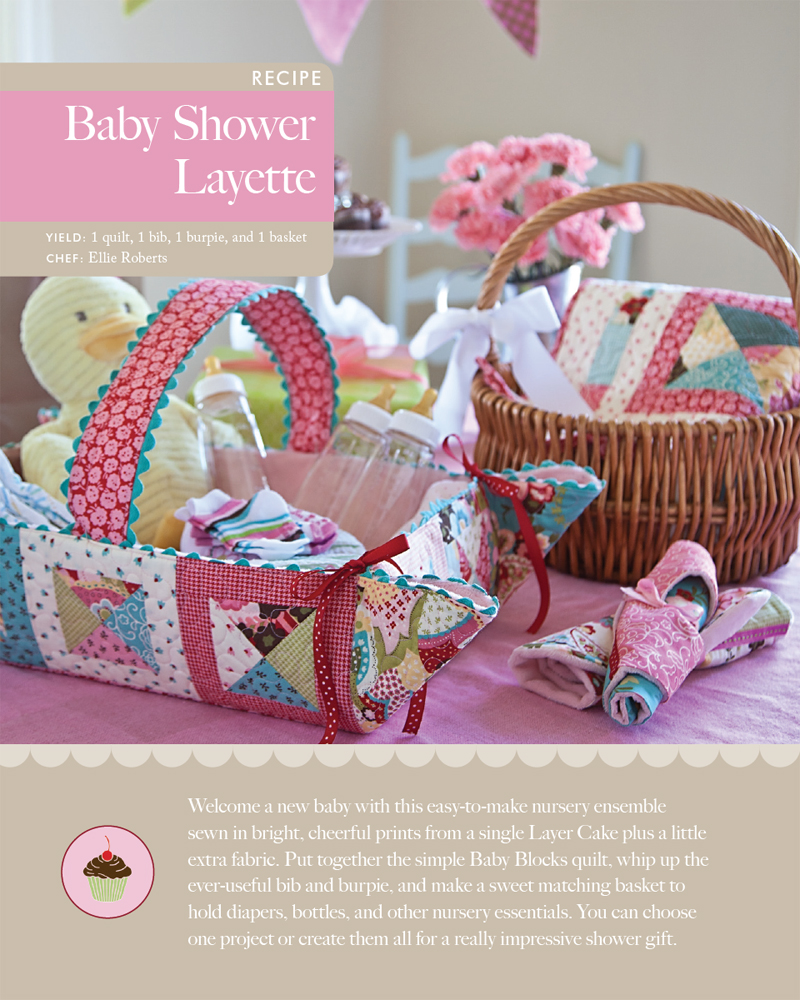
TIP:If you cut precisely with no waste, you can make this quilt plus the Baby Blocks Bib & Burpie and the Baby Blocks Basket (pages 133 and 134) all from one Layer Cake.
All seam allowances are ¼″.
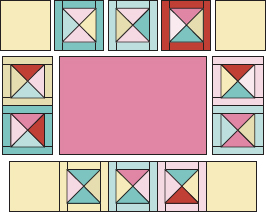
1. Sort the Layer Cake triangles into sets of 4 with complementary colors. With a scant ¼″ seam allowance, sew 2 triangles together along the short sides; repeat with the other pair. Press.
2. With a scant ¼″ seam allowance, sew the 2 sets of paired triangles together to make a square, aligning the center seams. Press.
3. Repeat Steps 1 and 2 to make 20 units total.

4. Sew 2 matching 1¾″ × 5″ strips to the sides of the units from Step 3. Press. Sew matching 1¾″ × 7½″ strips to the top and bottom of each unit. Press.
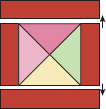
Block assembly diagram
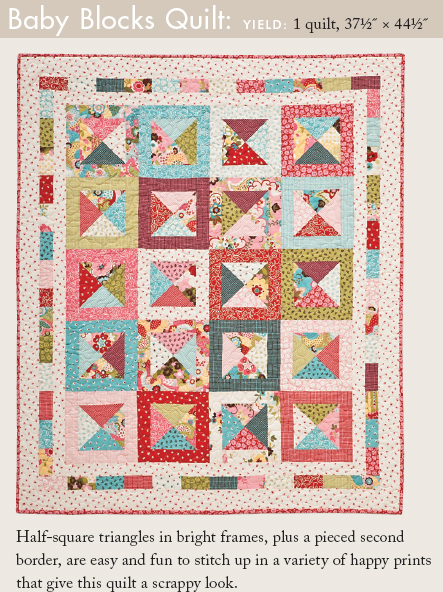
5. On a design wall or flat surface, lay out the blocks in a pleasing way. Sew the blocks together in 5 rows of 4 blocks each. Press.
6. Sew the rows together. Press.
7. This quilt features 3 borders. Refer to the quilt assembly diagram to sew the 1¾″ × 28½″ inner border strips to the top and bottom of the quilt top. Press. Sew the 1¾″ × 38″ inner border strips to the sides of the quilt top. Press.
8. To make the pieced middle border, sew 12 of the 1¾″ × 3¼″ border rectangles together along the short ends. Repeat to make the other pieced border for the top and bottom border. Sew 2 sets of 13 border rectangles, plus a 1¾″ × 2¼″ coping rectangle, together for the side borders. Press. Sew the side borders to the quilt top first, and then sew the remaining pieced borders to the top and bottom. Press after each addition.
9. Sew the 2½″ × 40½″ outer border strips to the sides of the quilt top. Press. Sew the 2½″ × 37½″ outer border strips to the top and bottom of the quilt top. Press.
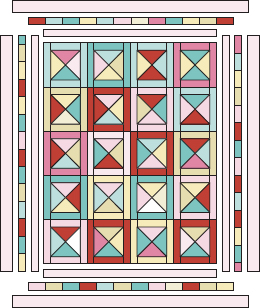
Quilt assembly diagram
Refer to Finishing Touches (page 189) or use your favorite method to layer, baste, quilt, and bind the quilt.
•2 Layer Cake squares for bib*
•2 Layer Cake squares for burpie
• yard microfiber plush, chenille, or cotton flannel fabric for backing (I used Moda Snuggles.)
•20″ ribbon ( ″ to ½″ wide)
•1 snap or 1½″ of self-fastening hook and loop tape
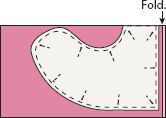
All seam allowances are ¼″. Patterns are available to print from http://tinyurl.com/10905-patterns. Enlarge 200%.
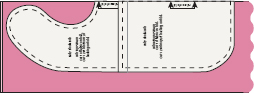
1. Trace the Bib Top and Bib Bottom patterns onto paper and cut out.
2. Fold each of the Layer Cake squares in half, right sides together, and place patterns for both Bib Top and Bib Bottom on the fold line. Pin in place and cut out.
3. Pin the bib top to the bib bottom, right sides together, and sew along the straight edge. Press the seam open.
4. Pin a 10″ ribbon over the seam on the right side of the bib front. Topstitch in place along each side of the ribbon.
5. Tape together the Bib Top and Bib Bottom patterns, aligning the dashed stitching lines and overlapping the seam allowance.
6. Cut a 10″ × 16″ rectangle from the backing fabric and fold it in half lengthwise, right sides together. Place the Bib Top/Bottom pattern on the fold, pin, and cut out.
7. Pin the front of the bib to the backing, right sides together. Sew all the way around, leaving a 3″ opening on the bottom.
8. Turn the bib right side out, press, and topstitch the opening closed. NOTE: Do not use a hot iron directly on the backing fabric if you are using a synthetic fabric such as Snuggles.
9. Attach a snap using a snap kit, or stitch a 1½″ piece of hook and loop tape to each side of the neck.
1. Cut a 10″ × 10″ Layer Cake square down to 7½″ × 10″ to make the burpie top.
2. Pin the 7½″ × 10″ burpie top and the 10″ × 10″ burpie bottom pieces, right sides together, along the long edges, and sew. Press the seam open.
3. Pin a 10″ -long piece of ribbon over the seam on the right side of the burpie. Topstitch the ribbon in place along both edges.
4. Cut a 10″ × 17½″ rectangle from the backing fabric.
5. Using the rounded corner of the Bib Bottom pattern as a guide, round the 4 corners of the burpie front and back.
6. Pin the burpie front to the back, right sides together. Stitch all the way around, leaving a 3″ opening for turning.
7.Turn the burpie right side out, press, and topstitch the opening closed. Do not use a hot iron directly on the backing fabric if it is synthetic!

•1 Layer Cake for basket exterior*
• yard coordinating fabric for basket bottom and handle
•¾ yard microfiber plush, chenille, or flannel for basket interior
• yard 45″ -wide batting
• yard of 44″ -wide heavyweight fusible interfacing (I used Decor-Bond by Pellon.)
• yard of ½″ sew-through boning for handle (such as Rigilene, available in the notions department of fabric stores)
•4 yards of rickrack, lace, or other trim
•2 yards of ribbon (″ to ½″ wide)
•3 sheets of plastic canvas 12″ × 18″
•Quilt basting spray
*See Tip on using leftovers from the Baby Blocks Quilt (page 131).
20 squares 3″ × 3″; subcut each in half diagonally once for block centers.
Choose 10 different Layer Cake squares; from each, cut 2 rectangles 1½″ × 5½″ and 2 rectangles 1½″ × 3½″ for block frames.
4 squares 5½″ × 5½″ for basket corners
1 rectangle 10½″ × 15½″ for basket bottom
2 rectangles 2½″ × 22″ for handle
1 rectangle 20½″ × 25½″
1 rectangle 25″ ″ – 30″ for basket
1 strip 1¾″ × 22″ for handle
2 rectangles 2½″ × 22″ for handle
2 pieces 23″ long for handle; save the rest for basket edge
8 pieces 12″ long
2 rectangles 4½″ × 14½″
2 rectangles 4½″ × 9½″
1 rectangle 9½″ × 14½″
All seam allowances are ¼″ unless otherwise specified.
1. Refer to Steps 1–3 for the Baby Blocks Quilt (page 132) to make 10 blocks.
2. Sew 2 rows of 3 blocks each for the basket sides. Press. Sew a 5½″ × 5½″ square to each end of these 2 rows for the corners. Press.
3. Sew 2 sets of 2 blocks each for the basket ends. Sew these to the short sides of the 10½″ × 15½″ basket bottom rectangle. Press.
4. Sew the rows of 3 blocks from Step 2 to the long sides of the basket bottom. Press.
5.Use basting spray to attach the batting to the basket exterior. (There is no backing at this point because the basket interior is added later.) Quilt as desired.
6. Round the corners using the Bib Bottom pattern (Patterns are available to print from http://tinyurl.com/10905-patterns) as a guide.
7. Round the corners of the basket interior fabric to match the basket exterior.
1. Fuse the interfacing to the 2 handle pieces, following manufacturer’s directions.
2. Baste 23″ -long rickrack pieces to both long edges of a handle piece.
3. Pin the 2 handle pieces right sides together, and sew together on the 2 long edges. Turn right side out and press.
4. Using a safety pin, pull the 1¾″ × 22″ strip of batting through the handle. You may need to adjust the batting to smooth it out.
5. Topstitch each long edge of the handle ″ from edges. Stitch 2 more rows ½″ inside the first stitching lines.
6. Slip the boning through the center of the underside of the handle. Leave ¼″ sticking out on each end.
1. Baste the rickrack around the edges of the pieced basket exterior.
2. Baste the end of a 12″ -long ribbon to the outer edge of each basket corner square, where it meets a pieced block.
3. Pin the handle ends to the middle of the center blocks on the basket’s long sides.
4. Pin the basket interior and exterior, right sides together. Sew all around, leaving a 5″ opening on a short side. Turn the basket right side out.
5. Insert a 4½″ × 9½″ piece of plastic canvas into the opening, under the 2 pieced blocks on the short side of the basket at the opposite end.
6. With the basket flat, sew from one end of the short side to the other, following the block seamlines, to encase the plastic.
7. Insert a 4½″ × 14½″ plastic canvas piece under the 3 pieced blocks on a long side of the basket. Sew next to the inside edge of the plastic, encasing it. Repeat on the other side.
8. Insert the 9½″ × 14½″ plastic into the center of the basket. Stitch along the other short end of the basket, encasing the plastic.
9. Add the last 4½″ × 9½″ plastic to the last short side.
10. Topstitch around the perimeter of the basket ″ from the edge, closing up the opening.
11. Fold the basket sides up, pull up the pairs of ribbons at each corner, and tie into bows to give the basket depth.