Chapter 16
Job Estimating, Billing, and Tracking
IN THIS CHAPTER
 Turning on job costing and setting up jobs
Creating estimates and estimate-based invoices
Charging for time and out-of-pocket expenses
Comparing budgeted, estimated, and actual job information
QuickBooks Pro, QuickBooks Premier, and QuickBooks Enterprise Solutions have a feature that’s very interesting for businesspeople — such as contractors, consultants, engineers, and architects — who do jobs or projects for their customers. These flavors of QuickBooks have the capability to do simple project or job costing. This capability means that your business can create project or job estimates; track revenue, costs, and profits by project or job; and bill invoices by project or job.
In this short chapter, I describe the QuickBooks job costing feature.
Turning On Job Costing
To turn on the job costing or estimating feature in QuickBooks, choose Edit ⇒ Preferences. Click the Jobs & Estimates icon on the left; click the Company Preferences tab (as shown in Figure 16-1); and then use the Do You Create Estimates? and Do You Do Progress Invoicing? radio buttons to tell QuickBooks whether, in fact, you want to do these things. You get this, right? You select Yes if you do and No if you don’t.
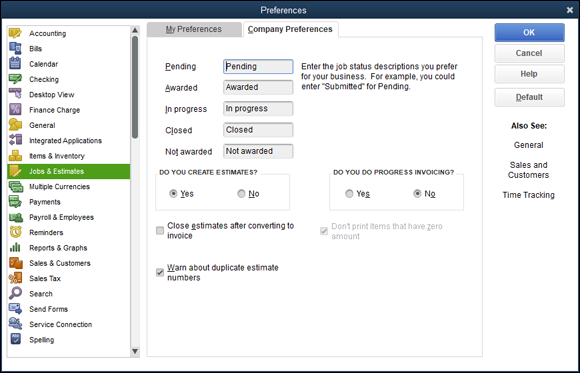
FIGURE 16-1: The Company Preferences tab showing job and estimate options.
Note: Progress invoicing (or progress billing) refers to the practice of billing or invoicing a client or customer as work on a project progresses. In other words, rather than invoice at the end of a project, you might bill half the agreed-upon amount when work is roughly half done. Then you might bill the remaining half of the agreed-upon amount when the work is finished.
While you’re looking at the Company Preferences tab (Figure 16-1), let me also mention that as the figure shows, QuickBooks lets you categorize jobs as falling into five status categories: Pending, Awarded, In Progress, Closed, and Not Awarded. As you might guess, you use these job-status descriptions to categorize your jobs.
Setting Up a Job
If you want to use QuickBooks job costing, your first step is setting up a job. Suppose that you’re a contractor. You can use QuickBooks to track the invoices and costs of the remodeling jobs you do. You just need to set up a job every time you get ready to bid on a project.
To set up a job, first set up a customer in the usual way; then set up a job, also in the usual way. In Chapter 3, I describe how you do all this, so I don’t repeat that information here. To save you time, however, I’ll just say that all you need to do is choose Customers ⇒ Customer Center to display the Customer Center window, right-click the customer for whom you might do a job, and then choose Add Job from the Customer:Job contextual menu. When QuickBooks displays the New Job window, describe the job by filling out the fields in the window that QuickBooks displays.
Creating a Job Estimate
In QuickBooks, job costing starts with an estimate. An estimate is a list of the estimated costs you’ll incur for some job you’ll perform for some customer.
It’s a bit of a stretch for the example Pine Lake Porcelain business used in the pages of this book, but what if a new customer asked you to set up a little gift shop with merchandising displays of a bunch of coffee and tea mugs? In a sense, you wouldn’t just be selling inventory, but also doing a job or project: setting up a gift shop.
Assuming that you’ve already created a job and told QuickBooks that you use estimates, here are the steps that you follow to create an estimate:
-
Choose Customers ⇒ Create Estimates.
QuickBooks opens a Create Estimates window (see Figure 16-2), which bears an uncanny resemblance to the Create Invoices window that you’ve seen if you’ve worked with QuickBooks at all. (See Chapter 4 for more information about the Create Invoices window.)
-
Start filling in the blanks.
Choose the appropriate Customer:Job from the drop-down menu at the top of the form. QuickBooks automatically fills in as much information as it can — usually, at least the Name/Address text box. In Figure 16-2 (and this is hard to see, I grant you), the job is Castlerock Coffee House, which includes estimates for various units of the blue, red, yellow, and even the rainbow printed mugs from our Pine Lake Porcelain company.
If you configured QuickBooks to track classes (described in Chapter 3), the appropriate drop-down menu shows up at the top center of the form. Go ahead and use that menu, if appropriate.
 Feel free to change the default settings, such as Date and Estimate #, by using the date-setting tricks you can find in Chapter 4 and on the online Cheat Sheet. (See this book’s introduction for details on how to access the online Cheat Sheet.)
 -
Add the line items — details, details, details.
You fill in the details of a Create Estimates window the same way that you fill in the details of a Create Invoices window. Read Chapter 4 if you have questions.
One field that’s unique to the Create Estimates window is Markup. The Markup field, which appears in some versions of the Create Estimates window (in Figure 16-2, between the subtotal and the state sales tax of 10 percent), adds a specified percentage of the line item price total. Although I opted to not mark up this order, you do have the option to mark up the estimates by a set amount (enter 100 or $100 to add that amount to the estimate) or by a percentage (100 would double the entire cost). The Markup field doesn’t appear in all versions of the Estimates template — only the Custom Estimate and Proposal templates.
In Chapter 3, I describe how to add items to the QuickBooks Items list. Each line item that you want to include in your job estimate needs to be described in the Items list. Note that because you often sell work to clients and customers by using, in part, an estimate, you typically want to include full descriptions of the items. (My construction-contractor clients, for example, often use several lines of descriptive text to fully explain each item that shows up in the estimate.) -
(Optional) Add any optional information.
Use any of the other boxes available in the Create Estimates window to collect and store additional information. Just as you can in the Create Invoices window, you can click the Customer Message drop-down menu and choose or write a friendly message.
You can also use the Memo field to write a note to yourself regarding the job, or maybe add some notes about the screenplay that you’ve been thinking about pitching to the studios — whatever suits your fancy.
If you want to include other items in the Create Estimates window, you can customize that window. Click the Formatting tab to show the Formatting ribbon and then click the Customize Data Layout button. QuickBooks displays a dialog box (not shown) that you can use to control which bits of information appear on the estimate.

FIGURE 16-2: The Create Estimates window.
In Chapter 4, I talk a bit about how to customize invoice forms. You may want to look there if you have questions about how to customize the Create Invoices form.
 Before you print that estimate, remember that information in the Create Estimates window isn’t the same information that appears in the written estimate. To see how the printed version looks, click the down arrow below the Print button in the Create Estimates window, and choose Preview from the drop-down menu. The result is a full-page image, shrunk to fit onscreen.
If you haven’t saved your estimate yet, click either the Save & New button or the Save & Close button.
To examine the estimate (or any onscreen QuickBooks form) more closely, click the Zoom In button at the top of the Print Preview screen or move the mouse cursor over the image. When the cursor looks like a magnifying glass with a plus sign (+) in it, click the left mouse button. Because you can see only part of the preview this way, use the scroll bars at the bottom and right of the windows to move around to the different areas.
Note that the magnifying glass now has a minus sign (–) in it and that the Zoom In button toggles to Zoom Out. If you complete more than one estimate, you can use the Prev Page and Next Page buttons in the Print Preview screen to look at other estimates. When you finish, click the Close button.
When you get back to the Create Estimates window, click the Print button; QuickBooks Pro displays the Print One Estimate dialog box. Click Print to print the estimate without any further ado.
If you haven’t used QuickBooks to print estimates before, you may need to set up your printer for this task first. To do so, choose File ⇒ Printer Setup and then choose Estimate from the Form Name drop-down menu. Specify the printer settings that you want for printing estimates. (This process works the same way as it does for printing other forms, such as invoices, as I describe in Chapter 4.) Click OK when you’re done. The Print One Estimate dialog box that QuickBooks displays after you click Print in the Create Estimates window works the same way as the Print One Invoice dialog box. Read Chapter 4 if you need help with this dialog box.
Revising an Estimate
To revise an estimate, display the Create Estimates window, as described earlier in this chapter. Then click the Previous button until you see the estimate.
Make your changes, and QuickBooks recalculates all the totals. Smile. Imagine doing this task by hand — the recalculating, the looking-up of prices, the retyping, the wasting of an inordinate amount of time. Making these changes automatically with QuickBooks doesn’t quite beat eating a hot dog with sauerkraut in the park on a sunny day, but it’s pretty close.
When you revise an estimate, QuickBooks asks whether you want to treat the revision as a change order that appears on the estimate. If you indicate “Yes, that sounds like a solid idea,” QuickBooks adds detail to the estimate to clearly flag and describe whatever bits of the estimate you changed: items, quantities, prices, and so forth.
You can keep only one estimate per job. After you click Save & New, any changes that you make automatically take the place of the old estimate. If you make changes in an estimate, though, you can tell QuickBooks to treat the revision as a change order. With a change order, the modifications to an existing estimate get added to the bottom of the estimate. Cool, right?
Turning an Estimate into an Invoice
You can easily turn the estimate into an invoice by following these steps:
-
On the Customer Center screen, select your customer.
QuickBooks shows you a list of transactions for the customer, including any active estimates.
-
Double-click the estimate you want to work with.
The Create Estimates window opens. (Refer to Figure 16-2.)
-
Click the Create Invoice button at the top of the window.
If you indicated that you might progress-bill a customer or client, QuickBooks displays a dialog box that asks whether you want to invoice the entire estimate or some portion of the estimate. Answer the question by selecting the appropriate option button; then click OK. QuickBooks creates an invoice based on your estimate (see Figure 16-3). If you need to make any changes, edit the invoice directly and then click OK to continue.
If you don’t see the Create Invoice button at the top of your Create Estimates window, maximize the window so that it fills the QuickBooks program window. Increasing the window size should solve the problem. By the way, there should be other options of items you can create, such as a Sales Order or Purchase Order, if necessary. -
(Optional) Make any necessary changes in the resulting invoice.
The invoice that you see is a regular QuickBooks invoice, and you can edit it the same way that you edit any invoice. Until you click Save & New, the invoice isn’t recorded in your records.
-
After you make all your changes, click Save & New or Save & Close to record the invoice.
If you want to print the invoice instead, you can click the Print button.
FIGURE 16-3: The Create Invoices window with the data from Figure 16-2.
Comparing Estimated Item Amounts with Actual Item Amounts
In the previous paragraphs, I describe how you can take an estimate and create an invoice by using that estimate as a starting point. I also say that you can edit the numbers that come off the estimate. Now, here’s an interesting job-costing point: QuickBooks prints reports, like the one in Figure 16-4, that let you compare the item estimates shown in the original estimates with the actual billed items shown in invoices.
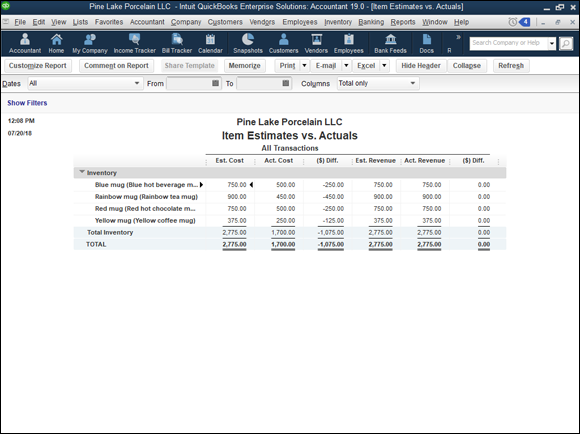
FIGURE 16-4: An Item Estimates vs. Actuals report.
To produce such a report, choose Report Center ⇒ Jobs, Time & Mileage ⇒ Item Estimates vs. Actuals. QuickBooks displays a report that lets you compare estimated amounts with invoiced amounts. If you bid jobs by using estimates but must invoice with actual numbers, creating such a report is a great way to see how good a job you’re doing in your estimating.
Charging for Actual Time and Costs
If you charge a customer for actual costs and hours, you need to track the costs and time when you incur the charges for them. You assign the cost to the job by entering the customer and job information in the Customer:Job column of the window you use to record a particular cost or time charge. If you use the Enter Bills window (see Chapter 6) to record a bill for a particular job, you use the Customer:Job column to designate the job.
To charge a customer for costs or time that you recorded, follow these steps:
- Choose Customers ⇒ Create Invoices to open the Create Invoices window.
-
Change the name in the Customer:Job drop-down menu to the proper customer.
This step is easy: Activate the drop-down menu, and choose the appropriate customer and job. If you assigned time or costs to this customer, a screen pops up, asking you to click the Time/Costs button to include the charges in your invoice.
-
Click the Add Time/Costs button.
QuickBooks displays the Choose Billable Time and Costs dialog box (not shown). The dialog box already shows the costs and time charges that you assigned to this customer and job combination.
-
Select the billable time and costs that you want to add to the invoice.
Check the time charges and costs that you want to bill for. Note that the Choose Billable Time and Costs dialog box provides Items, Expenses, and Mileage tabs.
-
(Optional; expenses only) Indicate the markup.
The Expenses tab has a couple of extra fields at the top that indicate the Markup Amount or % and the Markup Account. If applicable, fill in the fields with the appropriate information.
-
(Optional) Indicate whether you want the charges to appear as a single item on the invoice.
If you want to avoid listing the gory details of the charges to your customer, select the Print Selected Time and Costs As One Invoice Item check box located in the bottom-left corner of the invoice. Also, you can select the Taxable box to indicate whether selected expenses are taxable.
-
Click OK.
After you have everything the way you want it, click OK. As if by magic — even if it was by your hard work and the sweat of your own brow — the invoice appears.
-
(Optional) Add anything else you want to include on the invoice.
This invoice is a regular QuickBooks invoice, remember? You may want to click the down arrow beside the Print button and choose Preview from the drop-down menu to make sure that only the job costs that you want to appear do appear.
-
Click Save & New or Save & Close.
That’s how you record the invoice.
After you record the invoice, the job costs that have been billed are removed from the Choose Billable Time and Costs window. You’re finished. Breathe easier.
You can also track the amount of time that you or other employees spend on clients or customers. To turn on time tracking, choose Edit ⇒ Preferences, scroll down to and click the Time & Expenses icon; then select the Do You Track Time? option button on the Company Preferences tab. After you do this, you can track the time that you spend on a client or customer by choosing Customers ⇒ Enter Time ⇒ Use Weekly Timesheet or Customers ⇒ Enter Time ⇒ Time/Enter Single Activity. Either command displays an easy-to-understand window that lets you record time spent on a particular client or customer.
Here’s an important final point: The time-tracker clock keeps ticking as long as the QuickBooks program runs. The program doesn’t need to be the active Windows program to continue working. I mention this because in some older versions of QuickBooks, the timer stops if you start working with another program, such as your word processor or email program.
Tracking Job Costs
To see the costs assigned or allocated to a project, use the Job, Time & Mileage Reports, which are available when you choose Reports ⇒ Jobs, Time & Mileage. You can experiment with the different reports to see which one provides the information in a format and at a level of detail that works best for you. If you’re invoicing customers by job and collecting cost data by customer and job, you can produce great job-profitability reports that show what you’ve made by job. Also note that you can budget amounts by customer and job, using the budgeting technique described in Chapter 12. If you do the extra work of budgeting by customer job, you can also compare actual job revenue and costs with budgeted job revenue and costs.