Chapter 3
Populating QuickBooks Lists
IN THIS CHAPTER
 Adding items to the Item list
Adding employees to the Employee list
Adding new customers and jobs
Adding new vendors
Understanding and using the other lists
Organizing, printing, and exporting lists
Dealing with the Chart of Accounts list
QuickBooks Setup (which I discuss at some length in Chapter 2) doesn’t actually get QuickBooks completely ready to use. You also need to enter additional information about your products, employees, customers, and vendors (and a handful of other items) into lists. In this chapter, I describe how you create and work with these lists. I also describe how you clean up some of the accounting messiness created when you enter information into these lists.
The Magic and Mystery of Items
The first QuickBooks list you need to finish setting up is the Item list — the list of stuff you buy and sell. Before you start adding to your Item list, however, I need to tell you that QuickBooks isn’t very smart about its view of what you buy and sell. It thinks that anything you stick on a sales invoice or a purchase order is something you’re selling.
If you sell colorful coffee mugs, for example, you probably figure (and correctly so) that you need to add descriptions of each of these items to the Item list. If you add freight charges to an invoice, however, QuickBooks thinks that you’re adding another mug. And if you add sales tax to an invoice, well, guess what? QuickBooks again thinks that you’re adding another mug.
This wacky definition of items is confusing at first. But just remember one thing, and you’ll be okay: You aren’t the one who’s stupid; QuickBooks is. No, I’m not saying that QuickBooks is a bad program. It’s a wonderful accounting program and a great tool. What I’m saying is that QuickBooks is only a dumb computer program — not an artificial-intelligence program. It doesn’t pick up on the little subtleties of business, such as the fact that even though you charge customers for freight, you aren’t really in the shipping business.
Each entry in the invoice or purchase order — the mugs that you sell, the subtotal, the discount, the freight charges, and the sales tax — is an item. Yes, I know this setup is weird, but getting used to the wackiness now makes the discussions that follow much easier to understand.
If you want to see a sample invoice, take a peek at Figure 3-1.

FIGURE 3-1: A sample QuickBooks invoice.
Do you see those first three items: rainbow mugs, yellow mugs, and blue mugs? You can see the sense of calling them items, right? These mugs are things that you sell.
But then suppose that you give frequent buyers of your merchandise a 10 percent discount. To include this discount in your accounting, you need to add a Subtotal item to tally the sale and then a Discount item to calculate the discount. Figure 3-1 also shows them. See them? Kind of weird, eh?
Then look at the Shipping item, which charges the customer $50 for freight. Yep, that’s right — another item. In sum, everything that appears on an invoice or a purchase order is an item that you need to describe in your Item list.
Just above the invoice total, if you look closely, you can see another item for including sales tax on your invoices — and that’s really an item, too.
 I describe creating invoices in Chapter 4 and creating purchase orders in Chapter 7.
Adding items you might include on invoices
You may have added some items as part of QuickBooks Setup, but you’ll want to know how to add any other needed items and how to add new items. To add invoice or purchase order items to the Item list, follow these steps:
-
Choose Lists ⇒ Item List.
If QuickBooks asks whether you want to set up multiple items, indicate “No way, man.” QuickBooks then displays the Item List window, as shown in Figure 3-2.
If QuickBooks asks whether you want to add multiple items at one time, you can also reply, “Why, yes, thank you very much.” Then QuickBooks displays a worksheet like the one used during the QuickBooks Setup process (I describe it in Chapter 2), which you can use to set up multiple items in one fell swoop. You can choose to set up multiple items in one fell swoop, by the way, by clicking the Item button at the bottom of the list window and then choosing Add/Edit Multiple Items from the drop-down menu. -
Click the Item button at the bottom of the Item List window and then choose New from the drop-down menu.
QuickBooks displays the New Item window, as shown in Figure 3-3.
-
Categorize the item.
Choose an item type from the Type drop-down menu. The Item list that you see depends on the type of business you told QuickBooks you were in when you set up the program, so use the following as a sample; the amount and type of items that you need depend on the business you’re in. Choose one of the following item types by clicking its name on the menu:
- Service: Choose this type if you charge for a service, such as an hour of labor or a repair job.
- Inventory Part: Choose this type if what you sell is something that you buy from someone else, and you want to track your holdings of the item. If you sell thingamajigs that you purchase from manufacturer Thingamajigs Amalgamated, for example, you specify the item type as Inventory Part. (For more information on using QuickBooks to track inventory, see Chapter 7.)
- Inventory Assembly: Choose this type if what you sell is something that you make from other Inventory items. In other words, if you buy raw materials or other components and then assemble these things to create your finished product, the finished product is an Inventory Assembly item.
- Non-Inventory Part: Choose this type if what you sell is something that you don’t want to track as inventory. (You usually don’t use this item type for products that you sell, by the way. Instead, you use it for items that you buy for the business and need to include in purchase orders.)
- Other Charge: Choose this item type for things such as freight and handling charges that you include in invoices.
- Subtotal: This item type adds everything before you subtract any discount, add the sales tax, and so on.
- Group: Use this item type to enter a bunch of items (which are already on the list) at one time. This item is a nice time-saver. If you commonly sell sets of items, for example, you don’t have to specify those items individually every time you write an invoice.
- Discount: This item type calculates an amount to be subtracted from a subtotal.
- Payment: This option is wacky. If your invoice sometimes includes an entry that reduces the invoice total — customer deposits at the time of sale, for example — choose this item type. If this item type confuses you, however, just ignore it.
- Sales Tax Item: Choose this item type for the sales tax that you include in the invoice.
- Sales Tax Group: This item type is similar to the Group item type, but you use it only for sales taxes that are collected in one transaction and owed to multiple agencies.
-
Type an item number or name.
Press the Tab key or use your mouse to click the Item Name/Number text box below the Type drop-down menu; then type a short description of the item.
-
(Optional) Make the item a subitem.
If you want to work with subitems — items that appear within other items — select the Subitem Of check box and use the corresponding drop-down menu to specify the parent item to which a subitem belongs.
If you set up a parent item for coffee mugs and subitems for blue, yellow, and rainbow mugs, for example, you can produce reports that show parent items (such as mugs) and subitems (such as the different-colored mugs). Subitems are just an extra complexity, so if you’re new to this QuickBooks stuff, I suggest that you keep things simple by avoiding them. -
Describe the item in more detail.
Move the cursor to the Description text box, and type a description. This description then appears in the invoice. Note that if you specified the item type as Inventory Part in Step 3, you see two description text boxes: Description on Purchase Transactions and Description on Sales Transactions. The purchase description appears in purchase orders, and the sales description appears in sales invoices.
- If the item type is Service, Non-Inventory Part, or Other Charge, tell QuickBooks how much to charge for the item, whether the item is subject to sales tax, and which income account to use for tracking the income that you receive from selling the item.
- For a Service type, use the Rate text box to specify the price you charge for one unit of the service. If you charge by the hour, for example, the rate is the charge for an hour of service. If you charge for a job, such as a repair job or the completion of a specific task, the rate is the charge for the job or task.
- For a Non-Inventory Part type, use the Price text box to specify the amount you charge for the item.
- For an Other Charge type, use the Amount or % text box, which replaces the Rate text box, to specify the amount you charge for the item. You can type an amount, such as 20 for $20, or you can type a percentage. If you type a percentage, QuickBooks calculates the Other Charge Amount as the percentage multiplied by the preceding item shown on the invoice. (You usually put in an Other Charge after using a Subtotal item — something I talk about in the “Creating other wacky items for invoices” section later in this chapter.)
-
 For all three types, use the Tax Code drop-down menu to indicate whether the item is taxed. (Note that the Tax Code field appears only if you told QuickBooks in QuickBooks Setup that you charge customers sales tax.)
 - For all three types, use the Account drop-down menu to specify which income account you want to use to track the income that you receive from the sale of this item.
-
If the item type is Inventory Part, tell QuickBooks how much to charge for the inventory part, how much the inventory part costs, and which income account to use for tracking the product sales income.
For an Inventory Part item type, QuickBooks displays the New Item window shown in Figure 3-4. You use the extra fields that this special version of the window displays to record the following information:
- Description on Purchase Transactions: Describe the part. This description appears in the documents (such as purchase orders) that you use when you buy items for your inventory.
- Cost: Specify the average cost per unit of the items that you currently have. This field acts as the default rate when you enter the item in a purchase transaction.
- COGS Account: Specify the account that you want QuickBooks to use for tracking this item’s cost when you sell it. (QuickBooks suggests the COGS [cost of goods sold] account. If you’ve created other accounts for your COGS, select the appropriate account.)
- Preferred Vendor: Specify your first choice when ordering the item for your business. (If the vendor isn’t in your Vendor list, QuickBooks asks you to add it. If you say, “Yeah, I do want to add it,” QuickBooks displays the Add Vendor window, which you can use to describe the vendor.)
- Description on Sales Transactions: Type a description of the item that you want to appear in documents (invoices and so on) that your customers see. QuickBooks suggests the same description that you used in the Description on Purchase Transactions text box as a default.
- Sales Price: Enter the amount that you charge for the item.
- Tax Code: Indicate whether the item is taxed.
- Income Account: Specify the account that you want QuickBooks to use for tracking the income from the sale of the part — probably the Merchandise Income or Sales account. You typically use the Merchandise Income account to track wholesale (nontaxable) sales and the Sales account to track retail (taxable) sales.
- Asset Account: Specify the other current asset account that you want QuickBooks to use for tracking this Inventory item’s value.
- Reorder Point (Min): Specify the lowest inventory quantity of this item that can remain before you order more. When the inventory level drops to this quantity, QuickBooks adds a reminder to the Reminders list, notifying you that you need to reorder the item. (To see the Reminders list, choose Edit ⇒ Preferences, select Reminders, and then select the Show Reminders List When Opening Company File check box on the My Preferences tab.)
- Max: Specify the maximum inventory you’d like to have on hand after a shipment of new product comes in.
- On Hand: If you’re setting up an item for the first time as part of setting up QuickBooks, set this field to the physical count for the item at the conversion date. Otherwise, leave this field set to zero.
- Total Value: Leave this field set to zero too.
- As Of: Enter the current date.
-
If the item type is Inventory Assembly, tell QuickBooks which COGS and income account to use for tracking the item, how much to charge for the inventory assembly, and how to build the item from other component Inventory items.
Note: The Inventory Assembly item is available in QuickBooks Premier and Enterprise but not in Simple Start or QuickBooks Pro.
For an Inventory Assembly item type, QuickBooks displays a different New Item window. You use the extra fields that this special version of the window displays to record the following information:
- COGS Account: Specify the account that you want QuickBooks to use for tracking this item’s cost when you sell it. (QuickBooks suggests the COGS account. If you’ve created other accounts for your COGS, select the appropriate account.)
- Description: Type a description of the item that you want to appear in documents that your customers see, such as invoices.
- Sales Price: Enter the amount that you charge for the item.
- Tax Code: Indicate whether the item is taxed.
- Income Account: Specify the account that you want QuickBooks to use for tracking the income from the sale of the part — probably the Merchandise Sales or Sales Income account. You typically use the Merchandise Sales account to track sales of tangible items (merchandise, in other words) and the Sales Income account to track anything else.
- Bill of Materials: Use the Bill of Materials list to identify the component items and the quantities needed to make the inventory assembly.
- Asset Account: Specify the other current asset account that you want QuickBooks to use for tracking this Inventory item’s value.
- Build Point: Specify the lowest inventory quantity of this item that can remain before you manufacture more. When the inventory level drops to this quantity, QuickBooks adds a reminder to the Reminders list, notifying you that you need to make more of the item.
- On Hand: If you’re setting up an item for the first time as part of setting up QuickBooks, set this field to the physical count for the item at the conversion date. Otherwise, leave this field set to zero.
- Total Value: If you enter a value other than zero in the On Hand field, set the total value amount as the cost of the items you’re holding. Otherwise, leave this field set to zero.
- As Of: Enter the conversion date in the As Of text box if you’re describing some item as part of getting QuickBooks set up. Otherwise, enter the current date.
-
If the item type is Sales Tax Item, tell QuickBooks what sales tax rate to charge and what government agency to pay.
Note: The Sales Tax Item version of the New Item window looks a little different from the window shown in Figure 3-4. This stuff is straightforward, though. Enter the sales tax rate in the appropriate box and the state (or the city or other tax agency name) in the appropriate box:
- Sales Tax Name and Description: Specify further details for later identification.
- Tax Rate: Specify the sales tax rate as a percentage.
- Tax Agency: Name the state or local tax agency that collects all the loot that you remit. If the tax agency isn’t in the list, you can add it by choosing Add New from the drop-down menu.
-
If the item type is Payment, describe the payment method and how you want QuickBooks to handle the payment.
You use payment items to record a down payment made when the invoice is created to reduce the final balance due from the customer later. Note: Retainers and advance deposits are handled differently.
The Payment version of the New Item window looks a little different from the window shown in Figure 3-4.Use the Payment Method drop-down menu to specify the method of payment for a payment. QuickBooks provides a starting list of several of the usual payment methods. You can easily add more payment types by choosing Add New from the drop-down menu. When you choose this entry, QuickBooks displays the New Payment Method dialog box. In the dialog box’s only text box, identify the payment method: cows, beads, shells, or some other what-have-you.
When you’re finished, use the area in the bottom-left corner of the New Item window to group the payment with other undeposited funds or, if you use the drop-down menu, deposit the payment to a specific account.
-
Click OK or Next when you’re finished.
When you finish describing one item, click OK to add the item to the list and return to the Item List window. Click Next to add the item to the list, and keep the New Item window onscreen so that you can add more items.
-
If you added a new Inventory item, record the purchase of the item.
After you finish describing any new Inventory items, you need to make another transaction to categorize the purchase of the items (unless they just showed up one morning on your doorstep). For an explanation of these transactions, turn to Chapter 7.
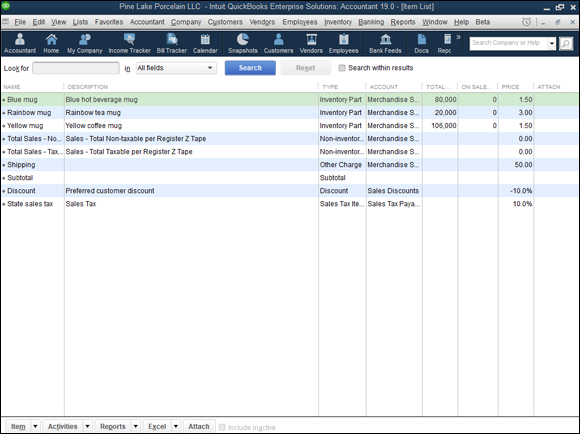
FIGURE 3-2: The QuickBooks Item List window.
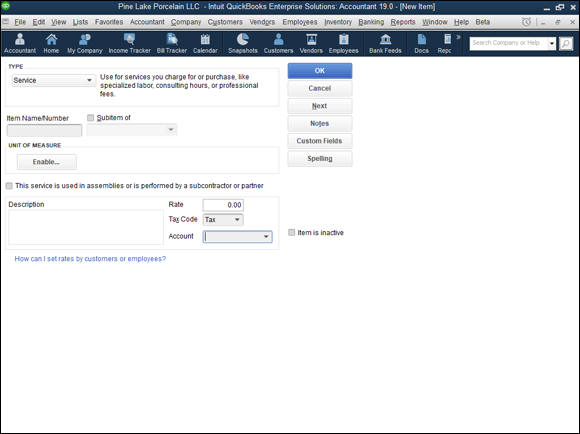
FIGURE 3-3: The QuickBooks New Item window.
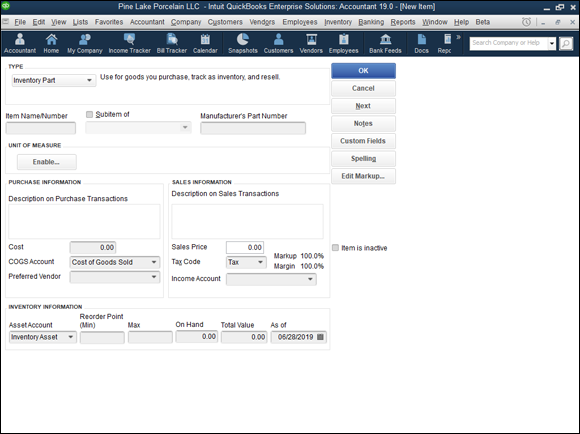
FIGURE 3-4: The QuickBooks New Item window with the Inventory Part item type selected.
Creating other wacky items for invoices
In the preceding section, I don’t describe all the items that you can add. You can create a Subtotal item to calculate the subtotal of the items you list in an invoice, for example. (You usually need this subtotal when you want to calculate sales tax on the invoice’s items.) You may want to create other wacky items for your invoices, such as discounts. I describe these special types of items in the next few sections.
Creating Subtotal items to stick subtotals on invoices
You need to add a Subtotal item if you ever want to apply a discount to a series of items on an invoice. (I show a Subtotal item in the invoice shown in Figure 3-1 earlier in this chapter.) To add a Subtotal item to your Item list, choose Lists ⇒ Item List, click the Item button, and choose New from the drop-down menu. This action displays the New Item window — the same window I show several times earlier in this chapter. Specify the item type as Subtotal and then provide an item name (such as Subtotal).
When you want to subtotal items in an invoice, all you do is stick this Subtotal item in the invoice after the items you want to subtotal. Keep in mind, though, that QuickBooks doesn’t set up a subtotal feature automatically. You have to add a Subtotal item; otherwise, you can create and apply a Discount item only to the single item that immediately precedes the discount. A Discount item, by the way, calculates a discount on an invoice.
Creating Group items to batch stuff you sell together
You can create an item that puts one line on an invoice that’s actually a combination of several other items. To add a Group item, display the New Item window and specify the item type as Group. QuickBooks displays the New Item window shown in Figure 3-5.

FIGURE 3-5: The QuickBooks New Item window with the item type Group selected.
If you sell three items — say, blue mugs, yellow mugs, and red mugs — but sometimes sell the items together in a set, you can create an item that groups the three items. Note that when you create a group, you continue to track the group member inventories individually and don’t track the inventory of the group as a new item.
In the New Item window, use the Item/Description/Qty list box to list each item included in the group. When you click an item line in the Item/Description/Qty list box, QuickBooks places a down arrow at the right end of the Item column. Click this arrow to open a drop-down menu of items. (If the menu is longer than can be shown, you can use the scroll bar on the right to move up and down the menu.) If you select the Print Items in Group check box, QuickBooks lists all the items in the group in invoices. (In the case of the mugs, invoices list the individual blue, red, and yellow mugs instead of listing the group name, such as Mug Set.)
Creating Discount items to add discounts to invoices
You can create an item that calculates a discount and sticks the discount in an invoice as another line item. (I show a Discount item in the invoice that appears in Figure 3-1.) To add a Discount item to the list, display the New Item window, specify the item type as Discount, and provide an item name or number and a description.
Use the Amount or % text box to specify how the discount is calculated. If the discount is a set amount (such as $50), type the amount. If the discount is calculated as a percentage, enter the percentage, including the percent symbol. When you enter a percentage, QuickBooks calculates the discount amount as the percentage multiplied by the preceding item shown in the invoice. (If you want to apply the discount to a group of items, you need to use a Subtotal item and follow it with the discount, as Figure 3-1 shows.)
Use the Account drop-down menu to specify the expense account that you want to use to track the cost of the discounts you offer.
Use the Tax Code drop-down menu to specify whether the discount gets calculated before or after any sales taxes are calculated. (This option appears only if you indicated during QuickBooks Setup that you charge sales tax.)
You probably want to check with your local sales tax revenue agency to determine whether sales tax should be calculated before or after the discount.
If you need to collect sales tax, and you didn’t set up this function in QuickBooks Setup, follow these steps:
-
Choose Edit ⇒ Preferences.
The Preferences dialog box appears.
- Click the Sales Tax icon in the list on the left, click the Company Preferences tab, and then select the Yes option button in the Do You Charge Sales Tax area.
- Add the Sales Tax item(s) to your Item list.
-
Click the Add Sales Tax Item button.
When QuickBooks displays the New Item dialog box (not shown), enter a name for the sales tax in the Sales Tax Name box, the sales tax rate in the Tax Rate box, and the state agency to which you remit the sales tax in the Tax Agency box.
- Click OK twice to close the New Item dialog box and the Preferences dialog box.
Creating Sales Tax Group items to batch sales taxes
Sales Tax Groups enable you to batch several sales taxes that you’re supposed to charge as one tax so that they appear as a single sales tax in the invoice. Combining the taxes is necessary — or at least possible — when you’re supposed to charge, say, a 6.5 percent state sales tax, a 1.7 percent county sales tax, and a 0.4 percent city sales tax but want to show one all-encompassing 8.6 percent sales tax in the invoice.
To add a Sales Tax Group item, display the New Item window and then specify the item type as Sales Tax Group. QuickBooks displays the New Item window shown in Figure 3-6. Use the Tax Item/Rate/Tax Agency/Description list box to list the other sales tax items that you want to include in the group. When you click an item line in the list box, QuickBooks places a down arrow at the right end of the Tax Item column. You can click this arrow to open a drop-down menu of Sales Tax items.
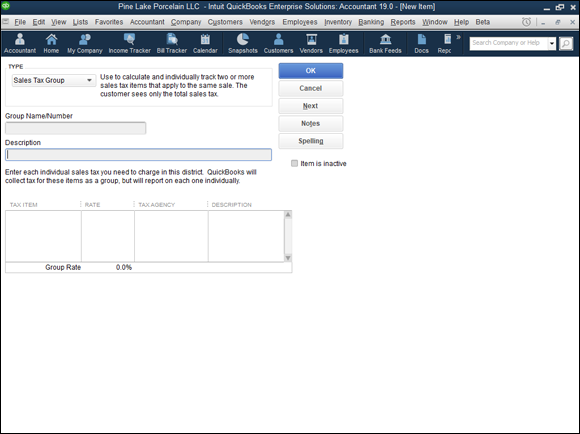
FIGURE 3-6: The New Item window for the item type Sales Tax Group.
Editing items
If you make a mistake, you can change any piece of item information by displaying the Item List window and double-clicking the item so that QuickBooks displays the Edit Item window, which you can use to make changes.
The Item List window provides another tool you can use to enter subsequent, similar items: the Duplicate Item command. To use this command, select the item you want to copy, click the Item button in the bottom-left corner, and then choose the Duplicate Item command from the drop-down menu. QuickBooks duplicates the selected item and then displays the New Item window. Make whatever changes you want, and click Save.
The Item List window also provides a tool you can use to add and edit item information. If you click the Item button in the bottom-left corner of the window and choose the Add/Edit Multiple Items command from the drop-down menu, QuickBooks displays the Add/Edit Multiple List Entries window. This window provides a spreadsheet you can use to add or edit more than one item at a time. The method I describe in the previous paragraphs often works best because it allows you to collect more information — information such as item descriptions. But if you need to enter or edit a large number of items, check out the Add/Edit Multiple Items command. Sometimes, that command saves you time.
Adding Employees to Your Employee List
If you do payroll in QuickBooks, or if you track sales by employees, you need to describe each employee. Describing employees is pretty darn easy. Choose the Employees ⇒ Employee Center command to display the Employee Center window. Then click the New Employee button that appears just above the list in the top-left corner of the screen to have QuickBooks display the New Employee window. Figure 3-7 shows the Personal tab of this window.
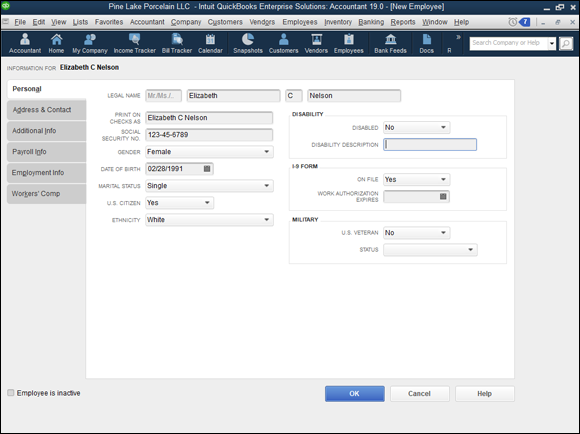
FIGURE 3-7: The Personal tab of the New Employee window.
The New Employee window is pretty straightforward, right? You just fill in the fields to describe the employee.
Lesser computer-book writers probably would provide step-by-step descriptions of how you move the cursor to the First Name text box and type the person’s first name, how you move the cursor to the next text box, type something there, and so on. Not me. No way. I know that you can tell just by looking at this window that all you do is click a text box and type the obvious bit of information. Right?
I do need to tell you a couple of important things about the New Employee window:
- When you release an employee, it’s important to enter the release date for the employee on the Employment Info tab after you write that final paycheck. (To change to a new tab, click the tab’s name. Click Employment Info to display the Employment Info tab, for example.) This way, when you process payroll in the future, you can’t accidentally pay the former employee.
- As for the Type option on the Employment Info tab, most employees probably fit the regular category. If you’re uncertain whether an employee fits the guidelines for corporate officer, statutory employee, or owner, see the Circular E publication from the Internal Revenue Service. And sleep tight.
The Address & Contact tab provides boxes for you to collect and store address information. The Additional Info tab enables you to create customizable fields in case you want to keep information that isn’t covered by the QuickBooks default fields — favorite color and that type of thing. Again, what you need to do on this tab is fairly straightforward.
By the way, if you told QuickBooks that you want to do payroll, QuickBooks prompts you to enter the information it needs to calculate things like federal and state income taxes, payroll taxes, and vacation pay by using boxes and buttons that appear on the Payroll Info and Worker’s Comp tabs.
After you finish describing an employee, click OK to add the employee to the list and return to the Employee List window.
You can also inactivate an employee from your list if the list starts to get cluttered with names of employees who no longer work for you. Read about inactivating items, employees, customers, and vendors in the nearby “Inactivating list items” sidebar. I recommend waiting to inactivate former employees until the year is finished and the W-2 forms have been printed.
Customers Are Your Business
Here’s how you add customers to your Customer list:
-
Choose Customers ⇒ Customer Center.
The Customer Center window appears.
-
Click the New Customer & Job button and then click New Customer.
Once those selections are made, QuickBooks displays the Address Info tab of the New Customer window, as shown in Figure 3-8. Use this window to describe the customer in as much detail as possible.
If you click the New Customer & Job button and choose the Add Multiple Customers: Jobs command, QuickBooks displays a worksheet you can use to describe multiple customers at a time. -
Type the customer’s name.
Enter the name of the customer as you want it to appear in the Customer list. Note that this name is the one that you use to refer to the customer within QuickBooks, so you can abbreviate or shorten the name if you want. If IBM Corporation is your customer, for example, you might enter only IBM in the Customer Name text box.
-
Specify the total of the customer’s unpaid invoices by using the Opening Balance text box.
Move the cursor to the Opening Balance text box, and type the total amount owed by the customer on the conversion date.
QuickBooks suggests that you not enter a balance in the Opening Balance box as part of setting up QuickBooks. (If you’re interested in the logic of QuickBooks’ argument, you can view the Customers online tutorial: Choose Help ⇒ Learning Center Tutorials and then click the Add the People You Do Business With link.) I’ve thought long and hard about this, however, and I think that you want to enter the customer’s unpaid balance in the Opening Balance box. Doing this makes setting up QuickBooks correctly much easier. - Enter the current date in the As Of text box.
- Enter the full company name in the Company Name text box.
-
(Optional) Enter the name of your contact, along with other pertinent information.
Move the cursor to the Full Name text boxes, and enter the customer contact person’s first name, middle initial, and last name. You can also enter the contact’s official position in the Job Title text box.
-
Provide telephone, fax, and email contact details.
Go ahead and fill in the telephone number, fax, website, and email text boxes.
-
Enter the billing address.
You can use the Invoice/Bill To text box to provide the customer’s billing address. QuickBooks copies the Company and Contact names to the first lines of the billing address, so you need to enter only the address. To move from the end of one line to the start of the next, press Enter.
-
Enter the shipping address.
You can use the Ship To text box to provide the customer’s shipping address. Click the Copy button to copy the billing address to the Ship To field. If the shipping address differs from the Bill To address, simply open the Ship To drop-down menu, choose Add New, and then enter the shipping address information the same way that you enter the Bill To address. You can add multiple shipping addresses. After you add a shipping address for a customer, you can choose the shipping address from the Ship To drop-down menu.
-
(Optional) Click the Payment Settings tab, and record more data.
You can use the boxes on the Payment Settings tab (see Figure 3-9) to record bits of customer information, such as the account number that should be included with any payments. You can also record payment-related information such as the customer’s credit limit and credit card information.
-
(Optional) Click the Sales Tax Settings tab, and specify the customer’s sales tax rate.
You can use the boxes on the Sales Tax Setting tab (not shown) to store the appropriate sales tax item and rate — and to record the customer’s resale certificate number, if that’s needed, because sometimes, you sell items to a customer that aren’t subject to sales tax.
-
(Optional) Click the Additional Info tab, and record more data.
When you click this tab, QuickBooks displays the tab shown in Figure 3-10. You can use this tab to describe the customer in more detail. You can, for example, categorize the customer via the Customer Type drop-down menu. (QuickBooks initially suggests using the customer types From Advertisement, Referral, Retail, and Wholesale, but you can choose the Add New entry to add your own customer types.)
You can complete the Rep field by typing a representative’s name or by using the drop-down menu to record the sales representative assigned to a customer. (See “The Sales Rep list” later in this chapter for more information.)
You can also click the Define Fields button to display dialog boxes you use to create fields for collecting your own customized bits of additional information. (For a while, I used to use a custom field to record the marketing campaign that acquired a client or customer, and that extra bit of data provided great insight into which marketing and advertising efforts delivered good returns and which didn’t.)
-
(Optional) Click the Job Info tab to add specific job information.
Because you’re creating a new customer account, not invoicing by jobs, I explain this step in the next section. If you’re the “can’t wait” type, feel free to take a look. You can add a specific job to the new customer’s information.
-
Save the customer information by clicking OK.
When you finish describing a customer, you can save it by clicking OK to add the customer to the list and then return to the Customer Center window.
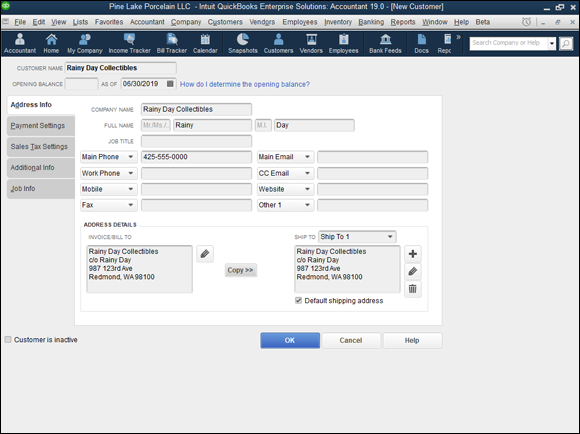
FIGURE 3-8: The Address Info tab of the New Customer window.
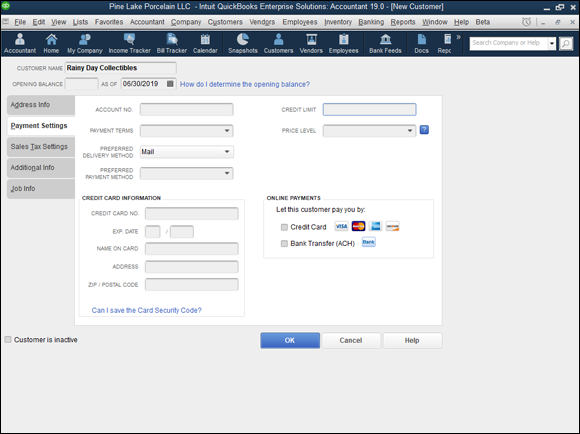
FIGURE 3-9: The Payment Settings tab of the New Customer window.
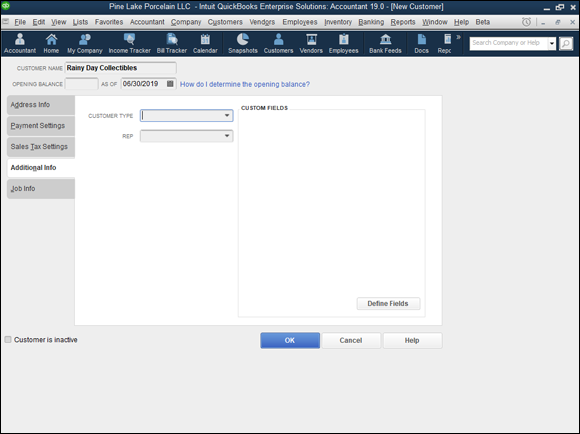
FIGURE 3-10: Add more details on the Additional Info tab of the New Customer window.
If you want to change some bit of customer information, display the Customer Center window, double-click the customer name for which you want to change information, and then make changes in the Edit Customer window.
It’s Just a Job
In QuickBooks, you can track invoices by customer or by customer and job. This may sound kooky, but some businesses invoice customers (perhaps several times) for specific jobs.
Take the case of a construction subcontractor who does foundation work for a handful of builders of single-family homes. This construction subcontractor probably invoices his customers by job, and he invoices each customer several times for the same job. He invoices Poverty Rock Builders for the foundation job at 1113 Birch Street when he pours the footing, for example, and then again when he lays the block. At 1028 Fairview, the same foundation job takes more than one invoice, too.
To set up jobs for customers, you first need to describe the customers (as I explain in the preceding section). Then follow these steps:
-
Choose Customers ⇒ Customer Center.
QuickBooks displays the Customer Center window.
-
Right-click the customer for whom you want to set up a job, choose Add Job from the contextual menu that appears, and click the Add Job tab.
QuickBooks displays the New Job window (shown in Figure 3-11). You use this window to describe the job. A great deal of the information in this window appears in the invoice.
-
Add the job name.
The cursor is in the Job Name text box. Just type the name of the job or project. In Figure 3-11, for example, I give the job the name Unique Design for Grotto.
-
(Optional) If you’re tracking the customer’s balances by job, enter the job’s opening balance.
Move the cursor to the Opening Balance text box, and type the total amount owed by the customer for the job you’re describing on the conversion date.
- Enter the current date in the As Of text box.
-
Identify the customer.
On the off chance that you chose the wrong customer in Step 2, take a peek at the Customer drop-down menu. Does it name the correct customer? If not, activate the drop-down menu and choose the correct customer.
-
(Optional) Name your contact, and fill in other relevant information.
You can enter the name of your contact and alternative contact in the Full Name text boxes. QuickBooks automatically fills in the company name, full name, and invoice/bill to fields if that information is available for the customer for whom you’re doing the job. You probably don’t need to be told this, but fill in the Phone, Fax, Email, and Website text boxes just so that you have that information on hand.
-
Enter the job’s billing address.
You can use the Invoice/Bill To text box to provide the customer’s job billing address. Because chances are good that the job billing address is the same as the customer billing address, QuickBooks copies the billing address from the Customer list. But if need be, make changes.
-
Select the Ship To address.
You can use the Ship To text box to provide the job’s shipping address. Click the Copy button if the shipping address is the same as the Invoice/Bill To address.
-
Click the Payment Settings tab, and describe the customer’s payment arrangements.
Using the Payment Settings tab (not shown), for example, you can record an account number and preferred payment method. You can set the customer’s credit limit by using the Credit Limit box. And you can store credit card payment information for customers who want you to keep their card numbers on file.
-
(Massively optional) Click the Additional Info tab, and categorize the job.
You can use the Customer Type drop-down menu of the Additional Info tab (not shown) to set the job type. The only initial types in the default menu are From Advertisement, Referral, Retail, and Wholesale. You can create other types by choosing Add New from the Customer Type drop-down menu (so that QuickBooks displays the New Customer Type dialog box) and then filling in the blanks.
-
(Optional) Click the Job Info tab, and add specific job information.
Figure 3-12 shows the Job Info tab. You can use the Job Status drop-down menu to choose None, Pending, Awarded, In Progress, Closed, or Not Awarded, whichever is most appropriate. The Start Date is (I know that this one is hard to believe) the day you start the job. As anyone knows, the Projected End Date and the End Date aren’t necessarily the same. Don’t fill in the End Date until the job is actually finished. The Job Description field can contain any helpful information you can fit in one line, and Job Type is an extra field you can use. (If you do use this field, you can add a new job type by choosing Add New from the Job Type drop-down menu.)
- Save the job information by clicking OK.
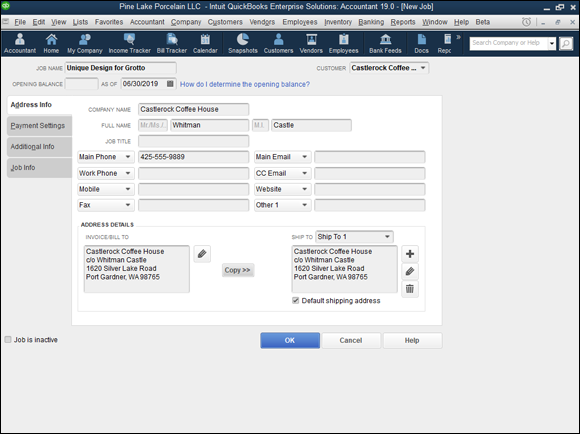
FIGURE 3-11: The Address Info tab of the New Job window.
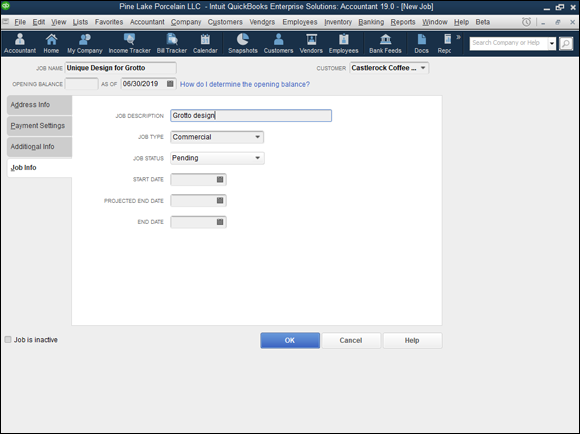
FIGURE 3-12: The Job Info tab of the New Job window.
You can edit job information the same way that you edit customer information. Display the Customer Center window by choosing Customer ⇒ Customer Center. When QuickBooks displays the window, double-click the job and make the changes in the Edit Job window that appears.
To add a large number of customers or jobs to the Customers list at the same time, display the Customer Center window, click the New Customer & Job button, and then choose the Add Multiple Customer: Jobs option. QuickBooks displays the Add/Edit Multiple List Entries worksheet, which lets you collect and edit all the same information that the regular Customers & Jobs windows do.
Adding Vendors to Your Vendor List
Adding vendors to your Vendor list works the same basic way as adding customers to your Customer list. Here’s how to get the job done:
-
Choose Vendors ⇒ Vendor Center or click the Vendors icon at the top of the screen.
QuickBooks displays the Vendor Center window. Along with listing your vendors, it lists any sales tax agencies that you identified as part of setting up Sales Tax items.
-
Click the New Vendor button and then choose the New Vendor command from the menu that appears.
After making these selections, QuickBooks displays the Address Info tab of the New Vendor window, as shown in Figure 3-13. You use this window to describe the vendors and all their little idiosyncrasies.
If you click the New Vendor button and choose the Add Multiple Vendors command, QuickBooks displays a worksheet you can use to describe multiple vendors at a time. -
Enter the vendor name.
The cursor is already in the Vendor Name text box. All you have to do is type the vendor’s name as you want it to appear in the Vendor list. If you want to list your vendors by company name, enter the company name. To list them by the first or last name of the sales representative, enter one of these names. Just remember that the list is going to sort, alphabetically or numerically, by the information you enter in this field, not by the information that follows it.
-
(Optional) Enter the name of your contact.
Fill in the Full Name text boxes with the customer contact’s first name, middle initial, and last name. You can also supply a title for the contact person.
-
(Optional) Enter the vendor’s telephone and email address and, if available, the fax number and website addresses.
You can change the labels used for the telephone number boxes by choosing some other description from their drop-down menu. And do note that the window also has an Other 1 text box so you can record some other bit of tangential information — perhaps the contact’s weight.
-
Enter the address to which you’re supposed to mail checks.
You can use the Address Details Billed From and Shipped From text boxes to provide the vendor’s addresses information. QuickBooks copies the Company and Contact names to the first line of the address, so you need to enter only the street address, city, state, and zip code. To move from the end of one line to the start of the next, press Enter.
-
(Optional) Check the default Payment Settings tab’s information.
Click the Payment Settings tab (not shown) to get to a set of boxes that lets you record the vendor’s account number, vendor payment terms, the right name to print on the check, and the credit limit.
An account number is required if you want to use QuickBooks’ online bill-payment feature (which I describe in Chapter 13) to pay the vendor. QuickBooks transfers the account number to the memo field of the payment check. -
(Optional) Check the default Tax Settings.
You can click the Tax Settings tab (not shown) to get to a set of boxes that lets you record the vendor’s tax identification number and indicate whether the vendor should receive a 1099 information tax return from you at the end of the year.
-
(Optional) Provide the default accounts to use with a vendor.
You can click the Account Settings tab (see Figure 3-14) to display a short list of accounts that QuickBooks will use to prefill account number fields when you enter a bill from the vendor.
-
(Optional) Click the Additional Info tab, and categorize the vendor.
The Additional Info tab (not shown) initially provides just a Vendor Type drop-down menu that you can use to categorize the vendor as a consultant, service provider, supplier, or tax agency. You can, however, add custom fields to the tab by clicking the Define Fields button.
-
Type 0 (zero) in the Opening Balance text box (refer to Figure 3-13).
You typically don’t want to enter the amount you owe the vendor; you do that later, when you pay your bills. But if you’re using accrual-basis accounting for your expenses (which just means that your accounting system counts bills as expenses when you get the bill, not when you pay the bill), you need to tell QuickBooks what amounts you owe vendors at the conversion date. You can do that most easily by entering opening balances for vendors in the Opening Balance box as you set up a vendor in the Vendor list.
-
Enter the conversion date in the As Of date field.
What you’re doing here, by the way, is providing the date on which the value shown in the Opening Balance text box is correct.
QuickBooks provides an Account Savings tab in the New Vendor window. Use this tab to specify a set of expense accounts that QuickBooks will suggest any time you indicate that you’re writing a check, entering a bill, or entering a credit card charge for the vendor -
Save the vendor information by clicking OK.
This step adds the vendor to the list and returns you to the Vendor Center window.
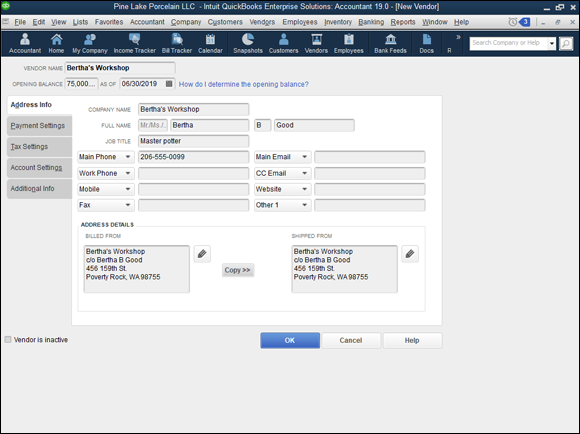
FIGURE 3-13: The Address Info tab of the New Vendor window.

FIGURE 3-14: The Account Settings tab of the New Vendor window.
To add a large number of vendors to the Vendor list at the same time, display the Vendor Center window, click the New Vendor button, and then choose the Add Multiple Vendors option. QuickBooks displays the Add/Edit Multiple List Entries worksheet, which lets you collect and edit all the same information that the regular vendor windows do. If you’re so inclined, you can use this window to copy and paste vendor information from a Microsoft Excel workbook.
The Other Lists
Throughout the preceding sections, I cover almost all the most important lists. A few others I haven’t talked about yet are Fixed Asset, Price Level, Billing Rate Level, Sales Tax Code, Classes, Other Names, Sales Rep, Customer Type, Vendor Type, Job Type, Terms, Customer Messages, Payment Method, Ship Via, Vehicle, and Memorized Transactions. I don’t give blow-by-blow descriptions of how you use these lists because you don’t really need them. The other QuickBooks lists are generally more than adequate. You can usually use the standard lists as is without building other lists.
Just so I don’t leave you stranded, however, I want to give you quick-and-dirty descriptions of these other lists and what they do.
To see some of these lists, choose the list from the Lists menu or choose Lists ⇒ Customer & Vendor Profile Lists and then choose the list from the submenu that QuickBooks displays.
The Fixed Asset Item list
If you buy fixed assets — things such as vehicles, various pieces of furniture, miscellaneous hunks of equipment, and so on — somebody is supposed to track this stuff in a list. Why? You need to have this information at your fingertips (or at your accountant’s fingertips) to calculate depreciation. And if you dispose of some item later, you need this information to calculate the gain or loss on the sale of the item.
For these reasons, QuickBooks includes a Fixed Asset list. Figure 3-15 shows the Fixed Asset Item List window, which you use to describe and identify your fixed assets.
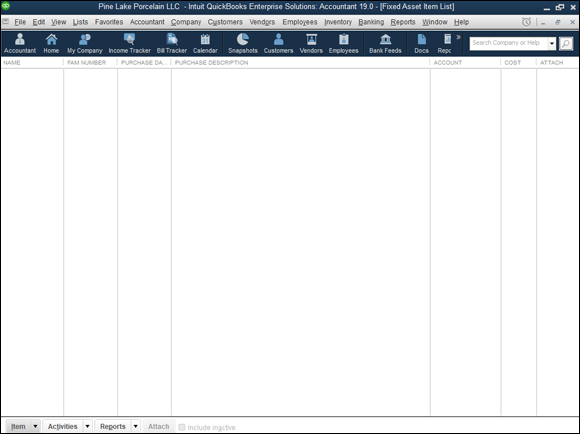
FIGURE 3-15: The Fixed Asset Item List window.
Note: I should tell you that your CPA or tax accountant already has such a list that he or she has been maintaining for you. So don’t, like, totally freak out because this is the first you’ve heard about this fixed-assets business.
Chapter 18 describes handling fixed assets in a bit more detail.
The Price Level list
The first time I encountered the QuickBooks Price Level feature, I was sorely confused about how it worked. I’m still a little confused — not about how the feature works, but about who’d really want to use it. But heck, what do I know? Here’s the deal: Price levels enable you to adjust an item price as you’re creating an invoice. You can create a price level that increases the price for some item by 20 percent, for example, and you create a price level that decreases the price for some item by 10 percent. You adjust a price by selecting a price level in the Price field of an invoice. (This may not make much sense until you see the Create Invoices window, which I describe in Chapter 4, but it’s fairly straightforward.)
The Billing Rate Levels list
The Billing Rate Levels list lets you build a list of custom prices for service items rather than use a standard rate for a particular service item. Then you use billing rate levels when you invoice a customer for services.
The Sales Tax Code list
The Sales Tax Code list, which appears if you turn on the Sales Tax option, maintains a list of sales tax codes. These sales tax codes, when used in an invoice or bill, tell QuickBooks whether items are taxable.
The Class list
Classes enable you to classify transactions by department or location, for example, so that you can track trends and assess performance across parts of your business. Classes are cool (really cool), but they add another dimension to the accounting model that you use in QuickBooks, so I’m not going to describe them here. I urge you — nay, I implore you — to get comfortable with how the rest of QuickBooks works before you begin mucking about with classes. Here are just a handful of useful tidbits in case you want to use classes:
-
You may need to turn on the QuickBooks Class Tracking feature. To do this, choose Edit ⇒ Preferences, click the Accounting icon, click the Company Preferences tab, and select the Use Class Tracking check box.
Note: The Class box appears in data entry windows only after you turn on Class Tracking.
- To display the Class list, choose Lists ⇒ Class List.
- To add classes to the Class list, display the Class List window (choose Lists ⇒ Class List), right-click the window, choose New from the contextual menu to display the New Class window, and then fill in the blanks.
- To tag transactions as falling into a particular class — invoices, checks, bills, journal entries, and so on — select the appropriate class in the Class list box.
By the way, one other point: Before you go off and start using classes to complicate your accounting, make sure that you can’t get what you want by beefing up your chart of accounts.
You won’t see a Class List command on the Lists menu if you indicated during QuickBooks Setup that you don’t want to use classes. But you can change your mind later and start using classes. Choose Edit ⇒ Preferences, click the Accounting icon, and select the Use Class Tracking check box on the Company Preferences tab.
The Other Names list
QuickBooks provides an Other Names list that works as a watered-down, wimpy Vendor and Employee list combination. You can write checks to people named in this Other Names list, but you can’t do anything else. You can’t create invoices or purchase orders for them, for example, and you don’t get any of the other information that you want to collect for vendors or employees.
You’re really better off working with good, accurate, rich Vendor and Employee lists. If you don’t like this suggestion, however, choose Lists ⇒ Other Names List to display the Other Names List window, click the Other Names button, choose New from the drop-down menu, and then fill in the blanks in the New Name window.
The Sales Rep list
You can create a list of the sales representatives you work with and then indicate which sales rep sells to a customer or generates a sale. To do this, choose Lists ⇒ Customer & Vendor Profile Lists ⇒ Sales Rep. When you choose this command, QuickBooks displays the Sales Rep List window, which lists all the sales representatives. To add sales representatives, click the Sales Rep button, choose New from the drop-down menu, and then fill in the window that QuickBooks displays.
Customer, Vendor, and Job Types list
You can create lists of customer types, vendor types, and job types and then use these lists to categorize customer, vendor, and job information. It’s probably no surprise that to do this, you need to choose the appropriate command:
- Lists ⇒ Customer & Vendor Profile Lists ⇒ Customer Type List
- Lists ⇒ Customer & Vendor Profile Lists ⇒ Vendor Type List
- Lists ⇒ Customer & Vendor Profile Lists ⇒ Job Type List
When you choose one of these commands, QuickBooks displays the appropriate List window, which lists all the Customer types, Vendor types, or Job types. To add types, click the Type button, choose New from the drop-down menu, and then fill in the window that QuickBooks displays.
How you use any of these types of lists depends on your business. If you want to sort or segregate customers, vendors, or jobs in some unusual way, use the Customer Type, Vendor Type, or Job Type list.
Over the past few years, I’ve used the Customer Type box to identify which marketing technique has brought me a client: yellow-pages advertising, newspaper advertising, professional referrals, and so on. Because QuickBooks easily prints reports that summarize client revenue by customer type, using the Customer Type field in this manner lets me easily see how much revenue different marketing activities produce — and when I’m getting a decent return on my marketing dollars.
The Terms list
QuickBooks maintains a Terms list, which you use to specify what payment terms are available. To add terms, choose Lists ⇒ Customer & Vendor Profile Lists ⇒ Terms List. When you choose this command, QuickBooks displays the Terms List window. To add more terms, click the Terms button, choose New from the drop-down menu, and then fill in the window that QuickBooks displays.
The Customer Message list
This list is another minor player in the QuickBooks drama. You can stick messages at the bottom of invoices if you first type the message in the Customer Message list. QuickBooks provides a handful of boilerplate messages: All work is complete!, Thank you for your business, It’s been a pleasure working with you, and so on. You can add more messages by choosing Lists ⇒ Customer & Vendor Profile Lists ⇒ Customer Message List. When QuickBooks displays the Customer Message List window, click its Customer Message button, choose New, and then use the New Customer Message window that QuickBooks displays to create a new message.
The Payment Method list
Now, this will be a big surprise. (I’m just kidding.) QuickBooks provides descriptions for the usual payment methods. But of course, you can add to these by choosing Lists ⇒ Customer & Vendor Profile Lists ⇒ Payment Method. When you choose this command, QuickBooks displays the lost city of Atlantis. Okay, not really. QuickBooks actually displays the Payment Method window. To add more methods — such as PayPal — click the Payment Method button, choose New from the drop-down menu, and then fill in the window that QuickBooks displays.
The Ship Via list
QuickBooks provides descriptions for the usual shipping methods. These descriptions are probably entirely adequate. If you need to add more, however, you can do so by choosing Lists ⇒ Customer & Vendor Profile Lists ⇒ Ship Via. When you choose this command, QuickBooks displays the Ship Via List window, which lists all the shipping methods that you or QuickBooks said are available. To add more methods, click the Shipping Method button, choose New from the drop-down menu, and then fill in the window that QuickBooks displays. Friends, it doesn’t get much easier than this.
The Vehicle list
As I describe in a bit more detail in Chapter 18, QuickBooks provides a Vehicle list that you can use to maintain a list of business vehicles. To see the Vehicle list, choose Lists ⇒ Customer & Vendor Profile Lists ⇒ Vehicle List. When you choose this command, QuickBooks displays the Vehicle List window, which lists all the vehicles that you previously said are available. To identify additional vehicles, click the Vehicle button, choose New from the drop-down menu, and then fill in the window that QuickBooks displays.
To record vehicle mileage inside QuickBooks, choose Company ⇒ Enter Vehicle Mileage. Then use the window that QuickBooks displays to identify the vehicle, the trip length in miles, the trip date, and a bit of other trip-related information.
The Memorized Transaction list
The Memorized Transaction list isn’t really a list. At least, it’s not like the other lists that I describe in this chapter. The Memorized Transaction list is a list of accounting transactions — invoices, bills, checks, purchase orders, and so on — that you’ve asked QuickBooks to memorize. To display the Memorized Transaction list, choose Lists ⇒ Memorized Transaction List.
You can have QuickBooks memorize transactions so that you can quickly record them later or even put them on a schedule for recurring use. This feature can save time for transactions that are largely identical each time you enter them and that you enter regularly.
The Reminders list
Here’s a list that isn’t accessible from the Lists menu. QuickBooks keeps track of a bunch of stuff that it knows you need to monitor. If you choose Company ⇒ Reminders, QuickBooks displays the Reminders window. Here, you see entries such as invoices and checks that need to be printed, inventory items you probably should reorder, and so on.
Organizing Lists
To organize a list, you must be in single-user mode. (I describe multiuser mode in Appendix C.) Here are some ways that you can organize your list:
- To move an item and all its subitems: Click the diamond beside the item and then drag the item up or down the list to a new location.
- To make a subitem its own item: Click the diamond beside the item and then drag it to the left.
- To make an item a subitem: Move the item so that it’s directly below the item you want it to fall under. Then click the diamond beside the item and drag it to the right.
- To alphabetize a list: Click the Name button at the top of the list window. QuickBooks alphabetizes your list of customers, vendors, accounts, and so on in both A-to-Z order and reverse Z-to-A order.
Printing Lists
You can print customer, vendor, and employee lists by clicking the Print button at the top of the specific Customer Center screen for the type of list you choose. The list is among the options available to print in a drop-down menu.
You can print a regular list by displaying the list, clicking the button in the bottom-left corner of the list window, and then choosing Print List. Often, however, the best way to print a list is to print a list report. You can create, customize, and print a list report by choosing Reports ⇒ List and then choosing the list that you want to print. You can also create one of a handful of list reports by clicking the Reports button in the list window and choosing a report from the drop-down menu. For more information on printing reports, see Chapter 15.
Click the Activities button in a list window to quickly access common activities associated with the items in that list, or click Reports to quickly access common reports related to the items in the list.
Exporting List Items to Your Word Processor
If you use QuickBooks to store the names and addresses of your customers, vendors, and employees, you can create a text file of the contact information for these people. Then you can export this file to another application, such as a word processor, to create reports that use this information.
To export list information to a text file, click the button in the bottom-left corner of the list window, and choose Print List from the drop-down menu. When QuickBooks displays the Print dialog box, select the File option button, click Print, and provide a filename when prompted.
The File menu’s Print Forms command also provides a Labels command for producing mailing labels for customers and vendors. Before I forget, let me also mention that the last command on the Company menu — Prepare Letters with Envelopes — lets you prepare letters (and, duh, addressed envelopes) by using the name and address information from the Customer, Vendor, and Employee lists discussed earlier in this chapter.
Dealing with the Chart of Accounts List
I saved the best for last. After you get done setting up your lists, you still need to finalize one list: Chart of Accounts, which lists the accounts you and QuickBooks use to track income and expenses, assets, liabilities, and equity.
This step is kind of a funny one, however, because a bunch of Chart of Accounts stuff is already set up; you’re just finalizing it. Typically, this task consists of two or possibly three separate steps: describing customer balances, describing vendor balances, and entering the rest of the trial balance.
Describing customer balances
If you entered customer unpaid invoice totals when you set up the customers — which is what I recommend — you’ve already described your customer balances. You, my friend, can skip to the next section, “Describing vendor balances.”
If you didn’t enter customer unpaid invoice totals, you need to supply that information before you finalize the Chart of Accounts information. To do this, enter the invoice in the usual way, which I describe in Chapter 4. The one really important thing to do is use the original invoice date when you enter the invoice.
Now, I know what you’re thinking: “Hey, dude. The order of your instructions is all screwed up. Here I am, slogging through Chapter 3, and now, totally out of the blue, you’re telling me that I have to jump ahead to Chapter 4 and read that?”
Yeah, well, that’s right. This jumping-around and jumping-ahead is the big reason why I tell you earlier to do it the way I did. Hey, sorry.
Describing vendor balances
If you entered vendor unpaid bill totals when you set up the vendors — which is also what I recommend earlier — you described your vendor balances. In which case, you can skip to the next section, “Camouflaging some accounting goofiness.”
If you didn’t enter vendor unpaid bill totals, you need to supply that information, as I describe in Chapter 6 in the discussion on recording your bills the accounts payable way. The one really important thing to do is to use the original vendor bill date when you enter the vendor bill.
Camouflaging some accounting goofiness
After you enter the customer and vendor balances into QuickBooks, you need to enter the rest of the trial balance, which you do by taking two big steps. In the first step, you camouflage a couple of goofy accounts, called suspense accounts, which QuickBooks creates when you set up the Item, Customer, and Vendor lists. The second step, which I describe in the following section, is supplying the last few missing numbers.
Figure 3-16 shows a sample trial balance after I enter the inventory, accounts receivable, and accounts payable balances. (These account balances get set up indirectly, as I note in the sidebar “For accountants and bookkeepers only” later in this chapter.) When you set up your Item, Customer, and Vendor lists, you also create account balances for inventory, accounts receivable, and accounts payable.

FIGURE 3-16: A sample trial balance.
You can produce your own half-complete trial balance from inside QuickBooks by clicking the Report Center icon and choosing Reports ⇒ Accountants & Taxes ⇒ Trial Balance. QuickBooks displays the trial balance report in a document window.
If you need to do so, enter the conversion date in the From box by clicking the box and typing the conversion date in MM/DD/YYYY format. Figure 3-16, for example, shows the conversion date 6/30/2019 on the To line. You can set the From box to any value; the From and To range just needs to end with the conversion date. Make a note of the credit and debit balances shown for the Uncategorized Income and Uncategorized Expenses accounts.
If you want, you can print the report by clicking the Print button; then, when QuickBooks displays the Print Report dialog box, click its Print button. Yes, you click two Print buttons.
After you have the conversion date balances for the Uncategorized Income and Uncategorized Expenses accounts, you’re ready to make the accrual-accounting adjustment. To do so, follow these steps:
- From the home screen, either click the Chart of Accounts icon in the Company area or choose Lists ⇒ Chart of Accounts to display the Chart of Accounts window, shown in Figure 3-17.
-
Double-click Opening Balance Equity in the Chart of Accounts list to display that account.
Opening Balance Equity is listed after the liability accounts. QuickBooks displays the register — a list of transactions — for the Opening Balance Equity account. Figure 3-18, coincidentally, shows this register. Note that your version of the Opening Balance Equity register will look different because it’ll have different transactions.
-
Select the next empty row of the register if it isn’t already selected (although it probably is).
You can select a row by clicking it, or you can use the up- or down-arrow key to move to the next empty row.
-
Type the conversion date in the Date field (see Figure 3-18).
Move the cursor to the Date field (if it isn’t already there), and type the date. Use MM/DD/YYYY format. You can type either 06302019 or 6/30/2019 to enter June 30, 2019.
-
Type the Uncategorized Income account balance (from the trial balance report) in the Increase field.
In Figure 3-16, for example, the Uncategorized Income account balance is $190,000. In this case, click the Increase field (shown in Figure 3-18) and type 190000 in the field.
You don’t need to include the dollar sign or the comma; QuickBooks adds the symbol and punctuation for you. -
Type Uncategorized Income (the account name) in the Account field.
Select the Account field, which is on the row below the word Payee (shown in Figure 3-18), and begin typing Uncategorized Income, the account name. As soon as you type enough of the name for QuickBooks to figure out what you’re typing, it fills in the rest of the name for you. When this happens, you can stop typing.
-
Click the Record button to record the Uncategorized Income adjustment transaction.
Again, select the next empty row of the register.
- Click the row or use the up- or down-arrow key.
-
Type the conversion date in the Date field.
Move the cursor to the Date field (if it isn’t already there) and type the date. You use MM/DD/YYYY format. You can type 6/30/2019, for example, to enter June 30, 2019.
-
Type the Uncategorized Expenses account balance in the Decrease field.
In Figure 3-16 (shown earlier), for example, the Uncategorized Expenses account balance is $75,000. In this case, you click the Decrease field and then type 75000. I’ve said this before, but I’ll say it again because you’re just starting: You don’t need to include any symbol or punctuation, such as a dollar sign or comma.
-
Type Uncategorized Expenses (the account name) in the Account field.
Select the Account field, which is on the second line of the register transaction, and begin typing Uncategorized Expenses, the account name. As soon as you type enough of the name for QuickBooks to figure out what you’re typing, it fills in the rest of the name for you.
-
Click the Record button to record the Uncategorized Expenses adjustment transaction.
Figure 3-18 shows the Opening Balance Equity register with the correction transactions. The correction transactions are numbered with a 1 and a 2. See them? They’re the second and third transactions in the register.

FIGURE 3-17: The Chart of Accounts window.
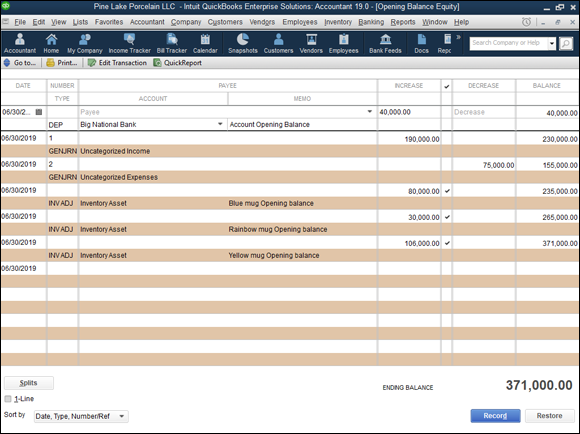
FIGURE 3-18: The two transactions, labeled GENJRN, fix the Uncategorized Income and Uncategorized Expenses account balances.
You can close the Opening Balance Equity register at this point. You’re finished with it. One way to close it is to click the Close button in the top-right corner of the window.
You can check your work thus far — and checking it is a good idea — by producing another copy of the trial balance report. What you want to check are the Uncategorized Income and Uncategorized Expenses account balances. They should both be zero, as shown in Figure 3-19.

FIGURE 3-19: Another sample trial balance
You can produce a trial balance by choosing Reports ⇒ Accountant & Taxes ⇒ Trial Balance. QuickBooks displays the trial balance report in a document window. If you need to enter the conversion date in the As Of line, click inside the box and type the conversion date in MM/DD/YYYY format.
If the Uncategorized Income and the Uncategorized Expenses account balances don’t show zero, you (with my help, of course) may have botched the accrual adjustment. To fix the mistake, redisplay the Opening Balance Equity register (as noted earlier, you can double-click Opening Balance Equity in the Chart of Accounts list to display that account); select the adjustment transactions; and then check the account, amount, and field (Increase or Decrease). If one of the fields is wrong, select the field and replace its contents by typing over it.
One other point. Though Figures 3-16 and 3-19 don’t show them, QuickBooks may display other accounts in its trial balance (depending on how you set up the QuickBooks file). You don’t need to worry about these other accounts, however. You need only make sure that the Uncategorized Income and Uncategorized Expense account balances equal zero after your adjustments.
Supplying the missing numbers
You’re almost done. Really. Your last task is entering the rest of the trial balance amounts into QuickBooks. To perform this task, you need to have a trial balance prepared as of the conversion date. If you followed my instructions in Chapter 2, you have one. Follow these steps:
-
Choose either Company ⇒ Make General Journal Entries or Accountant ⇒ Make General Journal Entries.
QuickBooks displays the Make General Journal Entries window, as shown in Figure 3-20.
-
Type the conversion date in the Date field.
Move the cursor to the Date field (if it isn’t already there), and type the date. As you may know by now, you use MM/DD/YYYY format. You can type 6/30/2019 for June 30, 2019, for example (or 06302019, if you don’t want to put in the slashes).
-
Type each trial balance account and balance that isn’t already in the half-completed trial balance.
Okay. This step sounds confusing. But remember that you’ve already entered your cash, accounts receivable, inventory, and accounts payable account balances; perhaps even a few other account balances; and a portion of the Opening Balance Equity account balance as part of QuickBooks Setup.
Now you need to enter the rest of the trial balance — specifically, the year-to-date income and expense account balances, any missing assets or liabilities, and the remaining portion of the Opening Balance Equity. To enter each account and balance, use a row of the Make General Journal Entries window’s list box. Figure 3-21 shows how this window looks after you enter the rest of the trial balance into the list-box rows.
If you need an account that isn’t already in your QuickBooks Chart of Accounts, no problem; enter the account name you want in the Account column of the Make General Journal Entries window. When QuickBooks displays the message Account not found, click the Set Up button. QuickBooks displays the Add New Account: Choose Account Type dialog box. Use this dialog box to identify the type of account you’re setting up: Income, Expense, Fixed Asset, Bank, Loan, Credit, or Equity. Click Continue to display the Add New Account dialog box. Use this dialog box to create a longer description of the account (if you want) and then click Save & Close. - Click the Save & New button to record the general journal entries that set up the rest of your trial balance.

FIGURE 3-20: An empty Make General Journal Entries window.
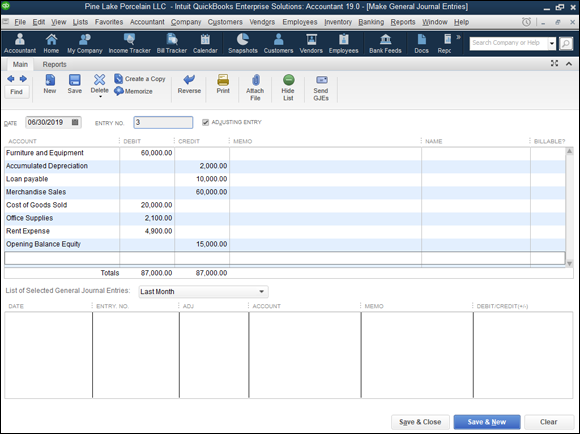
FIGURE 3-21: A completed Make General Journal Entries window.
Checking your work one more time
Double-checking your work is a good idea. Produce another copy of the trial balance report, and check that the QuickBooks trial balance is the same one that you wanted to enter.
You can produce a trial balance by choosing Reports ⇒ Accountant & Taxes ⇒ Trial Balance. Be sure to enter the conversion date in the As Of text box. If the QuickBooks trial balance report agrees with what your records show, you’re finished.
If the QuickBooks trial balance doesn’t agree with what your records show, you need to fix the problem. Fixing it is a bit awkward but isn’t complicated. Choose Reports ⇒ Accountant & Taxes ⇒ Journal. QuickBooks displays a report or journal that lists all the transactions that you or QuickBooks entered as part of setting up. (The Dates, From, and To text boxes need to specify the conversion date.) Scroll through the list of transactions until you get to the last one. The last transaction is the one that you entered to set up the rest of the trial balance; it names recognizable accounts and uses familiar debit and credit amounts. Double-click this transaction. QuickBooks redisplays the Make General Journal Entries window with the botched transaction. Find the mistake and then fix the erroneous account or amount by clicking it and typing the correct account or amount.
Congratulations! You’re done.