INTRODUCTION
Welcome to 60 Hikes Within 60 Miles: Portland! If you’re new to hiking or even if you’re a seasoned trekker, take a few minutes to read the following introduction. We’ll explain how this book is organized and how to get the best use of it.
About This Book
I suppose there’s one thing I should get out of the way right up front: yes, many of these hikes are more than 60 driving miles from Portland. When the idea was first proposed, that was the suggested range, but driving 60 miles from the middle of Portland doesn’t get you to most trailheads on Mount Hood, or any on the coast. And I didn’t want to write that book. So I changed it to 60 miles as the crow flies from the edge of the metro area. And even then, some are beyond it. But virtually all are within a two-hour drive of Pioneer Courthouse Square. Here is a quick rundown of the geographical areas covered:
IN THE COLUMBIA RIVER GORGE goes as far east as just past Mosier. This means an amazing territory that goes from waterfalls, moss, and ferns to oak savannas and wildflower meadows. It also goes up from the river to subalpine ridges, thousands of feet above.
AROUND MOUNT ST. HELENS is only on the south side, including up onto the peak itself. Hikes here also explore the wooded mountains between the Columbia and the mountain, and some of the effects the mountain has had on the environment.
UP THE CLACKAMAS RIVER means trails that are all accessed by driving up OR 224 past Estacada. This is mainly forest and lake country, with a lot of wilderness, and it goes all the way up to high lookouts in the Cascades.
UP THE SANTIAM RIVER means up OR 22 east of Salem. This is similar to the Clackamas area and neighbors it, creating a great swath of forest, hills, and solitude between Mounts Hood and Jefferson.
AROUND MOUNT HOOD means literally that: hikes basically in a circle around the mountain. Here you will go from creekside strolls to rocky ridges next to glaciers.
THE COAST AND COAST RANGE means west of Forest Grove and from Cape Lookout near Tillamook up to Seaside. The Coast Range offers younger forest but great hiking variety, and at the coast you can find sweeping views of the ocean, sandy beaches, and tremendously large trees.
PORTLAND AND THE WILLAMETTE VALLEY really means the Portland area plus Silver Falls State Park. This can mean sidewalks or city parks, farm country or waterfall heaven.
Within each of those areas, I have tried to offer a good selection and variety of hikes. For example, in each area you should be able to find easy walks for the whole family, river walks, lake visits, scenic viewpoints, challenging treks, and connections to larger areas with more options like backpacking trips. I wrote the book with the whole range of hikers in mind; some of you are just starting out or want to take it easy, and some of you want to go really big. I tried to accommodate everyone.
How to Use This Guidebook
The following information walks you through this guidebook’s organization to make it easy and convenient to plan great hikes.
OVERVIEW MAP AND MAP LEGEND
Use the overview map to assess the general location of each hike’s primary trailhead. Each hike’s number appears on the overview map and in the table of contents. As you flip through the book, a hike’s full profile is easy to locate by watching for the hike number at the top of each page. The book is organized by region, as indicated in the table of contents. A map legend that details the symbols found on trail maps appears.
REGIONAL MAPS
The book is divided into regions, and prefacing each regional section is an overview map. The regional maps provide more detail than the overview map, bringing you closer to the hikes.
TRAIL MAPS
A detailed map of each hike’s route appears with its profile. On each of these maps, symbols indicate the trailhead, the complete route, significant features, facilities, and topographic landmarks such as creeks, overlooks, and peaks.
To produce the highly accurate maps in this book, the author used a handheld GPS unit to gather data while hiking each route, and then sent that data to the publisher’s expert cartographers. However, your GPS is not really a substitute for sound, sensible navigation that takes into account the conditions that you observe while hiking.
Further, despite the high quality of the maps in this guidebook, the publisher and author strongly recommend that you always carry an additional map, such as the ones noted in each entry’s listing for “Maps.”
ELEVATION PROFILES (DIAGRAM)
For trails with any significant elevation changes, the hike description will include this profile graph. Entries for fairly flat routes, such as a lake loop, will not display an elevation profile.
For hike descriptions where the elevation profile is included, this diagram represents the rises and falls of the trail as viewed from the side, over the complete distance (in miles) of that trail. On the diagram’s vertical axis, or height scale, the number of feet indicated between each tick mark lets you visualize the climb. To avoid making flat hikes look steep and steep hikes appear flat, varying height scales provide an accurate image of each hike’s climbing challenge.
THE HIKE PROFILE
Each hike contains a brief overview of the trail, a description of the route from start to finish, key at-a-glance information—from the trail’s distance and configuration to contacts for local information—GPS trailhead coordinates, and directions for driving to the trailhead area. Each profile also includes a map (see “Trail Maps,” previous page) and elevation profile (if the elevation gain is 100 feet or more). Many hike profiles also include notes on nearby activities.
KEY INFORMATION
The information in this box gives you a quick idea of the statistics and specifics of each hike.
DISTANCE & CONFIGURATION Distance notes the length of the hike round-trip, from start to finish. If the hike description includes options to shorten or extend the hike, those round-trip distances will also be factored here. Configuration defines the trail as a loop, an out-and-back (taking you in and out via the same route), a figure eight, or a balloon.
DIFFICULTY The degree of effort that a typical hiker should expect on a given route. For simplicity, the trails are rated as easy, moderate, or strenuous.
SCENERY A short summary of the attractions offered by the hike and what to expect in terms of plant life, wildlife, natural wonders, and historical features.
EXPOSURE A quick check of how much sun you can expect on your shoulders during the hike.
TRAFFIC Indicates how busy the trail might be on an average day. Trail traffic, of course, varies from day to day and season to season. Weekend days typically see the most visitors. Other trail users that may be encountered on the trail are also noted here.
TRAIL SURFACE Indicates whether the trail surface is paved, rocky, gravel, dirt, boardwalk, or a mixture of elements.
HIKING TIME How long it took me to hike the trail. I like to dawdle, and I can easily fritter away time eating or admiring wildflowers. On average, I cover 2 miles an hour (more hiking downhill, fewer on steady ascents, particularly during hot weather). If you’re an experienced hiker in great shape, you’ll finish the hikes with time to spare, but if you’re a beginner or you like to stop to take in the views, allow for a little extra.
ELEVATION CHANGE Lists the cumulative elevation change along the trail.
SEASON The time of year when a particular hike is accessible. In most cases, the determining factor is snow. Except where specific hours are noted, hikes are accessible daily, sunrise–sunset.
BEST TIME If you want to save a hike for when it’s at its best, this is the time to shoot for.
BACKPACKING OPTIONS Feel like spending the night out? Here’s a quick glance; more details can be found in the text.
DRIVING DISTANCE How far each hike is from Pioneer Courthouse Square in downtown Portland. Not that you’d want to start from here necessarily, but the numbers should give you a good estimate of travel times to the trailheads from where you live. Driving times are provided as well.
ACCESS Fees or permits required to hike the trail are detailed here—and noted if there are none. Trail-access hours are also shown. A number of trailheads in this book require a Northwest Forest Pass. All of the outdoors shops listed in Appendixes A and B sell the pass, which costs $5 for one day and $30 for one year; you can also buy it at discovernw.org/store.
Other passes, such as the Interagency Senior Pass and various national passes, are available, so make sure to get the one that best meets your needs. Visit tinyurl.com/usfsregion6passesandpermits for more information.
MAPS Resources for maps, in addition to those in this guidebook, are listed here. (As previously noted, the publisher and author recommend that you carry more than one map—and that you consult those maps before heading out on the trail to resolve any confusion or discrepancy.)
WHEELCHAIR ACCESS At a glance, you’ll see if there are paved sections or other areas for safely using a wheelchair.
FACILITIES This item alerts you to restrooms, water, picnic tables, and other basics at or near the trailhead.
CONTACT Listed here are phone numbers and websites for checking trail conditions and gleaning other day-to-day information.
LOCATION The address for the trail.
COMMENTS Here you will find assorted nuggets of information, such as whether or not dogs are allowed on the trails.
IN BRIEF
Think of this section as a taste of the trail, a snapshot focused on the historical landmarks, beautiful vistas, and other sights you may encounter on the hike.
DESCRIPTION
The heart of each hike. Here, the author provides a summary of the trail’s essence and highlights any special traits the hike has to offer. The route is clearly outlined, including landmarks, side trips, and possible alternate routes along the way. Ultimately, the hike description will help you choose which hikes are best for you.
NEARBY ACTIVITIES
Look here for information on things to do or points of interest, such as nearby parks, museums, and restaurants. Note that not every hike has a listing.
DIRECTIONS
Used in conjunction with the GPS coordinates, the driving directions will help you locate each trailhead. Once at the trailhead, park only in designated areas.
GPS TRAILHEAD COORDINATES
As noted in “Trail Maps,”, the author used a handheld GPS unit to obtain geographic data and sent the information to the publisher’s cartographers. The coordinates included with each hike profile—the intersection of the latitude (north) and longitude (west)—will direct you to the trailhead for that hike. In some cases, you can drive within viewing distance of a trailhead. Other hiking routes require a short walk to the trailhead from a parking area. You will also note that this guidebook uses the degree–decimal minute format for presenting the GPS coordinates:
N45º 33.613' W122º 10.365'
The latitude and longitude grid system is likely quite familiar to you, but here is a refresher, pertinent to visualizing the GPS coordinates:
Imaginary lines of latitude—called parallels and approximately 69 miles apart from each other—run horizontally around the globe. The equator is established to be 0°, and each parallel is indicated by degrees from the equator: up to 90°N at the North Pole, and down to 90°S at the South Pole.
Imaginary lines of longitude—called meridians—run perpendicular to latitude lines. Longitude lines are likewise indicated by degrees. Starting from 0° at the Prime Meridian in Greenwich, England, they continue to the east and west until they meet 180° later at the International Date Line in the Pacific Ocean. At the equator, longitude lines are approximately 69 miles apart, but that distance narrows as the meridians converge toward the North and South Poles.
To convert GPS coordinates given in degrees, minutes, and seconds to degree–decimal minute format, divide the seconds by 60. For more on GPS technology, visit usgs.gov.
TOPOGRAPHIC MAPS
The maps in this book have been produced with great care and, used with the hike text, will direct you to the trail and help you stay on course. However, you’ll find superior detail and valuable information in the U.S. Geological Survey’s 7.5-minute-series topographic maps. At mytopo.com, for example, you can view and print free USGS topos of the entire United States. Online services such as Trails.com charge annual fees for additional features such as shaded relief, which makes the topography stand out more. If you expect to print out many topo maps each year, it might be worth paying for such extras. The downside to USGS maps is that most are outdated, having been created 20–30 years ago; nevertheless, they provide excellent topographic detail. Of course, Google Earth (earth.google.com) does away with topo maps and their inaccuracies, replacing them with satellite imagery and its inaccuracies. Regardless, what one lacks, the other augments. Google Earth is an excellent tool whether you have difficulty with topos or not.
The author used the Gaia app on his iPhone for this edition and found it quite a bargain for $20. It works particularly well if you download maps of the area you’re hiking ahead of time, and remember that it works in airplane mode, as well. This saves on battery power immensely.
If you’re new to hiking, you might be wondering, “What’s a topo map?” In short, it indicates not only linear distance but also elevation, using contour lines. These lines spread across the map like dozens of intricate spiderwebs. Each line represents a particular elevation, and at the base of each topo a contour’s interval designation is given. If, for example, the interval is 20 feet, then the distance between each contour line is 20 feet. Follow five contour lines up on the same map, and the elevation has increased by 100 feet. In addition to the sources listed previously and in Appendix B, you’ll find topos at major universities, outdoors shops, and some public libraries, as well as online at nationalmap.gov and store.usgs.gov.
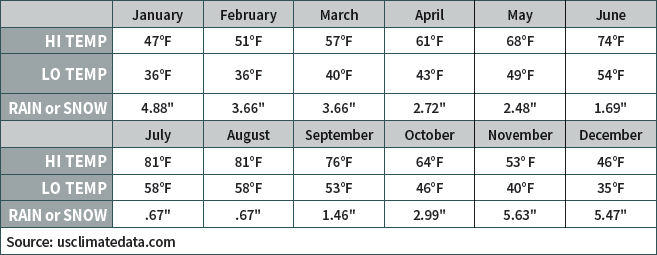
Weather
For most folks, the hiking season around Portland starts in March or April, when flowers bloom and temperatures start to rise. Unfortunately, that’s the least stable season, weather-wise. Forecasts are notoriously off the mark during spring, so if you aren’t absolutely, positively sure it will be clear, plan for 50-something degrees and drizzling into June.
Snow is a different matter: The higher-elevation hikes in this book generally won’t be completely clear until July. Also note that in the Columbia River Gorge, wind is a near-constant reality, so even on a sunny June day, a hike such as the one to Dog Mountain (Hike 6) can have you reaching for a hat and gloves. By mid- to late June, and all the way into October, you’ll see mostly sunny skies, mild temperatures, and happy hikers. Then winter comes, and for all intents and purposes it rains until spring. We try to think of it as “waterfall loading.”
The following chart lists average temperatures and precipitation by month for the Portland area. For each month, “Hi Temp” is the average daytime high, “Lo Temp” is the average nighttime low, and “Rain or Snow” is the average precipitation. And remember, this is for the city: subtract degrees across the board as you go higher up into the mountains.
Water
How much is enough? Well, one simple physiological fact should convince you to err on the side of excess when deciding how much water to pack: a hiker walking steadily in 90° heat needs approximately 10 quarts of fluid per day. That’s 2.5 gallons. A good rule of thumb is to hydrate prior to your hike, carry (and drink) 6 ounces of water for every mile you plan to hike, and hydrate again after the hike. For most people, the pleasures of hiking make carrying water a relatively minor price to pay to remain safe and healthy. So pack more than you anticipate needing, even for short hikes.
If you are tempted to drink “found” water, do so with extreme caution. Many ponds and lakes encountered by hikers are fairly stagnant, and the water tastes terrible. Drinking such water presents inherent risks for thirsty trekkers. Giardia parasites contaminate many water sources and cause the dreaded intestinal giardiasis that can last for weeks after ingestion. For information, visit The Centers for Disease Control website at cdc.gov/parasites/giardia.
For that reason, effective treatment is essential before using any water source found along the trail. Boiling water for 2–3 minutes is always a safe measure for camping, but day hikers can consider iodine tablets, approved chemical mixes, filtration units rated for giardia, and UV filtration. Some of these methods (for example, filtration with an added carbon filter) remove bad tastes typical in stagnant water, while others add their own taste. As a precaution, carry a means of water purification to help in a pinch, if you realize you have underestimated your consumption needs.
Clothing
Weather, unexpected trail conditions, fatigue, extended hiking duration, and wrong turns can individually or collectively turn a great outing into a very uncomfortable one at best—and a life-threatening one at worst. Thus, proper attire plays a key role in staying comfortable and, sometimes, in staying alive. Here are some helpful guidelines:
Choose silk, wool, or synthetics for maximum comfort in all of your hiking attire—from hats to socks and in between. Cotton is fine if the weather remains dry and stable, but you won’t be happy if that material gets wet.
Always wear a hat, or at least tuck one into your day pack or hitch it to your belt. Hats offer all-weather sun and wind protection as well as warmth if it turns cold.
Be ready to layer up or down as the day progresses and the mercury rises or falls. Today’s outdoor wear makes layering easy, with such designs as jackets that convert to vests and zip-off or button-up legs.
Wear hiking boots or sturdy hiking sandals with toe protection. Flip-flopping along a paved urban greenway is one thing, but never hike a trail in open sandals or casual sneakers. Your bones and arches need support, and your skin needs protection.
Pair that footwear with good socks. If you prefer not to sheathe your feet when wearing hiking sandals, tuck the socks into your day pack; you may need them if the weather plummets or if you hit rocky turf and pebbles begin to irritate your feet. And, in an emergency, if you have lost your gloves, you can use the socks as mittens.
Don’t leave rainwear behind, even if the day dawns clear and sunny. Tuck into your day pack, or tie around your waist, a jacket that is breathable and either water-resistant or waterproof. Investigate different choices at your local outdoors retailer. If you are a frequent hiker, ideally you’ll have more than one rainwear weight, material, and style in your closet to protect you in all seasons in your regional climate and hiking microclimates.
Essential Gear
Today you can buy outdoor vests that have up to 20 pockets shaped and sized to carry everything from toothpicks to binoculars. Or, if you don’t aspire to feel like a burro, you can neatly stow all of these items in your day pack or backpack. The following list showcases never-hike-without-them items, in alphabetical order, as all are important:
 Extra clothes: raingear, warm hat, gloves, and change of socks and shirt
Extra food: trail mix, granola bars, or other high-energy foods
Flashlight or headlamp with extra bulb and batteries
Insect repellent. For some areas and seasons, this is vital.
Maps and a high-quality compass. Even if you know the terrain from previous hikes, don’t leave home without these tools. And, as previously noted, bring maps in addition to those in this guidebook, and consult your maps prior to the hike. If you are versed in GPS usage, bring that device too, but don’t rely on it as your sole navigational tool, as battery life can dwindle or die, and be sure to compare its guidance with that of your maps.
Pocketknife and/or multitool
Sunscreen Note the expiration date on the tube or bottle; it’s usually embossed on the top.
Water As emphasized more than once in this book, bring more than you think you will drink. Depending on your destination, you may want to bring a container and iodine or a filter for purifying water in case you run out.
Whistle This little gadget will be your best friend in an emergency.
Windproof matches and/or a lighter, as well as a fire starter
FIRST AID KIT
In addition to the aforementioned items, those below may appear overwhelming for a day hike. But any paramedic will tell you that the products listed here—in alphabetical order, because all are important—are just the basics. The reality of hiking is that you can be out for a week of backpacking and acquire only a mosquito bite. Or you can hike for an hour, slip, and suffer a bleeding abrasion or broken bone. Fortunately, these listed items will collapse into a very small space. You can also purchase convenient, prepackaged kits at your pharmacy or online.
Adhesive bandages
Antibiotic ointment (Neosporin or the generic equivalent)
Athletic tape
Benadryl or the generic equivalent, diphenhydramine (for allergic reactions)
Blister kit (such as Moleskin/Spenco 2nd Skin)
Butterfly-closure bandages
Elastic bandages or joint wraps
Epinephrine in a prefilled syringe typically by prescription only, for people known to have severe allergic reactions to hiking occurrences such as bee stings
Gauze one roll and a half dozen 4-by-4-inch pads
Hydrogen peroxide or iodine
Ibuprofen or acetaminophen
Note: Consider your intended terrain and the number of hikers in your party before you exclude any article cited above. A botanical garden stroll may not inspire you to carry a complete kit, but anything beyond that warrants precaution. When hiking alone, you should always be prepared for a medical need. And if you are a twosome or with a group, one or more people in your party should be equipped with first aid material.
General Safety
The following tips may have the familiar ring of your mother’s voice as you take note of them.
Always let someone know where you will be hiking and how long you expect to be gone. It’s a good idea to give that person a copy of your route, particularly if you are headed into any isolated area. Let them know when you return. I always text a friend with my exact route and the instructions to call the sheriff if she doesn’t hear from me by a certain time.
Always sign in and out of any trail registers provided. Don’t hesitate to comment on the trail condition if space is provided; that’s your opportunity to alert others to any problems you encounter.
Do not count on a cell phone for your safety. Reception may be spotty or nonexistent on the trail, even on an urban walk—especially if it is embraced by towering trees.
Always carry food and water, even for a short hike. And bring more water than you think you will need. (That cannot be said often enough.)
Ask questions. State forest and park employees are there to help. It’s a lot easier to solicit advice before a problem occurs, and it will help you avoid a mishap away from civilization when it’s too late to amend an error.
Stay on designated trails. Even on the most clearly marked trails, there is usually a point where you have to stop and consider which way to go. If you become disoriented, don’t panic. As soon as you think you may be off track, stop, assess your current direction, and then retrace your steps to the point where you went astray. Using a map, a compass, and this book, and keeping in mind what you have passed thus far, reorient yourself, and trust your judgment. If you become absolutely unsure of how to continue, return to your vehicle the way you came in. Should you become completely lost and have no idea how to find the trailhead, remaining in place along the trail and waiting for help is most often the best option for adults and always the best option for children.
Always carry a whistle, another precaution that cannot be overemphasized. It may be a lifesaver if you do become lost or sustain an injury.
Be especially careful when crossing streams. Whether you are fording the stream or crossing on a log, make every step count. If you have any doubt about maintaining your balance on a log, ford the stream instead: use a trekking pole or stout stick for balance and face upstream as you cross. If a stream seems too deep to ford, turn back. Whatever is on the other side is not worth risking your life.
Be careful at overlooks. While these areas may provide spectacular views, they are potentially hazardous. Stay back from the edge of outcrops, and make absolutely sure of your footing; a misstep can mean a nasty and possibly fatal fall.
Standing dead trees and storm-damaged living trees pose a significant hazard to hikers. These trees may have loose or broken limbs that could fall at any time. While walking beneath trees, and when choosing a spot to rest or enjoy your snack, look up.
Know the symptoms of subnormal body temperature, known as hypothermia. Shivering and forgetfulness are the two most common indicators of this stealthy killer. Hypothermia can occur at any elevation, even in the summer, especially when the hiker is wearing lightweight cotton clothing. If symptoms present themselves, get to shelter, hot liquids, and dry clothes as soon as possible.
Know the symptoms of heat exhaustion (hyperthermia). Light-headedness and loss of energy are the first two indicators. If you feel these symptoms, find some shade, drink your water, remove as many layers of clothing as practical, and stay put until you cool down. Marching through heat exhaustion leads to heatstroke, which can be fatal. If you should be sweating and you’re not, that’s the signature warning sign. Your hike is over at that point—heatstroke is a life-threatening condition that can cause seizures, convulsions, and eventually death. If you or a companion reaches that point, do whatever can be done to cool the victim down, and seek medical attention immediately.
Most important of all, take along your brain. A cool, calculating mind is the most important asset on the trail. It allows you to think before you act.
In summary: Plan ahead. Watch your step. Avoid accidents before they happen. Enjoy a rewarding and relaxing hike.
Watchwords for Flora and Fauna
Be aware of the following concerns regarding plants and wildlife.
BLACK BEARS In my 20-plus years of hiking around Portland and Oregon, I have seen black bears exactly five times; three of those were running away before I spotted them, one never saw me, and one was so engrossed in huckleberries that it didn’t care about me at all. Though attacks by black bears are uncommon, the sight or approach of a bear can give anyone a start. If you encounter a bear while hiking, remain calm and avoid running in any direction. Make loud noises to scare off the bear, and back away slowly. In primitive and remote areas, assume bears are present; in more-developed sites, check on the current bear situation prior to hiking. Most encounters are food related, as bears have an exceptional sense of smell and not particularly discriminating tastes. While this is of greater concern to backpackers and campers, on a day hike, you may plan a lunchtime picnic or munch on an energy bar or other snack from time to time. So remain aware and alert.
BLACK FLIES Though certainly a pest and maddening annoyance, the worst a black fly will cause is an itchy welt. In this area, they are most active in the Cascades just after the snow melts, in June and July, during the day, and especially before thunderstorms, as well as during the morning and evening hours. Insect repellent has some effect, though the only way to keep out of their swarming midst is to keep moving.
MOSQUITOES Mosquitoes will mainly enter your hiking experience up in the Cascades in June and July, just after the snow melts. Ward off these pests with insect repellent and/or repellent-impregnated clothing. In some areas, mosquitoes are known to carry the West Nile virus, but in Oregon they are quite rare. The year 2016, for example, saw just four human cases. Still, all due caution should be taken to avoid their bites.
POISON OAK When using this book, your chances of encountering poison oak are greatest in the Columbia River Gorge, with the odds going up as you travel east. It likes dry country, so while you probably won’t see it at Multnomah Falls, you will see great stands of it at Catherine Creek. It also grows almost exclusively below 3,000 feet elevation, so on some hikes you will eventually get above it. Most people encounter poison oak while bushwhacking or traveling off-trail, so stay on established trails whenever possible.
Recognizing and avoiding poison oak is the most effective way to prevent the painful, itchy rash associated with it. The plant occurs as either a vine or a shrub, with three leaflets. It’s easiest to spot in summer and early autumn, when the leaves flush bright red. Beware of unknown bare-branched shrubs and vines in winter—the entire plant can cause a rash, no matter what the season.
Urushiol, the oil in the sap of the plant, is responsible for the rash. Within about 14 hours of exposure, raised lines and/or blisters will appear on the affected area, accompanied by a terrible itch. If you do happen to touch the plant, you must remove the oil within 15–20 minutes to avoid a reaction. Rinsing it off with cool water—hot water spreads it—is impractical on the trail, but some commercial products, such as Tecnu, are effective in removing it from your skin without the use of water.

Poison oak
Refrain from scratching because bacteria under your fingernails can cause an infection. As soon as possible, wash and dry the affected area thoroughly, applying a calamine lotion to help dry out the rash. If itching or blistering is severe, seek medical attention. To keep from spreading the misery to someone else, wash not only any exposed parts of your body but also any oil-contaminated clothes, hiking gear, and pets.
SNAKES In the region described in this book, you will very often encounter nonvenomous and nondangerous garter snakes; in the eastern Columbia Gorge, you might see a rattlesnake, although I never have. The best rule is to leave all snakes alone, give them a wide berth as you hike past, and make sure any hiking companions (including dogs) do the same.
The following is good advice for rattlesnake country, which again is really just the hikes east of Hood River. When hiking, stick to well-used trails, and wear over-the-ankle boots and loose-fitting pants. Do not step or put your hands beyond your range of detailed visibility, and avoid wandering around in the dark. Step onto logs and rocks, never over them, and be especially careful when climbing rocks. Always avoid walking through dense brush or willow thickets.
Should you encounter a rattlesnake, its body language will reveal its mood. A coiled rattler is primed for a strike, while a relaxed rattler is more sanguine. If the snake is within striking distance, stand motionless and wait for it to calm down and move on. Taking small, slow steps backward is another smart strategy. If you’re out of immediate range, you can either skirt the snake or wait for it to move. Some people believe tapping the ground with a stick—from a safe distance, rather than in the snake’s face—will encourage the snake to move on.
TICKS Ticks are often found on brush and tall grass, where they seem to be waiting to hitch a ride on a warm-blooded passerby. Adult ticks are most active April–May and again October–November. Among the varieties of ticks, the black-legged tick, commonly called the deer tick, is the primary carrier of Lyme disease. But Lyme disease is rare in Oregon, averaging 35–45 cases statewide per year. In 2016 Multnomah County had four reported cases.
Still, getting a tick is a hassle, so a few tips are in order. Use insect repellent that contains DEET. Wear light-colored clothing to make it easier for you to spot ticks before they migrate to your skin. At the end of the hike, visually check your hair, the back of your neck, your armpits, and your socks. During your posthike shower, take a moment to do a more complete body check. For ticks that are already embedded, removal with tweezers is best. Grasp the tick close to your skin, and remove it by pulling straight out firmly. Do your best to remove the head, but do not twist. Use disinfectant solution on the wound.
These arachnids like to hang out in the brush that grows along trails. I’ve noticed ticks mostly in the eastern Columbia River Gorge, but you should be tick-aware throughout the spring, summer, and fall. Ticks are ectoparasites, meaning they need a host for most of their life cycle in order to reproduce. The ticks that alight onto you while hiking will be very small, sometimes so tiny that you won’t be able to spot them. All ticks need to attach for several hours before they can transmit disease.
Hunting
Separate rules, regulations, and licenses govern the various hunting types and related seasons. Though there are generally no problems, hikers may wish to forgo their trips during the big-game seasons, when the woods suddenly seem filled with orange and camouflage. In our part of the world, this basically means the autumn, whether it’s deer, elk, or game birds. The only times I have ever encountered hunters on a hike around here were on Sauvie Island in late October and way up in the Cascades in mid-October. And that’s a total of three times.
REGULATIONS
The only regulations we need to concern ourselves with have to do with parking, registration, and the size of our groups.
For parking, if you have a Northwest Forest Pass, Oregon State Parks Pass, and a Washington State Parks Discovery Pass, you will have access to almost every trail in this book. A few have their own parking costs, and those will be mentioned in the text.
In designated wilderness areas, two more regulations come into play. One is that you will be required to fill out a free permit when entering the wilderness. The other is that, within wilderness areas, groups size is limited to 12 people.
Trail Etiquette
Always treat the trail, wildlife, and fellow hikers with respect. Here are some reminders.
Plan ahead in order to be self-sufficient at all times. For example, carry necessary supplies for changes in weather or other conditions. A well-planned trip brings satisfaction to you and to others.
Hike on open trails only. In seasons or construction areas where road or trail closures may be a possibility, use the websites or phone numbers shown in the “Contacts” line for each hike to check conditions prior to heading out. And do not attempt to circumvent such closures.
Avoid trespassing on private land, and obtain all permits and authorization as required. Also, leave gates as you found them or as directed by signage.
Be courteous to other hikers, bikers, and equestrians you encounter on the trails.
Never spook wild animals or pets. An unannounced approach, a sudden movement, or a loud noise startles most critters, and a surprised animal can be dangerous to you, to others, and to itself. Give animals plenty of space.
Observe the yield signs around the region’s trailheads and backcountry. Typically they advise hikers to yield to horses, and bikers to yield to both horses and hikers. By common courtesy on hills, hikers and bikers should yield to any uphill traffic. When encountering mounted riders or horsepackers, hikers can courteously step off the trail, on the downhill side if possible. So that the horse can see and hear you, calmly greet the riders before they reach you and do not dart behind trees. Also resist the urge to pet horses unless you are invited to do so.
Stay on the existing trail and do not blaze any new trails. Don’t cut short the switchbacks!
Be sure to pack out what you pack in, leaving only your footprints. No one likes to see the trash someone else has left behind. And yes, this includes bags of dog poop.
Tips on Enjoying Hiking Around Portland
It would be hard to have a bad time hiking around Portland, but there are degrees of enjoyment. Here are my tips to help you make the most of your day.
Try to avoid the crowds. I know it’s hard for many people to get out during the week, but understand that if you hike in the Gorge or at Mount Hood on weekends, it may be a madhouse. Go early in the morning. Or go after work (and bring a headlamp). Or go somewhere else! For the Gorge, in particular, I have offered a less crowded alternative for some of the most popular hikes.
Try hiking at different times of day. I love hitting a crowded trail in midafternoon, when the morning shift has left and the midday crowd is clearing out. Go nuts sometime and hike for the sunrise or sunset.
Bring food you actually like. Sounds silly, I know, but if you don’t like energy bars, don’t bring them. Bring something you want to eat. I also carry a couple of freezer packs on many hikes to keep my sandwich or fruit fresh.
Potluck it. Plan on a group meal along the way.
Have a hot meal or beverage. Who says you can’t bring your camp stove on a day hike? Pasta for lunch in a flowery meadow works pretty well.
Bring group snacks. People like people with snacks.
Carpool, and pitch in for gas.
Bring fresh socks and sandals or other comfortable footwear for the trip home. Kicking off those hiking shoes and filthy socks is the best!
Bring a bag to stash your dirty hike gear in for the drive home—especially if you’re a passenger.
Pack a cooler and posthike snacks in the car. Nothing beats finishing up the hike, kicking off your shoes, tearing into a bag of salty goodness, and washing it down with some liquid sugar. Or a beer, if you’re not driving. Or fruit, if that’s your thing.
Seriously consider shuttles and key swaps. I mention them where they make sense, but a key swap is a blast. Get two groups of people, swap cars on the way to the hike, park at either end, hand off keys when you meet, and then you’re hiking to your own car for the trip out. Or do the swap posthike over coffee or food. Bringing a spare for your ride is a good idea, too.
Make it an overnighter. Whether camping near the trailhead or spending a night in a hotel, why not make it two days in a row? I love spending a couple of nights every spring in Hood River, exploring the town and only doing that tedious drive home once. Same thing for the coast.
Get a cushion to sit on. Every time I whip out my little foam sit pad, people gawk and say they have to get one. Best $12 I ever spent.
Get a bladder for your water. It’s nice to take a sip without taking off your pack.