
By David Samuels
My most prized possession during my fractured childhood was a red plastic transistor radio that I religiously kept tuned to 1010 WINS news. “You give us twenty-two minutes, we’ll give you the world” was a promise that, minute by minute and hour by hour, helped me maneuver through a landscape of childhood strife. In twenty-two minutes, a war might break out. A three-car accident might close inbound traffic lanes on the Brooklyn Bridge.
When the anxiety became too much for me to handle, I would be packed off to spend the weekend with a Hasidic family in Borough Park or Crown Heights, where parents never fought and children came downstairs freshly washed and dressed for Friday-night dinner. There, I never needed my radio. The families who lived in the solid, modest brick houses were warm and accepting, and they took care of each other. They took me to see their rebbes, each of whom incarnated a different and wondrous style of spiritual kung fu. The Lubavitcher Rebbe’s unearthly blue eyes could penetrate your inner soul with a single glance and see everything there was to see there. The Bobover Rebbe was joyous and funny, and his Hasidim were, too. Together, they sang for hours, until their wordless melodies broke open the doors of heaven. The Belzer Rebbe was nice, too.
What these rebbes had in common with me was that we had all, in different ways, been touched by God. Finding a way to express that feeling was the work of a lifetime, which perhaps only a holy person could accomplish. But what about the Satmar Rebbe? It was said that Rebbe Yoel was a great tsadik, who pursued stringencies that even the Lubavitcher Rebbe, himself a titan, could never have handled, like waiting twenty-four hours to eat dairy after eating meat, perhaps, or fasting for the entire week of Tisha B’Av.
When I got older, I learned that Rebbe Yoel’s pursuit of extreme stringencies had led him to board a train to Switzerland at the darkest hour of Jewish history after forbidding members of his community from saving themselves. Better to die, he told them, than to travel to Palestine or America and lose your faith in such godless places. Even today, the story of Rebbe Yoel makes me feel a mixture of fury and helplessness that I associate with being a frightened child, clutching my little radio. There was nothing good about the secrets the Satmar were keeping.
Except I was wrong. When my first son was born, I needed something to serve guests at his bris, and I ventured down to Lee Avenue in Williamsburg, where I discovered the greatest chocolate babka in the world, a tall brioche filled with swirls of moist chocolate lava, which dries on the outside into an impossibly delicious crust. It is available at the Oneg Heimishe Bakery, which goes by other names, and is located just below street level, right across the highway. If you are looking for it, you will find it. And if not, not.
by Uri Scheft
Makes two 9 by 5-inch (23 by 13-centimeter) babkas
For the Dough
½ cup (120 milliliters) whole milk, at room temperature, plus more if needed
½ teaspoon pure vanilla extract
2½ tablespoons (20 grams) fresh yeast, or 2 teaspoons active dry yeast
2¼ cups (280 grams) unbleached all-purpose flour, sifted, plus more if needed and for dusting
2 cups plus 2 tablespoons (220 grams) pastry flour or cake flour, sifted
2 large eggs
⅓ cup (65 grams) sugar
Large pinch of fine sea salt
5 tablespoons plus 1 teaspoon (80 grams) unsalted butter, at room temperature, plus more for greasing
For the Filling
1½ cups (420 grams) Nutella
1 cup (150 grams) semisweet chocolate chips
For the Streusel Topping
⅓ cup (65 grams) sugar
1⅔ cups (170 grams) pastry flour or cake flour
8 tablespoons (1 stick/115 grams) cold unsalted butter, cut into very small slivers
For the Simple Syrup
¾ cup plus 1 tablespoon (160 grams) sugar
½ cup (120 milliliters) water
Make the dough: Put the milk in the bowl of a stand mixer and whisk in the vanilla by hand. Using a fork or your fingers, lightly mix the yeast into the milk. Fit the mixer with the dough hook and add the flours, eggs, sugar, salt, and finally the butter in small pinches.
Set the mixer on the lowest speed and mix, stopping to scrape down the sides and bottom of the bowl as needed and to pull the dough off the hook as it accumulates there and break it apart so it mixes evenly, until the dough is well combined (it will not be smooth), about 2 minutes.
If the dough is very dry, add more milk, 1 tablespoon (15 milliliters) at a time; if the dough looks wet, add more all-purpose flour, 1 tablespoon (8 grams) at a time, until the dough comes together. Increase the mixer speed to medium and mix until the dough is smooth and has good elasticity, about 4 minutes.
Lightly dust your work surface with flour and turn the dough out on top; lightly dust the top of the dough and the interior of a large bowl with flour. Grab the top portion of the dough and stretch it away from you, tearing the dough, then fold it back on top of the dough. Give the dough a quarter turn and repeat the stretch, tear, and fold until you can stretch a small piece of dough very thin without it tearing, about 5 minutes. Use your hands to push and pull the dough against the work surface in a circular motion to create a nice round of dough. Set the dough in the floured bowl, cover the bowl with plastic wrap, and set aside at room temperature for 30 minutes.
Transfer the dough to a piece of plastic wrap and press it into a 1-inch-thick (2.5-centimeter) rectangle. Wrap the dough in the plastic wrap and refrigerate for at least 1 hour or up to 24 hours.
Lightly grease two 9 by 5-inch (23 by 13-centimeter) loaf pans with butter.
Fill the dough: Unwrap the dough and roll it into a 9 by 24-inch (23 by 60-centimeter) rectangle. Spread the Nutella in an even layer over the dough, all the way to the edges, then sprinkle the chocolate chips in an even layer over the Nutella, across the entire surface of the dough. Working from the top edge, roll the dough into a tight cylinder. As you roll it, push and pull the cylinder a little to make it even tighter. Holding the cylinder by the ends, lift and stretch it slightly to make it even tighter and longer.
Slice the dough in half lengthwise, and set the halves with the exposed layers facing up. Divide the strips in half crosswise to make 4 shorter strips. Overlap one strip on top of another to make an X, making sure the exposed chocolate part of the dough faces up; then twist the ends together like the threads on a screw so you have at least two twists on each side of the X. Place the shaped babka in one of the prepared pans, exposed chocolate–side up. The dough should fill the pan by two-thirds and fit the length perfectly. Cover the pan with plastic wrap. Repeat to shape and twist the remaining 2 pieces of dough, place them in the second prepared pan, and cover with plastic wrap.
Set the loaf pans aside in a warm, draft-free spot until the dough rises 1 to 2 inches above the rim of the pans and is very soft and jiggly to the touch, 2 to 3 hours, depending on how warm your room is (see Note).
Meanwhile, make the streusel: Combine the sugar and pastry flour in a medium bowl. Add the cold butter and use your fingers or a dough cutter to work the butter into the dry ingredients until the mixture looks pebbly and all the butter bits have been incorporated. Cover the bowl with plastic wrap and refrigerate.
Bake the babkas: Preheat the oven to 350ºF (177ºC). (If you are letting the dough rise in the oven, as described in the Note, be sure to remove the loaf pans and bowl of water before preheating.)
Sprinkle the streusel evenly over the top of both babkas. Bake until the babkas are dark brown and cooked through, about 40 minutes; check them after 25 minutes, and if they are getting too dark, tent them loosely with a piece of parchment paper or aluminum foil.
Meanwhile, make the simple syrup: Combine the sugar and water in a small saucepan and bring to a boil over high heat. Reduce the heat to medium-low and simmer, stirring occasionally, until the sugar has dissolved. Turn off the heat and set the syrup aside to cool.
Remove the babkas from the oven and, while they are still hot, brush the surface of each generously with the cooled sugar syrup, taking care not to brush off the streusel (the syrup makes the top of the babkas shiny and beautiful and also locks in moisture so the cake doesn’t dry out; you may not need to use all the syrup—save any extra in an airtight container in the refrigerator and use it for sweetening iced coffee or tea). Run a paring knife between the babkas and the pan edges and turn them out of the pans. Slice and serve warm, or let cool completely in the pans before unmolding and slicing.
NOTE: If your room is very cold, you can speed up the rising process: Set a large bowl of hot water on the floor of the oven, place the loaf pans on the middle oven rack, close the oven door, and let the dough rise. Just remember that your babkas are in there before preheating the oven!

By Liel Leibovitz
Are you sitting down? Because I have news for you that you might not want to hear: The bagel is the least Jewish food in the world. Sure, the word itself comes from Yiddish. Right, it was brought to America by Jewish immigrants from Poland. True, it has become synonymous with the American Jewish experience, the archetypal culinary staple of our people. But somewhere along the way, the bagel ascended to the throne of America’s most popular breakfast bun, found its way into corners of the country untouched by Jews, and lost its soul. These days, the best bagel joints on earth aren’t run by Jews: Absolute Bagels on Manhattan’s Upper West Side is owned by Thai immigrants, Montreal’s St-Viateur Bagel chain is run by a nice Italian boy, and in Cleveland, two gentiles launched a bagel start-up without ever having stuffed their faces with the doughy delight after fasting on Yom Kippur. Just as foreign to the intricacies of tradition are those members of the tribe who, knowing little about their religion and uninterested in learning, describe themselves playfully as “Bagel Jews,” as if some schmear could cover up their discomfort with their heritage. So good-bye, bagel: We may still stack you with lox on a Sunday morning, but you belong to all of America now.
In Defense Of bagel jews
More than half of American Jews say being Jewish is mainly a matter of ancestry and culture, so I say it’s high time we take them at their word and recognize the integrity of Bagel Jews, for whom biting into the perfectly chewy cream cheese–slathered bread of our people is the closest thing there is to a religious experience. In fact, bagels and those who love them are as Jewish as Jewish can be. Jews love a good loophole (did you grow up with Shabbat timers on your lights?), and somewhere between the poor bagel pushcart operators of the Lower East Side and the Lender’s Bagel magnates of New Haven, we found our own alternative to eggs Benedict and bacon, egg, and cheese sandwiches in the form of the beloved cream-cheese-and-lox duo.
Of course, as with every Jewish practice, where there are two Jews, there are three opinions about what makes a perfect bagel: toasted or not, boiled or just baked, Brooklyn or Montreal. Still, the fact that the bagel has become a brunch staple gives Jews of all religious bents an opportunity to be as proud of our bread as we are of Leonard Cohen, to claim our place in mainstream culture while honoring our ancestors and preserving our traditions. As for yids in exile (we don’t all choose to reside in Brooklyn or Pico-Robertson), there’s no action more devout than stocking up on a baker’s dozen of our chewy Jewy bread, freezing it, and savoring the limited supply until the next coastal trip.
Danya Shults

How to Assemble an Appetizing Platter
What is a bagel if not for the smoked fish and the schmear? Talmudic scholars have wrestled with this question since biblical times. The answer can be found in an appetizing platter, a choice selection of smoked and cured fish served with bagels, cream cheese, and other accoutrements on the side.
There’s an art to assembling this mainstay of Jewish life, present at celebrations large and small, joyous and somber. You can personalize the platter to your taste, but the classic elements include Nova lox, paprika-rimmed sable, thick-cut kippered salmon, and a whole whitefish. (If you wish to serve pickled herring, place it in a separate bowl off to the side to contain the vinegary juices.) Account for 3 to 4 ounces of fish per guest, depending on their appetites.
Choose a serving platter or board big enough to fit all the fish, then line it with hearty greens, such as kale, lettuce, or collards, that have been thoroughly cleaned and dried. Position the whole whitefish down the center of the platter, peeling back the skin so guests can scoop out the meat. Arrange the other fish around it, each in its own zone. Lay a spoon next to the whitefish, and serving forks or ice tongs near the others. If you plan to replenish the platter while you’re entertaining, have preportioned smoked fish ready to go in the fridge.
Place a basket of sliced fresh bagels and toasted bialys nearby, as well as bowls of plain and scallion cream cheese (2 ounces per person should do the trick). On another plate, arrange sliced tomatoes and cucumbers, thinly sliced red onion, lemon wedges, and capers.
The irony of assembling such a painstaking spread? It will quickly get demolished.
By Katharine Weber

No other immigrant group is as central to the candy trade as Jews.
One hundred years ago, most confections were generic, sold as penny candy from jars on shop counters or distributed by peddlers, most of them Jewish immigrants from Europe who sold a variety of goods on their rounds. Some of those peddlers arrived in the United States with little more than the clothes they were wearing and an entrepreneurial spirit, and learned the candy trade from their employers. Candy was a relatively easy thing for a newcomer to make. It did not require a significant investment in equipment, materials, or labor, and could be made on a stovetop with a few inexpensive ingredients. Ruined batches were cheap failures, and regular production helped move businesses from home kitchens and pushcarts to retail shops and factories.
Topps was established by the four Shorin brothers in 1938, after their father’s American Leaf Tobacco business, founded in 1890 in Crown Heights, Brooklyn, faltered during the Depression. (Their father, Morris Chigorinsky, changed his name to Shorin after he arrived from Russia in 1888.) Wanting to take advantage of his tobacco distribution channels with a product they could sell to those same outlets, the brothers relaunched the family business with a name—Topps—that echoed the Cole Porter lyric “You’re the top!” When sugar was rationed during World War II, Topps bought up small candy companies, closed them, and used their sugar quotas. The company thrived even while larger gum brands went out of business.
Dubble Bubble ruled the bubble gum market when Abraham, Ira, Philip, and Joseph Shorin developed Bazooka bubble gum, recognizing that as World War II ended, the wartime slogan for their spearmint-flavored Topps Chewing Gum, “Don’t Talk Chum, Chew Topps Gum!” (a variation of “Loose lips sink ships”) was about to become obsolete. Bazooka Joe was modeled after Joseph Shorin, and soon became an iconic American character.
Not bad for a bunch of Jewish brothers from Brooklyn.
get the joke?
Bazooka gum is, essentially, Jewish Laffy Taffy—except with even more inscrutable jokes.
While the franchise originated in America, along with its profoundly odd “Bazooka Joe” comic strip, its Israeli offshoot and its Hebrew cartoons have become a staple of Jewish life and a favorite of countless candymen in synagogue. There is even an Israeli clothing company for religious women that inexplicably includes a square of the gum in every shipment. And while the American brand discontinued its accompanying comic strip in 2011, the Israeli comic is still going strong, punch line after impenetrable punch line.
Yair Rosenberg
By Mimi Sheraton

The bialy was the sole invention and provenance of Jewish bread bakers in Bialystok, Poland. They were much larger in Bialystok than they are in New York—roughly the size of an 8-inch salad plate. I have a photograph taken in 1939 of a boy holding up a bialy, which, by the way, was called a Bialystoker kuchen. They were made only in Bialystok. People from the surrounding regions called the Bialystok Jews Bialystoker kuchen fressers.
When I was doing research for my 2000 book The Bialy Eaters, I got a lot of arguments from people asserting that bialy is just a New York name for pletzel. But it isn’t true. It is the same dough, but the form is different. In fact, I developed my own theory as to how the bialy was invented. I think it was indeed made by bakers who made pletzels, which are big onion discs, which in Bialystok always had poppy seeds and, of course, onions. My theory is that a pletzel, having been formed but not baked, fell on the floor and somebody stepped on it with the heel going into the center, then, being frugal, decided to bake it anyway and see what happened. And so the bialy was born.
I interviewed many former Bialystokers about their town’s most famous export. They never split them the way we split a bagel. Whatever was going to be put on a bialy, if anything, was put on top. (As Max Ratner, a Bialystok native, told me, “Who could afford to put anything on them?” “Were they a luxury?” I asked. “Darling,” he responded, “food was a luxury.”)
But what everyone loved most was the fact that the rim was soft while the center was very thin and crisp—which is almost never achieved here in America. Someone in the family always liked the soft part, and someone else liked the crisp part, and it was to the bialy’s credit that it could make everyone happy.
Bialys
Makes 24 bialys
For the Sponge
3½ cups (564 grams) bread flour
1 teaspoon active dry yeast
2⅔ cups (631 milliliters) water, at room temperature
For the Filling
3 tablespoons (45 milliliters) extra-virgin olive oil
6 cups (1 kilogram) diced yellow onions (about 6 medium)
½ teaspoon kosher salt
3 tablespoons (19 grams) poppy seeds
For the Dough
3½ cups (564 grams) bread flour, plus more if needed
½ teaspoon active dry yeast
1 tablespoon kosher salt, plus more for sprinkling
½ cup (120 milliliters) water, at room temperature, plus more if needed
Prepare the sponge: Stir together the flour and yeast in a large bowl using a wooden spoon. Make a well in the center and pour in the water. Starting in the center of the well, move the spoon in a circular motion, increasing the area of the well and pulling flour into it until all the flour has been incorporated and you have a homogenous mass, about 3 minutes. The sponge will have a fairly loose consistency.
Cover with plastic wrap and let the sponge sit at room temperature until it doubles in size and develops bubbles on the surface, about 2 hours.
Make the filling: Heat the olive oil in a large skillet over medium heat. Add the onions and salt, reduce the heat to medium-low, and cook, stirring occasionally, until the onions are very soft, golden brown, and substantially reduced in volume, 25 to 30 minutes. Let cool, then stir in the poppy seeds. Set aside.
Make the dough: In the bowl of a stand mixer fitted with the dough hook, mix the flour, yeast, and salt on low speed for 1 to 2 minutes, until combined. Add the water and the sponge and mix on low speed for about 3 minutes to incorporate. Increase the speed to medium and mix for 5 to 7 minutes, until the dough is smooth and starts to pull away from the sides of the bowl. The dough should be shiny, elastic, and somewhat tacky, but not sticky. If the dough is clinging to the sides of the bowl, add more flour 1 tablespoon at a time until it reaches the desired consistency. If the dough feels dry, add more water 1 teaspoon at a time until it reaches the desired consistency.
Line two baking sheets with parchment paper and lightly sprinkle the parchment with flour.
Divide the dough into two equal pieces. Place one piece in a bowl and cover with plastic wrap to prevent it from drying out; set aside.
On a lightly floured work surface, using your hands, flatten the other piece of dough gently until you have released the air bubbles, but do not knead it. (After the dough has risen, it is easier to handle. Kneading it again will make it tight.)
Stretch the dough gently into a rope about 18 inches (46 centimeters) long and, using a bench scraper or a sharp knife, divide it into 12 equal pieces. If you do not have a scale, do your best to estimate the size.
Flatten a piece of dough with the palm of your hand, shaping it into a 3-inch (7.5-centimeter) disk. Gather the sides of the dough into the center and pinch them together, forming a small sphere. Turn the dough over, pinched-side down, and rotate it gently in a clockwise direction, tucking the sides in and making sure it is a completely round, roughly 2-inch (5-centimeter) ball. Place it on a prepared baking sheet and repeat with the remaining pieces of dough. Sprinkle the dough balls lightly with flour, cover with plastic wrap, and let rest for 20 to 30 minutes. Repeat with the second half of the dough.
Line two more baking sheets with parchment paper, or reuse the sheets that the dough is resting on, lining them with fresh parchment paper.
To shape the bialys, place a dough ball on a lightly floured surface, flatten it slightly with your hands, and, using a rolling pin, roll it into a 5-inch (12.5-centimeter) disk. Using your fingers, go around the disk, shaping a ½-inch (1.5-centimeter) rim, then stretch the dough in the center toward the rim until it is thin. Be careful not to tear the dough. Your bialys should have thin, crunchy centers and puffy, soft rims. Press a wide-bottomed glass, about 3 inches (7.5 centimeters) wide, into the center to flatten it. Transfer the disk to a prepared baking sheet and fill it with a scant 2 tablespoons of the filling, spreading it just on the inner part and leaving the rim clean. Sprinkle the filling with a touch of salt. Repeat with the remaining disks, placing them at least 1 inch (2.5 centimeters) apart on the baking sheets.
Put each baking sheet inside a large plastic bag and let the bialys rest for 20 to 30 minutes. Do not let the plastic touch the bialys, as they will puff up a bit.
Position a rack in the center of the oven. Preheat the oven to 500ºF.
After the bialys have rested, bake them for 12 to 15 minutes, until golden brown. Let cool on a wire rack.
The bialys will keep in a plastic bag at room temperature for up to 2 days or in the freezer for up to 2 months.
By Melissa Clark

Long before Jerry Seinfeld and President Obama declared black-and-white cookies to be an edible symbol of racial harmony, these chocolate-and-vanilla confections were simply a treat my grandmother Ella picked up at our local kosher bakery in Flatbush, along with the mandelbrot and babka. Maybe it was your cousin Rose who got them on the Upper West Side, or your great-uncle Harry in the Bronx. They were all around the city.
Black-and-whites have been an entrenched part of the very robust Jewish cookie scene in New York City for a century. More ubiquitous than rugelach, they are available in bodegas and bagel shops, where they remain as popular as ever.
They didn’t necessarily start out as Jewish. Originally from Bavaria, they came to the United States with German immigrants—maybe Jewish, maybe not. Some sources state that the cookies began their American sojourn on the Lower East Side; others point to Utica, New York. Versions of the cookie exist across the Northeast and Midwest, where they go by different names (half-moons, harlequins). The recipe is changeable as well. In some places, they’re made from devil’s food cake and soft buttercream instead of the lemon-scented sponge cake shellacked with the hardened chocolate and vanilla glazes I knew as a child. Other places use shortbread cookies and fondant.
But wherever or however they’re made, their common ground is chocolate and vanilla coexisting on a smooth, sweet surface. They’ve adapted to their surroundings without losing their essence, just like the Jews (and many other American immigrants, for that matter). And like bagels, Chinese food, and Jerry Seinfeld, they’re a deep-rooted part of the New York Jewish experience—no matter where you might have experienced them.
Black-and-White Cookies
Makes 36 small cookies
For the Cookies
1¼ cups (160 grams) unbleached all-purpose flour
½ teaspoon baking powder
½ teaspoon salt
1 teaspoon pure vanilla extract
¼ cup (60 milliliters) whole milk
1 teaspoon fresh lemon juice
6 tablespoons (¾ stick/85 grams) unsalted butter, at room temperature
½ cup (170 grams) granulated sugar
1 large egg, at room temperature
For the Glazes
1½ cups (165 grams) confectioners’ sugar
¼ cup plus 1 tablespoon (75 milliliters) whole milk
½ teaspoon pure vanilla extract
¼ cup (25 grams) unsweetened cocoa powder, sifted
Position a rack in the upper third of the oven. Preheat the oven to 375ºF (190ºC). Line two baking sheets with parchment paper or silicone baking mats.
Sift together the flour, baking powder, and salt into a medium bowl and set aside.
Combine the vanilla, milk, and lemon juice in a small bowl or a measuring cup and set aside.
In the bowl of a stand mixer fitted with the paddle attachment, or in a large bowl using a handheld mixer, beat the butter on high speed for about 1 minute, until light and airy. Gradually mix in the granulated sugar. Add the egg and beat until incorporated, then stop to scrape down the bowl.
With the mixer on medium-low speed, alternately add the flour and milk mixtures in three additions, starting and ending with the flour mixture and mixing until just combined after each addition; stop to scrape down the bowl as necessary.
Use a cookie scoop or a tablespoon to drop 1-tablespoon mounds of dough onto a prepared baking sheet, spacing them about 1½ inches (4 centimeters) apart. Bake in the upper third of the oven for 8 to 10 minutes, until the cookies are firm to the touch and fragrant. Repeat with the remaining batter. Let the cookies cool on the baking sheet for 10 minutes, then transfer them to a wire rack set over a sheet of parchment paper. Turn them over—the flat underside will become the top side of the cookie for easy glazing—then cool completely.
Make the glazes: Combine the confectioners’ sugar, ¼ cup (60 milliliters) of the milk, and the vanilla in a small bowl and stir until smooth. Holding a cookie in one hand over the bowl of glaze, use a small spoon to scoop up the glaze and pour it over half the cookie, then, with the back of the spoon, move the glaze around to completely coat half the cookie. Push any excess glaze off the edges so as to fully cover the half. Return the half-glazed cookie to the rack. Repeat with the remaining cookies.
Add the cocoa powder to the glaze remaining in the bowl, then add a teaspoon or two of additional milk, just enough to loosen it—you want it opaque enough to cover the cookie, but thin enough to be workable. Mix until smooth.
Glaze the unglazed half of each cookie as you did with the white glaze. Return them to the rack to set for 30 minutes before eating them or packing them up.
The cookies will keep in an airtight container at room temperature for up to 3 days.
separate but equal?
Now, I love the taste of black-and-white cookies as much as any respectable Jew. But I don’t understand why the black-and-white is hailed as a symbol of what a racially harmonious society should look like. It far more accurately illustrates how our society actually functions: Y’know, with black people all on one side, white people all on the other side, and a very thin margin in between where both sides are able to actually meet. How did we get duped into thinking that the baked good representation of the Mason-Dixon Line was something to aspire to?
Brown v. Board of Education didn’t happen so we could have “separate but equal” distribution of fondant, people. Let’s face it: When Justice Earl Warren said that separation is “inherently unequal,” he was talking about the vanilla half of the cookie. Because it’s always shittier than the chocolate side.
“See, the key to eating the black-and-white cookie, Elaine,” says Jerry on the infamous Seinfeld episode that introduced this concept, “is that you want to get some black and some white in each bite. Yet somehow racial harmony eludes us. If people would only look to the cookie, all our problems would be solved!”
Don’t do it, people. Don’t look to the cookie.
MaNishtana
By Adina Steiman

Blintzes might seem as familiar as other Jewish-food classics like babkas or latkes, but hardly anyone thinks they deserve to be reinvented with a blanket of duck-fat cracklings or a tahini-dosed filling. In fact, now that my grandmother has passed away, I don’t know a single person brave enough to attempt them, much less succeed at making them, as she did after decades of practice. But that lack of fashion only proves the blintz’s Jewish bona fides. Perhaps it’s because, even more than latkes, blintzes require a balaboosta’s true mastery of the frying pan.
In fact, “pans” should be plural, since you can’t produce blintzes in any useful quantity without having a couple of them going simultaneously—yet another degree of difficulty. But with a master behind the stove, the allure of the blintz, blurred by too many freezer-burned simulacra, comes into sharp focus. Tender and slightly thicker than crepes, the bletlach (Yiddish for “leaves”) are the foundation of the dish. And just like cooking crepes, cooking bletlach well requires hard-earned muscle memory, since the hot pan engraves every hesitation, every misstep you make with the batter.
Unlike crepes, bletlach are cooked only on one side to maintain a pillowy softness within—a softness that melds with the invariably tender fillings. Cottage cheese, or farmer cheese, is a classic, but my grandmother never liked the gummy, thickened versions she’d find at the supermarket, so she’d use ricotta cheese, along with a dose of cream cheese for richness and tang. She’d mix in a couple of eggs to help the filling set, and just a tiny bit of vanilla, sugar, and salt to balance the flavor. She wasn’t making dessert. She was making blintzes. And if her greengrocer had saved her some marked-down, overripe blueberries, they’d go in the bowl, too.
She’d fill and fold dozens of blintzes at a time, regardless of who was coming over, since she knew that they freeze beautifully if separated by sheets of waxed paper. Then, after thawing them for a day in the fridge, she’d give them their final panfrying, browning the tender leaves of those tidy packages until they turned as golden brown as autumn, transforming the sweet dairy within into molten lava ready to be released with the side of a fork. We’d never wait for her to finish frying them to eat them. She insisted we start as soon as they hit the paper towels, and she kept making more as we shouted our praise into the kitchen. Until there were none left.
Cheese Blintzes
Makes 32 blintzes; serves 6 to 8
For the Blintzes
4 large eggs
4 tablespoons (½ stick/55 grams) unsalted butter, melted, plus 2 tablespoons (30 grams) at room temperature
1 cup (240 milliliters) whole milk, plus more if needed
1¼ cups (300 milliliters) water, plus more if needed
2 tablespoons (20 grams) sugar
1 teaspoon pure vanilla extract
⅛ teaspoon kosher salt
2 cups (250 grams) unbleached all-purpose flour
For the Filling
2 cups (455 grams) farmer cheese
1 large egg
½ teaspoon packed lemon zest
3 tablespoons (30 grams) sugar
¾ teaspoon pure vanilla extract
Pinch of kosher salt
Make the blintzes: Place the eggs, 2 tablespoons (29 milliliters) of the melted butter, the milk, water, sugar, vanilla, and salt in the bowl of a food processor. Process for 20 seconds to combine. Add the flour and process for 20 seconds more. Scrape down the sides of the bowl with a spatula, then process for 20 seconds more. The batter will be very smooth and have the consistency of light cream. Transfer the batter to a medium bowl, cover, and refrigerate for at least 1 hour or up to 12 hours.
Stir the batter if it has separated, and add 1 tablespoon (15 milliliters) more water or milk if it has thickened too much. It should have the consistency of heavy cream and flow easily when you tilt the pan to distribute the batter.
Set up your work area: Have a large cutting board, a dish with the remaining 2 tablespoons melted butter, a paper towel folded into quarters, a ladle or ¼-cup (60-milliliter) measuring cup, and a butter knife with a rounded tip near the stove.
Heat a 6-inch (15-centimeter) crepe pan over medium-high heat. Moisten the paper towel with melted butter and use it to grease the pan. Using the ladle or measuring cup, scoop about 3 tablespoons (45 milliliters) of the batter into the skillet and swirl the pan to evenly coat the bottom and partway up the sides. The blintz should be about 1⁄16 inch (1.5 millimeters) thick, not paper-thin like a crepe.
After about a minute, when the edges of the blintz start to curl, use the tip of the butter knife to gently lift the edge of the blintz to check if it is browning on the bottom—it should be. (If the batter starts to blister and small holes form, reduce the heat slightly.) Cook the blintz on one side only. With one swift motion, flip the pan over the wooden board to release the blintz onto it, browned-side up, leaving enough space on the board for more blintzes to be placed side by side. (Once they have cooled, you can start stacking them on top of one another.) Repeat until all the batter has been used, greasing the pan after making each blintz—the butter prevents them from sticking together when they are stacked.
Make the filling: Place all the filling ingredients in the bowl of a food processor and process for 30 seconds. Scrape the sides of the bowl with a spatula and process again until blended, about 20 seconds more.
Set a blintz in front of you, browned-side up. Place a heaping tablespoon of the filling closer to the upper third of the blintz and flatten it slightly to form a small rectangle, about ½ inch (1.5 centimeters) thick. Lower the upper flap to cover the filling, fold both sides toward the center of the blintz to enclose the filling, and roll the filled portion toward you, ending seam-side down. Repeat until you have used all the filling. (You will have some unfilled blintzes left over. They are delicious folded, fried in butter, and topped with jam.)
To fry the blintzes, melt the remaining 2 tablespoons (30 grams) butter in a nonstick skillet over medium heat. When the butter is sizzling, place a few blintzes in the pan, seam-side down, and cook until golden brown on the bottom, 2 to 3 minutes. Flip them over using two forks and cook until they brown on the second side and puff up, 2 to 3 minutes more.
Serve immediately with sour cream and fresh berries or fruit compote.
Store filled, unfried blintzes, seam-side down, in an airtight container in the refrigerator for up to 4 days, or stack them between layers of waxed paper and store in an airtight container in the freezer for up to 2 months.
(Carob)
By Marjorie Ingall

If you attended a Jewish day school in the twentieth century, chances are, you know from bokser. Every Tu B’Shevat, a long, flat, curved, brown carob seed pod showed up on your desk, and you loved it. Despite its being disgusting. Tu B’Shevat celebrates the beginning of spring, and the custom is to eat a new fruit. Bokser was invariably new, always thrilling; it was the only time any of us saw or ate it. We had no idea that bokser was the same substance certain hippie moms tried to foist upon us, telling us it was “as good as chocolate!” It wasn’t.
According to the indispensable Jewish etymologist Philologos, the word bokser comes from the German Bockshornbaum, which means “ram’s horn tree.” Indeed, the pod resembled a dark, petrified horn. The texture was like that of a dead stick. The smell has been compared to Limburger cheese. The taste, at first, was nonexistent. Gradually, though, as you sucked and chewed, the slightest hint of chocolate came through. That moment was transcendent.
Alas, your interest and your jaw probably gave out long before you got through the thing; no one has ever finished an entire bokser. (As the goyim say of fruitcake, perhaps there is only a single one that just gets passed around year after year.) But in the years before supermarkets were filled with fruits and veggies from South and Central America, Asia, and Africa, you’d marvel at the fact that this mysterious object in your hand had come all the way from Israel.


By Zac Posen
Beets! Their color is like nothing else. I always want to start dyeing fabric in it. I’ve definitely dipped a napkin or two in my soup to test the colors. (You get a beautiful hot pink.)
When I decided to include a recipe for borscht in my cookbook, Cooking with Zac, it raised some eyebrows. It became an experiment in how to make haute borscht. Mine is pureed, and incorporating sour cream creates a more opaque look and adds texture. Something white in your red or pink fuchsia base. I enjoy the combination of the sour bite, the earthy richness of the beet, and the sweetness matched with that incredibly vibrant color from nature. There’s something retro and unusual about the flavor of Jewish cuisine because of that sour-sweetness. That’s very culturally appropriate. Life brings you sweet moments and sour moments. In Jewishness, as in good borscht, you should be able to find a balance of both.
Borscht
Serves 4 to 6
2 tablespoons (30 milliliters) olive oil
1 medium onion, diced
1 teaspoon kosher salt, plus more to taste
1 bay leaf
2 large garlic cloves, thinly sliced lengthwise
1 large carrot, cut into ⅛-inch-thick (3-millimeter) coins
2 to 3 tablespoons (30 to 45 milliliters) water
2 medium beets, peeled, quartered, and sliced ⅛ inch (6 millimeters) thick
½ teaspoon freshly ground black pepper, plus more to taste
5 cups (1.2 liters) vegetable broth
About ¼ head cabbage, chopped into ½-inch (1.5-centimeter) pieces (2½ cups/170 grams)
1 teaspoon apple cider vinegar, plus more to taste
Sour cream, for serving
Dill sprigs, for garnish
Heat the olive oil in a medium saucepan over medium heat. Add the onion and a pinch of salt and stir to coat with the oil. Add the bay leaf, cover the saucepan, and cook until the onion is translucent, 3 to 4 minutes. Add the garlic, stir to combine, cover, and cook until softened, about 2 minutes.
Add the carrot and a pinch of salt and stir to combine. Reduce the heat to low, cover, and cook, stirring occasionally, until the carrot starts to soften, 7 to 9 minutes—do not let the vegetables brown. Add 1 tablespoon (15 milliliters) of the water if the pan gets too dry.
Add the beets, ½ teaspoon salt, 2 tablespoons (30 milliliters) water, and the pepper to the saucepan and stir to combine. Cook, stirring occasionally, until the beets start to soften, 10 to 15 minutes.
Add the broth, increase the heat to high, and bring the broth to a boil. Add the cabbage, bring to a boil, then reduce the heat to medium-low, cover the pan with the lid ajar, and simmer until the cabbage has softened completely, 20 to 25 minutes.
Add the vinegar. Taste and adjust the seasonings, adding salt, pepper, and/or more vinegar if needed.
Ladle the hot soup into bowls, top with a spoonful of sour cream, and garnish with a sprig of fresh dill.
The soup will keep in an airtight container in the refrigerator for up to 1 week.
the secrets of soviet cuisine
If you’re a North American Jew of a certain vintage whose relatives came from Russia a century ago, Russian staples like borscht, herring, cabbage rolls, and rye bread are “Jewish food.” But as a Soviet-born, Russian-speaking Jew of a more recent vintage, that feels wrong. To me, this food is firmly part of my Soviet-Russian heritage—not my Jewish one.
There’s a reason I feel this way.
After seventy years of Communism, Soviet food emerged as a separate branch of Russian (and Ukrainian) food, which developed after the earlier generations of immigrants had already left. What showed up on Soviet Jews’ tables was a uniquely historic product of Soviet food policies, broadly applied to all citizens, plus anti-Jewish policies, which successfully erased all religious knowledge from the community. (There were exceptions, but the average Soviet Jew was divorced from any sense of Jewish culinary rules, which explains why pork-laden sosiski were an everyday food.)
So what, then, would you find on a Soviet-Jewish table in North America today? The list spans the breadth of the Soviet empire to include countless zakuski (appetizers), salads, soups, entrees, and desserts. The familiar herring (for example, selyodka pod shuba; shuba means “fur coat,” so it’s literally “herring under fur coat”), smoked fish, pickles, sprats, our version of ptcha, known as kholodetz, plus items like Salat Olivier (similar to potato salad, this Tsarist-era invention was adapted into a quintessential Soviet symbol), kharcho (a traditional Georgian beef soup, with tomatoes, walnuts, the Georgian spice blend kmehli-suneli, tamarind, and rice), schi (the most Russian of Russian soups, outranking borscht, schi is a cabbage soup, sometimes made with sauerkraut), and plov, the national pride of Uzbekistan and Tajikistan, a rice pilaf with lamb, carrots, onions, cumin, and paprika.
Unique among Jewish communities, Soviet Jews didn’t separate themselves from their non-Jewish neighbors by their diet—chronic food shortages, communal kitchens, and collectivist idealism hardly encouraged differentiating oneself by dietary preference. As a result, the dishes we brought with us might not always seem so different from broader Soviet cuisine. But these dishes also tell an important part of our story—not just about the way Soviet policies still shape our grocery lists, but of survival and the efforts of our mothers and grandmothers to keep their families alive and fed, whether that was finding tushenka (tinned meat) or waiting for hours at the bakery to get a coveted Kiev cake. What makes our food Jewish—and ensures that it will remain so for our children and grandchildren—is that we serve it while openly celebrating Jewish holidays, we make tweaks for kosher observance, and we left the sosiski behind along with our Soviet citizenships.
Lea Zeltserman
By Amanda Hesser and Merrill Stubbs

Why are two shiksas writing about brisket for an anthology about iconic Jewish foods? Because we are jealous. Jealous that we didn’t grow up with brisket—gloriously fatty, juicy, supple brisket. It’s the perfect braising beef; brisket is full of flavor, with a thick layer of fat that naturally bastes the meat as it cooks, making it impossible to ruin.
We WASPs were raised on pot roast, a parched cut that seems to beckon inexperienced cooks to boil it dry, and roast beef, which leaves every cook’s nerves frayed until the first slice reveals whether you succeeded in coaxing it to just the right pinkness. And you probably didn’t. WASPs love their unforgiving meats, just as they relish stony silences at the table.
Jews smartly embraced meats that like to actually be enjoyed. Brisket welcomes acids like vinegar and tomatoes, voraciously absorbs herbs and spices, and gets so tender you needn’t own a sharp knife to slice it. And it’s great for holidays and parties. You can cook it in advance, lay the slices in a serving dish, soaking in the cooking juices, and reheat it to serve. It’ll even be better this way. If you have leftovers, you have the makings of an epic sandwich.
We’ll spare you our holiday tables, but can we join yours?

Brisket
Serves 8 to 10
3 tablespoons (45 grams) kosher salt
1¼ teaspoons freshly ground black pepper
7 pounds (3 kilograms 175 grams) beef brisket, preferably point (or deckle) cut (see Note)
2 pounds (910 grams) yellow onions, sliced ¼ inch (6 millimeters) thick
1½ pounds (680 grams) carrots (about 5 large), cut ½ inch (1.5 centimeters) thick
1 head garlic (about 10 cloves), cloves peeled
1 (28-ounce/793-gram) can whole peeled tomatoes, drained, juices reserved
½ cup (120 milliliters) apple cider vinegar
¼ cup plus 2 tablespoons (90 milliliters) ketchup
¼ cup (55 grams) dark brown sugar
2 tablespoons (30 milliliters) tomato paste
1 teaspoon garlic powder
1 teaspoon onion powder
¼ cup (60 milliliters) water
2 tablespoons (30 milliliters) blackstrap molasses
2 tablespoons (30 milliliters) pomegranate molasses
Position a rack in the lower third of the oven. Preheat the oven to 350ºF (177ºC).
Combine 2½ tablespoons (37 grams) of the salt and 1 teaspoon of the pepper in a small bowl. Rub the brisket all over with the salt and pepper.
Scatter half the onions and carrots and all the garlic over the bottom of a large Dutch oven or roasting pan. Place the brisket, point (fat)-side up (see Note), over the vegetables and scatter the remaining vegetables, including the drained tomatoes, on top of the meat.
Combine the reserved tomato juices, the vinegar, ketchup, brown sugar, tomato paste, garlic powder, onion powder, water, and the remaining ½ tablespoon salt and ¼ teaspoon pepper in a medium bowl. Whisk until combined, then pour over the brisket.
Cover the pot with a large piece of parchment paper and place the lid on top, if using a Dutch oven. (If using a roasting pan, omit the parchment paper and cover tightly with heavy-duty aluminum foil.) Transfer to the oven and cook until the meat is very tender, about 3½ hours.
Remove the pot from the oven and trim off any large chunks of fat around the meat. Let come to room temperature, cover, and refrigerate until chilled completely, preferably overnight.
Remove the chilled brisket from the pot and slice it against the grain. Lay the meat in a roasting pan.
Remove about half the onions, half the carrots, and all the tomatoes from the pot and place in the roasting pan with the brisket. Using an immersion blender, puree the braising liquid and the onions and carrots remaining in the pot until smooth. Transfer the liquid to a medium saucepan and add the blackstrap molasses and pomegranate molasses. Bring the liquid to a simmer over medium heat and cook, stirring, until the gravy has thickened, about 7 minutes. Pour half the thickened gravy over the sliced meat and vegetables, and reserve the rest.
To serve the brisket, preheat the oven to 350ºF (165ºC).
Cover the pan with foil and warm the brisket until heated through, 30 to 45 minutes. Serve hot or warm, with the reserved warmed gravy and the accompanying vegetables.
NOTE: Because the whole brisket contains both the point and the flat parts, it’s important to tell your butcher which one you want. The point has more fat on it, so slow cooking it will give you a more tender brisket, because the fat will protect and moisturize the meat.
Overnight Method: To make the brisket overnight, preheat the oven to 200ºF (93ºC). Cook for 10 to 12 hours following the method above.
Slow Cooker Method: To make the brisket in a slow cooker, follow the steps above, but place everything in a large slow cooker, cover, and cook on Low for 10 to 12 hours.
to make ahead: The brisket can be made ahead and frozen. To freeze, cool the brisket to room temperature, then transfer to a glass container with a tight-fitting lid, cover, and freeze for up to 3 months.
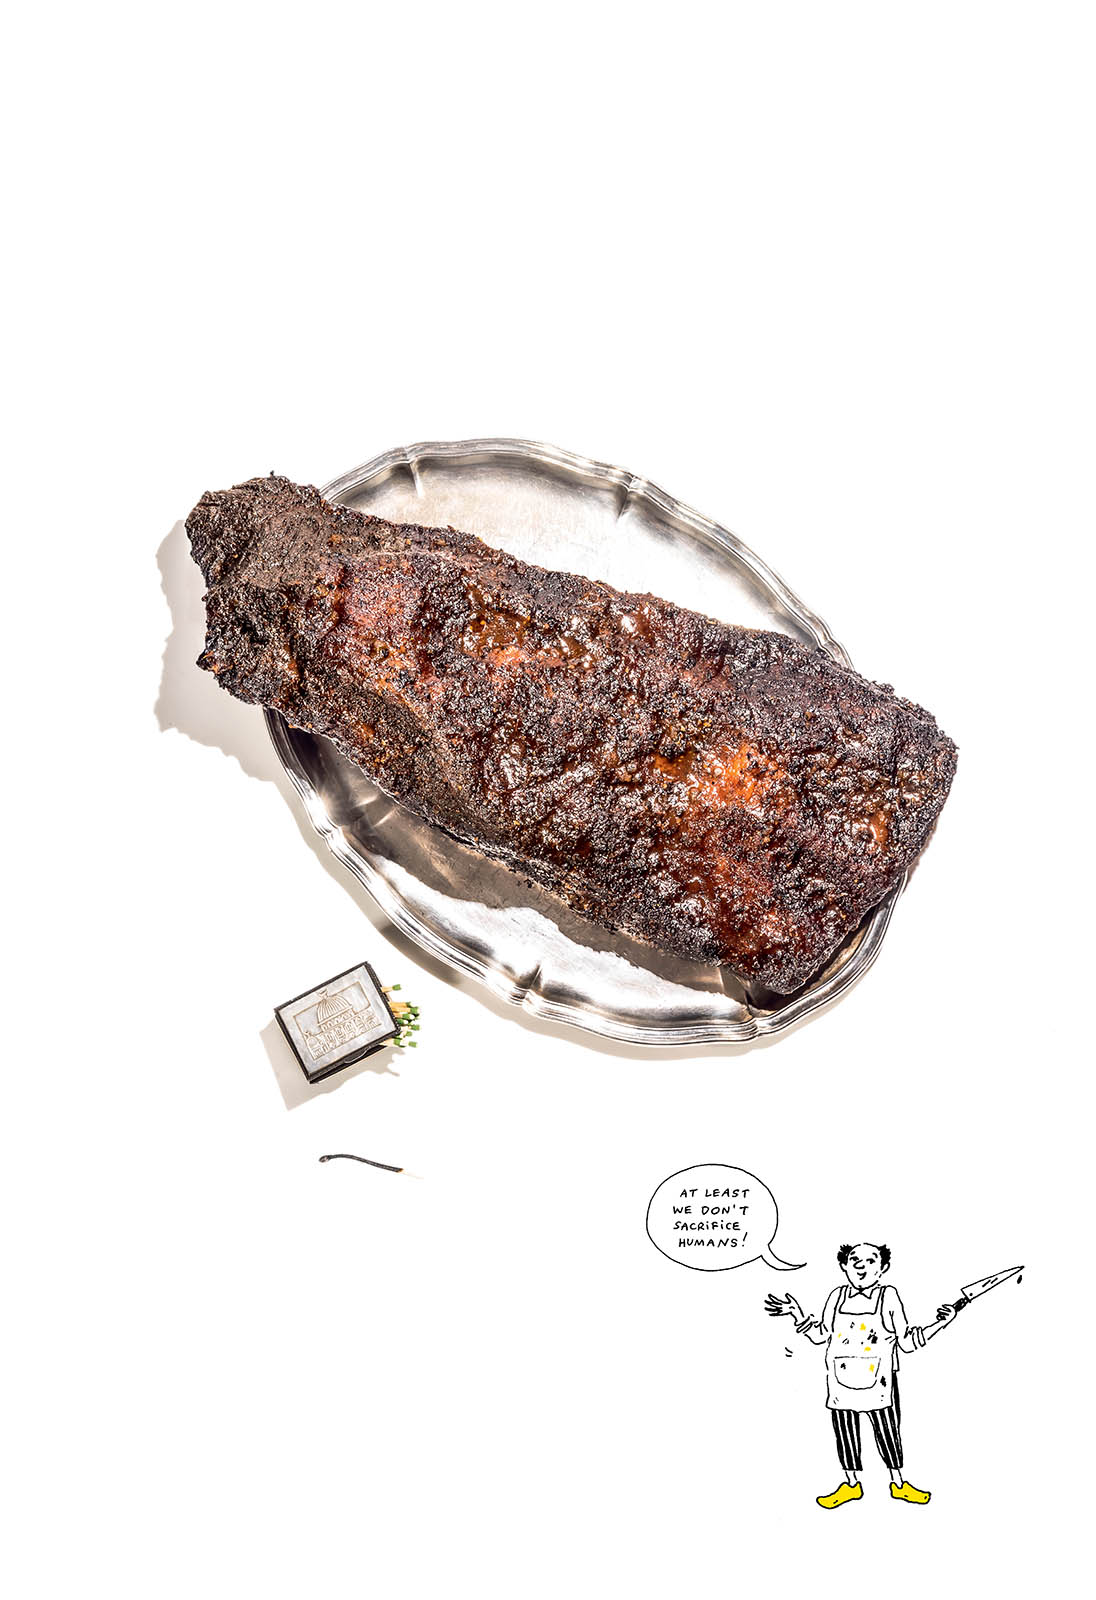
(Sacrifices, Barbecue, Etc.)
By Liel Leibovitz
Aaron Franklin of Austin, Texas, probably the world’s greatest barbecue pitmaster, smoked his very first kosher brisket in 2017. He wasn’t having a religious awakening; he was honoring Ari White and Izzy Eidelman, two Jews who captured the coveted Brisket King NYC title (the king of “kosher bacon”), in 2016 and 2017 respectively. The sinewy cut, of course, has long been a staple of both Jewish cooking and American barbecue, but the latter’s love affair with pork—pulled, ribs, or otherwise—meant that historically, Jews were largely absent around the barbecue pit. Not anymore, and amen to that: If you’re looking for the world’s first recipe for grilled meat, after all, look no further than Leviticus, which instructs the Israelites on how to build a pit and roast the burnt offering. With the bond between beef and holiness secured early on, and with kashrut paying close attention to slaughtering cattle in a specific way, sanctifying the moment of their sacrifice, it was only a matter of time before Jews returned to the fore of the meat scene.