
It has been established in Chapter 1 that the psoas major plays many roles. It is located in the core, but mostly overworked because of this. It is important to note again that other muscles have to be strong yet flexible to allow the psoas to remain healthy and adaptable. Those muscles are the abdominals, spinal extensors, and posterior antagonists such as the gluteus maximus. Any muscle that can aid in the centering and balance of the pelvis, like the quadratus lumborum and deep rotators, also helps relieve the psoas to connect the torso to the legs and act as a messenger in an economic fashion. The following exercises may help restore vitality to the psoas.
The “Give the Psoas a Break” Exercise: Constructive Rest Position for Everyone
This is a supine position that has been taught for many years. The system was developed by Mabel Todd in the early part of the twentieth century in Boston and then in New York City as an alternative to strict military physical education. She called this method Natural Posture. Her ideology was later termed Ideokinesis, an idea of movement used to improve muscular coordination through imagery. Creative yet scientific, it is based on functional anatomy with ease and repatterning of movement, and was embraced by major universities such as Columbia, NYU, and Juilliard.
Lulu Sweigard, a student-turned-colleague of Todd’s, named this certain exercise constructive rest position (CRP) in New York in the late 1920s. Other students, such as Barbara Clark, Sally Swift, and later Irene Dowd, became renowned teachers in the field of Ideokinesis, and people around the world have studied and embraced it as a way of rebalancing misguided physical efforts in a more natural way. This is also a concept that Joseph Pilates became aware of after the war, when he moved to New York and began work with singers and dancers; the Alexander Technique also teaches it.
Today this position is widely practiced; it is hard to find a professional dancer or body worker who has not been exposed to its benefits. This author was taught the CRP as the horizontal rest position at NYU many years ago, and still uses it for reasons ranging from abdominal and uteral cramping, to relaxing many muscles, specifically the psoas. It is a great way to release muscle contraction, as it allows the skeleton (and gravity) to do the work of neutral alignment in a restful state.

Figure 2.1: The Constructive Rest Position.
Technique: Begin lying on the back (supine) on a firm, flat surface. Bend the knees with the feet flat on the floor, hip width apart. The head can be supported so that it is in line with the spine. Some prefer to keep the hips, knees, and feet in line with each other; if this is hard to do and causes muscle tension, then let the knees rest against each other with the feet slightly wider and toes turned in.
The femur will rest gently into the hip socket, releasing the “grip” of the hip flexors. The spine will follow its natural curves. Both arrangements free the psoas.
Arms can be crossed at the elbows and lie across the chest; if this is uncomfortable, they can relax on the floor. (Remember, this is a rest position!)
Imagery:
(This author cannot begin to remember all the wonderful teachers who taught her this strategy, but gives thanks to the mentors Andre Bernard and Irene Dowd.)
The psoas is in a relaxed state at the lumbar spine. While doing this position, it might be helpful to have someone read the imagery list slowly to help guide you. It is released at the hip; even though there is hip flexion, it is not active against resistance, so the psoas is at rest. This exercise can be done daily, anytime during the day, and by anyone, and allows the psoas to “take a break.” When first practicing the technique, one may experience physical discomfort, even emotional feelings (see Part II).
In CRP, the body will give in to gravity – let go, and become balanced and receptive to its natural alignment and posture.
There is another position that is very effective for releasing the psoas, as described by the Egoscue method, a system of exercises designed by Pete Egoscue to alleviate chronic joint pain (see bibliography). Similar in principle to the CRP, one lies on the floor with one or both lower legs resting on a block or support. The support should be as high as the length of the femur. The support holds the weight of the lower leg and allows the thigh to fall directly into the hip socket, thereby releasing the psoas and other hip and spine muscles. This position is held for as long as possible to achieve the desired relaxation. If no support is available, the feet can rest against a wall, hip width apart, with the knees bent and the hips directly underneath them. Abdominal crunches can be added without engaging the psoas too much.
Understanding “Center”: Pelvic Stability Exercises – Level I
To understand and feel the concept of a stable pelvis, try the following:
1.Deep Breathing: Lie on the back with knees bent, feet on the floor, hip width apart, and hands on the front hip bones to make sure they are in line with each other. Breathe naturally but deeply, engaging the transversus abdominis on a strong exhalation – one will feel as if the waist is “cinching” on the exhalation. Do this for at least five full breaths, keeping the pelvis stable.
2.Pelvic Tilts: Assume the same position as above, with arms by the sides. On the inhalation allow the pelvis to tilt forward; the front hip bones (ASIS) release upward, while the tailbone remains on the floor. Exhale and press the naval toward the floor as the pelvis tilts backward. Do this slowly five times, then return to normal position, which is the neutral spine curvature. The sacrum, not the lower back, will be resting on the floor, with the pelvis centered.

Figure 2.2: Pelvic tilts; a) neutral spine, b) backward tilt, c) forward tilt.
3.Rotational Pelvic Exercises: Lie on the back in the position of exercise 1 with arms by the sides. Push the hips up about 2 inches off the floor, as the feet press into the floor. Try these three movements:
a.“Hike” the hips side to side 6 times.
b.Roll (rotate) the hips side to side 6 times.
c.Draw a figure 8 with the hips 6 times.
To end, roll down through the lower spine and rest the pelvis in the neutral position. One cannot help but feel where the center is after this exercise.

Figure 2.3: Rotational Pelvic Exercises.
To help visualize pelvic movement in exercises 2 and 3 above, use the reference in the following figure.

Figure 2.4: The pelvis can move in three planes; a) sagittal (plane 1), b) frontal (plane 2), c) horizontal (plane 3).
Plane 1
In the sagittal plane, it can move forward and backward, which is usually called pelvic tilt (see figure 2.2). Use the anterior superior iliac spine (ASIS) as a reference point. This point can be felt by placing the hands on the front hip bones. Move the pelvis forward and backward. The lumbar spine will hyperextend and the hips will flex with forward movement of the pelvis. With posterior or backward tilt, the lumbar spine will flex, engaging the psoas and abdominals.
Plane 2
In the frontal plane, the pelvis will move laterally and medially, as in “hiking the hip up.” The lumbar spine will also move laterally and the hips will abduct and adduct.
Plane 3
In the horizontal plane, the pelvis rotates inward and outward, although it is very limited and cannot happen without help from the sacroiliac, lumbar, and hip joints. It is similar to “twisting.”
These exercises mobilize the pelvic region without overstretching. If sensitive areas such as the sacroiliac joint become too loose, the result can be irritating at the very least, and may develop into chronic lower back pain. When ligaments overstretch they do not retain their firm hold to keep the joint together, so there is a “shifting” of joint stability, and muscle tendons will work overtime to keep the joint stable. The psoas also compensates for sacroiliac problems, which leads to it being overworked.
To explain in more detail, the pelvis has two important joint areas: the sacroiliac (SI) joint and the iliofemoral (common hip) joint. The SI joint, where the sacrum and iliac bones (the two sides of the pelvis) articulate, is the least moveable. It is considered a gliding joint and becomes more active during childbirth.
There are strong ligaments that connect the iliac bones to the sacrum. Therefore, it seems reasonable to assume that many women after childbirth can experience a sacroiliac shift because of loosened ligaments. This can cause discomfort in the lower back area that can be addressed through some strength exercises to compensate for the laxity. The squat exercise described on page 28 is an ideal strength move for this area if done in the position of outward rotation of the hip. Grand plies from ballet are also helpful.

Figure 2.5: The sacroiliac joint; a) transverse section of the pelvis, b) pelvic ligaments.
The six deep outward rotators of the hip are small muscles that can be targeted for help with stability at the SI joint, as they travel from the sacrum, across the pelvis to the femur. These include the piriformis, two gemelli, two obturators, and the quadratus femoris. View figure 2.6 and notice the positioning of the sciatic nerve behind the piriformis. If the muscle is too contracted, it will pinch the nerve and become a major factor in “sciatica.”The SI stretch on page 31 will alleviate this pressure.

Figure 2.6: The six deep outward rotators.
Sacroiliac Joint Exercises
Exercises that incorporate the abdominals, erector spinae, gluteus maximus, and deep external rotators of the hip to engage properly will help the sacroiliac joint remain strong yet supple, like the psoas should be. These can be done complementary to pelvic stability exercises.
1.Squats (Level I/II): There are many myths about squats, and most people would not consider them an exercise for the SI joint. Done properly and without extreme resistance, they can achieve great results for pelvic, core, and hip strength, developing protection for the SI joint and psoas.
Technique:
a.Begin standing in front of a mirror with a chair behind.
b.Hold a lightweight bar or band above the head without lifting the shoulders. The latissimus dorsi, fascia, and ribs will stretch away from the pelvis.
c.Engage the abdominals and erector spinae muscles as the knees bend to lower to a sitting position.
d.Allow the hips to fall back toward the chair, and bend deeply at the hips. Keep the head and chest forward without expanding the rib cage. If the upper thighs can come parallel to the floor, it is most effective.
e.Hold the sitting position for 10–20 seconds. The gluteus maximus, as well as the core, will work here and on the way back up from this position.
Repeat the exercise 5–10 times, stretching the body up and slightly back in between each repetition to open the front of the hips. Do not lose the engagement of the core and gluteus maximus, or hyperextend the lower back, while stretching.

Figure 2.7: Squats.
2.Spinal Twists (Level I): Standing spinal twists are the most beneficial rotation exercises when the gluteus maximus also needs to be targeted.
Technique: Stand straight with feet hip width apart. Keep the pelvis forward and rotate the upper spine (thoracic and cervical) to the right, as the gluteus maximus is squeezed and the core engaged (do not overdo it – this can be a gentle contraction). Elongate the spine and breath deeply as the twist is held. The hips can twist slightly; this will protect the lower spine, SI joint, and psoas. Repeat on the other side.

Figure 2.8: Spinal Twists.
3.Hand/Knee Balance (Level I/II)
Technique: Assume the table position (“all fours”), making sure the hands are under the shoulders and the knees are under the hips.
Level I: Stretch one leg behind, to hip height, and release the opposite arm forward. The pelvis remains centered with the core engaged.
Level II: Assume the position above, but with the support hand and knee in line with each other. This will narrow the base and challenge the balance. Hold for 10–20 seconds. Add a “sit-back,” releasing the gluteus maximus back toward the heel and hold for added benefit.

Figure 2.9: Hand/Knee Balance.
4.SI Stretch (Level I): If this area is too tight, it can be slowly stretched with the following exercise. The upper psoas is also affected, while the distal psoas is released. This is also a great stretch for the iliotibial band and smaller glutes.
Technique: Lie on the back with the legs straight and the arms outstretched. Bend one knee toward the chest and let it fall to the opposite side; allow the hips to roll with it. Keep the shoulders on the floor, but do not push them. Breathe and relax; never force a twist. Repeat with the other leg.

Figure 2.10: Sacroiliac Joint Stretch.
Finding Balance: Upright Stability Exercises
The psoas acts in a sense like a pendulum, allowing the swing of the heavy leg forward from the spine to walk. Knowing this, it is of paramount importance that the pelvis remains centered in its placement as the psoas connects to the movement. Of course, the pelvis will mobilize slightly but remain the central hub while going “with” the movement.
The pelvis is two-sided, with the sacrum in the middle; both sides need to be in balance with each other. Major stabilizing muscles like the quadratus lumborum and transversus abdominis can be engaged to allow the pelvis to be centered and the psoas to be free to aid transfer of weight in upright movement.

Figure 2.11: The stabilizing quadratus lumborum and transversus abdominis.
1.Walk Without Wiggling (Level I): It is hard to keep from swaying the hips sideways (laterally). Keep the pelvis centered and allow the legs to move freely, otherwise the psoas will be overworked. The pelvis will rotate minimally with alternately one side forward and the other side back. Allow this to happen as the leg swings forward.
2.One-Leg Balances (Level II): There are many of these to choose from – try the following:
a.Ballet barre exercises such as the passé position.
Technique: Stand on one leg and take the other one to passé position (bent knee, outward rotated hip, foot pointed to inside of standing knee). Keeping hips level, one can remain balanced while strengthening the legs and core. To increase strength, hold on to the barre or a wall and develop the supporting leg by doing pliés and relevés (bending the knee, then rising to the ball of the foot). Always track the knee over the toes.

Figure 2.12: Standing postures for balance, support, and alignment for the ballet barre.
b.Yoga postures such as Tree Pose.

Figure 2.13: Tree Pose.
In each of the one-leg standing exercises, use the pelvis centrally without hiking the hip up with the higher leg. Extend the spine, drop the tailbone, and lift the abdominals, not the shoulders. Relax the rib cage. This pattern will correct most misalignment issues.
Observe the body in a mirror to help correct any imbalance. The supporting side is strengthening isometrically, while the free leg is both strengthening and stretching. The psoas is working differently on each side, so balancing the pelvis will aid the necessary mechanics needed to stabilize, strengthen, and/or stretch.
Stimulating the Pelvic Floor: Balls and the Kegel
The pelvic floor is an area of deep, lower muscles near the base of the spine, where a sheet sometimes referred to as the urogenital diaphragm lies with other muscles such as the sphincter, bulbospongiosus, and perinea. These muscles have important functions during breathing, sex, and childbirth, and are a center for sensitive nerve endings, as is the psoas. When stimulated and strengthened, the area can influence energy, sensations, and emotions. Organs like the bladder and kidneys are also affected.

Figure 2.14: The pelvic floor muscles.
One of the best ways to develop this deep center correctly is by doing the following exercises:
1.Ball Therapy (Level I): A great exercise after sitting for long periods of time!
a.Lie down with small exercise balls (4–6 inches in diameter) under the pelvis, around the lower buttocks. Bend the knees with the feet flat on the floor. The pressure of the balls allows the organs to shift upward, releasing stress away from the pelvic floor. The person can then lift one or both legs, as in the Happy Baby Pose from yoga (see Part III), to center and strengthen the area. In Happy Baby, supine position, the knees are bent and separated with the thighs against the lateral ribs; the hands can hold the feet, which are parallel to the ceiling. For lower abdominal and pelvic floor strength, try lifting the hips straight up off the balls, repeating 5–10 times.
Raising and lowering one leg at a time from a straight leg position will incorporate psoas work, if needed, by both strengthening and stretching, making the psoas elastic and responsive. Finish with both legs straight on the floor with the spine relaxed in neutral position to open the front of the hips.
b.For core stability, change the position of the balls so that one is a bit higher on the hip, on the sacroiliac joint. Place the other ball on the opposite side of the mid back on the erector spinae, about an inch away from the spine. Begin to “balance the core” by keeping weight into the balls even; repeat on the other side. This can be done with legs bent, feet flat on the floor.
Once pelvic movement versus stability is experienced, a pattern of alignment that emphasizes correct mechanics to aid the psoas can be developed.
2.The Kegel: Named after the gynecologist Dr. Arnold Kegel, the movement strengthens pelvic floor muscles.
Technique: This can be done lying down, sitting, or standing: simply put, squeeze the sit bones together, and hold and breathe. This lifts the pelvic floor and stimulates the entire area, improving muscle tone. It is used to prepare for childbirth and to aid incontinence and sexual function. The relation to the psoas is balance and support by strengthening the muscles around it. While squeezing sit bones towards one another, do not contract the larger muscles such as the gluteus maximus and abdominals – smaller muscles including the ones that control urine flow need to be activated to incorporate the pelvic floor.
“Lifting the pelvic floor” is a cue that can be used to help stabilize the core, as long as it is described so the client can understand it. Phrases such as “hugging the lower abdominals” are effective and can create the upward movement needed. This affects the connection of the pelvic floor, transversus abdominis, psoas major and diaphragm in a balanced and unique way.
Core Strengthening Exercises
Almost any core exercise to strengthen the area will include the psoas. The most important thing to remember is that the psoas is probably already overworked, so other core muscles must be emphasized.
1. Side-Bending (Level I)
Technique: Stand with feet shoulder-width apart. Keep body upright and bend to the left or to the right. Can be performed sitting, kneeling, or standing, and is both a strength and stretch exercise for the abdominals. Arms overhead will add difficulty.
Main movers: Spinal extensors. Abdominals.
Inner core stabilizers: Quadratus lumborum. Psoas.
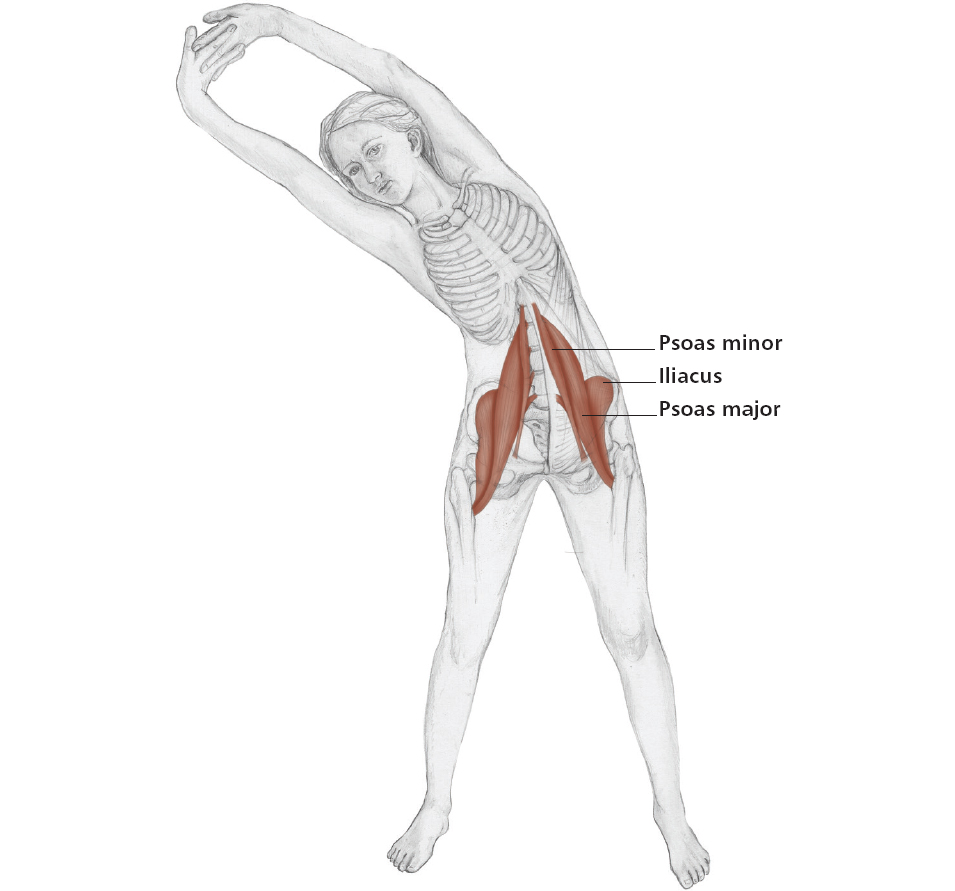
Figure 2.15: Side-Bending.
2. Partial Sit-up (Levels I–II)
Technique: Lie on back (supine position) with knees bent, and feet on the floor. Flex the spine (always exhale when flexing), coming up halfway, and roll back down through each vertebra on the inhale.
Main movers: Rectus abdominis.
Inner core stabilizers: Psoas. Pelvic floor.

Figure 2.16: Partial Sit-Up.
3. Windmills (Level I)
Technique: Standing with arms out to sides, touch right hand to left ankle, stand up and repeat to other side. This will do all three actions of the external oblique, and provide both a strength and stretch exercise. It is mild because rotation is minimal against resistance – bend knees slightly to keep from hyperextending them.
Main movers: Internal and external obliques. Spinal rotators/extensors.
Inner core stabilizers: Quadratus lumborum. Psoas. Transversospinalis group.

Figure 2.17: Windmills.
4. Roman Chair Rotational Crunches
Technique: (This exercise is very hard on the lumbar (lower) spine, so make sure that the abdominals are strong to begin with.) Sit sideways on a bench with feet stabilized on the floor. Lie back slowly in a curled (flexed) position until parallel with the floor; return. To isolate the obliques, rotate the spine, alternating sides on the return.
Main movers: Rectus abdominis. Hip flexors.
Inner core stabilizers: Psoas. Pelvic floor.
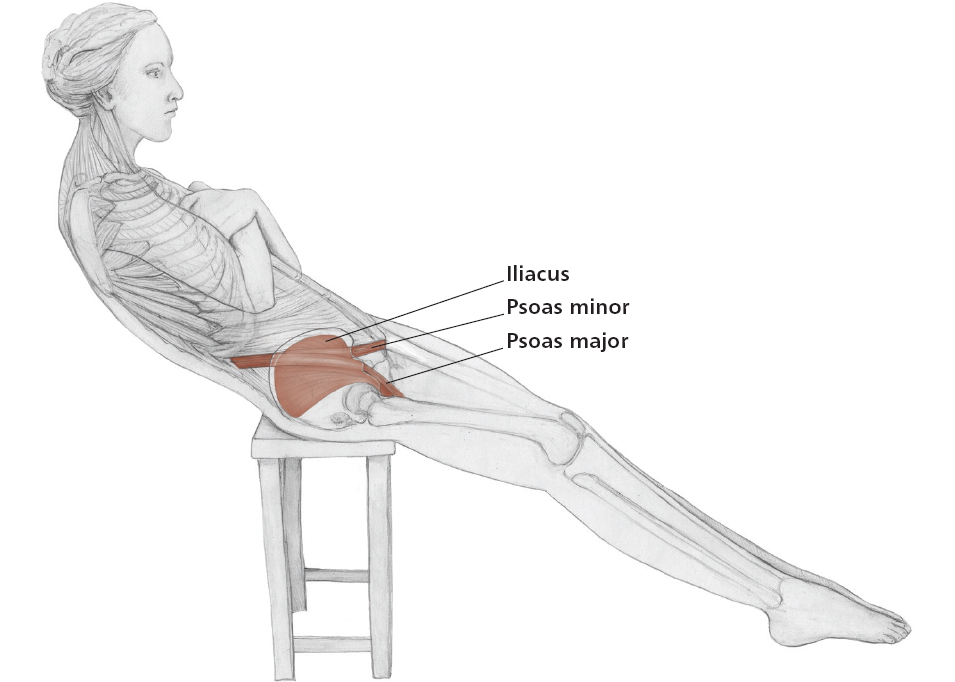
Figure 2.18: Roman Chair Rotational Crunches.
5. Hip Rolls
Technique: Lie on back, knees into chest and arms out to sides in ‘T’ position, palms down. Rolls knees to one side, then the other.
Do this at least five times; inhale on the way down, exhale back up to center, engaging the core. If there is back pain, do not allow the legs to go all the way to the floor.
Main movers: Obliques.
Inner core stabilizers: Transverse abdominis. Psoas.
Stretching Exercises
Since the psoas has so many attachments and roles, it is confusing to know when and where it needs to be stretched. The most important rule is: if there is a lot of time spent sitting, the lower psoas is relaxed in a shortened state, and needs to lengthen and open to counteract sitting hip flexion. The following exercises will accomplish this.
1.Rising Stomach Stretch (Level I): The abdominals must be engaged in this exercise so as not to injure the lower spine.
Technique: Lie face down and bring the hands close to the shoulders. Keep the hips on the ground, look forward and rise up by straightening the arms. If there is back pain, do not straighten the arms completely, and always press the shoulders down away from the ears.

Figure 2.19: Rising Stomach Stretch.
2. Half Bridge (Level I)
Technique: Lying on back with knees bent and feet flat on floor, curl the tailbone off the floor; begin to raise hips as high as what feels comfortable. Weight should be evenly distributed to both feet and shoulder blades.

Figure 2.20: Half Bridge.
3. Psoas Lift (Level I)
Technique: Lie on floor with knees bent, feet on floor shoulder-width apart, and arms out for support. Move right leg to one side while feet remain on floor. Lift left hip off the floor and hold the stretch. Repeat on the other side. If there is discomfort in the sacroiliac area, keep the supporting leg straight while lifting the hip.
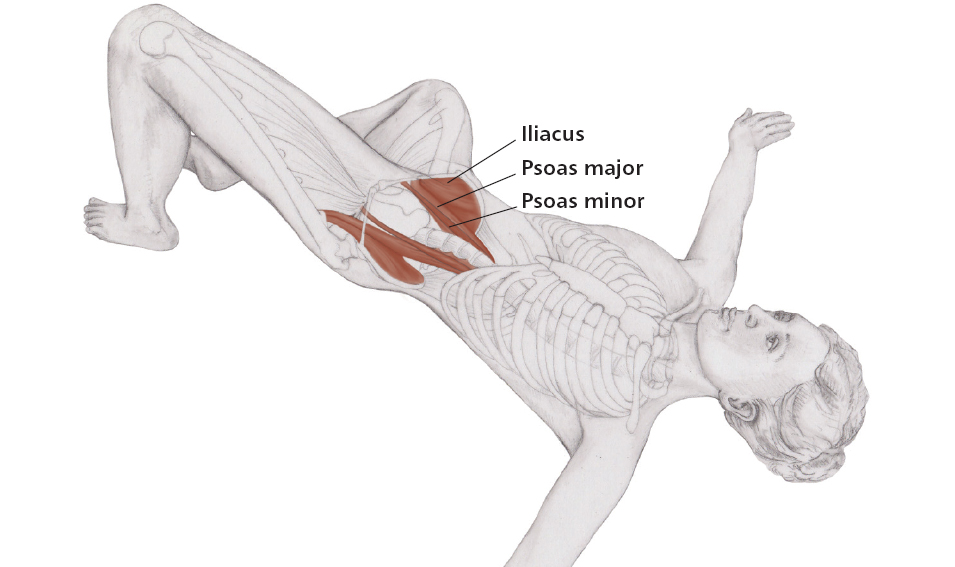
Figure 2.21: Psoas Lift.
4. Lunges (Runner’s Stretch) (Level I/II)
Technique: Begin standing with the left foot forward and the right leg back. Bend the front knee until it is directly over the toes; slide the right leg straight back until it is parallel to the floor, if possible. Keep the feet facing forward and do not let the front knee go farther forward than the toes. The spine is straight and the hands can rest on the floor or the front thigh. The hip flexors are strengthening in the front leg and stretching in the back leg. Hold for approximately 30 seconds, then repeat on the other side.
Variation: Push the hips forward and drop the back knee to the floor to increase the stretch of the psoas. Deepen the stretch by sliding the right leg back further with the heel off the ground.
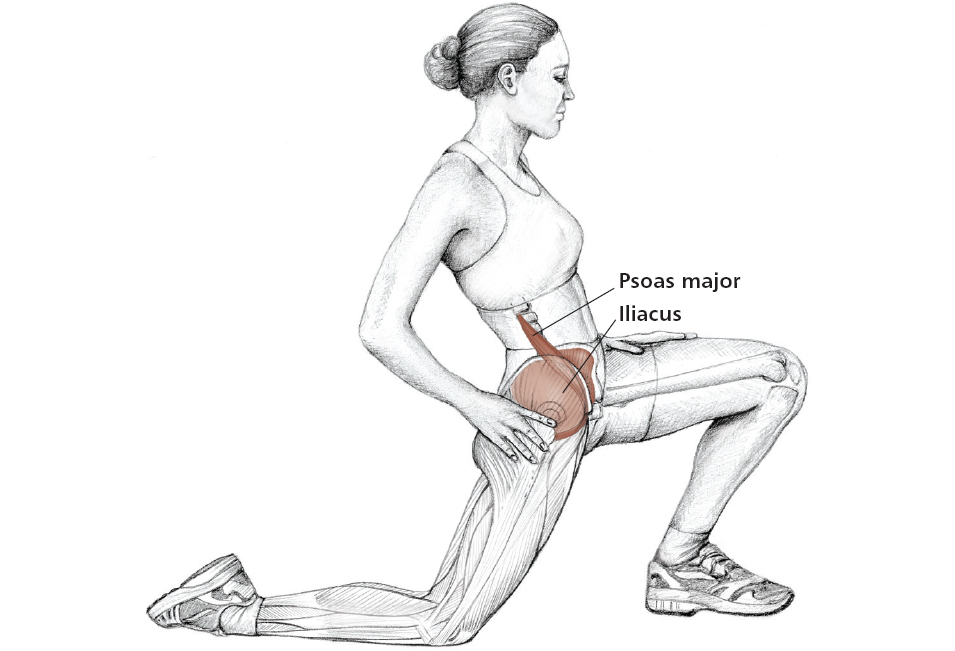
Figure 2.22: Variations of Lunges (Runner’s Stretch).
See Chapter 4 in this part for Pilates, and Part III for yoga exercises that will also strengthen or stretch the psoas area.
Review: Fact or Fiction?
The psoas is a muscle.
Fact – it was probably one of the first skeletal muscles. When talking about the psoas, it is important to remember that it is the psoas major muscle of the iliopsoas muscle group that is usually indicated.
The psoas causes back pain.
Fact – there can, however, be other reasons for back pain, and the psoas is not usually the main culprit.
The psoas is not a hip flexor.
Fiction – still under debate, its role as a hip flexor is not a major one, but, as part of the iliopsoas muscle group and because of its path, the psoas can aid in the action of hip flexion, depending on the movement.
The psoas is part of the core.
Fact – it is part of the deeper core, as it attaches to the transverse process of the lumbar spinal column and travels anteriorly past the pelvis.
The psoas cannot be palpated.
Fiction – it can be touched, but at the cost of disturbing other structures and stimulating the involuntary response of “fight or flight.”
The psoas moves in all three planes.
Fact – it can minimally contract or stretch in the sagittal, frontal, and horizontal planes, but is mostly a sagittal-plane muscle.
The psoas works alone.
Fiction – it is in fact extremely hard to isolate, as its action is synergistic with many other muscles.
The psoas can be stretched.
Fact – at the hip, any position that places the thigh behind the pelvis is a stretch for the lower psoas on that side.
The psoas is a mover more than a stabilizer.
Fiction – at the lumbar spine, and also as it travels to the femur, the psoas becomes more important as a stabilizer and postural muscle.
The psoas is the only muscle that connects the upper and lower extremities. Fact!