
The NEW PIE CRUSTS
THE SECRET for THE PERFECT PIE CRUST
We’re here to tell you that making perfect pie crust can be as easy as pie. Before revealing our secrets, though, let’s discuss what pie crust is. One of the reasons it may be so difficult for bakers to achieve the perfect pie crust is that there is a surprising lack of agreement about what makes the perfect pie crust. It is a combination of flour, fat, and water that, when baked, forms flaky layers of a crisp pastry that holds a filling. The pastry needs to be strong enough to provide structure to the pie yet still embody all those qualities that make pie so wonderful. Many people have imprinted an early memory of pie like their own grandmother’s pie crust, regardless of what that actually was. It may have actually been perfect or may objectively have been too thick, too thin, tough, mealy, soggy, or even chewy. But it was made with love and associated with happy memories, so it has become their personal gold standard. Anything dissimilar by definition must be some kind of failure. In The Man Who Ate Everything, author Jeffrey Steingarten gives one of the best descriptions of the characteristics of the perfect pie crust we have come across; and in his opinion, it must be seven things all at once: flaky, airy, light, tender, crisp, well-browned, and good tasting. We agree, and that is the standard we are guiding you toward.
Another factor contributing to widespread pie crust anxiety disorder is imprecision. Many pie crust recipes seem to have been written by friendly folk giving directions on a country road. “Yeah, just head up yonder for a piece and turn left by the funny-looking tree—you’ll know it when you see it.” Those instructions might take you where you want to go some of the time, but if you are not in the mood for an adventure involving deadends, backtracking, and getting completely lost in the woods with an inedible pie, some exact, step-by-step instructions with precise numbers might be more comforting. There is a myth that pie dough is a fickle product that on some days can require dramatically different amounts of flour or water. When the home baker is routinely advised to add between 2 and 6 tablespoons of water based on a judgment of the look or the feel of the dough, it is no wonder that baker is scared off. The fact is, most of us are fortunate enough to live in temperate climates and reside in houses with access to heating and cooling when needed. As such, the temperature and humidity in our kitchens vary over a relatively narrow range. When we are comfortable (not too hot or sweaty), usually our baking ingredients are comfortable, too. Their physical properties will not be changing on you from day to day. Be reassured that you are standing on solid ground. If you follow the instructions in our recipes that measure out exact amounts of ingredients (just like you would follow the driving directions of your GPS), we can reliably guide you right to the heart of Pietown. In order to have that level of precision, our preferred method of measuring ingredients for making pie crusts is by weight (ounces or grams) and NOT by volume (cups). So please, weigh your ingredients.
Please do that.
Really, we mean it.
It’s really worth it, and it can make such a change in how reliable a recipe can be (rest assured, we provide volume measurements as well, because we know there will be some who really want to make these pies, but either do not own a kitchen scale or are for some reason averse to using one). We are often told that baking, unlike cooking, is an exact science and that rigidity can be off-putting for some. Many believe there is only one right way to do it, and it must be done that way every time. Not true. There are many roads leading to Rome and many ways to make a great pie crust. In Baking and Pastry: Mastering the Art and Craft, the chefs at the Culinary Institute of America explain that pie crust, in its most basic form, is just three ingredients combined in a ratio of three parts flour, two parts fat, such as butter, shortening, or lard, and one part liquid (usually water). Pretty simple! As long as that formula is at the core of a recipe, it is possible to produce a viable pie crust using many different methods. In addition to those three core ingredients, we include a bit of sugar (for flavor and browning), salt (for flavor), baking powder (for browning and lightness), and vinegar (for tenderness). We think our pie crust recipes are the bees’ knees; however, if you already have a reliable pie crust recipe that you love, you can use it when making our pies. You won’t hurt our feelings.
Finally, in addition to the flour, fat, and water, pie crust has two additional, less tangible ingredients: temperature and time. The temperature of the ingredients really does matter. In our recipes, we specify cold butter and cold water when assembling the dough. Warm ingredients will be more difficult to handle and will result in an inferior crust that can be tough. If your kitchen is warmer than you’d like, you can even place the flour and bowl in the freezer beforehand to beat the heat. Likewise, time is a really important factor. Dominique Ansel even describes time as an essential ingredient in his book, The Secret Recipes. Work quickly when mixing the dough and rolling out the dough so that the ingredients do not have the opportunity to warm up. Also, be sure to give the dough sufficient time to rest in the refrigerator so that the flour will be fully hydrated, the proteins in the dough will have relaxed, and the butter will have firmed up.
In this section, we provide several sets of ingredients for making different quantities of pie crust. After trying all-shortening, all-butter, high-fat European-style butter, and lard, we have arrived at a combination of mostly butter with some shortening as our preferred fats for pie crust (see “A Word About Lard and Shortening” on this page). Taste an all-butter crust and an all-shortening crust side by side, and I think you’ll agree that the flavor of the butter crust is far superior. However, replacing a bit of the butter with some shortening produces a dough that is a bit softer, easier to roll, and a little more flexible when handling than an all-butter crust. These recipes are scaled for a standard single pie crust, a standard double crust, a deep-dish single crust, and a deep-dish double crust, depending on how much you may need (see this page for more on pie plates). The pie recipes later in the book specify the appropriate option or options for a particular pie.
We also provide a choice of method for making those crusts. While the ingredients stay the same, you can make a pie crust completely by hand with a pastry blender or use a food processor. As you read through the instructions, you’ll find that both methods follow essentially the same steps. Dry ingredients are combined, fat is dispersed into them, followed by the liquid. Finally, sufficient friction is applied to just get everything to stick together. We use both of these methods with very similar results. Making pie dough by hand takes more time than with a food processor, so you may want to use the faster option. You may not own a food processor, or you may simply prefer getting your hands in the dough and making your crust old-school! Just pick the method with which you feel most comfortable and follow the steps. Remember—easy as pie!

PASTRY Pie Crusts
These are the recipes for our standard flaky pie crusts. Each crust has a delightful buttery flavor and bakes up deliciously crisp and flaky (the methods instructing on how to make the dough begin on this page). We have provided four different sets of ingredients for the convenience of making the right amount of dough for either single- or double-crust pies in either standard or deep-dish pie plates. Each version of our standard crust, including the gingerbread variation, can be made by hand or with a food processor using the method that follows. You can double these recipes to make twice as many crusts at one time. The crusts will keep, wrapped, in the refrigerator for up to three days. Wrapped in plastic and placed in a freezer-safe zipper-top storage bag, they can be frozen for up to six months.
STANDARD SINGLE CRUST
Here is the quintessentially crisp, flaky, golden brown, and delicious pie crust.
MAKES ABOUT 12 OUNCES OF DOUGH FOR A 9 BY 1½-INCH STANDARD PIE PLATE
|
INGREDIENT |
VOLUME |
WEIGHT (STANDARD) |
WEIGHT (METRIC) |
|
All-purpose flour |
1 cup plus 3 tablespoons |
6 ounces |
170 grams |
|
Sugar |
1¼ teaspoons |
||
|
Salt |
½ teaspoon |
||
|
Baking powder |
⅛ teaspoon |
||
|
Vegetable shortening |
3 tablespoons plus 2 teaspoons |
1.5 ounces |
43 grams |
|
Cold unsalted butter, cut into 6 pieces |
6 tablespoons |
3 ounces |
85 grams |
|
Apple cider vinegar |
1 teaspoon |
||
|
Cold water (see instructions, this page) |
3 tablespoons |
1.6 ounces |
45 grams |
STANDARD DOUBLE CRUST
MAKES ABOUT 22 OUNCES OF DOUGH (12-OUNCE BOTTOM CRUST AND 10-OUNCE TOP CRUST) FOR A 9 BY 1½-INCH STANDARD PIE PLATE
|
INGREDIENT |
VOLUME |
WEIGHT (STANDARD) |
WEIGHT (METRIC) |
|
All-purpose flour |
2 cups plus 3 tablespoons |
11 ounces |
312 grams |
|
Sugar |
2¼ teaspoons |
||
|
Salt |
¾ teaspoon |
||
|
Baking powder |
⅛ teaspoon |
||
|
Vegetable shortening |
6 tablespoons |
2.5 ounces |
71 grams |
|
Cold unsalted butter, cut into 11 pieces |
11 tablespoons |
5.5 ounces |
156 grams |
|
Apple cider vinegar |
1½ teaspoons |
||
|
Cold water (see instructions, this page) |
5½ tablespoons |
3 ounces |
85 grams |
DEEP-DISH SINGLE CRUST
MAKES ABOUT 15 OUNCES OF DOUGH FOR A DEEP-DISH PIE (ABOUT 9½ BY 2 INCHES)
|
INGREDIENT |
VOLUME |
WEIGHT (STANDARD) |
WEIGHT (METRIC) |
|
All-purpose flour |
1½ cups |
7.5 ounces |
213 grams |
|
Sugar |
1½ teaspoons |
||
|
Salt |
½ teaspoon |
||
|
Baking powder |
⅛ teaspoon |
||
|
Vegetable shortening |
3 tablespoons plus 2 teaspoons |
1.5 ounces |
43 grams |
|
Cold unsalted butter, cut into 8 pieces |
8 tablespoons |
4 ounces |
113 grams |
|
Apple cider vinegar |
1 teaspoon |
||
|
Cold water (see instructions, this page) |
3 tablespoons plus 2 teaspoons |
2 ounces |
57 grams |
DEEP-DISH DOUBLE CRUST
MAKES ABOUT 26 OUNCES OF DOUGH (15-OUNCE BOTTOM CRUST AND 11-OUNCE TOP CRUST) FOR A DEEP-DISH PIE (ABOUT 9½ BY 2 INCHES)
|
INGREDIENT |
VOLUME |
WEIGHT (STANDARD) |
WEIGHT (METRIC) |
|
All-purpose flour |
2⅔ cups |
13 ounces |
369 grams |
|
Sugar |
2½ teaspoons |
||
|
Salt |
¾ teaspoon |
||
|
Baking powder |
¼ teaspoon |
||
|
Vegetable shortening |
6 tablespoons |
2.5 ounces |
71 grams |
|
Cold unsalted butter, cut into 14 pieces |
14 tablespoons |
7 ounces |
198 grams |
|
Apple cider vinegar |
1½ teaspoons |
||
|
Cold water (see instructions, this page) |
6½ tablespoons |
3.5 ounces |
99 grams |
GINGERBREAD CRUST
This variation on the standard flaky pastry adds the molasses flavor of dark muscovado sugar and some warm spices to complement the flavors of the Gingerbread Cashew pie (this page). This could also be a delicious alternative for the Dulce de Pumpkin (this page), Spiced Apple Cider (this page), or West Indies Wedding pies (this page). Follow the same method as for the basic pie crust on this page, substituting the muscovado sugar for plain sugar, and adding the cinnamon and ginger to the flour along with the salt and baking powder. Dark brown sugar can be used in place of the muscovado (see “Sugars,” this page).
MAKES ABOUT 22 OUNCES OF DOUGH (15-OUNCE BOTTOM CRUST AND 7 OUNCES FOR DECORATING THE TOP) FOR A DEEP-DISH PIE (ABOUT 9½ BY 2 INCHES, OR FOR A STANDARD 9 BY 1½-INCH DOUBLE-CRUST PIE)
|
INGREDIENT |
VOLUME |
WEIGHT (STANDARD) |
WEIGHT (METRIC) |
|
All-purpose flour |
2 cups plus 3 tablespoons |
11 ounces |
312 grams |
|
Dark muscovado sugar, lightly packed |
2¼ teaspoons |
||
|
Salt |
¾ teaspoon |
||
|
Baking powder |
⅛ teaspoon |
||
|
Ground cinnamon |
¼ teaspoon |
||
|
Ground ginger |
¼ teaspoon |
||
|
Vegetable shortening |
6 tablespoons |
2.5 ounces |
71 grams |
|
Cold unsalted butter, cut into 11 pieces |
11 tablespoons |
5.5 ounces |
156 grams |
|
Apple cider vinegar |
1½ teaspoons |
||
|
Cold water (see instructions, this page) |
5½ tablespoons |
3 ounces |
85 grams |
MAKING PIE DOUGH
by Hand
This is how many mothers and grandmothers (like ours) made pie dough.
Measure the flour, sugar, salt, and baking powder directly into a large mixing bowl. Stir the contents with your pastry blender or a whisk until well mixed.
Add the shortening and butter pieces to the flour. Cut the fat into the flour by pressing on the pieces of butter with the tines of the pastry blender, which will break them into smaller pieces and incorporate them into the flour. Keep moving and pressing the pastry blender around the bowl until all the larger chunks of butter and shortening have become much smaller. Reach into the flour with your hand and lift out a small handful of the mixture. Use your thumb and fingertips to press and smear any pieces of fat that are larger than ¼ inch across. Repeat until all the larger pieces of fat have been broken up and mostly incorporated into the flour. You should still be able to see small (less than ¼-inch) flecks of butter in the flour.
If measuring all ingredients by volume (measuring cups), simply combine the vinegar with the cold water and drizzle all of the liquid over the flour. If using a scale, place a liquid measuring cup with a spout on the scale and tare (zero out) the scale to subtract the weight of the measuring cup. Add the measured amount of vinegar to the cup (do not re-tare the scale); now add the cold water to the vinegar so that the combined vinegar plus water equals the weight of cold water listed in the ingredients. Drizzle the liquid over the flour.
Using a rubber spatula, stir the mixture until the water seems to have been all absorbed. The dough will still appear loose and crumbly. Using either the rubber spatula or the heel of your hand, press the wetter pieces of dough into the drier pieces of dough against the sides of the bowl. Continue until all the drier portions seem moistened and have clumped into shaggy clusters.
Remove the dough pieces from the bowl and press them together into a 5- to 6-inch disc on a piece of plastic wrap. If making a double batch or a recipe for a double crust, divide the dough into 2 discs using the weights specified in the recipe.
Wrap the disc(s) in plastic wrap, and smooth the outer 1-inch-thick edge with your fingertips or by rolling the disc along the countertop. These smooth edges will make the dough easier to roll out in a circle. Refrigerate for at least 4 hours but preferably overnight.
To roll out the dough, see “Rolling Out Crusts” on this page or the directions in the pie recipe. If specified, blind-bake (this page) the crust.
MAKING PIE DOUGH
Using a Food Processor
This has become our favorite method because it is faster, easier on the forearm muscles, and produces a crust that is identical to the one made by hand. If our grandmothers had had food processors, it would have been their favorite, too. Sometimes, the old ways are the best, but sometimes a change is welcomed. Yay for kitchen appliances!
Measure the flour, sugar, salt, and baking powder directly into the bowl of a food processor. Pulse the ingredients once or twice to combine them.
Scatter the shortening across the top of the flour mixture in three or four roughly equal nuggets. Pulse three to four times until the shortening seems to be evenly dispersed into the flour. If there are still large visible clumps, pulse one or two more times.
Scatter the butter pieces across the flour mixture, and pulse four or five times. At this point the flour should appear textured, like coarse cornmeal, with small (¼-inch) tidbits of butter flecked throughout. If not, pulse one or two more times.
If measuring all ingredients by volume (measuring cups), simply combine the vinegar with the cold water and drizzle all the liquid over the flour. If using a scale, place a liquid measuring cup with a spout on the scale and tare (zero out) the scale to subtract the weight of the measuring cup. Add the measured amount of vinegar to the cup (do not re-tare the scale); now add the cold water to the vinegar so that the combined vinegar plus water equals the weight of cold water listed in the ingredients. Drizzle the liquid over the flour in the food processor.
Using 1-second pulses, process the mixture until it transforms from dry and powdery and just begins to form into a large clump of cohesive dough, five to eight pulses. Stop pulsing once most of the dough is clumped together. The dough may look like pebbly curds of cottage cheese and there may be unincorporated flour in the bowl. That is what you want at this point. If you process the dough until it forms one large ball of dough and starts thwacking around in the food processor bowl, it will be overworked and bake up tough.
Transfer the dough and any remaining unincorporated flour to a smooth work surface (you can use a silicone rolling mat if you like, but we usually do this straight on the counter). To incorporate any loose flour, press and smear the flour across the work surface with the heel of your hand. Gather all of the dough and press it into a 5- to 6-inch disc about 1 inch thick. If making a double batch or a recipe for a double crust, divide the dough into 2 discs using the weights specified in the recipe.
Wrap the disc(s) in plastic wrap, and smooth the outer 1-inch-thick edge with your fingertips or by rolling the disc along the countertop. These smooth edges will make the dough easier to roll out in a circle. Refrigerate for at least 4 hours but preferably overnight.
To roll out the dough, see “Rolling Out Crusts” on this page or the directions in the pie recipe. If specified, blind-bake (this page) the crust.
COCOA
Pastry Crust

This crust is used for several of the pies in this book, including the Pittsburgh Proud (this page) and the Chocolate-Covered Cherry (this page). Chocolate crusts can be tricky. The addition of cocoa powder affects the flavor, sweetness, browning, and gluten formation. This recipe works because we first combine the cocoa powder and confectioners’ sugar with the shortening to form a paste, rather than adding them directly to the dry ingredients. We’ve found that the chocolate paste is more easily and evenly dispersed into the dry ingredients using a food processor rather than by hand so we are providing only one method for making it. Like the standard pastry crusts, you can double this recipe to make two crusts at one time. This dough will keep, wrapped, in the refrigerator for up to 3 days. Placed in a freezer-safe zipper-top storage bag, it can be frozen for up to 6 months.
MAKES ABOUT 15 OUNCES OF DOUGH FOR A 9 BY 1½-INCH STANDARD PIE PLATE OR A 9½ BY 2-INCH DEEP-DISH PIE PLATE. The recipe can be doubled and used for a double-crust pie.
|
INGREDIENT |
VOLUME |
WEIGHT (STANDARD) |
WEIGHT (METRIC) |
|
All-purpose flour |
1⅓ cups |
6.75 ounces |
191 grams |
|
Salt |
½ teaspoon |
||
|
Baking powder |
⅛ teaspoon |
||
|
Vegetable shortening |
2½ tablespoons |
1 ounce |
28 grams |
|
Confectioners’ sugar |
¼ cup |
1 ounce |
28 grams |
|
Dutch-process cocoa powder, either standard or black (see Sources, this page) |
¼ cup |
0.75 ounce |
21 grams |
|
Cold unsalted butter, cut into 8 pieces |
8 tablespoons |
4 ounces |
113 grams |
|
Vanilla extract |
1 teaspoon |
||
|
Strongly brewed coffee, cold (see Step 4) |
3 tablespoons plus 2 teaspoons |
2 ounces |
57 grams |
Measure the flour, salt, and baking powder directly into the bowl of a food processor. Pulse the ingredients once or twice to combine them.
Place the shortening, confectioners’ sugar, and cocoa into a separate small bowl. Using a small rubber spatula, smear the shortening into the powders, pressing against the sides and bottom of the bowl. Continue to work your way around the bowl until all the ingredients have been combined into a chocolatey paste. Using the small rubber spatula, divide the chocolatey paste into three or four roughly equal nuggets and add them to the flour mixture. Pulse three or four times (1-second pulses) until the chocolate seems to be evenly dispersed into the flour.
Add the butter to the flour and pulse four or five times. At this point the flour should appear slightly textured, like coarse cornmeal, with small bits of butter flecked throughout. If not, pulse one or two more times.
If measuring all ingredients by volume (measuring cups), simply combine the vanilla with the cold coffee and drizzle all the liquid over the flour. If using a scale, place a liquid measuring cup with a spout on the scale and tare (zero out) the scale to zero to subtract the weight of the measuring cup. Add the measured amount of vanilla to the cup (do not re-tare the scale); now add the cold coffee to the vanilla so that the combined vanilla plus coffee equals the weight for strongly brewed coffee listed in the ingredients. Drizzle the liquid over the flour in the food processor.
Using 1-second pulses, process the mixture until it transforms from dry and powdery into a large clump of cohesive dough, 8 to 15 pulses. Stop pulsing once most of the dough is clumped together.
Transfer the dough and any remaining unincorporated flour to a smooth work surface. To incorporate any loose flour, press and smear the flour across the work surface with the heel of your hand. Gather all the dough and press it into a 5- to 6-inch disc about 1 inch thick.
Wrap the disc(s) in plastic wrap, and smooth the outer 1-inch-thick edge with your fingertips or by rolling the disc along the countertop. These smooth edges will make the dough easier to roll out in a circle. Refrigerate for at least 4 hours but preferably overnight.
To roll out the dough, see “Rolling Out Crusts” (this page) or the directions in the pie recipe. If specified, blind-bake (this page) the crust.
Rolling Out
CRUSTS
As is the case with many aspects of life, the key to rolling out a crust is preparation. If you’re an experienced pie maker, rolling out dough may seem intuitive. However, every now and then, everyone needs a good refresher on the basics. If you are already a skilled pie maker and feel comfortable rolling out pie dough using your own gadgets and tricks, please continue to do so. However, we will share our methods, and maybe some of these ideas will improve your dough-rolling experience or quell any fears you may have about rolling pie dough.
ROLL ON A FLAT SURFACE. Rolling out pie dough is best done on a large, smooth, flat surface that is relatively cool. Smooth kitchen counters work well, but try to avoid areas where the counter can heat up, such as near a dishwasher or next to a warm stove or oven. If you have a tiled countertop, that can make rolling pie dough difficult because of the texture. In that case, you can also use a dining room table, but the lower height of the table may make rolling the dough uncomfortable on your back.
USE A SILICONE ROLLING MAT. Paul used to always roll out dough directly on a floured countertop. When Chris first suggested that Paul try the silicone dough rolling mat (see this page), Paul scoffed. “Isn’t that for kids? Do I really need a mat to show me how to roll dough into the shape of a circle?” Then he tried it, and well, that was the end of the story—we are now both huge fans of silicone rolling mats. You use less flour, the dough is less likely to stick, and the concentric circles printed on the mat actually are quite helpful in ensuring that the dough is rolled out to the proper size. After you have found your flat, cool surface, place your silicone rolling mat on it and start assembling the rest of your tools.
HAVE YOUR TOOLS HANDY. We like to have all our tools in place within easy reach so we are not running all over the kitchen looking for things while the dough is getting warm waiting for us. The main tools we like to always have on hand are a flour shaker for dusting the work surface, cooking spray, rolling pins (both a tapered French-style pin and an even-thickness dowel-style pin), dough thickness guides, a turntable, the pie plate, and a clean pair of scissors. You don’t need all these things—just have whatever you like to use within arm’s reach. Additional tools, like impression mats, cookie cutters, and fondant-decorating tools, should be at the ready if called for in making a specific pie.
READY TO ROLL. Spray a light layer of cooking spray over the inner surface of the pie plate. This provides some extra insurance that each slice is easily removed. Place the pie plate near the rolling mat, but not in the way. Remove the dough from the refrigerator and unwrap it. Dust the rolling mat, rolling pin, and both sides of the dough disc lightly with flour.
ROLL QUICKLY. You should not be rushing, but you want to work efficiently with the dough. Because our doughs are mostly butter, the doughs are hard and firm directly out of the refrigerator. The longer the dough is out of the refrigerator, the softer the butter gets, and the less flaky your final crust will be. Once you have started rolling out the dough, you will have a limited amount of time to complete the process. That time is mostly dependent on the temperature in your kitchen. When making pies in a warm kitchen, we start rolling the dough immediately after removing it from the refrigerator. In most other settings, you might want to wait 2 to 5 minutes for the butter in the dough to soften slightly before you start rolling. The dough should still be firm. The dough should begin to roll with slight pressure from the rolling pin. If the edge starts to crack, it is usually because the dough is too cold. Press the cracks together, stop rolling, and wait another minute before continuing.
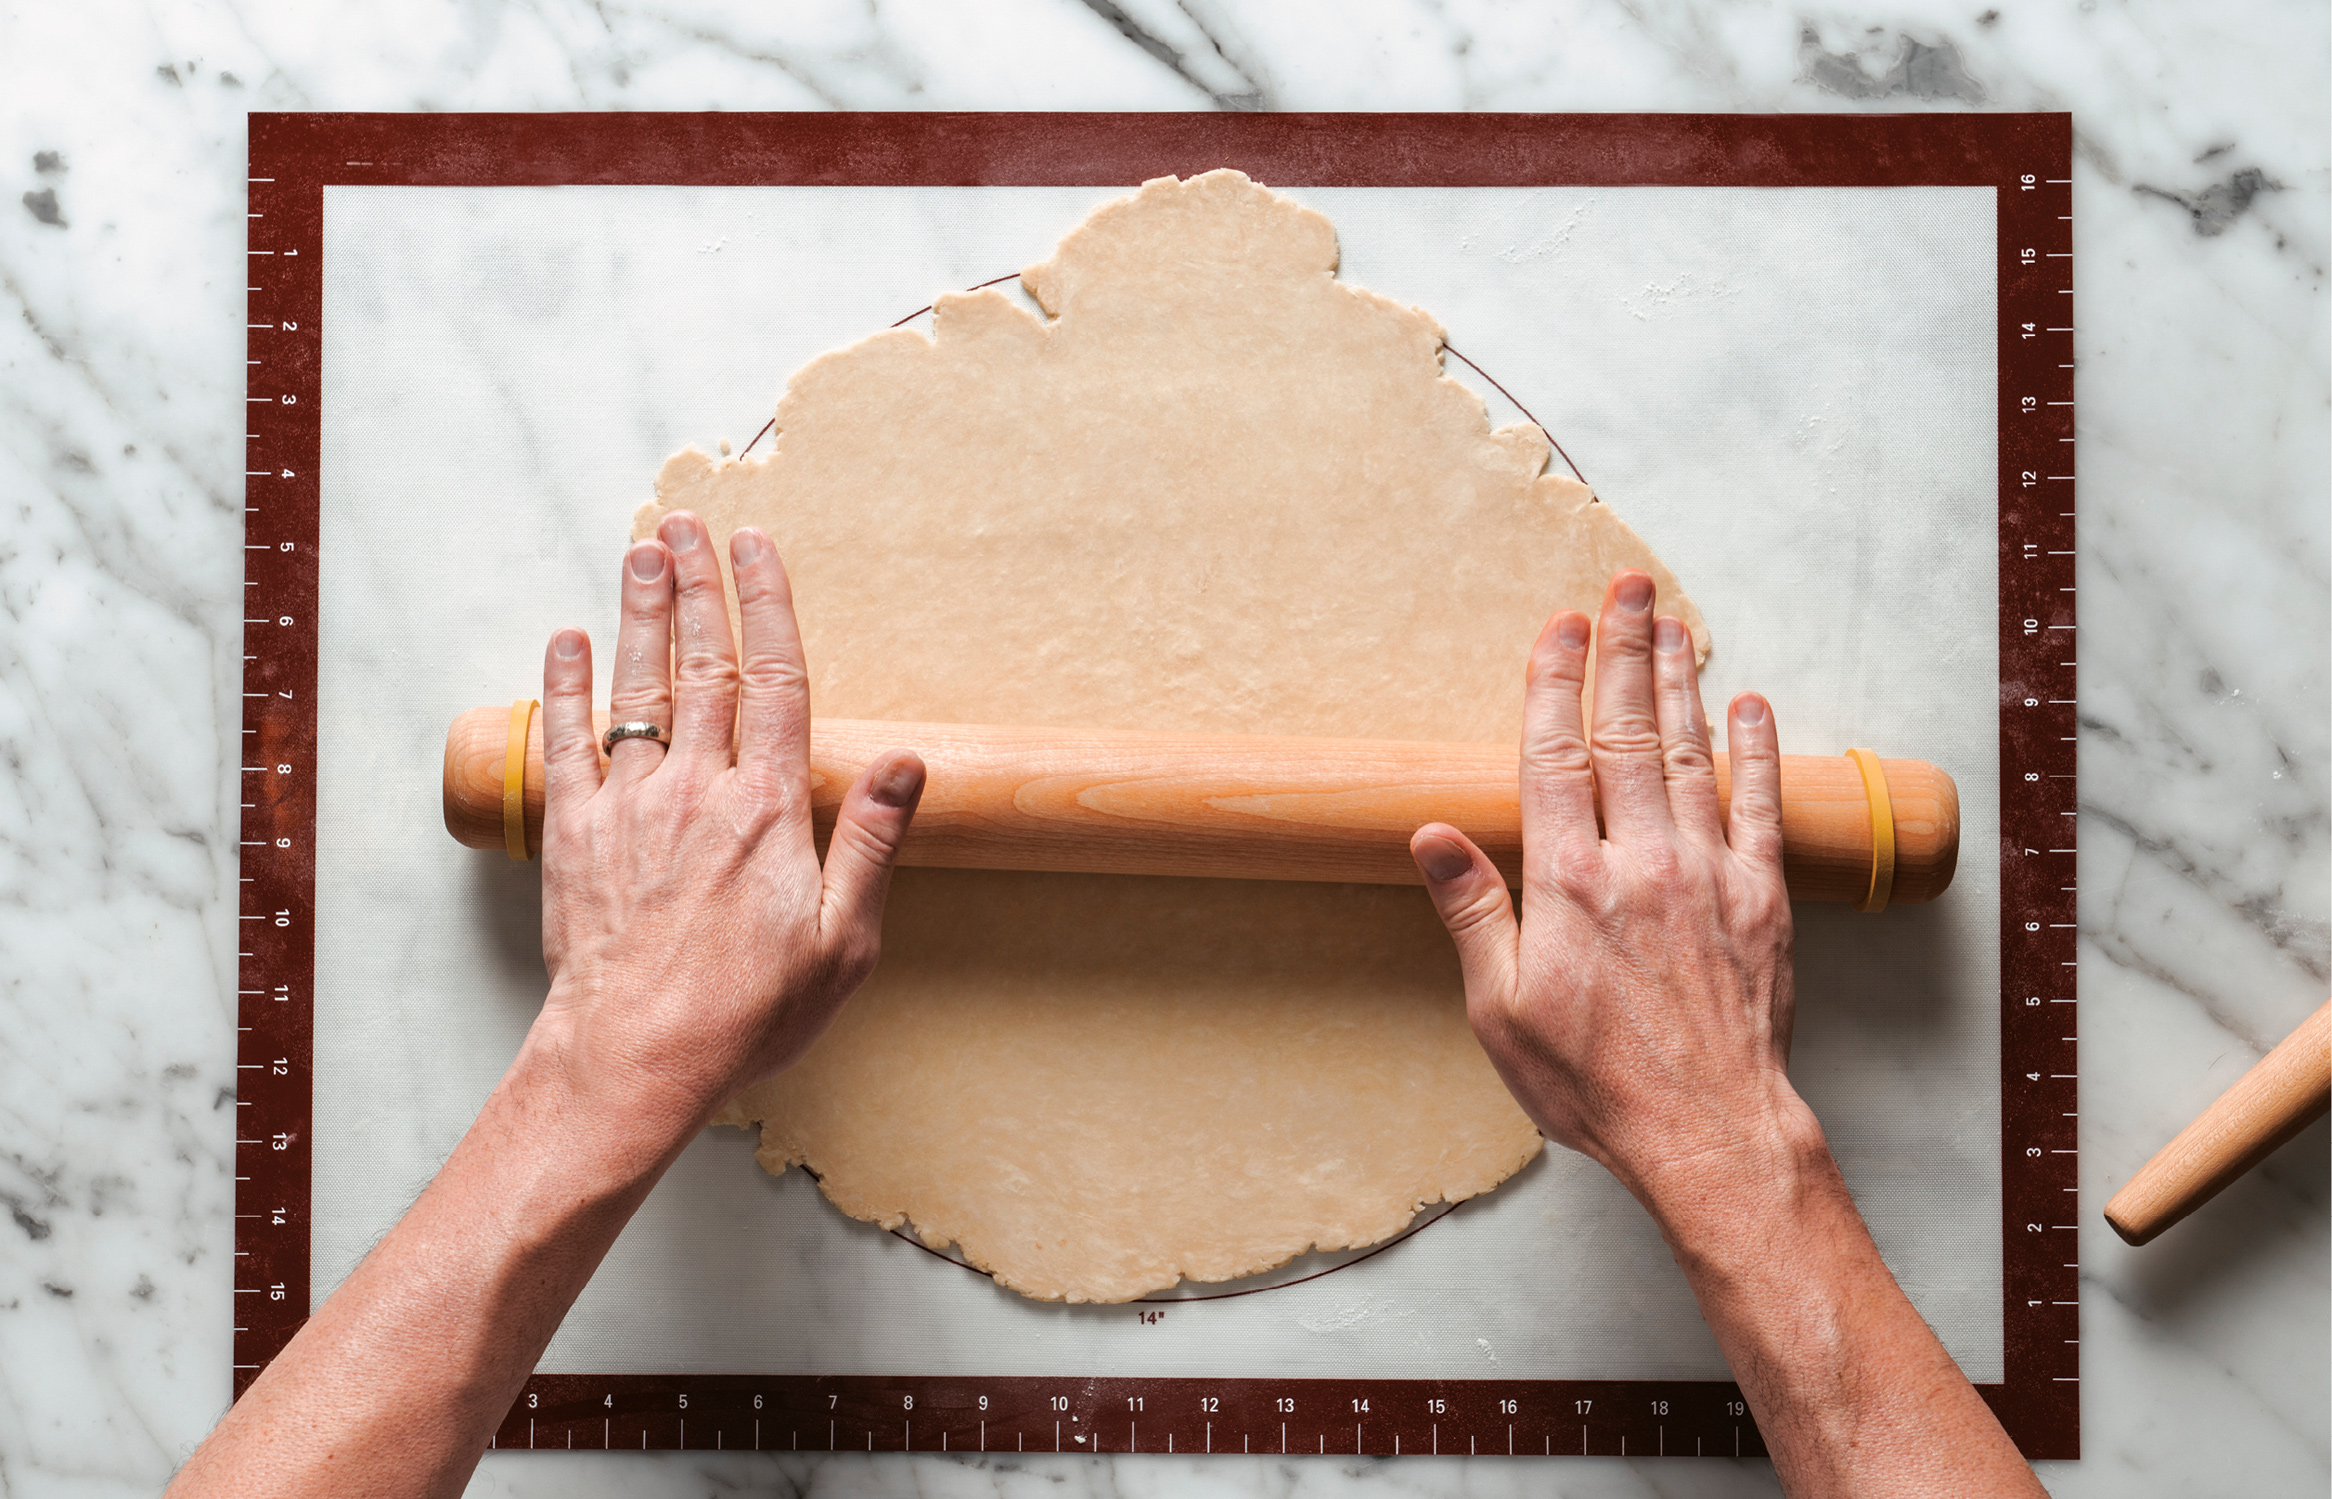
ROLLING BASICS. Place the center of a tapered rolling pin in the middle of the disc of dough. Roll the rolling pin toward you, pressing slightly harder with your right hand than your left. Lift the disc of dough and spin it a quarter-turn counterclockwise (use a bench scraper, this page, to help release the dough from the surface or mat if needed and re-flour your surface). If you start rolling when the dough is too cold or press too hard on the cold dough with the rolling pin, the edges of the disc can start to crack and split. If this happens, stop, press the cracked edges back together, and smooth the edge. That process may be sufficient to warm the disc of dough slightly from the heat of your hand, or you may need to wait another minute before restarting. Continue rolling and spinning the dough in this manner for four quarter turns. Turn the dough over and continue rolling and spinning the dough. If you find the dough beginning to stick anywhere, dust the surface with a bit more flour. If you find the dough is sticking to the rolling pin, you can also sprinkle a light dusting of flour on the top of the dough, as well. By keeping the dough constantly moving by turning it, there is less chance the dough will stick and you are more likely to roll it into a circle shape. If you keep the dough in place, it may adhere to the rolling surface, and you won’t realize it until it’s time to lift the dough into the pie plate, and you might end up with an oddly shaped piece of dough that could prove to be a challenge to fit into a round pie plate. Don’t worry if the edges of your pie dough become a little ragged as you roll; the edges get trimmed away once the dough is positioned in the pie plate. If at any point it becomes clear to you that the dough has become too warm and soft, you can transfer the dough on the silicone rolling mat into the refrigerator for a few minutes until it has firmed up a bit.
Once your dough is about 10 inches across, you can add ⅛-inch dough guides to help get the perfect, even ⅛-inch thickness we call for in our recipes (dough guides don’t work on tapered rolling pins, so if you’re using a French pin, you may choose to switch to a non-tapered dowel-style rolling pin or a standard ball-bearing pin at this point; see this page). If you don’t have dough guides, you can use these measurements to help steer you—once the dough has reached this size, it will be ⅛ inch thick.
For bottom crusts, the dough circles should measure:
• 13 inches in diameter for a standard 9 by 1½-inch pie plate
• 15 inches in diameter for a 9½ by 2-inch deep-dish pie plate
• 15 inches in diameter for a 12 by 1½-inch pie plate
For top crusts, the dough should be about 2 inches wider than the diameter of the top of the pie plate. For example, if your pie plate measures 10 inches from lip edge to lip edge, roll the dough to a 12-inch circle. These measurements should take into account the roughness in the dough’s edge, and the fact that the rough edges will be trimmed away. If there is a part of the circle that is less than the 13 or 15 inches specified, there may be a gap in your crust edge. You may have to patch this area later. Sometimes, to ensure all the dough bakes evenly, we roll the dough thinner than ⅛ inch, like when layering pieces on top of dough (such as lattice crusts with layered dough strips). Those directions will be included in the individual pie recipes. When the dough is at an even thickness, the size of the dough circle will vary depending on whether you are using a standard or deep-dish crust recipe.
TRANSFERRING THE DOUGH TO THE PIE PLATE. Place the rolling pin along the edge of the crust farthest from you. Using your fingertips, lift the edge of the crust onto the rolling pin and roll the pin toward yourself to wrap the dough loosely around the pin. Lift the dough and pin from the mat. Unroll the pin over the pie plate and allow the dough to settle in place so that equal amounts of dough are hanging over the edge all around. If you place the dough off-center, gently (gently!) reposition the dough using a very light touch. You do not want to stretch the dough at this point.
Using both hands, lift an edge of the dough and guide that portion down into the pie plate. The goal is to make sure that the dough is touching the surface of the pie plate all over—this is especially important where the bottom and sides of the pie plate meet. It should feel like you are draping a heavy piece of cloth into the pie plate. Try not to stretch the dough—stretched dough will only shrink back to its original size in the oven and give you a sad, shrunken crust. Continue working your way around the pie plate, fitting the dough into the bottom and against the sides (a cake decorating turntable makes this process easier).

TRIMMING THE OVERHANG. Once the dough is flush against all of the inner surfaces of the pie plate, you should have about 1 inch of extra dough hanging over the edge of the pie plate. For a single-crust recipe, use the scissors to trim the extra dough to about ½ inch beyond the pie plate edge. Fold the edge of the pie crust underneath itself. The folded edge should be flush against the edge of the pie plate. Crimp the edges as desired with your fingertips, knuckles, or using a decorative tool like the tines of a fork (see “Crimping Crusts,” this page).
These recipes err on the side of giving you a bit of breathing room in the form of extra dough, just in case your dough circle isn’t exactly round or your edges are a little ragged. Keep these dough scraps on hand while you bake your crust in case you happen to end up with a tear or hole (see “Fixing Cracks, Rips, Tears, and Holes,” this page). You can save any leftover trimmings of dough well wrapped in plastic in the freezer. After thawing, they can be pressed together into a new disc of dough for another pie. The rerolled scraps will be a bit tougher than the original dough, but it won’t go to waste.
FIXING CRACKS, RIPS, TEARS, AND HOLES: The Pie Dough Spackle
Sometimes life isn’t fair. You may have accidentally stretched the dough too much when fitting it into the pie plate. Or you were trying to follow all the steps carefully but got distracted at the wrong moment and poked your finger through the pie dough. You tried to patch it before baking, but the patch did not hold during the blind-baking. Arrrgh—that can be very frustrating! These things happen. If you do notice any small cracks or holes, grab that wad of pie dough scraps you have been saving in the refrigerator. Pinch off a small piece of dough and carefully smear it into the crack like putty. Be mindful—the pie crust is still very hot. An offset spatula would be useful about now. Bake the crust for an additional 5 minutes. If the rest of the crust is already sufficiently baked, simply cover those parts with a pie crust shield or aluminum foil to prevent them from getting too dark while your patched area is baking.

Blind
BAKING
“Blind-baking” is the term for either partially or fully baking the dough for a single crust pie before the filling is added. Generally speaking, crusts for cream pies are fully blind-baked before being filled, while crusts for custards that require baking, like a pumpkin pie, are partially blind-baked to give them a head start on becoming crisp-golden, and then the filling is added usually while the crust is still hot. To blind-bake, the unbaked dough is lined with foil or parchment and then pie weights (see this page) are added to keep the crust in place while it bakes to prevent slumping and shrinkage.
WHAT YOU NEED
Cooking spray
Pie weights (see this page)
18-inch-square piece of aluminum foil
Roll the dough to the specified diameter for the pie plate you are using (see this page). Remember that the target thickness for a bottom pie crust is ⅛ inch. Place the dough in the pie pan and crimp the edges as desired. Freeze the dough-lined pan for at least 20 minutes while preheating the oven to 350°F.
Lightly spray one side of an 18-inch piece of aluminum foil with cooking spray. Line the crust with the foil, sprayed side down. Fill the pan with pie weights. For standard pie plates, use 4 cups of pie weights. For deep-dish crusts, use 6 cups. Completely cover the edges of the crust with the foil.
FOR A PARTIALLY BLIND-BAKED CRUST, remove the pie from the oven when the edge is a light golden brown, 40 to 50 minutes. Lift out the pie weights using the corners of the foil. The goal is for the inside of the pie shell to be just beginning to brown. If the pie is too pale, return the crust to the oven without the weights and continue to bake, checking every 2 minutes or until the bottom is just beginning to turn light golden brown in spots. The pie will bake longer after the filling is added, so it should not be completely browned at this point. Partially blind-baked crusts are usually filled hot out of the oven, so keep that in mind when preparing the pie filling.
FOR A FULLY BLIND-BAKED AND COOLED CRUST, bake the crust until the edge is golden brown, 50 to 60 minutes, peeking under the edge of the foil to check for doneness. Remove the pie pan from the oven and lift out the pie weights using the corners of the parchment or foil. The goal is for the inside of the pie shell to be evenly golden brown—it should look like a finished crust. If the crust is still too pale, place it back into the oven without weights and continue to bake, checking every 2 minutes. Use a pie crust shield (see this page) if you don’t want the edges to brown any further. Cool the pie crust completely on a wire rack, about 1 hour.
BAKING THE COCOA PASTRY CRUST
When baking the Cocoa Pastry Crust (this page), the visual cues become a bit less helpful since the dark crust makes it harder to see when the dough transitions from raw to lightly browned or fully baked. In addition to the time and temperature instructions provided, you can lightly tap the crust with the pad of your finger to assess doneness. If the crust still seems wet and soft, you are not there yet. The finished crust will feel dry, crispy, and firm.
CRUMB Crusts
It is worth your while to become familiar with crumb crusts. These crusts are all made by grinding up existing items like cookies, nuts, or breakfast cereals to produce the crumbs that become your pie crust. They are faster and easier to make than pastry crusts, and especially good if you need a blind-baked crust but haven’t quite mastered the pastry crust. Crumb crusts are also a great way to introduce additional flavors to a pie beyond the flavors possible with pastry crusts. We blind-bake all our crumb crusts before adding the fillings. We find that baked crumb crusts are more flavorful and hold together much better than those that are left raw.
You’ll note that the underlying formulas for these crusts are all very similar: crumbs + butter + sugar. Does this mean that you can experiment with additional types of cookies, cereals, and even snacks like pretzels? Yes, you can! However, pay close attention to the amount of fat that is present in the experimental cookie. Items with a similar amount of fat per equal weight of serving listed on the nutritional label of a graham cracker should work in place of graham crackers. Items with higher fat content may slump when baking, requiring you to reduce the amount of butter in the recipe. If you don’t feel like experimenting, don’t. We’ve already done that and provided you with several delicious crumb crust recipes.
GRAHAM CRACKER CRUST
This is the classic graham cracker crust. You can substitute an equal weight of graham cracker crumbs for the whole crackers. If you’re in the habit of using the store-bought premade graham cracker crusts, please stop. This crust is so much better and very easy to make.
MAKES ONE 9½ BY 2-INCH DEEP-DISH PIE CRUST
|
INGREDIENT |
VOLUME |
WEIGHT (STANDARD) |
WEIGHT (METRIC) |
|
Graham crackers, broken into several pieces |
12 graham cracker sheets |
6.85 ounces |
194 grams |
|
Unsalted butter, melted |
6 tablespoons |
3 ounces |
85 grams |
|
Sugar |
2 tablespoons plus 2 teaspoons |
1.2 ounces |
33 grams |
|
Salt |
pinch |
In the bowl of a food processor, process the graham crackers until finely ground. If you do not have a food processor or just prefer to do it by hand, place the graham crackers in a plastic bag and crush them with your rolling pin until they have been reduced to fine crumbs. Pour the crumbs into a bowl and proceed with the recipe, stirring in the other ingredients by hand using a rubber spatula.
Pulse in the melted butter, sugar, and salt until the crumbs are moistened throughout, resembling wet sand. Transfer the crumb mixture to a 9½-inch deep-dish pie crust. We prefer the glass Pyrex pans with no lip (see “Equipment,” this page).
Using your fingers, spread the moistened crumbs evenly around the bottom and up the sides of the pie plate. Press the crumbs firmly so that they start to adhere all along the inner surface of the pie plate.
Find a sturdy cup or small bowl with smooth sides and bottom—a ⅓ cup dry measuring cup works well. Use the bottom and side of the cup to compact the crumbs into a smooth even layer. Pay special attention to the area where the sides and bottom of the pie plate meet.
When you think you have finished, carefully hold the pie plate up to the light and visually inspect it from several angles. Do this carefully (like, don’t turn it upside down or anything!). If you’re using a glass pie plate, lift up the pan and look through the bottom toward a light source. If you find thick or thin areas or even actual holes, this is your opportunity to correct your mistakes. Scrape off some crumbs from the thick area and move them to the thin. Compact and smooth crumbs with the cup.
When you are satisfied, start preheating the oven to 350°F, and place the crust in the freezer to chill for at least 10 minutes.
Bake the crust for 10 minutes on the middle rack. Depending on the pie recipe, the crust may need to be filled warm or cold.

COCOA GRAHAM CRACKER CRUST
This chocolate-flavored version of the graham cracker crust is so tasty! To make it, follow the Graham Cracker Crust recipe (this page), substituting the light brown sugar for granulated sugar and adding the Dutch-process cocoa powder, espresso powder, and vanilla to the melted butter before pulsing it into the crumbs. The result is a chocolate crust that is packed with more chocolate flavor than you thought a graham cracker could have. Feel free to use chocolate graham crackers instead, for even more chocolate reinforcement.
MAKES ONE 9½ BY 2-INCH DEEP-DISH PIE CRUST
|
INGREDIENT |
VOLUME |
WEIGHT (STANDARD) |
WEIGHT (METRIC) |
|
Graham crackers, broken into several pieces |
13 graham cracker sheets |
7.4 ounces |
209 grams |
|
Unsalted butter, melted |
6 tablespoons |
3 ounces |
85 grams |
|
Dutch-process cocoa powder, sifted |
¼ cup |
0.75 ounce |
21 grams |
|
Instant espresso powder |
½ teaspoon |
||
|
Vanilla extract |
1 teaspoon |
||
|
Light brown sugar, lightly packed |
¼ cup |
1.75 ounces |
50 grams |
|
Salt |
pinch |
NUT GRAHAM CRACKER CRUST
The addition of walnuts or pecans is a delicious complement to the traditional graham cracker crust. There is no need to toast the nuts first because they will cook while the crust bakes. Process the nuts with the sugar and salt until the mixture is fine, then add the graham crackers and proceed with the Graham Cracker Crust recipe (this page).
MAKES ONE 9½ BY 2-INCH DEEP-DISH PIE CRUST
|
INGREDIENT |
VOLUME |
WEIGHT (STANDARD) |
WEIGHT (METRIC) |
|
Walnut or pecan halves |
½ cup plus 1 tablespoon |
2 ounces |
57 grams |
|
Sugar |
3 tablespoons |
1.3 ounces |
37 grams |
|
Salt |
pinch |
||
|
Graham crackers, broken into several pieces |
9 graham cracker sheets |
5.1 ounces |
144 grams |
|
Unsalted butter, melted |
4 tablespoons |
2 ounces |
57 grams |
GLUTEN-FREE CRUMB CRUST
This is honestly one of our favorite crumb crusts; the fact that it’s gluten-free is a happy by-product. The sweetness and nuttiness from the Cheerios and the almond flour make it absolutely fabulous. To make it, follow the instructions for the Graham Cracker Crust recipe (this page), replacing the graham crackers with Honey Nut Cheerios and almond flour. This recipe uses no added salt.
MAKES ONE 9½ BY 2-INCH DEEP-DISH PIE CRUST
|
INGREDIENT |
VOLUME |
WEIGHT (STANDARD) |
WEIGHT (METRIC) |
|
Honey Nut Cheerios |
3¾ cups |
5 ounces |
142 grams |
|
Almond flour |
⅓ cup |
1 ounce |
28 grams |
|
Unsalted butter, melted |
6 tablespoons |
3 ounces |
84 grams |
|
Sugar |
¼ cup |
1.75 ounces |
50 grams |
ALPHA-BITS CEREAL CRUMB CRUST
Alpha-Bits is a slightly sweet multigrain cereal. The bits make a fun alternative to a graham cracker crust, especially if the flavor of graham crackers is too “loud” for a subtle pie filling, such as the Saturday Morning Cartoon Cereal (this page). Follow the instructions for the Graham Cracker Crust (this page), substituting Alpha-Bits cereal for the graham crackers.
MAKES ONE 9½ BY 2-INCH DEEP-DISH PIE CRUST
|
INGREDIENT |
VOLUME |
WEIGHT (STANDARD) |
WEIGHT (METRIC) |
|
Alpha-Bits cereal |
4 cups |
5 ounces |
142 grams |
|
Unsalted butter, melted |
6 tablespoons |
3 ounces |
85 grams |
|
Sugar |
¼ cup |
1.75 ounces |
50 grams |
|
Salt |
pinch |