MAKING, ROLLING, AND CUTTING OUT THE DOUGH
MY SEVEN FAVORITE COOKIE RECIPES
MY SIGNATURE GINGERBREAD COOKIES
MAKES ABOUT 32 (3-INCH) COOKIES
This is the cookie dough that started it all. When I first began baking cookies professionally, most of them were gingerbread, which led to many commissions for gingerbread replicas of New York landmarks and iconic architecture—the French/Gothic Sherry-Netherland Hotel, the original Dean & DeLuca store and dozens of other SoHo cast iron loft buildings, and many brownstones. I love this cookie for the delicious bite of ginger paired with sweet icing. For the first few years I made it, I ate at least five each day, dunked in coffee. It’s the perfect cookie—sophisticated enough for adults and appealing to kids. This is the only cookie that benefits from chilling the dough regardless of the method used to roll it out. The dough can be a bit sticky, making it difficult to use directly from the bowl as is standard in the Parchment Paper Method (here). When decorating, keep in mind that any part of a gingerbread cookie that isn’t covered with icing will appear dark.
3 cups plus 2 tablespoons (420 grams) unbleached all-purpose white flour
1 teaspoon baking soda
½ teaspoon baking powder
⅔ cup (1 stick plus 3 tablespoons, or 151 grams) unsalted butter, softened
½ cup packed (100 grams) brown sugar
1 tablespoon ground ginger
1½ teaspoons ground cinnamon
¼ teaspoon ground cloves
1½ teaspoons salt
1 large egg
¾ cup molasses
Whisk together the flour, baking soda, and baking powder in a medium bowl and set aside. In the bowl of a standing mixer fitted with the paddle attachment, combine the butter, brown sugar, ginger, cinnamon, cloves, and salt and mix on medium speed until the ingredients are thoroughly incorporated, about 1 minute. Reduce the speed to low, add the egg, and mix until thoroughly incorporated, about 1 minute. Raise the speed to medium and mix for 5 seconds more. Do not overbeat. Pour in the molasses and mix until thoroughly combined, about 30 seconds. Reduce speed to low.
Gradually add the flour mixture, scraping down the sides of the bowl as needed, and beat until the dry ingredients are just incorporated.
Divide the dough into two equal parts, flatten into discs, and double-wrap in plastic wrap. Refrigerate for at least 2 hours. Roll out the dough using the Pastry Cloth Method (here).
Preheat the oven to 350°F. Cut out shapes from the dough (see here). Bake the cookies until they are slightly firm to the touch, 8 to 14 minutes, depending on the size. Do not let the edges darken. Let the cookies rest on the baking sheet for 5 minutes, then transfer to a rack to cool completely before decorating.

SUGAR COOKIES
MAKES ABOUT 24 (3-INCH) COOKIES
This dough is not overly sweet so it pairs well with the royal icing. That said, unfrosted, these cookies taste amazing. If you are new to cookie decorating, this is the perfect dough to get you started. Not only is it easy to work with, but it is sturdy enough to stay intact when using intricately shaped cookie cutters.
2½ cups plus 2 tablespoons (340 grams) unbleached all-purpose white flour
½ teaspoon baking powder
½ teaspoon salt
¾ cup (1½ sticks or 170 grams) unsalted butter, softened
1 cup plus 2 tablespoons (225 grams) granulated sugar
1 large egg
1½ teaspoons vanilla extract
Whisk together the flour, baking powder, and salt in a medium bowl and set aside. In the bowl of a standing mixer fitted with the paddle attachment, combine the butter and sugar and mix on medium speed for 1 to 2 minutes, until thoroughly combined. Reduce the speed to medium low and add the egg and vanilla, mixing until thoroughly combined, about 40 seconds. Reduce speed and gradually add the flour mixture, scraping down the sides of the bowl as needed and beating just until the dry ingredients are incorporated.
If using the Pastry Cloth Method (here) to roll out the dough, divide the dough into two equal parts, flatten into discs, and double-wrap in plastic wrap. Refrigerate for at least 3 hours. If using the Parchment Paper Method (here), roll out the dough straight from the mixing bowl, working in three batches.
Preheat the oven to 350°F. Cut out shapes from the dough (see here). Bake the cookies until the edges begin to brown slightly, 9 to 15 minutes, depending on the size. Let the cookies rest on the baking sheet for 5 minutes, then transfer to a rack to cool completely before decorating.

ANDREA’S WHOLE WHEAT COOKIES
MAKES ABOUT 24 (3-INCH) COOKIES
This dough, named for my assistant Andrea, who helped create it, is made with stone-ground whole wheat flour (not to be confused with whole wheat pastry flour, which results in a fragile cookie) and hazelnut extract. It’s perfect if you love earthy flavors and a bit more texture to your cookie. If you do not like the flavor of hazelnut, replace it with vanilla extract.
2½ cups plus 2 tablespoons (340 grams) unbleached all-purpose white flour
1⅓ cups plus 1 tablespoon (252 grams) stone-ground whole wheat flour
1½ teaspoons salt
1 teaspoon baking powder
1½ cups (3 sticks or 340 grams) unsalted butter, softened
1¾ cups (354 grams) granulated sugar
1 large egg
2 teaspoons vanilla extract
2 teaspoons hazelnut extract
Whisk together the all-purpose and whole wheat flours, salt, and baking powder in a medium bowl and set aside. In the bowl of a standing mixer fitted with the paddle attachment, combine the butter and sugar and mix on medium speed until thoroughly combined, 1 to 2 minutes. Reduce the speed to low, add the egg and extracts, and beat for 1 minute.
Gradually add the flour mixture, scraping down the sides of the bowl as needed and beating just until the dry ingredients are just incorporated.
If using the Pastry Cloth Method (here) to roll out the dough, divide the dough into two equal parts, flatten into discs, and double-wrap in plastic wrap. Refrigerate for at least 2 hours. If using the Parchment Paper Method (here), roll out the dough straight from the mixing bowl, working in three batches.
Preheat the oven to 350°F. Cut out shapes from the dough (here). Bake the cookies until they just begin to darken around the edges, 8 to 14 minutes, depending on the size. Let the cookies rest on the baking sheet for 5 minutes, then transfer to a rack to cool completely before decorating.

CHOCOLATE COOKIES
MAKES ABOUT 24 (3-INCH) COOKIES
Yum. These are delicious straight from the cooling rack because of their distinctive rich chocolate flavor. Not only do they taste incredible, but they are a gorgeous dark brown color, making them a great background for certain cookies, including the Ghost (here) and the Indian Corn (here).
3 cups (390 grams) unbleached all-purpose white flour
1 teaspoon baking powder
½ teaspoon salt
1 cup (2 sticks or 227 grams) unsalted butter, softened
1½ cups plus 3 tablespoons (338 grams) granulated sugar
½ cup plus 2 tablespoons (57 grams) sifted unsweetened cocoa powder
2 large eggs
Whisk together the flour, baking powder, and salt in a medium bowl and set aside. In the bowl of a standing mixer fitted with the paddle attachment, combine the butter and sugar and mix on medium speed for 60 seconds. Reduce the speed to low, add the cocoa, and mix until thoroughly incorporated, about 30 seconds. Add the eggs, one at a time, scraping the bowl after each addition until thoroughly incorporated.
Gradually add the flour mixture, scraping down the sides of the bowl as needed and beating just until the dry ingredients are incorporated.
If using the Pastry Cloth Method (here) to roll out the dough, divide the dough into two equal parts, flatten into discs, and double-wrap in plastic wrap. Refrigerate for at least 3 hours. If using the Parchment Paper Method (here), roll out the dough straight from the mixing bowl, working in three batches.
Preheat the oven to 350°F. Cut out shapes from the dough (here). Bake the cookies until the centers are slightly firm, 8 to 14 minutes, depending on the size. Let the cookies rest on the baking sheet for 5 minutes. Transfer to a rack to cool before decorating.
VEGAN GINGERBREAD COOKIES
MAKES ABOUT 24 (3-INCH) COOKIES
This cookie is a favorite of my longtime yoga teacher, for whom I developed the recipe. It’s a wet dough; it will never harden to the same stiffness as doughs made with butter, no matter how long you chill it. The trick here is to use the Pastry Cloth Method (here) to roll it out, so that you can help yourself to lots of flour as you go. I like unsweetened soy milk for these, but if you can’t find it, the more readily available sweetened version is perfectly fine.
2 cups (260 grams) unbleached all-purpose white flour
1½ teaspoons ground ginger
½ teaspoon ground nutmeg
½ teaspoon ground cloves
½ teaspoon ground cinnamon
½ teaspoon baking soda
½ teaspoon baking powder
½ teaspoon salt
⅓ cup plus 1 tablespoon canola oil
¾ cup (169 grams) vegan sugar
¼ cup molasses
⅓ cup unsweetened soy milk
Whisk together the flour, ginger, nutmeg, cloves, cinnamon, baking soda, baking powder, and salt in a medium bowl and set aside. In the bowl of a standing mixer fitted with the paddle attachment, combine the oil and sugar and beat on medium speed for about 3 minutes. Reduce speed to low, add the molasses and soy milk, and mix until incorporated.
Gradually add the flour mixture, scraping down the sides of the bowl as needed and beating just until the dry ingredients are incorporated. The dough will be very wet.
Divide the dough into two equal parts, flatten into discs, and double-wrap in plastic wrap. Refrigerate for at least 3 hours. Roll out the dough using the Pastry Cloth Method (here).
Preheat the oven to 350°F. Cut out shapes from the dough (here). Bake the cookies until the centers are slightly firm, 8 to 14 minutes, depending on the size. Let the cookies rest on the baking sheet for 5 minutes, then transfer to a rack to cool completely before decorating.
OATMEAL COOKIES
MAKES ABOUT 24 (3-INCH) COOKIES
Yes, you can make a rolled and cut oatmeal cookie, which, when decorated, will come as a pleasant surprise to anyone who takes a bite. Kids love their flavor, making them a good choice because the oats and whole wheat flour add nutritional value. Use only old-fashioned rolled oats (not instant). Grind the oats until you can still see small pieces of them but not so finely that they become a powder.
1¾ cups (227 grams) unbleached all-purpose white flour
1 cup (100 grams) old-fashioned rolled oats (not instant), ground fairly fine
½ cup (60 grams) stone-ground whole wheat flour
½ teaspoon baking powder
1¼ teaspoons ground cinnamon
¼ teaspoon ground ginger
¾ teaspoon salt
1 cup (2 sticks or 227 grams) unsalted butter, softened
¾ cup packed (150 grams) light brown sugar
1 large egg
2 teaspoons vanilla extract
Whisk together the all-purpose flour, oats, whole wheat flour, baking powder, cinnamon, ginger, and salt in a medium bowl and set aside. In the bowl of a standing mixer fitted with the paddle attachment, combine the butter and brown sugar and beat on medium speed until thoroughly combined, about 1 minute. Add the egg and vanilla and beat on low until smooth, about 1 minute.
Gradually add the flour mixture, scraping down the sides of the bowl as needed and beating just until the dry ingredients are incorporated, 45 to 50 seconds. The dough will be slightly soft.
If using the Pastry Cloth Method (here) to roll out the dough, divide the dough into two equal parts, flatten into discs, and double-wrap in plastic wrap. Refrigerate for at least 3 hours. If using the Parchment Paper Method (here), roll out the dough straight from the mixing bowl, working in three batches.
Preheat the oven to 350°F. Cut out shapes from the dough (here). Bake the cookies until the centers are slightly firm to the touch, 8 to 14 minutes, depending on the size. Let the cookies rest on the baking sheet for 5 minutes, then transfer to a rack to cool completely before decorating.
GLUTEN FREE LEMON LIME SUGAR COOKIES
MAKES ABOUT 24 (3-INCH) COOKIES
Gluten free flour tends to make a very tender dough, which means that it was a challenge to create a gluten free recipe for rolled and cut cookies. After testing dozens of variations, I found this one to be excellent, though a tad more fragile than other doughs. It keeps its shape well and is a great combination of texture and flavor. I experimented using 1 cup rice flour in place of 1 cup of the gluten free flour, and it worked beautifully, too. I use Bob’s Red Mill xanthan gum, the stabilizer and thickener that gives the cookies their sturdiness, as well as the company’s gluten free flour. This turned out to be a huge favorite among my friends and samplers, who had no idea it was gluten free. It also happens to be my happiest discovery among the recipes I developed for this book.
3 cups (408 grams) Bob’s Red Mill All-Purpose Gluten Free Baking Flour, sifted before measuring
1½ teaspoons baking powder
¾ teaspoon xanthan gum
½ teaspoon salt
1 large egg
2 tablespoons heavy cream
2 teaspoons lemon extract
1 teaspoon lime zest
1½ teaspoons lime juice
1 cup (2 sticks or 227 grams) unsalted butter, softened, at room temperature
1 cup plus 2 tablespoons (225 grams) granulated sugar
Whisk together the flour, baking powder, xanthan gum, and salt in a medium bowl and set aside. In a small bowl, gently whisk together the egg, heavy cream, lemon extract, lime zest, and lime juice and set aside.
In the bowl of a standing mixer fitted with a paddle attachment, combine the butter and sugar and beat on medium speed until just smooth, less than a minute. Reduce the speed to low, gradually add the egg mixture, and mix until thoroughly incorporated. (The mixture may look curdled. This is okay.)
Gradually add the flour mixture, scraping down the sides of the bowl as needed and beating just until the dry ingredients are incorporated and the dough comes together on the paddle, 45 to 50 seconds.
If using the Pastry Cloth Method (here) to roll out the dough, divide the dough into two equal parts, flatten into discs, and double-wrap in plastic wrap. Refrigerate for at least 3 hours. If using the Parchment Paper Method (here), roll out the dough straight from the mixing bowl, working in three batches. Cut out shapes from the dough (here). Refrigerate cutout cookies for at least 30 minutes.
Preheat the oven to 350°F. Bake the cookies until they are firm to the touch, 12 to 17 minutes, depending on the size. Let the cookies rest on the baking sheet for 5 minutes, then transfer to a rack to cool completely before decorating.
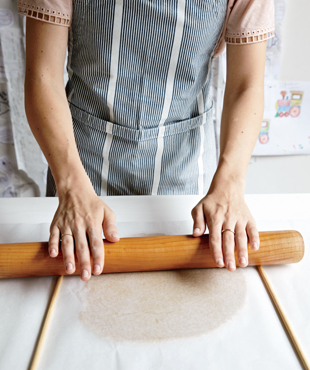
ROLLING OUT THE DOUGH
I like two methods for rolling out dough—the Pastry Cloth Method and the Parchment Paper Method. Choosing a method is strictly a matter of taste and comfort. Try them both and decide for yourself which one feels right.

THE PASTRY CLOTH METHOD
This is my go-to method for rolling out dough, probably because it’s the one I used when I started my cookie business so many years ago. It still works for me because I roll out large swaths of dough (I am usually making at least 4 dozen cookies at a time and often many more), and I like the simplicity of going from pastry cloth to baking sheet to oven. I rarely refrigerate the unbaked, cutout cookies (unlike in the Parchment Paper Method), but rather work quickly so that the dough does not get too warm before it goes into the oven. Admittedly, it seems a bit quaint—old-fashioned even—but I go for the tactile approach. You touch the dough, sprinkle flour around, and rub it into the pastry cloth. And I never get tired of looking at the faint linear images the cutters leave behind. Yes, it incorporates some flour into the dough, and yes, I do have to throw out a small piece of dough at the very end, but still, it feels right to me, however messy. I highly recommend this method when rolling out My Signature Gingerbread Cookies (here) and Vegan Gingerbread Cookies (here), both of which love more than a dusting of flour.
what you need
Baking sheets
Parchment paper, for lining baking sheets
Pastry cloth (see here)
Unbleached all-purpose white flour
Rolling pin fitted with ¼-inch silicone rings or accompanied by 2 (15-inch-long) ¼-inch-thick dowels
Dough of choice (here), chilled in the refrigerator and set out at room temperature until it gives under the rolling pin (Note: If the dough was refrigerated more than 4 hours, or overnight, it must be set out at room temperature for at least 30 minutes.)
1. Line four baking sheets with parchment paper and set aside.
2. Place the pastry cloth on a clean work surface and sprinkle flour over it. Gently rub the flour into the pastry cloth. Unwrap one batch of dough and set it in the center of the pastry cloth. Set the rolling pin fitted with the silicone rings in the center of the dough. Alternatively, arrange the dowels on the cloth perpendicular to you and far enough apart so that both ends of the rolling pin just sit on them. Roll up and away from your body. Pick up the pin, place it back in the center, and roll down toward you. Repeat rolling in this manner, checking after a few rolls to be sure the dough is not sticking. If it is sticking on either the bottom or the top, sprinkle a little flour onto the pastry cloth or the top of the dough and spread it around. Rotate the dough 45 degrees, and roll as above. To rotate the dough as it grows larger, slide both hands underneath it toward the center and gently lift. Roll until the rings on the pin hit the counter, at which point you will have a rectangle or circle of dough that is ¼ inch thick.
Cut out the cookies (see Cutting Out Cookies, here) and bake. If not quite ready to bake, freeze them in an airtight container (see here).
THE PARCHMENT PAPER METHOD
This method, in which the dough is rolled out between two pieces of parchment, allows you to begin rolling straight from the mixing bowl. It’s ideal if you are the neat, clean, orderly type, or if you are impatient for the dough to chill before cutting out your cookies and want to get going right away. That said, you still have to chill the dough after it is rolled out and again after the cookies are cut out (right on the baking sheet), so it isn’t necessarily a timesaving option. This technique doesn’t add flour to the dough during rolling, which means there’s no waste; you’ll use every last speck of it, unlike in the Pastry Cloth Method (opposite), which yields some unusable scraps since the dough ends up drying out.
what you need
Dough of choice (here)
13 x 18-inch sheets of parchment paper
Rolling pin fitted with ¼-inch silicone rings or accompanied by 2 (15-inch-long) ¼-inch-thick dowels
Baking sheets
1. Place a piece of dough between two sheets of the parchment. Use the rolling pin fitted with the silicone rings, or place the dowels on top of the top parchment sheet perpendicular to you and far enough apart so that both edges of the rolling pin just sit on top of them.
Set the rolling pin in the center of the dough and roll up and away from your body. Pick up the rolling pin, place it back in the center, and roll down toward your body. Repeat rolling in this manner, rotating the whole parchment paper–dough sandwich. Roll until the rings on the pin hit the counter, at which point you will have a rectangle or circle of dough that is ¼ inch thick.
2. Slide the whole package (parchment /dough/parchment) onto a baking sheet and refrigerate until firm, about 30 minutes. Roll the remaining dough in the same manner, then set it directly on top of the previous package. If you are not planning to bake the cookies the same day you roll out the dough, wrap the whole stack—the layers of parchment and doughs and baking sheet—in plastic wrap and refrigerate.
3. Remove one piece of dough from the refrigerator at a time. Flip it over and loosen the top piece of parchment until it comes completely away from the dough, then set it back on top of the dough. This will prevent your cutout cookies from sticking to the parchment. Flip the whole thing back over and remove the top piece of parchment altogether.
CUTTING OUT THE DOUGH
1. To cut out the cookies, place the cutter as close to the edge of the dough as possible and press firmly to cut through the dough. Lift it out of the dough, set it on the baking sheet, and push the dough out by pushing your index finger around the edge, being careful with the intricate parts. If the design is super-intricate, you may want to dip the cutter into flour first. If you’re using the Pastry Cloth Method and the dough does not easily come up off the cloth, slide a wide, flat metal spatula under the cutout and transfer it onto the baking sheet. If using the Parchment Paper Method, re-chill the dough in the refrigerator.
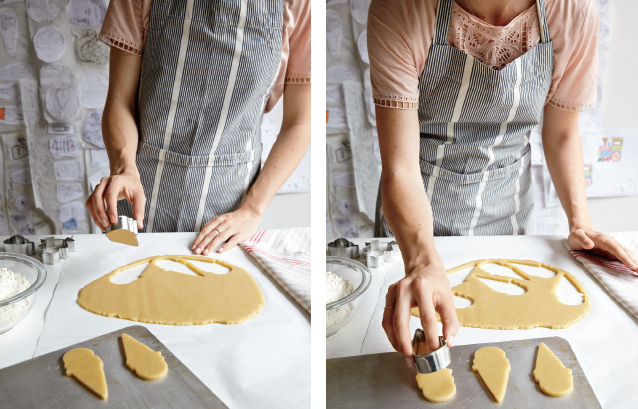
2. Whichever method you are using, gather up the scraps and press them together into a disc. Reroll using preferred method and cut out as above if there is enough. If not, add them to the next batch.
Tip: When I’m cutting the dough, there are inevitably small patches of dough left over. And if I don’t feel like rolling it up into a ball, chilling and rerolling and cutting, I use a mini cutter to use up the dough. A graduated set of cutters is great for this, or any mini cutter that will fit the space. And then I have something to munch on while I decorate other cookies.
Timesaver: Rolling and cutting out dough can be done in advance of baking the cookies. Arrange the cutout shapes between sheets of parchment in a rigid container, seal tightly, and freeze up to 2 months. To bake them, put them on parchment-lined baking sheets while they’re still firm. Bake as directed in the recipe, or an extra minute if the dough is still frozen.
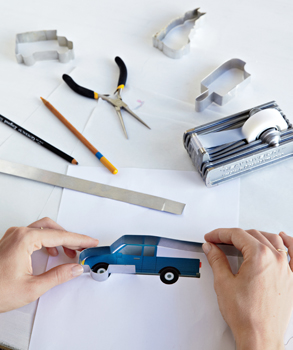
DIY COOKIE CUTTERS: HOW TO MAKE YOUR OWN
I make all of my own cutters, which may sound a bit extreme, but it’s actually very easy—and it allows me to cut out any cookie shape I can dream up. Cookie-friendly images are all over the place—in art and children’s books, on greeting cards, wrapping paper, and fabrics, and, of course, on the Internet. Once you begin to look at everything with an eye toward turning it into a cookie, you will find inspiration in places you would least expect. Aluminum cookie cutter strips are available online (see Sources, here).
what you need
Paper and pencil
¾- to 1-inch-wide aluminum cookie cutter strips
Needle-nose pliers
Clear adhesive tape
1. Hand-draw or trace your design on a piece of paper. Cut a length of the aluminum strip at least 2 inches longer than you will need to make the shape. This may be difficult to judge, so estimate more than you may need. Using the outer edge of the drawing as your guide, use your fingers and needle-nose pliers to bend the aluminum strip to conform to the shape of your drawing, setting the strip against the drawing throughout. The pliers work best to create sharp turns, while your fingers will shape curves. When you come to a sharp turn, mark the spot on the strip with a pencil and, using the pliers, bend the metal to make a crisp angle.
2. When the metal ends meet, allow them to overlap by ½ inch and cut with an old pair of scissors (so you don’t ruin a new pair). Wrap tightly with the tape at the overlap, making sure that the two sides of the cutter strip line up.