GIFT BOX CUTTER

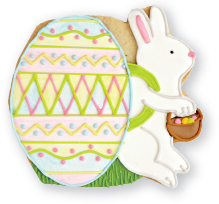
Decorate the Easter Bunny’s egg any way you like; I love the way painting watercolor on the hardened flooding icing gives the effect of a traditional colored Easter egg.
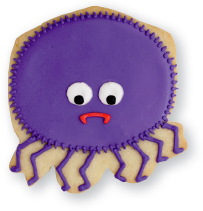
When outlining the Spider’s body, don’t follow the edge of the cookie precisely—make it a bit rounder by obscuring the corners on the cookie. Try hanging the spider for Halloween. Simply make a hole in it before baking.
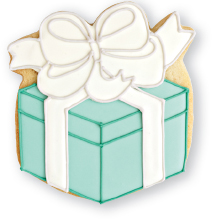
GIFT BOX
 beginner
  intermediate advanced
MAKES 24
what you need
TO MAKE THE COOKIES
3-inch gift box cookie cutter
Cookie dough of choice (here), prepared, chilled, and rolled out
Cooling racks
TO DECORATE
3 cups Royal Icing (here)
Pasteurized egg white or water
Gel food colors: turquoise, whitener, super black
4 plastic or parchment paper piping bags (here)
4 #1 tips
Assorted paintbrushes
- 1. Make the cookies. Cut out 24 cookies from the dough. Bake and cool as directed.
- 2. Make blue lining and flooding icing for the box; outline and paint in. Mix 1¼ cups royal icing in a bowl with turquoise gel to make Tiffany blue for the box. Thin to lining consistency and spoon ¼ cup into a piping bag fitted with a #1 tip. Thin the remaining icing to flooding consistency and cover with plastic wrap. Using the lining icing, outline the silhouette of the gift box, stopping where it meets the bow. Let set for 5 minutes. Using a paintbrush and the flooding icing, paint in the box, thinning it out where the bow overlaps. Let set until hard, 6 to 8 hours or overnight.
- 3. Make white lining and flooding icing for the bow; outline and paint in. Refresh the royal icing on medium low for 30 seconds. Mix 1¼ cups icing with whitener gel to make white for the ribbon and bow. Thin to lining consistency and spoon ¼ cup into a piping bag fitted with a #1 tip. Thin the remaining icing to flooding consistency, add a little whitener, and cover with plastic wrap. Using the lining icing, outline the silhouette of the ribbon and bow. Let set for 5 minutes. Using a paintbrush and the flooding icing, paint in the bow and ribbon. Let set for 4 to 6 hours.
- 4. Make lining icings: light gray to re-outline the bow and dark blue for the box; re-outline. Refresh the royal icing on medium low for 30 seconds. Spoon ¼ cup icing into each of two bowls. Cover one with plastic wrap. To the remaining bowl, add a toothpick of super black and a drop of whitener gel to make light gray to re-outline the bow. Thin to lining consistency and spoon it all into a piping bag fitted with a #1 tip. To the second bowl, add turquoise gel to make a darker Tiffany blue to re-outline the box. Thin to lining consistency and spoon it all into a piping bag fitted with a #1 tip. Using the gray lining icing, re-outline the bow and ribbon, then make the details in the center. Let set for 5 minutes. Using the darker Tiffany blue, re-outline the box, adding the lines to give it a ¾ perspective.
SPIDER
beginner intermediate advanced
MAKES 24
what you need
TO MAKE THE COOKIES
3-inch gift box cookie cutter
Cookie dough of choice (here), prepared, chilled, and rolled out
Cooling racks
TO DECORATE
2 cups Royal Icing (here)
Pasteurized egg white or water
Gel food colors: regal purple, whitener, super black, bright red
4 plastic or parchment paper piping bags (here)
4 #1 tips
Assorted paintbrushes
- 1. Make the cookies. Cut out 24 cookies from the dough. Bake and cool as directed.
- 2. Make purple lining and flooding icing for the spider. Mix 1½ cups royal icing in a bowl with regal purple and whitener gels to make purple for the spider’s body. Thin to lining icing and spoon ¼ cup into a piping bag fitted with a #1 tip. Thin the remaining icing to flooding consistency and cover with plastic wrap.
- 3. Outline and paint in the spider. Position the cookie so that the gift box is upside down. Using the lining icing, outline the spider’s body. Let set for 5 minutes. Reserve the lining icing. Using a paintbrush and the flooding icing, paint in the spider. Let set until hard, 6 to 8 hours or overnight.
- 4. Make lining icings: black for the pupils and red for the mouth; make white lining and flooding icing for the eyes. Refresh the royal icing on medium low for 30 seconds. Spoon 2 tablespoons icing into each of two bowls. Cover one with plastic wrap. To the remaining bowl, add super black gel to make black for the pupils. Thin to lining consistency and spoon all of it into a piping bag fitted with a #1 tip. To the second bowl, add bright red gel to make red for the mouth. Thin to lining consistency and spoon all of it into a piping bag fitted with a #1 tip. Mix ¼ cup royal icing with whitener gel to make white for the eyes. Thin to lining consistency and spoon 2 tablespoons into a piping bag fitted with a #1 tip. Thin the remaining icing to flooding consistency and cover with plastic wrap.
- 5. Draw in the spider’s hair and legs. Using the reserved bag of purple lining icing, draw the spider’s hair around the rim of the body, beginning just inside the oval and dragging the tip off onto the bare edges of the cookie. Make the spider’s eight legs and let set for 5 minutes.
- 6. Outline and paint in the eyes. Draw in the mouth and pupils. Using the white lining icing, outline two circles for the eyes. Let set for 5 minutes. Using a paintbrush and the white flooding icing, paint in the eyes. Using the red lining icing, draw the mouth and fangs. Let set for 2 to 3 hours. Using the black lining icing, make the pupils by holding the piping tip close to the cookie at a 45-degree angle.
EASTER BUNNY
beginner intermediate advanced
MAKES 24
what you need
TO MAKE THE COOKIES
3-inch gift box cookie cutter
Cookie dough of choice (here), prepared, chilled, and rolled out
Cooling racks
TO DECORATE
4¼ cups Royal Icing (here)
Pasteurized egg white or water
Gel food colors: leaf green, whitener, bright blue, electric pink, lemon yellow, neon green, super black, chocolate brown
8 plastic or parchment paper piping bags (here)
8 #1 tips
Assorted paintbrushes
Plate or ceramic mixing palette
- 1. Make the cookies. Cut out 24 cookies from the dough. Bake and cool as directed.
- 2. Make green lining and flooding icing for the grass. Mix ½ cup royal icing with leaf green and whitener gels to make green for the grass. Thin to lining consistency and spoon ¼ cup into a piping bag fitted with a #1 tip. Thin the remaining icing to flooding consistency and cover with plastic wrap.
- 3. Paint in the grass. Position the cookie so that the top of the gift box is to the right. Using a paintbrush and the green flooding icing, thinly paint the grass, thinning it out where the egg and the bunny overlap it. Let set for 30 minutes.
- 4. Make white lining and flooding icing for the bunny and egg; outline and paint in. Make the blades of grass. Mix 2 cups royal icing in a bowl with whitener gel to make white for the bunny and egg. Thin to lining consistency and spoon ¼ cup into a piping bag fitted with a #1 tip. Thin the remaining icing to flooding consistency and cover with plastic wrap. Using the white lining icing, outline the silhouette of the bunny and the egg. Make the egg as large as possible by drawing it to the top, outer, and bottom edges of the cookie. Let set for 5 minutes. Using a paintbrush and the white flooding icing, paint in the bunny and egg. Let set until hard, 6 to 8 hours or overnight. Using the reserved green lining icing, draw in the grass, making short, vertical lines.
- 5. Make watercolors and paint designs on the eggs. Refresh the royal icing on medium low for 30 seconds. Squeeze dots of bright blue, electric pink, and lemon yellow gels onto a plate or ceramic mixing palette. Using a paintbrush, gradually mix a little water into each gel to make watercolors (see here). Using a small watercolor brush and the watercolors, paint patterns, such as stripes, dots, and triangles on the egg. Let set for 5 minutes.
- 6. Make green lining and flooding icing for the handle; make lining icing for the decorations and to re-outline the bunny and egg. Spoon ¼ cup royal icing into each of five bowls. Cover four with plastic wrap. To the remaining bowl, add neon green gel to make pastel green for the handle and the egg decoration. Thin to lining consistency and spoon 2 tablespoons into a piping bag fitted with a #1 tip. Thin the remaining to flooding consistency and cover with plastic wrap. Mix electric pink gel into the second bowl to make pastel pink and spoon all of it into a piping bag fitted with a #1 tip. Mix bright blue gel into the third bowl to make pastel blue and spoon all of it into a piping bag fitted with a #1 tip. Mix lemon yellow gel into the fourth bowl to make pastel yellow and spoon all of it into a piping bag fitted with a #1 tip. Mix super black and whitener gels into the fifth bowl to make light gray and spoon all of it into a piping bag fitted with a #1 tip.
- 7. Make decorations on the egg with the lining icings. Re-outline the bunny, egg, and strap. Using the pastel blue lining icing, re-outline the egg. Using the pastel green, yellow, pink, and blue lining icings, pipe patterns including dots, stripes, waves, and zigzags on the egg. Using the light gray lining icing, re-outline the bunny and make arms and legs. Using the pastel green lining icing, pipe the outline of the strap around the bunny’s arm. Let set for 5 minutes. Using a paintbrush, paint in the strap with the pastel green flooding icing. Using the pastel pink lining icing, pipe the nose and inner ear. Reserve the piping bags of pastel pink, yellow, and green lining icings.
- 8. Make brown lining and flooding icing for the basket; outline and paint in. Make the bunny’s eye. Mix ¼ cup royal icing in a bowl with chocolate brown gel to make brown for the basket. Thin to lining consistency and spoon 2 tablespoons into a piping bag fitted with a #1 tip. Thin the remaining icing to flooding consistency, add whitener, and cover with plastic wrap. Using the brown lining icing, outline the silhouette of a basket under the bunny’s hand and make a dot for the bunny’s eye. Let set for 5 minutes. Using a paintbrush and the brown flooding icing, paint in the basket. Let set for 1 hour.
- 9. Re-outline the basket and handle. Make the eggs. Using the reserved brown lining icing, re-outline the basket and the handle. Let set for 5 minutes. Using the reserved pastel pink, yellow, and green lining icings, make the eggs in the basket. Using the pastel green lining icing, re-outline the green strap.
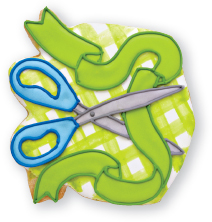
RIBBON AND SCISSORS
beginner intermediate advanced
MAKES 24
what you need
TO MAKE THE COOKIES
3-inch gift box cookie cutter
Cookie dough of choice (here), prepared, chilled, and rolled out
Cooling racks
TO DECORATE
3½ cups Royal Icing (here)
Pasteurized egg white or water
Gel food colors: whitener, neon green, super black, royal blue
4 plastic or parchment paper piping bags (here)
4 #1 tips
Assorted paintbrushes
Plate or ceramic mixing palette
- 1. Make the cookies. Cut out 24 cookies from the dough. Bake and cool as directed.
- 2. Make white flooding icing for the background and paint in. Mix 1¼ cups royal icing in a bowl with whitener gel to make white for the background. Thin to flooding consistency. Paint the surface of the cookie to the edges. Let set until hard, 6 to 8 hours or overnight.
- 3. Make watercolor and paint pattern on background. Squeeze a dot of neon green gel onto the mixing palette. Using a paintbrush, gradually mix in a little water to make a watercolor (see here). Paint the pattern on the background, making stripes on the diagonal.
- 4. Make green lining and flooding icing for the ribbon. Refresh the royal icing on medium low for 30 seconds. Mix ½ cup icing in a bowl with neon green gel to make bright green for the ribbon. Thin to lining consistency and spoon ¼ cup into a piping bag fitted with a #1 tip. Thin the remaining icing to flooding consistency, add a little whitener, and cover with plastic wrap.
- 5. Outline and paint in the ribbon. Using the green lining icing, outline the silhouette of the ribbon. Let set for 5 minutes. Using a paintbrush and the green flooding icing, paint in the ribbon. Let set until hard, 6 to 8 hours or overnight.
- 6. Make lining and flooding icings: gray for the scissor blades, blue for the handles, and dark green to re-outline the ribbon. Refresh the royal icing on medium low for 30 seconds. Fill two bowls with ½ cup icing each. Cover one with plastic wrap. To the other bowl, add super black to make medium gray to outline the scissors. Thin to lining consistency and spoon ¼ cup into a piping bag fitted with a #1 tip. Thin the remaining icing to flooding consistency, add whitener to lighten it, and cover with plastic. To the second bowl, add royal blue gel to make blue for the scissor handles. Thin to lining consistency and spoon ¼ cup into a piping bag fitted with a #1 tip. Thin the remaining icing to flooding consistency, add whitener, and cover with plastic wrap. Spoon ¼ cup royal icing into a bowl. Add neon green gel to make darker green to re-outline the ribbon. Thin to lining consistency and spoon it all into a piping bag fitted with a #1 tip.
- 7. Outline the blades and handles and paint in. Using the medium gray lining icing, outline the silhouette of the scissor blades. Skip over the part of the blade that lies under the ribbon. Using the blue icing, outline the silhouette of the handles. Fit the tops of the handles into the two bumps at the top of the cookie. Let set for 5 minutes. Using the light gray and light blue flooding icings, paint in the scissor blades and the handle. Let set for 1 hour.
- 8. Re-outline the blades and handles; make the interior details. Using the medium gray lining icing, re-outline the scissor blades and add detail. Using the blue lining icing, re-outline the scissorhandles. Let set for 5 minutes.