BASEBALL CAP CUTTER
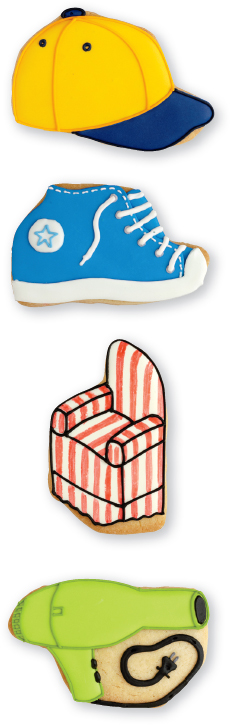
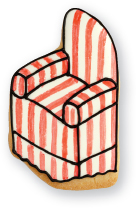
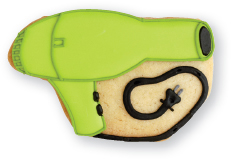
A cap, a sneaker, a hair dryer; the challenge here was to find a way to use this cookie vertically. Then I “saw” the chair, and though it seemed simple, it turned out to be a rather challenging cookie because of its three-quarters perspective. It helps to outline the cutter on a piece of paper first and practice drawing the interior lines—the arms, seat cushion, and top of the skirt—with your piping bag to get a feel for where they go. If you’re not comfortable painting in such slender stripes for the fabric, use an edible pen to make them.
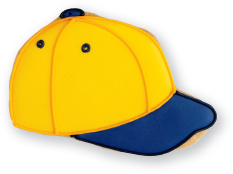
BASEBALL CAP
 beginner
  intermediate advanced
MAKES 24
what you need
TO MAKE THE COOKIES
3-inch baseball cap cookie cutter
Cookie dough of choice (here), prepared, chilled, and rolled out
Cooling racks
TO DECORATE
1½ cups Royal Icing (here)
Pasteurized egg white or water
Gel food colors: lemon yellow, egg yellow, whitener, navy blue
3 plastic or parchment paper piping bags (here)
3 #1 tips
Assorted paintbrushes
- 1. Make the cookies. Cut out 24 cookies from the dough. Bake and cool as directed.
- 2. Make the yellow lining and flooding icing for the baseball cap; outline and paint in. Mix ¾ cup royal icing in a small bowl with lemon yellow and egg yellow gels to make bright yellow for the baseball cap. Thin to lining consistency and spoon ¼ cup into a piping bag fitted with a #1 tip. Thin the remaining icing to flooding consistency and cover with plastic wrap. Using the lining icing, outline the silhouette of the yellow part of the cap only, leaving room for the button on the top. Let set for 5 minutes. Using a medium paintbrush and the flooding icing, paint in the yellow part of the cap. Let set until hard, 6 to 8 hours or overnight.
- 3. Make blue lining and flooding icing for the brim and button; outline and paint in. Mix ½ cup royal icing in a bowl with navy blue gel to make navy blue for the brim of the cap. Thin to lining consistency and spoon ¼ cup into a piping bag fitted with a #1 tip. Thin the remaining icing to flooding consistency, add a little whitener, and cover with plastic wrap. Using the lining icing, outline the edge of the brim, leaving bare the area where the brim meets the cap. Outline the button on the top of the cap. Let set for 5 minutes. Reserve the navy blue lining icing. Using a small paintbrush and the flooding icing, paint in the brim and the button. Let set until hard, about 4 hours.
- 4. Make darker yellow lining icing and re-outline the cap. Re-outline the brim and button; make details. Refresh the royal icing on medium low for 30 seconds. Mix ¼ cup icing with lemon yellow and egg yellow gels to make the orange-yellow for re-outlining the hat. Thin to lining consistency and spoon it all into a piping bag fitted with a #1 tip. Re-outline the cap only, then make two curved lines for the seams. Using the reserved navy blue lining icing, re-outline the brim and button. Draw a tiny circle in each of the two panels on the cap for air vents. Let set for 5 minutes.
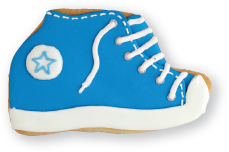
HIGH-TOP SNEAKER
beginner intermediate advanced
MAKES 24
what you need
TO MAKE THE COOKIES
3-inch baseball cap cookie cutter
Cookie dough of choice (here), prepared, chilled, and rolled out
Cooling racks
TO DECORATE
2 cups Royal Icing (here)
Pasteurized egg white or water
Gel food colors: bright blue, super black, whitener
4 plastic or parchment paper piping bags (here)
4 #1 tips
Assorted paintbrushes
Blue edible marker (optional)
- 1. Make the cookies. Cut out 24 cookies from the dough. Bake and cool as directed.
- 2. Make blue lining and flooding icing for the sneaker; outline and paint in the tongue. Mix 1 cup royal icing in a bowl with bright blue to make sky blue for the sneaker. Thin to lining consistency and spoon ¼ cup into a piping bag fitted with a #1 tip. Thin the remaining icing to flooding consistency and cover with plastic wrap. Using the lining icing, outline the top and right side of the sneaker’s tongue, stopping at the white toe cap. Let set for 5 minutes. Reserve the sky blue lining icing. Using a small paintbrush and the flooding icing, paint in the tongue, thinning out the icing where the toe cap and side of the shoe overlap it. Let set for 2 hours. Cover the remaining blue flooding icing with plastic wrap and reserve.
- 3. Outline the sneaker and paint in. Using the reserved sky blue lining icing, outline the body of the sneaker, overlapping the tongue and stopping where it meets the white sole. Using a medium paintbrush and the reserved flooding icing, paint in the sneaker, thinning out the icing where the white sole overlaps. Let set for 6 to 8 hours or overnight.
- 4. Make gray lining icing for the eyelets; draw in. Refresh the royal icing on medium low for 30 seconds. Mix 2 tablespoons icing with a toothpick each of super black and whitener gels to make metal gray for the eyelets. Thin to lining consistency and spoon it all into a piping bag fitted with a #1 tip. Draw six tiny circles along the curve of the sneaker where the laces go, spacing them an equal distance apart. Let set for 5 minutes.
- 5. Make white lining and flooding icing for the sole, toe cap, and logo; outline and paint in. Draw in the stitching and the laces. Mix ¾ cup royal icing in a bowl with whitener gel to make white for the sole, shoelaces, and logo. Thin to lining consistency and spoon ¼ cup into a piping bag fitted with a #1 tip. Thin the remaining icing to flooding consistency and cover with plastic wrap. Using the white lining icing, outline the sole and toe cap. Draw a circle on the side of the shoe for the logo. Draw short, evenly spaced dashes along the top and right side of the body of the sneaker to make the stitching. Make the bottom five laces, beginning at the eyelets and touching down at the edge of the tongue, squeezing hard and moving slowly to make fatter lines. Make the top lace by starting inside the eyelet and curving slightly down the side of the sneaker, squeezing hard to make fatter lines. Touch down, then squeeze a bit more gently to make the plastic end of the lace (or you won’t be able to lace your sneaker!). Outline the rest of the laces going across the tongue as above. Using a paintbrush and the white flooding icing, paint in the sole, toe cap, and circle. Let set until hard, 6 to 8 hours or overnight.
- 6. Make lining icing for the star. Refresh the royal icing on medium low for 30 seconds. Mix 2 tablespoons icing with bright blue gel to make light blue for the star. Thin to lining consistency and spoon into a piping bag fitted with a #1 tip. Outline a star on the white circle by drawing or dragging the tip on the surface. Let set for 10 minutes. Alternatively, use a blue edible marker.
CHAIR
beginner intermediate advanced
MAKES 24
what you need
TO MAKE THE COOKIES
3-inch baseball cap cookie cutter
Cookie dough of choice (here), prepared, chilled, and rolled out
Cooling racks
TO DECORATE
1½ cups Royal Icing (here)
Pasteurized egg white or water
Gel food colors: whitener, super black, bright red
2 plastic or parchment paper piping bags (here)
2 #1 tips
Assorted paintbrushes
Plate or ceramic mixing palette
Red edible marker (optional)
- 1. Make the cookies. Cut out 24 cookies from the dough. Bake and cool as directed.
- 2. Make white lining and flooding icing for the chair; outline and paint in. Mix 1 cup royal icing in a bowl with whitener gel to make bright white. Thin to lining consistency and spoon ¼ cup into a piping bag fitted with a #1 tip. Thin the remaining icing to flooding consistency and cover with plastic wrap. Position the cookie so that the brim of the cap is the top. Using the lining icing, outline the silhouette of the chair, making the bottom wavy by holding the piping tip a bit closer to the cookie. Let set for 5 minutes. Using a medium paintbrush and the white flooding icing, paint in the chair. Let set until hard, 6 to 8 hours or overnight.
- 3. Make black lining icing and re-outline the chair and details. Refresh the icing on medium low for 30 seconds. Mix ¼ cup icing in a bowl with super black gel to make black for outlining the chair. Thin to tight lining consistency and spoon all of it into a piping bag fitted with a #1 tip. Re-outline the silhouette of the chair, then make the lines for the arms, seat cushion, and skirt with the tip hovering slightly above the cookie. Let set for 10 minutes.
- 4. Make red watercolor for the stripes and paint on. Squeeze a dot of bright red gel onto a plate or ceramic mixing palette. Using a small paintbrush, mix in a little water to make a watercolor (see here). Using a watercolor brush, paint the stripes on the chair, making them equidistant from one another. Keep your brush as dry as possible to avoid getting the black lines wet (this can cause the color to bleed). Let set for 30 minutes. Alternatively, use red edible marker to draw in the stripes.
HAIR DRYER
beginner intermediate advanced
MAKES 24
what you need
TO MAKE THE COOKIES
3-inch baseball cap cookie cutter
Cookie dough of choice (here), prepared, chilled, and rolled out
Cooling racks
TO DECORATE
1½ cups Royal Icing (here)
Pasteurized egg white or water
Gel food colors: neon green, whitener, super black
4 plastic or parchment paper piping bags (here)
4 #1 tips
Assorted paintbrushes
Green edible marker (optional)
- 1. Make the cookies. Cut out 24 cookies from the dough. Bake and cool as directed.
- 2. Make green lining and flooding icing for the hair dryer; outline and paint in. Mix ¾ cup royal icing in a bowl with neon green gel to make lime green for the hair dryer. Thin to lining consistency and spoon ¼ cup into a piping bag fitted with a #1 tip. Thin the remaining icing to flooding consistency, add a little whitener, and cover with plastic wrap. Turn the cookie upside down, so that the top of the hat is the bottom. Using the green lining icing, outline the silhouette of the hair dryer. Let set for 5 minutes. If you like, you can draw the silhouette on with edible marker first. Using a medium paintbrush and the flooding icing, paint in the hair dryer. Let set until hard, 6 to 8 hours or overnight.
- 3. Make black lining and flooding icing for the cord and plug; outline, paint in, and make details. Refresh the royal icing on medium low for 30 seconds. Mix ¼ cup icing in a bowl with super black gel to make black for the cord, buttons, and nose of the dryer. Thin to lining consistency and spoon it all into a piping bag fitted with a #1 tip. Using the lining icing, make the power cord by first making one curvy line then butting a second line up against it (see here). Next, draw in the plug. Make the oval at the nose of the dryer and fill it in. Make the two buttons on the handle. Let set for 5 minutes.

- 4. Make dark green lining icing and re-outline the hair dryer. Meanwhile, mix ¼ cup royal icing in a bowl with neon green gel to make a dark neon green for outlining the dryer. Thin to lining consistency and spoon it all into a piping bag fitted with a #1 tip. Re-outline the hair dryer. Make the interior details. Let set for 5 minutes.
- 5. Make gray lining icing for the plug’s prongs and draw them in. Mix 2 tablespoons royal icing with super black and whitener gels to make gray for the plug’s prongs. Thin to lining consistency and spoon it all into a piping bag fitted with a #1 tip. Draw the prongs at the end of the plug. Let set for 20 minutes.