Who doesn’t love dessert? Some of us crave a piece of decadent cheesecake or a big slice of chocolate cake, while others cannot resist a bowl of warm, sweet fruit cobbler. The captivating aroma of cinnamon and those drips and drizzles of chocolate and caramel are tempting, and you know you just have to have a bite, a spoonful, or a bowl of satisfying goodness.
Slow Cooker Desserts captures the best of desserts—those special treats that transform meals into extraordinary celebrations—and bakes them to perfection, slowly, in a slow cooker.
In a slow cooker? Yes, in that familiar slow cooker!
Almost everyone owns a slow cooker, and today, many people own more than one. Most folks wouldn’t think of making a pot of chili, soup, or stew on a cold winter day without one. You cannot attend a party without dipping a chip into a slow cooker full of spicy Mexican cheese dip. The flavor of the food cooked in the slow cooker is wonderful, and for all of the busy cooks in the world (and that includes us), the slow cooker offers unsurpassed convenience and ease.
Now, we have captured the scrumptious flavors and easy preparation and sweetened the deal. The results are the best desserts you can imagine. Bake a fantastic cake, cheesecake, bread pudding, cobbler, or crisp in your slow cooker. You can simmer the finest fruit dessert, heat the most luscious fondue, or effortlessly melt the chocolate for decadent candies, all using that favorite slow cooker you already own. The best part is that all of these desserts are prepared in the slow cooker, not because that preparation method would be a plausible option, but instead, because the slow, even heat and moist environment makes the ideal cooking method and gives you the best flavor.
The recipes in this book were tested in a slow cooker with a stoneware bowl or vessel set in a heating base. In this design, the heat wraps around the sides of the stoneware. The recipes were not tested in “multi-pots” or appliances that are designed to cook at various settings, such as simmer, stew, and deep-fry, as well as slow cooking.
The particular brand does not matter, so you can use that Crock-Pot slow cooker—or any other brand you might have. We understand that many people call the slow cooker by that common trade name. In fact, we started our career in the test kitchen of Rival Manufacturing Company—the company that started the slow cooker craze by introducing the Crock-Pot slow cooker. Today, there are many brands of slow cookers to choose from, and you can use the brand you prefer.
WHAT SIZE AND SHAPE OF SLOW COOKER?
In Slow Cooker Desserts, you will find a recipe for any size and shape of slow cooker you might own.
| Large Slow Cookers | 5 quarts or larger, round or oval | Cakes, cheesecakes, cobblers, crisps |
| Medium Slow Cookers | 3½ to 5 quarts, round or oval | Cobblers, crisps, puddings |
| Small Slow Cookers | 1 to 2 quarts, round | Fondues |
Each recipe gives a suggested size of slow cooker to use. If you wish to use another size of slow cooker, you can do so. However, do not overfill the slow cooker, and be sure the lid rests flat on the slow cooker. If you use a larger slow cooker than specified in the recipe, leaving the slow cooker less than half full, you may need to reduce the cooking time, and you should definitely check the dessert as it cooks to avoid burning or overcooking.
COOKING IN THE SLOW COOKER
Spray the slow cooker with nonstick spray to make cleanup easier. When baking in a springform pan, there is no need to spray the slow cooker first with nonstick spray. Put the ingredients in the slow cooker and put the lid on the vessel.
The recipes list which heat setting to use, low or high, to cook or bake the dessert. Cook for the time and at the heat setting recommended in the recipe. Check the baking progress at the minimum cooking time listed. The recipes give tips so you can check to be sure they are done; if the dessert is not quite done, place the lid back on the slow cooker, continue cooking on the listed heat setting, and test again in 15 to 30 minutes.
One convenient aspect of slow cooking, even when slow cooking a dessert, is that you are free to do other tasks or run errands while the slow cooker does its magic. Another bonus is that timing is not as exact as when baking in an oven—baking in the oven for an extra minute or two may cause overbrowning, but not so with the slow cooker. Follow the recommended times, but if the phone or doorbell rings while the slow cooker is running, an extra 5 or 10 minutes will not ruin your efforts.
Slow cookers do not have a thermostat—so the actual temperature will vary with the brand, size, and shape of the cooker, the electrical voltage, and even the stoneware. After a use or two, you will be more familiar with your slow cooker and will know if the treats you bake in your slow cooker are usually done at the minimum or maximum time listed.
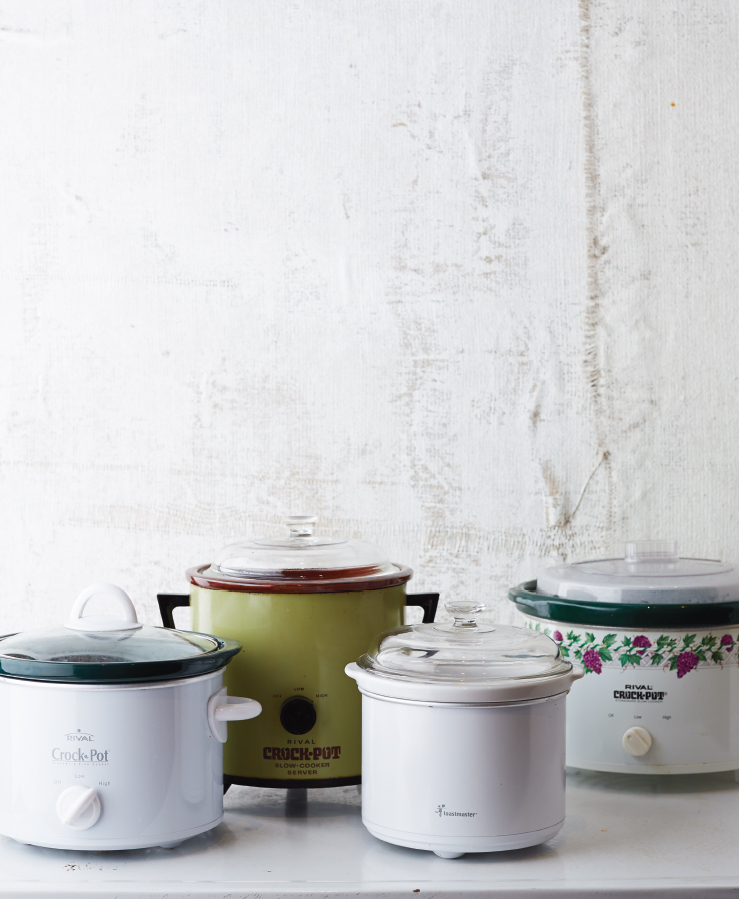
We have observed a change in slow cookers over the years—originally, they were very slow. Even on the high setting, the appliance cooked very slowly. If you are lucky enough to have a slow cooker that is ten to fifteen years old or older, you can slow cook the most delicious chicken or stew you could imagine—and you will never hear the lid jiggle from steam or see the liquids boil. If you have a slow cooker purchased more recently, in the last ten years or so, you are probably used to hearing that lid jiggle from steam—even on low. While we love the first slow cookers (and yes, some of our nostalgic favorites are pictured here), they are now quite rare. Their slow heat is just not suited to baking the cakes or cheesecakes in springform pans like we do in this book. We tested the recipes in slow cookers that are newer and hotter than their antique counterparts, and for the best results, we recommend that you use the newer, hotter models for these recipes.
BAKING A CAKE OR CHEESECAKE
We recommend using a 7-inch springform pan for cakes or cheesecakes— which means that the cake is a perfect size to serve or give as a special gift. That 7-inch-diameter cake is ideal—it makes enough to serve a typical dinner party, yet does not make such a large cake that you have days and days of leftovers. It is also the ideal size to make and give as a gift to welcome a new neighbor, spread holiday joy, cheer an ailing friend, or share with a coworker.
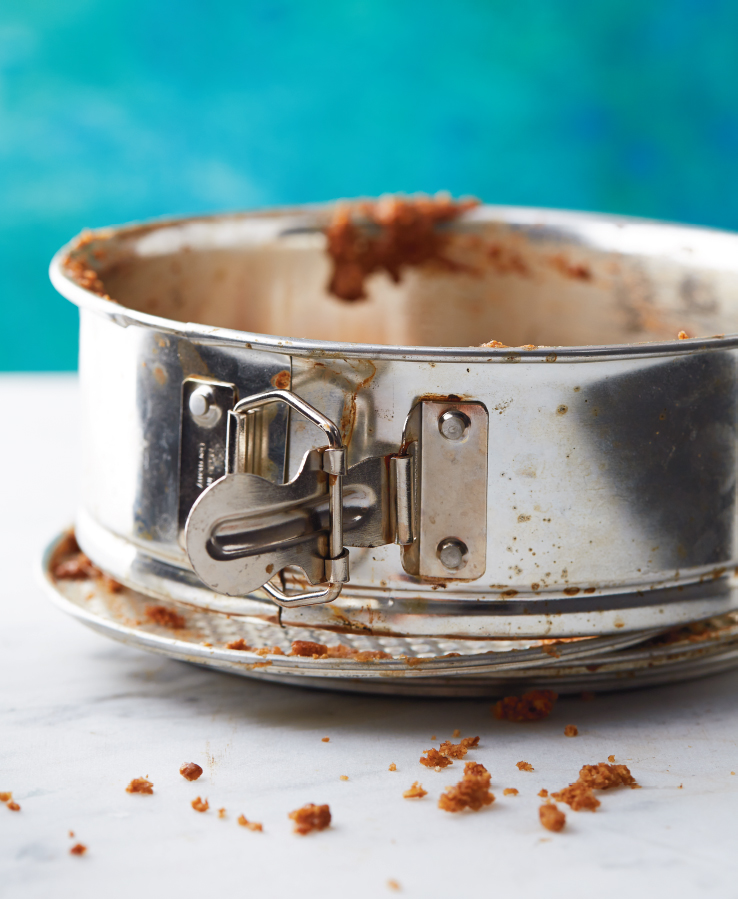
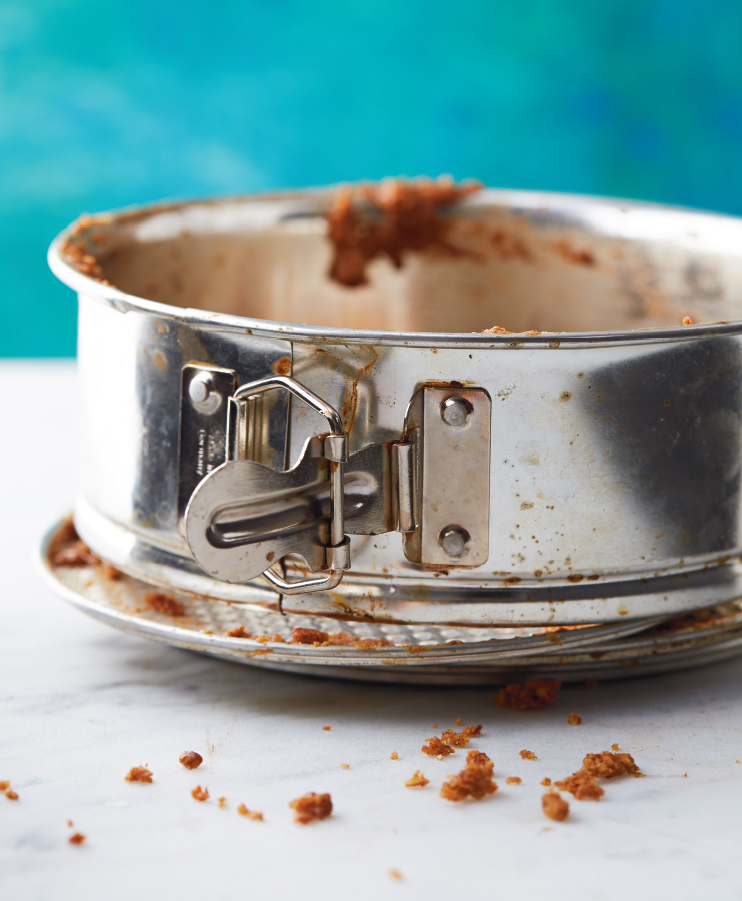
A springform pan is a pan with two parts: a base and an outer ring with a clamp that allows it to expand when released. Thanks to the clamp, the sides of the pan can be lifted off the base of the pan without disturbing whatever you’ve baked or chilled in the pan. To use a springform pan, tighten the sides so the bottom is held snug, and then fill the pan for baking. Once the cake is cool, gently run a table knife around the edges of the cake, then loosen the clamp and remove the sides. The cake will still rest on the bottom of the pan, but since the sides are gone, it makes it easy and attractive to cut and serve the cake.
Occasionally you may want to remove the cake from the bottom of the pan—especially if you wish to wrap it as a gift or serve it on your own cake plate. We recommend spraying the bottom of the pan with nonstick spray before baking. Occasionally, we will also cut a circle of parchment paper to line the bottom to ensure easy removal.
A springform pan usually clamps so tightly that the bottom and sides are so firmly attached that batter or filling does not seep out while baking. If in doubt, or if your pan does not clamp together tightly, wrap the outside of the bottom and sides of the pan in aluminum foil before filling the pan.
It may take a little effort to buy a 7-inch springform pan. We only occasionally find them at retail kitchen shops or discount merchants, but they are readily available online. We sell them on our site, www.pluggedintocooking.com. Additionally, sites like Amazon.com and other common online retailers sell the correct size pan.
Check the Fit
A 7-inch springform pan is perfectly sized to fit in most larger slow cookers—especially a 5-quart or larger slow cooker. If it fits, you can bake in it, so confirm that it fits down flat and does not rest on the sides of the stoneware bowl. Be sure to check the fit of the springform pan in your slow cooker before starting a recipe.
Place the Springform Pan on an Aluminum Foil Ring
An aluminum foil ring holds the springform pan up, off the bottom of the slow cooker, and lets the warm air encircle it evenly. Crumple a sheet of aluminum foil, about 24 inches long, into a thin strip, then form the strip into a 7-inch ring. Place the foil ring in the bottom of your slow cooker. Center the filled pan evenly on top of the foil ring. Do not cover the top of the springform pan directly with foil; instead, put the lid on the slow cooker.
Occasionally, we use loaf pans to bake in large, oval slow cookers. They work well for cakes but not for cheesecakes. (When baking a cheesecake, you need to use the springform pan so you can remove the sides of the pan to serve the cheesecake.) Select an 8½ x 4½–inch metal loaf pan. Pans without handles are more likely to fit correctly. Be sure to check the fit of the pan in the slow cooker before starting a recipe. Place the filled loaf pan on an aluminum foil ring (see here). Do not cover the top of the loaf pan directly with foil; instead, put the lid on the slow cooker.
Parchment Paper Lining
For some puddings and other treats, a parchment paper lining will even out the heat and protect the sides of the dessert from overbrowning. Place a sheet of parchment paper, about 16 x 12 inches, over the stoneware insert of the slow cooker. Press it down so the paper conforms snugly against the bottom and walls of the insert. It is necessary to cover the stoneware completely, so if needed, place a second sheet of parchment paper over the first, perpendicular to the first and crisscrossing the papers. Press the papers down evenly and be sure they line the stoneware bowl snugly. Press carefully so as not to tear the paper. (If it tears, start over so the paper forms a bowl and the liquids from the recipe cannot seep out.) Fold down the top edges of the paper just enough so the lid will rest flat on the stoneware.
REMOVING CAKES FROM THE SLOW COOKER
Carefully remove the hot pan or puddings from the slow cooker. Remember, while slow cookers bake more slowly, they are still hot. Use caution and hot pads to carefully lift the hot pan out of the slow cooker.
MEASURE ACCURATELY TO ACHIEVE SUCCESS
Accurately measuring the ingredients is always the first step toward the best baking. While you might be able to estimate an ingredient when seasoning a soup or stew, baking is a precise science, and you need to measure carefully.
Select the correct equipment to measure accurately.
Dry measuring cups: Dry measuring cups are usually sold as nested 1-, ½-, ⅓-, and ¼-cup measures. It is important to use these when measuring flour, sugar, or other dry ingredients so you can level off the top with a flat edge, such as a table knife.
Liquid measuring cup: This is a clear, marked glass or plastic cup with a spout used to measure liquids. Check the measurement at eye level to be sure it is accurate. Do not measure dry ingredients in this cup—you may be tempted to shake the cup to try to level it off and that will compact the flour and cause incorrect measurements.
Measuring spoons: Measuring spoons are usually sold as nested 1-tablespoon, 1-teaspoon, ½-teaspoon, and ¼-teaspoon measures. Fill the spoon and if measuring a dry ingredient, level it off with the flat edge of a knife. Remember that 3 teaspoons equal 1 tablespoon; if a recipe calls for 1½ tablespoons, measure 1 tablespoon plus 1 teaspoon plus ½ teaspoon.
If measuring a sticky ingredient, like honey, molasses or syrup, peanut butter, or solid shortening, spray the cup or spoon first with nonstick spray. The sticky ingredient will come out of the measuring cup or spoon much more easily.
Other Equipment
Mixer: Many of the recipes recommend using an electric mixer. The recipes are small enough that they work well with a hand mixer—no need to get out the big stand mixer.
Whisk: We often recommend whisking the flour with the leavening ingredients and salt so they are thoroughly blended and aerated before adding them to the liquid ingredients.
Wire rack: Most of the cake recipes recommend transferring the baked cake from the slow cooker to a wire rack to cool.
CHOOSE THE BEST INGREDIENTS
Follow the recipes, using the ingredients listed. Substituting other ingredients, especially those that are labeled “lower fat” or “light,” or those ingredients that are formulated for special diets or to avoid specific allergens, may affect the results.
Canola or vegetable oil: There is an array of oils in the baking aisle and most will work well. For baking, choose flavorless, “neutral” oils like canola, corn, or vegetable oil, and save those oils with a distinctive flavor like olive oil or walnut oil for other cooking tasks or when called for in specific recipes. To measure oil, pour it into a liquid measure and check the volume at eye level.
Vegetable shortening: This fat is a solid at room temperature and is essentially flavorless. To measure accurately, fill a dry measuring cup with shortening and press down to eliminate air pockets. You can store vegetable shortening at room temperature for 8 to 12 months.
Flour: We recommend all-purpose flour for many recipes. To measure any kind of flour (all-purpose or whole grain), spoon the flour out of the flour canister and into the dry measuring cup, and then level it off with the flat edge of a table knife. (This is known as the spoon-and-sweep method for measuring.) Do not dip the measuring cup into the flour canister, nor shake the cup to level it off. Flour does not need to be sifted for the recipes in this book. Store all-purpose flour in an airtight container at room temperature for 6 to 8 months. Store whole-grain flour in an airtight container in the refrigerator for up to 6 months, or in the freezer for up to 1 year.
Brown sugar: Brown sugar is labeled dark or light, and you can use them interchangeably in this book. The dark brown version has a more intense molasses flavor and is popular in Southern cooking. We find people often use the one they are most familiar with, which is frequently the one they grew up with—so Roxanne chooses dark and Kathy chooses light. Brown sugar is always measured “packed,” so spoon it into the measuring cup and pack it lightly to remove any air pockets. It should hold its shape when turned out into the mixing bowl.
Sugar: We tested the recipes in this book with sugar. These recipes were not tested with other sweeteners, and the use of sweeteners may affect the results. To measure sugar, fill a dry measuring cup to overflowing, and then level it off with the flat edge of a table knife.
Salt: There is now an array of salts available—different colors, origins, and textures. While we may turn to these for savory cooking, typical table salt is our choice for baking.
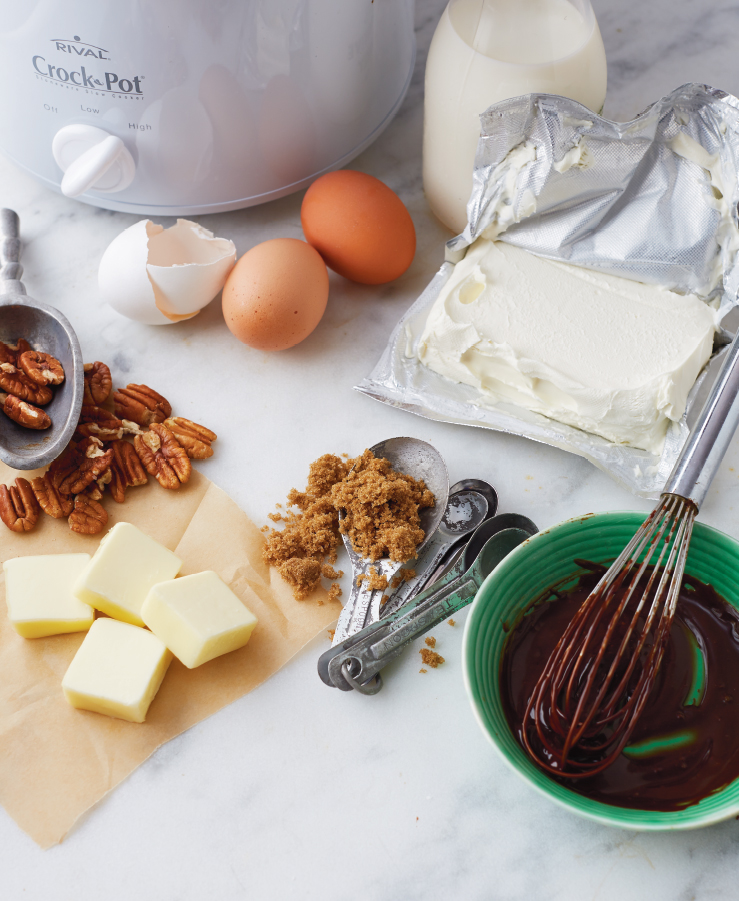
Butter: We prefer unsalted or “sweet” butter for baking, and it is the butter used in the recipes in this book. We do not recommend using margarine. When cooking, it is difficult to substitute “light” butter or butter spreads, as they have a higher moisture content than regular butter and will affect the texture and flavor of the baked good or dish. Purchase butter when it’s on sale, then store it in the freezer for 6 to 9 months.
Eggs: The recipes in this book were tested using large eggs. Results will not be consistent if you use medium or jumbo eggs, or egg substitutes.
Leavening agents: Baking soda and baking powder are the chemicals that make cakes rise—without them, your baked goods could end up dense and heavy. Using a little baking soda or baking powder—or both—creates a light and wonderful cake. Baking soda reacts with acids, like vinegar, fruit juice, or buttermilk. Baking powder does not require an acid, so you will often see it used in cakes made with milk. Do not interchange baking powder with baking soda. Both can be stored in an airtight container at room temperature. Store baking powder for up to 18 months and baking soda for up to about 2 years.
Milk: Milk is often used in cakes, puddings, and many other desserts. For optimum flavor, use regular whole dairy milk, but in a pinch, 2 percent or reduced-fat milk can be used.
Buttermilk: We love the tang and flavor of buttermilk. The acidity of buttermilk also affects leavening, so you cannot substitute milk for buttermilk. If you are in a pinch and don’t have buttermilk on hand, pour 1 tablespoon white vinegar or lemon juice into a 1-cup measure and add milk to equal 1 cup. Allow it to stand for a few minutes, then measure out the volume you need for the recipe you are preparing.
Cream: Heavy or whipping cream gives a great flavor and is a common ingredient in cheesecakes and fondue. Whipped, it is the ideal topping on warm cobblers, crisps, and other desserts. Heavy cream has a fat content of 36 to 42 percent—a fact that makes it taste luscious and whip beautifully. Half-and-half, a commercial blend of cream and milk, is used in some recipes. Half-and-half and heavy cream are not interchangeable. Look for both in the dairy section of the grocery store.
To make whipped cream, pour very cold cream into a deep, chilled bowl. Beat with an electric mixer, starting at low speed, then gradually increasing the speed to medium-high until the cream is frothy, then beat until stiff peaks form—the cream should hold its shape when you lift the beaters out of the bowl. Heavy cream doubles in volume when whipped.
If you wish to make a sweetened whipped cream, beat the cream until soft peaks form, and then gradually add confectioners’ sugar while beating the cream until it is stiff. Begin with about 2 tablespoons confectioners’ sugar to each 1 cup cream, or sweeten to taste.
Chocolate: The array of baking chocolate has exploded, with many varieties, origins, and artisanal products now available at the local grocery store. Common baking chocolate bars include unsweetened, semisweet, and bittersweet chocolate, while chips are now available in such flavors as semisweet and milk chocolate. Each variety has a slightly different flavor and level of sweetness, but we find that in our recipes you can generally substitute one variety of baking chocolate for another. Candy bars, on the other hand, are usually much sweeter, so we do not recommend substituting a chocolate candy bar for the baking chocolate. If a candy bar is to be used, it will be specified in the recipe.
Now, get ready to bake great desserts in your slow cooker!
We are passionate about slow cooker desserts and are thrilled you are sharing this sweet journey with us. Slow cookers have always been a part of both our professional life and our friendship. We met in the test kitchen of Rival, the company that first introduced the slow cooker to the world, and used cakes, like the Harvey Wallbanger and Sherry Pecan, to test how evenly new models of slow cookers heated. Company engineers, sales professionals, and marketing reps came into the test kitchen daily for sweet nibbles!
Now fast-forward some thirty years, and we are still the best of friends and still love the moist, wonderful cakes that can only be baked in a slow cooker. Today’s slow cooker recipes feature new flavors and up-to-date ingredients, and they are baked in new, sleek models of the popular appliance—but the rich, wonderful flavor is still there.
We hope you enjoy these flavorful slow cooker desserts as much as we have enjoyed sharing our favorite recipes with you.