Fine Weight
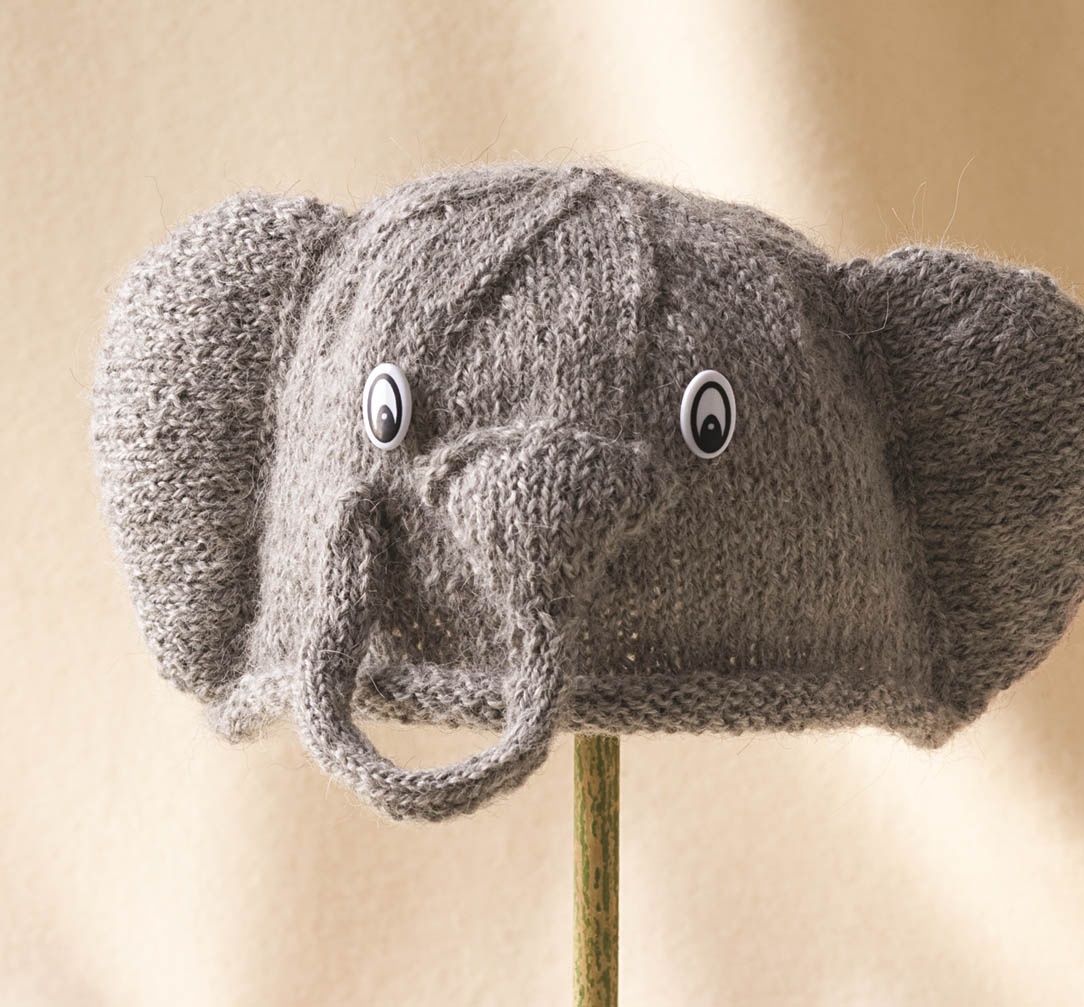
Alpaca Elephant Hat
Designed by Caroline Perisho
To say this is cute is an understatement at best, and the cuteness is complemented by the softness of pure alpaca wool. Take lots of photos of your toddler in this one!
- Sizes and Finished Measurements: To fit a toddler, approximately 16" (41 cm) circumference
- Yarn: Frog Tree Sport Alpaca, 100% alpaca, 1.75 oz (50 g)/130 yds (119 m), 009 Light Gray
- Needles: US 5 (3.75 mm) circular needle 16" (40 cm) long and set of four US 5 (3.75 mm) double-point needles or size you need to obtain correct gauge
- Gauge: 22 stitches = 4" (10 cm) in stockinette stitch
- Other Supplies: Stitch markers, tapestry needle, scrap yarn for holders, polyester fiberfill, button eyes
Beginning the Hat
- Cast on 91 stitches and join into a round, being careful not to twist the stitches, as follows: Slip the last cast-on stitch onto left needle, place marker, knit last cast-on stitch together with first cast-on stitch. You now have 90 stitches. Work stockinette stitch until piece measures 4.5" (11.5 cm).
Decreasing for the Crown
- Round 1: *K8, K2tog; repeat from *. You now have 81 stitches.
- Round 2 and all even-numbered rounds: Knit.
- Round 3: *K7, K2tog; repeat from *. You now have 72 stitches.
- Round 5: *K6, K2tog; repeat from *. You now have 63 stitches.
- Continue in this manner, knitting 1 fewer stitch between the decreases and working 1 round even between decrease rounds, until 18 stitches remain.
- Next round: *K2tog; repeat from *. You now have 9 stitches.
- Next round: *K2tog; repeat from * to last stitch, K1. You now have 5 stitches.
- Cut yarn, leaving an 8" (20.5 cm) tail. Thread tail onto tapestry needle and draw through remaining stitches twice. Pull up snug and fasten off.
Knitting the Trunk
- Cast on 14 stitches onto double-point needles and work back and forth. Work 6 rows in stockinette stitch.
- Next row: K1, ssk, knit to last 3 stitches, K2tog, K1. You now have 12 stitches.
- Next row: Purl.
- Repeat these 2 rows until 6 stitches remain. Following the instructions in the glossary, work 6-stitch I-cord for 5" (12.5 cm).
- Next row: *K2tog; repeat from *. You now have 3 stitches.
- Next row: K3tog, cut yarn, leaving a 6" (15 cm) tail, and pull tail through last stitch.
Knitting the Ears (Make 2)
Left Front and Right Back
- Cast on 8 stitches onto double-point needles and work back and forth.
- Row 1 (RS): K1, M1, K6, M1, K1. You now have 10 stitches.
- Row 2: P1, M1, P9. You now have 11 stitches.
- Row 3: K1, M1, K9, M1, K1. You now have 13 stitches.
- Row 4: P1, M1, P12. You now have 14 stitches.
- Row 5: K1, M1, K12, M1, K1. You now have 16 stitches.
- Row 6: P1, M1, P15. You now have 17 stitches.
- Row 7: K1, M1, K15, M1, K1. You now have 19 stitches.
- Row 8: P1, M1, P18. You now have 20 stitches.
- Row 9: K1, M1, K18, M1, K1. You now have 22 stitches.
- Row 10: P1, M1, P21. You now have 23 stitches.
- Row 11: K1, M1, K21, M1, K1. You now have 25 stitches.
- Row 12: P1, M1, P24. You now have 26 stitches.
- Work 6 rows even in stockinette stitch. Place 26 stitches on holder.
Left Back and Right Front
- Cast on 8 stitches onto double-point needles and work back and forth.
- Row 1 (WS): P1, M1, P6, M1, P1. You now have 10 stitches.
- Row 2: K1, M1, K9. You now have 11 stitches.
- Row 3: P1, M1, P9, M1, P1. You now have 13 stitches.
- Row 4: K1, M1, K12. You now have 14 stitches.
- Row 5: P1, M1, P12, M1, P1. You now have 16 stitches.
- Row 6: K1, M1, K15. You now have 17 stitches.
- Row 7: P1, M1, P15, M1, P1. You now have 19 stitches.
- Row 8: K1, M1, K18. You now have 20 stitches.
- Row 9: P1, M1, P18, M1, P1. You now have 22 stitches.
- Row 10: K1, M1, K21. You now have 23 stitches.
- Row 11: P1, M1, P21, M1, P1. You now have 25 stitches.
- Row 12: K1, M1, K24. You now have 26 stitches.
- Work 6 rows even in stockinette stitch. Place 26 stitches on holder.
- Pin left back and left front together and seam along the rounded edges, leaving remaining stitches on holders. Lightly stuff the ears with fiberfill, then join the remaining stitches with three-needle bind-off. Repeat for right ear.
Finishing
- Position the ears along the sides of the hat as shown in photo (see above) and sew them in place. Position the base of the trunk centered on the front of the hat between the ears as shown. Lightly stuff the base of the trunk and sew around it, leaving the I-cord free. Tack the end of the I-cord to the side of the face. Weave in ends. Sew on button eyes.
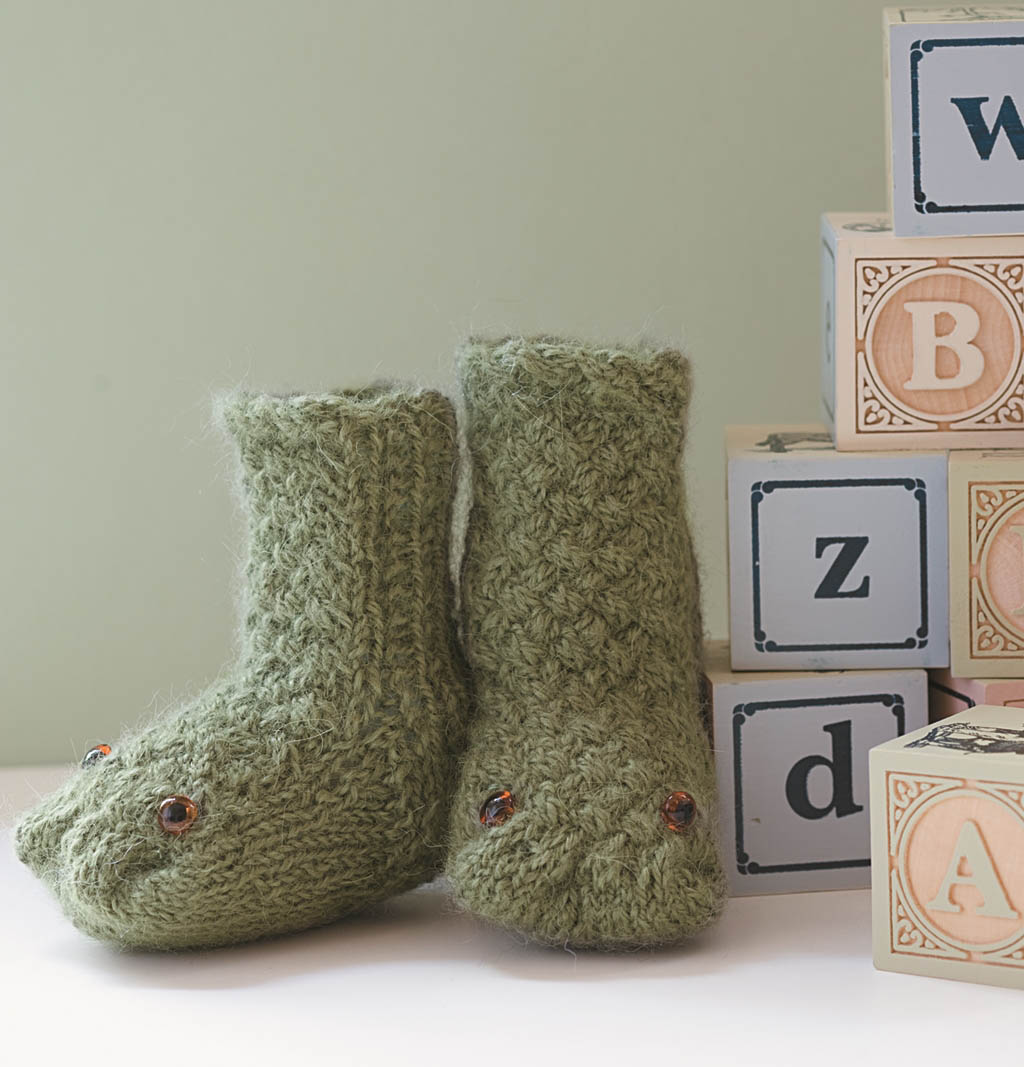
Alpaca Gator Socks
Designed by Caroline Perisho
Isn’t it amazing what two little buttons can do? Here they transform booties into mini alligators for your child’s pleasure. Knitted in pure alpaca, they’re soft and fun at the same time.
- Sizes and Finished Measurements: To fit an infant, approximately 3" (7.5 cm) foot length
- Yarn: Frog Tree Alpaca, 100% alpaca, 1.75 oz (50 g)/130 yds (119 m), 402 Green
- Needles: Set of four US 5 (3.75 mm) double-point needles or size you need to obtain correct gauge
- Gauge: 28 stitches = 4" (10 cm) in Woven Cable pattern
- Other Supplies: Stitch marker, cable needle, tapestry needle, four doll eyes
- Abbreviations:
- C4F (cable 4 front) place 2 stitches on cable needle and hold in front, K2, K2 from cable needle
- C4B (cable 4 back) place 2 stitches on cable needle and hold in back, K2, K2 from cable needle
Stitch Patterns
Woven Cable
Round 1: *C4F; repeat from *.
Round 2: Knit.
Round 3: K2, *C4B; repeat from *, to last 2 stitches, K2.
Round 4: Knit.
Repeat rows 1–4 for pattern.
K1, P1 Rib
Round 1: *K1, P1; repeat from *.
Repeat round 1 for pattern.
Knitting the Leg
- Cast on 41 stitches and distribute onto 3 double-point needles so there are 11 stitches on needle 1, 20 stitches on needle 2, and 10 stitches on needle 3. Join into a round, being careful not to twist the stitches, as follows: Slip the last cast-on stitch onto left needle, place marker, knit the last cast-on stitch together with the first cast-on stitch. You now have 40 stitches.
- Round 1: Work K1, P1 Rib on needle 1, work Woven Cable pattern on needle 2, work K1, P1 Rib on needle 3.
- Continue in this manner until you have completed 6 full repeats of Rounds 1–4 of Woven Cable pattern.
Knitting the Heel Flap
- Leave 20 Woven Cable stitches on needle to hold for instep. Knit the 10 rib stitches from needle 1 onto needle 3. Work back and forth on these 20 stitches only as follows:
- Row 1 (WS): Slip 1, purl to end of row.
- Row 2: *Slip 1 pwise, K1; repeat from *.
- Repeat Rows 1 and 2 three more times, ending with Row 1.
Turning the Heel
- Row 1 (RS): K10, K2tog, K1, turn.
- Row 2: P2, P2tog, P1, turn.
- Row 3: K3, K2tog, K1, turn.
- Row 4: P4, P2tog, P1, turn.
- Row 5: K5, P2tog, K1, turn.
- Row 6: P6, P2tog, P1, turn.
- Row 7: K7, K2tog, K1, turn.
- Row 8: P8, P2tog, P1, turn.
- Row 9: K9, K2tog, K1, turn.
- Row 10: P10, P2tog, turn.
Knitting the Gusset
- With needle 1, knit 10 remaining heel stitches and pick up and knit 8 stitches along side of heel. With needle 2, work Woven Cable pattern as established on 20 instep stitches. With needle 3, pick up and knit 8 stitches along other side of heel, knit 5 stitches from needle 1. You now have 13 stitches on needles 1 and 3 and 20 stitches on needle 2.
- Round 1: Knit to last 3 stitches on needle 1, K2tog, K1; work pattern as established on needle 2; K1, ssk at beginning of needle 3, knit to end of round.
- Round 2: Knit stitches on needles 1 and 3; continue pattern as established on needle 2.
- Repeat Rounds 1 and 2 until 10 stitches remain on needles 1 and 3, then work Round 2 only until 5 repeats of Rounds 1–4 of Woven Cable pattern have been worked from the beginning of heel shaping.
Finishing
- Join 20 sole stitches with 20 instep stitches using the three-needle bind-off. Weave in ends. Sew doll eyes to front of socks.
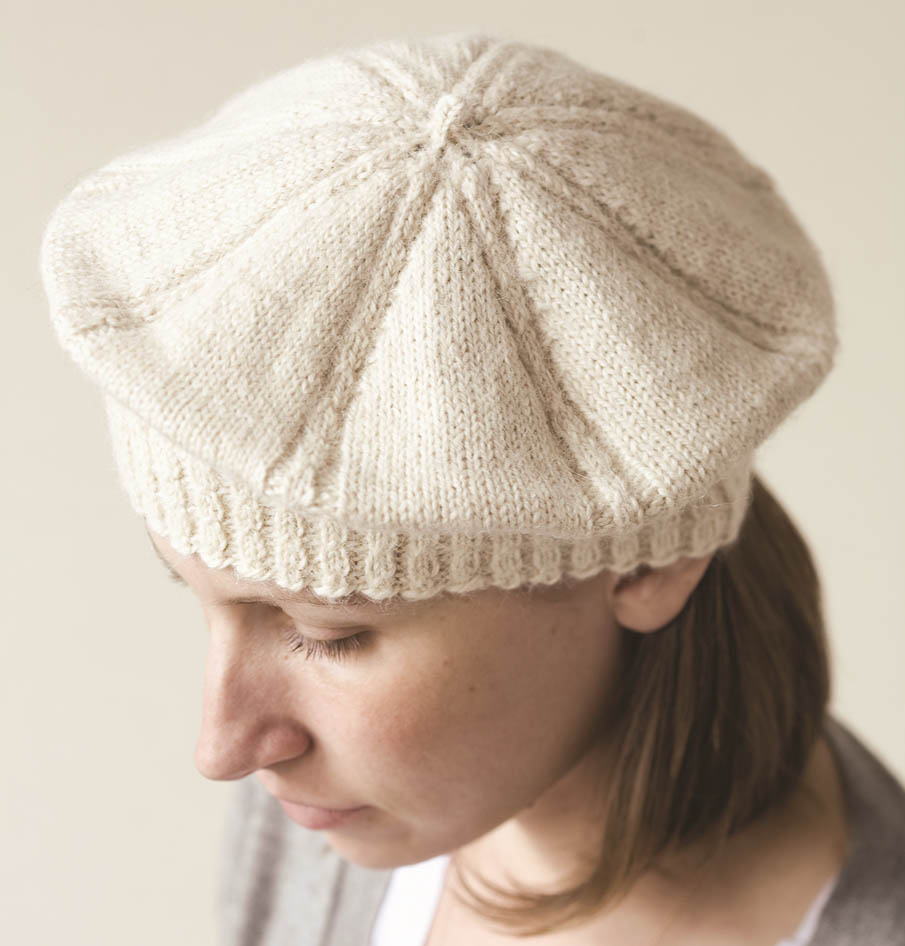
Mock Cable Alpaca Tam
Designed by Kathleen Taylor
This simple tam is knit with incredibly soft and warm alpaca and merino wool from Decadent Fibers. The mock cable is easy to work, and you don’t even need a cable needle!
- Sizes and Finished Measurements: To fit most adults and youths, approximately 21" (53 cm) circumference after blocking
- Yarn: Decadent Fibers Marshmallow, 80% alpaca/20% merino wool, 4 oz (113.5 g)/315 yds (288 m), MM Natural
- Needles: US 4 (3.5 mm) circular needle 16" (40 cm) long and set of four US 4 (3.5 mm) double-point needles or size you need to obtain correct gauge
- Gauge: 26 stitches and 32 rounds = 4" (10 cm) in stockinette stitch
- Other Supplies: Stitch markers, tapestry needle
- Abbreviations: MC mock cable
Stitch Patterns
Mock Cable (MC)
With right needle, reach past the first stitch on left needle and lift the second stitch up and over the first; knit that stitch, then knit the first stitch.
Ribbing
Rounds 1, 3, and 4: *P1, K2, P1; repeat from *.
Round 2: *P1, MC, P1; repeat from *.
Repeat rounds 1–4 for pattern.
Crown
Round 1: *P1, MC, P2, K16, P1; repeat from * 7 more times.
Rounds 2–4: *P1, K2, P2, K16, P1; repeat from * 7 more times.
Repeat rounds 1–4 for pattern.
Getting Started
- With circular needle, cast on 176 stitches. Join into a round, being careful not to twist the stitches. Work Rounds 1–4 of Ribbing pattern 3 times, then work Round 1 once more, placing marker after every 22 stitches (8 sections).
Knitting the Crown
- Work Rounds 1–4 of Crown pattern 7 times, then work Rounds 1–3 once more. Note: The crown cables will not always line up with a ribbing cable.
Decreasing the Crown
- Round 1: *P1, K2, P1, P2tog, K14, P2tog; repeat from * 7 times.
- Round 2: *P1, MC, P2, K14, P1; repeat from * 7 times.
- Round 3: *P1, K2, P2, K14, P1; repeat from * 7 times.
- Round 4: *P1, K2, P1, P2tog, K12, P2tog; repeat from * 7 times.
- Round 5: *P1, K2, P2, K12, P1; repeat from * 7 times.
- Round 6: *P1, MC, P2, K12, P1; repeat from * 7 times.
- Round 7: *P1, K2, P1, P2tog, K10, P2tog; repeat from * 7 times.
- Rounds 8 and 9: *P1, K2, P2, K10, P1; repeat from * 7 times.
- Round 10: *P1, MC, P1, P2tog, K8, P2tog; repeat from * 7 times.
- Rounds 11 and 12: *P1, K2, P2, K8, P1; repeat from * 7 times.
- Round 13: *P1, K2, P1, P2tog, K6, P2tog; repeat from * 7 times.
- Round 14: *P1, MC, P2, K6, P1; repeat from * 7 times.
- Round 15: *P1, K2, P2, K6, P1; repeat from * 7 times.
- Round 16: *P1, K2, P1, P2tog, K4, P2tog; repeat from * 7 times.
- Round 17: *P1, K2, P2, K4, P1; repeat from * 7 times.
- Round 18: *P1, MC, P1, P2tog, K2, P2tog; repeat from * 7 times.
- Round 19: *P1, K2, P2, K2, P1; repeat from * 7 times.
- Round 20: *K2tog twice, P2tog twice; repeat from * 7 times.
- Round 21: *K2tog, P2tog; repeat from * 7 times.
- Rounds 22 and 23: *K2tog; repeat from * to end of round. You now have 4 stitches.
Finishing
- Slip 4 remaining stitches onto 1 double-point needle and slide to right end of needle. Following instructions for I-cord, work 4 rows. Cut yarn, leaving an 8" (20 cm) tail. Thread tail onto tapestry needle and draw through remaining stitches twice. Pull up snug and fasten off. Weave in ends. Wash and block tam on a 10" (25.5 cm) dinner plate.
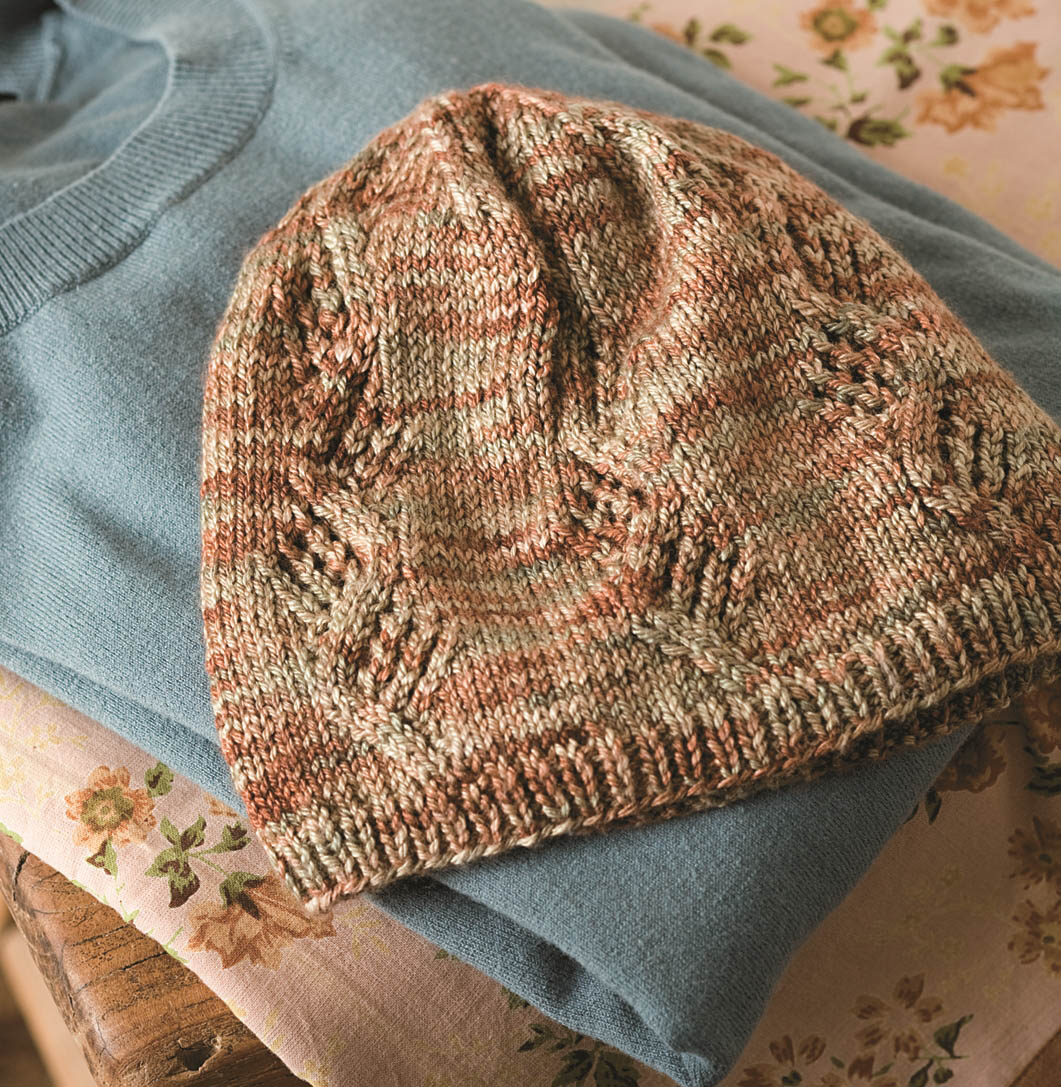
Silk-Merino Leaf Lace Hat
Designed by Sarah-Hope Parmeter
A fingering-weight silk-and-merino blend make this hat perfect for autumn wear. It is knitted in the round with six repeats of a leafy lace pattern.
- Sizes and Finished Measurements: To fit most adults, approximately 18" (45.5 cm) stretching to 24" (61 cm) circumference
- Yarn: Curious Creek Fibers Omo, 50% silk/50% merino wool, 1.75 oz (50 g)/205 yds (186 m), Savanna Grasses
- Needles: US 3 (3.25 mm) circular needle 16" (40 cm) long and set of four US 3 (3.25 mm) double-point needles or size you need to obtain correct gauge
- Gauge: 24 stitches = 4" (10 cm) in stockinette stitch, 26 stitches = 4" (10 cm) in pattern
- Other Supplies: Stitch marker, cable needle, tapestry needle
Knitting the Hat
- With circular needle, cast on 114 stitches. Place marker and join into a round, being careful not to twist the stitches. Work 5 rows of K1, P1 Rib (see Stitch Pattern for K1, P1 Rib).
- Work Rows 1–6 of chart 1 (see below), working the 19-stitch repeat 6 times in each round.
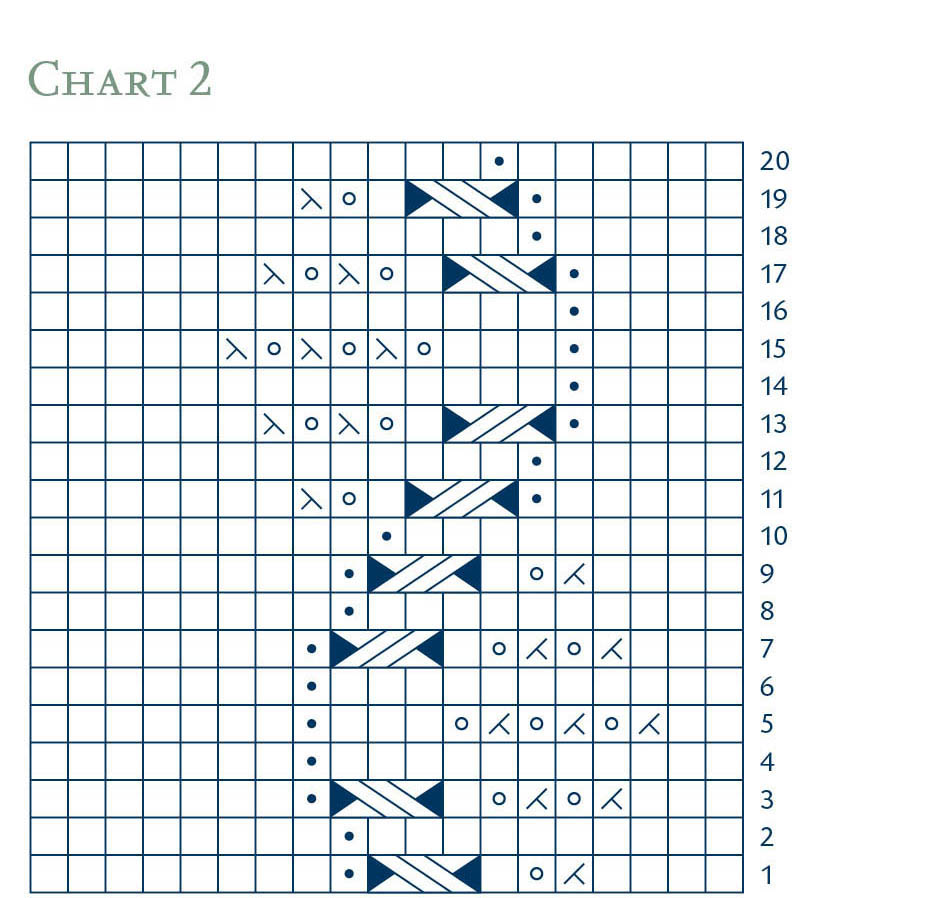
- Work Rows 1–20 of chart 2 (see below) twice, working the 19-stitch repeat 6 times in each round.
Decreasing for the Crown
- Change to double-point needles when there are too few stitches for the circular needle.
- Work Rows 1–16 of chart 3 (see below). Note: At the beginning of Rounds 5, 7, 9, 11, 13, 15, and 16, remove the marker, slip 1 stitch from left to right needle, replace marker, then work round as charted.
Finishing
- Cut yarn, leaving an 8" (20.5 cm) tail. Thread tail onto tapestry needle and draw through remaining stitches twice. Pull up snug and fasten off. Weave in ends.
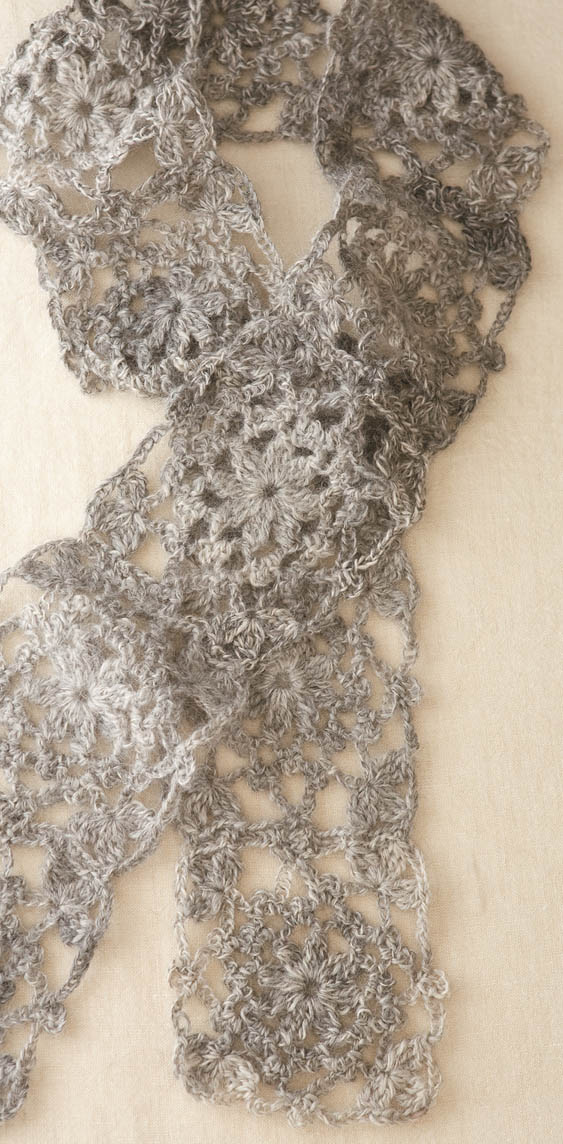
Lacy Gray Alpaca Scarf
Designed by Mary Jane Hall
Light as a feather, this scarf was crocheted in a delicate openwork pattern using a lovely alpaca-and-angora blend, hand spun by Reneé Barnes.
- Finished Measurements: Approximately 4.5" (11.5 cm) wide and 50" (127 cm) long
- Yarn: Renée Barnes Handspun, 90% alpaca/10% angora, 3.5 oz (100 g)/176 yds (158 m), Gray
- Crochet Hook: Size G/6 (4 mm) or size you need to obtain correct gauge
- Gauge: 1 square = 4.5" (11.5 cm)
- Other Supplies: Tapestry needle
- Abbreviations:
- tr cl triple cluster: [yo twice, insert hook in designated space, yo and draw through (yo and draw through 2 loops on hook) twice] 3 times, yo and draw through last 4 loops on hook
Crocheting the Squares
- Ch 6, join with sl st to form a ring.
- Round 1: Ch 4 (counts as first triple) [yo twice, insert hook in ring, yo and draw through, (yo and draw through 2 loops on hook) twice] 2 times, yo and draw through last 3 loops on hook, *ch 5, [yo twice, insert hook in center of ring, yo and draw through (yo and draw through 2 loops on hook) twice] 3 times, yo and draw through last 4 loops on hook (tr cl made); repeat from * 6 times, ch 5, sl st in top of first cluster. You now have 8 tr cl with ch 5 between each.
- Round 2: Sl st to center of ch-5 space, ch 1, (sc, ch 3, sc) in same ch-5 space, *ch 5, (sc, ch 3, sc) in next ch-5 space; repeat from * 6 times, ch 5, sl st in first sc. You now have 8 ch-5 spaces.
- Round 3: Sl st to center of ch-5 space, ch 1, (sc, ch 3, sc) in same ch-5 space, *ch 9 (sc, ch 3, sc) in next ch-5 space; repeat from * 7 times, ch 9, sl st to first sc. You now have 8 ch-9 spaces.
- Round 4: Sl st to center of ch-9 space, (sc, ch 5, sc) in center ch, *ch 6, (1 tr cl, ch 5) twice in fifth chain of next ch-9, 1 tr cl in same ch, ch 6 (sc, ch 5, sc) in fifth ch of next ch 9; repeat from *, ch 6, join with sl st to first sc. You have 3 tr cl in each corner. Break yarn.
- Repeat the ring and Rounds 1–4 ten more times.
Finishing
- Weave in ends. With RS together, sew squares together into a strip. Block lightly.
Starfish of Yak
Designed by Daniel Yuhas
With five points to grab hold of, your baby will love this toy! The construction is ingenious — no breaking of yarn, no sewing of seams — and the yak-merino yarn keeps things soft.
- Finished Measurements: Approximately 11" (28 cm) from tip to tip
- Yarn: Karabella Super Yak, 50% yak/50% merino wool, 1.75 oz (50 g)/125 yds (115 m), 10397 Pink
- Needles: Set of four US 3 (3.25 mm) double-point needles or size you need to obtain correct gauge
- Gauge: 22 stitches and 32 rows = 4" (10 cm) in stockinette stitch
- Other Supplies: Stitch markers, scrap yarn for holders, small amount of polyester fiberfill, tapestry needle
- Abbreviations:
- inc L left lifted increase (see box at left)
- inc R right lifted increase (see box at left)
Stitch Pattern
Increases
Left lifted increase: Pick up the stitch 2 stitches below the last stitch on the right-hand needle and knit it through the back loop — 1 stitch increased.
Right lifted increase: Pick up the stitch below the next stitch on the left-hand needle and knit it — 1 stitch increased.
- Note: You’ll begin by knitting a pentagon in the round. While knitting the legs back and forth from each side of the pentagon, the first and last stitch of each row are placed on a holder, then joined together with three-needle bind-off.
Getting Started
- Cut a short piece of scrap yarn from the skein about the same length as one of your needles. Using the backward loop method, cast on 10 stitches over the needle and scrap yarn. Divide the stitches so you have 2 stitches on needle 1 and 4 stitches on each of needles 2 and 3. Join into a round, being careful not to twist the stitches.
- Round 1: K2 on needle 1, (K2, pm, K2) on needles 2 and 3.
- Round 2: *K1, inc R, K1; repeat from *. You now have 3 stitches on needle 1 and 3 stitches on either side of the markers on needles 2 and 3.
- Round 3: Knit.
- Tie the scrap yarn to tighten the cast-on stitches together.
- Round 4: *K1, inc L, K1, inc R, K1; repeat from *. You now have 5 stitches on needle 1 and 5 stitches between markers on needles 2 and 3.
- Round 5: Knit.
- Round 6: *K2, inc L, K1, inc R, K2; repeat from *. You now have 7 stitches on needle 1 and 7 stitches between markers on needles 2 and 3.
- Round 7: Knit.
- Round 8: *K3, inc L, K1, inc R, K3; repeat from *. You now have 9 stitches on needle 1 and 9 stitches between markers on needles 2 and 3.
- Round 9: Knit.
- Continue in this manner, working 1 more stitch before the inc L and 1 more stitch after the inc R on the increase rounds and knitting 1 round even between increase rounds until you have 19 stitches on needle 1 and 19 stitches between the markers on needles 2 and 3: 95 stitches total.
Knitting the Legs
- Place stitches from needles 2 and 3 onto scrap yarn holders. Working back and forth on remaining 19 stitches, proceed as follows: On every row except on the Set-up Row, slip the first and last stitch of every row onto a holder or extra double-point needle, being careful not to drop any stitches.
- Set-up row: K2, inc L, K7, inc L, K1, inc R, K7, inc R, K2. You now have 23 stitches.
- Row 1 (WS): Slip, P21, slip. You now have 21 stitches.
- Row 2: Slip 1, K2, inc L, K7, inc L, K1, inc R, K7, inc R, K2, slip 1. You now have 23 stitches.
- Rows 3 and 5: Repeat Row 1.
- Rows 4 and 6: Repeat Row 2.
- Row 7: Repeat Row 1. You now have 21 stitches.
- Row 8: Slip, K2, inc L, K15, inc R, K2, slip.
- Row 9: Slip, P19, slip. You now have 19 stitches.
- Row 10: Slip, K2, inc L, K6, inc L, K1, inc R, K6, inc R, K2, slip. You now have 21 stitches.
- Row 11: Repeat Row 9.
- Row 12: Slip, K2, inc L, K13, inc R, K2, slip.
- Row 13: Slip, P17, slip. You now have 17 stitches.
- Row 14: Slip, K2, inc L, K5, inc L, K1, inc R, K5, inc R, K2, slip. You now have 19 stitches.
- Row 15: Repeat Row 13.
- Row 16: Slip, K2, inc L, K11, inc R, K2, slip. You now have 17 stitches.
- Row 17: Slip, P15, slip. You now have 15 stitches.
- Row 18: Slip, K2, inc L, K4, inc L, K1, inc R, K4, inc R, K2, slip. You now have 17 stitches.
- Row 19: Repeat Row 17.
- Row 20: Slip, K2, inc L, K9, inc R, K2, slip. You now have 15 stitches.
- Row 21: Slip, P13, slip. You now have 13 stitches.
- Row 22: Slip, K2, inc L, K3, inc L, K1, inc R, K3, inc R, K2, slip. You now have 15 stitches.
- Row 23: Repeat Row 21.
- Row 24: Slip, K2, inc L, K7, inc R, K2, slip. You now have 13 stitches.
- Row 25: Slip, P11, slip. You now have 11 stitches.
- Row 26: Slip, K2, inc L, K2, inc L, K1, inc R, K2, inc R, K2, slip. You now have 13 stitches.
- Row 27: Repeat Row 25.
- Row 28: Slip, K2, inc L, K5, inc R, K2, slip. You now have 11 stitches.
- Row 29: Slip, P9, slip. You now have 9 stitches.
- Row 30: Slip, K2, inc L, K1, inc L, K1, inc R, K1, inc R, K2, slip. You now have 11 stitches.
- Row 31: Repeat Row 29.
- Row 32: Slip, K2, inc L, K3, inc R, K2, slip. You now have 9 stitches.
- Row 33: Slip, P7, slip. You now have 7 stitches.
- Row 34: Slip, K2, inc L, K1, inc R, K2, slip. You now have 7 stitches.
- Row 35: Slip, P5, slip. You now have 5 stitches.
- Row 36: Slip, K3, slip. You now have 3 stitches.
- Row 37: Slip, P1, slip. You now have 1 stitch.
Sealing the Leg
- Hold the slipped stitches from both sides of leg with purl sides together. Knit the first 2 stitches from each needle together and slip the last remaining stitch from leg point over the resulting stitch. Join remaining stitches together with the three-needle bind-off. You will have 1 remaining stitch at the end of the bind-off. Lightly stuff the leg.
Knitting the Next Leg
- Place the next 19 held stitches on a needle. Knitting the remaining stitch from the first leg together with the first of the 19 stitches, work the Set-up Row: K2tog, K1, inc L, K7, inc L, K1, inc R, K7, inc R, K2. Continue as for first leg. Repeat 3 more times for the other legs.
Finishing
- When all legs are stuffed, break the yarn and sew the hole closed. Weave in the end and pull through to the inside.
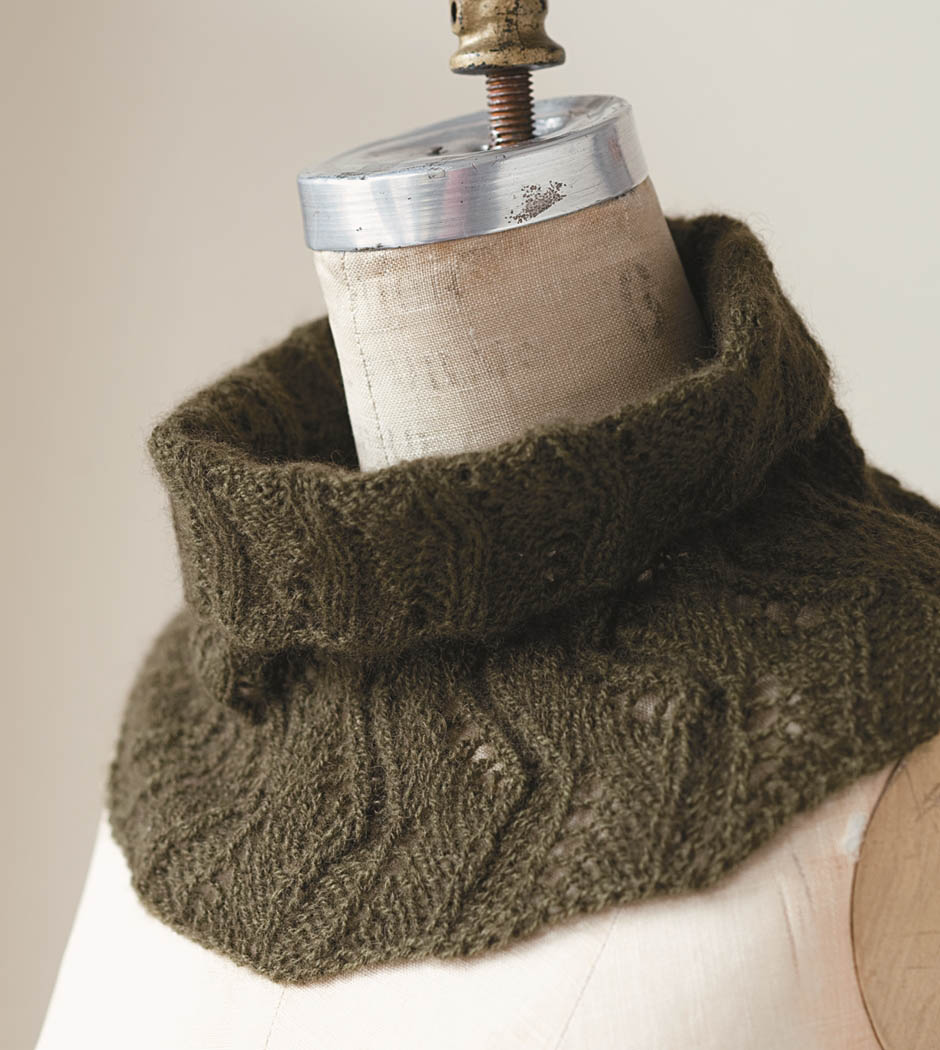
Qiviut Neck Muff
Designed by Jackie Erickson-Schweitzer
Lusciously soft and warm, this lacy neck muff knitted in qiviut is designed to be worn as a yoke or as a cowl. The lace consists of two simple pattern rows that produce a softly scalloped edge.
- Sizes and Finished Measurements: To fit most adults, approximately 18" (45.5 cm) circumference at neck, 30"(76 cm) circumference at lower edge, and 9" (23 cm) length
- Yarn: Windy Valley Musk Ox Pure Qiviut, 100% qiviut, 1 oz (28.5 g)/218 yds (199 m), Arctic Moss
- Needles: US 5 (3.75 mm) circular needle 16" (40 cm) long or size you need to obtain correct gauge; circular needle 16" (40 cm) long, 2 sizes larger than gauge needle; and circular needle 16" (40 cm) long, 5 sizes larger than gauge needle
- Gauge: 21 stitches = 4" (10 cm) in stockinette stitch, 25 stitches = 4" (10 cm) in pattern on smallest needles
- Other Supplies: Stitch marker, tapestry needle
Stitch Pattern
Zigzag Ribbed Lace
Round 1: *P2, ssk, K3, yo, K1 tbl; repeat from *.
Round 2: *P2, K6; repeat from *.
Rounds 3–10: Repeat Rounds 1 and 2.
Round 11: *P2, K1 tbl, yo, K3, K2tog; repeat from *.
Round 12: *P2, K6; repeat from *.
Rounds 13–20: Repeat Rounds 11 and 12.
Repeat rounds 1–20 for pattern.
Knitting the Muff
- With smallest needle, cast on 112 stitches loosely.
- Edge row: Slip 1 pwise wyib, knit to end of row.
- Place marker and join into a round, being careful not to twist the stitches. Work Rounds 1–20 of Zigzag Ribbed Lace pattern, then work Rounds 1–10 once more.
- Change to middle-size needle. Work Rounds 11–20 of pattern.
- Change to largest needle. Work Rounds 1–20 of pattern.
- Bind off as follows: *P2tog, with yarn in front slip stitch back to left needle; repeat from * until all stitches are bound off. Break yarn and pull through remaining loop.
Finishing
- Weave in ends. Steam lightly without touching the fabric. If desired, gently finger block the beginning and end to emphasize the scallops.
Beaded Cashmere Wristlets
Designed by Grace Maggie Covey
These wristlets will look lovely peeking out from the sleeves of your favorite coat. They are narrow at the wrist and wider at both ends, so you can wear them either end up.
- Sizes and Finished Measurements: To fit average woman, approximately 6.5" (16.5 cm) circumference at wrist, 7" (18 cm) long
- Yarn: JoJoland Cashmere, 100% cashmere, 2 oz (57 g)/200 yds (183 m), CA55 Periwinkle
- Needles: Set of four US 3 (3.25 mm) double-point needles or size you need to obtain correct gauge
- Gauge: 24 stitches = 4" (10 cm) in stockinette stitch, 22 stitches = 4" (10 cm) in pattern
- Other Supplies: Big-eye beading needle, approximately 882 size 6° seed beads, stitch marker, tapestry needle
- Abbreviations: S1b slide bead(s) up next to needle (S2b = slide 2 beads, etc.)
Preparing the Yarn
- Thread yarn end onto a big-eye beading needle. Picking up beads with the needle, string 441 beads for one wristlet. Using the knitted-on method, cast on 3, S7b, *cast on 5, S7b; repeat from * 5 more times, cast on 2. You now have 7 swags of beads with 5 stitches between each swag, 35 stitches total.
Knitting the Wristlets
- Divide the stitches onto 3 needles and join into a round, being careful not to twist the stitches. Place a marker.
- Round 1: K2, P1, Sb6, P1, *K3, P1, Sb6, P1; repeat from * to last stitch, K1.
- Round 2: K2, P1, Sb5, P1, *K3, P1, Sb5, P1; repeat from * to last stitch, K1.
- Round 3: K2, P1, Sb4, P1, *K3, P1, Sb4, P1; repeat from * to last stitch, K1.
- Round 4: K2, P1, Sb3, P1, *K3, P1, Sb3, P1; repeat from * to last stitch, K1.
- Round 5: K2, P1, Sb2, P1, *K3, P1, Sb2, P1; repeat from * to last stitch, K1.
- Round 6: K2, P1, Sb1, P1, *K3, P1, Sb1, P1; repeat from * to last stitch, K1.
- Round 7: Knit.
- Repeat Rounds 6 and 7 twenty-nine times, then work Round 6 once more. You now have 31 single-bead rounds.
- Work Round 5, then Round 4.
- Next round: K2, P1, yo, P1, *K3, P1, yo, P1; repeat from * to last stitch, K1.
- Knit 1 round.
- Bind off as follows: *P1, move stitch back to left needle, P2tog; repeat from * until all stitches are bound off, pulling yarn tail through last stitch.
Finishing
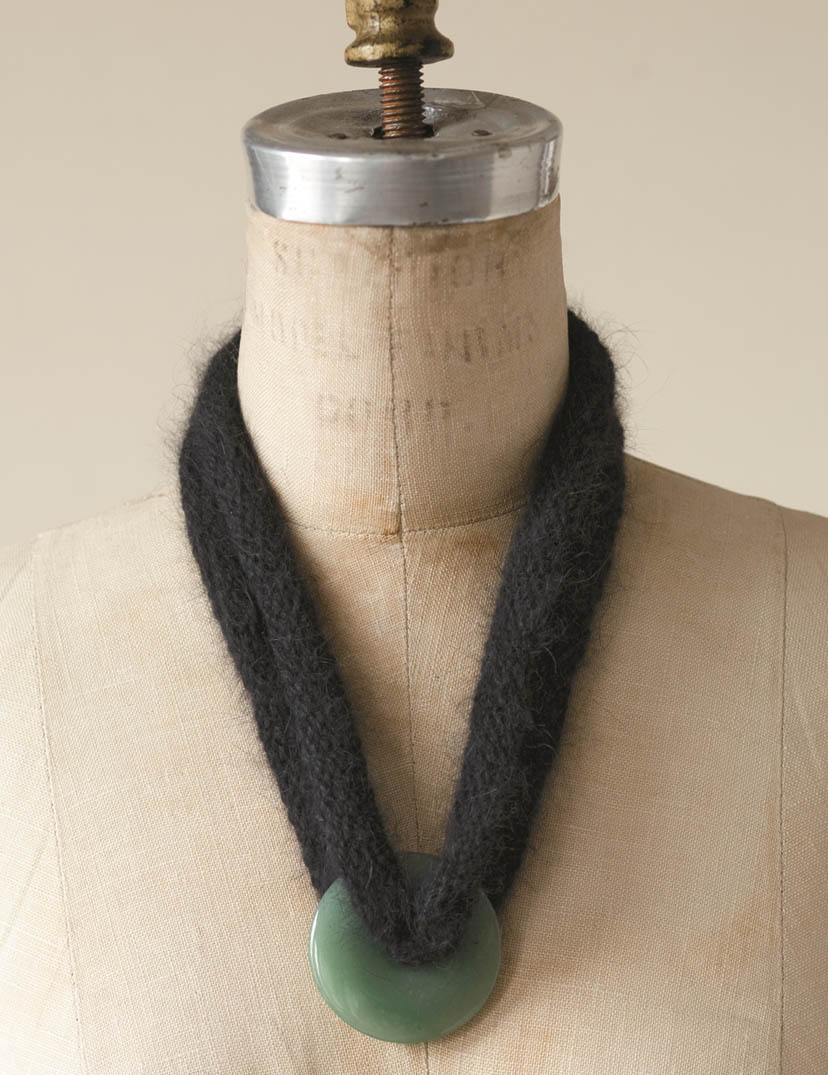
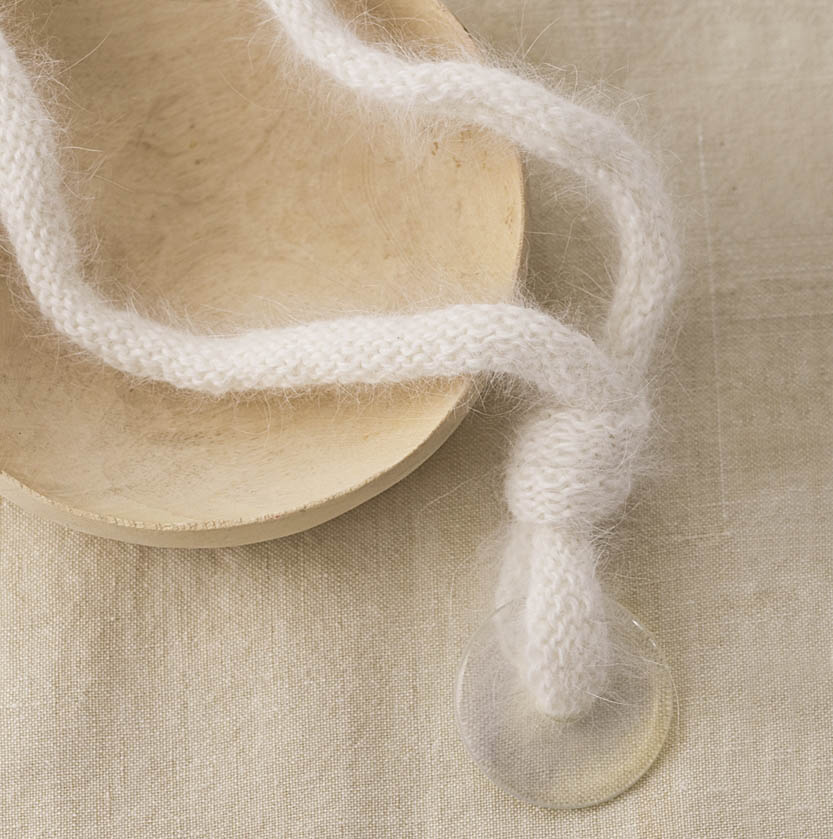
Angora Pendant Necklace
Designed by Cathy Carron
Here’s a new way to show off stone discs. Two styles are shown here, but you may think up more. Knitted in the round, it’s nine rounds and you’re done!
- Finished Measurements: Approximately 30" (76 cm) long
- Yarn: Valeria di Roma Angora, 100% angora, 1.75 oz (50 g)/55 yds (50 m), 8007 Ivory or 8042 Black
- Needles: US 5 (3.75 mm) circular needle 24" (60 cm) long or size you need to obtain correct gauge
- Gauge: 24 stitches = 4" (10 cm) in stockinette stitch
- Other Supplies: 50 mm donut bead, stitch marker, tapestry needle
Knitting Version 1 (Ivory)
- Cast on 180 stitches. Slide bead over needle, place marker, and join into a round, being careful not to twist the stitches. Knit 9 rounds, slipping the bead around as necessary. Bind off.
Finishing
- Weave in ends. Tie knot about 2" (5 cm) above bead.
Knitting Version 2 (Black)
- Cast on 180 stitches. Place marker and join into a round, being careful not to twist the stitches. Knit 9 rounds. Bind off.
Finishing
- Weave in ends. Fold the knitted loop in half and push one end through the bead. Slide the bead to center of loop.
Angora Bridal Garter
Designed by Cathy Carron
The bride will love wearing this angora garter, and the woman who receives it will be delighted! Knitted in the round, it has a lovely pink elastic ribbon woven through the eyelets.
- Sizes and Finished Measurements: To fit most adults, approximately 14 ” (35.5 cm) circumference, stretching to 26" (66 cm)
- Yarn: Valeria di Roma Angora, 100% angora, 1.75 oz (50 g)/55 yds (50 m), 8007 Ivory
- Needles: US 5 (3.75 mm) circular needle 24" (60 cm) long or size you need to obtain correct gauge
- Gauge: 24 stitches = 4" (10 cm) in stockinette stitch
- Other Supplies: Stitch marker, tapestry needle, 1.5 yds (137 cm) ⅜” (1 cm) elastic ribbon
Knitting the Garter
- Cast on 171 stitches. Place marker and join into a round, being careful not to twist the stitches.
- Rounds 1 and 2: Knit.
- Round 3: *K1, K2tog; repeat from *. You now have 114 stitches.
- Round 4: Knit.
- Round 5: *Yo, K2tog; repeat from *.
- Round 6: Knit.
- Round 7: *K2, M1; repeat from *. You now have 171 stitches.
- Rounds 8 and 9: Knit.
- Bind off.
Finishing
- Weave in ends. Weave elastic ribbon through eyelet holes and tie into a bow.
A Pair of Silk Purses
Designed by Judith Durant
The silk yarn used for these purses is combined with the tiniest bit of polyester and then knitted into a ribbonlike strand. It has beautiful shine and texture and is as light as a feather. The fabric is very accommodating; it took to the frames as if they were made for each other (which, actually, they were).
- Finished Measurements: Approximately 4" (10 cm) tall and 4" (10 cm) wide at widest point
- Yarn: Lang Yarns Silk, 98% silk/2% polyester, 0.88 oz (25 g)/85 yds (78 m), 727.0023 Blue
- Needles: US 5 (3.75 mm) straight needles for square purse, set of five US 5 (3.75 mm) double-point needles for round purse or size you need to obtain correct gauge
- Gauge: 32 stitches and 40 rows = 4" (10 cm) in stockinette stitch
- Other Supplies: Tapestry needle, sewing needle and coordinating sewing thread, square or round 2.5" (6.5 cm) purse frame, US D/3 (3.25 mm) crochet hook (for round bag), two jump rings, and chain of desired length (optional)
Stitch Pattern
Knot Stitch
Row 1: *K3, (P3tog, K3tog, P3tog in next 3 stitches); repeat from * to last 3 stitches, K3.
Rows 2 and all ws rows through 8: Purl.
Rows 3 and 7: Knit.
Row 5: K3, *K3 (P3tog, K3tog, P3tog in next 3 stitches); repeat from * to last 6 stitches, K6.
Repeat rows 1–8 for pattern.
Knitting the Square-top Purse
Getting Started
- Cast on 21 stitches. Purl 1 row. Work Rows 1–8 of Knot Stitch pattern, then work Rows 1 and 2.
Begin Shaping
- Increase row: K1, M1, work in pattern to last stitch, M1, K1.
- Continue in pattern as established, working increase row every fourth RS row (knit rows) 5 more times, then purl 1 row. You now have 33 stitches. Work 10 rows even in pattern.
- Decrease row: K1, ssk, work in pattern to last 3 stitches, K2tog, K1.
- Continue in pattern as established, working decrease row every fourth RS row (knit rows) 5 more times, then purl 1 row. You now have 21 stitches. Work 10 rows even in pattern. Bind off all stitches.
Finishing
- Fold bag in half with WS together and sew side seams with mattress stitch from bottom to end of shaping. Weave in ends. Use sewing needle and thread to sew top of bag to frame. Attach chain with jump rings if desired.
Knitting the Round Purse
Getting Started
- Cast on 8 stitches. Place 2 stitches on each of 4 double-point needles and join into a round, being careful not to twist the stitches. Knit 1 round.
- Note: If you find it difficult to work this first round, cast on 8 stitches and place 4 stitches on each of 2 needles. With a third needle, knit the stitches from one needle, slide all stitches down to the other end of the needles and, with the empty needle, knit the stitches from the second needle. It should now be easier to distribute the 8 stitches onto 4 needles.
- Round 1: *Kfb; repeat from *. You now have 16 stitches.
- Round 2: Knit.
- Round 3: *K2, M1; repeat from *. You now have 24 stitches.
- Round 4: Knit.
- Round 5: *K3, M1; repeat from *. You now have 32 stitches.
- Round 6: *(P3tog, K3tog, P3tog in next 3 stitches), K1; repeat from *.
- Round 7: *K4, M1; repeat from *. You now have 40 stitches.
- Round 8: Knit.
- Round 9: *K5, M1; repeat from *. You now have 48 stitches.
- Round 10: Knit.
- Round 11: *K6, M1; repeat from *. You now have 56 stitches.
- Round 12: *K2, (P3tog, K3tog, P3tog in next 3 stitches), K2; repeat from *.
- Round 13: *K7, M1; repeat from *. You now have 64 stitches.
- Round 14: Knit.
- Round 15: *K8, M1; repeat from *. You now have 72 stitches.
- Round 16: Knit.
- Round 17: *K9, M1; repeat from *. You now have 80 stitches.
- Round 18: *K4, (P3tog, K3tog, P3tog in next 3 stitches), K3; repeat from *.
- Round 19: *K10, M1; repeat from *. You now have 88 stitches.
- Round 20: Knit.
Finishing the Bottom and Knitting the Top
- Row 1: K8, bind off 72, K8, then knit the 8 beginning-of-row stitches again. You now have 16 stitches on 1 needle.
- Row 2: P16.
- Row 3: Bind off 2 stitches, K1 (you now have 2 stitches on needle), (P3tog, K3tog, P3tog in next 3 stitches), K2, (P3tog, K3tog, P3tog in next 3 stitches), K4.
- Row 4: Bind off 2 stitches, purl to end of row.
- Row 5: Bind off 2 stitches, knit to end of row.
- Row 6: Bind off 2 stitches, purl to end of row.
- Bind off remaining 8 stitches.
- Repeat for other side of purse.
Finishing
- With WS together and beginning with the first bound-off stitches, join the front and back together with slip stitch crochet. Weave in ends. Use sewing needle and thread to sew top of bag to frame, stretching the knitting as necessary to make a smooth edge. Attach chain with jump rings, if desired.
Frilly Merino-Angora Booties
Designed by Gwen Steege
Ruffles and pompoms! And what makes them even more appealing is the soft, cozy angora-merino yarn they’re knit with. The perfect gift for the newest baby on your block!
- Finished Measurements: Approximately 3.25" (8.5 cm) foot length
- Yarn: Sublime Angora Merino, 80% extra fine merino/20% angora, 1.75 oz (50 g)/130 yds (119 m), 47 Dusky
- Needles: Set of four US 3 (3.25 mm) double-point needles or size you need to obtain correct gauge
- Gauge: 24 stitches = 4" (10 cm) in stockinette stitch
- Other Supplies: Stitch holder, tapestry needle
Knitting the Cuff
- Cast on 90 stitches, and divide them evenly among 3 needles. Join into a round, being careful not to twist the stitches.
- Rounds 1 and 2: Knit.
- Round 3: * Slip 1, K2tog, psso; repeat from *. You now have 30 stitches.
- Rounds 4–6: Knit.
- Round 7: *K3, K2tog; repeat from *. You now have 24 stitches.
- Round 8: K3, *yo, K4; repeat from * to last stitch, yo, K1. You now have 30 stitches.
- Rounds 9 and 10: Purl.
- Rounds 11–13: * K1, P1; repeat from *.
Working the Heel Flap
- Set-up round: Cut the yarn, leaving a tail to weave in later. Place 7 stitches from needle 1 and 8 stitches from needle 3 onto 1 needle, and attach the yarn to these 15 stitches at the beginning of the RS row: These will be the heel stitches. Place the remaining stitches (instep stitches) on a spare needle or stitch holder and hold aside until the heel is complete. In this section, you will be working back and forth in rows.
- Rows 1, 3, 5, and 7: *Slip 1 wyib, K1; repeat from *.
- Rows 2, 4, 6, and 8: Slip 1 wyib, purl to end of row.
- Repeat Row 1 once more.
Turning the Heel
- Row 1 (WS): P9, P2tog, P1, turn.
- Row 2: Slip 1, K4, ssk, K1, turn.
- Row 3: Slip 1, P5, P2tog, P1, turn.
- Row 4: Slip 1, K6, ssk, K1, turn.
- Row 5: P8, P2tog, turn.
- Row 6: Knit to end of row. You now have 10 heel stitches.
Forming the Gusset and Instep
- Set-up round: Pick up 8 stitches along the left side of the heel flap. Work the 15 instep stitches that you set aside before working the heel, continuing in the established K1, P1 rib pattern. Use an empty needle to pick up 8 stitches along the right side of the heel flap, then knit the first 5 of the remaining heel stitches again. There are 15 instep stitches on needle 2, and 13 heel stitches each on needles 1 and 3. The middle of the heel is now the beginning of each round.
- Round 1:
- Needle 1: Knit to last 3 stitches, K2tog, K1.
- Needle 2: * K1, P1; repeat from * to end of row, ending K1.
- Needle 3: K1, ssk, knit to end of needle.
- Repeat Round 1 until 30 stitches remain: 15 instep stitches and 15 stitches total on the other 2 needles (sole stitches). On the last round, you will need to decrease on needle 1 only. You will have 7 stitches on needle 1 and 8 stitches on needle 3.
- Work even for 5 more rounds, continuing in the K1, P1 pattern on the instep stitches and plain knit on the heel stitches.
Shaping the Toe
- Round 1:
- Needle 1: Knit to last 3 stitches, K2tog, K1.
- Needle 2: K1, ssk, knit to last 3 stitches, K2tog, K1.
- Needle 3: K1, ssk, knit to end of needle.
- Repeat Round 1 until 10 stitches remain: 5 instep stitches and 5 stitches total on the other 2 needles. Move these sole stitches to one needle.
- With 5 stitches on each needle, place the needles parallel and use kitchener stitch to weave the toe stitches together.
Finishing
- Make ties by working two 2-stitch I-cords, each 17" (43 cm) long.
- Weave the I-cord ties through the eyelets at the ankles.
- Following the instructions in the glossary, make 4 pompoms, each about 1" (2.5 cm) in diameter. Leave 2 long tails on the yarn you use to tie the pompoms together at the center. Thread 1 tail through a tapestry needle and draw it through the end of 1 of the I-cords. Use the other tail to tie it very firmly in place. Trim the tails to blend in with the pompom. Repeat for each of the 3 other pompoms.
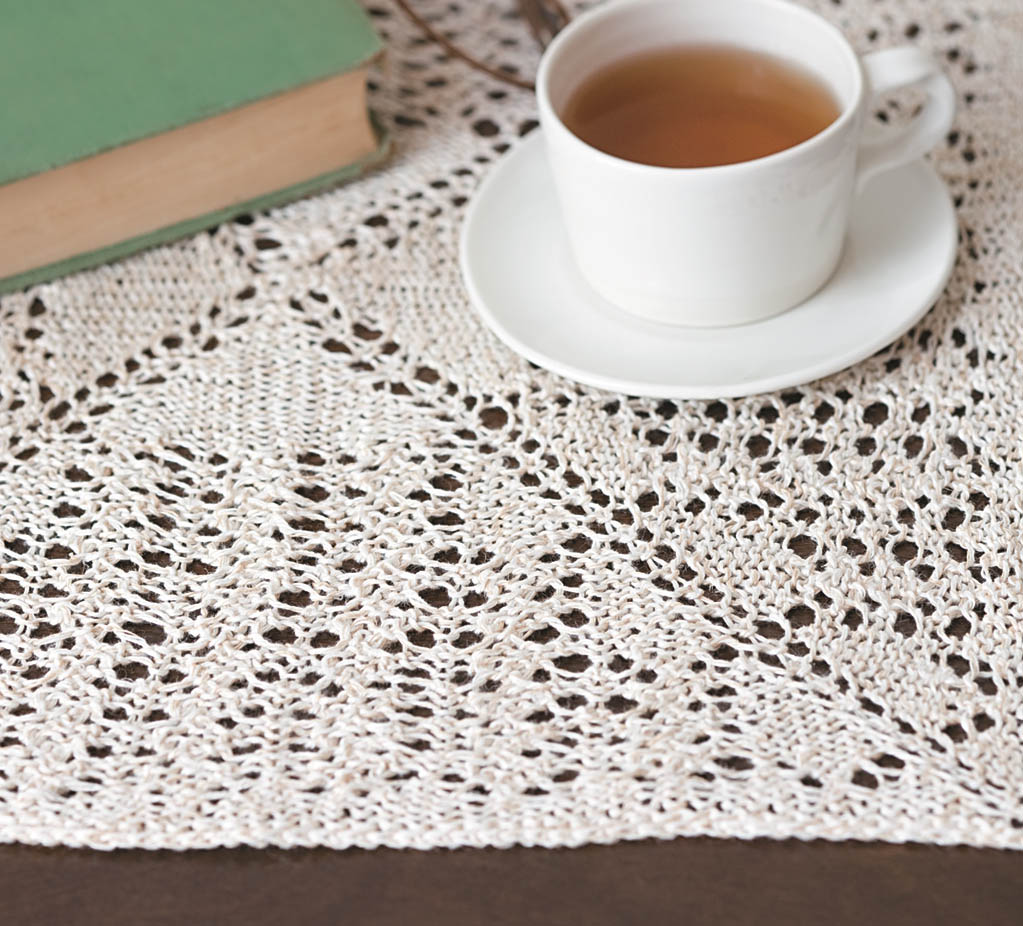
Lacy Linen Table Layer
Designed by Cheryl Oberle
The word “linen” is used for a fiber made of flax and for textiles used in the home. In this case, we have a linen linen! The cloth is started in the center and worked circularly.
- Finished Measurements: Approximately 16" (40.5 cm) square
- Yarn: Louet Sales Euroflax Sport Weight, 100% linen, 3.5 oz (100 g)/270 yds (247 m), 95 Soapstone
- Needles: US 5 (3.75 mm) circular needle 16" (40 cm) long, US 5 (3.75 mm) circular needle 24" (60 cm) long, and set of five US 5 (3.75 mm) double-point needles or size you need to obtain correct gauge
- Gauge: 18 stitches and 32 rounds = 4" (10 cm) in stockinette stitch
- Other Supplies: Stitch markers, tapestry needle
- Abbreviations: p2sso pass 2 slipped stitches over the last stitch on left needle
Casting On and Setting Up
- Note: Bamboo or wooden needles are recommended because they’re not as likely to slip as heavy metal ones.
- Using a modified circular, start as follows to cast on 8 stitches: Leaving a tail, make a large loop with the yarn, holding the yarn so the crossed area of the loop is on the top and the tail falls off to the left. With 1 double-point needle *reach inside the loop and pull the yarn coming from the ball through to the front to make a stitch, then take the needle over the top of the loop and make a yarn over. Repeat from * until you have the desired number of stitches. Cast on 1 extra stitch (9 stitches on the needle), turn and K2tog, then knit to the end of the row (8 stitches on the needle). Divide the stitches evenly onto 4 double-point needles (2 stitches per needle) and join to begin circular knitting, leaving a large hole in the center. After working several rounds of the pattern, pull on the tail to close up the loop and draw the stitches together into a perfect center.
- Round 1: K1, yo; repeat from *. You now have 16 stitches.
- Round 2: Knit.
- Round 3: [K1 (mark this stitch), yo, K3, yo] 4 times. You now have 24 stitches.
- Note: The marked stitches are the corner stitches, and the yarn over increases are worked on either side of these stitches every other round throughout the knitting. Use a distinctly colored stitch marker to indicate the beginning of the round.
- Round 4 and all even-numbered rounds: Knit
- Round 5: [K1, yo, knit to the next marked stitch, yo] 4 times. You now have 32 stitches: 4 corner stitches and 7 stitches in each section.
- Repeat Rounds 4 and 5 twelve more times. You now have 80 stitches: 4 corner stitches and 19 stitches in each section.
Beginning the Lace Pattern
- Round 1: [K1 (marked stitch), yo, pm, K1, *yo, ssk, K1, K2tog, yo, K1; repeat from * to next marked corner stitch, pm, yo] 4 times.
- Round 2 and all even-numbered rounds: Knit.
- Round 3: [K1 (marked stitch), yo, knit to marker, sm, K2, *yo, sl 2 kwise, K1, p2sso, yo, K3; repeat from * to next marker, sm, knit to next marked stitch, yo] 4 times.
- Round 5: [K1 (marked stitch), yo, knit to marker, sm, K1, *yo, ssk, K1, K2tog, yo, K1; repeat from * to next marker, sm, knit to next marked stitch, yo] 4 times.
- Round 7: [K1 (marked stitch), yo, knit to marker, sm, K2, *yo, sl 2 kwise, K1, p2sso, yo, K3; repeat from * to next marker, sm, knit to next marked stitch, yo] 4 times.
- Round 9: [K1 (marked stitch), yo, knit to marker, sm, K1, *yo, ssk, K1, K2tog, yo, K1; repeat from * to next marker, sm, knit to next marked stitch, yo] 4 times.
- Round 11: [K1 (marked stitch), yo, knit to marker, sm, K2, *yo, sl 2 kwise, K1, p2sso, yo, K3; repeat from * to next marker, sm, knit to next marked stitch, yo] 4 times.
- Round 12: Knit, removing markers from needles (these markers will be replaced on next repeat of Round 1). You now have 128 stitches: 4 corner stitches and 31 stitches in each section.)
- Rounds 13–24: Repeat Rounds 1–12 once more. You now have 176 stitches: 4 corner stitches and 43 stitches in each section.
- Rounds 25–36: Repeat Rounds 1–12 once more. You now have 224 stitches: 4 corner stitches and 55 stitches in each section.
- Round 37–40: Repeat Rounds 1–4 once more, removing markers from the needles on Round 4. You now have 240 stitches: 4 corner stitches and 59 stitches in each section.
- Round 41: [K1, yo, knit to the next marked stitch, yo] 4 times.
- Round 42: Knit.
- Round 43: [K1, yo, purl to the next marked stitch, yo] 4 times.
- Round 44: Knit.
- Last round: Turn and work around on WS, binding off loosely kwise.
Linen Bag
Designed by Cheryl Oberle
Linen fiber, made from the flax plant, is perhaps the oldest natural textile fiber known, and fragments have been found dating back to 8,000 B.C.E. It is cool to the touch and gets softer with washing. For this bag, a sport-weight linen yarn is doubled for a sturdy bag that just may last another 8,000 years! Close this bag by passing the long handle through the short handle.
- Finished Measurements: Body: 7" (18 cm) square, handle: 6.5" (16.5 cm) long
- Yarn: Louet Sales Euroflax Sport Weight, 100% linen, 3.5 oz (100 g)/270 yds (247 m), 04 Soft Coral
- Needles: US 3 (3.25 mm) straight needles or size you need to obtain correct gauge
- Gauge: 18 stitches and 32 rows = 4" (10 cm) in stockinette stitch
- Other Supplies: Tapestry needle
Preparing the Yarn
- Wind the skein into 2 equal balls. For the body of the bag, hold 1 strand from each ball and knit them together.
Knitting the Left Half of the Bag
Knitting the Front
- With 2 strands of yarn held together, cast on 20 stitches. Work in stockinette stitch, creating a pattern by randomly purling on the RS or knitting on the WS. There is no right or wrong way to do this — it all looks good! Continue until piece measures 7" (18 cm).
Knitting the Handle
- Cut 1 strand of yarn, leaving a 3" (7.5 cm) tail to be woven in later, and knit the handle with a single strand. Continue in stockinette stitch (no random patterning) for 13" (33 cm).
Knitting the Back
- Join a second strand of yarn and work the back as for the front, knitting with 2 strands together and adding a random pattern, until back measures 7" (18 cm). Bind off.
Knitting the Right Half of the Bag
- Work as for left half but knit the handle for only 7" (18 cm).
Joining the Halves
- For the front, begin at cast-on edge of left front and pick up and knit 30 stitches to top of body (just below the handle). With another needle and beginning at top of right front (just below handle), pick up and knit 30 stitches down to the cast-on edge. With WS together, join 30 stitches of left and right front with three-needle bind-off. Join at center back as for front, picking up 30 stitches along each edge and joining with three-needle bind-off.
Finishing
- Turn the bag inside out and join side seams with mattress stitch. Turn bag right-side out and sew bottom with a backstitch. Steam bag lightly.