So far, just about everything you've done with WPF has been declarative; that is, all the functionality has taken place in the XAML file. WPF is specifically designed that way, to be useful to designers as well as to developers. The only C# you've had to write so far has been some very rudimentary event handlers. In this section you're going to create an example that more closely resembles a production application, and that's going to involve a supporting class, and some event handlers.
In this example, you're going to grab the images of the first 20 presidents of the United States from the White House's website, and present them in a custom WPF control, a modified ListBox control. The control will not be wide enough to show all 20 images, so you'll provide a horizontal scroll bar, and as the user moves the mouse over an image, you'll provide feedback by enlarging that image (from 75 to 85) and increasing its opacity from 75% to 100%. As the user moves the mouse off the image, you'll return the image to its smaller, dimmer starting point.
This application will use some declarative animation, as you've already seen, although slightly subtler than the rotating square. In addition, when the user clicks on an image, you'll handle the click and display the name of the president using a C# event handler, and then you'll reach into the control and place the president's name into the title bar of the control.
Figure 19-7 shows the result of scrolling to the 16th president and clicking on the image. Note that the name of the president is displayed in the title bar and that the image of President Lincoln is both larger and brighter than the surrounding images.
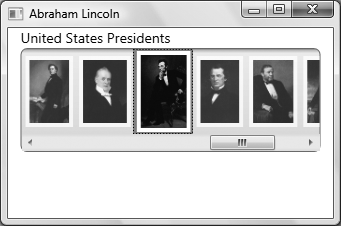
Figure 19-7. The Presidential Browser application makes use of some slightly subtler animations, but most of it still takes place in the XAML.
Create a new WPF application called Presidential Browser. Up until now, you've placed all your elements in the default Grid control that WPF provides. This time, though, you want two items in the grid—the text block that says "United States Presidents" and the sideways ListBox of photographs, so you can make use of WPF's layout elements.
In addition to the grid element, WPF provides a layout object called a stack panel. A stack panel lets you stack a set of objects one on top of (or next to) another set of objects. That turns out to be very useful for laying out your page. If you want a stack that is horizontal and vertical (essentially a table), that's what the grid element is for. A grid has columns and rows, both counting from zero.
You'll create a simple grid of two rows and one column, and inside each row you'll place a stack panel. The top stack panel will hold the text, and the bottom stack panel will hold the ListBox that will, in turn, hold the photos. We'll break this down for you and take it one step at a time.
To begin, set the width of the Window element to 330 and the height to 230. Next, give the grid some dimensions, by adding properties to the grid element. A width of 300 and a height of 190 should do it. Add the properties like this:
<Grid Width="300" Height="190" >Next, you'll need to define the rows in the grid element. That's easy enough to do with the RowDefinition element, but you'll need to put that within a <Grid.RowDefinitions> element, like this:
<Grid Width="300" Height="190">
    <Grid.RowDefinitions>
        <RowDefinition Height="20" />
        <RowDefinition Height="*" />
    </Grid.RowDefinitions>
You know that you want the first row to be a fixed 20 units high, so that number's hardcoded. The second row, though, should be whatever space is left in the grid. You could do the math yourself (and come up with 170), but the * element lets WPF do it for you.
The next things you need to add to the Grid are the two StackPanel elements. These are relatively easy: you just add the StackPanel elements inside the <Grid> tags. Inside each StackPanel, you'll add a TextBlock element, which does what it sounds like—it holds text. The TextBlock is a flexible control for displaying text, but here we're just using it to align the text in the panel. Add the following code to the XAML:
<StackPanel Grid.Row="0">
    <TextBlock FontSize="14">United States Presidents
    </TextBlock>
</StackPanel>
<StackPanel Grid.Row="1">
    <TextBlock Text="Bottom Stack Panel" VerticalAlignment="Center"/>
</StackPanel>
The first thing you need to notice here is that the rows in the grid are numbered from zero, the same as with arrays. The TextBlock element has a property for FontSize; it also has font weight and font family and the other features you might expect in a text element.
Your XAML code should now look like Example 19-6.
Example 19-6. This is the starting XAML for the Presidential Browser application, with the layout elements in place
<Window x:Class="Presidential_Browser.Window1"
    xmlns="http://schemas.microsoft.com/winfx/2006/xaml/presentation"
    xmlns:x="http://schemas.microsoft.com/winfx/2006/xaml"
    Title="Window1" Height="300" Width="300">
    <Grid Width="300" Height="190">
        <Grid.RowDefinitions>
            <RowDefinition Height="20" />
            <RowDefinition Height="*" />
        </Grid.RowDefinitions>
        <StackPanel Grid.Row="0">
            <TextBlock Text="Top Stack Panel" VerticalAlignment="Center"/>
        </StackPanel>
        <StackPanel Grid.Row="1">
            <TextBlock Text="Bottom Stack Panel" VerticalAlignment="Center"/>
        </StackPanel>
    </Grid>
</Window>Your next goal is to get the pictures into a ListBox and to turn the ListBox sideways so that the pictures scroll along, as shown previously in Figure 19-7.
To accomplish that, we need to do two things: we need to work with the style of the ListBox, and we need to work with its data. We'll take these one at a time to make it clear.
You've created a Brush as a resource before; now you'll make one for the entire Window element, in a Window.Resources section. This brush will be a LinearGradientBrush, which is a bit fancier than the Fill brush you used before. The gradient brush uses a nice shading effect that changes gradually through the colors identified in the GradientStop elements. The exact details aren't important, but you should note that we're giving this resource a name, as all resources have, so we can use it on the ListBox later. Create a Window.Resources section at the top of your XAML file, and add this code:
<Window.Resources>
    <LinearGradientBrush x:Key="ListBoxGradient"
           StartPoint="0,0" EndPoint="0,1">
        <GradientStop Color="#90000000" Offset="0" />
        <GradientStop Color="#40000000" Offset="0.005" />
        <GradientStop Color="#10000000" Offset="0.04" />
        <GradientStop Color="#20000000" Offset="0.945" />
        <GradientStop Color="#60FFFFFF" Offset="1" />
    </LinearGradientBrush>
</Window.Resources>
Briefly, all linear gradients are considered as occurring on a line ranging from 0 to 1. You can set the start points and endpoints (traditionally, the start point 0,0 is the upper-left corner and the endpoint 1,1 is the lower-right corner, making the linear gradient run on an angle). We've set the linear gradient to end at 0,1, making the gradient run from top to bottom, giving a horizontal gradient, moving through five colors, unevenly spaced.
The next resource you need to define is a Style object. We haven't specifically applied a style as a resource yet, but Style objects work like any other resource: they manage the properties of their targets, in this case, their style properties.
A difference in this case is that instead of defining a TargetName for the resource, you'll define a TargetType. That means that the style will be applied to all objects of a specific type (in this case, ListBox). Within the Style, you define a Template, which means that the style definition can be applied to objects, or modified by them. Within that, there's a set of properties defined for the Border element, most of which are pretty self-explanatory. Notice that for a background, the Border element uses the ListBoxGradient brush that you defined a moment ago.
Within the Border element is a ScrollViewer element. This element is what gives the ListBox a horizontal scroll bar, but not a vertical one. Within the ScrollViewer is another StackPanel element—this is where you'll keep the images of the presidents. The IsItemsHost property indicates that this StackPanel will hold other objects (you'll see how this works in a bit), and the Orientation and HorizontalAlignment properties simply orient the StackPanel inside the ScrollViewer.
Add the following Style within the Window.Resources element, right after the LinearGradiantBrush:
<Style x:Key="SpecialListStyle" TargetType="{x:Type ListBox}">
    <Setter Property="Template">
        <Setter.Value>
            <ControlTemplate TargetType="{x:Type ListBox}" >
                <Border BorderBrush="Gray"
                     BorderThickness="1"
                     CornerRadius="6"
                     Background="{DynamicResource ListBoxGradient}" >
                     <ScrollViewer
                         VerticalScrollBarVisibility="Disabled"
                         HorizontalScrollBarVisibility="Visible">
                            <StackPanel IsItemsHost="True"
                            Orientation="Horizontal"
                            HorizontalAlignment="Left" />
                     </ScrollViewer>
                </Border>
            </ControlTemplate>
        </Setter.Value>
    </Setter>
</Style>
The style for the ListBox that you just created contains a StackPanel that contains items. The next thing you'll do is define the style for these items. The items, you'll recall, are the images of the presidents that you're displaying. We mentioned that these images will change appearance when the user moves the mouse over them. You saw earlier in the chapter how to interact with the user's mouse movements—you'll need to define some triggers. The Triggers will reside in the Style, rather than being attached to a specific instance of a control.
This style begins by setting its target type, as the last style did (ListBoxItems), and three properties: MaxHeight, MinHeight, and Opacity. The MaxHeight and MinHeight properties have the same value, which means that the size of the items is fixed, but you'll be able to change that dynamically, as you'll see shortly. The Opacity of a control is defined as a value between 0 and 1:
<Style x:Key="SpecialListItem"
    TargetType="{x:Type ListBoxItem}">
        <Setter Property="MaxHeight"  Value="75" />
        <Setter Property="MinHeight"  Value="75" />
        <Setter Property="Opacity"    Value=".75" />
The style then sets a couple of triggers. As with the triggers you saw earlier in the chapter, these triggers associate an EventTrigger with a RoutedEvent. Specifically, the first trigger uses the MouseEnter event that you saw in an earlier example:
<EventTrigger RoutedEvent="Mouse.MouseEnter">
In this case, the event will be kicked off when the mouse enters the object that is associated with this EventTrigger (that object will be the ListBox item), as opposed to targeting a specific control as you did earlier in the chapter. Within that EventTrigger you defined an EventTrigger.Actions element. In this case, the action is BeginStoryBoard, and there is a single, unnamed Storyboard:
<EventTrigger RoutedEvent="Mouse.MouseEnter">
    <EventTrigger.Actions>
        <BeginStoryboard>
            <Storyboard>
                <DoubleAnimation Duration="0:0:0.2"
                    Storyboard.TargetProperty="MaxHeight"  To="85" />
                <DoubleAnimation Duration="0:0:0.2"
                    Storyboard.TargetProperty="Opacity" To="1.0" />
            </Storyboard>
        </BeginStoryboard>
    </EventTrigger.Actions>
</EventTrigger>
The action is inside the storyboard, where you'll find two animations. These are DoubleAnimation elements, because you're changing two properties with double values. These two animations are defined to have a duration of 2/10 of a second. The TargetProperty refers to the property of the object to be animated (that is, the ListBox item)—in the first case, the height of the ListBox item, which will be animated to a height of 85 (from a starting point of 75). The second animation will change the opacity from its starting point of .75 to 1 (making it appear to brighten). The other trigger is for the MouseLeave event, and just reverses the effects.
Here's the XAML for the entire style; add this to the Windows.Resources section:
<Style x:Key="SpecialListItem"
    TargetType="{x:Type ListBoxItem}">
        <Setter Property="MaxHeight"  Value="75" />
        <Setter Property="MinHeight"  Value="75" />
        <Setter Property="Opacity"    Value=".75" />
    <Style.Triggers>
        <EventTrigger RoutedEvent="Mouse.MouseEnter">
            <EventTrigger.Actions>
                <BeginStoryboard>
                    <Storyboard>
                        <DoubleAnimation Duration="0:0:0.2"
                            Storyboard.TargetProperty="MaxHeight"
                            To="85" />
                        <DoubleAnimation Duration="0:0:0.2"
                            Storyboard.TargetProperty="Opacity"
                            To="1.0" />
                    </Storyboard>
                </BeginStoryboard>
            </EventTrigger.Actions>
        </EventTrigger>

        <EventTrigger RoutedEvent="Mouse.MouseLeave">
            <EventTrigger.Actions>
                <BeginStoryboard>
                    <Storyboard>
                        <DoubleAnimation Duration="0:0:0.2"
                            Storyboard.TargetProperty="MaxHeight" />
                        <DoubleAnimation Duration="0:0:0.2"
                            Storyboard.TargetProperty="Opacity" />
                    </Storyboard>
                </BeginStoryboard>
            </EventTrigger.Actions>
        </EventTrigger>
    </Style.Triggers>
</Style>We're now going to cheat somewhat, and rather than getting our data from a web service or from a database, we're going to put it right into our resources. The data will consist of a generic list of ImageURL objects. You haven't heard of these types of objects before, because you're going to create the class right now. Right-click on the project file in the Solution Explorer and choose Add → Class. When the Add New Item dialog box appears, the Class item will be selected automatically. Leave it selected, and give the class file a name of PhotoCatalog.cs. Visual Studio will automatically open a new class file for you. Add the code in Example 19-7, and be sure to add the using System.Windows.Media.Imaging statement, because you'll need it, and also be sure to add the public modifier to the class name.
Example 19-7. The ImageURL class defines a new class that you'll be able to use in the XAML application namespace
using System;
using System.Collections.Generic;
using System.Windows.Media.Imaging;
namespace PhotoCatalog
{
    public class ImageURL
    {
        public string Path { get; private set; }
        public Uri ImageURI { get; set; }

        public BitmapFrame Image { get; private set; }
        public string Name { get;  set; }
        public ImageURL(  ) { }
        public ImageURL(string path, string name)
        {

            Path = path;
            ImageURI = new Uri(Path);
            Image = BitmapFrame.Create(ImageURI);
            Name = name;
        }
        public override string ToString(  )
        {
            return Path;
        }
    }

    public class Images : List<ImageURL> { }
}
You've actually created two classes here. The first class, ImageURL, is designed to act as a wrapper —that is, it'll hold the properties for an image that you retrieve given the path to an image, or a URI from which we can create an image. Note that you override ToString( ) to return the Path property, even though we haven't explicitly created the backing variable.
The second class is at the very bottom: Images derives from a generic list of ImageURL objects. The implementation is empty—all you're really doing with this class is providing an alias for List<ImageURL>.
Now that you've declared these classes, you can create instances of them in the Resources section of the XAML file—you're not limited to the types defined by the XAML namespace. However, before you can use your new type, you must first include the class in your XAML file by creating a namespace for this project. At the top of the XAML file, you'll find the other namespace declarations for this project; they all start with xmlns:. Add your own xmlns statement, and call the new namespace local, like this:
xmlns:local="clr-namespace:Presidential_Browser"
As soon as you type local=, IntelliSense will help you out with the rest of the namespace. You'll probably notice an error message in the Design window at that point, and you'll need to reload the designer. Go ahead and do that, and everything will be fine.
Now that you have the local namespace, you can create an instance of the Images class in the Window.Resources section, like this:
<local:Images x:Key="Presidents"></local:Images>
This is the XAML equivalent of writing:
List<ImageURL> Presidents = new List<ImageURL>( );
You then add to that list by creating instances of ImageURL between the opening and closing tags of the Images declaration:
<local:ImageURL ImageURI="http://www.whitehouse.gov/history/presidents/images/
gw1.gif" Name="George Washington" />
Again, this is the XAML equivalent of writing:
ImageURL newImage = new ImageURL(
     "http://www.whitehouse.gov/history/presidents/images/gw1.gif,"
     "George Washington");
Presidents.Add(newImage);
You'll need to do that 20 times, once for each of the first 20 presidents. The URL is somewhat long, so you might want to cut and paste it, or you can download the code listing for this chapter from http://www.oreilly.com and cut and paste that part. Now you have a static data resource you can refer to in the rest of your XAML file; and that completes the Resources section.
Now that you've defined the resource, the next step is to provide a way for the Grid element to access the data in that resource. To do that, provide a DataContext for the Grid:
<Grid Width="300" Height="190"
    DataContext="{StaticResource Presidents}">
Every Framework object has a DataContext object, usually null. If you don't instruct the object otherwise, it will look up the object hierarchy from where it is defined until it finds an object that does have a DataContext defined, and then it will use that DataContext as its data source. You can use virtually anything as a DataContext—a database, an XML file, or, as in this case, a static resource.
Now that you've got all the resources in place, you're finally ready to define the ListBox and the template for its contents in the second StackPanel. The first thing you need to do is set some of the properties for the ListBox element:
<StackPanel Grid.Row="1" Grid.ColumnSpan="3" >
  <ListBox Style="{StaticResource SpecialListStyle}"
      Name="PresPhotoListBox" Margin="0,0,0,20"
      SelectionChanged="PresPhotoListBox_SelectionChanged"
      ItemsSource="{Binding }"
      IsSynchronizedWithCurrentItem="True" SelectedIndex="0"
      ItemContainerStyle="{StaticResource SpecialListItem}" >
The first line shown here places the stack panel into the grid at row offset 1 (the second row). The ListBox itself has its style set to a StaticResource (the SpecialListStyle resource you defined earlier in the Resources section). The ListBox is named:
Name="PresPhotoListBox"
And an event handler is defined for anytime an image is clicked:
SelectionChanged="PresPhotoListBox_SelectionChanged"
The source for each item is set to Binding, indicating that you're binding to the source in the parent element (which you just defined in the Grid element's DataContext property). Finally, the ItemContainerStyle is set, again, to the style defined earlier in the Resources section.
Each item in the ListBox will be drawn from the (unknown) number of items in the data (which in this case happens to be statically placed in the Resources, but could well be dynamically drawn from a web service). To do this, we'll need a template for how to draw each item. Add the following code as a subelement of the ListBox element:
<ListBox.ItemTemplate>
    <DataTemplate>
        <Border VerticalAlignment="Center"
           HorizontalAlignment="Center" Padding="4"
           Margin="2" Background="White">
            <Image Source="{Binding Path=ImageURI}" />
        </Border>
    </DataTemplate>
</ListBox.ItemTemplate>
Within the ListBox.ItemTemplate, you place a DataTemplate; this is necessary if you want to show anything more than simple text derived from the data retrieved. In this case, you place a Border object within the DataTemplate, and within the Border object you place the Image object. It is the Image object you really care about (though the Border object helps with placement). The Image requires a source; here, you add Binding (indicating that you are binding to the current source), and you state that you'll be using the ImageURI property to set the Path. Because the source you're binding to is a list of ImageURL objects, and each ImageURL has four public properties (Path, ImageURI, Image, and Name), this is the critical piece of data required to tell the DataTemplate how to get the information necessary to create the image in the ListBox.
Except for defining the ImageURL class, everything you've done so far in this example has been done declaratively, in the XAML file. Now it's finally time to write some C# in this example. You may have noticed that you did create an event handler for when the user changes the selected item in the ListBox:
SelectionChanged="PresPhotoListBox_SelectionChanged"
This is typically done by clicking on an image (though you can accomplish this with the arrow keys as well). This event will fire the event handler in the code-behind file, which is, finally, C#.
The event handler is, as you would expect, in the code-behind file, Window1.xaml.cs. Switch to that file now, and add the following event handler:
private void PresPhotoListBox_SelectionChanged(
           object sender, SelectionChangedEventArgs e)
{
    ListBox lb = sender as ListBox;
    if (lb != null)
    {
        if (lb.SelectedItem != null)
        {
            string chosenName =
                 (lb.SelectedItem as ImageURL).Name.ToString(  );
            Title = chosenName;

        }
    }
    else
    {
        throw new ArgumentException(
                "Expected ListBox to call selection changed in
                PresPhotoListBox_SelectionChanged");
    }
}
Like all event handlers in .NET, this handler receives two parameters: the sender (in this case, the ListBox) and an object derived from EventArgs.
In the code shown, you cast the sender to the ListBox type (and consider it an exception if the sender is not a ListBox, as that is the only type of object that should be sending to this event handler).
You then check to make sure that the selectedItem is not null (during startup it is possible that it can be null). Assuming it is not null, you cast the selectedItem to an ImageURL, extract the Name property, and assign it to a temporary variable, chosenName, which we then in turn assign to the title of the window.
The interim variable is useful only for debugging; there is no other reason not to write:
Title = (lb.SelectedItem as ImageURL).Name.ToString( );
If you're not sitting in front of your computer right now, Example 19-8 has the complete XAML listing. Please replace the ellipses (…) in the URLs in this listing with:
"http://www.whitehouse.gov/history/presidents/images
We omitted this long URL from the listing to save space.
Example 19-8. Here is the complete XAML listing for the Presidential Browser application
<Window x:Class="Presidential_Browser.Window1"
   xmlns="http://schemas.microsoft.com/winfx/2006/xaml/presentation"
   xmlns:x="http://schemas.microsoft.com/winfx/2006/xaml"
   xmlns:local="clr-namespace:Presidential_Browser"
   Title="Window1" Height="300" Width="300">
   <Window.Resources>
      <LinearGradientBrush x:Key="ListBoxGradient"
         StartPoint="0,0" EndPoint="0,1">
         <GradientStop Color="#90000000" Offset="0" />
         <GradientStop Color="#40000000" Offset="0.005" />
         <GradientStop Color="#10000000" Offset="0.04" />
         <GradientStop Color="#20000000" Offset="0.945" />
         <GradientStop Color="#60FFFFFF" Offset="1" />
      </LinearGradientBrush>
      <Style x:Key="SpecialListStyle" TargetType="{x:Type ListBox}">
         <Setter Property="Template">
            <Setter.Value>
               <ControlTemplate TargetType="{x:Type ListBox}" >
                  <Border BorderBrush="Gray"
                          BorderThickness="1"
                          CornerRadius="6"
                          Background=
                            "{DynamicResource ListBoxGradient}" >
                     <ScrollViewer
                         VerticalScrollBarVisibility="Disabled"
                         HorizontalScrollBarVisibility="Visible">
                        <StackPanel IsItemsHost="True"
                                    Orientation="Horizontal"
                                    HorizontalAlignment="Left" />
                     </ScrollViewer>
                  </Border>
               </ControlTemplate>
            </Setter.Value>
         </Setter>
      </Style>
      <Style x:Key="SpecialListItem"
             TargetType="{x:Type ListBoxItem}">
         <Setter Property="MaxHeight"  Value="75" />
         <Setter Property="MinHeight"  Value="75" />
         <Setter Property="Opacity"    Value=".75" />
         <Style.Triggers>
            <EventTrigger RoutedEvent="Mouse.MouseEnter">
               <EventTrigger.Actions>
                  <BeginStoryboard>
                     <Storyboard>
                        <DoubleAnimation Duration="0:0:0.2"
                           Storyboard.TargetProperty="MaxHeight"
                           To="85" />
                        <DoubleAnimation Duration="0:0:0.2"
                           Storyboard.TargetProperty="Opacity"
                           To="1.0" />
                     </Storyboard>
                  </BeginStoryboard>
               </EventTrigger.Actions>
            </EventTrigger>

            <EventTrigger RoutedEvent="Mouse.MouseLeave">
               <EventTrigger.Actions>
                  <BeginStoryboard>
                     <Storyboard>
                        <DoubleAnimation Duration="0:0:0.2"
                           Storyboard.TargetProperty="MaxHeight" />
                        <DoubleAnimation Duration="0:0:0.2"
                           Storyboard.TargetProperty="Opacity" />
                     </Storyboard>
                  </BeginStoryboard>
               </EventTrigger.Actions>
            </EventTrigger>
         </Style.Triggers>
      </Style>
      <local:Images x:Key="Presidents">
         <local:ImageURL ImageURI=".../gw1.gif" Name="George Washington" />
         <local:ImageURL ImageURI=".../ja2.gif" Name="John Adams" />
         <local:ImageURL ImageURI=".../tj3.gif" Name="Thomas Jefferson" />
         <local:ImageURL ImageURI=".../jm4.gif" Name="James Madison" />
         <local:ImageURL ImageURI=".../jm5.gif" Name="James Monroe" />
         <local:ImageURL ImageURI=".../ja6.gif" Name="John Quincy Adams" />
         <local:ImageURL ImageURI=".../aj7.gif" Name="Andrew Jackson" />
         <local:ImageURL ImageURI=".../mb8.gif" Name="Martin Van Buren" />
         <local:ImageURL ImageURI=".../wh9.gif" Name="William H. Harrison" />
         <local:ImageURL ImageURI=".../jt10_1.gif" Name="John Tyler" />
         <local:ImageURL ImageURI=".../jp11.gif" Name="James K. Polk" />
         <local:ImageURL ImageURI=".../zt12.gif" Name="Zachary Taylor" />
         <local:ImageURL ImageURI=".../mf13.gif" Name="Millard Fillmore" />
         <local:ImageURL ImageURI=".../fp14.gif" Name="Franklin Pierce" />
         <local:ImageURL ImageURI=".../jb15.gif" Name="James Buchanan" />
         <local:ImageURL ImageURI=".../al16.gif" Name="Abraham Lincoln" />
         <local:ImageURL ImageURI=".../aj17.gif" Name="Andrew Johnson" />
         <local:ImageURL ImageURI=".../ug18.gif" Name="Ulysses S. Grant" />
         <local:ImageURL ImageURI=".../rh19.gif" Name="Rutherford B. Hayes" />
         <local:ImageURL ImageURI=".../jg20.gif" Name="James Garfield" />
      </local:Images>

   </Window.Resources>
   <Grid Width="300" Height="190"
         DataContext="{StaticResource Presidents}">
      <Grid.RowDefinitions>
         <RowDefinition Height="20" />
         <RowDefinition Height="*" />
      </Grid.RowDefinitions>
      <StackPanel Grid.Row="0">
         <TextBlock FontSize="14" Grid.Row="0" >
             United States Presidents</TextBlock>
      </StackPanel>
      <StackPanel Grid.Row="1" Grid.ColumnSpan="3" >
           <ListBox Style="{StaticResource SpecialListStyle}"
                   Name="PresPhotoListBox" Margin="0,0,0,20"
                   SelectionChanged="PresPhotoListBox_SelectionChanged"
                   ItemsSource="{Binding }"
                   IsSynchronizedWithCurrentItem="True"
                   SelectedIndex="0"
                   ItemContainerStyle=
                         "{StaticResource SpecialListItem}" >
             <ListBox.ItemTemplate>
                <DataTemplate>
                   <Border VerticalAlignment="Center"
                           HorizontalAlignment="Center"
                           Padding="4" Margin="2" Background="White">
                      <Image Source="{Binding Path=ImageURI}" />
                   </Border>
                </DataTemplate>
            </ListBox.ItemTemplate>
         </ListBox>
      </StackPanel>
   </Grid>
</Window>
Run the application now, and you should see that it looks like Figure 19-7 (shown previously). The individual images animate when you mouse over them, and clicking one changes the title bar of the window to show the president's name.