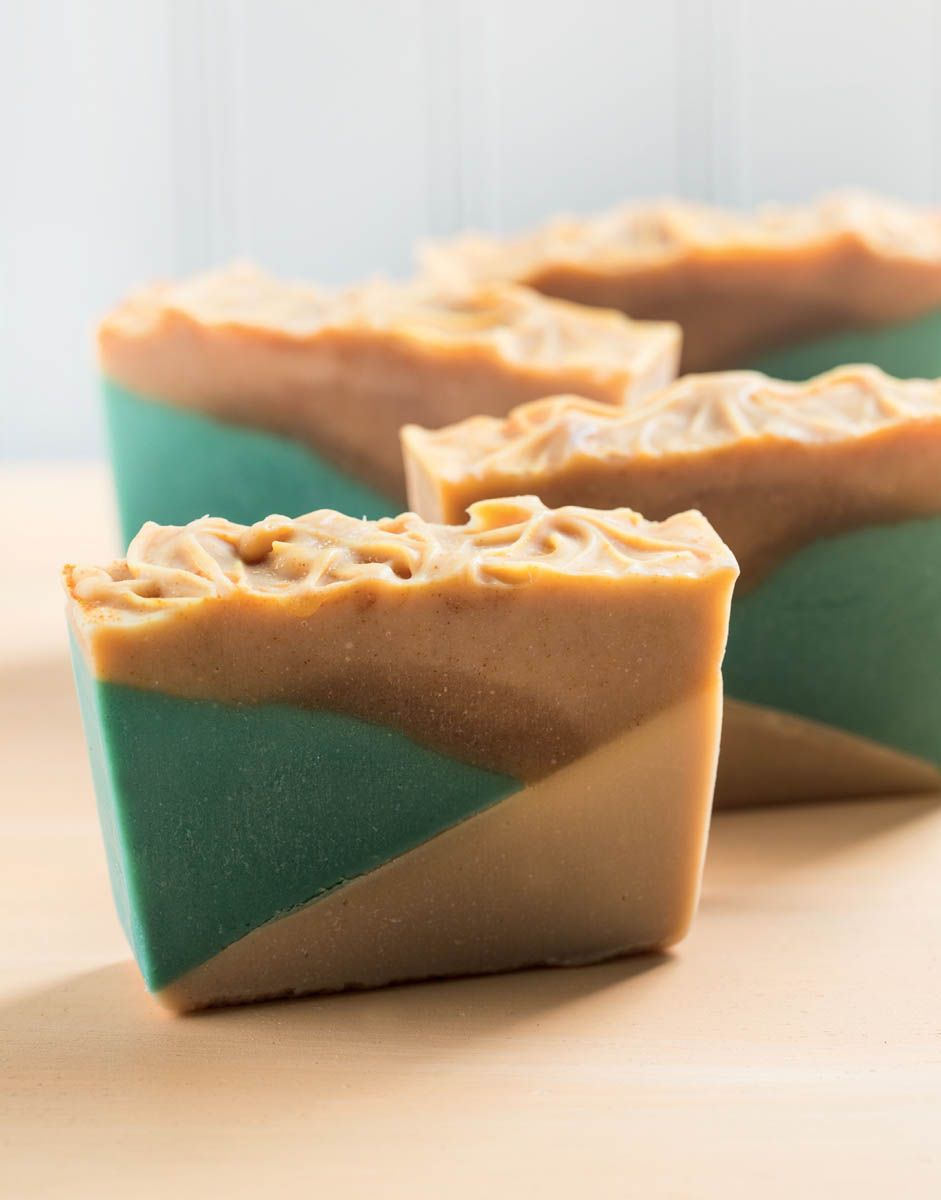
Angled-Pour Beer Bars
This soap is made in three stages. To achieve the angled look of this design, each layer of soap needs time to harden enough to withstand the shifting angle of the mold. To do that, you need to make three separate batches from start to finish to allow each previous layer time to set up fully. This recipe also uses fragrance-oil discoloration as a design element. The beer adds to a dense, foamy lather.
Note that we still refer to the lye-liquid combination as lye-water, even though the recipe substitutes beer for water.
Approximately 12 bars
Stage 1: Make the First Layer
Ingredients & Equipment
Lye-Water Amounts
- 1.5 ounces sodium hydroxide (lye)
- 3.6 ounces boiled beer (start with 16 ounces; see page 142)
Tip: A dark beer will affect the color of your soap, so use a blonde beer to allow the design to stand out more.
Base Ingredient Amounts
- 3.3 ounces palm oil
- 2.9 ounces coconut oil (76°F)
- 0.2 ounce castor oil
- 0.6 ounce sunflower oil
- 3.7 ounces canola oil
- 0.3 ounce shea butter (refined)
Fragrance
- 0.75 ounce Honey Ale fragrance oil
Equipment
- Standard equipment (see list on page 21)
- 3-pound plastic loaf mold
- A cutting board or other implement about 1" thick for propping the mold
Soap Safely!
- Work in a well-ventilated area. Do not breathe any fumes!
- Wear long sleeves, long pants, and closed-toe shoes.
- Don safety goggles (regular glasses are not sufficient protection) and rubber gloves during the entire soapmaking process.
- Keep children and pets away from your workspace.
Instructions
Prepare the Mold
Prop a soap cutter or other implement under one of the long sides of the mold so that when soap is poured it will fill the opposite side of the mold only.
Boil the Beer
Before you can safely add lye to beer, you need to remove the alcohol and the carbonation, both of which can react with the lye and cause a bubbly volcano effect. To do so, boil the beer for about 15 minutes, watching it carefully the entire time so it doesn’t foam over.
Half or more of the volume of the beer will be lost during the boil, so start with more than enough to cover the recipe requirements. The 16 ounces of beer called for in this recipe yields the 7.2 ounces that is split between the first two batches.
Once the beer has boiled for 15 minutes, refrigerate it uncovered overnight to ensure that as much of the carbonation and alcohol is lost as possible. Pull the beer out of the fridge at least an hour before you begin making the soap to bring it back to room temperature.
Make the Soap Mixture
- 1. Add the lye to the boiled beer (never the other way around) a little bit at a time, stir gently, and set aside until clear.
- 2. Melt the palm oil in its original container, mix it thoroughly, and measure into a bowl large enough to hold all the oils and the lye-water with room for mixing. Melt and measure the coconut oil and add it to the bowl. Add the castor, sunflower, and canola oils. Add the shea butter to the warm oils and stir until melted.
- 3. When the oils and the lye-water are both below 120°F, add the lye-water to the oils, pouring it over a spatula or the shaft of the stick blender to minimize air bubbles. Tap the stick blender a couple of times against the bottom of the bowl to release any air trapped in the blades. Do not turn on the stick blender until it is fully immersed. Stick-blend until light trace (the consistency of a melted milkshake) is achieved, 1 to 2 minutes.
- 4. Add the Honey Ale fragrance oil and stick-blend to a medium trace (the consistency of cake batter).
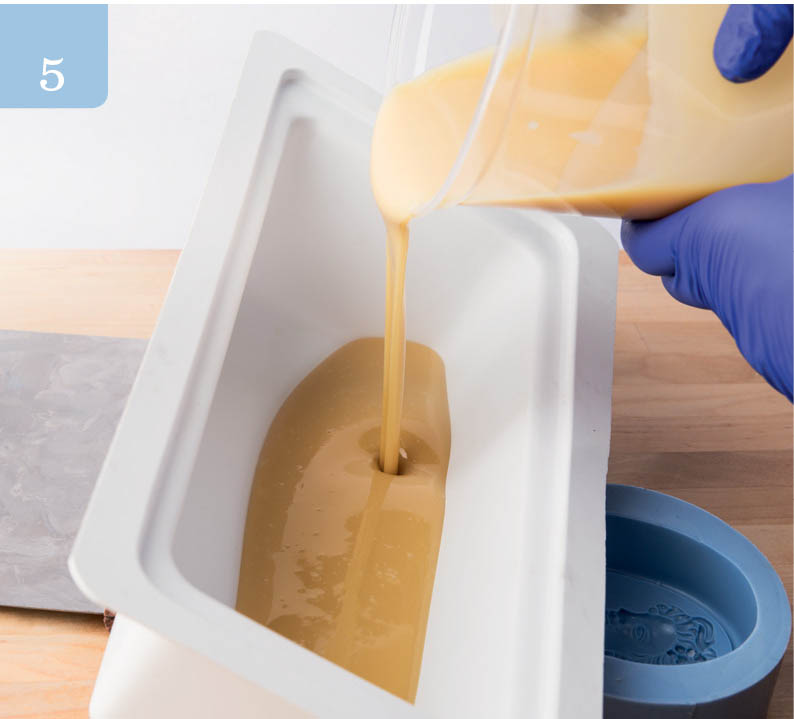
Pour the First Layer
- 5. Pour the soap into the mold, being sure to aim at the edge opposite to the one that is elevated. Leave the soap at an angle and proceed to Stage 2.
Stage 2: Make the Second Layer
Ingredients & Equipment
Lye-Water Amounts
- 1.5 ounces sodium hydroxide (lye)
- 3.6 ounces boiled beer (see previous page)
Base Ingredient Amounts
- 3.3 ounces palm oil
- 2.9 ounces coconut oil (76°F)
- 0.2 ounce castor oil
- 0.6 ounce sunflower oil
- 3.7 ounces canola oil
- 0.3 ounce shea butter (refined)
Colorant
- 1⁄2 teaspoon Hydrated Chrome Green Oxide
- 1⁄2 tablespoon sunflower oil (or other liquid oil)
Fragrance
- 0.75 ounce Lemon Earl Grey fragrance oil
Equipment
- Standard equipment (see list on page 21)
- Mini-mixer
Instructions
Prepare the colorant
Prior to starting the soapmaking process, mix the Hydrated Chrome Green Oxide in the sunflower oil, using the mini-mixer. Push the powder under the surface of the oil with the tip of the blade to saturate the powder before you begin or you’ll stir up a messy cloud of pigment. Mix the colorant thoroughly for the most even color results.
Make the Soap Mixture
- 1. Add the lye to the boiled beer (never the other way around) a little bit at a time, stir gently, and set aside until clear.
- 2. Melt the palm oil in its original container, mix it thoroughly, and measure into a bowl large enough to hold all the oils and the lye-water with room for mixing. Melt and measure the coconut oil and add it to the bowl. Add the castor, sunflower, and canola oils. Add the shea butter to the warm oils and stir until melted.
- 3. When the oils and the lye-water are both below 120°F, add the lye-water to the oils, pouring it over a spatula or the shaft of the stick blender to minimize air bubbles. Tap the stick blender a couple of times against the bottom of the bowl to release any air trapped in the blades. Do not turn on the stick blender until it is fully immersed. Stick-blend until light trace (the consistency of a melted milkshake) is achieved, 1 to 2 minutes.
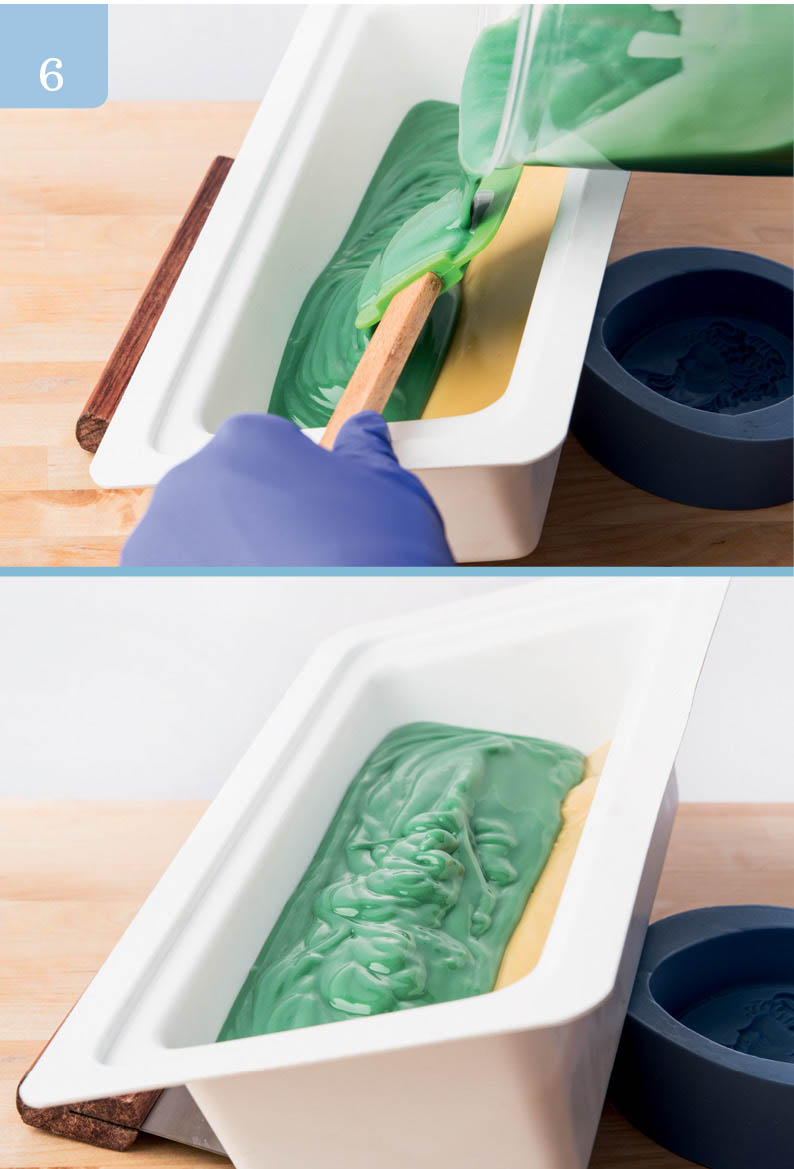
- 4. Add the Hydrated Chrome Green Oxide mixture to the soap and stir well. Add the Lemon Earl Grey fragrance oil and stick-blend to a medium trace (the consistency of cake batter).
Pour the Second Layer
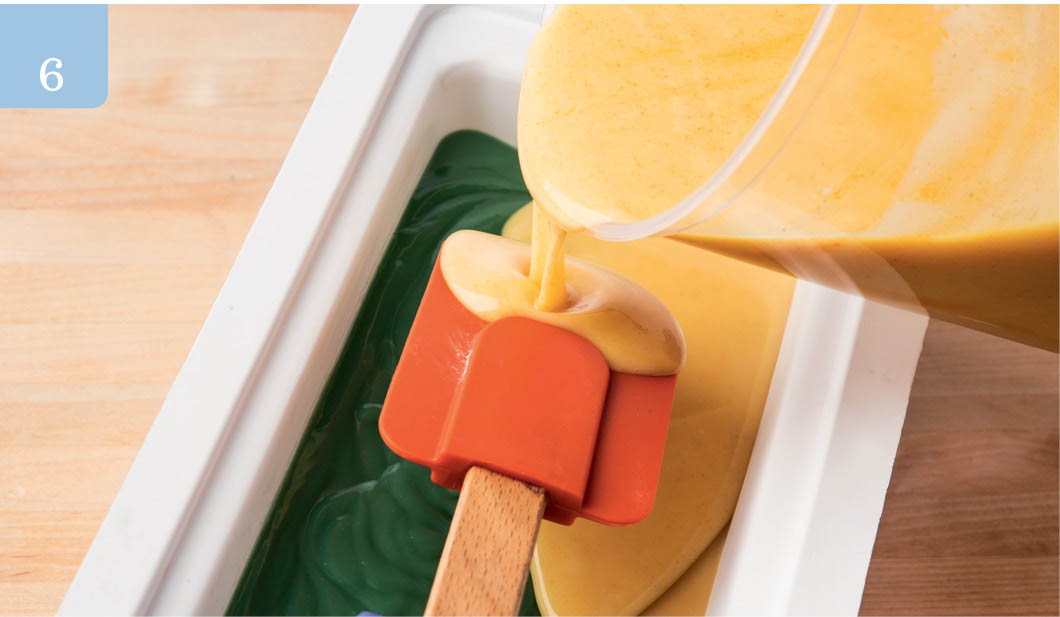
- 5. Carefully change the angle of the mold by moving the prop to the other side. It takes 5 to 10 minutes for the first layer to set up, so making the second batch should allow time for the first batch to harden enough to withstand this move, but do work cautiously. It’s important to make the layers one right after the other so that the batches stick to each other.
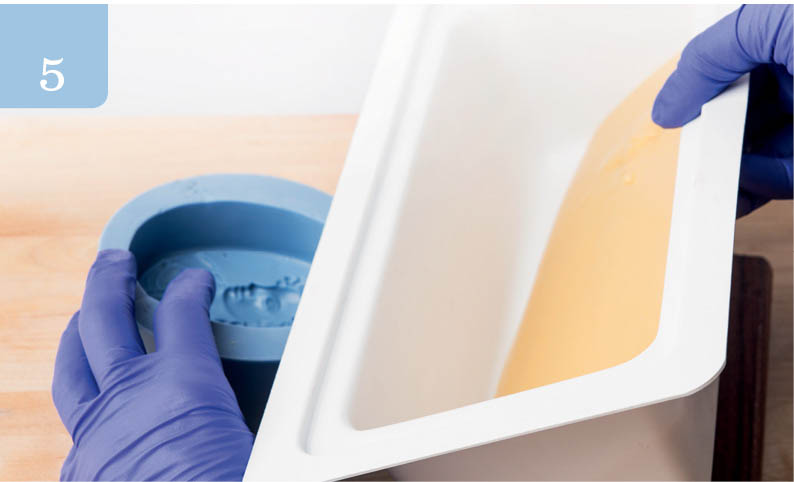
- 6. Pour the soap into the mold, aiming at the edge opposite to the one that is elevated. Pour close to the mold or over a spatula to prevent breaking through the first layer. Leave mold at an angle.
Stage 3: Make the Final Layer
Ingredients & Equipment
Lye-Water Amounts
- 2.0 ounces sodium hydroxide (lye)
- 4.6 ounces distilled water (you can use boiled beer, but water is recommended for a more neutral color)
Base Ingredient Amounts
- 4.2 ounces palm oil
- 3.6 ounces coconut oil (76°F)
- 0.3 ounce castor oil
- 0.7 ounce sunflower oil
- 4.8 ounces canola oil
- 0.4 ounce shea butter (refined)
Colorant
- 6 mL diluted Canary LabColor
- 11⁄2 teaspoons + 1⁄4 teaspoon lemon peel powder (found in grocery stores or online)
Fragrance
- 0.75 ounce Lemongrass essential oil
Equipment
- Standard equipment (see list on page 21)
Instructions
Make the Soap Mixture
- 1. Add the lye to the water (never the other way around), stir gently, and set aside until clear.
- 2. Melt the palm oil in its original container, mix it thoroughly, and measure into a bowl large enough to hold all the oils and the lye-water with room for mixing. Melt and measure the coconut oil and add it to the bowl. Add the castor, sunflower, and canola oils. Add the shea butter to the warm oils and stir until melted.
- 3. When the oils and the lye-water are both below 120°F, add the lye-water to the oils, pouring it over a spatula or the shaft of the stick blender to minimize air bubbles. Tap the stick blender a couple of times against the bottom of the bowl to release any air trapped in the blades. Do not turn on the stick blender until it is fully immersed. Stick-blend until light trace (the consistency of a melted milkshake) is achieved, about 2 minutes.
- 4. Add the Canary LabColor and 11⁄2 teaspoons Lemon Peel Powder to the soap and mix well. Add the Lemongrass essential oil and stick-blend to a medium trace (the consistency of cake batter).
Pour the Final Layer
- 5. Slowly and carefully remove the prop and allow the mold to lie flat (as it normally would). Making this third batch should allow the first and second batches enough time to harden and withstand this move, but do work cautiously. As noted before, it’s important to make the layers one right after the other.
- 6. Pour the soap into the mold over a spatula held close to the soap to avoid breaking through the first layers. Once all of the soap is in the mold, gently tamp the mold on the work surface to remove any air bubbles.
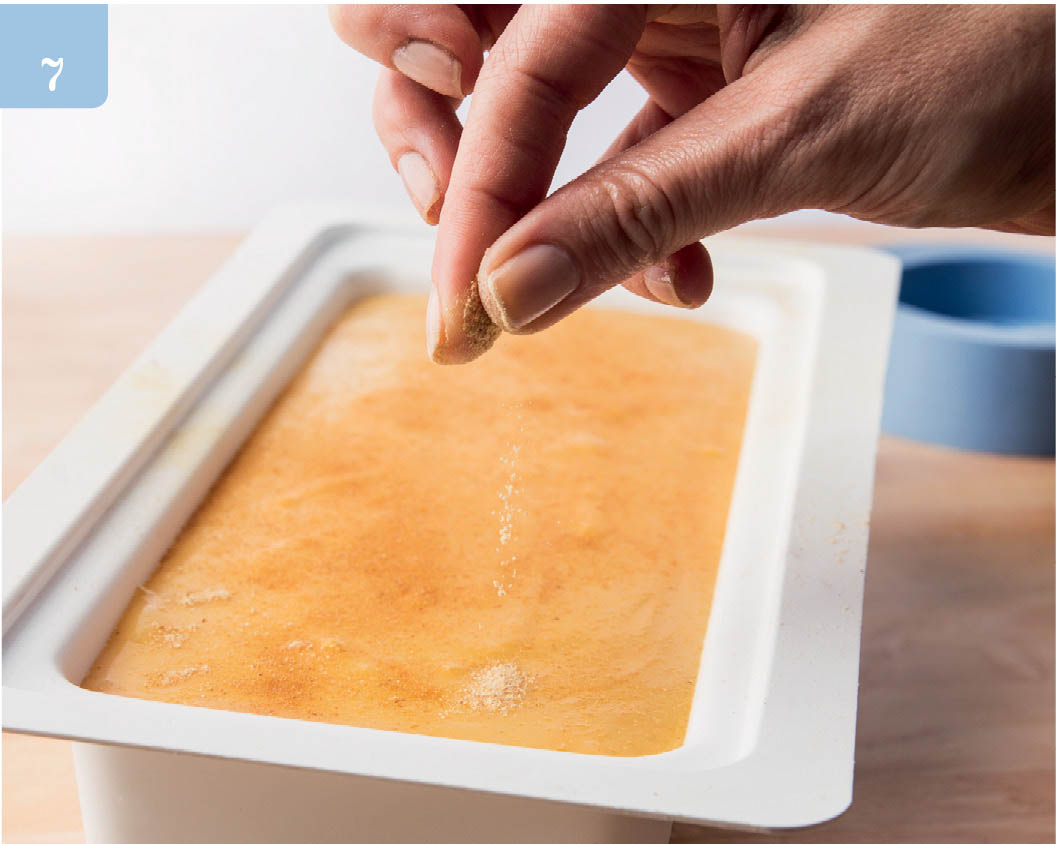
- 7. Sprinkle the lemon peel powder over the surface of the soap. Take a deep breath, close your eyes, and blow over the top of the soap. The pressure from your breath will ensure that the entire surface of the soap is coated nicely with this subtle color.
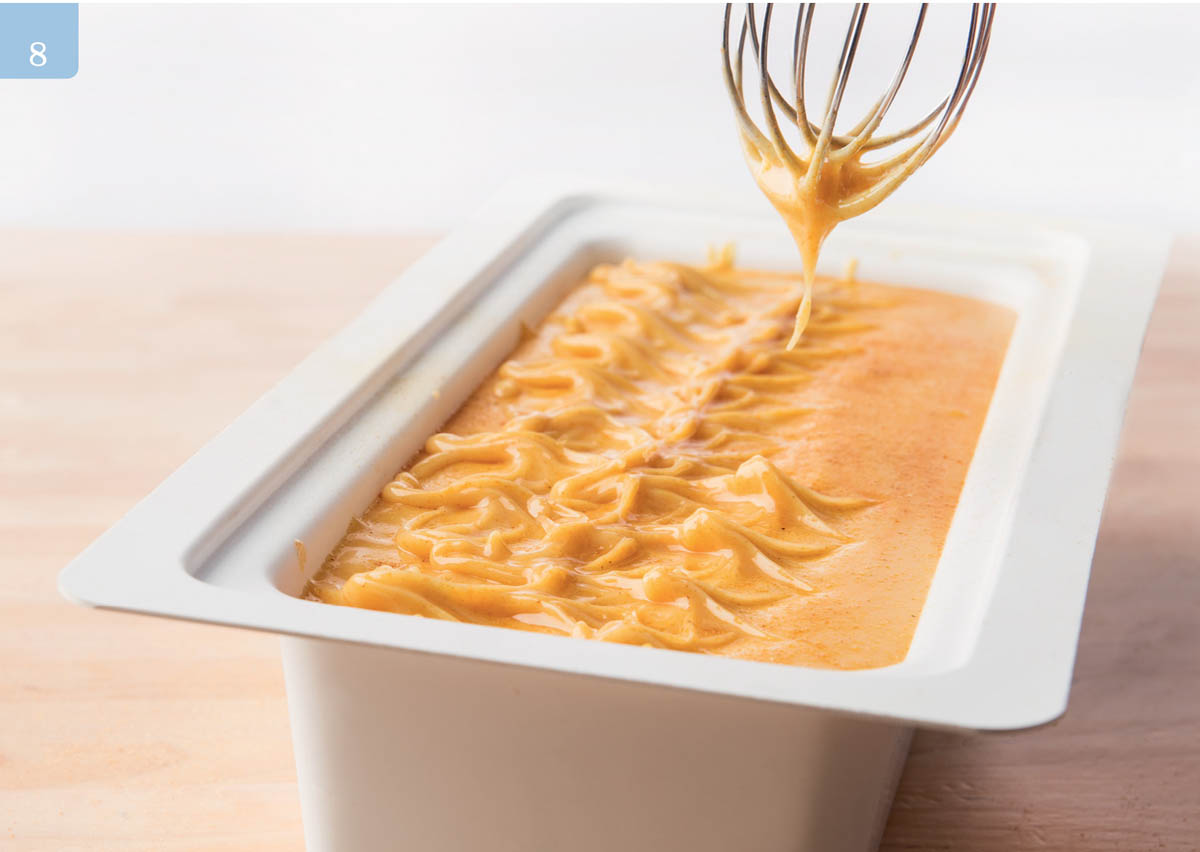
- 8. For visual interest, create peaks in the top of the soap by dipping the tip of a whisk into the soap.
Final Steps
- 9. To help decrease soda ash formation, spray the entire surface with 91% isopropyl rubbing alcohol two or three times over a 90-minute period, then cover the mold with either plastic wrap or a lid fashioned out of cardboard.
- 10. Insulate the entire mold by wrapping it in a large towel and set it aside for at least 24 hours at room temperature before unmolding. Unmold within 4 days.
Tip: If the soap peaks over the top of the mold, fold a piece of cardboard in half and create a tent over the mold, then drape the towel over the cardboard.
- 11. Cut the soap into bars and allow to cure in a well-ventilated area for 4 to 6 weeks, turning the bars over every few days to ensure that they cure evenly.