Doorknocker
Keirsten Giles

Materials
24- or 26-gauge copper sheet
6" (15 cm) of 12-gauge copper wire
12" (30.5 cm) of 20-gauge copper wire
18" (45.5 cm) of 24-gauge copper wire
2 copper 5⁄32" × 3⁄32" (4 × 2.4 mm) eyelets
2 amber 7×12mm oval beads
2 dark topaz 4mm faceted round Czech fire-polished beads
Tools
Metal shears
Metal file
Butane micro torch
Annealing pan with pumice stone
Fireproof work surface (cookie sheet)
Utility pliers
Quenching bowl
Pickle
Mini crock
Copper tongs
0000 steel wool
Brass texture sheet or coin
Painter’s tape
Heavy utility hammer
Steel bench block
Ultrafine sandpaper
Large bail-forming pliers (9 mm)
Chain-nose pliers
Flat-nose pliers
Chasing hammer
Ruler
Fine-point Sharpie marker
Stepped forming pliers (1.75–8 mm)
Round-nose pliers
Bent-nose pliers
2-hole screw-down punch
Round needle file
Center punch or flare tool
Flush cutters
Liver of sulfur
Rotary tumbler
Mixed stainless steel shot
Finished length
215⁄16" (7.5 cm)
1. Using the Doorknocker template (see Templates), cut two pieces from the copper sheet with metal shears and file the edges smooth. Anneal, quench, and pickle the pieces. Dry, then clean them with steel wool.
2. Texture the pieces with brass texture sheets or coins (see Coins + Patterned Sheet). Anneal again, quench, pickle, dry, and clean with steel wool. Clean up any irregularities in the edges caused by the texturing process with a metal file and ultrafine sandpaper.
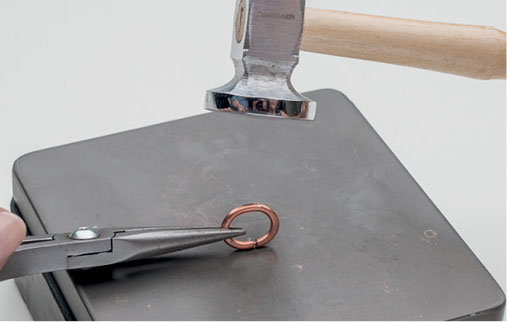
3. Using the 9 mm barrel of the large bail-forming pliers, create 2 rings from the 12-gauge copper wire. Flatten the rings slightly on the bench block with the chasing hammer, then form them into elongated ovals. Grasp each ring with chain-nose pliers at the 9 o’clock position (or 3 o’clock position if you are left-handed), with the seam at the 6 o’clock position, and lightly tap with the chasing hammer, on a bench block, until the shape starts to flatten into an oval (Figure 1). To keep the oval from being lopsided, turn the ring around, grasp it again at 9 o’clock, and hammer a little more in the same way. Keep flattening until the inner diameter is about 12 mm, just big enough to slide over the wider end of the piece. If the cut ends of the jump ring have opened or curled, squeeze them at the seam with chain-nose pliers to straighten them out again. It will eventually be slightly straighter across the top and rounder across the bottom.
Figure 1
4. When the ovals are the right shape and size, check the seams. If the seams are open, stand the ring on its side on the bench block and tap each end lightly with the hammer until the join comes together again.
5. Draw a line with the Sharpie across the textured side of the bottom of each metal piece, 10 mm from the bottom edge. With the textured side of the piece facing you, using the 2 mm barrel of the stepped forming pliers, curl each piece up toward you at the line to form a U shape (Figure 2). Make sure the two pieces are still even with each other.

Figure 2
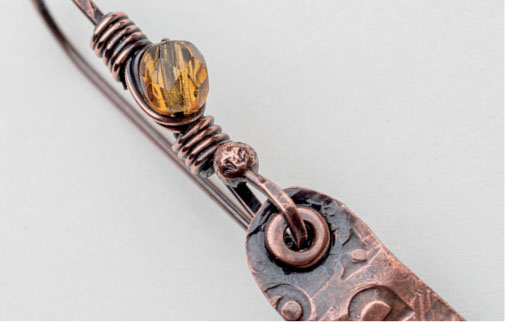
6. Slide an oval ring into the curl, with the seam of the ring hidden inside. With round- or bent-nose pliers, continue to curl the metal in toward the body of the piece. Curl both sides evenly with pliers. Tighten each curl with flat-nose pliers. When the curls are completely tightened, the oval rings will not move (Figure 3). Make sure the earrings are still even with each other.
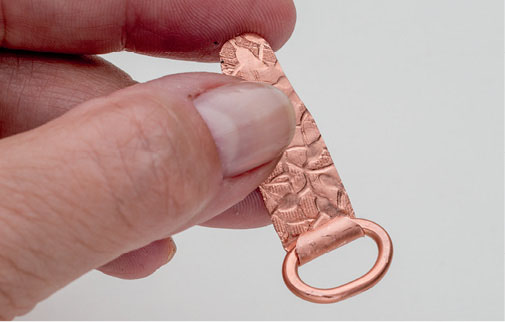
Figure 3
7. Using the Sharpie, make a mark at the top of each piece for the eyelets, centering the marks 3 mm from the top. Use the 3⁄32" (2.4 mm) punch of the 2-hole screw-down hole punch to make holes for the eyelets. If the holes are a little small, use the round needle file to expand them slightly. Insert the eyelets and flare the tube (see Riveting with a Tube Rivet + Eyelet).
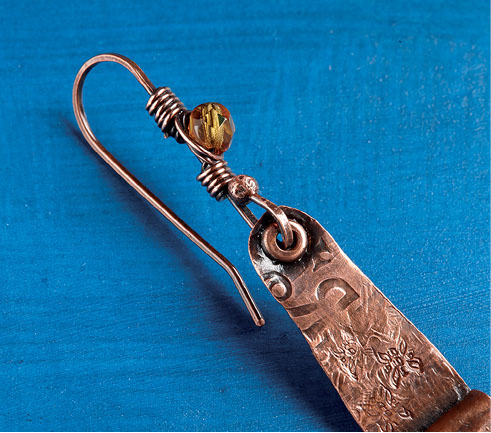
8. Using the 20-gauge wire, make four 3" (7.5 cm) ball-end head pins (see Balling the End of Wire). Thread an oval bead onto a head pin and attach it to the bottom of one earring with a wrapped loop; repeat for the other earring.
9. With the chasing hammer, slightly flatten about 1" (2.5 cm) of the shaft of each remaining head pin starting from the ball end. The flattened shape of the shaft will hold the wire wrap in place better than a round shape. Using the 2 mm barrel of the stepped forming pliers, grasp the head pin just under the ball and bend it into a U shape; repeat for the other ear wire. Make sure both U shapes are even with each other. Attach the ear wires to the top of the earrings.
10. Using 9" (23 cm) of 24-gauge copper wire and leaving a 2" (5 cm) tail at the bottom, wrap the wire four times around the base of the head pin, just above where the ball is.
11. Thread a 4mm bead onto the longer wire as close to the head pin as you can. Holding the bead in place against the head pin, wrap the wire twice around the head pin, above the bead. Wrap the wire in a circle around the bead twice. Then, wrap the head pin five more times above the bead, wrapping over the existing wraps. Trim the wire on the back and pinch in the end with chain-nose pliers.
12. Wrap the 2" (5 cm) tail at the bottom of the bead over the first wraps a few times, completing a double wrap on the bottom of the bead as well. Trim the excess wire and pinch in the end.
13. With one earring facing you, grasp the head pin just above the wrapped bead with the 7 mm barrel of the stepped forming pliers. Make sure the beaded portion of the head pin is flush against the barrel of the pliers, then bend the head pin over the pliers to create the ear wire. Make sure the ear wires are identical, adjusting as necessary, and making sure each earring hangs at the same length.
14. Oxidize the earrings with liver of sulfur and tumble to polish.
Resources
Copper sheet and wire: monsterslayer.com. Eyelets: riogrande.com. Coins: joelscoins.com. Amber beads: firemountaingems.com. Czech beads: fusionbeads.com.