24-gauge copper sheet metal, or 1⁄2" wide (1.3 cm) 24-gauge flat copper strip
4’ (1.2 m) of sterling 24-gauge round dead-soft wire
14" (35.5 cm) of sterling 18-gauge round half-hard wire
1 pair of sterling French ear wires
Metal shears
Ruler
Nylon mallet
Steel bench block
Metal file
Sanding sponges, medium and fine grit
Metal alphabet stamps
Brass mallet or utility hammer
1.25 mm metal hole-punch pliers
Round-nose pliers
Chain-nose pliers
Fine-point Sharpie marker
Washi tape or transparent tape roll or other 1⁄2" (1.3 cm) wide wedge
Flush cutter
Chasing hammer
Liver of sulfur
Pro-Polish pad
23⁄4" (7 cm) including the ear wire
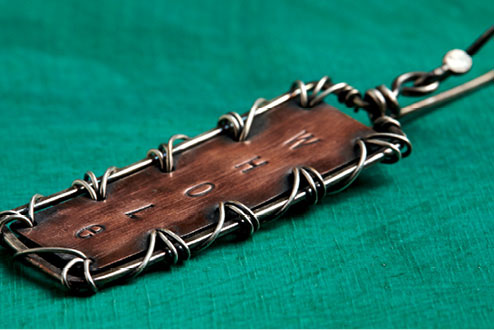
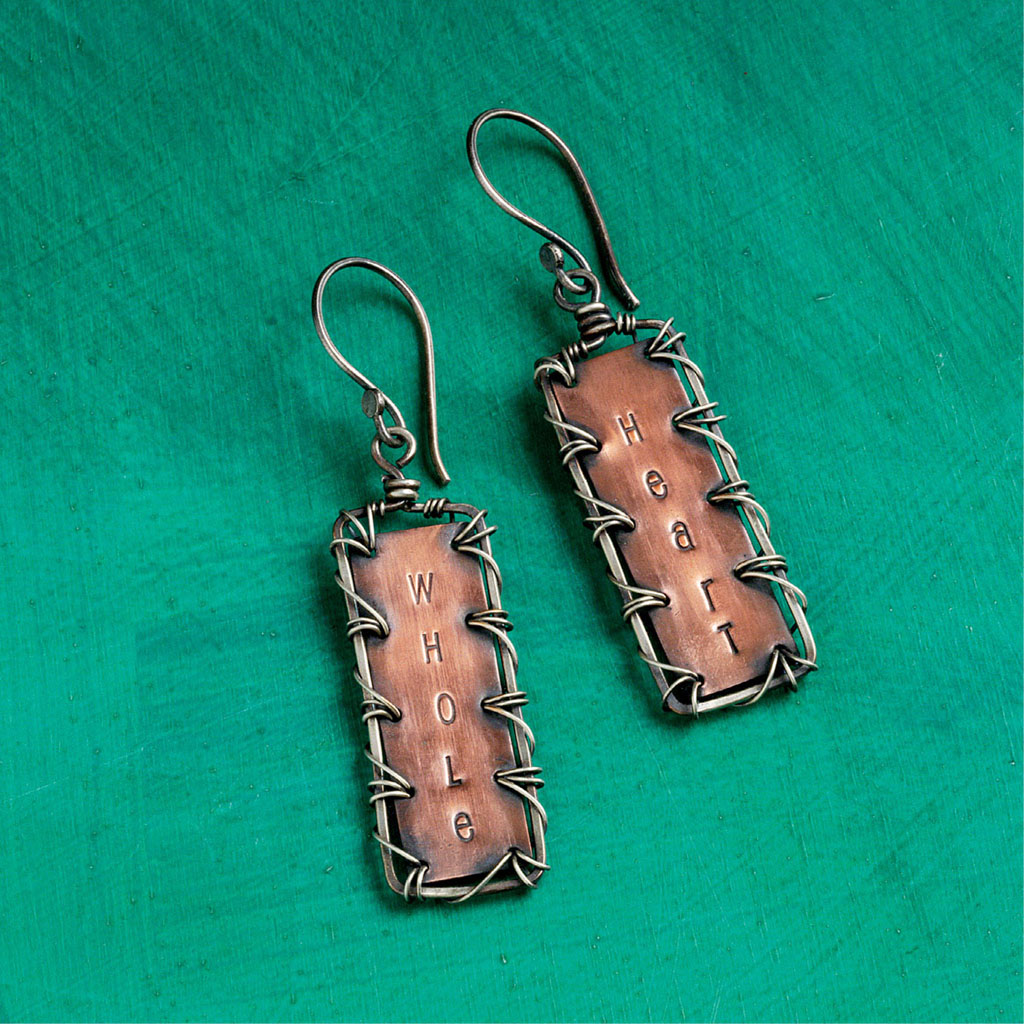
1. Using metal shears, cut a 3" × 1⁄2" (7.5 × 1.3 cm) strip of copper sheet. If the metal curls as you cut it, use the nylon mallet to gently hammer it flat. Measure and cut the strip into two 11⁄2" (3.8 cm) pieces, or plates.
2. With the metal file and sanding sponge, remove any sharp edges on the copper plates. Texture or stamp a word onto each plate with the alphabet stamps and brass mallet or utility hammer (see To Texture with Hammers and To Texture with Stamps).
3. Use a ruler and Sharpie to mark the spacing, then make 5 evenly spaced holes down each side of both plates with the hole-punch pliers (Figure 1).
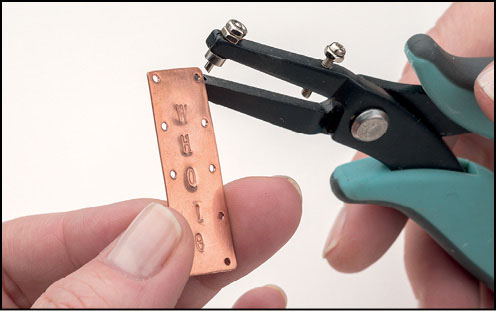
Figure 1
4. Using round-nose pliers, form a small simple loop at the end of a 7" (18 cm) piece of 18-gauge wire. Use the tip of the chain-nose pliers to create a 1⁄8" (3 mm) space below the simple loop, then make a 90° bend in the wire (Figure 2).
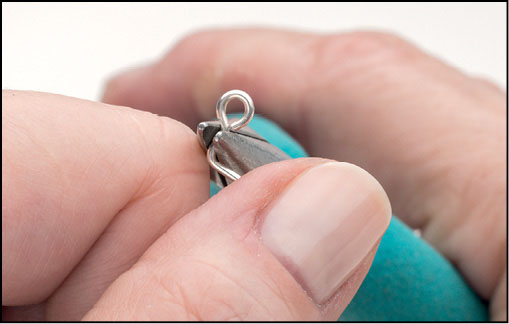
Figure 2
5. Line up the loop just formed with the top center of the metal plate. With the Sharpie, mark the wire at the corner of the plate. Pivot the wire to mark it at the second corner, then the third, and then the fourth. Use chain-nose pliers to form 90º bends in the wire at each spot marked (Figure 3).
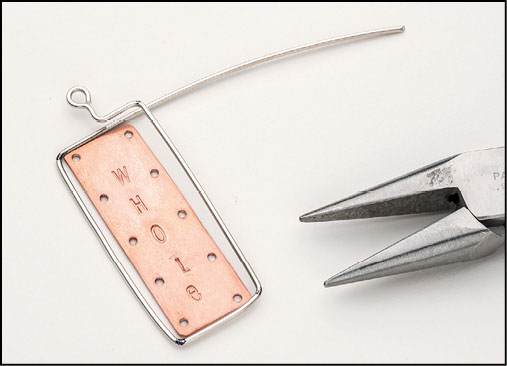
Figure 3
6. Wrap the short tail of the wire that remains around the area just below the simple loop. This is tricky because the two top corners are going to want to come closer together when wrapping the wire around the loop. To avoid that, hold the wire frame in the jaws of the chain-nose pliers and wrap the wire by hand. If that doesn’t work, I found that a spool of washi paper tape or transparent tape is just the right size to wedge into the frame and hold those corners apart while wrapping. Trim the excess wire with flush cutters and file if necessary. Repeat Steps 4–6 to make a second frame.
7. Slightly flatten the wire frame with the flat end of the chasing hammer. It doesn’t take much to flatten it, and doing so work-hardens the wire, helping it maintain its shape.
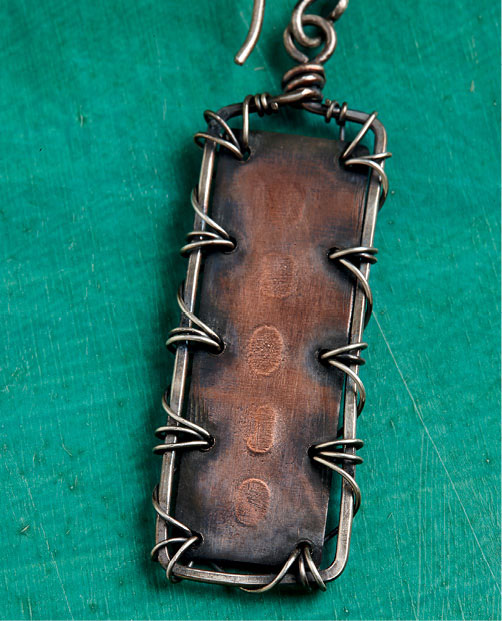
8. Holding a metal plate in the center of a wire frame, push about 3" (7.5 cm) of a 2’ (61 cm) piece of 24-gauge wire through the top right hole, passing it from the front to the back. The longer end on the front side of the work will be called the working wire; the short end on the back of the work is called the tail wire. Wrap the working wire around the edge of the frame and up through the top right hole. Do the same thing again, through the same hole so there are 2 stitches holding the plate onto the corner. Guide the working wire down to the hole below and repeat the double wrapping before moving on to the next hole. Continue until you reach the top left hole (Figure 4).

Figure 4
9. Wrap the working wire around the frame three times after the last stitches. Trim the excess wire. Go back to the beginning of the stitches and wrap the tail wire around the frame three times as well and trim the excess wire.
10. Add an ear wire to the loop at the top of each earring.
11. Oxidize in liver of sulfur and very hot water; very hot water makes the two different metals oxidize at the same time. Remove the excess oxidation with a polishing pad.
Sterling wire, copper sheet metal or strip: riogrande.com. Washi paper tape: joann.com.