It would be impossible to include every technique for creative papermaking in this book. Truly, there are as many ideas as there are people to think them up!
If you’re hooked on papermaking and want to try some new effects, this chapter provides a sampling to whet your appetite even further.
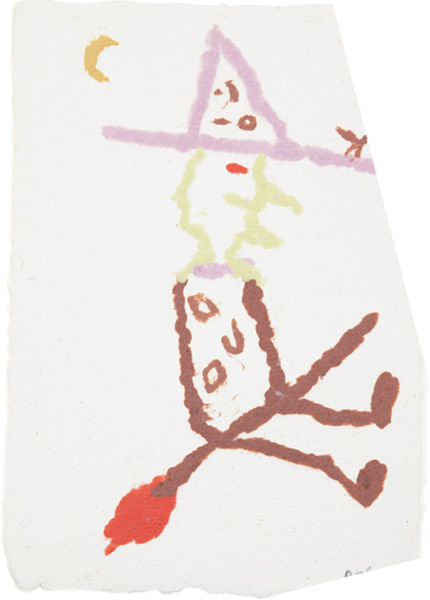
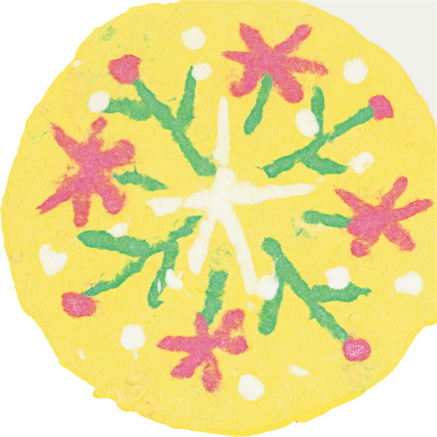
When you dip a pin in pulp slurry, it will pick up fibers. You can then use the pin to “draw” with those fibers on the surface of a newly formed wet sheet. By lowering the pin horizontally to the wet sheet and dropping the point onto the surface, the pin fibers and surface fibers will create a bond. When you pull the pin away, the fibers will slide off and be deposited onto the surface in a line. With practice, you can make curved lines, lay down several lines adjacent to each other, and make thicker lines. Pin drawing can be a very sensitive medium for artistic expression.
Crafty Tips
 Bend the pin just below its head to create something to grip. You don’t want your fingertips to touch the sheet’s surface.
Thick and thin slurries lay down different kinds of lines. See the difference by experimenting with thick, thin, and medium-thick slurries. You also can make lines thicker by laying down several thin lines side-by-side.
Although I work with pins, there is room for discovery in trying thin wires. Bending a thin wire would be easier than bending a pin, and pins tend to break, rather than bend.
The line of fibers can be manipulated on the sheet. You can use the point of the pin to move them a bit to one side or to straighten the line’s edges. This is delicate and requires a careful touch. The point of the pin must engage with the added fibers only, or you might tear your sheet.
Use short containers for the pulp you’ll be drawing with. Tall containers make it difficult to get the pin down into the pulp. It also helps to tip the container to one side when dipping the pin.

“Pin drawing” and “patience” both start with a P.
Step 1. Make a full-sized sheet of paper, following the basic papermaking procedure through step 6 (see page 54), but don’t put on the cover screen.
Step 2. Prepare a thick slurry of colored pulp. Divide it by pouring into two small containers. Add water to one container to thin out the pulp.
Step 3. Draw a shape on the new sheet’s surface by dipping a pin into the thick slurry and lifting out some fibers. Lower the pin horizontally, but with a bit of a slant, so the fibers near the pin point will touch the sheet’s surface first. Lower the remaining fibers onto the sheet.
Step 4. Slide the pin slowly out of the pulp. Because the fibers touching the surface will have bonded slightly, the wet fibers on the pin will generally slide off as the pin is withdrawn. By repeated dipping, make the line as long as you wish.
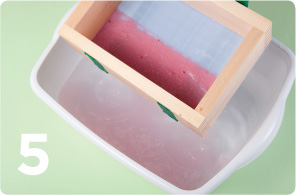
Step 5. Dip the pin into the thinner pulp slurry and experiment with drawing more lines. Note the differences between the lines.
Step 6. Complete your drawing. Put the cover screen over the new sheet and finish making the paper.
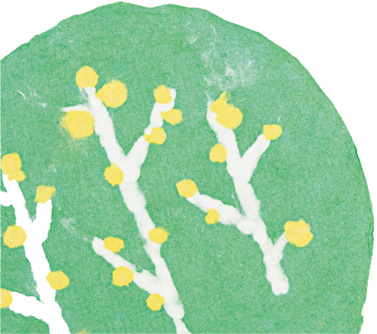
If you dip one edge of a pour hand mold into water, you have a pool over that side of the papermaking screen, into which you can pour colored pulps. The width and length of the pool is something you can play with by raising or lowering the hand mold’s edge in the water. When you lift the mold from the water, there will be a strip of pulp on one side of the papermaking screen that is straight on one edge and ragged on the other. You can use this as a secondary layer and add it on top of a newly formed wet sheet, using the pulp layering technique (see page 78).
Step 1. Prepare three different colors of pulp.
Step 2. Make a full-sized sheet of paper, following the basic papermaking procedure through step 6 (see page 54), but don’t put on the cover screen. Set this sheet aside to drain a bit.
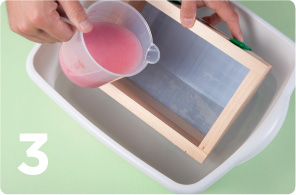
Step 3. Use a second papermaking screen (the cover screen can be used) in the mold and dip the mold at a slanted angle into the vat. Water will come up over the edge of the papermaking screen. Keep the mold at a steep angle, so deep water covers about one-quarter of the screen.
Step 4. Hold the mold steady. Into the pool of water above the screen, pour different-colored pulps in different places. Don’t pour in too much pulp. Add glitter if desired.
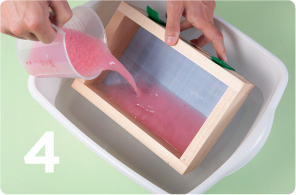
Step 5. Lift the mold out of the water. For the first effort, lift it straight up, not changing the angle. In later efforts, try lifting the mold out with a bit of a scooping action. This will cause water and some pulp to wash a little higher on the screen as the mold is lifted. This can result in a ragged, possibly dramatic, edge as the pulp drains on the screen.
Step 6. Use the pulp layering technique (see page 78) to transfer the shape to your full-sized sheet. Dry and press the paper as desired.
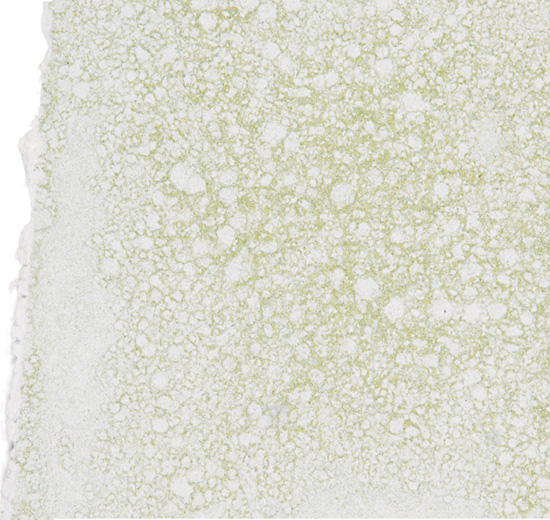
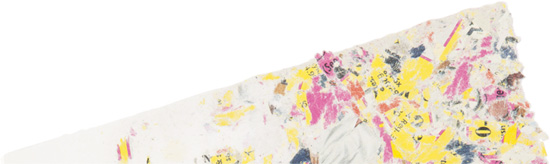
The success of this sheet depends on finding the right paper for recycling. You want paper that is heavily clay-coated and shiny, with huge expanses of deep-colored ink. Heavy clay coating is identified by a high gloss; it’s a very shiny paper. Not all shiny paper uses clay, though, so look for the glossiest and shiniest piece you can find. Magazine covers and interior pages are good hunting grounds, as are slick advertising pieces.
You’ll know you’ve succeeded if you get a lot of foam while blending the paper. Foam indicates a clay formula coating, and it is the key to the bubble effect you want as the finished result. When you pour the foamy pulp into the deckle, the foam bubbles start bursting. Each burst sprays out minute clay particles, colored by the ink. The bigger the bubbles, the more obvious the effect. For the best result, aim to keep the bubbles intact until they are down near the screen. When the conditions are right, a quite spectacular visual surface can be made.

Step 1. Prepare your mold and lower it into the vat (see step 3, page 53) before blending the pulp. Leave it there while you run the blender.
Step 2. Add the shiny paper and water to the blender. Run it for about 12 to 15 seconds on a low speed, then turn the blender up to high speed. There should be some foam generated.
Step 3. Turn the blender off, pour the recycled pulp into the hand mold, and lift the mold out of the water as rapidly as possible. You want the least amount of foam bubbles to dissipate before the pulp has drained down onto the screen. In the best case, many small bubbles and a number of large ones will burst as the pulp reaches the screen.
Step 4. Complete the steps for making paper, as usual.
Frequently Asked Questions
Q: Can I recycle shiny paper?
A: Yes, you most certainly can. What makes shiny paper shine is a coating of clay. When you recycle the paper, there will be a lot of foam in the blender, but that is no problem. In fact, the clay used at the paper mill is very expensive and is not a bad thing for your handmade sheet. The moonscape technique shows what shiny paper can do that non-shiny papers can’t.
The wet surface of a newly formed sheet is easily textured — the wetter, the better. Any textured surface put down on a wet sheet will impact the position of the fibers. This opens more worlds than one mind can conquer. Think about all the cloth surfaces in a large fabric store, from canvas to netting. Each can be used to texture a newly formed sheet of paper. There are plenty of nonfabric surfaces out there, too, so keep your eyes open as you move through your day.
Fine Texture
Step 1. Choose a piece of cloth with a very fine weave, such as bed sheeting, and cut close to the size of the paper sheet you’re texturing.
Step 2. Make a full-sized sheet of paper, following the basic papermaking procedure through step 6 (see page 54), but don’t put on the cover screen. Instead, lay the fabric over the new paper sheet and apply the sponge to remove some water. Leave the fabric on the sheet throughout all the remaining papermaking steps.
Step 3. Remove the piece of bed sheet carefully after the paper sheet dries. Examine the paper sheet’s surface closely and move your fingertips across it to feel the texture.
Coarse Texture
Step 1. Choose a piece of cloth with a pronounced, rough, dimensional surface. Perhaps you can find cloth that is ribbed, such as corduroy. Cut a piece close to the size of the paper sheet you’re texturing.
Step 2. Repeat Steps 2 and 3 in the previous section.

The colored strips were textured by the grout pattern on the back of a ceramic tile (shown underneath), then pulp-layered onto the surface of a white sheet of paper.

A good subject for spirited debate over coffee would be, “Where does texturing end and embossing begin?” They are similar in that both impact the surface of handmade paper, but embossing raises or lowers the surface in a particular shape or pattern, beyond what would be considered the paper’s normal surface. You could think of embossing as exaggerated texturing, and it does indeed add a fresh dimension to paper. In commercial papers, embossing is often done to paper after it is manufactured. Here is a way to do it as the paper is made.
Step 1. Select a rough or patterned surface to use as an embossing plate. Prepare the pulp and make a full-sized sheet of paper, following the basic papermaking procedure through step 6 (see page 54), but don’t put on the cover screen.
Step 2. Place the embossing plate on the surface of the newly formed wet sheet. Carefully press down on the plate, observing how the new sheet’s pulp rises into the embossing plate’s open areas.
Step 3. Put the cover screen over the new sheet and embossing plate. Leave the embossing plate in place as you continue making the paper. Handle the sheet carefully, because any shifting of the embossing plate will distort the embossing.
Step 4. Replace the top and bottom wet couch sheets with dry ones before pressing the sheet. With the embossing plate still in place, put the new sheet and couch sheets under pressure in a press or under weight of any kind.
Step 5. Remove the dry sheet carefully, followed by the embossing piece. This should result in an excellently embossed sheet.
Crafty Tip
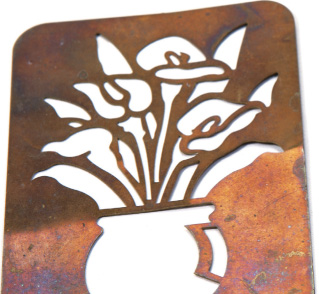
Craft stores offer a great number of metal embossing plates, as well as plastic stencils, many of which can be used for embossing handmade paper as it is being made. Also consider using small, reasonably flat jewelry or other such items you might find around the house and apply them in the same ways as you would an embossing plate. You also can find embossed felts at most craft stores. Instead of a cover screen, put an embossed felt over a newly formed sheet and leave it on through final drying.
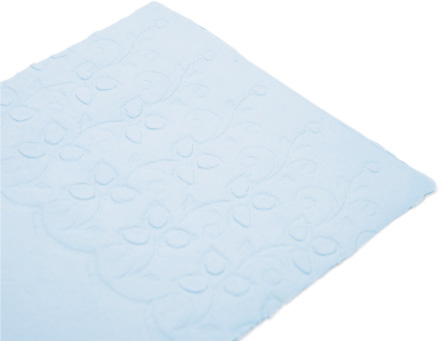
This larger embossing plate can produce a nice facing for a greeting card.

In papermaking, where the water goes, the fiber goes. Consequently, if you block off part of your screen’s surface, the water won’t go there and neither will the fibers. If you want to make a sheet half the size of your hand mold, simply cover half your screen with a solid material. If you want an open space in the middle, place some solid material (such as thin wood, foam core, or plastic) cut to the size and shape you desire in the middle of your screen. It’s another world to explore.
Step 1. Cut out an image from a foam food tray or a thin board (see page 80). For your first experiment, try something easy like a heart, square, or other simple shape. The size must be smaller than the paper-making screen.
Step 2. Blend the pulp and set the assembled mold into the water. Place the cut-out image on the screen wherever you wish. Hold it down firmly, so no pulp will run under it.
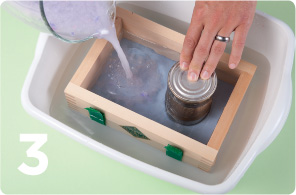
Step 3. Pour the pulp into the deckle using your other hand. If this gets too difficult, ask someone to help you, especially in the next step.
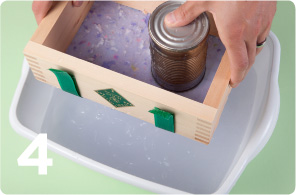
Step 4. Keep the image firmly on the screen while lifting the hand mold out of the water. Hold it level while the water drains.
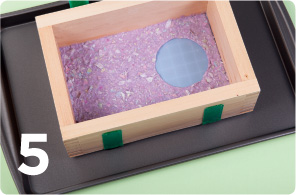
Step 5. Remove the paper and screen from the mold and set them on a drain pan.
Let water drain for several minutes. Carefully remove the cut-out shape from the screen. Take care that the pulp around the edges of the image doesn’t rise with the image. If you used a foam food tray, you can insert a pin at a slant into the image to help lift it.
Step 6. Lower a cover screen over the new sheet and complete the papermaking process.
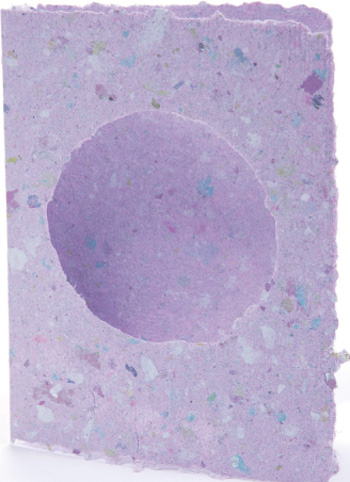
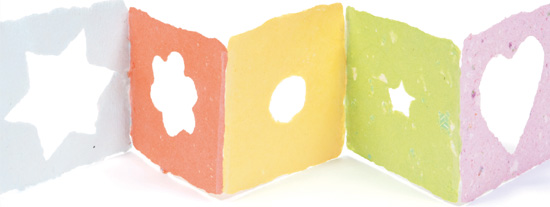
If you like to make greeting cards, think about how the placement of an opening might work in your favor. For instance, when the paper is folded in half, a shaped opening in front might become a window for words or images inside the card.

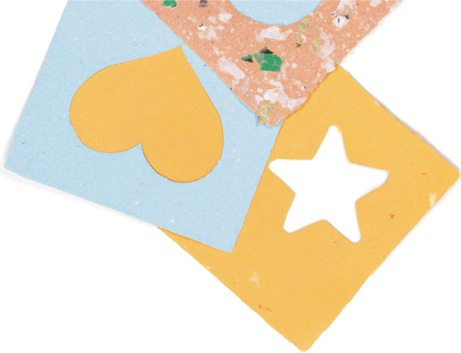
This project uses the screen block out technique described on the previous page. Use the finished book as a child’s toy, and add words to make it a book about shapes. Or use it as a greeting card or art gift for an adult.
Materials
Papermaking supplies (see page 25)
Square molds, about 5″ square (see Tip)
Cookie cutters or pie-tin molds (see pages 80–81) for interior shapes
Clear tape or needle and thread for joining pages
Crafty Tip
Square molds can be made from old picture frames with the glass and backing removed, or square containers such as milk cartons. Or you can wing it by setting up four sponges in a square shape. Whatever will hold the pulp in place is fair game!
Instructions
1. As described on the previous page, place the cookie cutter directly in the center of the mold and pour the pulp. Do this for each page, each time with a different shape, in a nice variety of colors.
2. Blot and dry the papers.
3. If keeping the rough edges, attach the pages along the sides using tape. If trimming the edges, you can stitch them together with needle and thread instead. Stitching works better on cut edges, as the thread can catch on rough edges.

Joined by invisible tape, sheets with assorted windows can make a surprising accordion-fold book.
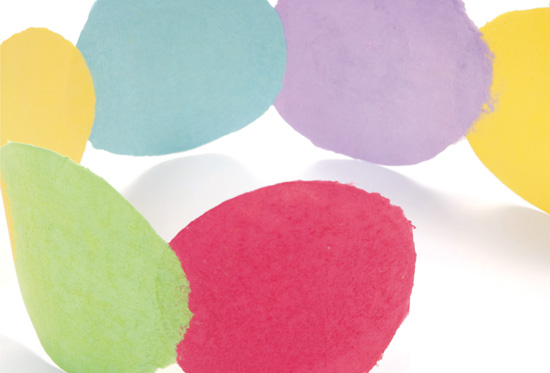
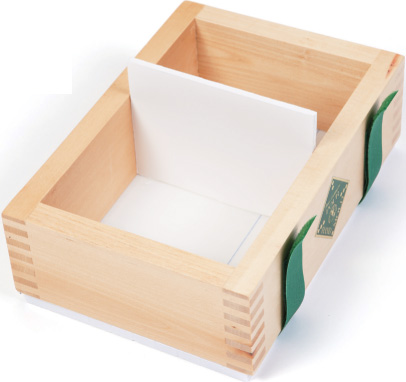
Deckle division is simply dividing your hand mold’s deckle into two or more compartments. In an undivided deckle, you can pour only one kind or color of pulp. In a deckle divided into two separate compartments, you can pour in two kinds of colors of pulp, one in each compartment. If you remove the divider while the two pulps are draining (after the mold is lifted from the water), the two pulps will flow into each other. This can produce dramatic effects, resulting in a single sheet made of two different pulps.
For the deckle divider, use a piece of foam core or cut what you need from a piece of foam food board (the kind meat or pastries are packaged on). Measure and cut it to fit snugly inside the deckle as shown. Once you’ve prepared the deckle divider, the rest is easy.
Step 1. Blend two different pulp colors, one at a time, and pour them into separate containers.
Step 2. Slide the divided deckle into the vat. Gently pour one pulp into half of the deckle and the second pulp into the other half. Agitate the pulp gently in both compartments.
Step 3. Lift the mold up and out of the water with one hand. When ¼ to ½ of the deckle’s pulp has drained, use your other hand to quickly pull the foam divider straight up and out. The portions of the pulps not drained will flow into each other, forming a single sheet.
Step 4. Allow all the water to drain out and complete the papermaking process as usual.
Dividing the deckle is not hard, yet it opens wide many doors to creativity and unusual, striking handmade sheets.
Crafty Tips
Pulps can sometimes be made to flow into each other more forcefully by gently rocking the mold after the divider has been lifted. This can create more dramatic sheets. Experiment.
If you are unable to lift the hand mold with one hand, get someone to help; or lift the mold and set it quickly on a surface and then lift the divider.
This technique will produce a two-sided sheet. On one side, the line where the two pulps meet will be indistinct or almost nonexistent (above). On the other, it will likely be sharply defined (at right).
This technique has almost everything in common with pulp layering (see page 78), except here you are dealing with an entire sheet. This requires adept, more careful handling, but sheet layering offers its own effects, including two-sided sheets. This is also a good technique to remember when it’s necessary to patch a very weak sheet or a sheet with thin spots or holes in it. It is another field that offers a great deal of exploration. The basic introduction that follows can get you started on your own unique experiments.
Step 1. Prepare white pulp and make a sheet of paper through step 5 (see page 54), but don’t put the cover screen on the new sheet. Set aside the sheet to drain.
Step 2. Prepare colored pulp and make a second thin sheet of paper. When you lift the screen and colored sheet from the mold, drag it screen-side-down over a wrung-out sponge to pull some of the water out of the sheet. Then, turn the screen over so the colored sheet is on the bottom side. The sheet is not likely to fall from the screen unless it is exceedingly wet or very thick.
Step 3. Lower the colored sheet down onto the white one, perfectly matching the edges of the two sheets. (Yes, perfectly matching the edges is difficult; just give it your best shot.)
Step 4. Complete the papermaking process as usual. The result will be a sheet that is white on one side and colored on the other. In future experiments, combine any two types of sheets you think would be exciting.
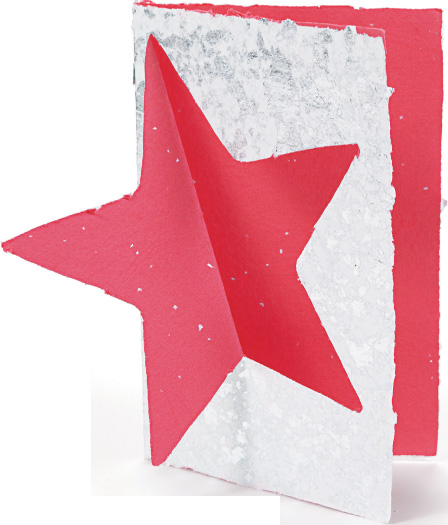
Simple foldouts are an easy and dramatic way to use sheet-layered paper. The cutout can be made from any symmetrical shape. Just trace half of the shape anywhere on the front of the folded sheet layered paper, and make a dotted line from top to bottom down the middle of your shape. Cut along the traced line, and score and fold along the dotted line. (See the template on page 199.)
Few people are as productive as Maria Nerius, an author, editor, papermaker, craft industry consultant, media hostess, and more. Having once made crafts for a living, Maria paid attention to how things sold. She spends much of her professional life encouraging designers and crafters to learn how to make money on their crafts. Here’s her short list for making cards that sell:
You can have the cutest cards in town, but if you’re using unpopular colors, the cards will not sell. Make paper and cards with current color trends! A trip to the card or gift shop can inspire fresh, innovative ideas.
Make a professional presentation. Display cards in clear, plastic sleeves. Make prices clear with stickers or signage.
Offer a quantity discount. If you sell one for $2.95, offering four for $10 often nets the $10 purchase.
Make cards people need. Popular card categories are birthday, wedding, baby, and thank you.
You’re Invited!
For some fun invitations or thank you notes, try this simple design. Use the template on page 200 to make your own template out of food board (for instructions, see page 80). When the paper is dry, write a personal message and fold on the lines shown on the template (folded cards will be 3½″ × 5″). Seal and mail with a first class stamp, or send in a larger self-sealing envelope.


Sometimes, when paper is held up to light, an image can be seen in the paper. This image is a watermark, a spot where the paper is thinner and more light can pass through. If you can make your paper thinner in selected areas, you can make a watermark.
Watermarks have a fascinating history. They have been an item of mystique since 1282 and are still used for identification, authentication, anti-counterfeit, anti-fraud, and artistic expression. Commercially, watermark technology can be pretty advanced, producing complex watermarks that appear shaded and dimensional like a photograph. A look-alike watermark can be added chemically after the paper is dry.
Fortunately for home papermakers, there’s also effective primitive technology for making watermarks. Bend a wire into an image, or form an image with something flat and not too broad. Secure it to the face of a papermaking screen and make a sheet. Where the image was on the screen, the paper will be thinner. When held to the light, the watermark will be revealed.
Two Toothpicks
This is a simple exercise in watermarking, though it can deliver a delightful and clear mark. Primarily, it gives you the sense of how the first mark was sewn onto the face of a papermaking screen. The materials are easy to get and easy to use.
Step 1. Assemble some flat toothpicks, a needle and thread, and a piece of window screen as big as your papermaking screen. The window screen is suggested because you might not want to use your papermaking screen for your first effort.
Step 2. Arrange the toothpicks on the surface of the window screen in a simple design; for instance, the form of a V. With the needle and thread, tack the toothpicks to the screen, rather than sewing along their entire length. A tack at each end and one in the middle should suffice.
Step 3. Following the basic hand papermaking steps (see page 52), make a sheet of paper, using the window screen as the papermaking screen. Take care when removing the sheet from the screen. When the sheet is dry, hold it to the light and behold your watermark.
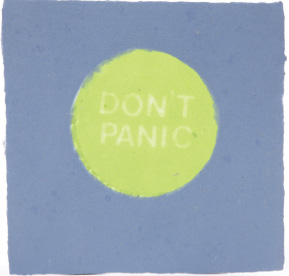
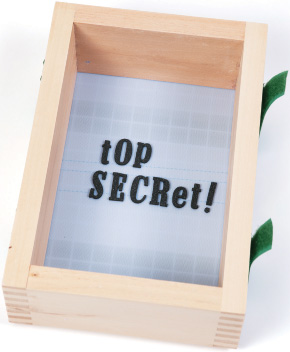
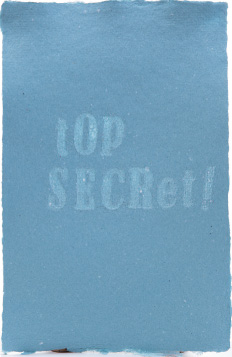
For a more complex watermark, try forming a message in your paper. “Smile” is easy for a first effort. A personal favorite is “Don’t Panic.” We went with “Top Secret!” Choose some ½″-tall plastic, self-adhesive letters from an office supply store. When using thicker letters, the paper you make will need to be thick enough so the letters won’t break the surface. The idea is to experiment to find what works — and don’t forget to have fun!
Step 1. Apply the letters to the face of the papermaking screen, leaving ¼″ between them. Will the letters stick? Usually. Roll over them with a rolling pin after they are on the screen. How long will they stay after being dunked in water? I’ve had varying luck, with some sticking for a long time and others a short time.
Step 2. Follow the basic papermaking steps (see page 52), using the screen with the watermark to make a sheet of paper. Be aware that paper thickness is of great importance when using plastic letters for a watermark. If the paper’s too thick, the mark doesn’t show. If too thin, the mark makes a hole in the paper. Keep adjusting the amount of pulp until the thickness is right. Then, write down your formula for future use.
Crafty Tips
You can use contact cement in addition to (or instead of) needle and thread. It can be messy, though, so use sparingly. If cement fills any screen pores to either side of the toothpicks, the water flow through the screen will be affected, to the detriment of the watermark.
If the watermark in the final sheet is too obvious, make the next sheet a little thicker. If it is too dim or hard to see, make the next sheet thinner.
For a more complex, custom watermark, try forming your own designs with bent wire. A humble plastic twist-tie can be effective, or use something else that is easy to bend, such as coiled solder. Use needle nose pliers to shape the latter. Coiled solder is so malleable it can be bent around images, such as cookie cutters, to form shapes.
As you can well imagine, the way you dry your paper can affect what the paper surface looks like. Board drying is a very old technique, practiced by early Chinese papermakers. The surface used in this technique need not be a board. It can be any water-safe surface that appeals to you. It’s a good idea to spray the surface before you start, to lessen release problems. You can use silicone (read the label about good ventilation), cooking sprays, or petroleum jelly. Keep the coverage light, though, and wipe off all excess release aid before applying the sheet.
Step 1. Select a board or other flat surface at least 2″ longer and wider than the paper sheet you’re making. Make sure the surface is clean.
Step 2. Prepare pulp and make a sheet of handmade paper through step 5 (see page 54). Allow water to drain naturally from the sheet for 2 minutes. This will provide some stabilization of the sheet.
Step 3. Pick up the new sheet and screen and turn them over. Gently put the new sheet down onto the board’s surface. Use a sponge, couch sheet, and press bar as usual to pull as much water out of the sheet as possible.
Step 4. Peel off the couch sheet carefully. Leave the new paper sheet in place until it is dry, then remove it from the board. If you have trouble lifting the dry sheet off the board, try working it off by inserting a knife blade between the sheet and the board at various places around the sheet. Then continue to lift gently.
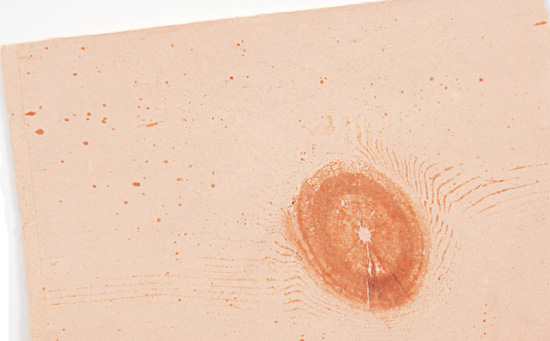
Bored? Try a Board!
Board drying can deliver an amazing surprise. When I saw a board with a knot on its surface, I decided I wanted to reproduce the knot's texture-swirls on a sheet of paper. I carried out the process of board drying, placing the wet sheet over the knot. But, when I took off the dry sheet expecting to see texturing, what I actually saw was a meticulously detailed and accurate reproduction of the knot — in full, gorgeous, true color.
This was a whole new world to explore! I tried more board surface knots. Another surprise: Not one of them was reproduced on my paper. This made my first lucky result even more valued. Will it ever happen again? The hunt must continue. Perhaps the “right” board has to be found, one not overly cured and certainly without any finish. The situation needs further exploration. Join me. Beat me to another successful sheet.
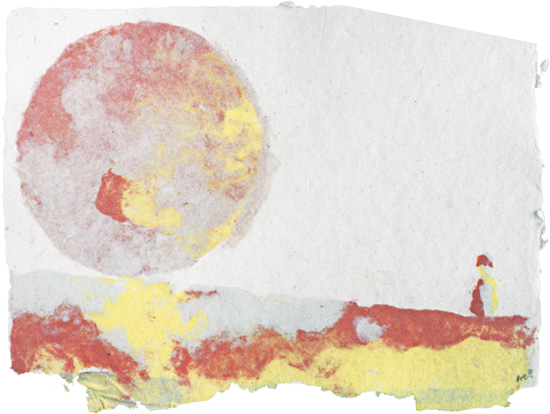
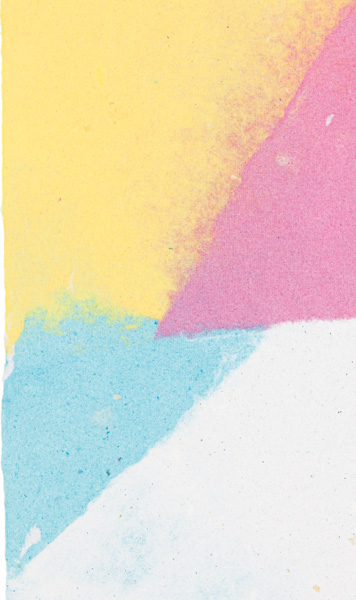
Air drying produces a soft sheet with a variegated surface. From an art standpoint, the surface produced by unfettered shrinkage forces can be highly dramatic. The precise nature of the air-dried surface can vary widely, depending on the pulps used for the sheet, the rate of drying (high or low relative humidity), and whether any type of restraint is placed on the surface during drying.
Left totally unrestrained, pulp shrinkage can result in a sheet that might be relatively flat or extremely curled. Almost always, the surface will not be very smooth. Sometimes, sheet flatness can be maintained by putting weights on either end of the papermaking screen during drying. A window screen or very light cloth can be placed over the sheet and kept taut but relaxed with weights at either end. As with most techniques, air drying is a great field for experimentation.
Step 1. Prepare pulp and make a sheet of hand-made paper through step 5 (see page 54).
Step 2. Set the paper-making screen, with the wet sheet on it, somewhere to dry. Allow it to dry solely by evaporation. To help speed things up, the screen and sheet can be pulled across the surface of a wrung-out sponge to remove some water, and the sheet can be set on or near a drying force, such as a heat register or a sunny window.

Rugged and untamed, this surface of an air dried, pulp-painted sheet shows the power of unrestrained shrinkage forces.
A combination of air and press drying creates a cameo, textured image area on an otherwise smooth surface, creating dimension, kind of like embossing in reverse. One procedure is described below; variations will likely occur to you after trying this project.
Try It
Step 1. Locate a foam food tray or piece of wood larger than the sheet of paper you’re making. Cut an image (tree, animal, heart) into the material that will be an open space for air drying.
Step 2. Prepare pulp and make a sheet of handmade paper through step 5 (see page 54). Remove the papermaking screen and new sheet from the hand mold and place them on a drain rack or smooth surface. For experimentation, try adding a bit more pulp, possibly of another color, in the area where the cut-out image will be.
Step 3. Place the foam tray or wood carefully on top of the new sheet. Press down slowly and uniformly. The board will compress the covered part of the sheet, while leaving the cut-out image area at the original height.
Step 4. Turn the assembled pieces (foam or wood, new sheet, screen) upside down, so the foam or wood is on the bottom and the screen on the top. Remove water from the sheet by pressing on the screen with a sponge.
Step 5. Remove the papermaking screen carefully and replace it with a couch sheet. Press down on the couch sheet until it has removed all the water it can, carefully remove it, and replace it with a dry one. When removing a wet couch sheet, the paper sheet might tend to rise with it. Use your fingernail or a knife to keep that from happening.
Step 6. Turn the whole package over again, so the couch sheet is on the bottom and the foam or wood on top. Place a weight (book, container of water, brick) on the foam or wood board to provide pressure. Change the couch sheet as it gets damp until the paper sheet is dry. In the finished sheet, the part that was dried under pressure will have a smooth surface, and the air-dried cutout will be rough.
Variation
For another effect, you can make a sheet as usual, remove it from the deckle, and do the following:
Put a cover screen over half of it and sponge only the half covered by the cover screen.
Remove the cover screen, put couch sheets over only that half, and put pressure for drying only on the couch sheets, permitting the other half of the sheet to air dry.
Change couch sheets as they get damp until the sheet is dry.
Another favorite project involves the self-bonding technique. No glue, tape, or adhesive is used to hold the pages of this book together.
Materials
Papermaking supplies (see page 25)
Instructions
1. Use tin cans, shapes, or a standard hand mold to make a sheet of paper in the usual way.
2. Remove water so the sheet holds together but is still reasonably damp. Transfer to couch material. Lay a couch sheet or cloth on the newly formed sheet, leaving a ¾″ border of paper exposed on the left edge.
3. Make a second sheet. Remove enough water so the paper can be handled but is still damp. Lay the second paper directly over first. On the left edge where damp sheets meet, the pages will self-bond. Use a spray bottle to lightly mist and re-wet this area. Separated by the couch material, the rest of the sheet will become an open page for the book.
4. Continue to make and layer sheets, as described in step 3.
5. Use as much pressure as possible to press the stack of sheets with couch material.
6. Change couch sheets as needed until the papers (your new book) are dry. If the handmade paper is thicker than standard text weight, there is no need for front and back covers.

The sheets shown here are naturally bonded in the papermaking process.