It's easy to forget that computers depend on a reliable, steady source of electric power. Power isn't sexy. PC enthusiasts talk for hours about the latest processor or video card, but seldom give a thought to such boring issues as power supplies and power protection. Experts, on the other hand, recognize that reliable power is the foundation of a reliable computer. If you take a peek at experts' computer rooms, you'll find that all of their systems have top-notch, high-capacity power supplies, backed up by industrial-strength power protection. If your computer and data are important to you, you would do well to emulate them.
Power supplies lack glamour, so nearly everyone takes them for granted. That's a big mistake, because the power supply performs two critical functions: it provides regulated power to every system component, and it cools the computer. Many people who complain that Windows crashes frequently understandably blame Microsoft. But, without apologizing for Microsoft, the truth is that many such crashes are caused by low-quality or overloaded power supplies.
If you want a reliable, crash-proof system, use a high-quality power supply. In fact, we have found that using a high-quality power supply allows even marginal motherboards, processors, and memory to operate with reasonable stability, whereas using a cheap power supply makes even top-notch components unstable.
The sad truth is that it is almost impossible to buy a computer with a top-notch power supply. Computer makers count pennies, literally. Good power supplies don't win marketing brownie points, so few manufacturers are willing to spend $30 to $75 extra for a better power supply. For their premium lines, first-tier manufacturers generally use what we call midrange power supplies. For their mass-market, consumer-grade lines, even name-brand manufacturers may compromise on the power supply to meet a price point, using what we consider marginal power supplies both in terms of output and construction quality.
The following sections detail what you need to understand how to choose a good replacement power supply.
The most important characteristic of a power supply is its form factor, which defines its physical dimensions, mounting hole locations, physical connector types and pinouts, and so on. All modern power supply form factors derive from the original ATX form factor, published by Intel in 1995.
When you replace a power supply, it's important to use one with the correct form factor, to ensure not only that the power supply physically fits the case, but also that it provides the correct types of power connectors for the motherboard and peripheral devices. Three power supply form factors are commonly used in current and recent systems:
- ATX12V
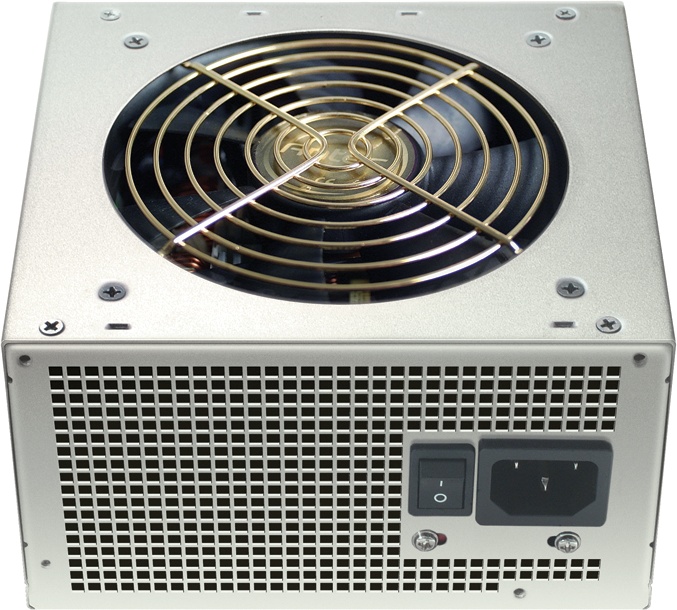
ATX12V power supplies are the largest physically, available in the highest wattage ratings, and by far the most common. Full-size desktop systems use ATX12V power supplies, as do most mini-, mid-, and full-tower systems. Figure 16-1 shows an Antec TruePower 2.0 power supply, which is a typical ATX12V unit.
- SFX12V
SFX12V (s-for-small) power supplies look like shrunken ATX12V power supplies, and are used primarily in small form factor microATX and FlexATX systems. SFX12V power supplies have lower capacities than ATX12V power supplies—typically 130W to 270W for SFX12V versus up to 600W or more for ATX12V—and are generally used in entry-level systems. Systems that were built with SFX12V power supplies can accept an ATX12V replacement if the ATX12V unit physically fits the case.
- TFX12V
TFX12V (t-for-thin) power supplies are physically elongated (versus the cubic form of ATX12V and SFX12V units) but have capacities similar to SFX12V units. TFX12V power supplies are used in some small form factor (SFF) systems with total system volumes of 9 to 15 liters. Because of their odd physical shape, you can replace a TFX12V power supply only with another TFX12V unit.
Although it is less likely, you may encounter an EPS12V power supply (used almost exclusively in servers), a CFX12V power supply (used in microBTX systems), or an LFX12V power supply (used in picoBTX systems). Detailed specification documents for all of these form factors can be downloaded from http://www.formfactors.org.
The changes from older versions of the ATX specification to newer versions and from ATX to smaller variants such as SFX and TFX have been evolutionary, with backward compatibility always kept firmly in mind. All aspects of the various form factors—including physical dimensions, mounting hole locations, and cable connectors—are rigidly standardized, which means you can choose among numerous industry-standard power supplies to repair or upgrade most systems, even older models.
Here are some other important characteristics of power supplies:
- Rated wattage
The nominal wattage that the power supply can deliver. Nominal wattage is a composite figure, determined by multiplying the amperages available at each of the several voltages supplied by a PC power supply. Nominal wattage is mainly useful for general comparison of power supplies. What really matters is the individual amperage available at different voltages, and those vary significantly between nominally similar power supplies.
- Efficiency
The ratio of output power to input power expressed as a percentage. For example, a power supply that produces 350W output but requires 500W input is 70% efficient. In general, a good power supply is between 70% and 80% efficient, although efficiency depends on how heavily the power supply is loaded. Calculating efficiency is difficult, because PC power supplies are switching power supplies rather than linear power supplies. The easiest way to think about this is to imagine the switching power supply drawing high current for a fraction of the time it is running and no current the remainder of the time. The percentage of the time it draws current is called the power factor, which is typically 70% for a standard PC power supply. In other words, a 350W PC power supply actually requires 500W input 70% of the time and 0W 30% of the time.
Combining power factor with efficiency yields some interesting numbers. The power supply supplies 350W, but the 70% power factor means that it requires 500W 70% of the time. However, the 70% efficiency means that rather than actually drawing 500W, it must draw more, in the ratio 500W/0.7, or about 714W. If you examine the specifications plate for a 350W power supply, you may find that in order to supply 350W nominal, which is 350W/110V or about 3.18 amps, it must actually draw up to 714W/110V or about 6.5 amps. Other factors may increase that actual maximum amperage, so it's common to see 300W or 350W power supplies that actually draw as much as 8 or 10 amps maximum. That variance has planning implications, both for electrical circuits and for UPSs, which must be sized to accommodate the actual amperage draw rather than the rated output wattage.
High efficiency is desirable for two reasons. First, it reduces your electric bill. For example, if your system actually draws 200W, a 67%- efficient power supply consumes 300W (200/0.67) to provide that 200W, wasting 33% of the electricity you're paying for. An 80%- efficient power supply consumes only 250W (200/0.80) to provide that same 200W to your system. Second, wasted power is converted to heat inside your system. With the 67%-efficient power supply, your system must rid itself of 100W of waste heat, versus half that with the 80%- efficient power supply.
- Regulation
One of the chief differences between premium power supplies and less expensive models is how well they are regulated. Ideally, a power supply accepts AC power, that is possibly noisy or outside specifications, and turns that AC power into smooth, stable DC power with no artifacts. In fact, no power supply meets the ideal, but good power supplies come much closer than cheap ones. Processors, memory, and other system components are designed to operate with pure, stable DC voltage. Any departure from that may reduce system stability and shorten component life. Here are the key regulation issues:
- Ripple
A perfect power supply would accept the AC sine wave input and provide an utterly flat DC output. Real-world power supplies actually provide DC output with a small AC component superimposed upon it. That AC component is called ripple, and may be expressed as peak-to-peak voltage (p-p) in millivolts (mV) or as a percentage of the nominal output voltage. A high-quality power supply may have 1% ripple, which may be expressed as 1%, or as actual p-p voltage variation for each output voltage. For example, at +12V, a 1% ripple corresponds to +0.12V, usually expressed as 120mV. A midrange power supply may limit ripple to 1% on some output voltages, but soar as high as 2% or 3% on others. Cheap power supplies may have 10% or more ripple, which makes running a PC a crapshoot.
- Load regulation
The load on a PC power supply can vary significantly during routine operations; for example, as a DVD burner's laser kicks in or an optical drive spins up and spins down. Load regulation expresses the ability of the power supply to supply nominal output power at each voltage as the load varies from maximum to minimum, expressed as the variation in voltage experienced during the load change, either as a percentage or in p-p voltage differences. A power supply with tight load regulation delivers near-nominal voltage on all outputs regardless of load (within its range, of course). A top-notch power supply regulates voltages on the critical voltage rails—+3.3V, +5V, and +12V—to within 1%, with 5% regulation on the less critical −5V and −12V rails. An excellent power supply might regulate voltage on all critical rails to within 3%. A midrange power supply might regulate voltage on all critical rails to within 5%. Cheap power supplies may vary by 10% or more on any rail, which is unacceptable.
- Line regulation
An ideal power supply would provide nominal output voltages while being fed any input AC voltage within its range. Real-world power supplies allow the DC output voltages to vary slightly as the AC input voltage changes. Just as load regulation describes the effect of internal loading, line regulation can be thought of as describing the effects of external loading; for example, a sudden sag in delivered AC line voltage as an elevator motor kicks in. Line regulation is measured by holding all other variables constant and measuring the DC output voltages as the AC input voltage is varied across the input range. A power supply with tight line regulation delivers output voltages within specification as the input varies from maximum to minimum allowable. Line regulation is expressed in the same way as load regulation, and the acceptable percentages are the same.
- Noise level
The power supply fan is one of the major noise sources in most PCs. If your goal is to reduce the noise level of your system, it's important to choose an appropriate power supply. Noise-reduced power supplies—models such as the Antec TruePower 2.0 and SmartPower 2.0, Enermax NoiseTaker, Nexus NX, PC Power & Cooling Silencer, Seasonic SS, and Zalman ZM—are designed to minimize fan noise, and can be the basis of a system that is nearly inaudible in a quiet room. Silent power supplies, such as the Antec Phantom 350 and the Silverstone ST30NF, have no fans at all and are almost totally silent (there may be a minor buzzing from the electrical components). In practical terms, there's seldom much advantage in using a fanless power supply. They are quite expensive relative to noise-reduced power supplies, and the noise-reduced units are sufficiently quiet that whatever noise they make is subsumed by the noise from case fans, the CPU cooler, hard drive rotation noise, and so on.
In the last few years, there have been some significant changes in power supplies, all of which have resulted directly or indirectly from the increased power consumption and changes in the voltages used by modern processors and other system components. When you replace a power supply in an older system, it's important to understand the differences between the older power supply and current units, so let's take a brief look at the evolution of ATX-family power supplies through the years.
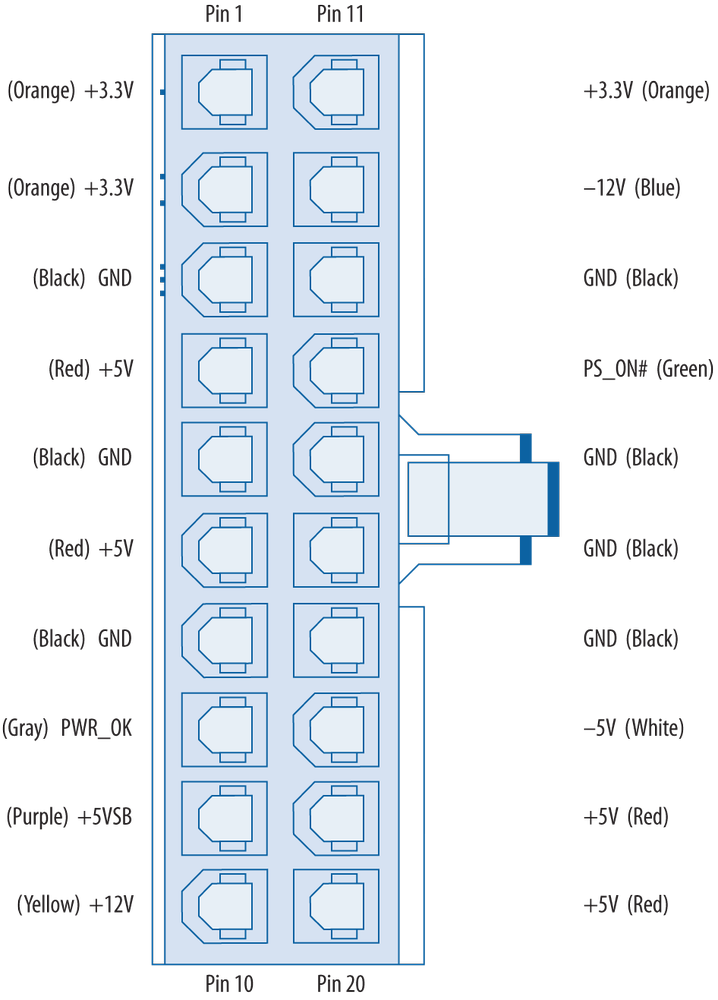
For 25 years, every PC power supply has provided standard Molex (hard drive) and Berg (floppy drive) power connectors, which are used to power drives and similar peripherals. Where power supplies differ is in the types of connectors they use to provide power to the motherboard itself. The original ATX specification defined the 20-pin ATX main power connector shown in Figure 16-2. This connector was used by all ATX power supplies and early ATX12V power supplies.
The 20-pin ATX main power connector was designed at a time when processors and memory used +3.3V and +5V, so there are numerous +3.3V and +5V lines defined for this connector. The contacts within the connector body are rated to carry at most 6 amps. That means the three +3.3V lines can carry 59.4W (3.3V x 6A x 3 lines), the four +5V lines can carry 120W, and the one +12V line can carry 72W, for a total of about 250W.
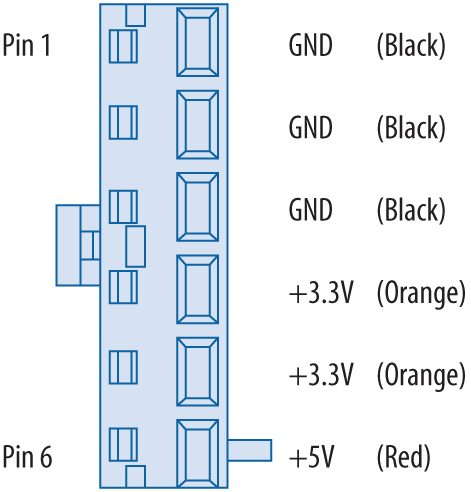
That setup sufficed for early ATX systems, but as processors and memory became more power-hungry, system designers soon realized that the 20-pin connector provided inadequate current for newer systems. Their first modification was to add the ATX auxiliary power connector, shown in Figure 16-3. This connector—defined in ATX specifications 2.02 and 2.03 and in ATX12V 1.X, but dropped from later versions of the ATX12V specification—uses contacts rated for 5 amps. Its two +3.3V lines therefore add 33W of +3.3V carrying capacity, and its one +5V line adds 25W of +5V carrying capacity, for a total addition of 58W.
Intel dropped the auxiliary power connector from later versions of the ATX12V specification because it was superfluous for Pentium 4 processors. The Pentium 4 used +12V power rather than the +3.3V and +5V used by earlier processors and other components, so there was no longer any need for additional +3.3V and +5V. Most power supply makers stopped providing the auxiliary power connector soon after the Pentium 4 shipped in early 2000. If your motherboard requires the auxiliary power connector, that is sufficient evidence that that system is too old to be economically upgradable.
While the auxiliary power connected provided extra +3.3V and +5V current, it did nothing to increase the amount of +12V current available to the motherboard, and that turned out to be critical. Motherboards use VRMs (voltage regulator modules) to convert the relatively high voltages supplied by the power supply to the low voltages required by the processor. Earlier motherboards used +3.3V or +5V VRMs, but the increased power consumption of the Pentium 4 made it necessary to change to +12V VRMs. That created a major problem. The 20-pin main power connector could provide at most 72W of +12V power, much less than needed to power a Pentium 4 processor. The auxiliary power connector added no +12V, so yet another supplementary connector was needed.
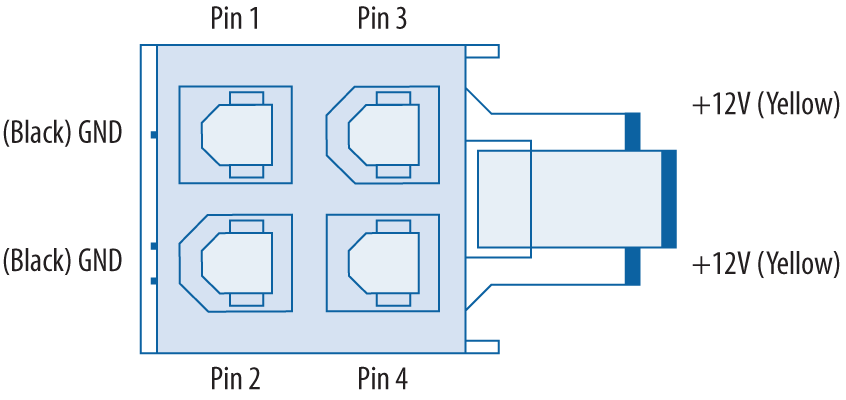
Intel updated the ATX specification to include a new 4-pin 12V connector, called the +12V Power Connector (or, casually, the P4 connector, although recent AMD processors also use this connector). At the same time, they renamed the ATX specification to the ATX12V specification to reflect the addition of the +12V connector. The +12V connector, shown in Figure 16-4, has two +12V pins, each rated to carry 8 amps—for a total of 192W of +12V power—and two ground pins. With the 72W of +12V power provided by the 20-pin main power connector, an ATX12V power supply can provide as much as 264W of +12V power, more than sufficient for even the fastest processors.
The +12V power connector is dedicated to providing power to the processor, and attaches to a motherboard connector near the processor socket to minimize power losses between the power connector and the processor. Because the processor was now powered by the +12V connector, Intel removed the auxiliary power connector when they released the ATX12V 2.0 specification in 2000. From that time, all new power supplies came with the +12V connector, and a few to this day continue to provide the auxiliary power connector.
These changes over time mean that a power supply in an older system may have one of the following four configurations (from oldest to newest):
20-pin main power connector only
20-pin main power connector and 6-pin auxiliary power connector
20-pin main power connector, 6-pin auxiliary power connector, and 4-pin +12V connector
20-pin main power connector and 4-pin +12V connector
Unless the motherboard requires the 6-pin auxiliary connector, you can use any current ATX12V power supply to replace any of these configurations.
That brings us to the present ATX12V 2.X specification, which made more changes to the standard power connectors. The introduction of the PCI Express video standard in 2004 again raised the old issue of the +12V current available on the 20-pin main power connector being limited to 6 amps (or 72W total). The +12V connector can provide plenty of +12V current, but it is dedicated to the processor. A fast PCI Express video card can easily draw more than 72W of +12V current, so something needed to be done.
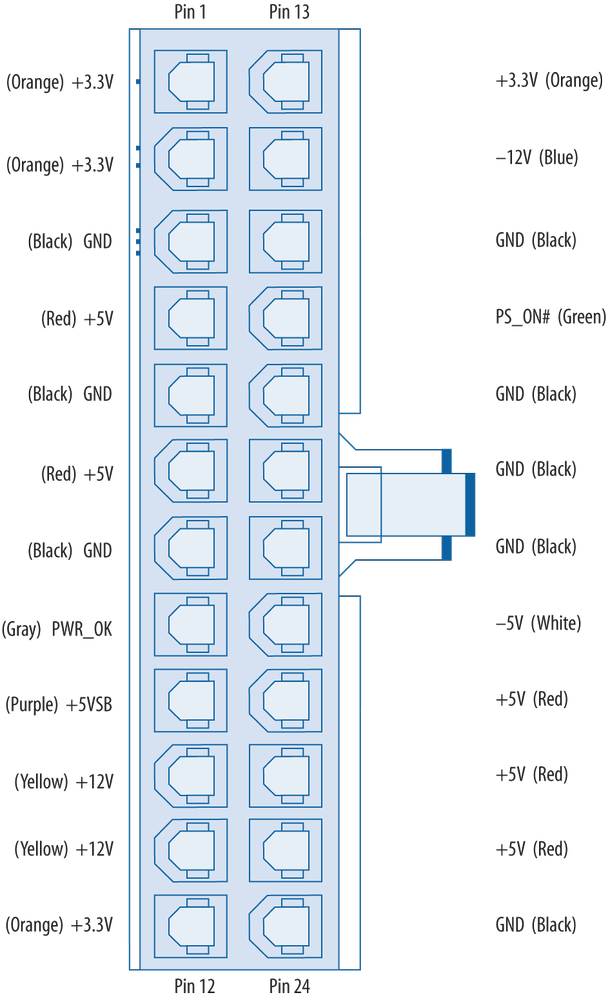
Intel could have introduced yet another supplementary power connector, but instead it decided this time to bite the bullet and replace the aging 20-pin main power connector with a new main power connector that could supply more +12V current to the motherboard. The new 24-pin ATX12V 2.0 main power connector, shown in Figure 16-5, was the result.
The 24-pin main power connector adds four wires to those of the 20-pin main power connector, one ground (COM) wire, and one additional wire each for +3.3V, +5V, and +12V. As is true of the 20-pin connector, the contacts within the body of the 24-pin connector are rated to carry at most 6 amps. That means the four +3.3V lines can carry 79.2W (3.3V x 6A x 4 lines), the five +5V lines can carry 150W, and the two +12V lines can carry 144W, for a total of about 373W. With the 192W of +12V provided by the +12V power connector, a modern ATX12V 2.0 power supply can provide a total of up to about 565W.
One would think 565W would suffice for any system. Not true, alas. The problem, as usual, is a question of which voltages are available where. The 24-pin ATX12V 2.0 main power connector allocates one of its +12V lines to PCI Express video, which at the time the specification was released was thought to be sufficient. But the fastest current PCI Express video cards can consume far more than the 72W that dedicated +12V line can provide. For example, we have an NVIDIA 6800 Ultra video adapter that has a peak +12V draw of 110W.
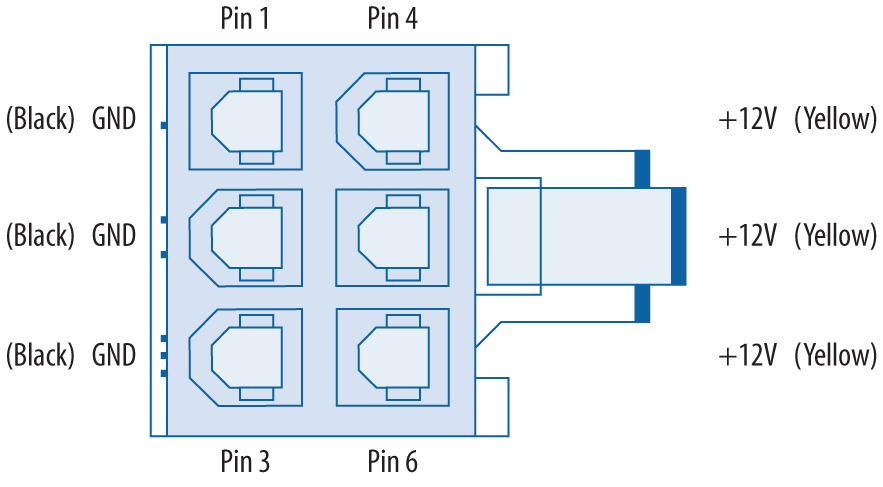
Obviously, some means of providing supplemental power was necessary. Some high-current AGP video cards addressed this problem by including a Molex hard drive connector, to which you could attach a standard peripheral power cable. PCI Express video cards use a more elegant solution. The 6-pin PCI Express graphics power connector, shown in Figure 16-6, was defined by PCISIG (http://www.pcisig.org)—the organization responsible for maintaining the PCI Express standard—specifically to provide the additional +12V current needed by fast PC Express video cards. Although it is not yet an official part of the ATX12V specification, this connector is well-standardized and present on most current power supplies. We expect it to be incorporated in the next update of the ATX12V specification.
The PCI Express graphics power connector uses a plug similar to the +12V power connector, with contacts also rated to carry 8 amps. With three +12V lines at 8 amps each, the PCI Express graphics power connector can provide up to 288W (12 x 8 x 3) of +12V current, which should suffice for even the fastest future graphics cards. Because some PCI Express motherboards can support dual PCI Express video cards, some power supplies now include two PCI Express graphics power connectors, which boosts the total +12V power available to graphics cards to 576W. Added to the 565W available on the 24-pin main power connector and the +12V connector, that means an ATX12V 2.0 power supply could be built with a total capacity of 1,141W. (The largest we know of is a 1,000W unit available from PC Power & Cooling.)
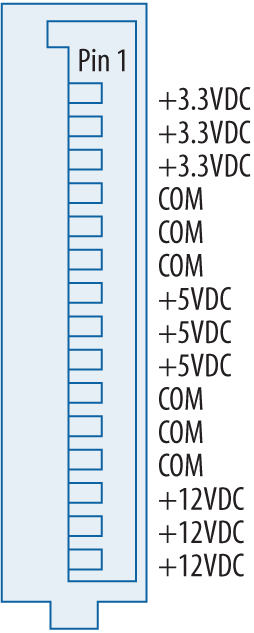
With all of the changes over the years, device power connectors had been neglected. Power supplies made in 2000 included the same Molex (hard drive) and Berg (floppy drive) power connectors as power supplies made in 1981. That changed with the introduction of Serial ATA, which uses a different power connector. The 15-pin SATA power connector, shown in Figure 16-7, includes six ground pins, and three pins each for +3.3V, +5V, and +12V. In this case, the high number of voltage-carrying pins is not intended to support higher current—an SATA hard drive draws little current, and each drive has its own power connector—but to support the make-before-break and break-before-make connections needed to allow hot-plugging, or connecting/disconnecting a drive without turning off its power.
Despite all of these changes throughout the years, the ATX specification has gone to great lengths to ensure backward compatibility of new power supplies with old motherboards. That means, with very few exceptions, you can connect a new power supply to an old motherboard, or vice versa.
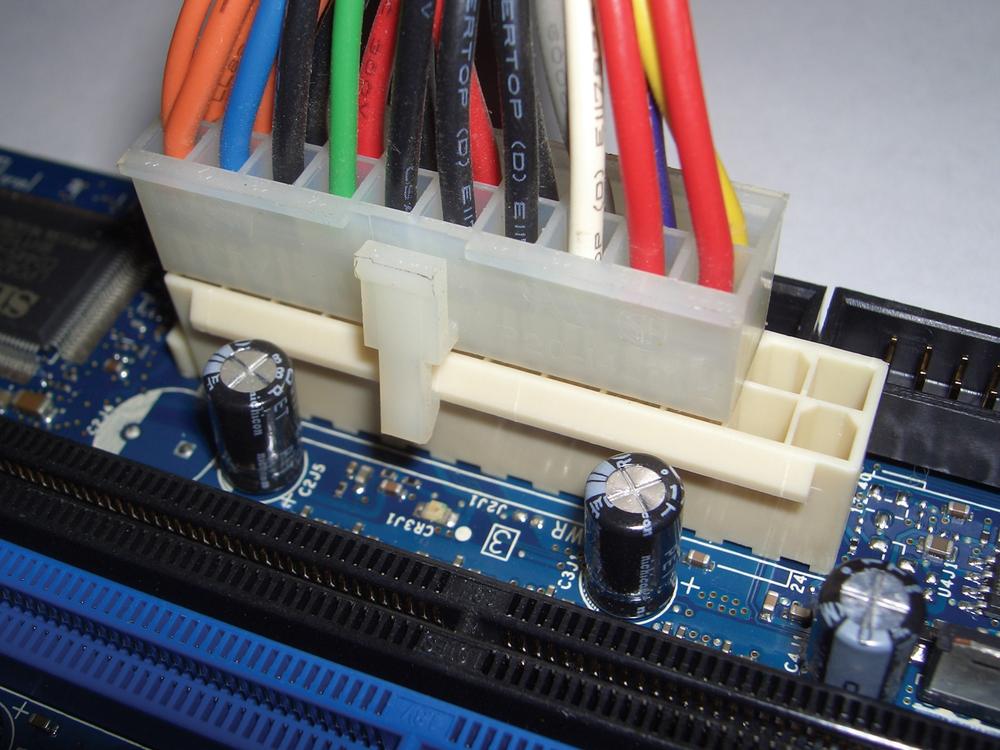
Even the change in the main power connector from 20 to 24 pins presents no problem, because the newer connector keeps the same pin connections and keying for pins 1 through 20, and simply adds pins 21 through 24 onto the end of the older 20-pin layout. As Figure 16-8 shows, an old 20-pin main power connector fits the 24-pin main power connector perfectly. In fact, the main power connector socket on all 24-pin motherboards we have seen is designed specifically to accept a 20-pin cable. Note the full-length ledge on the motherboard socket in Figure 16-8, which is designed to allow a 20-pin cable to latch into place.
Of course, the 20-pin cable doesn't include the extra +3.3V, +5V, and +12V wires that are present on the 24-pin cable, which raises a potential problem. If the motherboard requires the extra current available on the 24-pin cable to operate, it can't run using on the 20-wire cable. As a workaround, most 24-pin motherboards provide a standard Molex (hard drive) connector socket somewhere on the motherboard. If you use that motherboard with a 20-wire power cable, you must also connect a Molex cable from the power supply to the motherboard. That Molex cable provides the extra +5V and +12V (although not +3.3V) needed by the motherboard to operate. (Most motherboards do not have +3.3V requirements higher than the 20-wire cable can meet; those that do can use a supplemental VRM to convert some of the additional +12V supplied by the Molex connector to +3.3V.)
Because the 24-pin ATX main power connector is a superset of the 20-pin version, it's also possible to use a 24-pin power supply with a 20-pin motherboard. To do so, seat the 24-pin cable in the 20-pin socket, with the four unused pins hanging over the edge. The cable and motherboard socket are keyed to prevent installing the cable improperly. One possible problem is illustrated in Figure 16-9. Some motherboards put capacitors, connectors, or other components so close to the ATX main power connector socket that there's insufficient clearance for the extra four pins of the 24-pin power cable. In Figure 16-9, for example, those extra pins intrude on the secondary ATA socket.
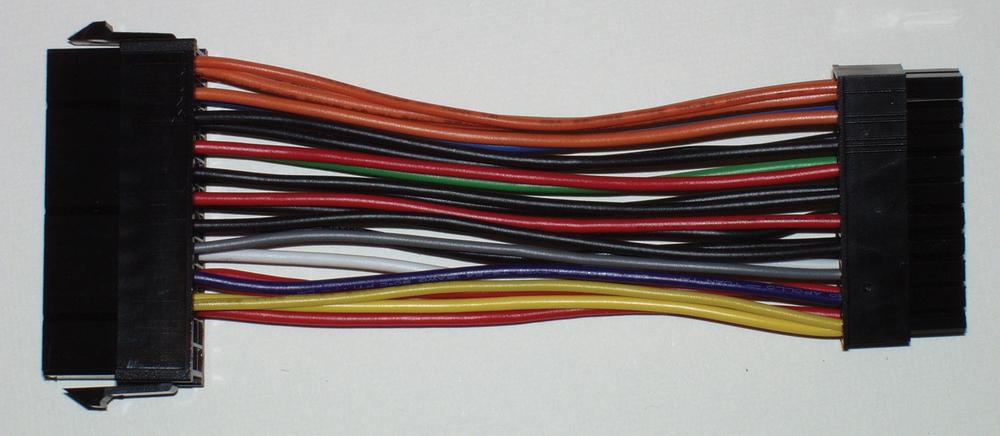
Fortunately, there's an easy workaround for this problem. Various companies produce 24-to-20-pin adapter cables like the one shown in Figure 16-10. The 24-pin cable from the power supply connects to one end of the cable (the left end in this illustration), and the other end is a standard 20-pin connector that plugs directly into the 20-pin socket on the motherboard. Many high-quality power supplies include such an adapter in the box. If yours doesn't and you need an adapter, you can purchase one from most online computer parts vendors or a well-stocked local computer store.
