Strech out thine arme no farther then they sleve wyll retche
Proverb (Coverdale 1541)
This Historical Summary is intended to provide the reader with an outline of the events and arguments which led up to the start of Operation MARKET-GARDEN and with a précis of what actually happened, so that the greater detail which is presented in the text of the itineraries can be placed in perspective. Frequent reference both to the in-text maps and to the Holts’ Map which accompanies this volume will aid understanding. The Plan in Outline is presented first, followed by An Overall Summary of What Happened so that readers can be familiar with the shape of the campaign before diving deeper into it.
An explanation of what actually happened over the 10 days of the Operation is greatly complicated by the fact that distinct and different actions took place simultaneously at locations separated by 60 miles (100 kilometres) or more. Therefore, with the aim of allowing the reader to obtain a clear picture of what happened where, we give a composite formation by formation description of What Happened on 17 September, the first day of the Operation, but describe subsequent and more detailed events in the itineraries on the spot where they took place. The HISTORICAL SUMMARY is thus divided into the following sections -
THE PLAN IN OUTLINE
AN OVERALL SUMMARY OF WHAT HAPPENED 17-25 SEPTEMBER REASONS WHY OPERATION MARKET-GARDEN WAS LAUNCHED
All over by Christmas?
In at the kill - Patton or Montgomery?
A Broad or a Narrow Front?
The Field-Marshal and the V2
REASONS WHY OPERATION MARKET-GARDEN FAILED
Inexperienced Commanders
Absentee Management
Failure to fly sufficient airborne forces in on 17 September
Delay at the very beginning at Joe’s Bridge
Not enough urgency by the British armour - ‘Success is a heady wine’
Failure at Son
American confusion at Nijmegen
Drop zones too far from the Arnhem Bridge
Failure of the British radios at Arnhem
But what about the Germans?
Intelligence, the SS and King Kong
THE PLAN IN MORE DETAIL
XXX Corps (British)
101st Airborne Division (US) (The Screaming Eagles)
82nd Airborne Division (US) (The All Americans)
1st Airborne Division (Brit) (The Red Berets)
WHAT HAPPENED ON 17 SEPTEMBER
XXX Corps
101st Airborne Division
82nd Airborne Division
1st Airborne Division
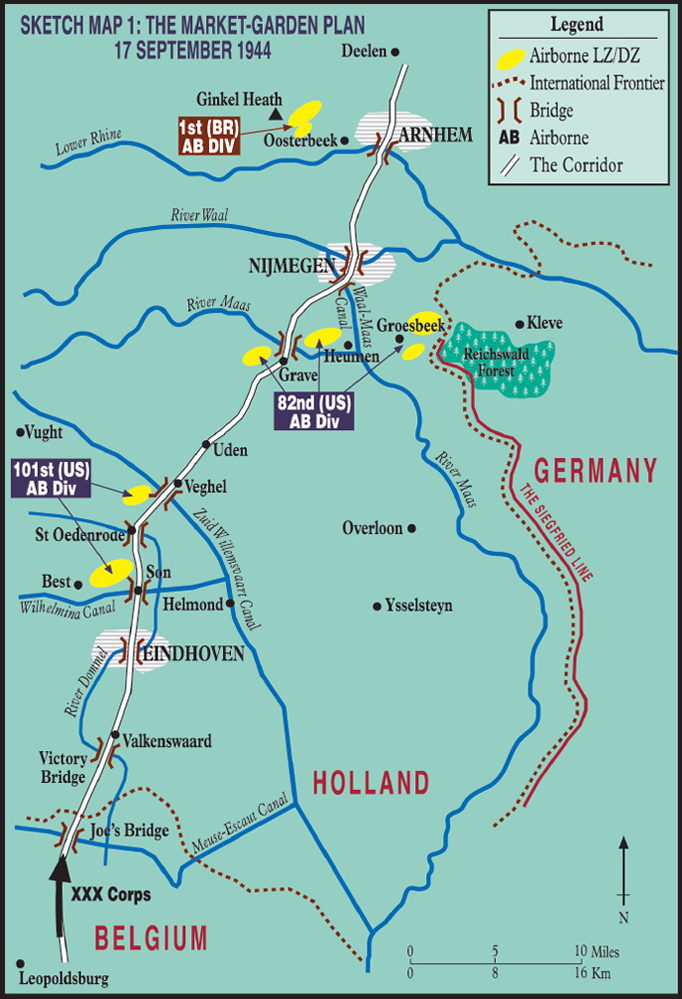
THE PLAN IN OUTLINE
The Military Aim
To establish a 21st Army Group bridgehead across the River Rhine at Arnhem.
The Method
Arnhem lay at the end of a main road (The Corridor) leading from XXX Corps’ forward positions at Joe’s Bridge in Belgium, through 100 kms of enemy-held Holland. The road crossed bridges over five significant river obstacles.
The method was to capture all the bridges by dropping airborne forces on or around them (OPERATION MARKET) and then to drive ground troops at speed up the road and over the bridges using an armoured column reinforced by artillery and air support (OPERATION GARDEN).
The Tasks
Airborne Forces- First Allied Airborne Army
101st (US) AB Division (The Screaming Eagles). Commanded by Major-General Maxwell D. Taylor. Tasked to drop between Veghel and Eindhoven and to open, and keep open, the XXX Corps Corridor over the Wilhelmina Canal at Son and the Zuid Willemsvaart Canal at Veghel, as well as crossings over the smaller rivers Dommel and Aa.
82nd (US) AB Division (The All Americans). Commanded by Brigadier-General James M. Gavin. Tasked to drop between Grave and Groesbeek, to take the bridges over the River Maas at Grave and the Waal at Nijmegen, and to dominate the high ground, known as the Groesbeek Heights, between Nijmegen and the German border.
1st (BR) AB Division (The Red Berets). Commanded by Major-General R.E. Urquhart with General Stanislaw Sosabowski’s First Polish Independent Parachute Brigade Group under his command. Tasked to capture the bridges at Arnhem and to establish a bridgehead across the Rhine.
XXX Corps. Commanded by Lieutenant-General Brian G. Horrocks. Tasked to advance at maximum speed northwards along The Corridor and to establish positions on the high ground north of Arnhem.
AN OVERALL SUMMARY OF WHAT HAPPENED 17-25 SEPTEMBER 1944
On Sunday 17 September 1944 in Operation MARKET, an Allied airborne army consisting of the American 82nd and 101st Airborne Divisions, and the British 1st Airborne Division, dropped behind enemy lines in Holland intending to capture the bridges over five significant rivers.
On the ground, in Operation GARDEN, the British XXX Corps had the simultaneous task of driving rapidly up a single road into enemy territory and across those bridges to their objective 60 miles (100 kms) away - the town of Arnhem.
The operation had been mounted at the instigation of Field-Marshal Montgomery in a bid to outflank the defences of the Siegfried Line and then, by driving south into the Ruhr, finish the war by Christmas 1944 (Sketch Maps 1 & 2).
The operation failed. The ground forces did not get across the Arnhem bridge. The men of the British 1st Airborne Division were forced into two small areas - one around the northern end of the Arnhem road bridge (Sketch Map 6) that was their target and another that came to be called The Cauldron (whose shrinking boundary was called The Perimeter) (Sketch Map 5) around the Hartenstein Hotel in Oosterbeek. The Germans called it the Hexenkessel - the witches’ cauldron. Despite an astonishing display of determination and stubborn resistance, they were surrounded and defeated before XXX Corps could reach them. Of the 10,000 or so men who had landed around Arnhem by parachute or glider less than a quarter returned.
Much mutual criticism followed. The Americans accused XXX Corps of being too slow. In his memoirs General Ridgway said
[The] stand at Arnhem was a monument to British valor, but a monument too to human weakness, to the failure to strike hard and boldly.
The British claimed that Eisenhower, the Supreme Commander, did not give them the administrative support that they needed to enable the operation to succeed. The British Army blamed the Air Forces for not dropping enough men on the first day of the operation… wireless sets did not work… air photos were ignored… the Germans captured the operational plans… the British tanks did not like to fight at night… the Americans took too long to capture the Nijmegen bridge… excuses and accusations were legion… and so was the bravery of those who fought, American, Belgian, British, Dutch, Polish, and German.
REASONS FOR LAUNCHING OPERATION MARKET-GARDEN
There are many interlocking reasons why MARKET-GARDEN took place. The most fascinating and all-pervasive aspect of what was one of the Second World War’s most daring and innovative operations is that it was promoted by the most careful and conservative of all generals - Montgomery. Why did he do it? Some possible reasons are discussed below.
All over by Christmas?
Following the success of the airborne landings on 6 June further airborne operations were considered as early as 13 June in an attempt to widen the Normandy bridgehead. The first was code-named WILD OATS and was a drop behind German lines south-west of Caen, but it was not carried out for a number of reasons, including concern over the German flak that might be encountered. Next, a drop code-named BENEFICIARY envisaged the capture of St Malo and, once again, concern about German flak was one of the reasons why the drop was never made. By the end of July two more drops had been considered but cancelled.
On 25 July the US 1st Army began an assault that broke through at St Lo and then on 1 August Lieutenant-General George Patton’s 3rd Army smashed out via Avranches and began an armoured drive that covered 100 miles in a week, reaching le Mans on 8 August (see Sketch Map 2). That same day, following active prompting by General George C. Marshall, U.S. Chief of Staff in Washington, who had been impressed by the activities of Brigadier Orde Wingate in Burma, the 1st Allied Airborne Army was formed under US Lieutenant-General Louis H. Brereton.
Once again an airborne operation was planned, this time not in an effort to aid a breakout, but as a complement to the advancing US ground forces. This plan, code-named TRANSFIGURE, was completed by 13 August and cancelled five days later as Patton’s rapid progress made it unnecessary.

Montgomery’s British 21st Army Group break-out from Normandy began more slowly on 30 July and was confirmed by the defeat of the Germans at Falaise by British, Canadian and American forces on 19 August. Thereafter the British advance accelerated. On 3 September they captured Brussels and the next day Antwerp, the culmination of a striking advance of over 250 miles in five days by the 11th and Guards Armoured Divisions. During this period airborne operations LINNET and LINNET II were conceived and cancelled, but the intent to use the Allied Airborne Army was firmly entrenched in the minds of the Allied Commanders. The U.S. chiefs in particular wanted to see what the airborne force could do. Just about everyone on the Allied side had the ‘victory virus’. So dramatic had been the achievements from the middle of August to the first week of September - and the Russians had reached Yugoslavia destroying 12 German divisions in the process - that it looked like a repeat of the German collapse of 1918. Anything now seemed possible.
Thus, by the beginning of September 1944, the British had liberated Brussels and the Americans and the French Paris, and the Allied armies were sweeping across Europe towards Germany. Commanders, British and American, felt that the Germans were effectively defeated and that the war could end quickly, maybe even by Christmas: too quickly, perhaps, to make use of the Airborne Army (for whom new shoulder patches had been made) unless something was planned very quickly - and then there was the question of who would be in the military limelight at the war’s end, Montgomery or someone else?
In at the Kill - Patton or Montgomery?
Since October 1942 and his victory at El Alamein Montgomery had never lost a battle. That fact and his skilled use of the media kept him in the public eye and high on the popularity list both in Britain and America. His direct criticisms of the failure of the American troops at Kasserine in February 1943 brought him into conflict with General George Patton and in the invasion of Sicily Patton challenged Montgomery’s 8th Army to beat his own 7th Army in a race to complete the capture of The Island. Patton won.
The personal rivalry between the two men was firmly established, but when Patton was sidelined for slapping a shell-shocked private soldier in the face after accusing him of being a coward, it looked as if the contest was over. Patton, however, was too good a general to leave on the shelf and he was nominated to command the shadow army in England that was part of the deception plan prior to the Normandy landings. On 1 August 1944, he was back in action in Normandy with his 3rd Army and led the remarkable American drive across France in direct contrast to the stalemate on the British front around Caen for which Montgomery was being criticised. Now Patton was getting the popular headlines - not Montgomery - and it looked as if the war might soon be over. How might Montgomery regain the limelight and beat Patton into Berlin?
It may seem simplistic to attribute major historical events to the personal ambitions of individuals, but it is not so. Too often it is assumed that the commanders of armies or the leaders of countries are not influenced by the same desires as ordinary mortals - for recognition, promotion, success and public acclaim. They are, and in spades. To aggravate matters in the Montgomery versus Patton rivalry there was the ‘Broad Front’ and ‘Narrow Front’ controversy.
As the Allied armies advanced towards Germany so their supply lines became longer and longer. All materiel was still coming onto the continent via Normandy and, despite the efforts of the Red Ball Express, an almost continuous line of lorries stretching the near 500 miles from the beaches, it was becoming increasingly difficult to provide the leading formations with the supplies that they needed - in particular petrol. Such were the shortages that the fighting generals argued with each other over who should get what. What was really needed if the momentum of the advances was to be sustained was a port in the north -Antwerp.
Eisenhower also had the challenge of deciding upon the best way to end the war now that the German border was in sight. His favoured policy was that of an advance on a broad front, but without Antwerp and with the shortage of supplies the real situation on the ground boiled down to that of two main thrusts - one by Patton in the area of Metz and one by Montgomery nearing the Dutch border. Montgomery argued that there should be a single rapier-like thrust in the north under his command (Bradley told Patton that he thought it would be a ‘butter-knife thrust’), while Patton naturally wanted to maintain his momentum in the south (in his diary on 17 September he noted, ‘To hell with Monty. I must get so involved that they can’t stop me’) and both knew that there were not enough supplies for each to have their own way. Therefore each pleaded his own case to the Supreme Commander. Montgomery, the Land Forces Commander since D-Day, was the senior ranking officer and used that position in getting access to Eisenhower, but he was soon to lose that job to the American, something that he did not relish and for which he would need to be compensated. Perhaps he could be allowed to have his airborne operation but not his single all-out thrust.
In America President Franklin D. Roosevelt was coming up to be elected for a record fourth term and now that for the first time American forces in Europe outnumbered those of Britain, Eisenhower was under political pressure to see that they were well to the fore and in the news. In fact if he had decided to go for the single thrust that Montgomery advocated it would have probably been led by the stronger force - the Americans - but that would have upset the delicate balance of Allied co-operation and so that option was out. In Britain, too, it was clear that party politics, suspended for the duration of the war, were going to return in the near future and politicians, whose personal ambitions had been sublimated in the National Government, began to make moves. One of those moves could have prompted Operation MARKET-GARDEN and all because of a hole in the ground in Chiswick.
The Field-Marshal and the V2
On 1 September 1944, Eisenhower assumed command of the Allied ground forces in Europe, replacing Montgomery who, presumably as compensation, was promoted to Field-Marshal. It did not placate him. Instead he renewed his efforts to persuade the Supreme Commander to divert all supplies to him in order to make his ‘rapier-like thrust’ in the north and then a new urgency suddenly materialised - a German secret weapon appeared.
London had thought itself safe from the air once the Blitz was over but on 15 June 1944, the attack on London by the VI flying bombs began in earnest with over 200 being launched in the first 24 hours. However, by September 1944 the VI menace seemed to be over since the rapidly advancing Allied Armies had put London out of its range. Provided that the armies continued to advance at their recent speed even the rocket weapon that intelligence had reported would not be able to reach London. Duncan Sandys, who had been appointed by his father-in-law Churchill a year earlier to co-ordinate intelligence information on the VI and V2, decided to tell the nation that at last its capital city was safe. Why do that? Well, it could be a way for an aspiring politician to make sure of his public image, in anticipation of the approaching peace and imminent re-emergence of party politics. On Thursday 7 September he held a press conference announcing the end of ‘the battle of London’ and on the next day newspaper headlines, accompanied by pictures of Duncan Sandys, declared that the city was at last safe. That evening mysterious explosions occurred in Chiswick and near Epping. Sandys knew that the first V2s had arrived but the public did not and if they found out the real reason for the explosions his image would be less than a happy one.
What could be done to rescue the situation? Perhaps if the V2 launching sites could be over-run in the next few days it might be possible to prevent a major bombardment or even keep the existence of the weapon secret long enough for the Chiswick explosion not to have a negative effect on Sandys’standing. (In fact a Secrecy Order was placed upon the news so that it would not leak out to the public) The rockets had come from an area in Holland between the Hague and Wassenaar, roughly l00kms west of Arnhem. A message from the Chiefs of Staff certainly went to Field-Marshal Montgomery almost immediately, whether prompted by Sandys or not, asking what could be done about the Dutch V2 launching sites. Within 48 hours Montgomery had Eisenhower’s approval for a new airborne operation designed to cross the Rhine and to debouch into the areas from which the V2s were being launched. It was called MARKET-GARDEN and it took the place of yet another cancelled plan - COMET. The Allied Airborne Army had seven days in which to get ready.
REASONS WHY OPERATION MARKET-GARDEN FAILED
It is rarely possible to find a single reason why a complicated military operation failed. Generally there is a mix of reasons and there is certainly a mix for MARKET-GARDEN, although we do propose later what we feel was the major factor.
Hindsight, of course, allows one to highlight factors that were not visible to those involved (e.g. the strength of the German resistance) - a matter of not being able to see the wood for the trees - and it is easy to pontificate from an armchair.
Nevertheless, where planning or performance seems inadequate, it is important to say so in order to seek an understanding of why events unfolded as they did.
Inexperienced Commanders
The overall responsibility for the operation was that of the American Lieutenant-General Brereton and his appointment of the British Lieutenant-General ‘Boy Browning to plan and command it was a mistake. Browning, though the ‘father’ of the British airborne forces, had no airborne combat experience. On 17 September he flew in his whole Corps HQ, taking thirty-eight precious gliders away from the combat troops, yet exerted no significant pressure on the conduct of operations. What is more, the bulk of the airborne forces involved was American and, in Major-General Ridgway, Brereton had available an experienced and aggressive airborne general with recent and successful action in Normandy. He would have kept a firmer and more driving hand on the tiller. In his biography of Ridgway Jonathan M. Sofer tells of a rivalry between the two men in which Browning, ‘who hoped to get command of all Allied airborne forces (for OVERLORD) had virtually accused Ridgway of cowardice for taking a boat into Sicily instead of jumping himself’.
Major-General Urquhart, chosen to command the British 1st Airborne Division at Amhem, also had no airborne experience and accepted his orders to land his men too far from the target. Had he been a true airborne general it is likely that he would have refused to agree ‘to the point of resignation’ and the dropping plan might have been changed in order to put troops down nearer the bridge. This might have allowed larger numbers of airborne troops to get to the Arnhem bridge quicker and thus be able to hold onto it until XXX Corps turned up. General John Frost, who had led the airborne stand at the Arnhem Bridge, had some firm views about this, made in an exclusive interview with the authors, more of which is quoted later as appropriate.
A PERSONAL OPINION
By Major-General John Frost
This is a very difficult thing because you’ve got to balance the airborne experience with battle experience and there was nobody in the airborne at the time among the senior ranks who had any battle experience at all. General Lathbury had had only one battle - in Sicily - which had been a pretty abysmal failure anyhow and that was all… It was an airborne division and meant to go with quite a different sort of technique than the ordinary infantry.
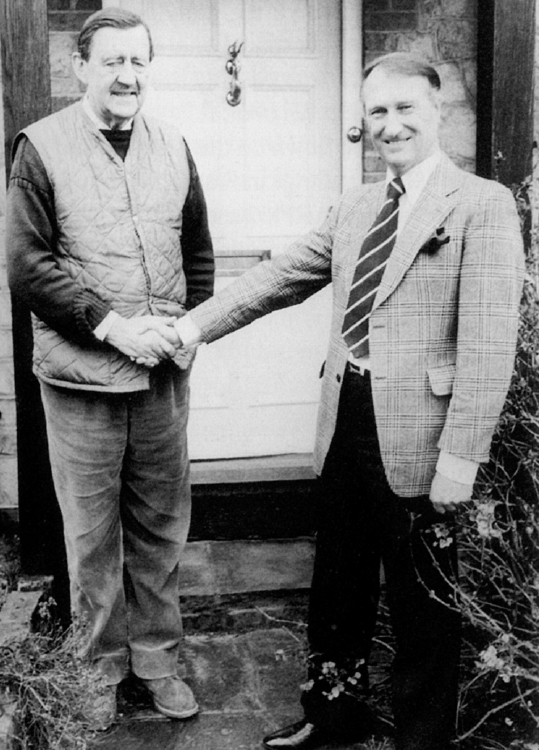
Major-General John Frost with Tonie Holt, 1982.
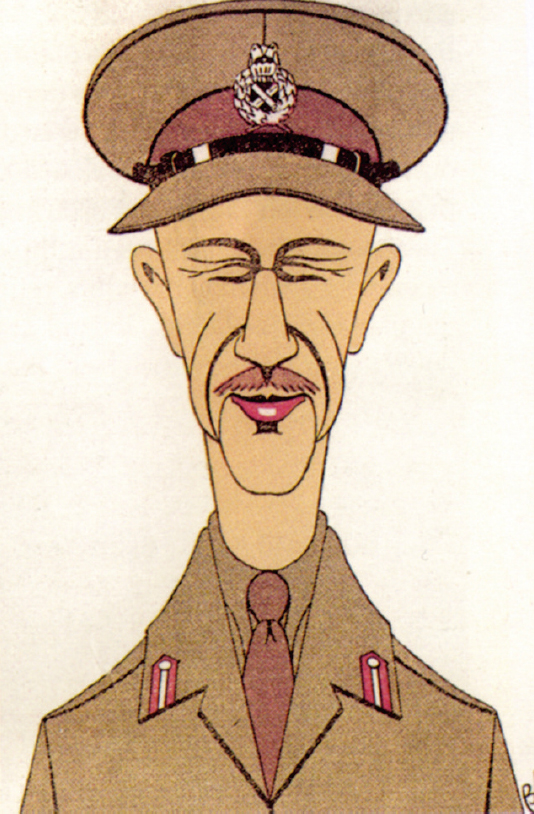
Dutch caricature of Lieutenant-General Sir Miles Dempsey.
The ground forces involved were part of the British 2nd Army commanded by Lieutenant-General Miles Dempsey whose three Corps were to be part of the Operation. XXX Corps was to drive straight up The Corridor road, VIII Corps was to cover the right flank and XII Corps the left. As the fighting progressed the efforts of XXX Corps were frequently diverted from their main task of reaching the bridge at Arnhem by the need to react to flank attacks on The Corridor. Both Field-Marshal Montgomery, the 21st Army Group Commander, and General Dempsey seemed detached from what was going on. General Frost had a view on this.
A PERSONAL OPINION
By Major-General John Frost
When you read the Official History you see how very little is said about activity on the part of the Army Commander. This is General Dempsey… . There is one mention of General Dempsey coming up and he obviously did not meet General Gavin. But if you talk to General Horrocks and say ‘How often did you see Dempsey during this battle?’ he says, I never saw him once - until he had to go back to get orders to withdraw the Division.’
The American Official History does show a picture of General Dempsey and General Gavin conferring but does not say where or when, while General Horrocks said that from the afternoon of 19 September he and General Browning took all the major decisions together.
Failure to fly sufficient forces in on 17 September
If two missions had been flown on the first day it is likely that the airborne forces would have had sufficient strength to take both ends of the Arnhem bridge that day and, despite delays in The Corridor to the south, have held on until XXX Corps arrived. Because he felt that two missions in a day would tire the aircrews, involve night flying and prevent adequate servicing of the aircraft, Brereton ruled that there should be only one, thus forcing the airborne operation to take place over at least three days. Inexplicably Browning accepted this. Ridgway would not have done so. In fact Clay Blair in his book Ridgway’s Paratroopers gives a detailed analysis of how two trips could have been flown on the first day and points out that it was done for the DRAGOON Operation (the Landings in France in August). If the first lift had left England at 0500 hours it would have returned to base at about 1100 hours. There could then have been a three-hour interval for servicing and rest followed by the second departure at 1400 hours, returning at 1900 hours. It would still have been light when the planes arrived over Holland at about 1630 hours and, while it would have been dark when they returned to England, the airfields could have been illuminated.
General Frost was vehement on this point.
A PERSONAL OPINION
By Major-General John Frost
That of course jeopardized the whole operation because once the first lift had been landed and while there were people still dropping and guarding dropping zones that was a fair indication that more people were coming in. I have never been convinced that it wasn’t possible to drop two lifts in the day. After all it’s a comparatively short hop from airfields in the east and south of England to Holland and back. It’s only a matter of an hour’s flying time each way and to my mind it’s nonsense to think that we couldn’t have emplaned in the dark and taken off at first light and those aircraft would all have been back in England by midday at the very latest. There was plenty of time then to have taken the second lift and then drop them and come back. When taxed with this the American Airborne commander Brereton says that his men weren’t skilled enough to fly by night. But nobody had to fly by night. There were quite enough hours of daylight. That to my mind was a very great mistake…. I know that Hollingshurst, one of the senior Air Marshals in the RAF, was very keen to do two in a day. It’s such a silly little hop really when you think what was being done in Burma by the same sort of pilots. The run across to Holland and back was chicken feed.
If there had been two missions on 17 September then at two of the most critical places on The Corridor, i.e. Arnhem and Nijmegen, there would have been sufficient forces for the bridges to be captured quickly. At Nijmegen that could have meant that when XXX Corps arrived at around midday on 19 September the Guards could have crossed the bridge a day and a half earlier than they actually did and with obvious results.
Delay at the very beginning at Joe’s Bridge
Little attention has been given to the effects of the delay in the Guards’ advance caused by the loss of eight or nine tanks not much more than 20 minutes after starting out at 1435 hours on 17 September. As is discussed later on, there is a real possibility that some, if not all, of the tanks were casualties not from German fire but from the ‘friendly fire’ of RAF Typhoons, a fatal hiccup that is ‘overlooked’ in conventional histories. However, the Guards had a very limited objective for the day which was to get to Valkenswaard, only 12 kms up the road, which they did just before darkness. If they had not lost so many tanks early on they might have reached Valkenswaard mid-afternoon and decided to go straight on to Eindhoven, thus liberating it a day earlier. However, the Americans had not captured the bridge at Son intact so that would still have needed repair, but it could have been crossed at least half a day earlier.
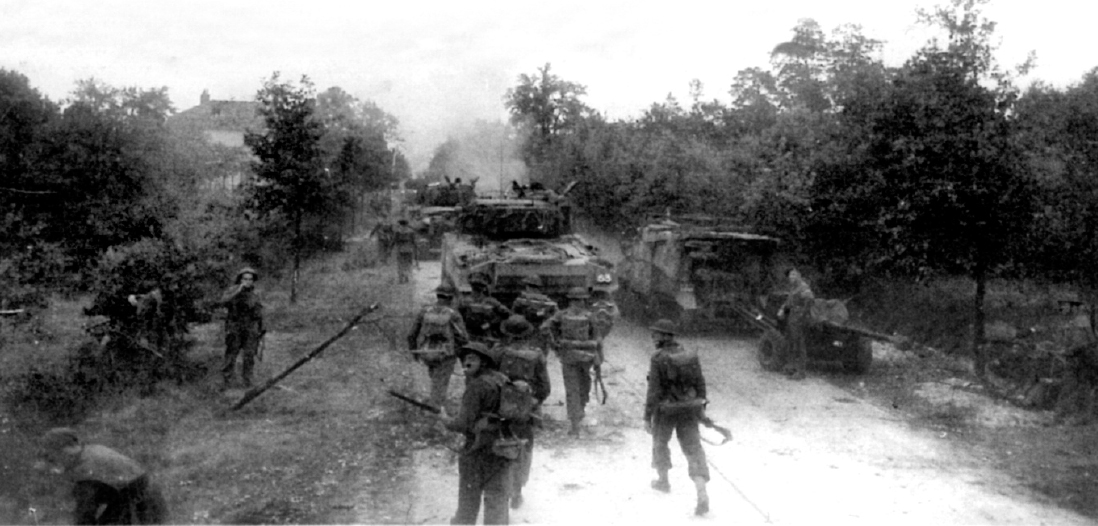
2nd Bn, Irish Guards Tanks and 2rd Bn Infantry at the Belgium-Dutch Border, 17 September 1944. Note the concrete Corridor road.
Not enough urgency by the British armour - ‘Success is a heady wine’.
The blanket criticism given by many American commanders that XXX Corps was too slow (‘they stopped for tea’ is a constant mantra in American accounts) is difficult to refute. (Some Australian historians make exactly the same accusation for the delay in the British exploitation of the landings at Suvla Bay in 1915.) Despite the heinous problems introduced by the one narrow road and the poor weather which limited air support, there are particular times when, given the urgency of the operation, the Guards’ spearhead seemed to be marking time. Even at the very beginning, setting an objective only 12 kms away on the first day, when there were 100 to go and seemingly two days in which to do it, could not have impressed sufficient urgency on the leading troops. General Ridgway tells how on 20 September he came upon British troops stalled on The Corridor around Son, apparently confronted by German forces, and how, after waiting for 40 minutes and seeing no activity, he got into his jeep and drove all the way to Nijmegen. Then perhaps the most difficult of all delays to understand is that in not continuing the advance to Arnhem after crossing the bridge at Nijmegen. The first Grenadier tanks crossed the bridge at about 1830 hours on 20 September, but the advance was not continued until 1100 hours the following day, some 6 hours after all effective action by John Frost’s men at the Arnhem bridge had been overcome. It is interesting to speculate whether, had it been the Irish Guards tanks that had made the first crossing, their natural ebullience would have led them to continue. Speaking long after the war, General Horrocks implied a responsibility for the slowness of the advance. Previous startling progress across France and Belgium, the possibility that the war might be over by Christmas and that the Germans appeared to be beaten, bred an overconfidence that all would go to plan almost without trying. ‘Success’, he said, ‘is a heady wine.’
Failure at Son
The failure of the 101st AB Division to take the Son bridge intact on 17 September held up the advance of XXX Corps, whose forward elements had reached the area around 1900 hours on 18 September. It was eleven hours before the advance could continue. If the bridge had been taken intact, then, even if the armour had stopped overnight to rest and refuel, the effective delay would have been smaller.
American confusion at Nijmegen
The Guards reached Nijmegen at around 1200 hours on 19 September. Browning had emphasised that taking the high ground at Groesbeek was Gavin’s first priority, not the bridge. John Frost disagreed.
A PERSONAL OPINION
By Major-General John Frost
It is in fact a gentle slope and it’s always nice to be a little bit higher than your enemy and as such it does perfectly control the exits from Germany through the rather wooded territory there but what happens on those Groesbeek Heights had absolutely no effect or no influence on what happened at the Nijmegen Bridge. The vital thing here was the bridge. It didn’t matter how much you went and sat on the Groesbeek Heights, which were only about 300 or 400 feet high anyhow, if you haven’t got the Nijmegen Bridge, and no German sitting on top of those heights can hurt anybody who’s trying to take the Nijmegen Bridge. It’s an irrelevant factor in my view.
Gavin, however, told Colonel Lindquist, commanding the 508th PIR, to send a force to the bridge immediately after landing. This was not done (the matter is discussed later). If an American force had gone directly to the bridge they would have taken it and the Guards could have rolled on towards Arnhem on the afternoon of 19 September, some 36 hours earlier than they actually did and while Frost still held the northern end of the Arnhem bridge (effective resistance there finished around 0500 hours on 21 September). If there is ONE reason for the failure of Operation MARKET-GARDEN then in our view it is that the capture of the bridge here was not given absolute priority. The delay allowed the Germans to move strong forces south of the bridge and to prevent its capture for 3 days. No other delay throughout the Operation exceeded 24 hours.
Drop zones too far from the Arnhem Bridge
The major asset of an airborne assault is that of surprise. By having the drop zones so far (the furthest almost 8 miles away and even the nearest some 5 miles away) from their target, the bridge at Arnhem, the 1st AB Division were denied that asset. It was not difficult for the Germans to work out where the British were heading and to concentrate their forces to stop them. The reasons given for the selection of the zones ranged from the condition of the ground to the concentration of enemy anti-aircraft fire in the area. Originally it was intended to drop the Polish forces just south of the bridge itself, but the ground was later considered to be unsuitable. An interesting question is, ‘If it was deemed possible to drop the Polish forces just south of the Arnhem bridge why couldn’t the 1st AB have been dropped there?’ Some cynics have suggested that because the ‘Poland’ that the Polish forces had been formed to liberate no longer existed (the Russians had taken it over) the Poles were likely to become an embarrassment to Britain after the war. Therefore by sending them into an area supposedly well covered by anti-aircraft fire, casualties would be high and the scale of the problem reduced. If this sounds far-fetched, readers would do well to remember what the British did to the Cossacks, as detailed in Nicholas Bethell’s the Last Secret.
While the British are criticised for accepting drop zones too far from their target it is not often pointed out that the 82nd Airborne Division dropped at least 7kms (almost 5 miles) from the Nijmegen bridge. Of course there was concern about the high ground, the built-up area and the possible threat of a German attack from the Reichswald Forest, but it is fair to ask why gliders had not been used to make a coup de main attack on at least one of the bridges, bearing in mind the success of John Howard’s attack at Pegasus Bridge on 6 June. John Frost has his own answer.
A PERSONAL OPINION
By Major-General John Frost
It would certainly have been possible to have dropped a small body of parachutists on the south bank of the river and it certainly should have been possible to have landed a small number of gliders on the road in Arnhem itself to take the north end. After all, if the Germans could do this in 1940 at Eben Emael it’s nonsense to say that we couldn’t have attempted to do the same thing in 1944 with all the advantages and things that we had by this time. So there you have a mistake to start with - a coup de main should have been done.
In his Memoirs Field-Marshal Montgomery wrote,
The airborne forces were dropped too far away from the vital objective - the bridge… - I take the blame for this mistake… I should have ordered… that at least one complete Parachute Brigade was dropped quite close to the bridge so that it could have been captured in a matter of minutes.
Failure of the British radios at Arnhem
Control on a modern battlefield depends upon the radio. General Urquhart lost practical control of his Division almost immediately after landing because his tactical radios did not work. He could talk neither forward to his battalion commanders nor back to XXX Corps. Thus he lost the ability to react to changing conditions. However, each of his battalions had clear orders and one, the 2nd Battalion, did get to The Bridge on the first day. Therefore the only likely tactical result of the radio failure was that Urquhart was unable quickly to divert 1st and 3rd Battalions to reinforce Frost at The Bridge. We discuss possible reasons for the failure of the radios at the visit to Ginkelse Heide.
But what about the Germans?
In the SHAEF weekly intelligence summary No 26 for the week ending 16 September 1944, was the note that two SS Panzer Divisions might be refitting near Arnhem, but the tone and attitude of the overall summary was that the Germans did not have enough forces to hold the West Wall (the Siegfried Line). Thus, the optimistic view that the Germans were effectively beaten was re-inforced, a case of hearing what you want to hear. In a similar situation on 1 July 1916, the British Army suffered the greatest one-day loss of men in its history because the Generals in charge wished to believe that the preliminary artillery barrage would destroy the German barbed wire (it did not). Their subordinates were too frightened to oppose the culture of absolute belief. Here in 1944 such acquiesence to a leader’s view is perhaps understandable, bearing in mind the advances of the previous weeks and so possible enemy reaction was virtually ignored. He was, the culture proposed, already defeated.
In the film A Bridge Too Far the most telling illustration of the failure of the higher commanders to take account of German resistance in their planning, is the performance by Gene Hackman as Major-General Stanislaw Sosabowski protesting at a briefing conference for MARKET-GARDEN. Captain Jan Jozef Lorys was one of the General’s staff officers and he told the authors the background to the real incident. The General, he said, was
a good man to work with, very straightforward… we had air photos twice a day and we saw changes, improvements to German defences around Nijmegen and Arnhem. The General would bring this up at various conferences… this was not very well looked at. At a certain conference he jumped and shouted, The Germans! The Germans!’ It did not look to us that they were beaten completely, they were retreating but they were getting ready to fight.
Sosabowski was of course proved to be correct, not an outcome that endeared him to the British military establishment. Additionally of course there was the unforseen but telling coincidence that the two German officers primarily responsible for the defence of Holland-General Student and Field-Marshal Model - happened to be located where they could react quickly and effectively.
Field-Marshal Montgomery later (Memoirs) admitted that,
The 2nd SS Panzer Corps was refitting in the Arnhem area, having limped up there after its mauling in Normandy. We knew it was there. But we were wrong in supposing that it could not fight effectively.
Intelligence, the SS and King Kong
There was a two-way movement of clandestine activity from Britain to Europe - escapees, generally of Jewish refugees or RAF men shot down, who were coming back and agents going in, under the aegis of organisations like SOE (the Special Operations Executive). An SOE operation in Holland, code-named NORTH POLE, was penetrated by the Germans who operated it themselves between 1942 and 1944 capturing over sixty Dutch agents. Two of the agents escaped via a resistance group named the ‘Dutch-Paris Line’. Associated with this line for a time was a smaller line run by a Dutch agent called Christiaan Lindemans sometimes known as ‘King Kong’ (qv) who is said to have warned General Student that an airborne operation in Holland was likely, though this has since been disproved. Student denied that he had ever met him. Dutch-Paris had over 150 of its members arrested (forty did not survive) and suspicion fell upon Lindemans. Apart from the fact that the instigators of MARKET-GARDEN did not wish to hear any news that might prevent the operation taking place, it was inevitable after NORTH POLE that the British mistrusted reports coming from the Dutch underground - including the one that two SS Panzer Divisions had appeared in the area of the forthcoming operation. There are many variations of the story that General Browning deliberately tore up aerial photographs that showed the presence of enemy tanks. These photos had been taken at the insistence of Major Brian Urquhart (no relation to the General) Browning’s Intelligence Officer. In his entertaining autobiography, A Life in Peace and War, he wrote,
The information coming in from various sources, including the Dutch Resistance, and the mounting evidence that the German Army routed in Normandy was re-forming itself… [made me]… increasingly anxious. I was also worried by the state of mind of General Browning and my brother officers… the MARKET-GARDEN operation was constantly referred to as ‘the party’.
Brian Urquhart noticed comments in a 21st Army Group Intelligence Summary that elements of the 9th and 10th SS Panzer Divisions were refitting in the Arnhem area - something confirmed by Dutch Resistance.
When I informed General Browning and Colonel Walch they … became quite annoyed when I insisted upon the danger… - They said… that I should not worry unduly, that the reports were probably wrong and that in any case the German troops were refitting and not up to much fighting.
Urquhart arranged for RAF Spitfires to take photos near the dropping zones scheduled for 1st Airborne Division.
The pictures when they arrived confirmed my worst fears. There were German tanks and armoured vehicles parked under the trees within easy range of the 1st Airborne Division’s main dropping zone.
Urquhart showed the pictures to Browning only to be ordered to go on sick leave as he was ‘suffering from acute nervous strain’. It was clear that ‘the party’ was not going to be cancelled for any reason but Urquhart does not say what happened to the pictures. None have ever been found. After the war Urquhart became Under Secretary-General of the United Nations, was knighted and lives in New York.
THE PLAN IN MORE DETAIL
XXX Corps - Commanded by Lieutenant-General Brian Horrocks (Sketch Map 1)
The Corps’ aim was simple - to advance with maximum speed from the bridgehead across the Meuse-Escaut Canal at Joe’s Bridge and, using the bridges captured by the airborne forces, get to Arnhem, there to establish itself on the high ground with a view to exploiting beyond to the Zuyder Zee (now called IJsselmeer) and ideally to get to Arnhem within two days. The 5th Guards Armoured Brigade of the Guards Armoured Division was to lead the attack with the Irish Guards Group of infantry and tanks at the front. Thirty minutes before zero hour a heavy concentration of artillery was to be laid upon enemy gun positions and Typhoons of 83rd Group RAF were to give close air support. Because so many earlier planned airborne operations had been cancelled at the last moment, Horrocks did not intend to give the signal for the Guards to advance until he saw the airborne armada overhead and therefore knew for certain that the operation was ‘on’.
101st Airborne Division - Commanded by Major-General Maxwell Taylor (Sketch Map 1)
When the Division had dropped in Normandy on 6 June it had suffered many casualties as a result of having been spread over a wide area. General Maxwell Taylor determined not to repeat the experience and planned to concentrate his drop zones. His Division had three Parachute Infantry Regiments - 501st, 502nd and 506th with the following tasks. -
• The 501st (Colonel Howard R. Johnson) was to drop on DZ A nearVeghel and to take the road and rail bridges over the Aa River and the Zuid Willemsvaart Canal at Veghel.
• The 502nd (Colonel John H. Michaelis) was to drop on Zone B northwest of Son (later to be used for gliders) and to secure the DZ for the gliders, take the road bridge over the Dommel at St Oedenrode, be prepared to relieve the 506th at Son and help in the move on Eindhoven.
• The 506th (Colonel Robert R. Sink) was to drop on Zone C beside Zone B (also to be used later for gliders) and to seize the bridge at Son over the Wilhelmina Canal and then move south to take Eindhoven and the four road bridges over the Dommel River. A minority task was to take the road and rail bridges at Best.
Not only was the Division to take the crossings, it was also to hold the towns and to keep open the 16 miles (25 kms) of The Corridor that passed through them. It was a task that Maxwell Taylor likened to the task of protecting the railways from the Indians in the opening of the West.
82nd Airborne Division - Commanded by Brigadier-General James Gavin (Sketch Map 3) The task of the Division was to seize the bridge over the Maas at Grave, to take the high ground in the area of Groesbeek to the east of Nijmegen, to take at least one of the four bridges over the Maas-Waal Canal that guarded the western approach to the city and to take the main road bridge over the Waal that carried The Corridor road through the centre of Nijmegen (Sketch Map 3). Since the Division was further up The Corridor than the 101st, the ground troops of XXX Corps would take longer to reach it and General Gavin, prompted by Browning, adopted a defensive stance in the Nijmegen area, believing that taking and holding the high ground at Groesbeek as a buffer to German attacks from over the border was essential to, and took priority over, the taking of the main road bridge.
When the Division had jumped in Sicily, Salerno and Normandy, General Gavin had set off in the lead plane. He did the same thing here and had with him Captain Arie D. Bestebreurtje, a Dutch officer, whose role was to liaise with and to obtain information from the Dutch people. Gavin’s Division consisted of three Parachute Infantry Regiments - the 504th, the 505th and the 508th and he was promoted to Major-General during the Operation.
• The 504th (Colonel Ruben H. Tucker) was to drop both north and south of the nine-span bridge over the River Maas at Grave, to take and hold it, and to head for the smaller bridges over the Maas-Waal Canal at Heumen (Molenhoek), Malden, Hatert and Honinghutje.
• The 505th (Colonel William E. Ekman) was to drop south of the town of Groesbeek, move north and take and hold it as well as a glider landing zone south-east of Groesbeek. It was to hold the high ground in the area and assist the 504th in the taking of the bridges at Maiden and Heumen.
• The 508th (Colonel Lindquist) was to drop on the high ground north of Groesbeek, establish road blocks to the east of Groesbeek/Berg en Dal to stop German attacks from the Reichswald/Wyler area and then to take the Nijmegen road bridge. There is doubt, however, as to when the latter task was given to Lindquist. There were further tasks of helping with the taking of the bridges at Hatert and Honinghutje.
1st Airborne Division - Commanded by Major-General Roy Urquhart (Sketch Map 4)
The primary task of the Division was to seize the railway bridge, the pontoon bridge and the road bridge over the Lower Rhine at Arnhem. Since this was the task deepest into enemy-held territory it was therefore the most dangerous. Originally it had been given to the 101st, but as the British had already spent weeks planning actions in the area for OPERATION COMET (which was cancelled), Lieutenant-General ‘Boy’ Browning, the Deputy Commander of the 1st Allied Airborne Army, decided that the British Division would have the job instead. Urquhart, although lacking airborne experience, had seen much combat and had proved himself to be a good leader. Despite the current planning climate that proposed that airborne troops should be set down as near as possible to their objectives, Urquhart was forced to choose DZs and LZs between 5 and 8 miles west of the bridge, thus losing the element of surprise. (His reasons are discussed at the stop at Ginkelse Heide in Itinerary 5). When General Gavin heard the plan he said, ‘My God, he can’t mean it’.
Urquhart’s Division consisted of the 1st and 4th Parachute Brigades, each of three battalions, the 1st Airlanding Brigade, again with three battalions, and the Polish Parachute Brigade Group. Because of limited aircraft availability Urquhart decided to land his force over two days with the following first day units and tasks -
• 1st Airlanding Brigade (Brigadier P. H. W. ‘Pip’ Hicks) (1st Border Regiment, 7th Kings Own Scottish Borderers, and 2nd South Staffords) - to land on LZ ‘S’ and to secure it for unloading the first lift and for the arrival of the second lift on 18 September. In addition to set up defensive posts on the main roads west of the LZs.
• 1st Parachute Brigade (Brigadier G. W. Lathbury) (1st, 2nd and 3rd Parachute Battalions) - to land on DZ ‘X’ and LZ ‘Z’ with the task of seizing and holding the bridges at Arnhem. First priority was given to the main road bridge. Battalions followed three different routes, with only one company (of the 1st Battalion) kept back as a divisional reserve, while the Recce Squadron of the Brigade was to attempt a coup de main operation using jeeps to capture the bridges.
On the second day the remaining elements of the Division were scheduled to arrive: -
• 4th Parachute Brigade (Brigadier ‘Shan’ Hackett) - to land on DZ T and LZ ‘Z’ with the tasks of approaching Arnhem along the Ede road in order to take the high ground north of the town and to secure the drop zones for the later arrival of the 1st Polish Parachute Brigade.
• 1st Polish Parachute Brigade (Major-General Sosabowski) - to land on DZ ‘K’ (south of the Arnhem road bridge) and LZ ‘L’ (north of the Rhine at Papendal) with the task of crossing the road bridge and occupying the eastern part of Arnhem.
WHAT HAPPENED ON 17 SEPTEMBER
Shortly after 1400 hours all of the airborne forces were on the ground.
XXX Corps
General Horrocks set up his HQ on top of the factory roof just to the east of Joe’s Bridge, in full view of the bridge itself. Although he was told by radio that the air armada was on its way, he waited until he saw the planes overhead before he set H-Hour as 1435 hours, but in doing so lost several hours of daylight in which progress might have been made. The leading troop of tanks was commanded by Lieutenant Keith Heathcote of 3rd Squadron, 2nd Battalion Irish Guards, and as he set off the artillery barrage lifted from the German gun positions and formed a moving screen in front of him. The leading tanks had crossed the border into Holland by 1500 hours, but once there were held up by determined enemy resistance, so that it was not until around 1815 hours that the Guards began to move forward again. By darkness the advance had reached only to Valkenswaard, just 8 miles up the 60-mile (100 kms) corridor to Arnhem and, on hearing that the bridge at Son had been blown, Brigadier Gwatkin, the 5th Guards Brigade Commander, decided not to resume the advance until the following morning. It had been a hard day and rather than the low-grade static troops that the Corps had expected to meet, four German infantry battalions, two battalions of the 6th Parachute Regiment and two battalions of the 9th SS Division, had opposed the advance. With twenty-four hours left the Corps still had 52 miles to go to Arnhem.
101st Airborne Division
Four hundred and twenty-eight planes carried the Division into battle. Only three failed to reach a DZ - one pathfinder and two carrying parachutists - but the glider landings an hour later were less fortunate. Seventy gliders took off from England, but only 53 came in without damage. Two failed to leave England, one landed in the Channel, three crashed on the DZ and the rest were scattered. The gliders brought in artillery pieces and observers, plus engineers and 32 jeeps, but it would be seven days before the whole Division was on the ground. In one glider was Walter Cronkite, a reporter for United Press, who would later cover the Nuremberg Trials and become a world-famous television anchor man for CBS.
When Lieutenant-Colonel Harry Kinnard commanding the 1st Battalion of the 501st PIR landed he discovered that he was near the village of Kameren some three miles north-west of his scheduled DZ. Nevertheless he moved quickly towards Veghel led by some of his men who had taken bicycles and lorries in their eagerness to reach their objectives. The other two battalions had landed on DZ ‘A’ in good formation and met little opposition. The town was quickly taken, together with the bridges over the Aa and the Zuid Willemsvaart Canal and some 50 German prisoners.
• 502nd PIR. Best and St Oedenrode
Major-General Maxwell Taylor jumped with the 1st Battalion of the 502nd which was commanded by Lieutenant-Colonel Patrick Cassidy, both of whom had been photographed together in the doorway of their aircraft before taking off from Welford, one of twenty-four airfields in England used for the lift. The battalion dropped two miles south of its planned DZ but Cassidy gathered his men and after an exchange of fire with Germans in the town, in which 20 of the enemy were killed and fifty-eight captured, took St Oedenrode. The town of Best, however, was to prove more difficult.
The initial force that set off for Best was ‘H’ Company reinforced with machine guns and engineers. The road and rail bridges there were not on the direct line of advance proposed for XXX Corps, but Maxwell Taylor had added them to his tasks in order to provide an alternative route should the main Son road be blocked. Although the bridges would eventually be taken (one blown) it would involve half the Division and a squadron of British tanks, but at the end of 17 September the Germans held both Best and the bridges.
• 506th PIR. Son
The men of the 506th began landing on DZ ‘C at about 1315 hours and within 45 minutes a two-pronged move through the Zonsche Forest towards the bridge on the main road in Son had begun. The 2nd Battalion advanced directly down the main road towards the bridge engaging in a fire fight with Germans in the houses en route, while the 1st Battalion worked their way in from the right (of the 2nd Battalion). Just as men from the two battalions met within sight of the bridge it was blown. Although Colonel Robert Sink, commanding the 506th, had thought ahead and included a platoon of Engineers in his force, they were only able to improvise a small footbridge, and that, with a captured small rowing boat, was insufficient to enable a strong enough force to cross the canal and to advance upon Eindhoven before dark. That fact, together with a rumour that a German regiment was preparing to defend Eindhoven, persuaded Colonel Sink to abandon the idea of taking the city by 2000 hours (his aim) and to wait for daylight.
82nd Airborne Division
Four hundred and eighty-two planes and fifty gliders carried 7,277 paratroopers and 209 men in gliders. Only one plane and two gliders failed to reach their zones, although many were hit by ack ack fire. One paratrooper was killed when his chute failed to open and another when he was hit by a supply bundle. Seven of those arriving by glider were injured, but there was very little immediate German opposition. The Corps Commander, General Browning, plus a skeleton HQ, landed with the Division in the 505th area while General Ridgway, its disappointed former commander who had hoped to command the Corps himself, flew overhead in a borrowed B17 to watch the drop.
• 504th PIR. Bridges at Grave, Heumen, Malden, Hatert and Honinghutje.
The Regiment dropped both north and south of the bridge at Grave. One stick of sixteen men commanded by Lieutenant John S. Thompson came down within 700 yards of the southern end of the bridge while the bulk of the force gathered at the northern end. German flak guns offered some opposition but within 3 hours the 504th had taken and secured the bridge. The bridge at Malden was blown by the Germans as the paratroopers charged towards it, but the bridge at Heumen was taken intact in a night attack and later became the main bridge across the Maas-Waal for the advance of XXX Corps on Nijmegen. The 504th with a platoon of the 508th arrived at Hatert to find the bridge destroyed but no attack was made on Honinghutje that day (Sketch Map 3).
• 505th PIR. Groesbeek and the High Ground on the German border.
The drop was entirely successful and one battalion set off for its objective within 20 minutes of hitting the ground. With help from members of the Dutch underground isolated Germans were captured and all-round defensive positions were dug on the high ground around Groesbeek overlooking the routes north from the Reichswald Forest into the Division’s area, where a Divisional reserve was established. Patrols sent out after dark made contact with the 504th at the Heumen bridge, penetrated into the Reichswald Forest where it was thought some 1,000 German tanks were in hiding (this proved to be untrue) and were just too late to prevent the destruction of the railway bridge over the Maas River at Mook.
• 508th PIR. Hatert, Berg en Dal and the Nijmegen road bridge.
The orders for the taking of the Nijmegen road bridge were confused. Priority was given to establishing positions on the high ground of the Berg en Dal/Groesbeek ridge and in the area of Hatert to the west to prevent any movement of the Germans south from Nijmegen. The story is examined in more detail in Itinerary Three. While the drop was successful and the high ground secured against what would become ferocious attacks over the coming days, it was some 7 hours before the first co-ordinated attack was made on the road bridge. German SS troops who had only just arrived in Nijmegen repulsed the attack and would continue to hold the bridge for another 3 days - the British would not cross in force until a fourth day passed by which time all effective resistance by 1st AB at the Arnhem bridge was over.
1st Airborne Division
The Division reached its planned LZs and DZs without losing one aircraft to enemy action but thirty-eight of the 358 gliders failed to arrive, mainly because their tow ropes broke. The landing took the Germans by surprise and, in contrast to the Americans, the British put their gliders down before the paratroopers jumped, General Urquhart landing by glider.
• 1st Parachute Brigade - the Arnhem road and rail bridges.
Because of damage to the gliders on landing the Recce Squadron was unable to unload its jeeps as quickly as planned for the coup de main attack on the bridges and not until some time after landing (US sources say 4 hours and British sources say 1 hour) did the parachute battalions set off for Arnhem. 1st and 3rd Parachute Battalions met stiff opposition from elements of 9th SS Panzer Division under Lieutenant-Colonel Ludwig Spindler and an SS Training Battalion led by Sturmbannführer Sepp Krafft, the Germans establishing blocking lines along Wolfhezerweg and Dreijenseweg (Sketch Map 4). Both battalions were still short of the main road bridge when darkness fell. The 2nd Battalion, commanded by Lieutenant-Colonel John Frost, meeting less opposition, reached the northern (Arnhem) end of the road bridge and captured the buildings around it by 2030 hours. Several attempts to reach the southern end of the bridge failed. The element of that battalion that had set out for the rail bridge reached it just as the Germans blew it up and then went on to join the rest of the Battalion at the road bridge the following day.
• 1st Airlanding Brigade - securing the LZs and DZs.
By 1600 hours the LZs and DZs for the second lift had been secured and a few prisoners taken. While the 1st and 3rd Parachute Battalions battled on their roads into Arnhem and the 2nd Battalion fought at the road bridge, the 1st Airlanding Brigade settled down for a relatively quiet night to guard the LZs and DZs and to await the morrow.
The spirit of the whole Operation is summarised by an exceptional poem, written on the 50th Anniversary by British Arnhem veteran Fred ‘Lucky’ Lockhurst of 1 Para Squadron RE, who sadly passed away in 1996.
It Was Thus
It was descending on a bright and sunny lunchtime.
It was welcoming smiles and warm handshakes from the Dutch civilians.
It was marching down the leafy lanes
and into the quiet Sunday afternoon streets.
Suddenly it was machine guns. It was stretcher-bearers.
It was machine guns. It was stretcher-bearers.
It was hand grenades and shouts of ‘Die you German bastards!’
It was leaping from garden to garden.
It was dodging from doorway to doorway.
It was smashing out of windows and beating out fires.
It was noise. It was night.
It was morning. It was the second lift.
It was more men and more strength, more chances of success.
Days followed night and night followed days
And it was carrying in the wounded and carrying out the dead.
It was frantically waving yellow silk triangles.
It was watching the slaughter of valiant airmen.
It was choking at the sight of much-needed supplies drifting out of reach.
It was cursing. It was praying.
It was the screeching of Panzers and the whirring of the mortar bombs.
It was the mutilated trees and the mutilated men.
It was crapping in the corner of a garage or in the corner of a slit trench.
It was the ‘V sign stuttered out of a Bren gun.
It was the cries of ‘Woho Mohamed’ and the groans of the badly wounded.
It was the dirt in the mouth and the singing in the ears.
It was the rain-soaked clothing and the blood-soaked earth.
It was the shortage of food and of ammunition, of sleep, of hope.
It was surrender, but it was not a defeat.
It was a brave, brave, brave try.
It was Arnhem, 1944.
‘Woho Mohamed’ was the battle-cry of the original Red Devils in North Africa in 1942-43. Lieutenant-Colonel R. G. Pine-Coffin, DSO, MC, who commanded the 3rd Battalion in North Africa, described how he first heard it on the day of the Battle of Jebel Mansour. A party of the Battalion, whilst held in reserve, heard an Arab cowherd uttering the cry as one of the cows he was watering from a stream got confused by the cowherd’s guttural ‘Urrahs’ and charged off. The Paras were much impressed by the cry and immediately adopted it as their own. It soon spread to the 1st and 2nd Battalions and was first used as a battle-cry by a company of the 3rd Battalion (probably Dobie’s), whilst helping the 2nd Battalion beat off an attack in the Tamera Valley. ‘To shout it really correctly,’ wrote Pine-Coffin, ‘either for stopping cows or killing the enemy, the ‘Woho’ part should be dragged out as long as possible and the ‘Mohamed’ clipped very short’.
The cry was often heard during the Battle of Arnhem-Oosterbeek. There are many later variations on the original spelling quoted above.
THE AFTERMATH
After the Battle of Arnhem-Oosterbeek the Germans were left in possession of deserted towns, their citizens all evacuated, many buildings destroyed and still smouldering. Large-scale looting and further wanton destruction took place, the spoils being transported back to Germany in trucks marked ‘a gift from Holland’.
For the population of 96,000, evacuated to other parts of western Holland, now came the terrible Hunger Winter. When the Dutch railway workers struck, there were many German reprisals, most significantly the banning of all freight movement from the north and east (where most food was produced) to the west, causing widespread starvation. It is estimated that well over 30,000 civilians died in this period and those that survived existed on tulip bulbs, sugar-beet and the occasional potato. Meanwhile many escapee or wounded Allied men were being hidden, at great risk, by the Dutch Resistance.
PEGASUS I: 22-23 October 1944
The sheltering of these men was co-ordinated by the strong Resistance group based on Ede, where some eighty Airborne men were hidden, forty of them in a sheep-pen, with another 40 in a sheep-pen near Oud Reemst to the east. They maintained a telephone link with Nijmegen through the Provincial electricity station. First Lieutenant-Colonel Dobie, CO of 1 Para Battalion, was sent back over the Rhine to meet General Dempsey, commanding the 2nd British Army, who ordered the 101st US AB Division (then occupying parts of The Island) to give support. Then key members of the Resistance, including Tonny de Nooij (qv) and some of the British soldiers they were protecting, made a recce to the river and chose a crossing site, just west of Renkum. This was agreed by Major Digby Tatham-Warter (qv), who commanded the soldiers, and Dutch leaders of the Ede group. The night of Monday 23 October was chosen, but on Friday the 20th the population of Bennekom was ordered to evacuate within 3 days. The date of the escape was changed to Sunday 22 October and the assembly area was a wood to the northwest of Bennekom (later to be called ‘the English Grove’). The evaders, accompanied by local guides and dressed in civilian clothes, travelled by day, mingling with the streams of civilian evacuees. Once assembled they were issued with uniforms and weapons, provided by the Resistance. Their final number was 138, plus ten Dutchmen and two Russians who had escaped from Deelen airport. They set off towards the river at 2130 hours in a light mist, forming a long column, each man holding the man in front. They were guided by Maarten van den Bent.
On the other side of the river routes were prepared by the 2nd Battalion 506th PIR, with jeeps and lorries at the ready to transport them to Nijmegen. A Bofors bombardment had been laid down over the previous nights to confuse the enemy and machine guns and mortars protected the crossing point. With the Americans were some Sappers from XXX Corps to man the twenty-three rowing boats.
The column made its way through the dangerous last lap between Renkum and the Wageningen hill. At 0030 it crossed the Renkum-Wageningen road and then the water meadows to the river bank. Tatham-Warter described how he was then seen and led to Dobie by the extraordinary Canadian maverick, Leo Heaps, whose exploits, as described in his own book, The Grey Goose of Arnhem, seem totally incredible. Tatham-Warter wrote,
He was a very bold and enterprising officer who had, early in the battle of Arnhem, first attached himself to David Dobie’s battalion and then somehow purloined a jeep and made his way through alone to the bridge. And now, after a long and exciting escape experience, he had involved himself with the ‘Pegasus’ operation.
Other senior officers, such as Urquhart, also give credence to some of Heaps’s more lurid tales.
By 0200 hours the risky operation, in three crossings, was successfully completed, with the loss of only one of the Russians and the serious injury of Major Tony Hibbert (qv), his legs crushed between two jeeps. Brigadier Lathbury sent a confirmatory message via the BBC: ‘Message for Bill, everything is well, all our thanks.’ ‘Bill’ was the resistance leader D. Wildeboer. He and many of his countrymen and women had taken enormous personal risks to ensure the success of this daring operation - the largest escape by Allied soldiers from enemy-occupied territory. The escapees enjoyed a glass of champagne before being de-briefed by Generals Dempsey and Horrocks the following day and then being flown back to the UK.
PEGASUS II: 16-18 November 1944
Encouraged by the success of Pegasus I, and because many men were still being hidden in the area, another escape attempt was planned for 17 November. A crossing point some 2kms further to the east was chosen, with the use of boats with outboard motors with silencers. Unfortunately the telephone link between Ede and Nijmegen was cut on 16 November and communication then depended on difficult radio broadcasts via London. Following the civilian evacuation of October, the Germans had strengthened the area leading to the river and an assembly point had to be chosen much further (some 20kms) away which involved crossing several main roads. The 120 men, consisting mainly of airborne men, plus some RAF, an American, a Frenchman, a Russian and a Dutchman, had to start their hazardous journey early on 16 October. As with Pegasus I, once assembled, they were issued with British uniforms, papers and Dutch guides and divided into two groups. One group was led by Major Hugh Maguire, an Intelligence Officer with 1st AB HQ, who, realising that he was running behind the planned timetable, took a shortcut over a road known to be strongly defended by the Germans. They were spotted and fired upon by the Germans, killing Major John Coke of the KOSB. The group then scattered, only five men reaching the river, too late for the RV. An American in a canoe picked up one wounded man the next day, but the boat was hit and both men drowned. Only seven men of the two groups finally made it over the river. Most of those left behind were taken prisoner, some of the Dutch who had been masquerading as British soldiers were shot by the Germans on 8 March 1945 at Woeste Hoeve near Arnhem, together with 115 other Dutchmen. The final casualty list from this brave but sadly unsuccessful operation has never been ascertained.
The Liberation
Bitter fighting continued throughout the winter in the Nijmegen and Groesbeek areas, where the frontline was taken over in November by the Canadians under General Crerar, and in The Island, where the 506th PIR joined the DCLI in the west. (See Itineraries Three and Four below.) At the end of March 1945 two battalions of the Lincolns took over in The Island and on 3 April two companies crossed the Rhine near the Loo ferry south-east of Arnhem. Gradually the Allies worked their way over the River IJssel towards Arnhem and Ede was liberated by the Canadian Calgary Regiment of the 49th (Polar Bear) West Riding Division on 17 April, which also liberated Arnhem. Many memorials to them exist in the area.
The Reconstruction
When the citizens returned after the Liberation, it is estimated that only 145 houses remained intact. The Sacré Coeur Girls’ School on the road to Velp (where a young Audrey Hepburn had lived during the battle, passing messages for the Resistance in her socks) became the centre of municipal administration. There everyone entering the town had to apply for a permit. Separated families and friends were reunited and the number of those who didn’t survive became apparent. Imagine the scenes of desolation and chaos that met the orderly Dutch as they entered the outskirts of their forlorn town to find it reduced to rubble. But they set to work with the sort of determination the British showed after the Blitz. The water supply was quickly established and though without gas or electricity, oil or any other fuel, things were almost miraculously cleared and the rebuilding began. So, too, did the mournful task of reburying the dead who lay in many fields and gardens in the area (see Graves Registration below).
The First Memorials
As soon as some measure of normalcy been re-established, the citizens began to think of commemorating their Liberation, their own dead and those of their liberators. The dates of the memorials are included in their description in the following Itineraries, from which it may be seen that some were erected as early as 1945.
The Films/TV/Magazines
Theirs is the Glory. This, the first movie representation of the Operation, was released in September 1946. It mixes actual shots of the battle with re-creation, acted by men and women who actually took part in the real events, and tells the story simply and without judgement. It was directed by Brian Hurst and produced by Castleton Knight, both of whom had experience in wartime feature and propaganda films. It was funded by the Rank Organisation, the music was composed by Muir Matheson and the novelist Louis Golding worked on the screen play.
About 200 men of the 21st Independent Para Company were flown from their administrative duties in Norway and Denmark to the newly-created Arnhem Film Unit on a mushroom farm at Braintree in Essex, to join a motley crew of RAMC, RASC, Paras, Sappers and Gunners. All were paid £3 per day, with bonuses of £5 for ideas that were used in the script, and they crossed to a still war-torn Arnhem and Oosterbeek on 6 August 1945. Their billets, with Dutch people only newly returned to their homes, or in barracks, were primitive and their duties included clearing locations of unexploded materiel. Around them the Graves Registration Unit was working to find the bodies of their missing comrades, a task many of the men felt compelled to join. Only small areas of the true scenes of the battle (like bits of the Hartenstein, the Tafelberg and the St Elisabeth Hospital and a section of Benedendorpsweg) could be used for the early shots, which required undamaged houses and streets and much was shot in Heveadorp or in England.
One of the leading players was Lieutenant Hugh Ashmore, OC No 3 Platoon, 21st IPC, who gives the briefing at the beginning of the film and who was used in publicity. Major Freddie Gough of the Reconnaissance Squadron played himself, albeit in a role of exaggerated seniority at The Bridge (John Frost is not even mentioned). A much-bandaged Major ‘Dickie’ Lonsdale re-created his own pep talk in the Old Church, using the door of the church (which is now on display in the Hartenstein Museum) to write his crib. The two war correspondents Alan Wood of the Daily Express and the Canadian Stanley Maxted also play themselves and they become the lasting, and very moving, voices of Arnhem. Other enduring scenes are those enacted in the house of Kate ter Horst, who also plays herself, adding to her legend as the Angel of Arnhem.
This 82-minute-long film has a period flavour with its accents and bravura slang of the 1940s services, yet its honesty and the courage it portrays shine through, making it compulsory viewing for any student of the campaign.
Unfortunately the rights to the video have been acquired by Carlton International and it is currently no longer commercially available.
The True Glory. Arnhem had also featured in this filmed account of the War in Europe which was released in August 1945. The commentary was provided by a still-serving RAF cameraman, Richard Attenborough. This is available from After The Battle (see below) Videocassette No. 18.
A Bridge Too Far. The best-known MARKET-GARDEN film is based on the war correspondent Cornelius Ryan’s extraordinarily detailed book, first published in 1974 and reprinted on the 50th Anniversary of VE Day in 1995. Its title comes from Lieutenant-General ‘Boy’ Browning’s supposed remark to Field-Marshal Montgomery as he briefed him on the operation, ‘But sir, I think we might be going a bridge too far,’ (though it is now generally accepted that Browning did not actually use the expression). A glance at the long list of servicemen and civilians of all nationalities interviewed by Ryan (from Eisenhower to Maxwell Taylor, from Montgomery to Robert Cain VC, from Kate ter Horst to Jan Voskuil, from Sosabowski to von Rundstedt, Blumentritt and Student) and the detailed bibliography bear witness to the man’s extensive research. Purists can point out the odd inaccuracy, but no other book so graphically gives the atmosphere of the entire campaign.
Ryan died of cancer in 1976 and was therefore not able to influence the filming of his book in 1977 by Joseph Levine (producer) and Richard Attenborough (director). Levine planned his biggest production yet with a budget of £15million. Colonel John Waddy served as British joint military adviser and several other senior participating officers were enrolled as such. Jan Voskuil, the acknowledged local authority on the Arnhem battle (father of historian Robert (qv)) and After the Battle Editor Winston G. Ramsay, expert on military vehicles, also helped. The cast was a brilliant line-up of international stars. The performance of Edward Fox as the ebullient Horrocks rings particularly true and Paul Maxwell made a convincing Major-General Maxwell Taylor. Michael Caine is less convincing as the Irish Guards officer, Joe Vandeleur. John Frost and Anthony Hopkins, who played him, (as related to the authors by the General) took an instant dislike to each other, which was soon tempered as each recognized the other’s professionalism in their own field.
The film begins with authenticity and clarity but unfortunately later degenerates into what is, even to those familiar with the actual events, a confusing patchwork, with some major inaccuracies - especially at the Nijmegen Bridge where the superb actions of Captain Tony Jones (qv) are not even mentioned while Robert Redford appears to take the bridge single-handedly. And yet… it must be remembered that this is a feature film, not a documentary and it does, in many respects, portray the spirit of the Operation - the initial hopes, the obduracy of some of the senior officers, the sheer dogged courage of the men, the delight and support of the civilians, the danger, the disappointment, the dejection.
World at War. This celebrated television series included an episode on Arnhem which also covered the Battle of the Bulge and the Rhine Crossing. It featured General Horrocks who also appeared in a memorable television series on Operation MARKET-GARDEN. Horrocks was a ‘natural’ on the small screen - enthusiastic but with the ability to explain with clarity this complicated exercise. His performance was obviously keenly studied by Edward Fox.
Magazines. ATB (After the Battle) produce several of their superbly researched magazines on the Operation: a Special Edition, Prelude to MARKET GARDEN, THE BATTLE OF ARNHEM and WAR FILM: ‘A BRIDGE TOO FAR’: No.2 THE BATTLE OF ARNHEM: No. 86 which includes ‘The Market Garden Corridor Tour’ and No. 96 which includes ARNHEM VC INVESTIGATION (Flight Lieutenant Lord).
Contact: ATB, Church House, Church Street, London E15 3JA. Tel: 020 8534 8833.
E-mail: afterthebattle@mcmail.com
website: www.afterthebattle.mcmail.com
The Fortieth and Fiftieth Anniversaries
These were major and memorable gatherings, with large numbers of veterans and practically all the famous senior officers still fit enough to travel participating. Generous receptions and other events were hosted by the major towns along The Corridor and in Arnhem-Oosterbeek and commemorative medals were struck. After the 40th Anniversary work began on fund-raising for the Groesbeek Liberation Museum, actively supported by General Gavin who was present at the event.
They were also the trigger for many important new monuments to be erected and new books on the Operation to be published. Therefore the dates 1984 and 1994 will be seen throughout this book in the descriptions of memorials. Gatherings have been held on subsequent years, each with a dwindling number of veterans attending, and it is probable that the 60th anniversary in 2004 will be what the Americans so appropriately call ‘The Last Hurrah’.
One of the most imaginative commemorative events staged for the 50th Anniversary was the ‘MARKET-GARDEN Corridor Tour’. Some 800 historic military vehicles took part in this event which had been planned like a military operation, watched by over a million spectators along the route. Mass para drops were sadly somewhat curtailed by bad weather, but some managed to land at Son and at Ginkel Heath. There was also a fly-past of historic aircraft (including two ‘Flying Fortresses’ and three Spitfires) some towing gliders. The MARKET element started at Leopoldsburg and worked its way up The Corridor, many veterans joining in for parts of the route. A Torch of Freedom was brought with the column from Bayeux. Veterans of the 504th PIR re-enacted their daring Waal crossing (this time in DUKWs) and Lord Carrington led a group of Sherman tanks across the Nijmegen Bridge. Despite some major delays (which echoed the real thing 50 years earlier) this was a spectacular event which conveyed to the younger generation a tiny flavour of what happened in September 1944. [See After The Battle (qv) No 86].
THE MARKET-GARDEN CORRIDOR TODAY
The Profileration and Character of Memorials
Holland is a country rich with municipal sculpture and al fresco ornamentation. Every village, town and city has a goodly number of statues and sculptures on roundabouts, or in their centres, or dotted around housing estates. Many demonstrate the industry or main occupation of the area - either in days gone by or today. So there will be charming figures of clog makers and cowherds, statues of ponies and children, and some fun groups such as the giant skittles in Eindhoven. But many of them are of such an avant garde and symbolic nature as to be totally incomprehensible to the Anglo-Saxon mind. The same applies to some of the monuments to MARKET-GARDEN, and so the first-time reader may well spend some time carefully examining an arrangement of metal or concrete that turns out to have nothing to do with the campaign. Therefore we have illustrated as many of the memorials as we could and have tried to explain their meaning.
Some of them are in a rather sorry state, showing, perhaps, the lack of co-ordinated care such as is provided by the Souvenir Français Organisation in France.
Airborne Commemorative Markers
After the war containers, with text, were placed at a number of significant locations around the battlefield. In the late 1960s Officers of 4 Para Brigade (notably General Hackett) replaced them with 7 commemorative wooden posts, surmounted by a brass Pegasus symbol. In the mid-1980s 6 remained. They were:
1. In front of the Tafelberg
2. At No. 192 Utrechtseweg in what used to be the Pastor’s garden
3. On Dreijenseweg, where 156th Para Battalion was stopped
4. By ‘The Hollow’ on Valkenburglaan
5. By the ‘Lonsdale’ Church
6. By the entrance to the St Elisabeth Hospital
The wooden posts proved not to be durable and the handsome brass Pegasus badges were easy prey for souvenir hunters. Gradually the wooden posts were replaced by local town councils with concrete ones, with indented Pegasus badges.
Later was added
7. Just before the Nelson Mandela Bridge, marking the nearest point to The Bridge reached by 1 and 3 Para.
In 1999 was added
8. On the site of the Van Limburg von Stirum School near The Bridge
The Latest Memorials
Perhaps surprisingly, memorials and museums are still being initiated or enlarged. For instance, in 1999 Airborne Commemorative Marker No 8 was erected at the Van Limburg Stirum School (qv) and a new plaque was added to the Frank Doucette Memorial (qv) in Leirop. The following year the Childrens’ Monument was erected at Kamp Vught (qv), the Groesbeek National Liberation Memorial (qv) underwent major extension and improvement, the Jacob Groenewoud Plantsoen (qv) in Arnhem was added to, a memorial in the form of a swing (qv) was erected in Nijmegen to those killed in wartime bombing. Several memorials have recently been erected or added to in the Over-Betuwe, the latest being to the crash site of the Dakota in which members of 156th Para were killed near Dodewaard. The house of war artist and sculptor Jac Maris (qv) in Heumen is currently being converted into a museum.
In 1994, after the major events of the 50th anniversary, the Municipality of Renkum decided they would not cooperate in the setting up of any new memorials. Since that date commemorative plaques on seats placed at various points around the battlefield are the only memorials to have been installed.
Keeping the Flame of Remembrance Burning/The Way Forward
Many towns and villages along The Corridor, on The Island and in Arnhem-Oosterbeek have annual commemorative ceremonies and events (see the listing and contacts for current information on page 276). These are normally held either on National Commemoration Day, 4 May or National Liberation Day, 5 May (hence the unveiling of so many monuments on those dates), or on the anniversary of either the battle or the liberation of the particular town.
At present many of these events depend upon organisation by, and participation of, local people who actually remember the events of 1944/45 and the presence of veterans.
Typical are the full programmes in the Nijmegen-Groesbeek and Arnhem-Oosterbeek areas, both largely centred on their main military museums, the National Liberation Museum at Groesbeek (qv) and the Airborne Museum at the Hartenstein (qv). They include wreath-laying ceremonies and services at main memorials and cemeteries, parachute drops (by modern Paras but often with participation of brave - some would say foolhardy -veterans!), tattoos, marches and parades, lunches, dinners and dances, concerts and militaria fairs. To be a spectator of, or participator in, these events is memorable, impressive, moving, sometimes sad, sometimes exciting and great fun.
It must be recognized that 17 September meant very different things to Arnhem-Oosterbeek (the beginning of hope followed by a dreadful battle and nine months of evacuation and starvation before returning to demolished homes) and Eindhoven-Nijmegen (the start of Liberation).
The important question that now arises is, however, what will happen when the last local survivor of the battles and the last veteran of the Operation are no more? One fear is that the acts of remembrance will, in time, die out and those, of so many nationalities, who gave their lives for freedom in the Netherlands will gradually be forgotten.
The question is raised in a country where there is a strong Peace/Anti-War movement, especially among the young. It is also a country with no great military tradition or history of victorious battles honoured. Many feel that commemorative events such as described above ‘glorify war’, that it is better to forget the past and get on with the future of a united Europe. Happily the flame of remembrance has been passed, still burning strongly, to other young people, like the schoolchildren of the Municipality of Renkum who annually place flowers on every single grave in the CWGC Cemetery and the families who immediately after the war ‘adopted’ war graves in cemeteries in their commune and have tended them with loving care ever since. Others have become fascinated in the historical aspects of the battles that took place on their soil over half a century ago and they have produced research and publications of an extremely high standard, as is evidenced in the multiplicity of titles in the Hartenstein Airborne Museum book stall.
Also balancing the Dutchman’s love of peace is his passion for freedom. It is difficult for those of us who have not endured enemy occupation to understand just what that precious word means. Dutch soil, as defined by the 1940 borders, had not been fought upon until the German invasion of that year since the British invaded Walcheren in 1809. This strong love in part explains the incredibly forgiving and understanding attitude of the Dutch (with very few exceptions) towards the price they had to pay for liberation. They suffered the trauma of battle, their homes were ruined, their possessions lost, their loved ones were killed, maimed, deported or shot, they were forced to evacuate and returned to desolation. Many a GI or Tommy has expressed his wonderment at this phenomenon, at the warm and ongoing welcome that is extended to them when they return to their old battle grounds. As long as one child of 1944 survives, one gets the impression that this will continue. But what then?
The answer seems to have been found in Eindhoven by the 18 September Foundation (qv) under their forward-looking Chairman, Mr. M. Besnard. As well as organising the traditional 18 September Veterans’ Welcome and Parade (which, unusually, includes German participation, including the Ambassador) and ceremony of rekindling the Flame of Freedom brought from Bayeux in Normandy (qv), plus an ecumenical service at St Catherine’s Church, their Committee, with the active support of the US Ambassador to the Netherlands, Mrs Schneider, have made it a priority to educate and involve the youth of the city in their annual commemorations. They organise specialised events which are designed to appeal to the younger generation and concentrate on cultural events with the theme of Freedom, Liberty and Peace. They also examine censorship and oppression and attract participation at the highest international level: lecturers have included Ministers of Foreign Affairs, Bishop Desmond Tutu’s second-in-command etc. Events include drama and poetry competitions, concerts (both classical and pop), films and street parties and continue for a week over the 18 September period. Another universal attraction at this time is the famous Circuit of Lights Festival (qv). This compares with the Blackpool Illuminations or London’s West End Christmas Lights in its spectacular effects, as is appropriate for the City of Lights, the home of Philips.
Illuminated Mississippi River Boat, Eindhoven Light Festival.
The event started simply in 1945, with candles in the windows of buildings along the Liberation route. It soon progressed to electric lamps in the streets as well as in the houses. It grew apace until 1969 when it became a 5-yearly event. It had to cease in 1972/73 because of the oil crisis, but in 1983 a small group of youngsters started it up again, having remembered seeing the colourful display from the pillions of their parents’ bikes, the traditional way of going round the route. From 1984, when a subsidy was granted from the 18 September Festival Committee, the event grew from strength to strength, with its own committee responsible for wheedling subsidies from local firms like, naturally, Philips, who donate the millions of bulbs, to iron works for the elaborate base of the illuminations, to schools who provide their halls for their 6 weeks of assembly work. Each area of the city has its own group of volunteers responsible for its lights - their design, welding, painting, wiring, mounting, cabling, connection, storage and repair.
There are thirty-six different points along the ‘figure of eight’ route, which is 22 kms in length. It starts at the station and finishes at the Airborne Monument (qv) and is traditionally followed by local citizens by bicycle. Many of the 600+ illuminations have a September 1944 theme - of tanks, jeeps, aeroplanes, parachutes, Screaming Eagles, Victory ‘V’s, sometimes with personalities like ‘Monty’, Churchill and Eisenhower. Others are simply spectacular fun. In 1997 a photographic competition was mounted, the results of which were printed in a colourful book, the proceeds of which went towards the Circuit of Lights.
A similar feeling that it is now up to the younger generation to continue some form of commemoration that is meaningful to them is being expressed by the members of the Lest We Forget Foundation (qv) in Arnhem-Oosterbeek. As the number of veterans they host dropped by half from 1999 to 2000 and some of the veterans found it impossible to march the short distance of the traditional ‘Silent March’ to The Bridge it has now been discontinued.
Apparent to the worldwide battlefield pilgrim is the lack along the MARKET-GARDEN area of well-defined, mapped and published routes. There are no standardised informative signs for points of interest along them. A good start, however, is being made by the Hartenstein Mueum, which in 2001 organised a walking route from the Museum down to the river and back, with explanatory markers along the way.
Models of excellence for routing and signing can be found in the United States for their Civil War sites, and in Europe, along the Normandy D-Day Beaches, standard information boards and route literature available at all tourist offices in the area even extend through two separate Départments - Calvados and La Manche. Similar clear and easily recognizable signing can be seen on the Somme where some important sites (like trench lines and bunkers) have been carefully preserved and are well-presented and explained to the visitor. Even in Gallipoli, in a remote area of Turkey, the excellently informative and durable bronze markers erected by Australian Ross Bastiaan give the visitor a clear picture of what happened at each historic spot. All these areas, like leper in Belgium and, to a perhaps over-commercialized extent, at Waterloo, have recognized the sobering fact that the future and continuance of battlefield pilgrimage lies in the developemnt of ‘tourism’. It brings many people to the area, who often visit other attractions, fill hotels, restaurants and museums and bring trade to local shops and businesses. The benefit to battlefield sites is often the upgrading of museums, the creation of adequate car parks and the preservation of historic places. The net result is the guarantee that the events and the sacrifices of local inhabitants and would-be liberators alike - even if in a somewhat diluted form - will be preserved, hopefully for ever more. This surely must be the way forward for the villages, towns and cities along the MARKET-GARDEN Route, but it would take a co-operative and cohesive initiative by all the VVVs and tourist authorities, museums and commemorative organisations in the area.
A sign that attitudes are slowly changing was the unveiling on 8 March 2001 in the small village of Haelen in Limburg in Holland, near the German border, of a unique Joint Monument to all the German and Allied soldiers of WW2. The ceremony was attended by veterans from both sides and was reported by the national press and television.
THE AIRBORNE FORCES MUSEUM ALDERSHOT
As a prelude to a visit to the MARKET-GARDEN Battlefields, a visit to the above museum is rewarding.
At present the Museum (full title Parachute Regiment and Airborne Forces Museum) is in the most appropriate location for it - Browning Barracks - but there are plans to move it in the future, so check the current situation before embarking on a visit.
Browning Barracks, Aldershot, Hants GU11 2BU. Tel: 01252 349619
Open: Mon-Sun 10.00-16.30, last admission 15.45. Entrance Fee payable.
The Museum contains a small book/souvenir shop which has a mail order catalogue. Tel: 01252 310304.
It was opened by Field-Marshal Montgomery on 23 March 1969 and charts the history of Airborne Forces from their inception to the present day. Items include many original photos, personal artefacts and uniforms of Airborne personalities such as John Frost and ‘Boy’ Browning (who based his on the WW1 Flying Corps uniform) and the original emblem of the Airborne forces - Bellerophon on the winged horse Pegasus, which was chosen by Browning in 1941 and designed in May 1942 by Major Edward Seago as a flash. Among the varied exhibits there are sections devoted to the history of air to ground supply (first used in action at the Houthulst Forest 1-4 October 1918), to the Polish Independent Para Brigade, to the US Airborne of MARKET; there are original paintings, three-dimensional cameos and models, including the Paras at Arnhem and the John Frost Bridge.

Airborne scene, September 1944. Detail of large picture presented to the Museum in 1994 by the artist, Eef Barkei
An appropriate summary of the MARKET Operation by Dr. John C. Warren of the USAAF Historical Division in 1946 appears in the US Section of the Museum:
When all is said, it is not the monumental size nor the operational intricacies of MARKET which linger longer in the memory. It is the heroism of the men who flew burning, disintegrating planes over their zones as coolly as if on review and gave their lives to get the last trooper out, the last bundle dropped. It is the stubborn courage of the airborne troops who would not surrender though an army came against them. In the sense that both troop carriers and airborne troops did all that men could do, there was, as Gavin said, no failure in MARKET.