Any standard DK (light worsted) weight yarn can easily be substituted for the stated yarn; however, checking your tension carefully beforehand is strongly recommended.
Each triangle square motif should measure 7.5cm (3in) square
5 rnds of granny square motif worked in tr sts = 10cm (4in)
40cm (16in) square

Crochet the triangle square motif in two halves: the first section in one colour where the work is turned at the end of each round; then crochet the second section onto the first. Join at the beginning and end of each round with slip stitches and half treble stitches. It is important that these joining stitches are worked into the correct place of the first section of the motif so that the stitches and motif lie neatly. For step-by-step guidance, see Techniques.
Make 25.
Foundation ring: using yarn B and 4mm hook, ch6, ss to form ring
Round 1 (RS): ch3 (counts as first tr), 2tr, ch2, 3tr, ch1, turn
Round 2: ch3 (counts as first tr), tr into 4th ch from hook, tr into 2sts, miss 1st of prev rnd, [2tr, ch2, 2tr] into corner ch-sp, tr into 2sts, f2tr inc into 3rd of ch3 of prev rnd, ch1, turn
Round 3: ch3 (counts as first tr), tr into 4th ch from hook, tr into 5sts, miss 1st of prev rnd, [2tr, ch2, 2tr] into corner ch-sp, tr into 5sts, f2tr inc into 3rd of ch3 of prev rnd, ch1, turn
Round 4: ch3 (counts as first tr), tr into 4th ch from hook, tr into 8sts, miss 1st of prev rnd, [2tr, ch2, 2tr] into corner ch-sp, tr into 8sts, f2tr inc into 3rd of ch3 of prev rnd, ch2, slip working loop onto a stitch holder and cut a 15cm (6in) tail of yarn

Triangle square motif
Make 5 each in yarns A, C, D, E and F. Refer to Techniques for step-by-step demonstration of where the beginning and end stitches of each round are worked into the first section of the triangle square motif.
Round 1: with RS facing, join yarn in ch st at the end of rnd 1 of first section, ch2, [3tr, ch2, 3tr] into foundation ring of first section, ch2, ss into f2tr inc of rnd 2 of first section
Round 2: ch2, htr into ch st at the end of rnd 2 of first section, turn, tr into ch-sp of prev rnd, tr into 2sts, miss 1st of prev rnd, [2tr, ch2, 2tr] into corner ch-sp, tr into 2sts, miss 1st of prev rnd, 2tr into ch-sp, ch2, ss into f2tr inc of rnd 3 of first section
Round 3: ch2, htr into ch st at the end of rnd 3, turn, tr into ch-sp of prev rnd, tr into 5sts, miss 1st of prev rnd, [2tr, ch2, 2tr] into corner ch-sp, tr into 5sts, 2tr into next sp (created by htr of prev rnd), ch2, ss into f2tr inc of rnd 4 of first section, turn
Round 4: ch3 (counts as first tr), tr into ch-sp, tr into 8sts, miss 1st of prev rnd, [2tr, ch2, 2tr] into corner ch-sp, tr into 8sts, 2tr into next sp (created by htr of prev rnd), ch2, fasten off invisibly to 3rd of starting ch3 of rnd 4 of first section
Next: using yarn needle, pick up tail of yarn from end of first section and fasten off invisibly to 3rd of starting ch3 of rnd 4 of second section
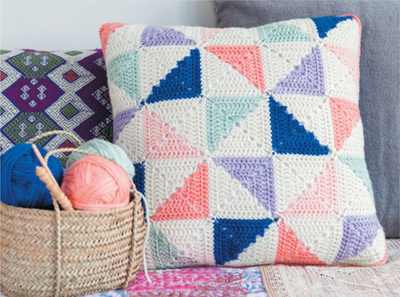
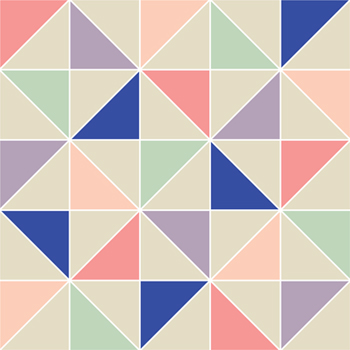
Arrange the triangle square motifs face up in a 5 x 5 grid matching the arrangement shown in the colour placement diagram to create a pinwheel design.
Using yarn A, join the motifs from the back, working rows of dc stitches vertically then horizontally. Crochet 1 dc into each corner ch-sp and 1 dc into the top of each side st.
Note that due to the construction technique of the triangle square motif, where the colour change is in the corner of the motif, either the first or last joining sts (excluding the corner sts) should be worked through the corner ch-sp and first or last side st. This will become apparent when working the rows of joining sts.
Side 1: along any side of the front panel, join yarn A in 7th st from corner of left most triangle square motif, ch1, dc into base of ch1, dc into 6sts, [dc, ch2, dc] into corner ch-sp
Side 2: *dc into 11sts, dc into ch-sp, dc2tog over same and next ch-sp, dc into 12sts, dc2tog over next 2 ch-sps* rep from * to * twice, dc into 11sts, [2dc, ch2, dc] into corner ch-sp
Side 3: *†dc into 12sts, dc2tog over next 2 ch-sps, dc into 11sts, dc into ch-sp, dc2tog over same and next ch-sp* rep from * to * twice†, dc into 12sts, [dc, ch2, dc] into corner ch-sp
Side 4: rep side 2
Side 1: rep from † to † of side 3, dc into 5sts, ss into first dc, turn
Button flap row 1: ch1, dc into front loop of 50sts, turn
Rows 2–5: ch1, dc into 50sts, fasten off

The back panel of this cushion is a one colour, basic granny square crocheted as follows:
Foundation ring: using yarn A and 4mm hook, ch6, ss to form ring
Round 1: s-tr, [2tr, ch2] into ring, [3tr, ch2] - 3 times into ring, ss into top of s-tr
Round 2: s-tr, [3tr, ch2, 3tr] into next 3 ch-sps, [3tr, ch2, 2tr] into last ch-sp, ss into top of s-tr
Round 3: ss into side sp (between ch3 and first tr of prev rnd), s-tr, 2tr into same sp, *†[3tr, ch2, 3tr] into corner ch-sp†, 3tr shell into side sp* rep from * to * 3 times, rep from † to † once more, ss into top of s-tr
Round 4: s-tr, 3tr shell into next side sp, *†[3tr, ch2, 3tr] into corner ch-sp†, 3tr shell into 2 side sps* rep from * to * 3 times, rep from † to † once more, 2tr into last side sp, ss into top of s-tr
Round 5: ss into side sp, s-tr, 2tr into same sp, 3tr shell into next side sp, *†[3tr, ch2, 3tr] into corner ch-sp†, 3tr shell into 3 side sps* rep from * to * 3 times, rep from † to † once more, 3tr shell into side sp, ss into top of s-tr
Rounds 6–22: rnds 1 to 5 set the pattern for the basic granny square motif, continue in this way for rnds 6 to 22, fasten off invisibly
 Naked
Naked
 Parma Violets
 Coraline
 Sapphire
 Mint Julep
 Peachy Cream
Steam block the front and back panels to 39cm (151⁄2in) square.
All edging sts are worked through corresponding sts and ch-sps of both front and back panels together.
First: with WS facing each other, line up front and back panels
Round 1: with front panel facing, join yarn C in top of first st (of both front and back panels) after button flap, ch1, dc into base of ch1, dc into 7sts, *†3dc into corner ch-sp†, dc into 66sts* rep from * to * 3 times, rep from † to † once more, dc into 8sts, dc into front loop of 50sts in front of button flap, ss into first dc
Next: pull working loop through same space just worked ss to back of work, turn work and dc into 50sts of back panel, ss into first edging st after button flap, fasten off and weave in loose ends
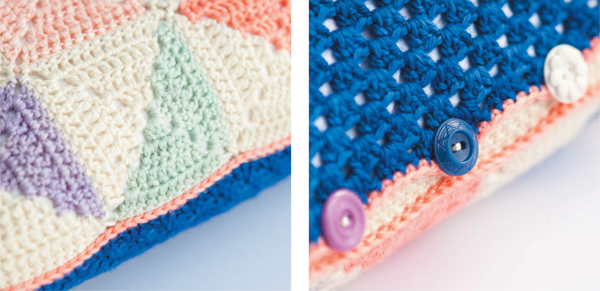
On row 3 of the button flap mark 5th, 15th, 25th, 35th and 45th sts with a pin. Sew a button onto each of the marked sts with the sewing needle and thread.
