The Core Location API is one of the great things about the iOS platforms, but until the arrival of the MapKit Framework in the 3.0 SDK, it was actually quite hard to take that location-aware goodness and display it on a map. The arrival of the MapKit framework has simplified this enormously.
Let’s look at the Core Location framework first and then work through a few example applications using MapKit to get you familiar with how the two frameworks interact.
The Core Location framework is an abstraction layer in front of several different methods to find the user’s location (and, by extrapolation, her speed and course). It can provide the latitude, longitude, and altitude of the device (along with the level of accuracy to which this is known). There are three levels of accuracy:
- The least accurate level uses the cell network to locate the user (the process is similar to triangulation, but more complex). This can quickly provide a position to around 12 km accuracy, which can be reduced to 1–3 km after some time depending on the tower density at your current location.
- The next accuracy level is obtained by utilizing a WiFi-based positioning system. This is much more precise, giving a position to approximately 100 m. However, it depends on the user being in range of a known wireless hotspot.
- The highest level of accuracy is obtained by using GPS hardware, which should provide a position to less than 40 m.
Warning
On the iPod touch and non-3G enabled iPads, the user’s location is derived solely from WiFi positioning. The original iPhone will use WiFi and cell tower triangulation, however, all later iPhone models and 3G-enabled iPads can also make use of the built-in GPS hardware.
The actual method used to determine the user’s location is abstracted away from both the user and the developer. The only control the developer has over the chosen method is by requesting a certain level of accuracy, although the actual accuracy achieved is not guaranteed. Further, the battery power consumed and the time to calculate the position increase with increasing accuracy.
Warning
Some users may choose to explicitly disable reporting of their position. You should therefore always check to see whether location services are enabled before attempting to turn on these services. This will avoid unnecessary prompting from your application.
The Core Location framework is implemented using the CLLocationManager class. The following code will create an instance of this class, and from then on will send location update messages to the designated delegate class:
self.locationManager = [[CLLocationManager alloc] init];
self.locationManager.delegate = self;
if( [CLLocationManager locationServicesEnabled] ) {
    [self.locationManager startUpdatingLocation];
} else {
    NSLog(@"Location services not enabled.");
}
To use this code, you will need to:
-
Import
CoreLocationin your declaration with the following code:
#import <CoreLocation/CoreLocation.h>
-
Declare a
CLLocationManagerproperty namedlocationManagerin your class declaration:
@property (nonatomic, strong) CLLocationManager *locationManager;
- Add the Core Location framework to your target.
-
Declare your class, e.g. your view controller class, as implementing the
CLLocationManagerDelegateprotocol.
We can filter these location update messages based on a distance filter. Changes in position of less than this amount will not generate an update message to the delegate:
self.locationManager.distanceFilter = 100; // 100 m
We can also set a desired level of accuracy; this will determine the location method(s) used by the Core Location framework to determine the user’s location:
self.locationManager.desiredAccuracy = kCLLocationAccuracyKilometer;
Note
You should set these filters before calling startUpdatingLocation on your location manager.
The CLLocationManagerDelegate protocol offers two methods. The first is called when a location update occurs:
- (void)locationManager:(CLLocationManager *)manager
  didUpdateToLocation:(CLLocation *)newLocation
  fromLocation:(CLLocation *)oldLocation {
   NSLog(@"Moved from %@ to %@", oldLocation, newLocation);
}
The second is called when an error occurs:
- (void)locationManager:(CLLocationManager *)manager
  didFailWithError:(NSError *)error {
    NSLog(@"Received Core Location error %@", error);
    [manager stopUpdatingLocation];
}
If the location manager is not able to ascertain the user’s location immediately, it reports a kCLErrorLocationUnknown error and keeps trying. In most cases, you can choose to ignore the error and wait for a new event. However, if the user denies your application access to the location service, the manager will report a kCLErrorDenied error. Upon receiving such an error, you should stop the location manager.
Note
As well as Standard location service, iOS also offers a Significant Change service that relies on the availability of cellular radio hardware on your iOS device as it functions using cell positioning. This offers large power savings and the ability to receive location updates even if your application is not running and has been backgrounded. This service is available only in iOS 4.0 and later.
As well as reporting the current location, the CLLocationManager class can, in the case where the device’s hardware supports it with the presence of a magnetometer, report the current heading of the device. The following code will create an instance of the class, and will send both location and heading update messages to the designated delegate class:
self.locationManager = [[CLLocationManager alloc] init];
self.locationManager.delegate = self;
if( [CLLocationManager locationServicesEnabled]
    && [CLLocationManager headingAvailable] ) {
  [self.locationManager startUpdatingLocation];
  [self.locationManager startUpdatingHeading];
}
[self.locationManager startUpdatingLocation];
[self.locationManager startUpdatingHeading];
}We can filter these update messages based on an angular filter. Changes in heading of less than this amount will not generate an update message to the delegate:
self.locationManager.headingFilter = 5; // 5 degrees
The default value of this property is kCLHeadingFilterNone. Use this value if you want to be notified of all heading updates.
The CLLocationManagerDelegate protocol offers a method that is called when the heading is updated:
- (void)locationManager:(CLLocationManager*)manager
       didUpdateHeading:(CLHeading*)newHeading {

   // If the accuracy is valid, process the event.
   if (newHeading.headingAccuracy > 0) {
      CLLocationDirection theHeading = newHeading.magneticHeading;

      NSLog(@"New heading is %@", theHeading);

   }
}
If location updates are also enabled, the location manager returns both true heading and magnetic heading values. If location updates are not enabled, the location manager returns only the magnetic heading value:
CLLocationDirection trueHeading = newHeading.trueHeading;
As mentioned previously, the magnetometer readings will be affected by local magnetic fields, so the CLLocationManager will attempt to calibrate its heading readings (if needed) by displaying a heading Calibration panel before it starts to issue update messages. However, before it does so, it will call the locationManagerShouldDisplayHeadingCalibration: delegate method:
- (BOOL)locationManagerShouldDisplayHeadingCalibration:
    (CLLocationManager *)manager {
   return YES;
}
If you return YES from this method, the CLLocationManager will proceed to display the device Calibration panel on top of the current window. The Calibration panel prompts the user to move the device in a figure-eight pattern so that Core Location can distinguish between Earth’s magnetic field and any local magnetic fields. The panel will remain visible until calibration is complete or until you dismiss it manually by calling the dismissHeadingCalibrationDisplay: method in the CLLocationManager class.
In Chapter 7, we built a simple Weather application, but it would be much better if the application gave us weather information for our current location. We can use the Core Location framework to retrieve the user’s latitude and longitude. Unfortunately the Weather Underground service, which we used to back our Weather application, takes only city names, not latitude or longitude arguments.
There are several ways around this problem. If you were developing on a platform that didn’t support geocoding, you’d need to make use of one of the many web services that provide geocoding (see sidebar for one such service); however, since iOS 5, Apple has provided native support for both forward and reverse geocoding.
Note
Although reverse geocoding was provided in the MapKit framework by the now deprecated MKReverseGeocoder class, until the arrival of iOS 5, there was no forward geocoding capabilities offered natively by the SDK. With the introduction of the CLGeocoder class, part of the Core Location framework, both capabilities are now natively provided. The CLGeocoder class should be used for all new application development.
Warning
Both forward and reverse geocoding requests make a network connection back to web services hosted by Apple. The calls will fail without a network connection.
Reverse geocoding is the process of converting coordinates (latitude and longitude) into place name information. From iOS 5, you should use the CLGeocoder class to make reverse-geocoding requests by passing it a CLLocation object:
CLLocation *location =
    [[CLLocation alloc] initWithLatitude:37.323 longitude:-122.031];
CLGeocoder *geocoder = [[CLGeocoder alloc] init];

[geocoder reverseGeocodeLocation: location
    completionHandler: ^(NSArray *placemarks, NSError *error) {

        for (CLPlacemark *placemark in placemarks) {

            NSLog(@"Placemark is %@", placemark);

        }
}];Forward geocoding is the process of converting place names into coordinates (latitude and longitude). From iOS 5, you can use the CLGeocoder class to make forward-geocoding requests using either a dictionary of address book information (see Chapter 11) or an NSString. There is no designated format for string-based requests; delimiter characters are welcome, but not required, and the geocoder service treats the string as case-insensitive.
NSString *address = @"1 Infinite Loop, CA, USA";
CLGeocoder *geocoder = [[CLGeocoder alloc] init];

[geocoder geocodeAddressString:address
    completionHandler:^(NSArray* placemarks, NSError* error){

        for (CLPlacemark *placemark in placemarks) {

            NSLog(@"Placemark is %@", placemark);

        }
}];Both forward and reverse geocoding requests return CLPlacemark objects, which store information for a given latitude and longitude. The data includes information such as the country, state, city, and street address associated with the specified coordinate, although it can also include points of interest and geographically related data nearby.
Let’s modify our Weather application to make use of Core Location and (optionally) give us the weather where we are, rather than just for a hardwired single location. Open the Weather project in Xcode.
We’ll need to add the Core Location framework to our project. Click on the Project icon at the top of the Project Navigator pane in Xcode, then click on the main Target for the project, and then on the Build Phases tab. Finally, click on the Link Binary with Libraries item to open up the list of linked frameworks, and click the + symbol to add a new framework. Select the Core Location framework (CoreLocation.framework) from the drop-down list and click the Add button.
We’re going to use the application delegate to manage the CLLocationManager. I’ve highlighted the changes you need to make to the AppDelegate.h interface file in bold:
#import <CoreLocation/CoreLocation.h> @class MainViewController; @interface AppDelegate :UIResponder <UIApplicationDelegate, CLLocationManagerDelegate>@property (strong, nonatomic) CLLocationManager *locationManager;
@end
-
We declare that the application delegate is a
CLLocationManagerDelegateas well as aUIApplicationDelegate.-
We declare a Boolean variable that we’ll use to indicate whether we’re currently supposed to be monitoring the device’s location.
-
We declare an instance of the
CLLocationManageras a property.
In the corresponding implementation file (AppDelegate.m) add the code shown in bold to the application:didFinishLaunchingWithOptions: method. This creates an instance of the CLLocationManager class and sets the delegate for the class to be the current class (the application delegate):
- (BOOL) application:(UIApplication *)application
    didFinishLaunchingWithOptions:(NSDictionary *)launchOptions {

    self.window = [[UIWindow alloc] initWithFrame:[[UIScreen mainScreen] bounds]];
    self.mainViewController =
      [[MainViewController alloc] initWithNibName:
        @"MainViewController" bundle:nil];

    self.locationManager = [[CLLocationManager alloc] init];
    self.locationManager.delegate = self;

    WeatherForecast *forecast = [[WeatherForecast alloc] init];
    self.mainViewController.forecast = forecast;

    self.window.rootViewController = self.mainViewController;
    [self.window makeKeyAndVisible];

    return YES;
}Finally, we have to implement the two CLLocationManagerDelegate methods we’re going to need. Make the changes shown in bold:
#pragma mark CLLocationManager Methods - (void)locationManager:(CLLocationManager *)manager didUpdateToLocation:(CLLocation *)newLocation fromLocation:(CLLocation *)oldLocation {
We’re going to modify the (currently unused) flipside of the Weather application and add a switch (UISwitch), similar to our Battery Monitor application from Chapter 6. This will toggle whether our application should be updating its location. However, let’s modify the FlipsideViewController interface file before we go to the nib file, adding both a switch and a switchThrown: interface builder action that we’ll connect to the switch. Make the changes shown in bold to FlipsideViewController.h:
#import <UIKit/UIKit.h>

@class FlipsideViewController;

@protocol FlipsideViewControllerDelegate
- (void)flipsideViewControllerDidFinish:(FlipsideViewController *)controller;
@end

@interface FlipsideViewController : UIViewController {
    IBOutlet UISwitch *toggleSwitch;

}

@property (weak, nonatomic) IBOutlet id <FlipsideViewControllerDelegate>
    delegate;

- (IBAction)done:(id)sender;
- (IBAction)switchThrown;

@end
In the corresponding implementation (FlipsideViewController.m), import both the Core Location framework and the application delegate interface file:
#import <CoreLocation/CoreLocation.h>
#import "AppDelegate.h"
Then in the viewDidLoad: method, we need to populate the reference to the application delegate and use the value of the updateLocation Boolean declared earlier to set the state of the UISwitch. Add the lines shown in bold:
- (void)viewDidLoad {
    [super viewDidLoad];
    AppDelegate * appDelegate =
     (AppDelegate *)[[UIApplication sharedApplication] delegate];
    toggleSwitch.on = appDelegate.updateLocation;

}
Next, provide an implementation of the switchThrown: method that you’ll attach to the UISwitch in Interface Builder:
-(IBAction)switchThrown {
    NSLog(@"Switch thrown");
    AppDelegate * appDelegate =
      (AppDelegate *)[[UIApplication sharedApplication] delegate];
    appDelegate.updateLocation = toggleSwitch.on;
    if ( toggleSwitch.on ) {
        appDelegate.locationManager.distanceFilter = 100;
        [appDelegate.locationManager startUpdatingLocation];
    } else {
        [appDelegate.locationManager stopUpdatingLocation];
    }
}-
We must set the same
updateLocationBoolean variable in the application delegate to be that of the state of the switch. We do this before starting location updates, as calls to thedidUpdateToLocation:fromLocation:method will trigger a call of therefreshViewmethod, which will check the state of theupdateLocationBoolean. If we haven’t already set this variable, it’s possible that we’ll end up with a race condition.
Now let’s add that switch to the flipside view. Make sure you’ve saved all your changes and then click on the FlipsideView.xib file to open it in Interface Builder. Drag and drop a label (UILabel) and a switch (UISwitch) element from the Object Library window into the Flipside View window and use the Attributes Inspector to set the default position of the switch to Off. Position them and adjust the attributes of the label so that your layout looks like Figure 10-1. While you’re here, double-click on the navigation bar title and change the text to Preferences. Save your changes; we’re done here.

Right-click and drag from File’s Owner to connect the toggleSwitch outlet to the UISwitch. Then right-click and drag back from the switch to File’s Owner to connect the switchThrown: action (see Figure 10-2).

We’ve reached a natural point to take a break and test the application. Save FlipsideView.xib and click the Run button in the Xcode toolbar to build and deploy the Weather application into the simulator. Once it’s running, click the Info button to go to the flip side of the application and toggle the switch. The Simulator will prompt you and ask whether you’re happy for it to use your current location. Tap the OK button to allow it (see Figure 10-3).
If you look at the Debug area, you should (after a short time) see something that looks a lot like Figure 10-4.

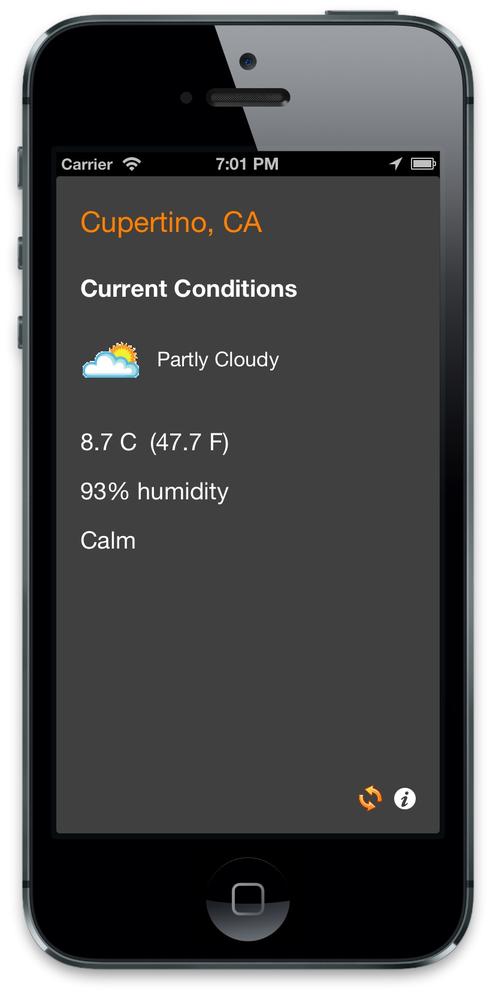
Figure 10-3. The flipside of the Weather application running in the iPhone Simulator with location services turned off (left), the permissions Alert window (middle), and with location services turned on (right)

Figure 10-4. The Weather application reporting the simulated location (of iPhone Simulator) in the Debug area when the flipside switch is thrown
Note
In the past, the iPhone Simulator reported its location as being at Lat. +37.33168900, Long. −122.03073100, corresponding to 1 Infinite Loop, Cupertino, CA. With the arrival of Xcode 4.2, the Simulator can now report your actual position (based on the WiFi position of your development machine).
Alternatively, you can use the Debug→Location menu item in the iOS Simulator to choose to use a different custom location or to choose a simulated run, bike ride, or freeway car journey.
Quit the simulator. Back in Xcode, click on the MainViewController.h interface file to open it in the Standard Editor. Since we’re now going to have multiple locations, we need somewhere to store the name of the location that we’ll get back from the reverse geocoder. We’ll also need to take out UIActivityIndicator instance variable and make it a property.
Delete the instance variable:
IBOutlet UIActivityIndicatorView *loadingActivityIndicator;
and add the following properties:
@property (strong, nonatomic) NSString *locationState;
@property (strong, nonatomic) NSString *locationCity;
@property (strong, nonatomic)
  IBOutlet UIActivityIndicatorView *loadingActivityIndicator;
You should notice that the circle next to the newly created IBOutlet property initially starts as unfilled, but after a few moments becomes a filled circle. This indicates that the outlet is properly connected to the activity indicator in the nib file. If the circle doesn’t fill, you’ll need to go back into Interface Builder and connect the activity indicator back up to File’s Owner.
At this point, you need to fix all the occurrences of loadingActivityIndicator to be self.loadingActivityIndicator. There are two: one at the start of the refreshView: method, and the other at the very end of the updateView method.
Then in the viewDidLoad: method, initialize the location strings:
- (void)viewDidLoad {
    [super viewDidLoad];
    self.locationState = [[NSString alloc] init];
    self.locationCity = [[NSString alloc] init];
    [self refreshView:self];
}
We’ll need access to the application delegate, so the next thing we need to do is import it at the top of the MainViewController implementation. Add this line to the top of the file:
#import "AppDelegate.h"
Next, in the refreshView: method, check whether the app is monitoring the device’s location so that you know whether to query the Weather Underground service with the app’s default location (London, UK) or with the current location:
- (IBAction)refreshView:(id)sender {
    [self.loadingActivityIndicator startAnimating];

    AppDelegate *appDelegate =
      (AppDelegate *)[[UIApplication sharedApplication] delegate];
    if( appDelegate.updateLocation ) {
        NSLog( @ "updating for location = %@, %@ ",
               self.locationCity, self.locationState );
        NSString *encodedState = [self.locationState
               stringByAddingPercentEscapesUsingEncoding:NSUTF8StringEncoding];
        NSString *encodedCity  = [self.locationCity
               stringByAddingPercentEscapesUsingEncoding:NSUTF8StringEncoding];
        [self.forecast queryServiceWithState:encodedState
                                     andCity:encodedCity
                                  withParent:self];

    } else {
        [self.forecast queryServiceWithState:@"UK"
            andCity:@"London" withParent:self];
    }

}
Now we’re ready to do our reverse geocoding. Open up the AppDelegate.m implementation, and in the didUpdateToLocation: method, add the code shown in bold:
- (void)locationManager:(CLLocationManager *)manager
    didUpdateToLocation:(CLLocation *)newLocation
           fromLocation:(CLLocation *)oldLocation {

    NSLog(@"Location: %@", [newLocation description]);

    if ( newLocation != oldLocation ) {
        CLGeocoder *geocoder = [[CLGeocoder alloc] init];
        [geocoder reverseGeocodeLocation:newLocation
                 completionHandler: ^(NSArray *placemarks, NSError *error) {
            CLPlacemark *placemark = [placemarks objectAtIndex:0];
            NSLog(@"%@",[NSString stringWithFormat:@"%@,%@",
                  placemark.locality, placemark.administrativeArea] );
            dispatch_async( dispatch_get_main_queue(), ^{
                self.mainViewController.locationState = placemark.administrativeArea;
                self.mainViewController.locationCity = placemark.locality;
                [self.mainViewController refreshView:self];
            });


        }];
    }
}
Here we simply retrieve the latitude and longitude from the CLLocation object, and we pass them to the CLGeocode class to resolve. There the handler block takes care of updating the main view controller.
We’re done. Save your changes and click the Run button in the Xcode toolbar to deploy the application in iPhone Simulator. Once it’s running, click the Info button to go to the flip side of the application and toggle the switch. Click the Done button and return to the main view. After a little while, the activity indicator in the top-righthand corner should start spinning, and the weather information should change from London to that of your nearest town (see Figure 10-5).
Let’s build a simple application to answer the question: “Where am I?” Start a new project in Xcode, select a Single View Application template, choose the iPhone as a device family, and name the project WhereAmI when prompted.
Add the MapKit and Core Location frameworks to your new project’s target. You do not need the Core Location framework to work with MapKit, but we’re going to use it later in the chapter, so we may as well add it now.
To do that, click on the Project icon at the top of the Project pane in Xcode, then click on the main Target for the project, and then on the Build Phases tab. Finally, click on the Link Binary with Libraries item to open up the list of linked frameworks, and click on the + symbol to add a new framework. Select the Core Location framework (CoreLocation.framework) from the drop-down list and click the Add button. Do this a second time, this time for the MapKit framework (MapKit.framework).
Once that’s done, click on the ViewController.h interface file to open it in the Standard Editor and add a map view instance to the class, and import both the Core Location and MapKit framework header files:
#import <UIKit/UIKit.h>
#import <MapKit/MapKit.h>
#import <CoreLocation/CoreLocation.h>

@interface ViewController : UIViewController

@property (strong, nonatomic) IBOutlet MKMapView *mapView;

@end
Save your changes and click on the ViewController.xib file to open it in Interface Builder. Drag and drop a map view (MKMapView) from the Object Library window into the View window. Then right-click and drag from the File’s Owner icon to connect the mapView outlet to the MKMapView, as shown in Figure 10-6.
This is a good place to check our code. Save your changes to the nib file, and click the Run button in the Xcode toolbar to build and deploy your application in iPhone Simulator. You should see something similar to Figure 10-7.


It’s not amazingly interesting so far, so let’s use Core Location to change that.
While MapKit knows the current user location and can mark it on the map (you’ll see the property that enables this, showsUserLocation, in the didUpdateToLocation:fromLocation: method shortly), there is no way to monitor it or update the current map view when the location changes. So, we’re going to implement an application that uses Core Location to determine and zoom to the current location and then display the standard user location marker using MapKit.
Click on the AppDelegate.h interface file to open it in the Xcode Editor. We’re going to declare that the application delegate also implement the CLLocationManagerDelegate protocol, and add a locationManager property to the class declaration. Make the changes shown in bold to this interface file:
#import <UIKit/UIKit.h>
#import <CoreLocation/CoreLocation.h>

@class ViewController;

@interface AppDelegate : UIResponder <UIApplicationDelegate,
                                      CLLocationManagerDelegate>

@property (strong, nonatomic) UIWindow *window;
@property (strong, nonatomic) ViewController *viewController;
@property (strong, nonatomic) CLLocationManager *locationManager;

@end
In the implementation file (AppDelegate.m), we need to create an instance of the location manager and start updating our location (see earlier in the chapter for an overview of the location manager):
#import "AppDelegate.h"
#import "ViewController.h"

@implementation AppDelegate

- (BOOL)              application:(UIApplication *)application
    didFinishLaunchingWithOptions:(NSDictionary *)launchOptions {

    self.window =
        [[UIWindow alloc] initWithFrame:[[UIScreen mainScreen] bounds]];

    self.locationManager = [[CLLocationManager alloc] init];
    if ( [CLLocationManager locationServicesEnabled] ) {
        self.locationManager.delegate = self;
        self.locationManager.distanceFilter = 1000;
        [self.locationManager startUpdatingLocation];
    }

    self.viewController =
      [[ViewController alloc] initWithNibName:@"ViewController" bundle:nil];
    self.window.rootViewController = self.viewController;
    [self.window makeKeyAndVisible];
    return YES;
}

// ... rest of the methods not shown...

@end
Now we must implement the locationManager:didUpdateToLocation:fromLocation: delegate method. Add the following to AppDelegate.m:
- (void)locationManager:(CLLocationManager *)manager
    didUpdateToLocation:(CLLocation *)newLocation
           fromLocation:(CLLocation *)oldLocation {

    double miles = 12.0;
    double scalingFactor =
      ABS( cos(2 * M_PI * newLocation.coordinate.latitude /360.0) );

    MKCoordinateSpan span;
    span.latitudeDelta = miles/69.0;
    span.longitudeDelta = miles/( scalingFactor*69.0 );

    MKCoordinateRegion region;
    region.span = span;
    region.center = newLocation.coordinate;

    [self.viewController.mapView setRegion:region animated:YES];
    self.viewController.mapView.showsUserLocation = YES;
}
Here we set the map region to be 12 miles square, centered on the current location. Then we zoom in and display the current user location.
Note
The number of miles spanned by a degree of longitude range varies based on the current latitude. For example, one degree of longitude spans a distance of approximately 69 miles at the equator but shrinks to 0 at the poles. However, unlike longitudinal distances, which vary based on the latitude, one degree of latitude is always around 69 miles (ignoring variations due to the slightly ellipsoidal shape of Earth).
Length of 1 degree of Longitude (miles) = cosine (latitude) × 69 (miles).
Click the Run button on the Xcode toolbar to build and deploy your application in iPhone Simulator. You should see something like Figure 10-8.
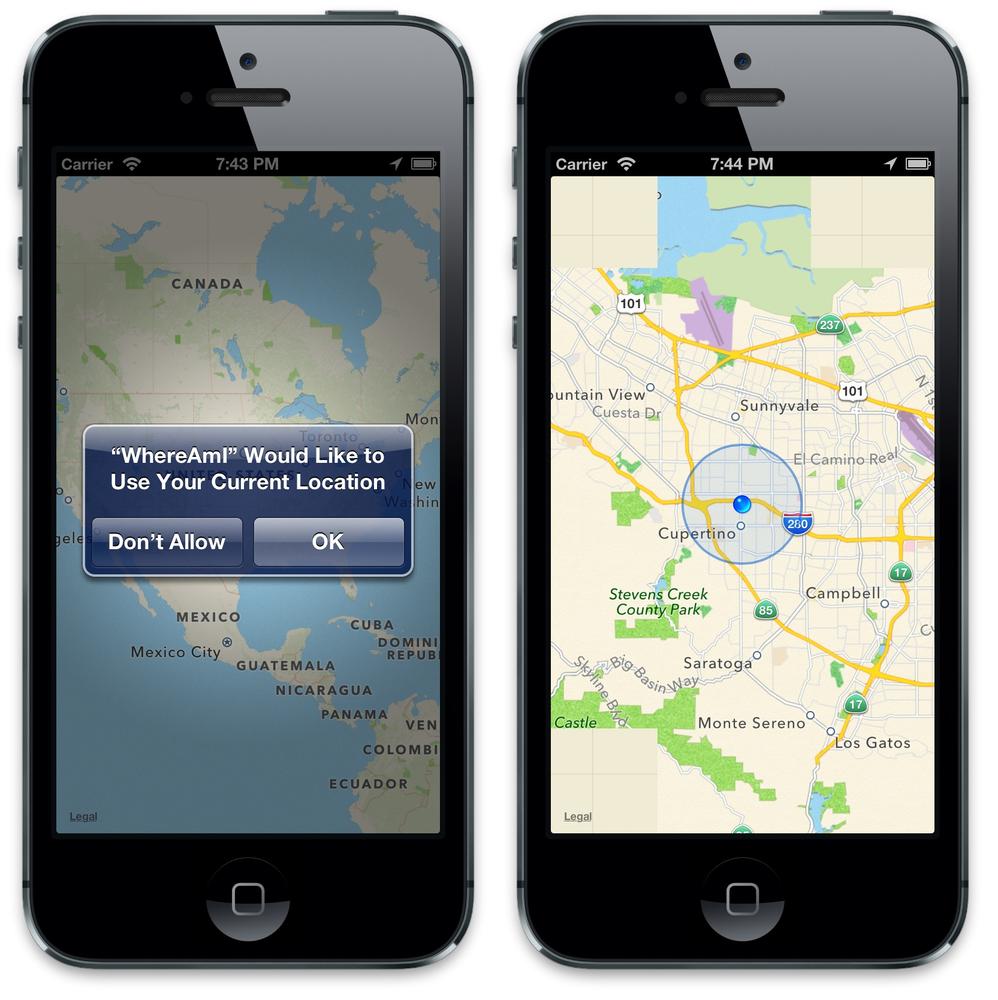
Figure 10-8. Asking user permission for the current location (left) and afterward, the map view showing the current user location (right)
If your current location changes, the user location will be automatically updated on the map.
Before leaving this example, let’s add one more feature to display the current latitude and longitude on top of the map. Open the ViewController.h interface file and add two outlets to UILabel for the latitude and longitude values:
#import <UIKit/UIKit.h>
#import <MapKit/MapKit.h>
#import <CoreLocation/CoreLocation.h>

@interface ViewController : UIViewController

@property (strong, nonatomic) IBOutlet MKMapView *mapView;
@property (strong, nonatomic) IBOutlet UILabel *latitude;
@property (strong, nonatomic) IBOutlet UILabel *longitude;

@end
Make sure you’ve saved those changes, and click on the ViewController.xib nib file to open it in Interface Builder. Drag and drop a round rect button (UIButton) onto the view form the Object Library, resizing it roughly to the size shown in Figure 10-9, and remembering to remove the default text.

We’re going to use the button as a backdrop for latitude and longitude labels. It’s actually a fairly common trick to do this, as it gives a nice box with rounded corners, but you must uncheck the User Interaction Enabled box in the View section of the Attributes Inspector tab in the Utilities panel. This will disable the user’s ability to select the button. If you’re uncomfortable doing this, you could equally well use a UIImage as a backdrop, or simply set the UILabel background to white or another appropriate color.
Next, drag and drop two labels from the Library on top of the button in the View window and change the label contents to be Latitude and Longitude. Finally, drag and drop two more labels onto the button and position them next to the previous two and set the contents to be 0.00.
Now right-click and drag from File’s Owner and connect the longitude and latitude outlets to the two labels we’re intending to use, as shown in Figure 10-10.

Save your changes to the nib file and click on the AppDelegate.m file to open it in the Standard Editor. All we have to do at this point is populate the two labels we just added. In the locationManager:didUpdateToLocation:fromLocation: method, add the lines shown in bold:
- (void)locationManager:(CLLocationManager *)manager
    didUpdateToLocation:(CLLocation *)newLocation
           fromLocation:(CLLocation *)oldLocation {

    double miles = 12.0;
    double scalingFactor =
      ABS( cos(2 * M_PI * newLocation.coordinate.latitude /360.0) );

    MKCoordinateSpan span;
    span.latitudeDelta = miles/69.0;
    span.longitudeDelta = miles/( scalingFactor*69.0 );

    MKCoordinateRegion region;
    region.span = span;
    region.center = newLocation.coordinate;

    [self.viewController.mapView setRegion:region animated:YES];
    self.viewController.mapView.showsUserLocation = YES;

    self.viewController.latitude.text =
      [NSString stringWithFormat:@"%f", newLocation.coordinate.latitude];
    self.viewController.longitude.text =
      [NSString stringWithFormat:@"%f", newLocation.coordinate.longitude];

}
Make sure you’ve saved your changes and click the Run button in the Xcode toolbar. If all goes well, you should be presented with a view that looks similar to Figure 10-11.

Just as we did for the UIWebView in Chapter 7, we’re going to build some code that you’ll be able to reuse in your own applications later. We’re going to build a view controller that we can display modally, and which will display an MKMapView annotated with a marker pin that can then be dismissed, returning us to our application.
We can reuse the Prototype application code we built back in Chapter 7 as a stub to hang our view controller from. Open the Finder and navigate to the location where you saved the Prototype project. Right-click on the folder containing the project files and select Duplicate; a folder called Prototype copy will be created containing a duplicate of our project. Rename the folder Prototype3.
Now open the new version of the project in Xcode and mouse over the blue Project icon at the top of the Project navigator and hit the Enter key, which will make the project name editable. Enter Prototype3 as the new project name, and a drop-down will appear prompting you to approve the changes to the project. Click Rename when prompted to rename the project.
Then, just as we did when we rebuilt the Prototype application to demonstrate the mail composer, prune the application down to the stub with the Go button and associated pushedGo: method we can use to trigger the display of our map view [see the section Sending Email in Chapter 7 for details].
Now, right-click on the Prototype group in the Project Navigator panel and click on New File from the menu. Under Cocoa Touch, select a UIViewController subclass, and name it MapViewController. Ensure that the “With XIB for user interface” checkbox is ticked.
You’ll need to add both the MapKit and the Core Location frameworks to your project, just as you did in the last section.
Note
We’re going to be using the Core Location and MapKit frameworks throughout this project; instead of having to include them every time we need them, we can use the Prototype_prefix.pch header file to import them into all the source files in the project. Open this file (it’s in the Supporting Files group) and change it to read as follows:
#ifdef __OBJC__
    #import <UIKit/UIKit.h>
    #import <Foundation/Foundation.h>
    #import <CoreLocation/CoreLocation.h>
    #import <MapKit/MapKit.h>
#endif
This file is called a prefix file because it is prefixed to all of your source files. However, the compiler precompiles it separately; this means it does not have to reparse the file on each compile run, which can dramatically speed up your compile times on larger projects.
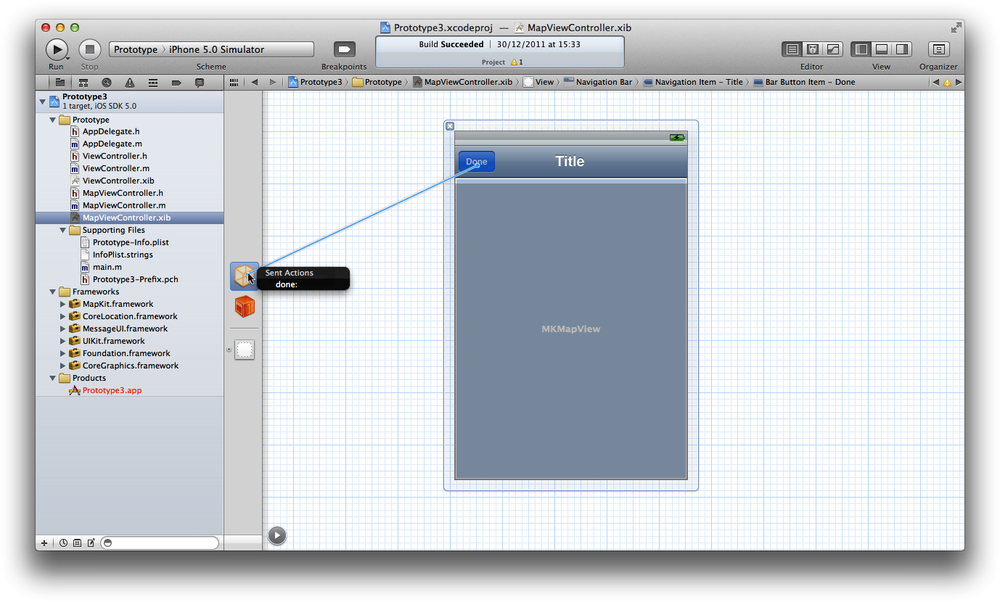
Let’s start by creating the UI for the new map view. Click on the MapViewController.xib file to open the nib file in Interface Builder. Drag and drop a navigation bar (UINavigationBar) from Object Library, and position it at the top of the view. Then drag a map view (MKMapView) into the view and resize it to fill the remaining portion of the View window. Finally, drag a bar button item (UIBarButton) onto the navigation bar, and again in the Attributes Inspector tab of the Utilities panel, changing its identifier from Custom to Done. Once you’ve done this, your view will look similar to what’s shown in Figure 10-12.

After saving the changes to the MapViewController.xib file, open the MapViewController.h interface file. Just as we did for the web view, we want to make this class self-contained so that we can reuse it without any modifications. We’re therefore going to override the init: function again to pass the information you need when instantiating the object:
#import <UIKit/UIKit.h>

@interface MapViewController : UIViewController <MKMapViewDelegate> {
    CLLocationCoordinate2D theCoords;
    NSString *theTitle;
    NSString *theSubTitle;
    IBOutlet MKMapView *mapView;
    IBOutlet UINavigationItem *mapTitle;
}

- (id) initWithCoordinates:(CLLocationCoordinate2D)coordinates;
- (id) initWithCoordinates:(CLLocationCoordinate2D)coordinates
                  andTitle:(NSString *)title;
- (id) initWithCoordinates:(CLLocationCoordinate2D)coordinates
                  andTitle:(NSString *)title
               andSubTitle:(NSString *)subtitle;
- (IBAction) done:(id)sender;

@end
I’ve actually provided three independent init methods; which one you use depends on how much metadata you want to pass to the MapViewController class. If you look at the corresponding implementation in the MapViewController.m file, you’ll notice that I’ve really only coded one of them. The other two are simply convenience methods that are chained to the first:
#import "MapViewController.h"

@implementation MapViewController

- (id)initWithNibName:(NSString *)nibNameOrNil bundle:
    (NSBundle *)nibBundleOrNil {
    self = [super initWithNibName:nibNameOrNil bundle:nibBundleOrNil];
    if (self) {
        // Custom initialization
    }
    return self;
}

- (id) initWithCoordinates:(CLLocationCoordinate2D)coordinates
                  andTitle:(NSString *)title
               andSubTitle:(NSString *)subtitle {
    if ( self = [super init] ) {
        theTitle = title;
        theSubTitle = subtitle;
        theCoords = coordinates;
    }
    return self;
}

- (id) initWithCoordinates:(CLLocationCoordinate2D)coordinates
                  andTitle:(NSString *)title {
    return [self initWithCoordinates:coordinates andTitle:title andSubTitle:nil];
}

- (id) initWithCoordinates:(CLLocationCoordinate2D)coordinates {
    return [self initWithCoordinates:coordinates andTitle:nil andSubTitle:nil];
}

- (IBAction) done:(id)sender {
    [self dismissViewControllerAnimated:YES completion:nil];
}

- (void)viewDidLoad {
    [super viewDidLoad];
    mapTitle.title = theTitle;

    // ... code to add annotations goes here later ...

}

- (void)didReceiveMemoryWarning {
    [super didReceiveMemoryWarning];
}

@end
Save your changes and click on the MapViewController.xib nib file to open it in Interface Builder. Right-click and drag from File’s Owner to the title item in the navigation bar and connect it to the mapTitle outlet, and then right-click and drag from File’s Owner to the map view to connect it to the mapView outlet. Finally, right-click and drag from the Done button to File’s Owner and connect it to the done: received action (see Figure 10-13) and from the map view to File’s Owner to connect it as a delegate.
Save your changes to the nib file and switch to the ViewController.m implementation file, then import the MapViewController class:
#import "MapViewController.h"
Next, replace the pushedGo: method with the following:
-(IBAction) pushedGo:(id)sender {
    CLLocationCoordinate2D coord = {37.331689, −122.030731};
    MapViewController *mapView =
      [[MapViewController alloc] initWithCoordinates:coord
                                            andTitle:@"Apple"
                                         andSubTitle:@"1 Infinite Loop"];
    [self presentViewController:mapView animated:YES completion:nil];

}
It’s time to stop and test our application. Save the file and click the Run button to compile and start the application in iPhone Simulator. Tap the Go button and the map view should load. Right now, we haven’t specified any annotations, or a region, so you should just see a default world map (see Figure 10-14).

Let’s change that. The first thing we need to do is create a class that implements the MKAnnotation protocol. Right-click on the Prototype group in the Project Navigator panel and click on New File from the menu. Select an Objective-C class, a subclass of NSObject, and name it SimpleAnnotation when prompted.
Open the SimpleAnnotation.h interface file Xcode has just created in the editor and modify it as follows:
#import <Foundation/Foundation.h>

@interface SimpleAnnotation : NSObject <MKAnnotation>

@property (nonatomic) CLLocationCoordinate2D coordinate;
@property (copy, nonatomic) NSString *title;
@property (copy, nonatomic) NSString *subtitle;

+ (id)annotationWithCoordinate:(CLLocationCoordinate2D)coord;
- (id)initWithCoordinate:(CLLocationCoordinate2D)coord;

@end
Open the corresponding SimpleAnnotation.m implementation file, and make the changes shown here:
#import "SimpleAnnotation.h"

@implementation SimpleAnnotation

+ (id)annotationWithCoordinate:(CLLocationCoordinate2D)coord {
    return [[[self class] alloc] initWithCoordinate:coord];
}

- (id)initWithCoordinate:(CLLocationCoordinate2D)coord {
    if ( self = [super init] ) {
        self.coordinate = coord;
    }
    return self;
}

@end
The SimpleAnnotation class is just a container; it implements the MKAnnotation protocol to allow it to hold the coordinates and title (with subtitle) of our annotation.
Save your changes and click on the MapViewController.m implementation file to open it in the Xcode Editor. Import the SimpleAnnotation class:
#import "SimpleAnnotation.h"
Edit the viewDidLoad: method to add the annotation using theCoords, theTitle, and theSubTitle passed to the MapViewController when it was initialized:
- (void)viewDidLoad {
    [super viewDidLoad];
    mapTitle.title = theTitle;

    SimpleAnnotation *annotation =
      [[SimpleAnnotation alloc] initWithCoordinate:theCoords];
    annotation.title = theTitle;
    annotation.subtitle = theSubTitle;

    MKCoordinateRegion region = { theCoords, {0.2, 0.2} };
    [mapView setRegion:region animated:NO];
    [mapView addAnnotation: annotation];
}
We’re done. Make sure all your changes are saved, and click the Run button in the Xcode toolbar to build and deploy your application in iPhone Simulator. If all goes well, clicking on the Go button should give you a view that looks like Figure 10-15.

At this point, you have reusable MapViewController and SimpleAnnotation classes, along with an associated nib file that you can drag and drop directly into your own projects.
You might want to think about some improvements if you do that, of course. For instance, you could easily expand the class to handle multiple annotations. While the annotations themselves can provide a much richer interface than a simple pushpin, look at the documentation for the MKAnnotationView class for some inspiration.