At this point, you have several applications that are almost ready to distribute, and perhaps you have ideas for your own applications and you want to start writing your first application and publish it to the App Store. However, before you can do that, you have to do some more housekeeping.
Two things have been missing from your iOS applications, the first being the lack of a custom icon. This is crucial for the marketing of your application; you need to bring your application design together to present it to users. When a user scrolls through a long list of possible applications on the App Store, applications with strong icon design stand out. But remember that the user has to look at your application’s icon every time he looks at the Home screen. The icon has to be distinctive to stand out, but it also has to be attractive so that the user is willing to keep your application around. I’ve uninstalled otherwise good applications because I couldn’t put up with their icons, and I’m not alone.
The standard iPhone Home screen icon (Icon.png) used for your application is 57×57 pixel square in PNG format with no transparency or layers at 72 dpi. In addition to this, you can provide a 114×114 pixel high-resolution (Icon@2x.png) icon in the same format that will be used when the application is running hardware with a Retina display. If you write an application for the iPad, the Home screen icon (Icon~ipad.png) should be 72×72 pixels. If you are building a universal application intended to run on both the iPhone and the iPad, you should provide icons in all three sizes.
Note
In general, applications should include two separate files for each image resource. One file provides a standard-resolution version of a given image, and the second provides a high-resolution version of the same image intended for Retina displays.
The naming conventions for each pair of image files is <file><device_modifier>.<file_extension> for standard resolution and <file>@2x<device_modifier>.<file_extension> for the high resolution version.
The <file> and <file_extension> portions of each name specify the usual name and extension for the file. The <device_modifier> portion is optional and contains either the string ~ipad or \~iphone. You include one of these modifiers when you want to specify different versions of an image for iPad and iPhone.
You also must provide Apple with a 512×512-pixel version of your application icon for display on the App Store (iTunesArtwork with no extension; you will need to provide this when you upload your app). This larger image must be in TIFF or JPEG format, and again it must have no transparency or layers.
It’s sensible to design your icon in 512×512 pixels and scale it down to the 57×57-pixel version supplied inside your application’s bundle. Doing things the other way around usually means that an unattractive and often pixelated icon is shown on the App Store.
Note
You can also provide a small icon, such as a 29×29-pixel PNG file, in your application bundle called Icon-Small.png along with a corresponding 58×58-pixel high-resolution image called Icon-Small@2x.png. Spotlight will use this icon on the device when the application name matches a term in the search query. Additionally, if your application includes a Settings Bundle (see the previous chapter for more on Settings Bundles), this icon is displayed next to your application’s name in the Settings application. If you do not provide this icon, your 57×57-pixel image is automatically scaled and used instead.
Table 13-1 details the different icon sizes that you may need to deal with when building an iOS application.
Table 13-1. Custom icons and images
|
Description |
Status |
Size (width×height pixels) | ||
|---|---|---|---|---|
|
iPhone |
iPad | |||
|
Standard |
Retina | |||
|
Application icon |
Required |
57×57 |
114×114 |
72×72 |
|
App Store icon |
Required |
512×512 | ||
|
Small icon |
Recommended |
29×29 |
58×58 |
50×50 (Spotlight) |
|
29×29 (Settings) | ||||
|
Document icon |
Optional |
22×29 |
44×58 |
64×64 |
|
320×320 | ||||
|
Toolbar and navigation bar icon |
If needed |
20×20 |
40×40 |
20×20 |
|
Tab bar icon |
If needed |
30×30 |
60×60 |
30×30 |
|
Newstand icon |
Newstand Apps |
At least 512 pixels on the longest edge | ||
|
Launch image |
Required |
320×480 |
640×960 |
768×1004 (portrait) |
|
1024×748 (landscape) | ||||
Both the iPhone and the iTunes Store will, by default, apply some visual effects to the icon you provide. They will round the corners, and add both drop shadows and reflected shine.
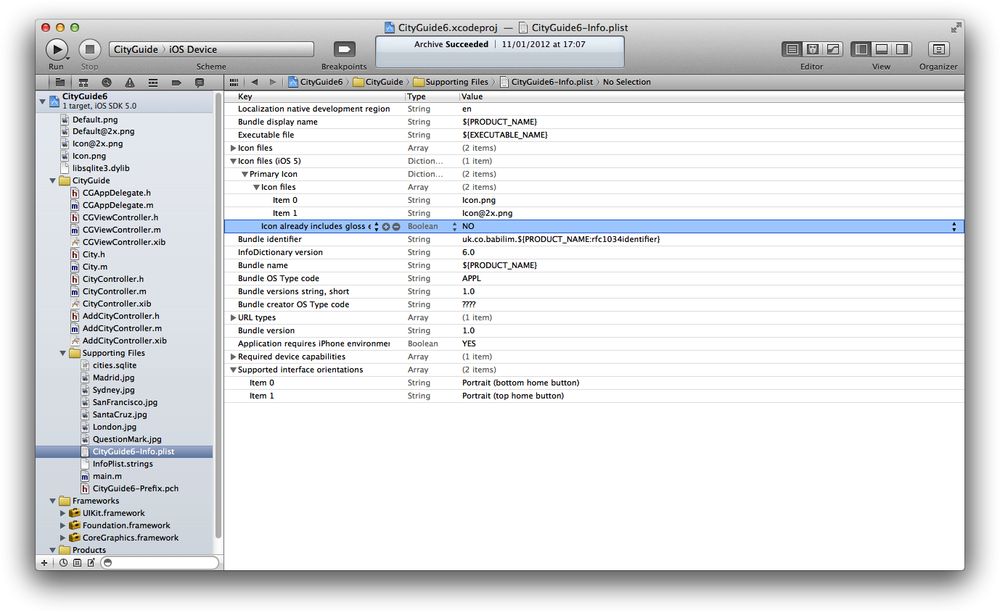
You can prevent iTunes from adding visual effects by setting the “Icon already includes glass and bevel effects” flag (UIPrerenderedIcon) inside the application’s Info.plist file. To do so, open the <ApplicationName>-Info.plist file for your project in the editor. Open the “Icons (iOS 5)” group and expand the Primary Icon entry and select “Icon already includes gloss and bevel effects,” as shown in Figure 13-1. Set this to YES to turn off the default visual effects added by both the App Store and the device.
Let’s generate an icon for the City Guide application we built in Chapter 5. Figure 13-2 shows a sample image from the Tango Desktop Project, which was released into the public domain and is available from Wikimedia Commons. You can find many public domain images at Wikimedia Commons. It’s advisable for you to make modifications to the images you find there to avoid possible confusion—because the images are public domain, other people may use them in their own applications.

Note
You can download the icon shown in Figure 13-2 from Wikimedia Commons (either right-click or Control-click the link labeled Applications-internet.svg and choose Save Linked File). Open it in an image editor such as Adobe Illustrator or the free and open source Inkscape.
Resize the file to 114×114 pixels and save it as a PNG file named Icon@2x.png. Then resize it again to 57×57 pixels and save it Icon.png. (If you are using Inkscape, you will need to use File→Export Bitmap, choose the Page option, and set the width and height to 57 before you click Export.)
Next, open the City Guide application in Xcode.
Note
You might want to make a copy of the CityGuide code, as we’ve done in the past, before modifying it.
Drag and drop the Icon.png file (and Icon@2x.png files) into App Icons placeholders by clicking on the Project icon (the blue icon at the top of the Project Navigator panel) and dragging and dropping the files into the App Icons section (see Figure 13-3).

If you deploy the application by clicking the Run button in the Xcode toolbar, the application will start inside iPhone Simulator. If you quit the application by clicking the Home button, you will see that it now has a shiny new icon, as shown in Figure 13-4.

One of the ways in which iOS devices cheat is by providing launch images. A launch image is immediately displayed on the screen when the application is started before the UI is displayed. Your application displays the launch image file while loading, which means there are no more blank screens while the application loads.
Note
One change that occurred with the arrival of the iPhone 5, with a screen whose aspect ratio was different than previous iPhone models, was that the existence of an appropriate launch image was used to determine whether the application was “iPhone 5 Ready.” As well as the normal Default.png and Default@2x.png images you should now add a Default-568h@2x.png image to your project.
Because of this change new projects created with recent Xcode revisions will have black launch images, whereas before this change projects were created without launch images.
Let’s add one of these to the City Guide application. Build and deploy the City Guide application onto your iPhone or iPod touch. While your device is still connected and your application is still running, open the Organizer window by going to Window→Organizer in the Xcode menu bar. Go to the Devices tab of the Organizer window and you should see a glowing green dot next to your device. Select your device, and then the Screenshots item in the menu, and click the New Screenshot button. Xcode will take a screen capture from your application, as shown in Figure 13-5.

Click the Save As Launch Image button, and you’ll be presented with a drop-down asking you to save the image into your project (see Figure 13-6).

If you took the image on a standard-resolution iPhone, the image will be named Default.png, and on a high-resolution device, it’ll be Default@2x.png. Finally, if you took the image on an 4-inch Retina device (e.g. iPhone 5) it’ll be Default-568h@2x.png. Here, I took the screenshot using an iPhone 4S, so a high-resolution (640×960 pixel) image was generated.
If you now click on the Project icon at the top, you’ll see it appears in the project summary, replacing the previous black launch image.
However, the other resolution version of the image isn’t generated automatically from your initial version. You’ll have to copy and resize your high-resolution image by hand.
To do this, right-click on the Default@2x.png image file in Xcode and select Show in Finder. This will open the Finder and highlight the image in your project folder. You can now open this image in your preferred image editor and make any changes you want. Remember, you need to save it as a single-layer PNG file without transparency; otherwise, your application will have problems loading the file at launch.
Once you’ve generated the lower resolution image (320×480 pixels), and an image for the 4-inch Retina device, you can drag and drop it into the project summary as we did for the icons earlier in the chapter.
If you rebuild the City Guide application at this point and redeploy it onto your device, the application will (at least apparently) now load instantly.
Although many developers have chosen to use the launch image as a splash screen, that’s not how Apple intended for this image to be used. Instead, it is intended to improve the user experience. Its presence adds to the user’s perception that your application is quick to load and immediately ready for use when it does load.
Because this is a mobile platform, users will switch between applications frequently. Even more than on the Web, where users’ attention spans are notoriously short, on a mobile device, users will become frustrated with applications that take a long time to launch (or shut down). You need to work to keep the launch time of your application to a minimum, and use the launch image to make a subtle transition into your application.
The launch image should be identical to the first screen of your application. However, since this is an image, the content is static, so you should not include any interface elements that may change from launch to launch. Therefore, avoid displaying elements that might look different between the launch image and your first screen. For instance, the Default.png image file we generated for our City Guide application includes a list of cities, but what happens if the user adds more cities? The list will change. We can’t update the list of cities in the launch image, so it’s probably best to remove them, leaving only the table view. This also has the benefit of hinting to the user that she can’t interact with the app just yet.
Most applications’ launch images will be very plain; this is not a problem, as they are there solely to convince your users that your application is quick to load. If you interrupt the user experience with a splash screen, your users might ask themselves why you’re wasting their time displaying such a screen, and why you don’t just get on with it and load the application. If you make use of the launch image correctly, they’ll know that you’re doing your best to give them a seamless experience.
The name displayed beneath your application icon on the iPhone Home screen is, by default, the name of your Xcode project. However, only a limited number of characters are displayed before an ellipsis is inserted and your application name is truncated. This is fairly messy, and generally users don’t like it. Fortunately, you can change your application’s display name by editing the “Bundle display name” field in the application’s Info.plist file.
If you look at our City Guide application, you’ll notice that the display name is the same as our project name: CityGuide. While the name is not long enough to be truncated when displayed on the iPhone’s Home screen, we might want it to be displayed as City Guide instead. Let’s make that change now.
Open the CityGuide project in Xcode and click on the CityGuide-Info.plist file to open it in the Xcode Editor. Double-click on the Value field in the “Bundle display name” field and change the ${PRODUCT_NAME} macro to City Guide, as shown in Figure 13-7.

If you rebuild the application and deploy it in iPhone Simulator, you’ll notice that the name displayed below the City Guide application icon has changed from CityGuide6 to City Guide.
Enabling and conversely disallowing rotations between Portrait and Landscape mode is actually amazingly easy. We can do it from the project summary page (see Figure 13-8). Editing this will automatically edit our Info.plist file to enable allowed orientations.

Additionally, in your view controller class, add the following method:
- (BOOL)shouldAutorotateToInterfaceOrientation:
      (UIInterfaceOrientation)interfaceOrientation {
    // Return YES for all supported orientations
    return YES;
}
Note
If you have multiple view controller classes, you should add this method to each of them.
If you allow rotations into landscape (left and right) and then rebuild your application and rotate your device, or if running in the Simulator if you select Hardware→Rotate Left or Hardware→Rotate from the menu, your UI will rotate into landscape mode.
Note
Although the shouldAutorotateToInterfaceOrientation: method is called in a timely fashion under some versions of the SDK, this is not always the case. To ensure that you are (reliably) notified of changes in the device orientation, you should register for notification of orientation change messages.
However, when the interface rotates, the UI elements will also squash and stretch into the new orientation. You need to make sure that the individual UI elements can cope with their new sizes elegantly. You can do that in one of two ways:
- Be careful when using the Size Inspector tab in the Utilities panel in Interface Builder to make sure they stretch in the correct fashion. The easiest way to do this is to make use of the Autosizing, Alignment, and Placement sections in the Size tab.
- Register for orientation change notifications and dynamically adapt your UI based on those events. For example, the built-in Calculator application has a different UI in portrait and landscape modes.
You can start generating orientation change notifications by calling this method of the UIDevice class (in the viewDidLoad: method of your view controller class):
[[UIDevice currentDevice] beginGeneratingDeviceOrientationNotifications];
When you are no longer concerned about orientation changes, you stop such notifications by calling this method:
[[UIDevice currentDevice] endGeneratingDeviceOrientationNotifications];
After starting notifications, you must also register your class to receive such messages using the NSNotificationCenter class:
NSNotificationCenter *notificationCenter = [NSNotificationCenter defaultCenter];
[notificationCenter addObserver:self
                    selector:@selector(handlerMethod:)
                    name:@"UIDeviceOrientationDidChangeNotification"
                    object:nil];
This would invoke the handlerMethod: selector (elsewhere in your view controller) in the current class when such a message was received:
-(void) handlerMethod:(NSNotification *)note {

     /* Deal with rotation of your UI here */
        NSLog(@"Rotating")
}The certificates we generated in Chapter 2 were intended only for development. If you want to distribute your application to end users, you’ll need to return to the iOS Provisioning Portal, generate a different set of profiles, and rebuild your application, signing it this time with your new distribution profile rather than the development profile you have used thus far.
Note
The different provisioning profiles are used for different purposes. The development profile you generated in Chapter 2 is intended for development and your own devices. The ad hoc distribution profile is for alpha and beta testing, while the App Store distribution profile is intended for distributing your final build to the iTunes App Store.
Ad hoc builds of your application are used to distribute your application outside your own development environment, and are intended to allow you to distribute your application to beta testers and for Enterprise distribution. In the same way you registered your iOS device for development, you must register all of the devices onto which you intend to distribute your application using an ad hoc build. You can register up to 100 devices per year in the iOS Provisioning Portal. This is a firm limit; deleting already registered devices will not allow you to add further devices.
Note
Normally, when you distribute applications via the ad hoc method, no application artwork is displayed when the user looks at your application inside the iTunes interface. However, if you place a copy of the 512×512-pixel PNG of your icon in your application bundle and name it iTunesArtwork without any file extension, this will be used by iTunes.
To deploy your application to your users via the ad hoc method, you need to create a distribution certificate, register any devices you plan to use, and create an ad hoc provisioning profile in the iPhone Developer Program Portal.
Just as in Chapter 2 when we dealt with development, the first thing you need is a distribution certificate, and to obtain that, you need to generate a certificate-signing request (CSR) using the Keychain Access application:
- As you did for the CSR you generated for the development certificate [see Creating a Development Certificate in Chapter 2], launch the Keychain Access application.
- Select Keychain Access→Preferences from the menu. Go to the Certificates Preference pane to confirm that the Online Certificate Status Protocol (OCSP) and Certificate Revocation List (CRL) options are turned off.
- Select Keychain Access→Certificate Assistant→Request a Certificate from a Certificate Authority from the Keychain Access menu, and enter the email address you selected as your Apple ID during the sign-up process and your name. Click the “Saved to disk” radio button, check the “Let me specify key pair information” checkbox, and click Continue. You’ll be prompted for a filename for your certificate request.
- Accept the defaults (a key size of 2,048 bits using the RSA algorithm) and click Continue.
The application will proceed to generate a CSR file and save it to disk.
In the iOS Developer Center (sign in here and look for the iOS Provisioning Portal link on the right), click on the Certificates link in the lefthand menu and then in the Distribution tab, click Request Certificate (if you already have a certificate, this option will be unavailable as you need only one). Follow the instructions that appear, and upload your CSR to the portal when asked.
If you joined the development program as an individual, you need to approve the signing request (in the Distribution tab of the Certificates section of the portal) before proceeding to download the new certificate. If you are part of a team, the nominated development team administrator needs to do this. After the request is approved, you may need to click on the Distribution tab to refresh the page. When you see a Download button, click it to save the certificate to disk.
Once the certificate file has downloaded, double-click it to install it into your Mac OS X login keychain, as shown in Figure 13-9.

Before you create the provisioning profile, you’ll need to register the devices you want the profile to support. To do this, you’ll need the unique device identifier (UDID) of each of these devices. Once you have the device identifiers, you need to add your users’ devices in the same way you added your own development device in Getting the UDID of Your Development Device in Chapter 2.
In the iOS Provisioning Portal, click Devices, select the Manage tab, and click Add Devices. Enter a device name in the appropriate box and the UDID in the box labeled Device ID, and click the Submit button. (You can click the + button to add more rows so that you can add several devices at once.) You have now registered the device; you need to do this for all of the devices to which you intend to distribute ad hoc builds.
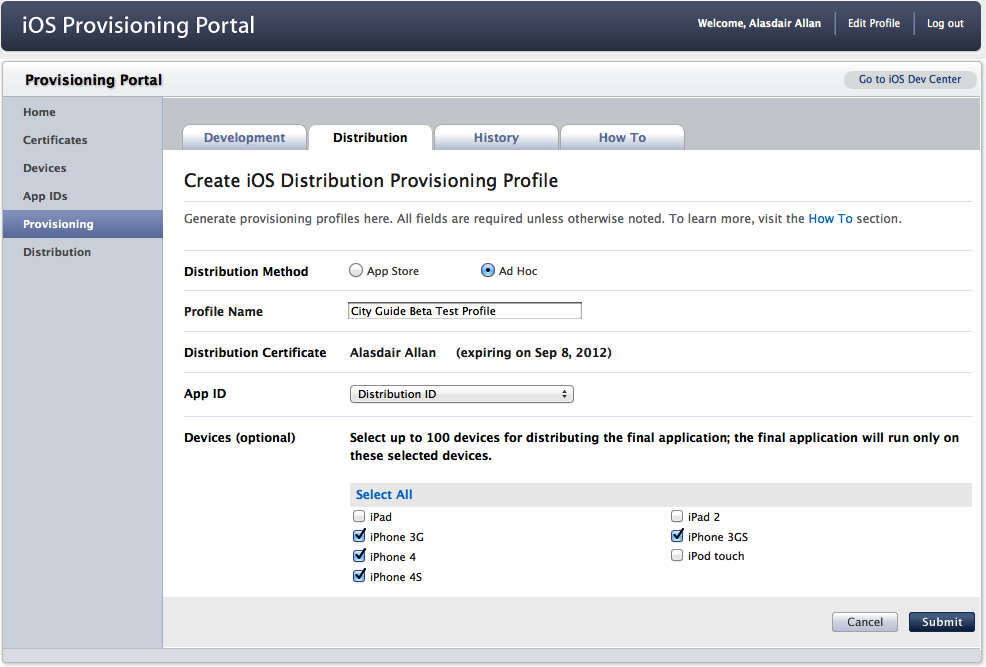
Now you’re ready to create a mobile provisioning profile. Go to the Provisioning section of the iOS Provisioning Portal, select the Distribution tab, and click New Profile.
Enter a profile name; you may be creating a number of ad hoc profiles, so naming your first distribution profile Ad-hoc Distribution Profile probably isn’t a great idea. You may want to name it after the application you’re distributing, so perhaps City Guide Beta Test Profile would be a good choice for distributing a beta of the City Guide application to testers.
Next, select the App ID you used for the application you’re going to distribute (Chapter 2), and then select all of the devices for which this profile will be valid, as shown in Figure 13-10.
Click Submit to generate the new mobile provisioning profile that you’ll use to distribute the application to your beta testers. The status will appear as pending; click the Distribution tab to reload it until it is no longer pending. When the profile is ready, click the Download button and download the provisioning profile to your Mac. Now drag the provisioning file onto the Xcode icon in the dock to make it available to the development environment.
Let’s make an ad hoc build of the City Guide application. Open your project in Xcode and make sure that “iOS Device” is selected as the Scheme in the Xcode toolbar; then, before building your application, open the CityGuide-Info.plist file and make sure the Bundle Identifier in your Info.plist file matches the one used to create the ad hoc mobile provisioning profile. See Putting the Application on Your iPhone in Chapter 3 if you’re unsure about this part. If you’ve been able to deploy your application onto your iPhone or iPod touch and you generated a wildcard app ID earlier, you shouldn’t have to change anything.
Once you’ve checked that, select Product→Archive from the Xcode menu to build your application. The Organizer window should open automatically to the Archives tab (see Figure 13-11). If not, open it by selecting Window→Organizer (⇧⌘2) from the Xcode menu.
Click the Share button and you should see something like Figure 13-12.

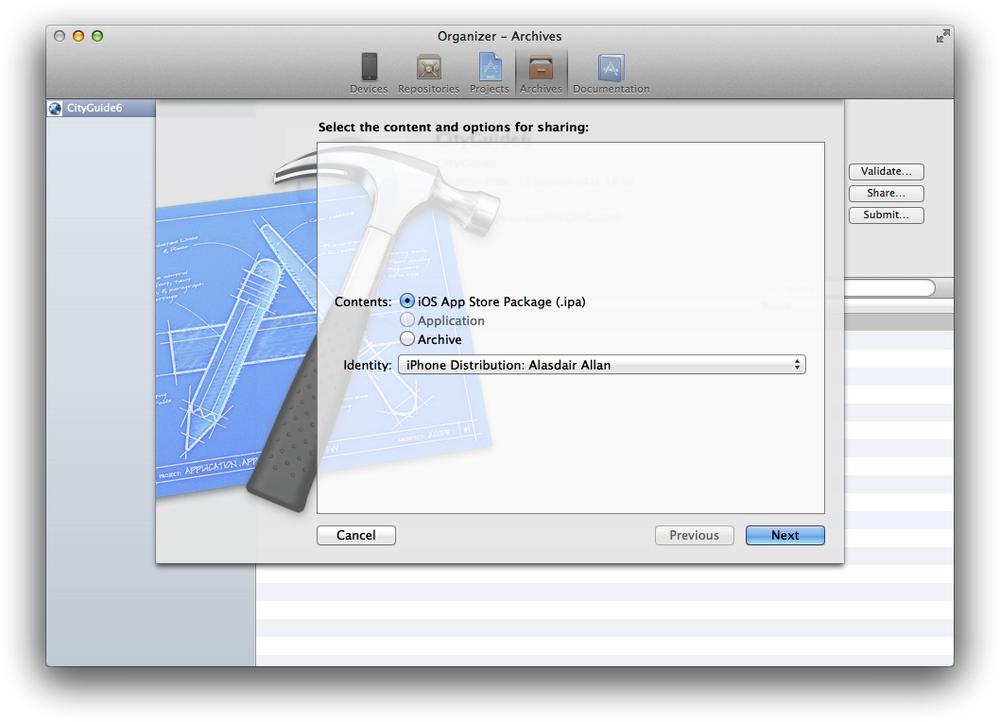
Make sure “iOS App Store Package (.ipa)” is selected and then choose your ad hoc provisioning profile in the Identity drop-down menu. Then click the Next button and save your store package on the Desktop (see Figure 13-13).

After you’ve saved your package file, drag and drop the package into iTunes and plug your device into your Mac. So long as the UDID of the device was specified as part of the ad hoc profile (see Figure 13-10), the app should sync to your iPhone or iPad like a normal application.
Similarly, to distribute the device to beta testers, ensure that their UDID is included in the profile and then drag and drop the .ipa file into an email.
Note
There are more sophisticated ways to distribute ad hoc builds. For instance, you can do over-the-air beta distribution; while this has been available for some time, there are now off-the-shelf options for doing web distributions. Both open source projects such as BetaBuilder for iOS, and commercial services such as TestFlight, simplify the process.
Apple intended ad hoc distribution to be a way for you to distribute your software to beta testers. However, developers have used it extensively for other purposes, including bypassing the App Store entirely and selling directly to the consumer (a somewhat torturous process).
If your intended end user is another developer, you can vastly simplify the ad hoc distribution process. Just create a normal development build, as though you were going to deploy the code to your own device, and send a copy of the binary to your colleague. He can then re-sign the binary with his own developer certificate using the Xcode command line codesign utility:
#! /bin/bash
export CODESIGN_ALLOCATE=/usr/bin/codesign_allocate
codesign -f -s "iPhone Developer" $1.app
Note
Before running this script, if you have not already done so, you should install the Xcode Command Line Tools. To do so, open the Xcode preferences, and go to the Downloads tab, and click the Install button next to the tools in the Components panel. This will install copies of the core command-line tools and headers into the system folders.
Warning
The way Xcode was distributed changed between version 4.2 and 4.3. If you have Xcode 4.2 installed, then the above snippet won’t work for you, as the command-line tools will be installed into the /Developer directory tree instead of into the system folders. Instead, use this snippet:
#! /bin/bash
export CODESIGN_ALLOCATE=/Developer/Platforms/iPhoneOS.platform\
/Developer/usr/bin/codesign_allocate
codesign -f -s "iPhone Developer" $1.app
Once he has re-signed the binary, he can use the Xcode Organizer window to install it onto his device. In the Applications section of the Summary tab, he should click the + symbol and select the binary. Xcode will then install it onto the appropriate iOS device.
Making a build of your application to submit to the App Store is similar to making an ad hoc build, and you’ll use the same distribution certificate you created for the ad hoc build earlier in the chapter. However, you have to return to the iOS Provisioning Portal to generate a new distribution provisioning profile.
Open the iOS Provisioning Portal in a browser (start here and follow the links to the iOS Provisioning Portal), and in the Provisioning section, select the Distribution tab and click New Profile. Enter a profile name; you’ll need only one App Store profile, so unlike the ad hoc profile, a good choice might be App Store Distribution Profile.
Finally, select the App ID you used for the application you’re going to distribute; since this is an App Store provisioning profile, there is no need to select devices this time around.
Note
Most developers use one (wildcarded) App ID for all of their applications [see Putting the Application on Your iPhone in Chapter 3]. The only reason you would need to use a separate profile for your application is if it makes use of In-App Purchase, Push Notifications, or Game Center.
Click Submit to generate the new mobile provisioning profile. The status will appear as pending; click the Distribution tab to reload it until it is no longer pending. When the profile is ready, click the Download button and download the provisioning profile to your Mac. Drag the provisioning file onto the Xcode icon in the dock to make it available to the development environment.
Warning
While I’m going to walk you through building a version of the City Guide application that is ready to be submitted to the App Store, you should not actually submit it. The App Store might start to look a bit odd if every reader of this book did that.
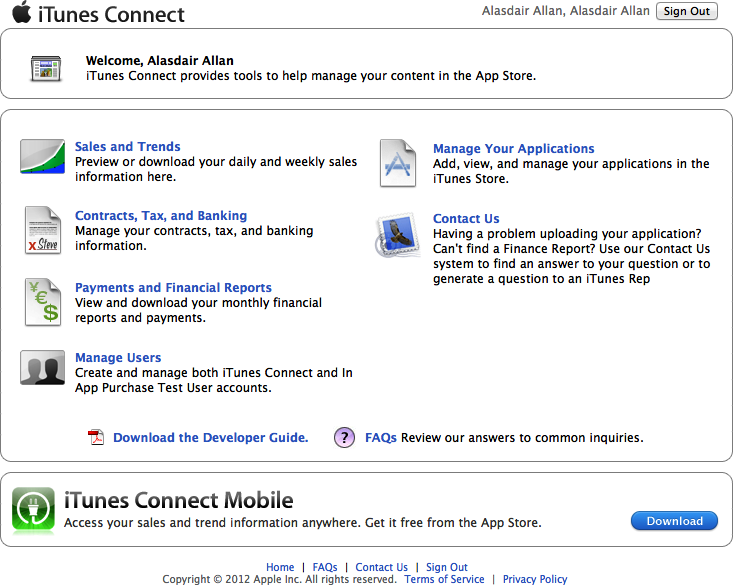
Let’s make an App Store build of our City Guide application. Before we build our application for distribution, we first have to create the application record in iTunes Connect.
Open iTunes Connect in a browser by going here. You should see something like Figure 13-14.
Note
If this is the first time you’ve submitted an application to iTunes Connect, you’ll be asked what primary language you will be using to enter your applications to the store. You’ll then be asked what company or developer name you want displayed on the App Store for all your applications. Both your primary language and your company name cannot be changed, so choose carefully. You won’t be asked these questions again the next time you submit an application to the store.
Click through on the Manage Your Applications link, click on the blue Add New App button (top left), and select an iOS application. You’ll be prompted for the application name, a SKU number, and to select the Bundle ID of your application along with suffix if you are using a wildcard ID (see Figure 13-15).
Note
The SKU (or stock-keeping unit) number must be a unique alphanumeric identifier that you choose for this product. Bear in mind that this SKU cannot be changed at any point in the future, even with the upload of a new binary (and version) of the application, so while you can choose just about anything, it should be fairly descriptive but not version-specific.
The application display name and description will appear as is on the iTunes App Store. You do not have to use the same name for the application as you used for your project binary or bundle display name. However, it should be related to the display name, or this might form grounds for rejection by the review team.

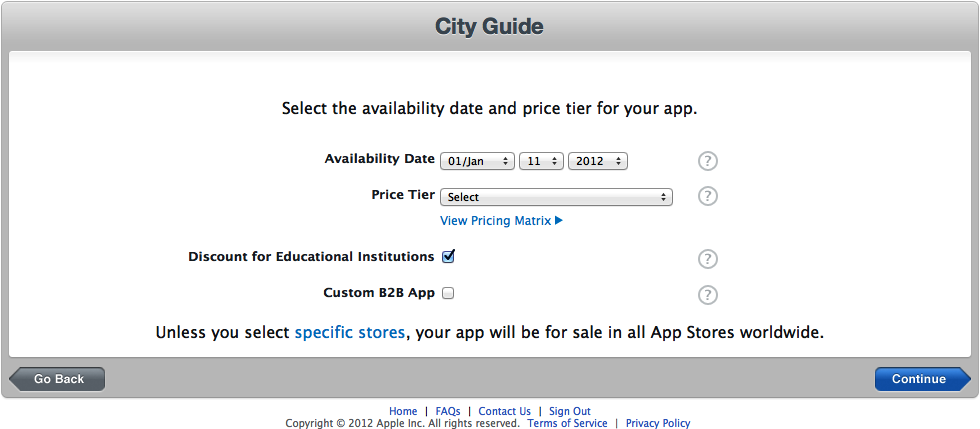
Click Continue, and you will be asked to set the price tier (see Figure 13-16) and availability date for your application. Your application will be made available on the store on this date, or whenever it leaves the review process and is approved by the App Store review team, whichever is later.
Warning
The availability date, like all application metadata, applies to all versions of your application. If you later upload an update for your application and change the availability date to a date in the future, your current version will be removed from the App Store until that date arrives.
Click Continue, and you’ll be asked to describe your application (see Figure 13-17). Most of this is self-explanatory, but if you have any problems, click the question mark to the right of each entry and some explanatory text will be displayed in a pop-up.

You should fill in all of the fields unless they are marked as being optional:
- Version number
- Provide the version number of the application. This must be 1.0 or above. Submitting apps to the store with a version number less than 1.0 is grounds for rejection.
- Application description
- You should try to keep your description fairly short so that your application screenshots will be “above the fold” (the part of the description the user will see without having to scroll) if the user is browsing the store from her mobile device.
- Primary and secondary category
- These are the App Store categories that best describe your application. You need only select the primary category.
- Keywords
- Application keywords are associated with the application binary and can be edited only when uploading a new binary, so think carefully about your choice of keywords for your application. Separate multiple keywords with commas, not spaces.
- Contact email address
- This is the email address that will be published to iTunes as the support address when your application is approved. It would be a sensible move to create a separate email address for each of your applications, rather than use a personal address. If your application becomes popular, you will receive a lot of email.
- Support and Application URLs
- Again, this is fairly self-explanatory. These are two URLs that can be identical; they link to support information about your application. Applications without associated URLs, or with URLs pointing to blank pages, will not be approved. Your support information should be in place before you upload your binary to iTunes Connect for review.
- Review notes
- If your application needs an account on an online service to be fully operative, supply an account name and password here. If you don’t, the review team will summarily reject your application.
After entering this metadata, you’ll be asked to rate your application under certain categories: Cartoon or Fantasy Violence; Realistic Violence; Sexual Content or Nudity; Profanity or Crude Humor; Alcohol, Tobacco, or Drug User or References; Mature/Suggestive Themes; Simulated Gambling; Horror/Fear Themes; Prolonged Graphic or Sadistic Realistic Violence; and Graphic Sexual Content and Nudity. This will generate your App Rating (4+, 9+, 12+, or 17+) that will allow users to filter your application using the parental controls inside iTunes. If you don’t rate your application realistically, the review team may reject it during the review process.
Finally, you should upload the 512×512 pixel version of your icon intended for use in iTunes and, at the very least, one screenshot for use by the App Store. Click the Save button and you should be presented with something that looks a lot like Figure 13-18.
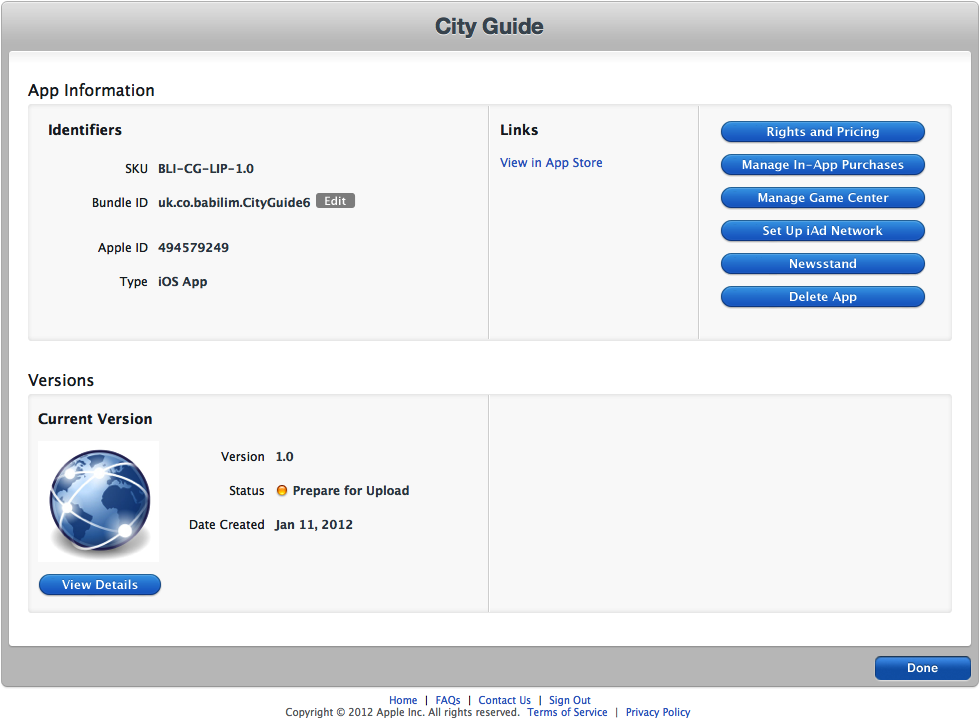
Click View Details to see the application summary screen. In the top right, you should see a bright blue Ready to Upload Binary button. Click on the button to tell iTunes Connect that you have a binary ready for upload.
You’ll then be asked whether your application uses encryption (see Figure 13-19). If your application includes any encryption code, you may have to fill out some forms to comply with US commercial encryption export controls.
You’ll then be returned to the summary screen; the Status of your application will now have changed from Prepare for Upload to Waiting for Upload. You should also receive an email notification, which is useful if you’re working as part of a team (see Figure 13-20).


We’re ready to build our application and upload it to iTunes Connect.
Open your project in Xcode and make sure that “iOS Device” is selected as the Scheme in the Xcode toolbar. Check that your code signing identity is correctly set for distribution (see Figure 13-21).

Then, in a similar fashion to how we made our ad hoc build in the previous section, select Product→Archive from the Xcode menu to build your application. The Organizer window should open automatically to the Archives tab as before, but if not, open it by selecting Window→Organizer (⇧⌘2) from the Xcode menu.
Click on the Validate button and you’ll be asked to log in to iTunes Connect (see Figure 13-22). Xcode is going to validate your archive Bundle ID and other details against the details you provided to Apple in iTunes Connect. If they don’t match, then validation will fail and you won’t be able to upload your binary.
Enter your details and click on the Next button, you’ll be presented with something a lot like Figure 13-23.

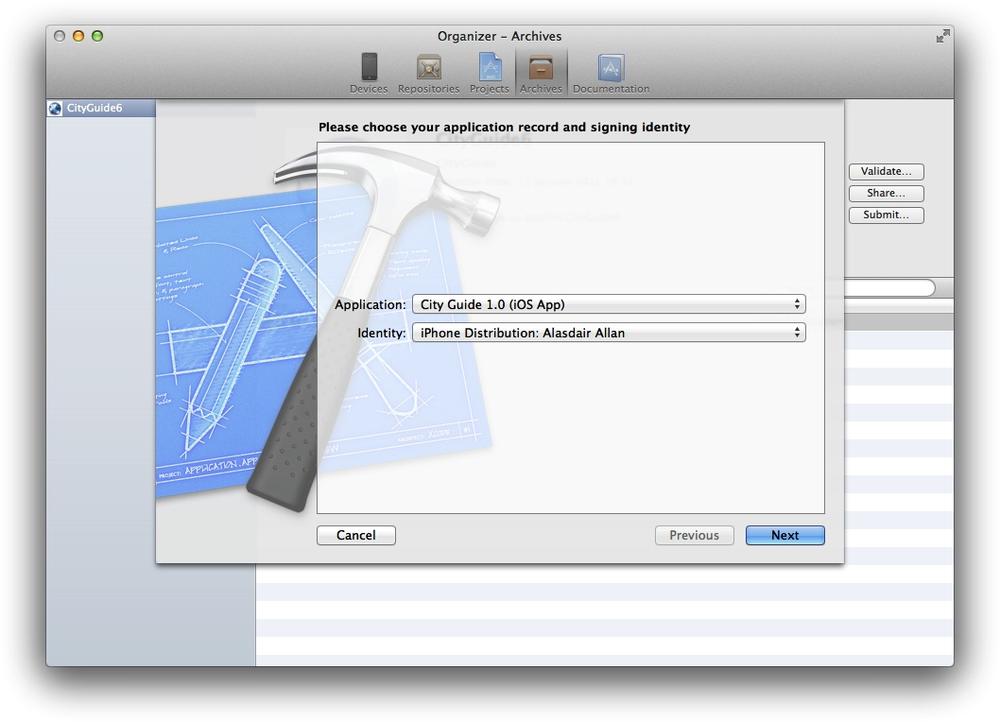
Choose your application from the drop-down, and select the signing identity we generated for App Store distribution (not the one we used for ad hoc—that isn’t going to work).
Note
If you don’t see the application, make sure you clicked on the Ready to Upload Binary button in iTunes Connect and that your application’s status is Waiting For Upload.
If all goes well, you should see something much like Figure 13-24.

Note
In the corner-case where you have never built the application for the device before, only for the simulator, make sure that you have selected Product→Build For→Build For Archiving from the Xcode menu before selecting Product→Archive. If you receive an error at this stage indicating a missing binary, this is probably what’s happened.
Click Finish, and then on the Submit button. You’ll be asked to sign into iTunes Connect one more time, and for validation, choose the application target and code signing identity. The application will then be uploaded directly to iTunes Connect. If you check on iTunes Connect, you should now see the application binary has been received (see Figure 13-25).
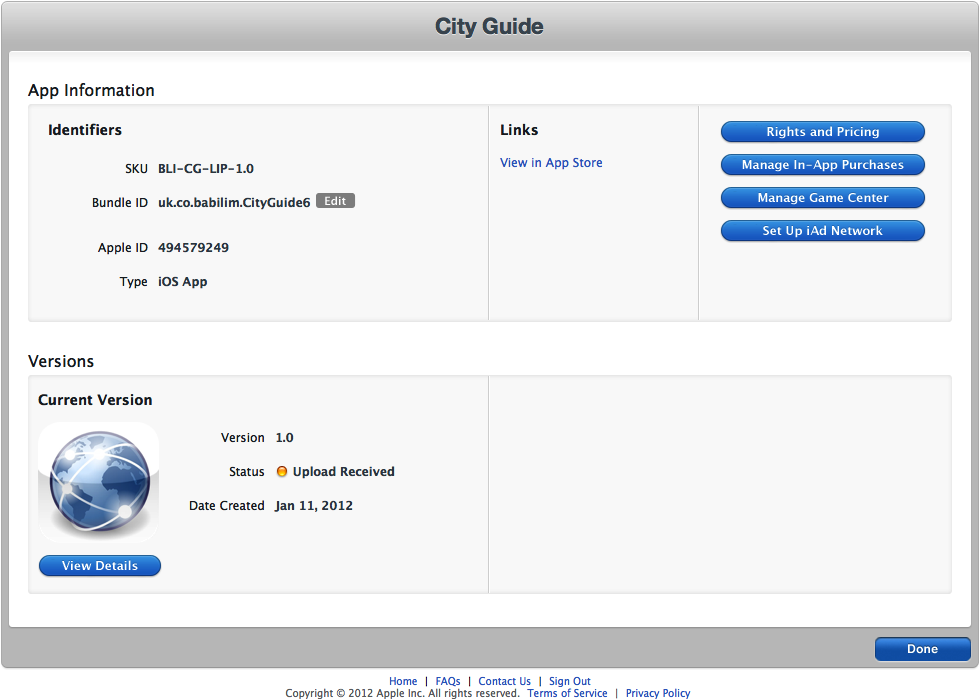
If you reload this page after a few minutes, you should see the status of your application change from Upload Received to Waiting for Review (see Figure 13-26).

Congratulations, your application is now in the queue for the review team.
If you’re confused about any aspect of distribution, you should make your way to the App Store Resource Center. This site walks you through the process of preparing your application for submission, the App Store approval process itself, and how to manage your applications on the store once they’re live.
The App Store review process is somewhat opaque, but generally, if your application is rejected, the review team will cite the specific section of the iOS Developer Program License Agreement that it violates in the rejection email. If you’re careful, you can avoid most of the common pitfalls and save yourself, and the review team, a lot of time.
Note
Copies of the iOS Developer Program License Agreement—the agreement you signed with Apple to become an iOS developer—and the iOS Human Interface Guidelines are available for download from the App Store Resource Center in the App Store Approval Process section.
Some of the more common reasons for rejection concern the following:
- Version number
- Applications submitted with version numbers less than 1.0, or applications tagged as “beta” or “alpha,” will be summarily rejected by the review team. Additionally, if there is any inconsistency in versioning—for instance, the version number in your application’s About dialog does not match the version number in your Info.plist file (and the number you provided to iTunes Connect)—your application may be rejected.
- Icons
- The artwork for your 57×57-pixel icon must be identical to your 512×512 icon. Additionally, if you are uploading a free “lite” version of your application as well as a premium “pro” version, the application icons cannot be identical between the two versions.
- Artwork
- Using Apple’s own graphics inside your application—for instance, logos or an image of an iOS device—is usually grounds for rejection.
- Copyright material
- Apple is extremely wary of allowing applications to make use of material (e.g., images, audio, and other media) that you do not have permission to use. Using material that might violate a trademark is similarly suspect.
- Human Interface Guidelines
- Violating the Human Interface Guidelines—for instance, using standard button icons for a nonstandard purpose, such as the Refresh, Organize, Trash, Reply, and Compose buttons—could be grounds for rejection.
- Private frameworks
- Applications published to the App Store are not allowed to link to private or third-party frameworks. Submitting applications for review that do link to such frameworks is an easy way to get your application rejected. Linking to third-party static libraries is a gray area, but is usually acceptable.
- Existing functionality
- Many applications have been rejected for duplicating existing functionality of a built-in app; applications that make extensive use of web browsers are particularly vulnerable to this accusation. Other obvious candidates are email clients and music player applications.
- Table views
- Improper handling of table view cells when the application has a table view in edit mode can be grounds for rejection, as can not deselecting table view cells appropriately after selecting them to perform some action.
- Network reachability
- Not testing for the presence of a network connection or not handling the loss of network connectivity correctly (and informing the user) is a common cause for rejection.
- Bandwidth limitations
- If your application makes use of large amounts of bandwidth, you need to make sure your current network connection is over the cellular network. Transferring large amounts of data over the cellular network can (sometimes) be grounds for rejection. So, if your application does that, you should disable, or throttle, data transfer when the device is on the cellular network.
- Keyboard type
- You should ensure that you are using the correct keyboard type when prompting for user input; using an inappropriate keyboard is usually grounds for rejection (e.g., using the keyboard designed to enter phone numbers for other purposes).
- OS compatibility
- If you claim that your application will run on OS 3.0 and later, you must ensure that it really does so. Apple will test your application with all of the versions of the OS between your minimum specified version and the current release. If the review team discovers that your application does not function correctly with a specific version of the OS, they will normally reject it. Unfortunately, it’s fairly rare for them to tell you in which version of the OS the bug manifested. This can lead to the unfortunate situation where you cannot duplicate the bug since you and the reviewer are testing the application under different OS revisions.
- Description
- Do not include the price in your application description, as part of your icon, or anywhere in the UI. According to Apple, this may “potentially confuse users,” as the text cannot be localized to all markets.
- Crippled functionality
- If you provide a free “lite” version of your application, it cannot have crippled functionality (e.g., obviously disabled buttons or menu items). It also cannot directly refer to the paid “pro” version of the application. Free or “lite” versions of an application are acceptable, but the application must be a fully functional application in itself and cannot reference features that are not implemented.
- Minimal user functionality
- If your application doesn’t actually do very much, it might get rejected. However, there are numerous cases where applications that don’t do very much have been accepted (e.g., flashlight applications).
- Does not work as advertised
- Applications that do not work as described in their application descriptions will be summarily rejected. You should therefore be careful when writing your application description when submitting your application to iTunes Connect.