Chapter 2
Paying Vendors
IN THIS CHAPTER
 Working with purchase orders
Recording receipts and bills
Sending payments to vendors
Using the other Vendor menu commands
You can make the process of tracking vendor information as simple or as sophisticated as you like. In this chapter, I assume that you’re going for sophisticated. You can make vendor management simpler, however, by not using purchase orders or an accounts payable system.
 You decide whether to use purchase orders and whether to track accounts payable (amounts that you owe vendors) as part of setting up QuickBooks. You can change your decision about using purchase orders or accounts payable later. To do this, you choose the Edit ⇒ Preferences command. For more information, refer to Book 2, Chapter 3.
Creating a Purchase Order
A purchase order serves a simple purpose: It tells a vendor that you want to purchase some item. In fact, a purchase order is a contract to purchase.
Many small businesses don’t use purchase orders. But when they grow to a certain size, many businesses decide to use them because purchase orders become permanent records of items that they’ve ordered. What’s more, using purchase orders often formalizes the purchasing process in a company. You may decide, for example, that nobody in your firm can purchase anything that costs more than $100 unless he or she gets a purchase order. If only you can issue purchase orders, you’ve effectively controlled purchasing activities through this procedure.
Creating a real purchase order
To use QuickBooks to create purchase orders, follow these steps:
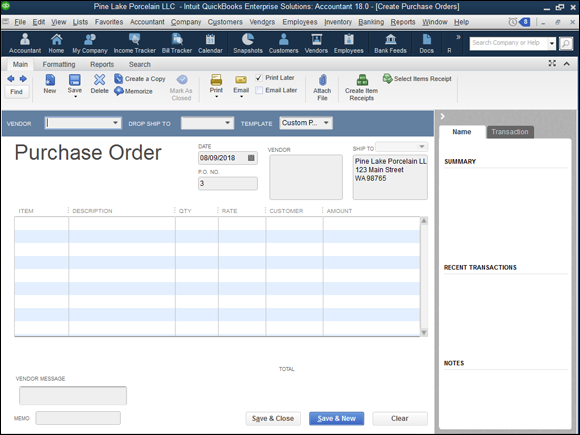
Tell QuickBooks that you want to create a purchase order by choosing Vendors ⇒ Create Purchase Orders.
QuickBooks displays the window shown in Figure 2-1.
If the Vendors menu doesn’t supply a Create Purchase Orders command, QuickBooks doesn’t know that you want to create purchase orders. Follow the instructions described in Book 2, Chapter 3 to turn on the purchase order feature.
Use the Vendor drop-down list to identify the vendor from which you want to purchase the item.
The Vendor drop-down list lists each of the vendors in your vendor list.
(Optional) Classify the purchase, using the Class drop-down list.
For more information about how you can use classes, read Book 4, Chapter 4. Note that you don’t see a Class drop-down list unless you’ve turned on class tracking.
(Optional) Choose a different Ship To address from the Ship To drop-down list in the top-right corner.
The Ship To drop-down list displays a list of all your customers, vendors, and employees. You change the Ship To address by selecting one of these other names. After you select an entry from the Ship To list, QuickBooks fills in the Ship To address box with the appropriate information.
The Create Purchase Orders window’s Main, Formatting, and Reports tabs supply some standard and, I hope, familiar buttons and boxes: Previous, Next, New, and so on. Because I spend quite a bit of time talking about these buttons and boxes in Book 3, Chapter 1, I don’t provide a redundant discussion of these buttons and boxes here. If you have questions about what the Previous and Next buttons do, refer to Book 3, Chapter 1.
Confirm the purchase order date.
Initially, QuickBooks puts the current system date in the Date box. You should, however, confirm that the date that QuickBooks enters as the purchase order date is correct. This is the contract date. Often, the date sets contractual terms, such as the number of days within which the item is to be shipped.
Confirm the purchase order number.
The purchase order number, or P.O. number, uniquely identifies the purchase order document. QuickBooks sequentially numbers purchase orders for you and places the appropriate number in the P.O. No. box. The guess that QuickBooks makes about the right purchase order number is usually correct. If it isn’t correct, you can enter a replacement number.
Confirm the vendor and Ship To information.
The Vendor block and the Ship To block identify the vendor from which you’re purchasing the item and the address to which you want the vendor to send the shipment. This information should be correct if your vendor list is up to date and you’ve correctly used the Ship To drop-down list to identify, if necessary, an alternative Ship To address. Nevertheless, confirm that the information shown in these two address blocks is correct. If the information isn’t correct, of course, fix it. You can edit address-block information by selecting the incorrect information and then retyping whatever should be shown.
Describe each item that you want to order.
You use the columns of the Create Purchase Orders window to describe in detail each item that you want to order as part of the purchase. Each item goes in its own row. To describe an item that you want to purchase from the vendor, you provide the following bits of information:
- Item: The Item column is where you record the unique item number for the item that you want to buy. Remember that items need to be entered, or described, in the Item list. Book 2, Chapter 2 discusses briefly how you go about setting up the Item list. Book 3, Chapter 3 talks in more detail about the Item list. The main thing to know about the Item list is that anything that you want to show in the invoice — or, for that matter, in a purchase order — must be described in the item file.
- Description: In the Description column, you describe the item that you select. You can also edit the Description field so that it makes sense to customers or vendors.
- Qty: The Qty column specifies the quantity of the item that you want. Obviously, you enter the number of items that you want in this column.
- Rate: The Rate column specifies the price per unit or rate per unit for the item. Note that QuickBooks uses different labels for this column depending on the type of business that you’ve set up.
- Customer: The Customer column identifies the customer for which the item is being purchased.
- Class: In the Class column, you classify purchase order items at the item level rather than at the purchase order level. Note that you won’t see this column unless you’ve turned on class tracking.
- Amount: The Amount column shows the total expended for the item. QuickBooks calculates the amount for you by multiplying the quantity by the rate (or price). You can edit the column amount. In this case, QuickBooks adjusts the rate (or price) so that quantity times rate always equals the amount.
You enter a description of each item that should be included in the purchase order. This means, for example, that if you want to order six items from a vendor, your purchase order should include six lines of information.
Print the purchase order.
The purpose of recording a purchase order in QuickBooks is to create a formal record of a purchase. You almost always want to transmit this purchase order to the vendor. The purchase order tells the vendor exactly what you want to purchase and the price that you’re willing to pay. To print the purchase order, you can click the Print button. You can also print purchase orders in a batch later if you select the Print Later check box (available on the Main tab) when you’re creating purchase orders, save all the purchase orders that you want to print later, and then choose the File ⇒ Print Forms ⇒ Purchase Orders command.
Save the purchase order.
To save your purchase order, click either the Save & Close button or the Save & New button. If you click the Save & New button, QuickBooks saves that purchase order and redisplays an empty version of the Create Purchase Orders window so that you can record another purchase order.
Using some purchase order tips and tricks
Even though the preceding section details all you need to know to create a purchase order, I want to make a few more important observations:
- Not every purchase deserves a purchase order. If you’re not used to working with purchase orders, it’s easy to go overboard when you start using this handy tool. Nevertheless, keep in mind that not all purchases warrant purchase orders (see the next item).
- Use purchase orders to manage buying. Typically, businesses use purchase orders as a way to control and document purchases. In fact, many purchases don’t really require a purchase order. Amounts that you’ve agreed to purchase that are documented through standard contracts — such as bills from the telephone company, the gas company, and your landlord — don’t need purchase orders, obviously. In addition, modest purchases, such as office supplies, often don’t need purchase orders. You definitely need a way to control these expenditures, but purchase orders probably aren’t the way to go.
- Consider other, complementary control tools. Other budgetary controls, such as “approval from the supervisor” or a simple budget, often work just as well.
Recording the Receipt of Items
When you receive items from a vendor, you can record the receipt. You typically do this when you want to record the receipt of an item even before you receive a bill for the item. In any business with inventory, for example, you want to know exactly how much inventory you have in your warehouse or on your store floor. You don’t want to wait to adjust your inventory records for these purchases until you receive the invoice from the vendor. In this scenario, you record when you receive items.
To record item receipts, follow these steps:
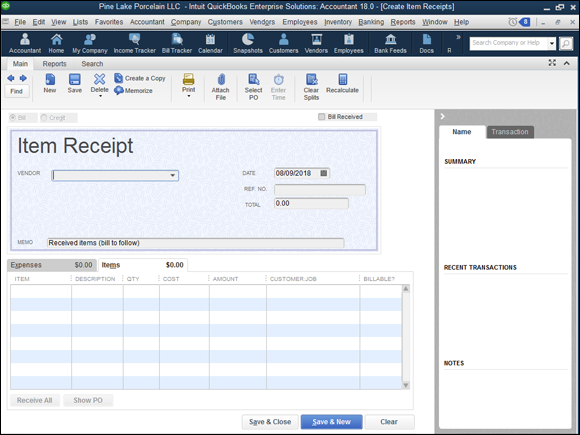
Choose the Vendors ⇒ Receive Items command.
QuickBooks displays the Create Item Receipts window, as shown in Figure 2-2.
- Select the vendor from which you’re receiving items from the Vendor drop-down list.
Select any purchase orders that you’re receiving items from.
If open purchase orders exist for the vendor, QuickBooks displays a message box, asking whether you want to receive items against one of the open purchase orders. If the items that you receive are items that you set up in a purchase order, click Yes. When QuickBooks displays the Open Purchase Orders dialog box — the dialog box lists only open purchase orders — select the one that ordered the items you’re now receiving and then click OK. QuickBooks fills out the Items tab of the Create Item Receipts window by using the information from the purchase order. This automatic data entry of purchase order information should save you time if the items that you’re receiving match items in the purchase order.
Confirm the receipt date.
Use the Date field to confirm the date of receipt. As with the Date field in other places in QuickBooks, enter the date in mm/dd/yyyy format. Or click the Calendar button that appears to the right of the Date field and choose the date from the pop-up calendar that QuickBooks displays.
Use the Total box to identify the total value of the order received, if available.
QuickBooks calculates this total for you by adding the individual item costs, so you can wait until later.
(Optional) Enter a reference number.
You can use the Ref. No. field to provide a reference number. For example, you may want to reference the vendor’s order number.
- (Optional) Provide a description in the Memo text box.
Describe the items received.
Use the Items tab to identify the items that you’ve received. The Items tab of the Create Item Receipts window resembles and works like the Items tab of the Create Purchase Order window, as described (briefly) earlier in the chapter and (in some detail) in the preceding chapter. For this reason, I don’t discuss how you enter, for example, item codes in the Item column. If you have questions about how the Items tab works, refer to one of the other appropriate chapters in this book.
Describe any related expenses.
The Expenses tab of the Create Item Receipts window works like the Expenses tab of the Write Checks window. If you have questions about how the Expenses tab works, see the discussion of writing checks in Book 3, Chapter 4.
Click either the Save & Close or Save & New button to save the receipt item.
If you click the Save & Close button, QuickBooks saves your item receipt information and closes the Create Item Receipts window. If you click the Save & New button, QuickBooks saves the item receipt information and redisplays a fresh, clean, cleared version of the Create Item Receipts window. Then you can use the window to describe the receipts of some other set of items.
That’s about all you need to know to work with the Create Item Receipts window. Nevertheless, let me quickly describe the half-dozen command buttons that I don’t reference in the earlier discussions:
- Select PO: This toolbar button displays the Open Purchase Orders dialog box, which lists the purchase orders open for the selected vendor. By selecting a listed purchase order, you tell QuickBooks to fill out the Items tab with the information from that purchase order or orders.
- Receive All/Clear Qtys: When it’s labeled Receive All, this command button says you’ve received all the items you ordered in some purchase order; when it’s labeled Clear Qtys, the button clears the received quantities shown on the Items tab if you’ve specified a purchase order. When you click this button, it changes from Receive All to Clear Qtys to Receive All, and so on.
- Show PO: This command button shows the selected purchase order.
- Clear Splits: This toolbar button erases any expense or item information that you’ve entered on the Expenses or Items tab and moves the total to the Expenses tab.
- Recalculate: This toolbar button recalculates the total amount by using the information that you’ve entered on the Expenses and Items tabs.
- Clear: This button (which appears in the bottom-right corner of the window) clears all the information that you’ve entered in the Create Item Receipts window, including Expenses-tab information, Items-tab information, and the vendor information shown at the top of the window. In effect, the Clear button lets you start over.
- Enter Time: This toolbar button opens the Select Time Period dialog box, shown in Figure 2-3, which you use to specify the date range of the work for which you’re paying.
Simultaneously Recording the Receipt and the Bill
You can record a bill for items that you receive at the same time that you record the receipt of the items. You can do this simply by selecting the Bill Received check box that appears near the top of the Create Item Receipts window (refer to Figure 2-2).
If you know that you’re going to record a bill at the same time that you record the receipt of items, you can also choose the Vendors ⇒ Receive Items and Enter Bill command. In other words, rather than choose the Receive Items command from the Vendors menu, you choose the Receive Items and Enter Bill command. When you do this, QuickBooks displays the Enter Bills window, shown in Figure 2-4. Essentially, the Enter Bills window is just another version of the Create Item Receipts window except that the Bill Received check box is already selected. To simultaneously record items that you’ve received and enter a bill, you follow the same steps as you do to record the receipt of the items.
One item worth noting about simultaneously recording bills and the receipt of items, however, is this: When you enter a bill, you need to be very precise about the charges of the vendor. In all probability, you won’t pay just for the ordered items, for example; you may also pay certain shipping and handling fees. These amounts won’t necessarily get recorded on the Items tab. They’ll probably be recorded on the Expenses tab.
Entering a Bill
If you told QuickBooks during the setup process that you want to track unpaid bills, also known as accounts payable, you can enter bills as you receive them. As you do this, QuickBooks keeps track of the unpaid bills.
Good, accurate record keeping of unpaid bills, or accounts payable, is essential if you want to do good accrual-basis accounting. As I discuss in Book 1, Chapter 1, accrual-basis accounting produces more accurate financial statements than other methods do.
To enter a bill, you follow either of two sequences of steps.
If you haven’t previously recorded an item receipt
If you’re entering a bill for which you haven’t previously recorded an item receipt, you follow these steps:
Choose the Vendors ⇒ Enter Bills command.
QuickBooks displays the Enter Bills window, shown in Figure 2-5. You use this window to describe the bills that you later need to pay.
- Use the Vendor drop-down list to identify the vendor.
- Use the Date, Amount Due, and Bill Due fields to describe the invoice date, the invoice due date, and the invoice amount.
- (Optional) Use the Terms drop-down list to identify the payment terms and the Ref. No. box to identify the vendor’s reference number.
- (Optional) If you want to, enter a memo description for the bill in the Memo box.
Identify the expenses billed.
Use the Expenses tab of the Enter Bills window to identify the expenses that the bill represents. To identify expenses, you supply the account number that should be debited; the amount; and (optionally) the Memo, Customer:Job, and Class information. If you have questions about how the Expenses tab works, see the discussion of writing checks in Book 3, Chapter 4. The Expenses tab of the Write Checks window works the same way as the Expenses tab of the Enter Bills window.
Identify the items billed on the Items tab.
Use the Items tab of the Enter Bills window to describe any items for which the vendor bills you. Use the Item column to identify the thing that you purchased, for example; then use the Qty, Cost, and Amount columns to identify what the item cost. You can also use the Customer:Job column if you’re tracking bills by customers. If you have questions about how to work with the Items tab, be aware that the Items tab of the Enter Bills window works the same way that the Items tabs of other QuickBooks windows work. You can, for example, refer to the discussion of the Create Invoices window in Book 3, Chapter 1.
The buttons available in the Enter Bills window — Select PO, Receive All, Show PO, Clear Splits, Recalculate, and Clear — work the same way as the similarly titled command buttons scattered around the edges of the Create Item Receipts window, discussed in “Recording the Receipt of Items” earlier in this chapter.
- Click either the Save & Close or Save & New button to save the bill.
If you have previously recorded an item receipt
To enter a bill when you’ve already recorded the receipt of the item for which the bill invoices, follow these steps:
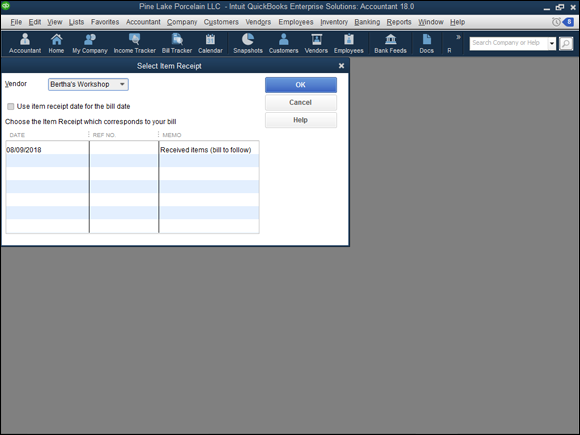
Choose the Vendors ⇒ Enter Bill for Received Items command.
QuickBooks displays the Select Item Receipt dialog box, shown in Figure 2-6.
- To identify the item receipt for which you’re now recording a bill, select the vendor from the Vendor drop-down list.
When QuickBooks displays a list of item receipts for the vendor, select the item receipt that corresponds to your bill, and click OK.
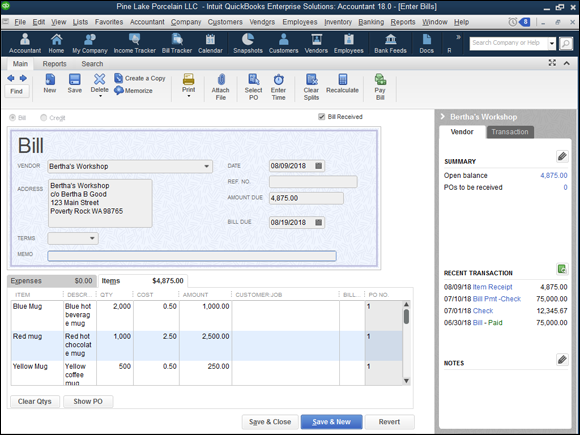
QuickBooks displays the Enter Bills window for the item. QuickBooks fills out much of the Enter Bills window by using the information from the item receipt, as shown in Figure 2-7.
You may be able to skip Steps 4–8 if your item receipt information correctly and completely fills the Enter Bills window.
- Use the Date, Amount Due, and Bill Due fields to describe the invoice date, the invoice due date, and the invoice amount.
- (Optional) Use the Terms drop-down list to identify the payment terms and the Ref. No. box to identify the vendor’s reference number.
- (Optional) If you want to, enter a memo description for the bill in the Memo box.
Use the Expenses tab of the Enter Bills window to identify the expenses that the bill represents.
To identify expenses, you supply the account number that should be debited, the amount, and (optionally) the Memo, Customer:Job, and Class information. If you have questions about how the Expenses tab works, see the discussion of writing checks in Book 3, Chapter 4. The Expenses tab of the Write Checks window works the same way as the Expenses tab of the Enter Bills window.
Use the Items tab of the Enter Bills window to describe any items for which the vendor bills you.
Use the Item column to identify the thing that you purchased, for example; then use the Qty, Cost, and Amount columns to identify what the item cost. You can also use the Customer:Job column if you’re tracking bills by customers. If you have questions about how to work with the Items tab, be aware that the Items tab of the Enter Bills window works the same way that Items tabs of other QuickBooks windows work. You can, for example, refer to the discussion of the Create Invoices window in Book 3, Chapter 1.
- Click either the Save & Close or Save & New button to save the bill and item receipt information.
 You record credit memos from vendors by using the Enter Bills window, too. The only difference in recording a credit memo is that you select the Credit radio button.
Paying Bills
If you use QuickBooks to keep track of the bills that you owe, you don’t use the Write Checks window (described in Book 3, Chapter 4) to record the bills that you want to pay. Rather, you tell QuickBooks to display a list of these unpaid bills that you’ve already recorded — and then you choose which bills QuickBooks should pay and the bank account on which QuickBooks should write the check.
Follow these steps to pay bills in this manner:
Choose the Vendors ⇒ Pay Bills command.
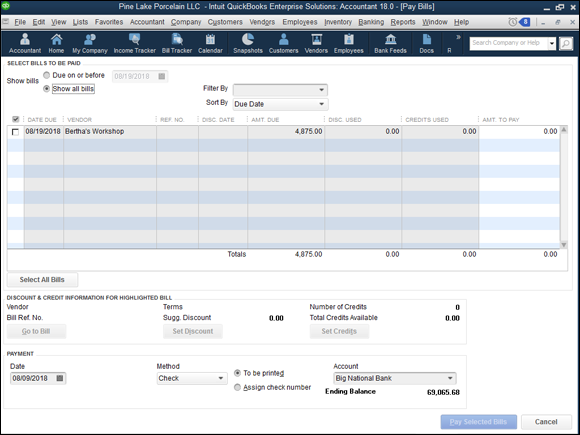
QuickBooks displays the Pay Bills window, shown in Figure 2-8. You use the Pay Bills window to describe the payment that you want to make.
Describe which bills you want to pay.
Use the Show Bills radio buttons at the top of the Pay Bills window to identify what you want to see. Select the Due On or Before radio button to show only those bills that are due on or before the specified date. To specify the date, enter the date in the Due On or Before box. To see a list of all the bills that you have to pay, select the Show All Bills radio button.
You can use the Sort By drop-down list to select the order that QuickBooks uses for listing your bills. You can sort bills by due date, discount date, vendor, and amount due.
Select the bills that you want to pay.
To select bills that you want to pay, click the check column. (The check column is the leftmost column in the list of unpaid bills; it’s headed by a check mark.) When you click the check column, QuickBooks marks the bill with a check mark. The check mark tells QuickBooks that you want to pay that bill. To deselect a bill, click the check column again. QuickBooks removes the check mark.
(Optional) Review a specific bill.
You can review detailed information about a specific bill by first clicking the bill to highlight it in the list and then clicking the Go to Bill button. When you do this, QuickBooks opens the Enter Bills window, displaying the bill information. To close the Enter Bills window, click the Close button.
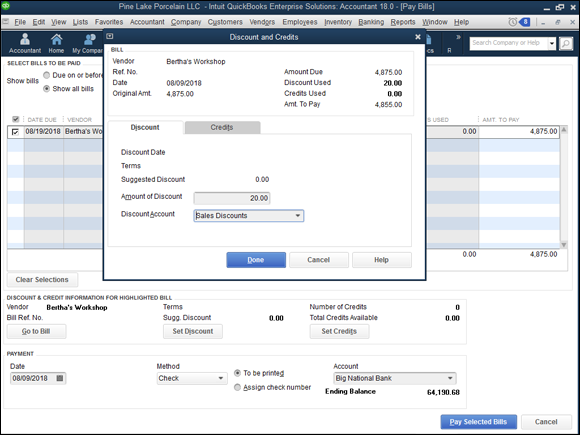
Set the discount and credit, and then click Done.
If you click the Set Discount button, QuickBooks displays the Discount tab of the Discount and Credits dialog box, as shown in Figure 2-9. You can use the Discount tab to enter a discount amount for the bill. If you enter a discount amount for the bill, you also enter the discount account. This is the account that gets credited for the reduction — the discount — in the correct amount.
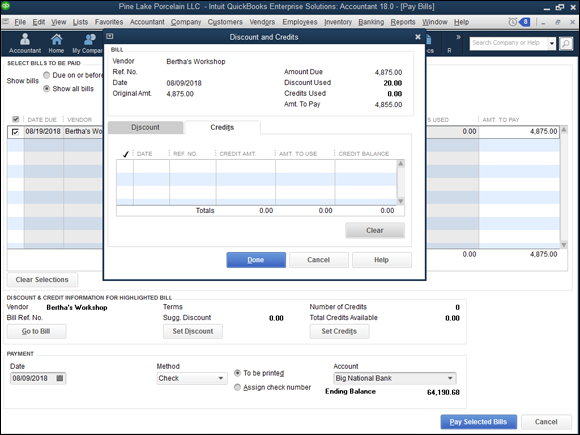
If you click the Pay Bills window’s Set Credits button, QuickBooks displays the Credits tab of the Discount and Credits dialog box, shown in Figure 2-10. The Credits tab lists any credit memos from this vendor. To apply a credit memo to the amount due to a vendor, click the Set Credits button. QuickBooks marks applied credits by placing a check mark in the marked column.
When you complete your work with the Discount and Credits dialog box, click the Done button to close the dialog box and return to the Pay Bills window.
Click the Clear button in the Discount and Credits dialog box to clear the applied credits shown on the Credits tab.
Use the Payment Account drop-down list in the bottom-right corner to select the bank account to be used for making payments.
You can double-check to make sure you have enough money in the bank account because the ending balance is displayed in the account you have selected after you complete this payment (refer to Figure 2-8).
Use the Method drop-down list in the Payment section to select the payment method.
If you want to pay your bills by check, for example, select Check. Assuming that you’ll print the checks in QuickBooks, select the To Be Printed radio button; otherwise, select the Assign Check Number radio button to have QuickBooks assign the next consecutive check number. You can also pay bills by other methods, such as by credit card and by online payment (if you’re set up for online payment or online banking).
Use the Date box in the Payment section to record the payment date.
This entry interacts with the entry in Step 7. The payment date that you set, for example, affects when an online payment gets made. The payment date also corresponds to the date that’s shown on printed checks.
After you select the bills that you want to pay and describe how you want to pay them, click Pay Selected Bills.
QuickBooks records the payment transactions in the bank account to pay the selected bills and closes the Pay Bills window.
Complete your task.
You still need to print any unprinted checks necessary to pay bills if you’re using checks to pay the bills. You also need to transmit any online payment instructions necessary to pay the bills, if that’s how you’ve chosen to pay the bills. If you’re going to handwrite checks, you obviously need to handwrite the checks and then mail them. In other words, all QuickBooks does at this point is record the payment transactions in the QuickBooks data file. You need to print the checks, send the online payment instructions, or handwrite the checks!
Reviewing the Other Vendor Menu Commands
In the preceding paragraphs of this chapter, I talk about the most important commands on the Vendor menu. Nevertheless, before I wrap up this little dog-and-pony show, I quickly review for you the other commands and what they do.
Vendor Center
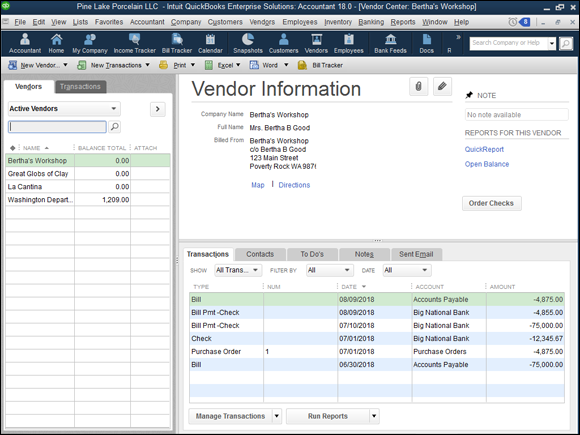
The Vendor Center window, shown in Figure 2-11, displays a list of vendors and detailed vendor information for the selected vendor. To use it, select from the Active Vendors drop-down list the vendor for which you want to see detailed information. The Vendor Center shows a bunch of information for a vendor. All this information comes from the Vendor list, by the way, which is discussed in Book 2, Chapter 2.
If you keep records of your vendors, including information such as their telephone numbers, just about the best place to store that information, in my humble opinion, is the Vendor list. You have to maintain the Vendor list for QuickBooks to work. Why not also go to a little bit of extra effort and keep all your vendor information there? If you adopt this approach, the Vendor Center window is the window that you can use to quickly look up things such as the vendor’s phone or fax number.
Sales Tax menu commands
The Sales Tax command displays a submenu of commands that pay sales tax amounts you’ve collected to the appropriate tax agency; adjust the sales tax liability due; and produce reports on the sales tax liability you owe, the sales tax revenue you’ve generated, and the sales tax codes you’ve set up.
Note: To see this menu, you need to tell QuickBooks that you collect sales tax. You may tell QuickBooks that you collect sales tax during the QuickBooks setup process. You can also use the Edit ⇒ Preference command’s Sales Tax preference settings for the company.
To pay the sales taxes you owe, simply choose the Vendors ⇒ Sales Tax ⇒ Pay Sales Tax command. When QuickBooks displays the Pay Sales Tax dialog box (which lists the amounts you owe various sales tax collection agencies), you select the agencies you want to pay or click the Pay All Tax button. QuickBooks records checks in the bank account register (see Book 3, Chapter 4 for details about how to work with the bank register), and you print the checks in the usual way.
To adjust the amount that QuickBooks thinks you owe a sales tax collection agency, you can choose the Vendors ⇒ Sales Tax ⇒ Adjust Sales Tax Due command. When QuickBooks displays the Sales Tax Adjustment dialog box, select a sales tax agency in the Sales Tax Vendor box and an appropriate expense or income account in the Adjustment Account box. Next, you select the appropriate button (Increase Sales Tax By or Decrease Sales Tax By) and enter the adjustment amount in the Amount box.
To print one of the sales tax reports, simply select the command that corresponds with the report. To print the Sales Tax Liability report, for example, choose the Vendors ⇒ Sales Tax ⇒ Sales Tax Liability command.
The Manage Sales Tax command displays a window with buttons and clickable hyperlinks that you can use to get sales tax information and perform some of the tasks described in the preceding paragraphs.
Visiting the Sales Tax Code List enables you to add, delete or edit codes. It also provides drop-down menus that give you options to do things described earlier, such as pay sales tax liability or view reports that show transactions where sales tax was charged.
Inventory Activities menu commands
The Inventory Activities command displays a submenu of commands that you use to work with QuickBooks inventory features and with the related Item list. I’m not going to discuss this stuff here — not because I’m lazy, but because I discuss inventory and the Item list in Book 3, Chapter 3.
Print/E-file 1099s
The Print/E-file 1099s command displays a submenu of commands that let you print 1099-MISC forms for a selected calendar year. You can see the vendors for which you probably need to print 1099s, for example, by choosing the Print/E-file 1099s ⇒ Review 1099 Vendors command. (When you choose this command, QuickBooks displays the Vendor 1099 Review report, which lists vendors and indicates the vendors that are, per your descriptions, eligible for a 1099.)
The reporting threshold may change in the future due to inflation, but the general rule is that if you operate a business or own rental property, you need to send a 1099-MISC to pretty much any unincorporated vendor you pay $600 or more during the year for services. And before you decide not to follow this rule, you should know two other facts.
- Your business tax return actually needs to disclose whether you followed this rule. Yikes.
- If you don’t send 1099s, you’ll pay a penalty from $30 to $100 per late 1099 if you’re merely late (with a maximum penalty total set to $500,000). If you simply blow off this requirement, the penalty equals $250 per 1099 — with no maximum penalty.
You can use the Print/E-file 1099s ⇒ 1099 Wizard command to start an online wizard that helps you identify the vendors that require 1099s and then prepare to print or e-file those 1099s.
Finally, you can choose the Print/E-file 1099s menu’s 1099 Summary Report and 1099 Detail Report commands to produce reports you can use to identify which vendors need 1099s and what detailed information goes in those 1099s.
For information about how to set 1099 preferences, refer to Book 2, Chapter 3.
Item List
The Vendors ⇒ Item List command displays the Item List window. You can read more about the Item List window in Book 3, Chapter 3.