A Gardening Primer
If you’re new to gardening, don’t be intimidated. With the right guidance, the right location, and a willingness to learn, anyone can grow their own food and medicinal plants. From backyards to rooftops to terraces, if there’s room for a plant or a pot, you can grow your own. The medicinal plants in this book can be grown in containers, formal vegetable gardens, formal herb gardens, or just mixed into your existing landscape.
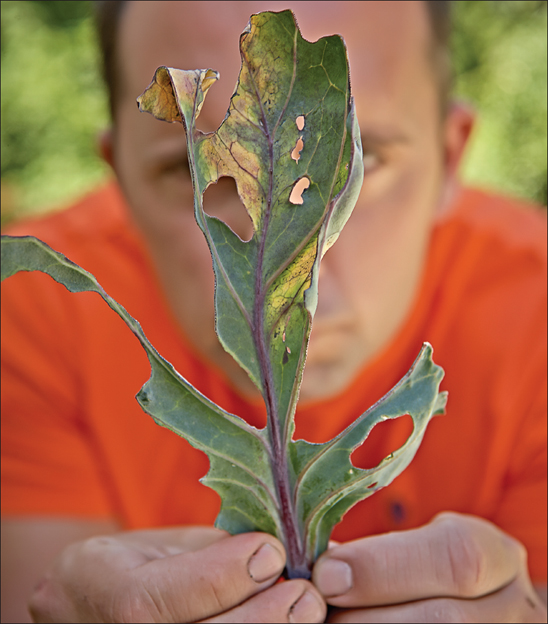
The first rule of gardening is to accept that some of your plants aren’t going to make it. I’ve been working in gardens since I was two years old, and I have killed more than my share of plants—it happens to all of us. Just try to figure out what went wrong—was the plant getting enough light, was it in the right soil, did I remember to fertilize—and chalk it up to experience. The second rule is there’s no such thing as a maintenance-free garden. Like all living things, plants have some basic requirements for survival. That largely comes down to finding the right location for each plant. Here are some important concepts you need to understand before you pick up your trowel.
Hardiness
When a plant survives for only one growing season and then dies during the winter, it’s called an annual. A perennial is a plant that can survive the winter and come back again year after year. The catch is that a plant that is perennial in one area may be an annual in another; for example, plants in St. John’s, Newfoundland, need to be a lot more winter-hardy than those in Victoria, B.C.
Before you even think about choosing plants, you need to know your hardiness zone. Every region of Canada has been assigned a zone number from 0 to 8, based on its climate. The lower the number, the lower the minimum temperature, and the fewer number of plants that will survive winter in that region. Your garden centre staff should be able to tell you what zone your community is in. If not, Agriculture and Agri-Food Canada has a complete plant hardiness zone map at http://atlas.agr.gc.ca/phz.
Whenever you buy a plant, the tag will tell you which zones it will survive in. Unfortunately, this can be a bit confusing. To begin with, many plant tags use the U.S. zone map, which is a bit different from the one used in Canada. For example, my hometown in southern Ontario is zone 5a according to the Canadian map, but it’s zone 4b on the U.S. version. What’s more, the U.S. scale goes up to zone 10, since many of the southern states are warmer than anywhere in Canada.
It’s important not to take zone maps as gospel: Local conditions, such as winds and elevation, can create microclimates that can turn zone 6 into zone 4. If you’re planting on a patio 10 storeys up, your zone will drop to a lower number.
Planting Time
Any time you grow plants outdoors you need to pay attention to the last frost date and the length of the growing season in your area. In Canada, the last frost date will be May or June (late April in some parts of B.C.). Do an internet search to find the last frost date in your area, or look to garden clubs, horticultural societies, garden centres, and agricultural agencies for advice.
The last frost date will help you determine when it’s safe to sow seeds, when to plant frost-tender plants outdoors, and when tropical plants are safe to move outside. Just remember that historical averages don’t mean you won’t be surprised! Where I live, May 15 is my last frost date, but Jack Frost has shown his face many times later in the month. Newbies often feel the warmth of early spring air and they jump immediately into gardening, only to be surprised weeks later by a late snowfall or a “killing frost” that crushes their enthusiasm.
Remember, too, that not everything is planted in the spring; some bulbs, including garlic, require fall planting. Read plant tags carefully and ask questions at your garden centre.
The length of the growing season is the number of days between the last frost date in spring and the first frost date in fall. This will affect what types of fruits and vegetables you can grow in your area. For example, if your growing season is only 100 days and the hot peppers you desire take 120 days to maturity, you’re out of luck! Dates to maturity can be found on plant tags and seed packs.
SOWING YOUR OWN SEEDS
A number of the plants in this book can be grown from seed. However, if you’re a first-time gardener, I highly recommend against it. I want you to have the most positive experience possible, and growing from seed can be frustrating. It requires a lot of time, space, and knowledge—and that knowledge comes at the cost of a lot of failed experiments. Besides, do you really need that many plants? Remember, a single tomato plant, if properly maintained, can feed a family of four! That’s why it’s usually best to simply purchase healthy transplants from the garden centre.
However, if you are willing to put in the effort, there are some huge benefits to growing from seed. First, you know exactly how the plants were started, which is especially important if you’re growing organic herbs. Second, you have access to great choices of plants, since many seed catalogues include items you’ll never find at a garden centre. And finally, you’ll save money!
To be successful growing from seed, you’ll need the right soil, the right trays, the right location, and the time to take care of your young plants. But above all, you have to start them at the right time of year. The number 1 reason people fail is they start too early! Read the seed pack and follow the instructions closely. Most will tell you to sow seeds indoors 4 to 6 weeks before the last frost date.
While starting seeds outdoors may be challenging, some plants are best sown directly into the garden because they do not enjoy being transplanted. This includes most root vegetables like carrots, beets, and radishes, as well as some quick-germinating plants like squash, beans, spinach, and peas. When direct sowing into the garden, make sure you plant the seeds at the correct depth; instructions will be on the pack.
Light
About 90% of edible plants should be grown in full sunlight. But in the world of gardening (and in this book) you will encounter three types of light specifications:
Full sun means 6 or more hours of direct light: That’s pretty much all afternoon in direct sunshine. West- or south-facing areas not shaded by buildings or large trees are typical full-sun gardens.
Part sun means 4 to 6 hours of morning sun or indirect light. Gardens facing north or east and gardens shaded by structures or trees are examples of part-sun locations.
Shade is considered 4 or fewer hours of sunlight. Gardens located directly under trees or blocked by structures are examples of shade gardens.
Water
Water is fundamental to all plants’ survival. But many gardeners don’t use water very efficiently. Be a soaker not a sprinkler! Water your plants deeply, ensuring the water penetrates the soil surface and gets down to the roots. Shallow sprinkling forces plants to send roots close to the surface to absorb water.
Using a soaker hose reduces the risk of water sitting on the plants’ foliage for lengthy periods, which can lead to disease. It’s also best to water in the morning so the afternoon sun will dry the foliage. Never put your gardens to bed wet!
Some containers need to be watered twice: If you water a pot and notice the water has drained immediately, you need to water it again. Containers typically use soilless mixes that are like sponges: When they are very dry, they can’t absorb moisture. So after watering once to open up the soil, give them another drink about 5 minutes later.
Air
During photosynthesis—the process by which plants turn sunlight into sugars—plants remove carbon dioxide from the air and release oxygen. Air circulation is important in the garden; giving plants the space they need will aid photosynthesis and reduce the risk of diseases (such as powdery mildew) by allowing foliage to dry quickly.
With any type of gardening, spacing plants is critical for success. Planting too close together is one of the most common mistakes made by novice gardeners: Those transplants look so small, and it’s hard to imagine they can grow several feet tall and wide in a single season! Refer to seed packs and plant tags to learn each plant’s space requirements, and follow the instructions closely.
Soil
Your plants are only as good as the soil you grow them in! Most properties have poor soil—it’s rare to find one where the soil is well drained and rich in organic matter, especially in new residential areas. Your planned garden may even be sitting on top of “builder’s fill,” a mix of bad soil, rocks, and random pieces of junk.
There are three basic types of soil. Sand is made up of coarse particles, so it drains well but is lacking in nutrients. Silt contains finer particles than sand and often contains some organic material. It can become very hard and compacted when it dries. Clay is made up of very fine particles of minerals. It retains a lot of moisture, is usually acidic, and doesn’t allow good drainage.
The ideal garden soil is called loam, a mix of about two parts sand, two parts silt, and one part clay. If your soil has too much sand or silt, your goal is to improve moisture retention and add nutrients. You can do this by adding equal amounts of topsoil and peat moss, or use triple mix (a blend of topsoil, peat moss, and composted manure). If the soil has too much clay, you’ll need to improve the drainage. To be honest, this is not easy to do. The only long-term solutions are to dig it out and replace it with better soil, or to build on top of it. I recommend building a raised bed edged with stone or pressure-treated lumber. Dig out as much clay as you can, put down a layer of coarse stone for drainage, and then add your new soil on top.
How much soil should you add? An investment in soil is well worth it, though replacing the soil in a large garden can be costly. At a minimum I recommend 20 cm (8 inches) of rich organic matter, but my preference is 40 to 45 cm (16 to 18 inches) for new gardens.
You’ve heard the saying “you get what you give”—it holds true for soil, too. You should always give back to your soil by improving and amending it every year. Many people like to add rich new soil to the garden (called “topdressing”) in spring, but the best time is actually the fall. The freezing and thawing that occurs in winter will help work it into the soil naturally. My favourite amendment for herb and vegetable gardens is sheep manure: It’s a natural nutrient booster that minimizes the need to use fertilizer.
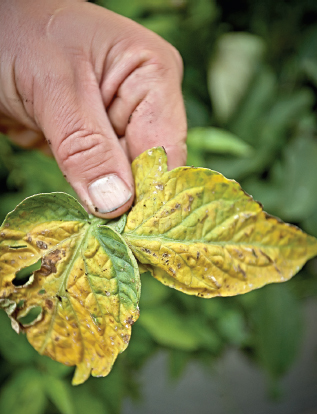
Yellowing foliage on any plant is an indicator of plant stress, which can be caused by a multitude of factors, including too much or too little water, a lack of iron, disease, and insect damage.
Fertilizer
Many plants need to be fertilized during the growing season. Fertilizers come in many different shapes and sizes: water-soluble, liquid, spikes, slow-release granular. They can be organic (fish emulsion, composted manure) or synthetic.
You may have noticed that fertilizer labels have three numbers, such as 20-20-20. The numbers indicate the relative amounts of nitrogen, phosphorus, and potassium (NPK) in the product. These are the primary nutrients plants need to grow, though there are many others, including calcium, magnesium, sulphur, copper, and iron.
Plants typically obtain nutrients by absorbing them through the soil, but the rate of absorption and the amount of nutrients available vary widely with location. For example, rich loamy soil has more nutrients than sandy or clay soil. Soilless mixes and potting soils, used for growing plants in containers, may have no nutrients at all, making fertilizing essential.
The appropriate type of fertilizer, and the right time to apply it, depends on the plant variety and soil. These are outlined in the plant descriptions throughout the book. But as a general rule, the best time to apply water-soluble fertilizer is when gardens are wet, as the fertilizer will be taken up by the roots much more easily.
Location
When choosing an appropriate location for your plant, light, soil, and air aren’t the only factors to consider. What good is growing your own plants if you don’t use them? Edible plants located far away from the kitchen or porch will never see the mouths they’re intended for! When possible, locate your edibles close to areas where they will be consumed. My favourite herbs are in pots on my back deck, close to my kitchen door and beside my barbecue. They get used often and, because they’re so visible, they receive all the watering and fertilizer they deserve.
When growing edible plants, I tend to prefer raised beds. They’re easier to maintain—you don’t have to bend down too far to weed or harvest—and when you raise a garden you can determine the type of soil your plants will grow in. Raised gardens also warm faster in early spring and generally produce yields more quickly, though they can require extra watering.
For this book, I grew the bulk of the plants in water troughs generally used for horses and cattle. They’re portable, they’re cheaper than purchasing cedar to build planter boxes, and they come with a drain to ensure the plants will not drown. Besides, I think they look cool—a little rural chic that would fit a funky urban setting! You can easily find these water troughs at farm supply stores, antique stores, online, or even at the occasional rural garage sale or auction.
Unfortunately, once you find a good location, it may not be suitable every year. Crop rotation is the process of making sure you never plant the same types of plants in the same space year after year. By rotating green crops (like spinach or Swiss chard) with root crops (like beets), you will minimize the risk of disease and improve overall garden health, as the soil will have time to replenish nutrients.
Some plants make great partners, while others don’t! For example, I’ve learned that planting marigolds near tomatoes can help deter insects. Nasturtiums play the same role if you plant them near squash. I’ve suggested a number of other companion ideas in the plant profiles in this book.
Weeding
Weeding is the most loathed task in the garden, but where there is soil there will eventually be weeds. Some offer health benefits (such as dandelion and plantain), but many just interfere with the plants you desire. Weeds are bullies that choke out gardens by reducing light and taking moisture and nutrients away from your plants. So get in there and weed often.
The best time to weed is when gardens are wet, such as immediately after a rain. The weeds will come out much more easily. Always try to pull out weeds before they flower and set seed, and do your best to remove the entire root. Be careful when discarding weeds: Place them immediately into a bag or container to capture any seeds and reduce their broadcast into other areas.
Mulch
Mulch is garden gold! Dry straw, shredded cedar, pine chips, and even used newspapers are all examples of mulch. A good layer of mulch around your plants can reduce weeds by up to 90%, retains moisture, keeps roots cool, and improves soil health by naturally decomposing and adding organic material to the soil underneath. (I prefer organic mulches like those mentioned above, though there are inorganic mulches available, too, such as shredded rubber and stone.)
The recommended depth for most mulches is 6.5 to 10 cm (2.5 to 4 inches). This can be expensive, but it’s well worth the investment since mulch helps prevent plant loss from disease. It reduces the splashing of soil during watering and rain, which keeps the soil off the foliage of plants and reduces the spread of pathogens.
Cleaning
Cleanliness is godliness in the garden. After harvesting your plants, make sure leaves, stems, and other unwanted plant material are removed and placed into the composter. If you allow those greens to sit in the garden and rot, you’re encouraging a breeding ground for insects and disease.
One of the most important chores is deadheading, or removing flowers after the blooms are spent. To deadhead, simply remove the spent flower and the stem that it’s located on.
If you’re not harvesting the seeds, you should deadhead your flowering plants often. This ensures more energy goes to support other parts of the plant rather than the flowers that have just finished. By deadheading you’ll increase yields and also see more flowers produced.
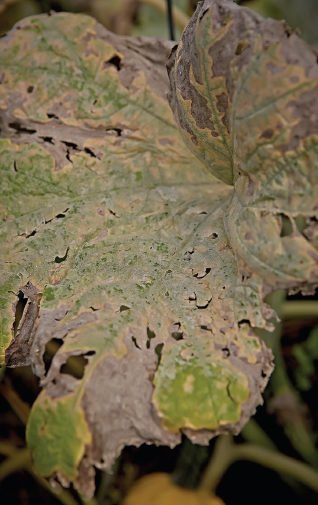
Powdery mildew is a common disease for many edible plants, including beans, cucumbers, and squash. To control, immediately remove and discard infected leaves. For severe cases, removal of the entire plant may be necessary.
Bugs
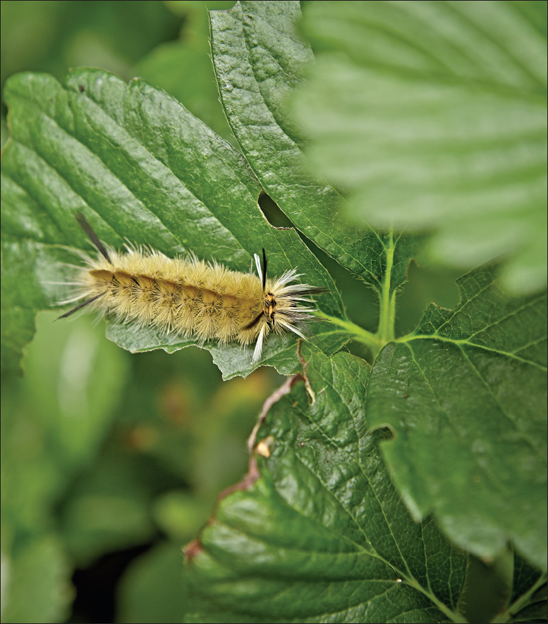
Cutworms (caterpillars), aphids, slugs, and whiteflies are just some of the insects that may visit your garden during the growing season. If caught early they can usually be managed easily, but if left alone they will destroy your garden. Just about every plant has an insect that enjoys eating it, and every insect requires a different type of control. Cutworms may be stopped by making collars from empty soup cans with the ends cut out and placing them around seedlings. Other insects can be controlled by a sprinkle of crushed eggshells.
Inspect your gardens often for insects: Look for them at night, as many insects are nocturnal. Try to identify the insect and then research the proper treatment. When in doubt, pick and squish! You may also be able to use a high-pressure nozzle to wash bugs away—just be careful not to damage your plants.
An effective and non-toxic control is insecticidal soap. It’s available at garden centres, or you can make your own. Just use 2½ tablespoons of liquid dish soap (free of degreasers) and 2½ tablespoons of vegetable oil per gallon of distilled warm water. Mix together and apply with a spray bottle when necessary. Never spray during the hottest part of the day or when temperatures are over 32°C (90°F). It may cause leaf burn.
Disease
Rain, heat, humidity, reduced air circulation, and weak plants are the perfect ingredients for a disease-ridden garden. Plant diseases are often fungal infections, such as powdery mildew, black spot, and fusarium wilt. Many of these can be controlled by applications of a fungicide, but some are not treatable. When a tomato plant is infected with fusarium wilt, for example, your best bet is to carefully remove it before it infects other plants.
One of the best ways to reduce disease is to increase air circulation in the garden by proper plant spacing, clearing away fallen leaves, and immediately removing any diseased foliage. You can also limit the spread by washing your hands, discarding old gloves, and sterilizing pruners when dealing with plants with disease.
When to Give Up
Don’t try too hard to rescue a plant that’s plagued by disease or infested with bugs. You’re probably better off removing it and starting over. Remember, you’re trying to grow for health, so get rid of those plants before they harm the health of others!
