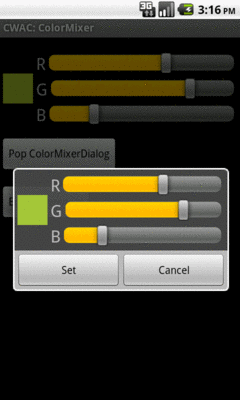
Figure 645: The ColorMixerDialog
Android ships with a number of dialog classes for specific
circumstances, like DatePickerDialog and ProgressDialog.
Similarly, Android comes with a smattering of Preference classes
for your PreferenceActivity, to accept text or selections from
lists and so on.
However, there is plenty of room for improvement in both areas. As such, you may find the need to create your own custom dialog or preference class. This chapter will show you how that is done.
We start off by looking at creating a
custom AlertDialog, not by using AlertDialog.Builder, but
via a custom subclass. Then, we show how to create your
own dialog-style Preference, where tapping on the
preference pops up a dialog to allow the user to customize the
preference value.
Understanding this chapter requires that you have read
the chapter on dialogs, along with
the chapter on the preference system. Also, the samples
here use the custom ColorMixer View described
in another chapter.
For your own application, the simplest way to create a custom
AlertDialog is to use AlertDialog.Builder, as described
in a previous chapter. You do not need to
create any special subclass — just call methods on the
Builder, then show() the resulting dialog.
However, if you want to create a reusable AlertDialog, this may
become problematic. For example, where would this code to create the
custom AlertDialog reside?
So, in some cases, you may wish to extend AlertDialog and supply
the dialog’s contents that way, which is how TimePickerDialog and
others are implemented. Unfortunately, this technique is not well
documented. This section will illustrate how to create such an
AlertDialog subclass, as determined by looking at how the core
Android team did it for their own dialogs.
The sample code is ColorMixerDialog, a dialog wrapping around the
ColorMixer widget shown in a previous chapter. The implementation
of ColorMixerDialog can be found in the
CWAC-ColorMixer
GitHub repository, as it is part of the CommonsWare Android
Components.
Using this dialog works much like using DatePickerDialog or
TimePickerDialog. You create an instance of ColorMixerDialog,
supplying the initial color to show and a listener object to be
notified of color changes. Then, call show() on the dialog. If the
user makes a change and accepts the dialog, your listener will be
informed.
Figure 645: The ColorMixerDialog
The ColorMixerDialog class is not especially long, since
all of the actual color mixing is handled by the ColorMixer widget:
package com.commonsware.cwac.colormixer;

import android.app.AlertDialog;
import android.content.Context;
import android.content.DialogInterface;
import android.os.Bundle;

public class ColorMixerDialog extends AlertDialog
  implements DialogInterface.OnClickListener {
  static private final String COLOR="c";
  private ColorMixer mixer=null;
  private int initialColor;
  private ColorMixer.OnColorChangedListener onSet=null;

  public ColorMixerDialog(Context ctxt,
                          int initialColor,
                          ColorMixer.OnColorChangedListener onSet) {
    super(ctxt);

    this.initialColor=initialColor;
    this.onSet=onSet;

    mixer=new ColorMixer(ctxt);
    mixer.setColor(initialColor);

    setView(mixer);
    setButton(ctxt.getText(R.string.cwac_colormixer_set),
              this);
    setButton2(ctxt.getText(R.string.cwac_colormixer_cancel),
               (DialogInterface.OnClickListener)null);
  }

  @Override
  public void onClick(DialogInterface dialog, int which) {
    if (initialColor!=mixer.getColor()) {
      onSet.onColorChange(mixer.getColor());
    }
  }

  @Override
  public Bundle onSaveInstanceState() {
    Bundle state=super.onSaveInstanceState();

    state.putInt(COLOR, mixer.getColor());

    return(state);
  }

  @Override
  public void onRestoreInstanceState(Bundle state) {
    super.onRestoreInstanceState(state);

    mixer.setColor(state.getInt(COLOR));
  }
}
We extend the AlertDialog class and implement a constructor
of our own design. In this case, we take in three parameters:
Context (typically an Activity), needed for the superclassColorMixer.OnColorChangedListener object, just like
ColorMixer uses, to notify the dialog creator when the color is
changedWe then create a ColorMixer and call setView() to make that be
the main content of the dialog. We also call setButton() and
setButton2() to specify a “Set” and “Cancel” button for the dialog.
The latter just dismisses the dialog, so we need no event handler.
The former we route back to the ColorMixerDialog itself, which
implements the DialogInterface.OnClickListener interface.
When the user clicks the “Set” button, we want to notify the
application about the color change…if the color actually changed.
This is akin to DatePickerDialog and TimePickerDialog only
notifying you of date or times if the user clicks Set and actually
changed the values.
The ColorMixerDialog tracks the initial color via the
initialColor data member. In the onClick() method —
required by DialogInterface.OnClickListener — we see if the
mixer has a different color than the initialColor, and if so, we
call the supplied ColorMixer.OnColorChangedListener callback object:
  @Override
  public void onClick(DialogInterface dialog, int which) {
    if (initialColor!=mixer.getColor()) {
      onSet.onColorChange(mixer.getColor());
    }
  }
Dialogs use onSaveInstanceState() and onRestoreInstanceState(),
just like activities do. That way, if the screen is rotated, or if
the hosting activity is being evicted from RAM when it is not in the
foreground, the dialog can save its state, then get it back later as
needed.
The biggest difference with onSaveInstanceState() for a dialog is
that the Bundle of state data is not passed into the method.
Rather, you get the Bundle by chaining to the superclass, then
adding your data to the Bundle it returned, before returning it
yourself:
  @Override
  public Bundle onSaveInstanceState() {
    Bundle state=super.onSaveInstanceState();

    state.putInt(COLOR, mixer.getColor());

    return(state);
  }
The onRestoreInstanceState() pattern is much closer to the
implementation you would find in an Activity, where the Bundle
with the state data to restore is passed in as a parameter:
  @Override
  public void onRestoreInstanceState(Bundle state) {
    super.onRestoreInstanceState(state);

    mixer.setColor(state.getInt(COLOR));
  }
The Android Settings application, built using the Preference
system, has lots of custom Preference classes. You too can create
your own Preference classes, to collect things like dates, numbers,
or colors. Once again, though, the process of creating such classes
is not well documented. This section reviews one recipe for making a
Preference — specifically, a subclass of DialogPreference
– based on the implementation of other Preference classes in
Android.
The result is ColorPreference, a Preference that uses the
ColorMixer widget. As with the ColorMixerDialog from the previous
section, the ColorPreference is from the CommonsWare Android
Components, and its source code can be found in the
CWAC-ColorMixer
GitHub repository.
One might think that ColorPreference, as a subclass of
DialogPreference, might use ColorMixerDialog. However, that is
not the way it works, as you will see.
A Preference is much like a custom View, in that
there are a variety of constructors, some taking an AttributeSet
(for the preference properties), and some taking a default style. In
the case of ColorPreference, we need to get the string resources to
use for the names of the buttons in the dialog box, providing them to
DialogPreference via setPositiveButtonText() and
setNegativeButtonText().
Here, we just implement the standard two-parameter constructor, since that is the one that is used when this preference is inflated from a preference XML file:
  public ColorPreference(Context ctxt, AttributeSet attrs) {
    super(ctxt, attrs);

    setPositiveButtonText(ctxt.getText(R.string.cwac_colormixer_set));
    setNegativeButtonText(ctxt.getText(R.string.cwac_colormixer_cancel));
  }
The DialogPreference class handles the pop-up dialog that appears
when the preference is clicked upon by the user. Subclasses get to
provide the View that goes inside the dialog. This is handled a bit
reminiscent of a CursorAdapter, in that there are two separate
methods to be overridden:
onCreateDialogView() works like newView() of CursorAdapter,
returning a View that should go in the dialogonBindDialogView() works like bindView() of CursorAdapter,
where the custom Preference is supposed to configure the View for
the current preference valueIn the case of ColorPreference, we use a ColorMixer for the
View:
  @Override
  protected View onCreateDialogView() {
    mixer=new ColorMixer(getContext());

    return(mixer);
  }
Then, in onBindDialogView(), we set the mixer’s color to be
lastColor, a private data member:
  @Override
  protected void onBindDialogView(View v) {
    super.onBindDialogView(v);

    mixer.setColor(lastColor);
  }
We will see later in this section where lastColor comes from
– for the moment, take it on faith that it holds the user’s
chosen color, or a default value.
Of course, the whole point behind a Preference is to allow the user
to set some value that the application will then use later on.
Dealing with values is a bit tricky with DialogPreference, but not
too bad.
The preference XML format has an android:defaultValue attribute,
which holds the default value to be used by the preference. Of
course, the actual data type of the value will differ widely —
an EditTextPreference might expect a String, while
ColorPreference needs a color value.
Hence, you need to implement onGetDefaultValue(). This is passed a
TypedArray — similar to how a custom View uses a
TypedArray for getting at its custom attributes in an XML layout
file. It is also passed an index number into the array representing
android:defaultValue. The custom Preference needs to return an
Object representing its interpretation of the default value.
In the case of ColorPreference, we simply get an integer out of the
TypedArray, representing the color value, with an overall default
value of 0xFFA4C639 (a.k.a., Android green):
  @Override
  protected Object onGetDefaultValue(TypedArray a, int index) {
    return(a.getInt(index, 0xFFA4C639));
  }
When the user clicks on the preference, the DialogPreference
supplies the last-known preference value to its subclass, or the
default value if this preference has not been set by the user to date.
The way this works is that the custom Preference needs to override
onSetInitialValue(). This is passed in a boolean flag
(restoreValue) indicating whether or not the user set the value of
the preference before. It is also passed the Object returned by
onGetDefaultValue(). Typically, a custom Preference will look at
the flag and choose to either use the default value or load the
already-set preference value.
To get the existing value, Preference defines a set of
type-specific getter methods — getPersistedInt(),
getPersistedString(), etc. So, ColorPreference uses
getPersistedInt() to get the saved color value:
  @Override
  protected void onSetInitialValue(boolean restoreValue, Object defaultValue) {
    lastColor=(restoreValue ? getPersistedInt(lastColor) : (Integer)defaultValue);
  }
Here, onSetInitialValue() stores that value in lastColor —
which then winds up being used by onBindDialogView() to tell the
ColorMixer what color to show.
When the user closes the dialog, it is time to persist the chosen
color from the ColorMixer. This is handled by the
onDialogClosed() callback method on your custom Preference:
  @Override
  protected void onDialogClosed(boolean positiveResult) {
    super.onDialogClosed(positiveResult);

    if (positiveResult) {
      if (callChangeListener(mixer.getColor())) {
        lastColor=mixer.getColor();
        persistInt(lastColor);
      }
    }
  }
The passed-in boolean indicates if the user accepted or dismissed the
dialog, so you can elect to skip saving anything if the user
dismissed the dialog. The other DialogPreference implementations
also call callChangeListener(), which is somewhat ill-documented.
Assuming both the flag and callChangeListener() are true, the
Preference should save its value to the persistent store via
persistInt(), persistString(), or kin.
Given all of that, using the custom Preference class in an
application is almost anti-climactic. You simply add it to your
preference XML, with a fully-qualified class name:
<PreferenceScreen
  xmlns:android="http://schemas.android.com/apk/res/android">
  <com.commonsware.cwac.colormixer.ColorPreference
    android:key="favoriteColor"
    android:defaultValue="0xFFA4C639"
    android:title="Your Favorite Color"
    android:summary="Blue.  No yel--  Auuuuuuuugh!" />
</PreferenceScreen>
At this point, it behaves no differently than does any other
Preference type. Since ColorPreference stores the value as an
integer, your code would use getInt() on the SharedPreferences to
retrieve the value when needed.
The user sees an ordinary preference entry in the
PreferenceActivity:
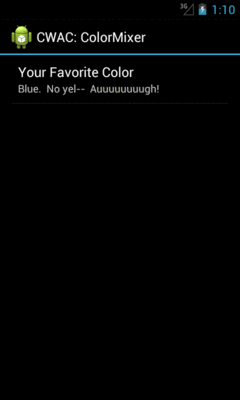
Figure 646: A PreferenceActivity, showing the ColorPreference
When tapped, it brings up the mixer:
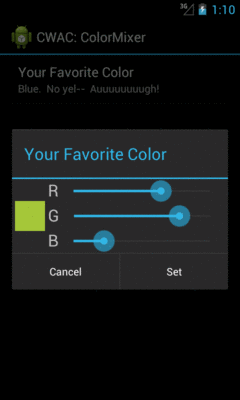
Figure 647: The ColorMixer in a custom DialogPreference
Choosing a color and clicking “Set” persists the color value as a preference.