Figure 1093: The original Kindle Fire, running a sample application, showing the menu bar
The most aggressive firm in creating a Google-free Android ecosystem is Amazon. The most visible aspect of that work is Amazon’s Kindle Fire series of devices. From 2011 through 2013, each year has brought forth a new generation of Kindle Fire models, each with newer versions of Android and more powerful hardware. However, none support the Play Store or other Google proprietary apps and technologies. As a result, Amazon has also been building their own replacements, which developers can elect to use if they need the capabilities but are targeting the Fire.
This chapter will outline what you should expect as you start working on apps for the Kindle Fire series of devices.
Understanding this chapter requires that you have read the core chapters of this book.
Once upon a time, there was the Kindle Fire. It was a 7” tablet, made by Amazon.
Nowadays, there is a series of devices in the Kindle Fire family:
This chapter will attempt to point out which of these devices certain statements pertain to. The phrase “the original Kindle Fire” refers to the first-generation Kindle Fire.
Any time you are looking at a device that is known to be a significant departure from conventional Android devices, you need to consider what capabilities the device has and how that relates to your code and graphic assets. Android’s flexibility means that, in many cases, you can work within the limits of the SDK to craft something that will look well on unusual devices. However, you will need to understand what is and is not possible for the device in question, in this case the Kindle Fire.
However, there are now several devices in the Kindle Fire family, which makes this more complicated.
Amazon has branded their variation of Android “FireOS”.
The first-generation Kindle Fire runs an Amazon-customized version of Android 2.3.3. The HD models run an Amazon-customized version of Android 4.0.3, while the HDX models run a FireOS based on Android 4.2.2.
Note that these devices will not show up in Google’s “Device Dashboard” pie chart, as Google can only count those devices that use the Play Store, which the Kindle Fire series lacks.
The original Kindle Fire (first and second generation)
uses -large, -mdpi resources. On the surface,
this would not be terribly surprising, as the 7” display works out to
around 169dpi, and 7” displays are definitely in the -large
resource bucket.
However, bear in mind that Android 2.3 did not fully support tablets. The only Google-endorsed tablet that shipped with Android 2.x was the original Samsung Galaxy Tab, and that technically was a really large phone that, er, could not place phone calls.
As such, Android 2.3 did not consider a 1024x600 display to be
-large. It considered such a display to be -xlarge. This was
corrected in Android 3.1, in preparation for a new line of ~7”
Honeycomb tablets.
In general, this should not pose an issue when testing your app on hardware. In practice, it will pose a problem for your emulator, as will be explained later in this chapter.
The Kindle Fire HD 7” and 8.9” are -large, though they are -hdpi
in terms of screen density.
The Kindle Fire HDX 7” is -large, while the Kindle Fire HDX 8.9”
is -xlarge. Both are xhdpi in terms of screen density.
All of the Kindle Fire devices support:
The Kindle Fire HD devices add:
The Kindle Fire HDX devices add:
The Kindle Fire HDX 8.9” offers a rear-facing camera in addition to the front-facing camera.
None of the Kindle Fire series support telephony (voice or SMS).
If your application truly needs any of those missing capabilities, you are out of luck.
If your application could use some of those capabilities but can get
by without them, be sure to add the appropriate <uses-feature>
elements to your manifest with android:required="false" (e.g.,
<uses-feature android:name="android.hardware.camera"
android:required="false" />
). Otherwise, your app will not be
available for the original Kindle Fire if Android thinks that you really do
need the capability (e.g., you have requested the CAMERA
permission).
All of the devices profiled in this part of the book are clearly different than what you are used to from an Android development standpoint. Some things, like availability of Bluetooth, will fit within the Android SDK’s framework for optional capabilities. Other things will represent where a device manufacturer has meandered farther from the Android device norm, in ways that may not be completely obvious to you, let alone your code.
As was noted previously in this chapter, the original version of the Kindle Fire runs Android 2.3, a version of Android not designed for tablets. Moreover, Android 2.3 was designed for devices that had dedicated off-screen options for HOME, BACK, and MENU buttons. However, Amazon apparently wanted to avoid such buttons, yet they lacked source code access to Honeycomb, where support for the system bar was added.
So, they faked it.
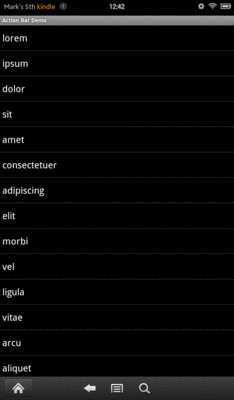
The Kindle Fire supports what Amazon refers to as the “menu bar”. This is akin to the system bar found on tablets running Android 3.0+, insofar as:
However, unlike the system bar:
Here, for example, is an application running on the original Kindle Fire:
Figure 1093: The original Kindle Fire, running a sample application, showing the menu bar
In this case, this is a normal activity, and the menu bar is always visible.
However, here is the same activity with
android:theme="@android:style/Theme.NoTitleBar.Fullscreen" in the
manifest:
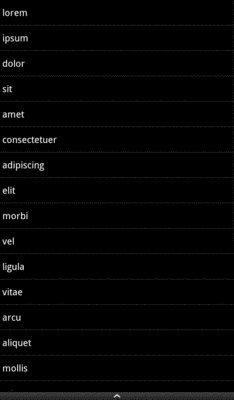
Figure 1094: The original Kindle Fire, running a sample application, with the menu bar collapsed
Hence, if you set your activity to be full-screen, the status bar at the top goes away, and the menu bar shrinks to a smaller bar. Tapping on that bar brings back the menu bar, but this time overlaying the bottom portion of your activity.
The Kindle Fire lacks Google Maps, both the app and the library used
for things like MapView.
The Kindle Fire lacks the Play Store and anything that depends upon it, such as GCM.
The Kindle Fire lacks Gmail.
The Kindle Fire lacks anything from Google that is not part of the Android Open Source Project.
If your application depends on one or more of these, your app will not work well on a Kindle Fire without adjustments, though some have alternatives from Amazon that can be used.
If you enable the standard Android setting, you can install apps on
the Kindle Fire from alternative sources, such as sideloading via
USB. This is how the development tools deploy apps to a device when
you are working on your app, and anyone can use this technique so
long as they have the Android SDK (or at least enough to provide
adb access).
However, there is one notable limitation of sideloading: icon quality.
When you submit your app for distribution through the Amazon AppStore, you will upload what they refer to as the “thumbnail” image. This is a 512x512 pixel rendition of your icon and is independent from any icons you may have put as resources in the APK file itself. When your app is installed from the Amazon AppStore, your thumbnail is downloaded as well and is used for the home screen carousel, among other things:
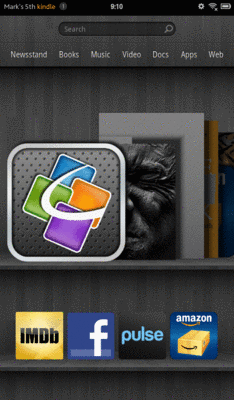
Figure 1095: The original Kindle Fire home screen, with a high-resolution version of the QuickOffice icon
However, when you sideload an app, or install it off the Web, there is no “thumbnail”. The Kindle Fire will use your in-APK icon, no different than any other home screen. However, when it blows up your, say, 72x72 pixel icon to the large shelf in the carousel, it does not look very pretty:
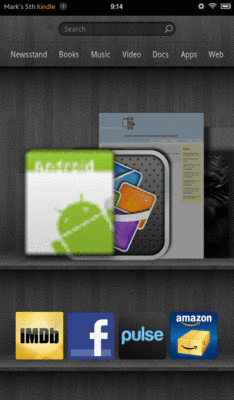
Figure 1096: The original Kindle Fire home screen, with a not-so-high-resolution version of the stock Android launcher icon
Things are somewhat better on the HD series:
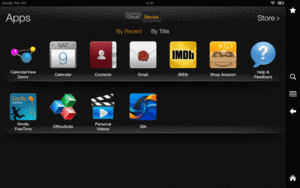
Figure 1097: Kindle Fire HD, with CommonsWare App Icon
Developing for the Kindle Fire series is best accomplished using an actual Kindle Fire device. For example, there is no good way to simulate the behavior of the Kindle Fire menu bar using the standard Android emulator. That being said, having an emulator that at least resembles the Kindle Fire will be useful for debugging purposes, since you can do more with an emulator (e.g., run Hierarchy View) than you can with production devices.
Amazon does not distribute an emulator image for the Fire, meaning that developers have to fake it as best they could using a stock emulator. This is fairly limiting, as the Fire does not look much like a standard Android emulator.
Briefly, Amazon was distributing an SDK add-on with emulator images, but that SDK add-on no longer seems to offer such images.
Note that the emulators in portrait mode get a bit tall, in terms of pixels, so be sure to use the scaling option in the AVD Manager to scale down the emulator so that it will fit your development machine’s monitor.
Figure 1098: Kindle Fire Emulator
The official original Kindle Fire emulator image also overcomes a limitation in the standard Android emulator image.
As mentioned earlier in this chapter, Gingerbread did not support
tablets. More importantly, it had a snippet of code that assumes that
devices running with the Kindle Fire’s resolution must be -xlarge.
In reality, the Kindle Fire (and other 7” tablets) should use a
-large configuration. However, the standard Android emulator will use -xlarge.
However, the official Kindle Fire emulator will correctly report the
emulator as -large, matching the device.
The Kindle Fire is ready for use with your development tools, once
you teach your development machine how to have adb connect to
the fire.
Linux and OS X users simply need to run android update adb, after
having installed the Kindle Fire SDK components, to have the ADB USB
entries added to the adb_usb.ini file.
On Windows, you will need to do that too, after doing some other things to unpack a local copy of the device drivers. Details for this process can be found in the Kindle Fire developer documentation.
Note that the original Kindle Fire automatically switches into USB Mass Storage mode when you plug it into a PC using the USB cable. This means that apps on the Kindle Fire do not have access to external storage. You will need to unmount the Kindle from your development machine’s OS and click the Disconnect button on the Kindle Fire’s “You can now transfer files from your computer to Kindle” screen to be both connected via USB and allow apps access to external storage.
Unlike the vast majority of Android devices, the Kindle Fire series lacks the Play Store. It is quite likely the most popular device ever shipped that does not include the Play Store, though it is far from the first. Hence, if you want your app to be available to Kindle Fire users, you will need to explore other ways of promoting and delivering the app.
The primary way to reach Kindle Fire users is through the Amazon AppStore. This is Amazon’s equivalent to the Play Store. And, unlike the Play Store, which is only available pre-installed on devices, any Android device can download an app client for the Amazon AppStore. That, coupled with Amazon’s promotions like the “free app of the day”, means that your app on the Amazon AppStore has reach beyond just the Kindle Fire series and future Amazon Android devices.
At a high level, publishing on the Amazon AppStore is not significantly different than publishing on the Play Store: you supply the APK and descriptive material to Amazon, and it gets listed. However, the devil, as they say, is in the details:
This is not to say that distributing through the Amazon AppStore is intrinsically a bad idea. Because of some of these hurdles, plus the AppStore’s much smaller user base, many developers are skipping it. This results in less competition and greater visibility for your app. However, you need to review all the Amazon AppStore developer rules and make decisions for yourself as to whether it makes sense for you and what you are trying to accomplish with the app.
In April 2013, Amazon also launched Coins, which is their replacement for Google’s in-app purchasing model for the Play Store.
Because Amazon did not license the Play Store or other commercial components from Google, you cannot reach Kindle Fire users through the Market (except for those who install pirated versions of the Play Store client on their devices).
However, all other distribution vectors should work as they would on
any other device. In addition to sideloading via USB, users can
install apps off of the Web by visiting a URL in the device’s browser
(by default, Amazon Silk) and tapping on the link to the APK. This
will trigger a download of the app — users can then tap on the
Notification for the download to trigger an install. Similarly, one
would imagine that other apps whose job is to download and install
apps (e.g., enterprise app “markets”) should work normally as well.
Note, though, that all off-AppStore installs will have rough icons, so you will want to supply your icons in all densities, in hopes that the Kindle Fire will choose a higher-quality rendition of the icon.
Since Amazon does not license the Google proprietary apps, the Kindle Fire series lacks common things like Google Maps.
However, Amazon has their own equivalents for some of these:
Amazon maintains a set of documentation related to Kindle Fire and Kindle Fire HDX development, along with a set of forums for asking Amazon-specific development questions regarding the Kindle Fire or their various SDKs.
Amazon is also reported to monitor
the kindle-fire tag on Stack Overflow.