Figure 22: Android Studio New Project Wizard, Second Page
Creating an Android application first involves creating an Android “project”. As with many other development environments, the project is where your source code and other assets (e.g., icons) reside. And, the project contains the instructions for your tools for how to convert that source code and other assets into an Android APK file for use with an emulator or device, where the APK is Android’s executable file format.
Hence, in this tutorial, we kick off development of a sample Android application, to give you the opportunity to put some of what you are learning in this book in practice.
The application we will be building in these tutorials is called EmPubLite.
EmPubLite will be a digital book reader, allowing users to read
a digital book like the
one that you are reading right now.
EmPubLite will be a partial implementation of
the EmPub reader used for the APK
version of this book. EmPub itself is a fairly extensive application, so
EmPubLite will have only a subset of its features.
The “Em” of EmPub and EmPubLite stands for “embedded”. These readers are
not designed to read an arbitrary EPUB or MOBI formatted book that you might
download from somewhere. Rather, the contents of the book (largely an unpacked
EPUB file) will be “baked into” the reader APK itself, so by distributing
the APK, you are distributing the book.
Of course, you may have little interest in writing a digital book reader app.
The tutorials presented in this book are certainly optional. There is no expectation that you have to write any code in order to get value from the book. These tutorials are here simply as a way to help those of you who “learn by doing” have an opportunity to do just that.
Hence, there are any number of ways that you can use these tutorials:
EmPubLite app.T2-Project/
directory containing a copy of the EmPubLite sample app after having completed
the steps found in this tutorial.
You can import these projects into your IDE,
examine what they contain, cross-reference them back to the tutorials themselves,
and run them.Any of these are valid options — you will need to choose for yourself what you wish to do.
The instructions in the remaining tutorials should be accurate for Android Studio 2.2.x. The instructions may work for other versions of this IDE, but there may also be some differences.
We need to create the Android project for EmPubLite.
From the Android Studio welcome dialog, click “Start a new Android Studio project”, which will bring up the new-project wizard, as was described in the preceding chapter.
In this first wizard page, fill in:
EmPubLite for the “Application Name”commonsware.com for the “Company Domain”com.commonsware.empublite for the “Package Name”Also, leave the C++ support checkbox unchecked, and choose some safe spot on your development machine to store the project in. Then, click “Next” to advance to the next page of the wizard.
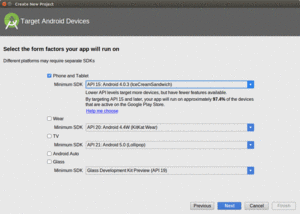
On the second wizard page, check “Phone and Tablet”, and choose “API 15” in the “Minimum SDK” drop-down:
Figure 22: Android Studio New Project Wizard, Second Page
Then, click “Next” to advance to the next page of the wizard.
There, click “Empty Activity”, and then click “Next”.
On that last wizard page, change the “Activity Name” to
EmPubLiteActivity, change the “Layout Name” to main,
and uncheck “Backwards Compatibility (AppCompat)”:
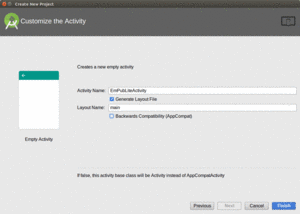
Figure 23: Android Studio New Project Wizard, Final Page
Finally, click “Finish” to have Android Studio create your new project for you.
Android Studio has two ways of viewing the contents of Android projects. The default one, that you are presented with when creating the project, is known as the “Android view”:
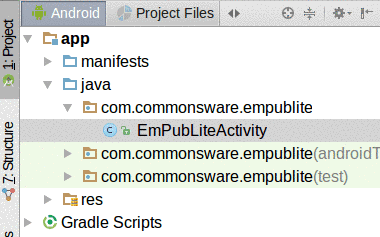
Figure 24: Android Studio “Android View”
While you are welcome to navigate your project using it, the tutorial chapters in this book, where they have screenshots of Android Studio, will show the project view:
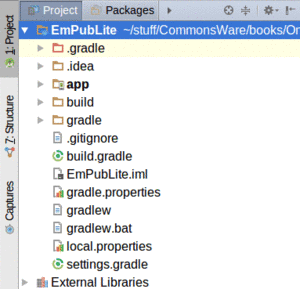
Figure 25: Android Studio “Project View”
To switch to this view — and therefore match what the tutorials will show you — click on the arrowheads to the right of the “Android” and “Project Files” tabs and choose “Project”.
Your first decision to make is whether or not you want to bother setting up an emulator image right now. If you have an Android device, you may prefer to start testing your app on it, and come back to set up the emulator at a later point. In that case, skip to Step #4.
Otherwise, here is what you may need to do, based on the operating system on your development machine.
If your CPU met the requirements, and you successfully enabled the right things in your system’s BIOS, the Android Studio installation should have installed HAXM, and you should be ready to go.
If, on the other hand, you got some error messages in the installation wizard regarding HAXM, you would need to address those first.
The wizards of Cupertino set up their Mac hardware to be able to run the Android x86 emulator, which is awfully nice of them, considering that Android competes with iOS. The Android Studio installation wizard should have installed HAXM successfully, and you should be able to continue with the next step of the tutorial.
The Android x86 emulator on Linux does not use HAXM. Instead, it uses KVM, a common Linux virtualization engine.
If, during the Android Studio installation process, the wizard showed you a page that said that you needed to configure KVM, you will need to do just that before you can set up and use the x86 emulator. The details of how to set up KVM will vary by Linux distro (e.g., Ubuntu).
The Android emulator can emulate one or several Android devices. Each configuration you want is stored in an “Android virtual device”, or AVD. The AVD Manager is where you create these AVDs.
Note that Android Studio now has its own implementation of the AVD Manager that is separate from the one Android developers have traditionally used. You may see screenshots of the older AVD Manager in blog posts, Stack Overflow answers, and the like. The AVD Manager still fills the same role, but it has a different look and feel.
To open the AVD Manager in Android Studio, choose Tools > Android > AVD Manager from the main menu.
You should be taken to “welcome”-type screen:
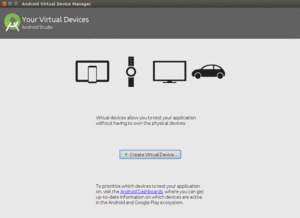
Figure 26: Android Studio AVD Manager, Welcome Screen
Click the “Create Virtual Device” button, which brings up a “Virtual Device Configuration” wizard:
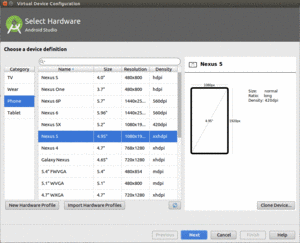
Figure 27: Android Studio Virtual Device Configuration Wizard, First Page
The first page of the wizard allows you to choose a device profile to use as a starting point for your AVD. The “New Hardware Profile” button allows you to define new profiles, if there is no existing profile that meets your needs.
Since emulator speeds are tied somewhat to the resolution of their (virtual) screens, you generally aim for a device profile that is on the low end but is not completely ridiculous. For example, an 800x480 or 1280x768 phone would be considered by many people to be fairly low-resolution. However, there are plenty of devices out there at that resolution (or lower), and it makes for a reasonable starting emulator.
If you want to create a new device profile based on an existing one — to change a few parameters but otherwise use what the original profile had – click the “Clone Device” button once you have selected your starter profile.
However, in general, at the outset, using an existing profile is perfectly fine.
Clicking “Next” allows you to choose an emulator image to use:
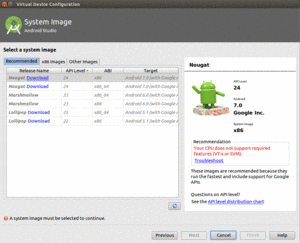
Figure 28: Android Studio Virtual Device Configuration Wizard, Second Page
The emulator images are spread across three tabs:
For the purposes of the tutorials, you do not need an emulator image with the “Google APIs” — those are for emulators that have Google Play Services in them and related apps like Google Maps. However, in terms of API level, you can choose anything from API Level 15 (Android 4.0.3) on up. You should have one or more suitable images already set up for you, courtesy of having installed Android Studio.
The emulator images with “Download” next to them will trigger a one-time download of the files necessary to create AVDs for that particular API level and CPU architecture combination, after another license dialog and progess dialog:
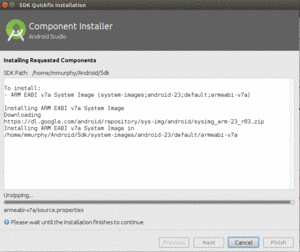
Figure 29: Android Studio Component Installer Dialog, Downloading API 23 ARM Image
Once you have downloaded the image(s) that you want, click on one of them in the wizard:
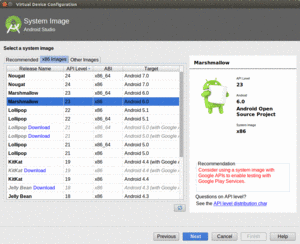
Figure 30: Android Studio Virtual Device Configuration Wizard, After Choosing Image
Clicking “Next” allows you to finalize the configuration of your AVD:
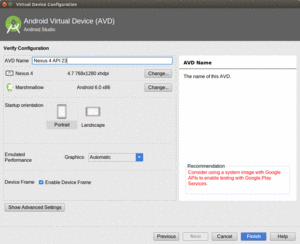
Figure 31: Android Studio Virtual Device Configuration Wizard, Third Page
A default name for the AVD is suggested, though you are welcome to replace this with your own value.
Change the AVD name, if necessary, to something valid: only letters, numbers,
spaces, and select punctuation (e.g., ., _, -, (, )) are supported.
The rest of the default values should be fine for now.
Clicking “Finish” will return you to the main AVD Manager, showing your new AVD. You can then close the AVD Manager window.
You do not need an Android device to get started in Android application development. Having one is a good idea before you try to ship an application (e.g., upload it to the Play Store). And, perhaps you already have a device – maybe that is what is spurring your interest in developing for Android.
If you do not have an Android device that you wish to set up for development, skip this step.
The first step to make your device ready for use with development is to go into the Settings application on the device. What happens now depends a bit on your Android version:
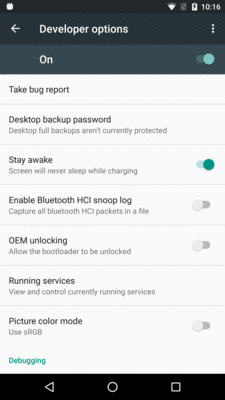
Figure 32: Developer Options, in Settings App
You may need to slide a switch in the upper-right corner of the screen to the “ON” position to modify the values on this screen.
Generally, you will want to scroll down and enable USB debugging, so you can use your device with the Android build tools:

Figure 33: Debugging Options, in Settings App
You can leave the other settings alone for now if you wish, though you may find the “Stay awake” option to be handy, as it saves you from having to unlock your phone all of the time while it is plugged into USB.
Note that on Android 4.2.2 and higher devices, before you can actually use the setting you just toggled, you will be prompted to allow USB debugging with your specific development machine via a dialog box:
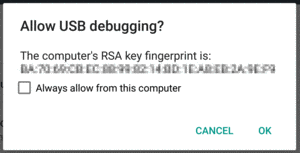
Figure 34: Allow USB Debugging Dialog
This occurs when you plug in the device via the USB cable and have the driver appropriately set up. That process varies by the operating system of your development machine, as is covered in the following sections.
When you first plug in your Android device, Windows will attempt to find a driver for it. It is possible that, by virtue of other software you have installed, that the driver is ready for use. If it finds a driver, you are probably ready to go.
If the driver is not found, here are some options for getting one.
Some versions of Windows (e.g., Vista) will prompt you to search Windows Update for drivers. This is certainly worth a shot, though not every device will have supplied its driver to Microsoft.
In your Android SDK installation, if you chose to install the “Google USB Driver”
package from the SDK Manager, you will find an extras/google/usb_driver/
directory, containing a generic Windows driver for Android devices. You can try
pointing the driver wizard at this directory to see if it thinks this driver is
suitable for your device. This will often work for Nexus devices.
If you still do not have a driver, the OEM USB Drivers in the developer documentation may help you find one for download from your device manufacturer. Note that you may need the model number for your device, instead of the model name used for marketing purposes (e.g., GT-P3113 instead of “Samsung Galaxy Tab 2 7.0”).
Odds are decent that simply plugging in your device will “just work”. You can
see if Android recognizes your device via running adb devices in a shell
(e.g., OS X Terminal), where adb is in your platform-tools/ directory of
your SDK. If you get output similar to the following, the build tools detected your
device:
List of devices attached
HT9CPP809576  device
If you are running Ubuntu (or perhaps other Linux variants), and this command
did not work, you may need to add some udev rules. For example, here is a
51-android.rules file that will handle the devices from a handful of
manufacturers:
SUBSYSTEM=="usb", SYSFS{idVendor}=="0bb4", MODE="0666"
SUBSYSTEM=="usb", SYSFS{idVendor}=="22b8", MODE="0666"
SUBSYSTEM=="usb", SYSFS{idVendor}=="18d1", MODE="0666"
SUBSYSTEMS=="usb", ATTRS{idVendor}=="18d1", ATTRS{idProduct}=="0c01", MODE="0666", OWNER="[me]"
SUBSYSTEM=="usb", SYSFS{idVendor}=="19d2", SYSFS{idProduct}=="1354", MODE="0666"
SUBSYSTEM=="usb", SYSFS{idVendor}=="04e8", SYSFS{idProduct}=="681c", MODE="0666"
Drop that in your /etc/udev/rules.d directory on Ubuntu, then either reboot
the computer or otherwise reload the udev rules (e.g., sudo service udev reload).
Then, unplug and re-plug in the device and see if it is detected.
Now, we can confirm that our project is set up properly by running it on a device or emulator.
To do that in Android Studio, just press the Run toolbar button (usually depicted as a green rightward-pointing triangle).
You will then be presented with a dialog indicating where you want the app to run: on some existing device or emulator, or on some newly-launched emulator:
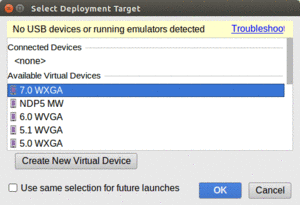
Figure 35: Android Studio Device Chooser Dialog
If you do not have an emulator running, choose one from the list, then click OK. Android Studio will launch your emulator for you.
And, whether you start a new emulator instance or reuse an existing one, your app should appear on it:
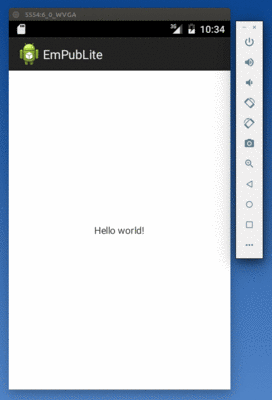
Figure 36: Android 7.0 Emulator with EmPubLite
Note that you may have to unlock your device or emulator to actually see the app running. It will not unlock automatically for you, except the very first time that you run the emulator.
… we will modify the AndroidManifest.xml file of our tutorial project.