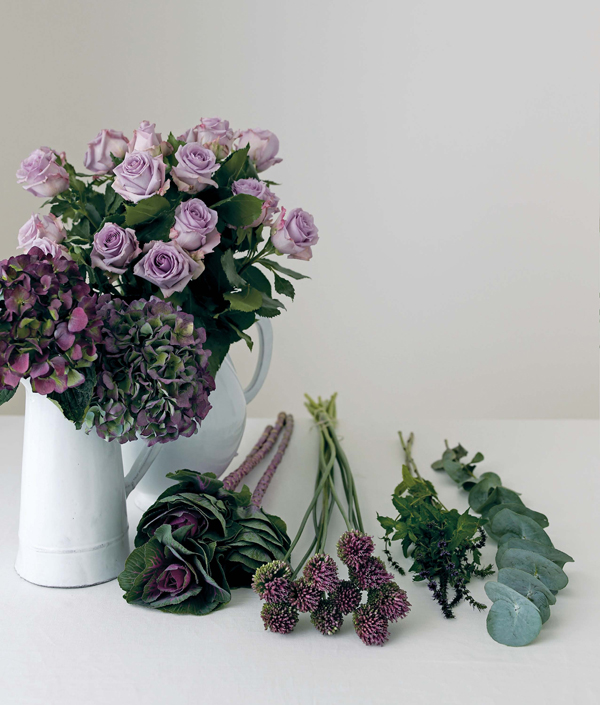
This hand-tied arrangement is an updated version of the traditional ‘flat’ bouquet. The flower stems are left longer, so the flowers can either be displayed as they come, or may be re-arranged by the recipient. Flat bouquets are the ideal gift for friends who enjoy arranging flowers.
9 × stems alliums
10 × stems salvia leucantha
3 × stems eucalyptus
8 × stems Cool Water roses, stripped of their lower leaves
3 × ornamental cabbage heads
2 × purple-tinged hydrangea heads
reel of twine
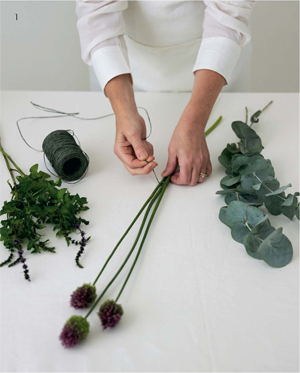
1 Begin by taking three stems of allium and grouping them together so the heads are staggered in height. Cut a length of twine and tie them together two thirds of the way down the stems. This forms the backbone for the bouquet, so it’s important to choose flowers with strong stems.
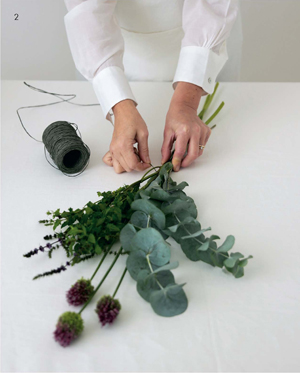
2 Add three stems each of salvia and eucalyptus to the bunch of alliums, placing the salvias on one side and the eucalyptus on the other. Make sure the foliage curves away from the centre. Tie together, two thirds of the way down the stems.
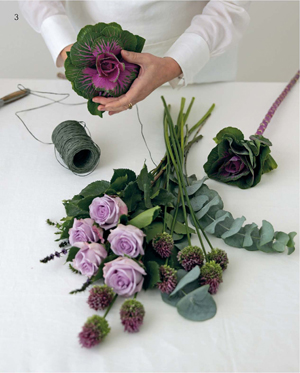
3 Place the roses and the remaining alliums on top of the hand-tied bunch, with five roses on one side of the bouquet and three on the other. With a flat bouquet, the idea is to display the flowers rather than arranging them, so the taller pieces should be at the back and the shorter, larger-headed pieces at the front. Take the ornamental cabbages and gently open out the leaves for a more rounded, flower-like effect.
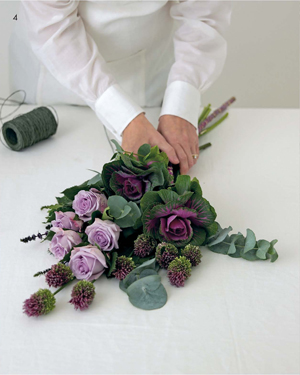
4 Now place the two ornamental cabbages on top of the other flowers, towards the centre. Finally, add the hydrangea heads, placing them just below the cabbages. Now grasp the stems tightly towards the bottom and tie them all securely in place. Neatly trim the ends into a ‘wheatsheaf’ shape (the ends should be about a third of the total length of the arrangement). The bouquet is now complete.
OPPOSITE Flat bouquets began to lose popularity when the continental hand-tied posy arrived on the scene in the early 1980s. In the bad old days, I remember seeing dreadful flat bouquets containing all the odds and ends from the florists’ shop. Fortunately, things have moved on since then, and this luscious arrangement reinvents the flat bouquet’s old-fashioned image.
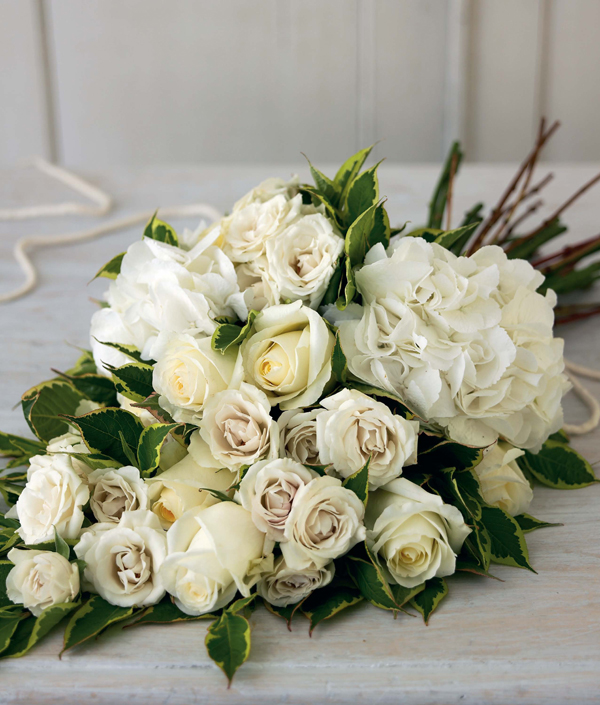
THIS PAGE I love these Majolica white spray roses, with their porcelain pink tint. Here they are tucked in and around large-headed, creamy-white Blizzard roses. Flawless white hydrangea blooms are positioned towards the base of the bouquet, and variegated weigelia foliage is entwined among the flowers. The overall effect is soft and gentle — the perfect pew end at a wedding, or presented wrapped in tissue to celebrate the birth of a baby.
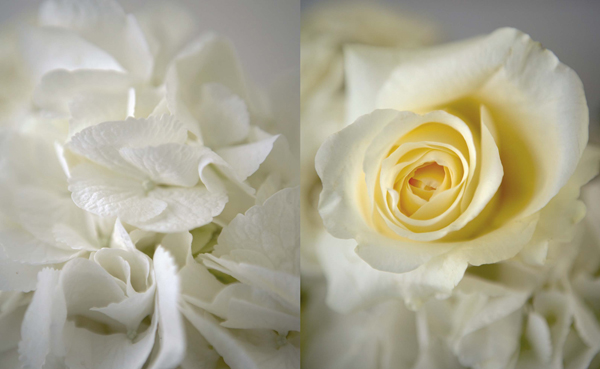
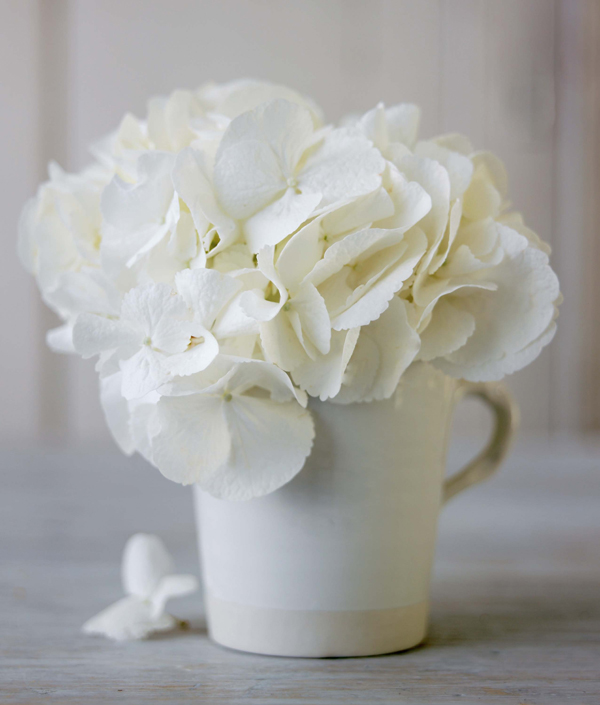
THIS PAGE The cloudlike bloom of the white hydrangea flower is ravishing in close-up. Use it with other white flowers, or gather an armful for a dramatic vase display.
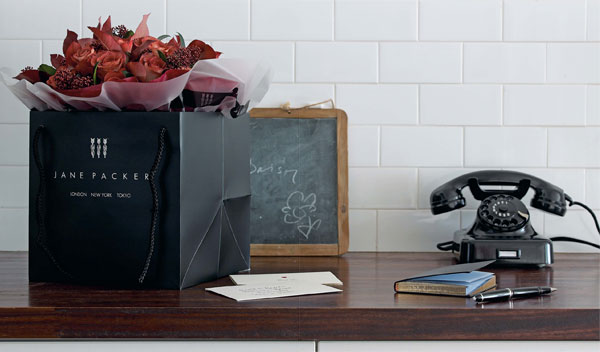
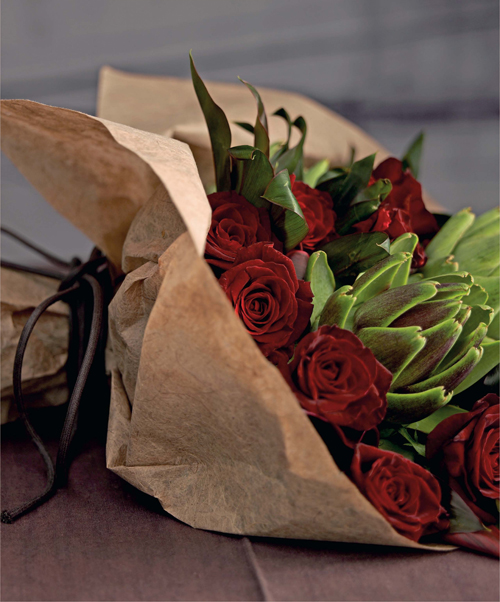
THIS PAGE Casually wrapped in brown paper and tied with brown cord, the overall effect of this flat bouquet is spontaneous chic. It’s amazing how the wrapping can influence the look. The flowers are blood-red Grand Prix roses, cordyline foliage and artichokes tinged with burgundy.
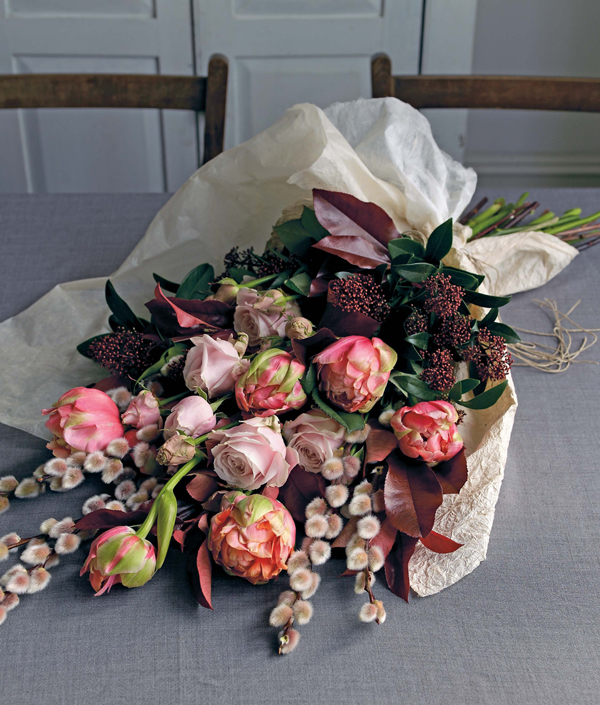
THIS PAGE A classic flat bouquet of tactile pussy willow, peony tulips and pink roses. The rich burgundy foliage is photinia and skimmia, and was chosen to add depth to the gentle pinks.
The hand-tied bouquet arrived in the UK after years of popularity on the continent, where florists automatically spiral the stems as the customer selects their blooms. They are now one of the most popular floral presentations. Hand-tied bouquets are perfect gifts as the flowers are already arranged and only need be transferred to a vase.
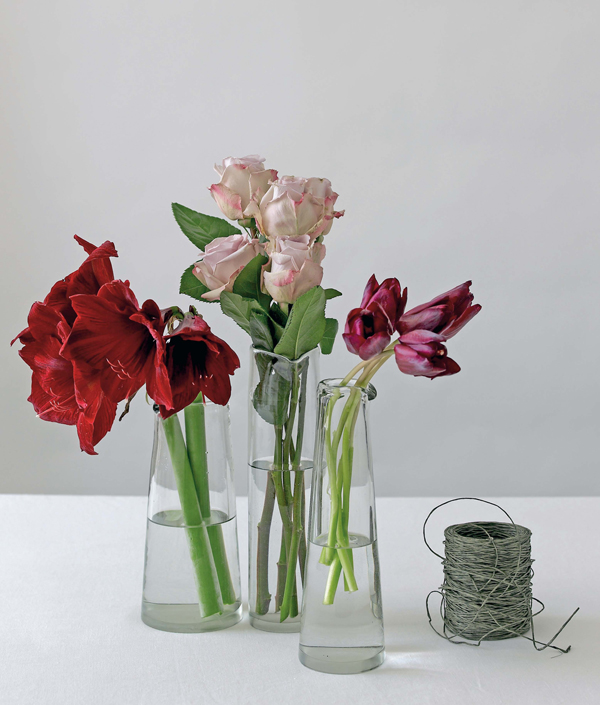
3 × stems amaryllis
15 × stems Amnesia roses
10 × stems Black Knight tulips
reel of twine
paper to wrap bouquet
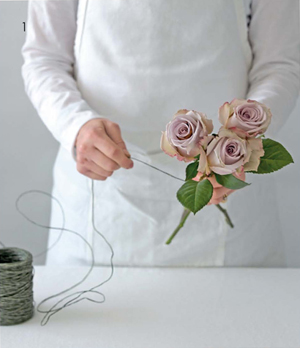
1 Take one large flower head as the central point of the bouquet and tie the twine to the stem of this flower at the ‘binding point’ — about 15–20cm below the flower head. Hold the flower firmly in your left hand. With your right hand, cluster several heads around the first flower, one at a time, winding the twine around the stems and rotating the bouquet in an anti-clockwise direction as you do so. Build up a circle of flower heads around the central flower.
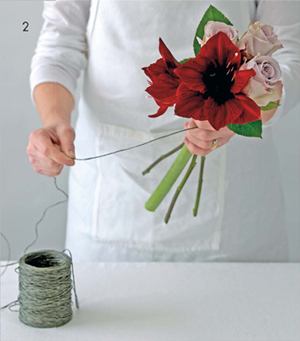
2 Begin to build up a second circle of flowers around the first. Slant the stems at a gentle angle to create a rounded shape across the top of the bouquet. Make sure you continue to bind the stems at the same point. For example, if you start with a binding point of 20cm below the flower heads, you must continue binding at this point.

3 As you continue to add stems, rotating the bouquet anti-clockwise as you work, you will see that the bouquet of flowers is gradually taking on an even, domed shape across the top.
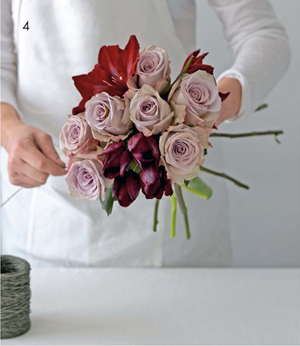
4 Continue to add ingredients until the bouquet is the desired size or all the flowers have been used.
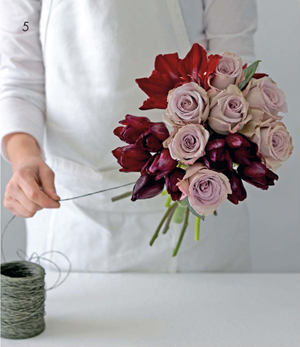
5 Wind the twine around the binding point several times, then tie in a knot.
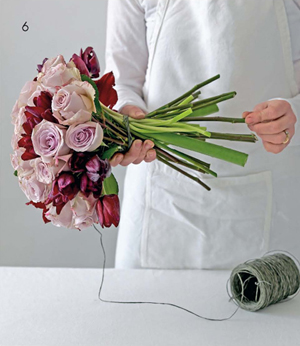
6 Cut off the ends of the flower stems so they are level. Their length depends on the height of the bouquet — for example, if the binding point is 20cm, then you should leave a 20cm length of stem beneath this point.

7 Gather together a length of tissue and wrap around the stems, making sure that the two ends of the tissue are the same length where they meet.
8 Tie the tissue in place at the binding point or ‘waist’, making sure it covers the stems. Here, I used soft cream tissue to enhance the flowers and add to the overall size and impact of the bouquet.
OPPOSITE I love hand-tied bouquets, from small sweet posies to glamorous armfuls of flowers like this one. They have become the most ordered floral gift, partly due to the fact that they are so easy for the recipient to take care of — no need to re-arrange the flowers; just trim the bottom of the stems and pop them in a vase.
ABOVE A hand-tied bouquet of dramatically coloured, densely massed flowers: red hydrangeas, scarlet amaryllis, burgundy dahlias, cotinus leaves and a red-tinged succulent. The succulent was removed from its pot and the roots were washed and wrapped in clingfilm. It was then taped to a discarded stem that acts as the stem of the plant, allowing me to bind it in place like any other ingredient.
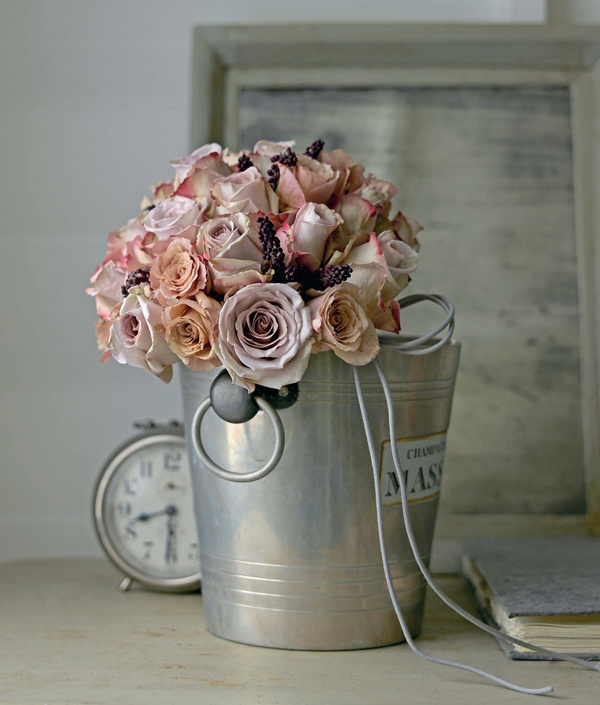
OPPOSITE I love this selection of roses: the faded ice-cream shades lend the arrangement a beguiling, almost melancholy charm and work so well with the dull metal of the champagne bucket. Note that the higher and shorter the binding point of the bouquet, the more closely the flowers will be massed.
ABOVE & OPPOSITE Amazing textures make for amazing bouquets. When combining flowers, it’s important to choose a variety of blooms in different shapes and sizes, so that each ingredient is clearly distinguishable. This lush hand-tied bouquet contains delicate Majolica spray roses, creamy white hydrangeas, huge-headed and aptly named Blizzard roses, vibrant green poppy heads, and strands of white-painted bear grass. The grass stems were bent into a loop and tied in at one end of the grass.

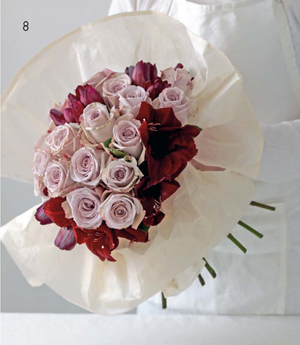
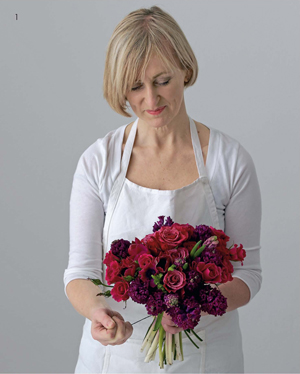
I love this unusual style of hand-tied bouquet – grouping flowers into small posies by variety, then binding them together in a bouquet. My philosophy is to use flowers in a natural way, taking inspiration from the way they grow, rather than using dozens of different flowers dotted throughout, like some bouquets on the high street.
9 × stems cordyline leaves
6 × stems Soutine roses
5 × amaranthus trails
8 × stems pink arums
6 × stems dark red roses, such as Grand Prix
5 × stems cotinus foliage
reel of twine
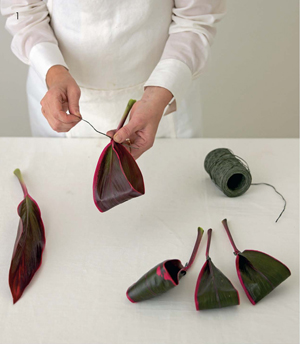
1 Form the cordyline leaves into loops by folding them over on themselves and tying the point of the leaf to the stem with twine.
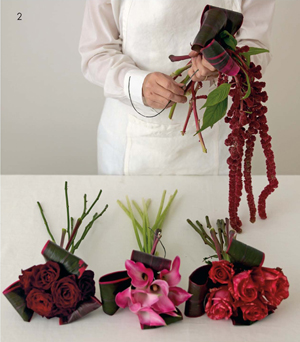
2 Strip the thorns and lower leaves from the rose and amaranthus stems. Now begin to bind together the single varieties of flower.
3 Make up four bunches altogether, each bunch made up of one single variety of flower and surrounded by the cordyline leaves.
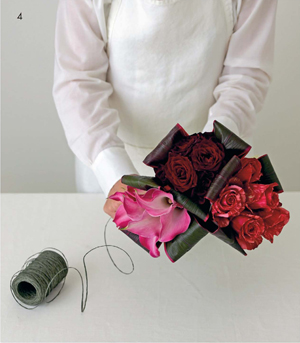
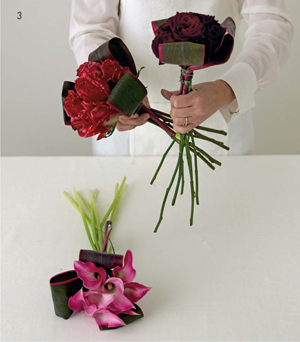
4 Tie together the bunched arums and the two varieties of rose, imagining that they occupy the 12 o’clock, 20 minutes past and 20 minutes to positions on a clock face and, leaving slight gaps between the three posies.
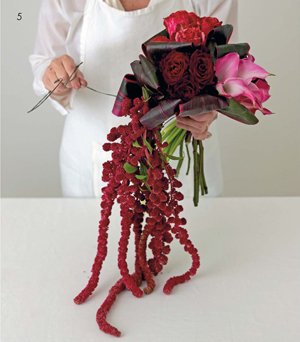
5 Add the amaranthus posy to the bouquet, then fill in the gaps between the other flowers with stems of dark burgundy cotinus.
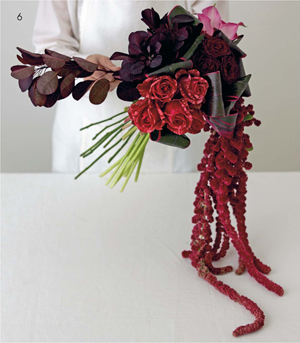
6 Make sure you have turned the bouquet in the same direction while assembling it, so the stems form a neat spiral. Now trim the stems so they are all level, and place the bouquet in a vase.
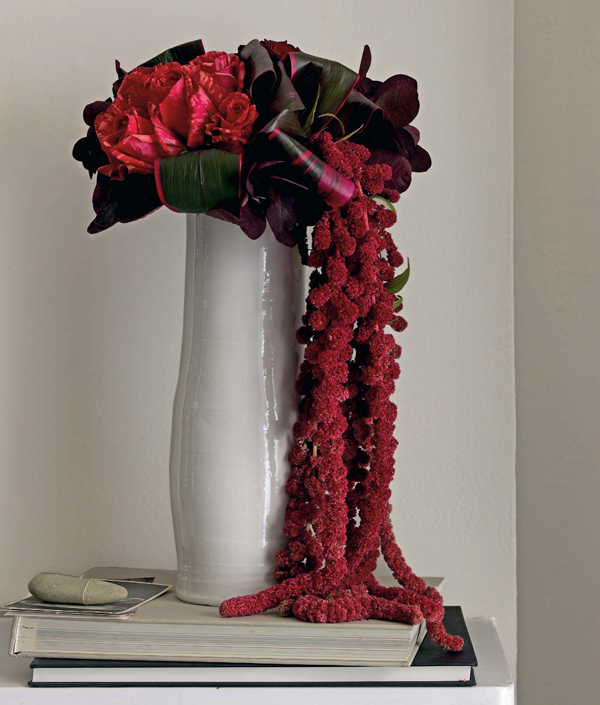
THIS PAGE Use a tall vase to emphasize the drama of the amaranthus as it falls the length of the vase and tumbles onto the surface below. Amaranthus is also available in green, so you could recreate this look using green flowers and foliage.
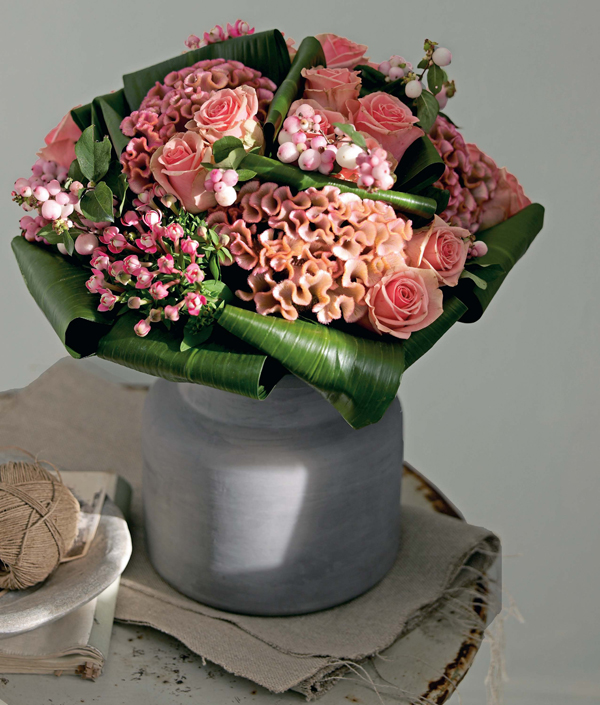
THIS PAGE The same technique was used to create this soft pink bouquet. Individual bunches, each consisting of roses, celosia, snowberries and pink bouvardia, are wrapped in aspidistra leaves.
OPPOSITE Loops of thin ribbon are looped around Amnesia roses and cordyline leaves to enhance the colour and add texture.

Mention a basket arrangement, and it’s easy to conjure up an image of those old-fashioned baskets with a huge hooped handle, filled with ghastly ingredients that almost hurt your eyes with their clashing colours. It doesn’t have to be like that! Choose a basket that you’d like to have in your home, and which will still see some use once the flowers are no more than a distant memory.
6–7 stems variegated cordyline leaves
3 × golden-yellow quince or apples
9 × stems poppy heads
3 × ornamental cabbage heads
2 × artichokes
2 × green hydrangea heads
3 × stems grey brodea foliage
square of floral foam, cut to size
plastic liner or bin bag, cut to size
canes for fruit
1 Start by preparing your ingredients. Trim the cordyline leaves at the base to make them shorter, slicing away the softer edges and leaving the central stem. Strip the foliage from the lower stems of the other ingredients and soak the floral foam in water until it is saturated.
2 Take the fruit and insert canes into the base of each piece. Next line the basket with the plastic and insert the block of foam, allowing it to stand proud of the rim by several centimetres.

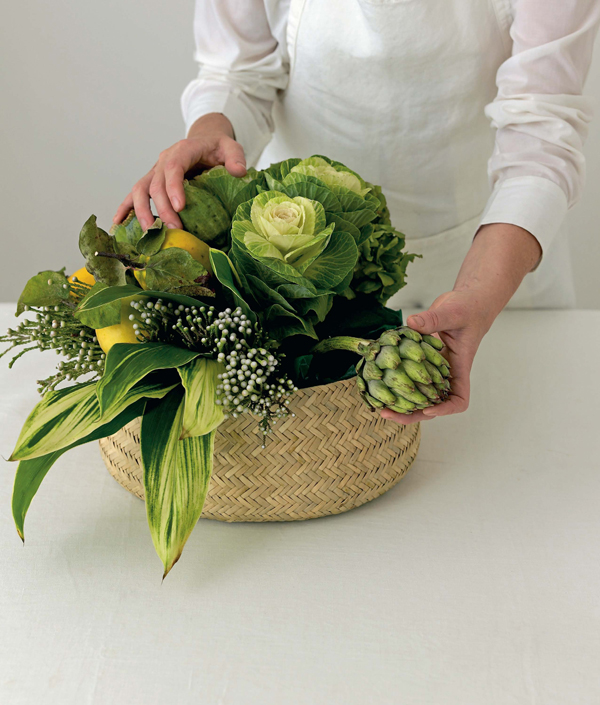
3 Start to insert the ingredients. The idea is for the arrangement to look natural and uncontrived. Starting from one side of the basket, mass the ingredients together and allow them to overhang the edges of the basket.
4 Gradually fill the basket, making sure it looks right from every angle. Around the edges of the basket, push the stems upwards into the foam, so the flowers conceal the rim of the basket. The finished effect should have an abundant feel, with the flowers loosely grouped together so every angle provides a different aspect.
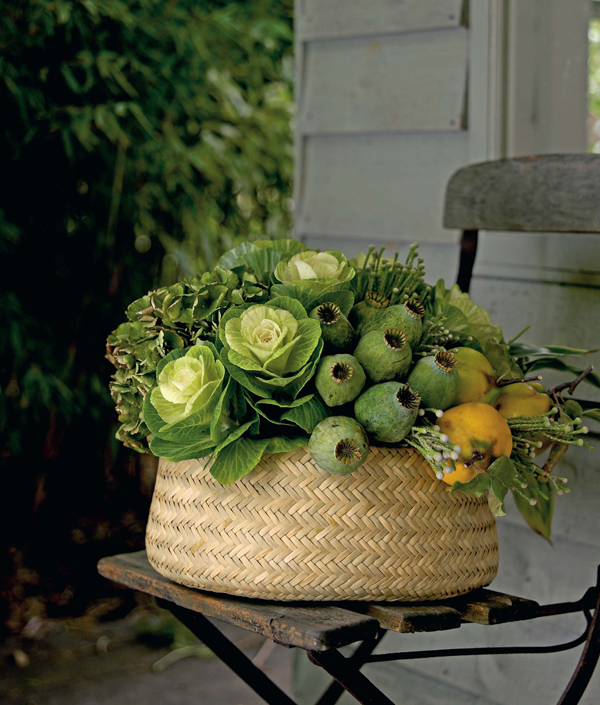
OPPOSITE I feel that this basket is suitable for so many different occasions and can be displayed in almost any situation — on a low table, or occupying the centre of a dining table. The basket has a late summer feel about it, due to the golden fruit and the faded green tones of the cabbages.

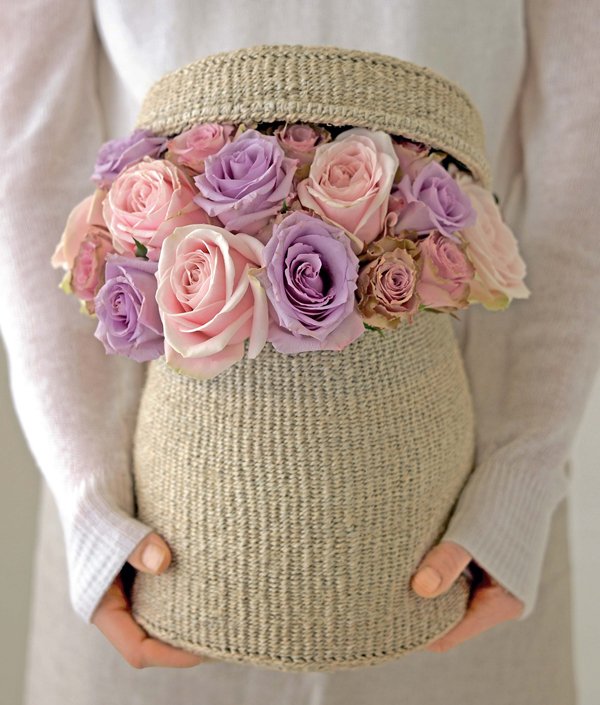
I love this hatbox basket display. It feels very modern, with its tall cylindrical shape holding a grouping of single-variety flowers. The soft colour of the basket demands gentle tones, whereas a darker basket could carry stronger colours. For several years we have featured on our website a bright pink hatbox filled with fabulous pink roses. The reaction has been phenomenal, so this ‘flowers in a basket’ effect is obviously well loved.
Approximately 20 × stems roses in a variety of lilac, pale pink and darker pink shades
plastic liner
2 × blocks floral foam
tall basket with lid
reel of wire
‘Oasis Fix’ adhesive tack

1 Soak the floral foam in water until it is saturated. Line the basket with plastic and fill it with the blocks of wet floral foam, allowing the foam to sit just proud of the rim of the basket. Trim the plastic liner to fit.

2 Insert a 10cm section of rose stem into the centre of the foam so it can hold the lid of the basket slightly open. If necessary, use a piece of ‘Oasis Fix’ adhesive tack to hold the stem in place. Tie the basket lid to the base using a length of wire.
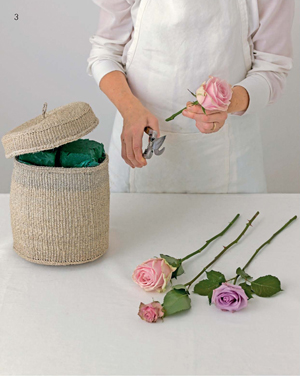
3 Once the basket is ready, prepare the roses. Remove all the thorns and foliage from the lower part of the stems. Take a large-headed rose and cut the stem to a length of about 5cm. Cut the end of the stem on an angle, so you can push the flower in to the foam easily. Insert the flower smoothly into the foam, and repeat the process with another rose.

4 Fill the basket aperture with the roses. Use larger-headed roses towards the centre of the basket, and smaller roses towards the edges. Mix up the colours for an attractive effect, instead of grouping the varieties together. The space between the lid and base should be crammed with roses bursting to get out.
OPPOSITE The traditional basket arrangement had fallen out of favour when I designed this ‘hatbox’ basket. It’s modern and stylish, and the basket can be used again afterwards. It’s also the simplicity of the flower choice that makes it work so well. I’ve seen many copies of this arrangement since it first appeared on our website, so now I am laying claim to the design!
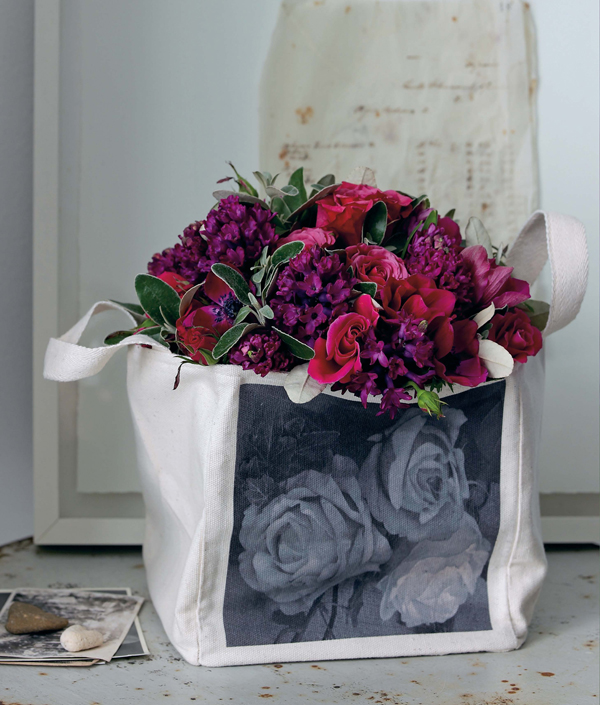
I am always searching for new ways in which to present my flowers, and recently discovered this lovely linen bag with its faded floral print. The bag needs the support of the acrylic box, which also contains the flowers and the water. Here’s how to tackle it!
5 × stems dark pink spray roses
8 × stems anemones
10 × stems purple hyacinth
6 × stems senecio foliage
square of plastic/cellophane
reel of twine
rigid plastic container that fits inside bag (to act as a support and liner)
cotton canvas bag
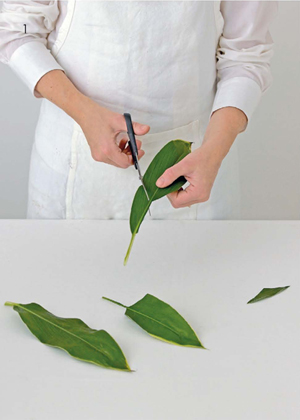
1 Following the instructions on pages 23–24, make a hand-tied posy to the width of the opening of the linen bag. Tie with twine, then trim the stems to a length where the heads of the flowers will rest on the opening of the the bag.

2 Cut a piece of plastic or cellophane large enough to cover all the stems. Stand the posy in the centre of the plastic square, gather up the edges of the plastic, and tie it at the binding point of the bouquet. Then, using a jug, pour water through the centre of the bouquet so that it fills the plastic bag.
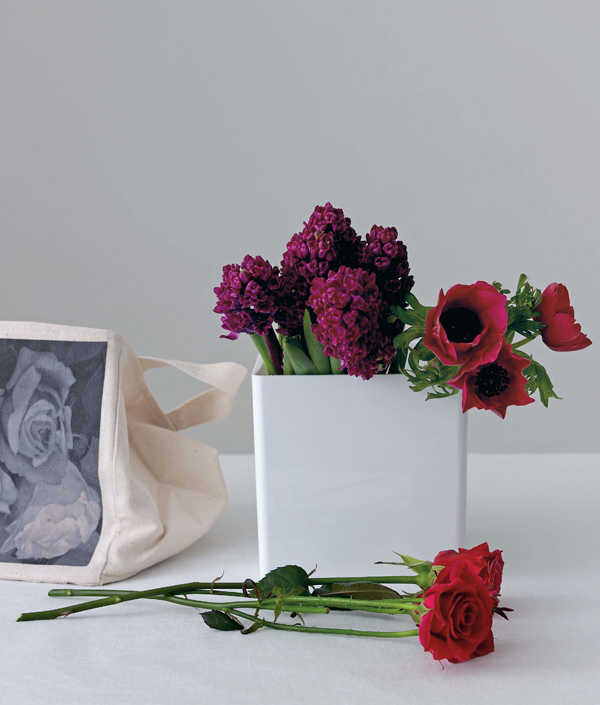
3 Place the posy into the square plastic container and then sit this in the bag. The grey senecio foliage works perfectly with the black and white print, and I think this makes the gift look completely ‘finished’ in terms of feel and design.
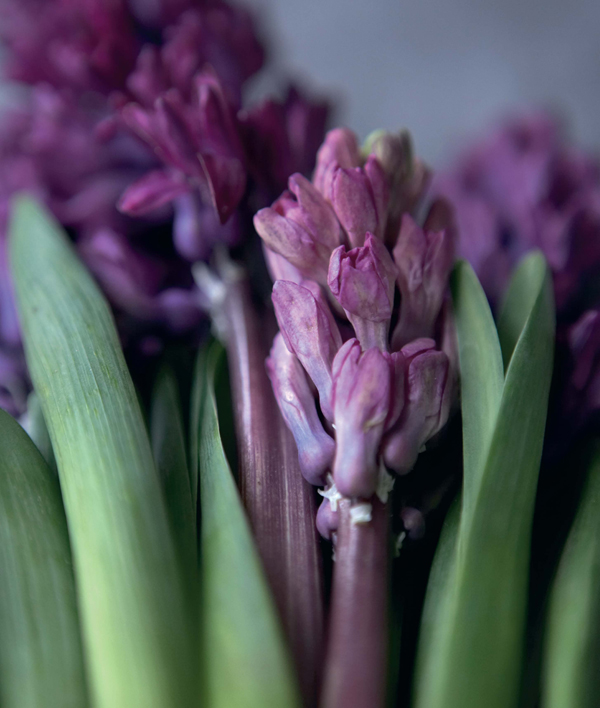
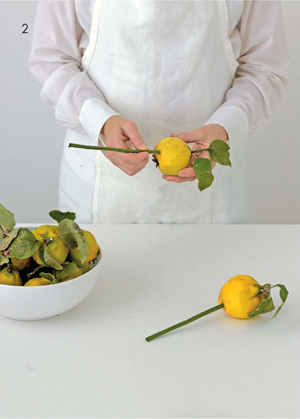
OPPOSITE I am constantly amazed by flowers and just how breathtakingly beautiful they are. This new purple variety of hyacinth is no exception. Just take a second to marvel at the purple stems against the spring green of its leaves.

Filled with a dazzling selection of flawless red roses, this heart-shaped arrangement is a hugely romantic gesture. The inspiration behind this gift was the fantasy of a glamorous showgirl having extravagant flowers lavished upon her by a besotted admirer who wanted to declare his undying love!
Approximately 80 × stems roses in four different varieties and colours. I used Grand Prix, Black Baccara, Tiramisu spray roses and a stripy rose called Soutine
1 × heart-shaped floral foam base

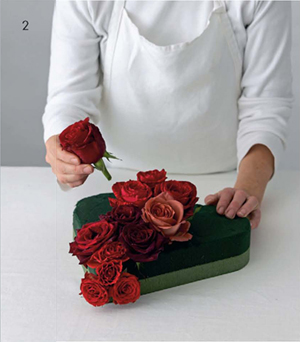
1 Soak the floral foam base in water until it is saturated. Prepare a group of roses at a time by removing all foliage and thorns and cutting the stems down to about 3–5cm in length. Begin by inserting a smaller-headed variety at the sides.
2 Gradually add more roses, using the larger-headed, more open blooms towards the centre. Mix up the varieties as you cover the base, but mass each variety in groups of three or more heads.

3 Continue to add the blooms, making sure that, as you work, you create a slight pillow-like rise in the centre and a curved shape at the top.
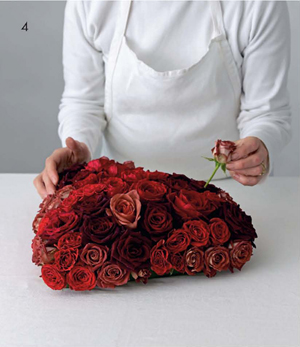
4 Once you have finished and the floral foam base is entirely covered, make sure the heart is allowed to drain off any excess water before it’s put on display. Leave it overnight, if possible, so it will not leak and damage any surfaces when finished.
OVERLEAF This slightly brownish-tinged spray rose with intriguing paler undersides to the petals is called Tiramisu.
THIS PAGE An extravagant arrangement of roses is the perfect declaration of love for many different occasions — Valentine’s Day, an engagement or a wedding gift. This luscious rose heart, propped up on a dressing table, red lipstick at hand, makes me think of some glamorous 1950s diva who has received a gift from an adoring fan.