I didn’t start cooking big feasts in earnest until about ten years ago, but in my youth I learned the power of good food to bring people together and the magic that takes place around a dinner table with friends, family, and food. I grew up in the Hollywood Hills in the 1970s, before it became what it is now—an enclave for wealthy industry people. Back then, the Hills was a place where artists, bohemians, and hippies settled to be close to nature. My parents were all of the above. My father, the actor Harrison Ford, was a carpenter at the time. Our house was a former ranger station, built in the early 1900s, a true shanty that my dad was forever fixing up. In every picture of me as a kid, behind me are open walls with conduits going through them. My mother was an illustrator, and a really great home cook. She always kept a vegetable garden and used to go out and pull stuff out of the ground and then cook it for our dinner. I thought this was just the way things were until I discovered that my friends’ mothers were getting their vegetables out of bags from the freezer. My brother, Willard, and I spent our childhood with friends, roaming the Hills, building forts, looking for small animals, and pulling unusual plants out of the ground to take back home. At the end of the day, our house was where all the kids ended up and the reason was simple: my mother’s food was better than the food at any of the other houses.
Although we didn’t have money, the one luxury we did have was a big old house in Wisconsin that has been in my mother’s family for generations. Every summer, we would leave the Hills and go to the lake, where we had everything two boys could want: canoes, fishing boats, and cousins. There we had the most consistent family time around the table. After long days spent swimming, fishing, berry picking, or just generally fooling around, we would sit around a big table of homemade food that we had all cooked together—my mother, my great-aunt Mimi, my brother, and my cousins. It seemed as if the days refused to get dark, and we’d eat and talk and play games and laugh. Then we’d fall asleep, exhausted, and start all over again the next day. This went on for the entire summer, and every summer for pretty much my entire life. The Lake House Fish Fry is directly inspired by those memories, but re-creating the feeling I had as a kid sitting around a table full of family and food is the inspiration for all of the feasts in this book.
As a carpenter, my dad had a workshop full of tools, and a drafting table in the house where he was always doing line drawings and blueprints. Often he’d take me to a construction site and show me what he was working on; explain how things fit together; show me the floor joists and what held up the house. Seeing how meticulous my father was in his craft stayed with me as a chef, but came back in an even stronger way when I was developing the cooking ovens and all the other elements used to build these feasts.
For me, one of the best things about cooking outdoors as I do in the feasts is the theatrics involved. At any party, guests tend to congregate in the kitchen. The makeshift outdoor kitchens you’ll create for these feasts are like built-in entertainment. There are easier ways to do things, but these feasts are about creating an event. There’s anticipation. There’s action. And then there’s really good food. People leave these dinners talking not just about the food but about the experience.
When I embark on a cooking project, large or small, I write one master prep list on a sheet of butcher paper or newsprint and stick it on the wall. No task is taken for granted, and nothing—big or small—gets forgotten. (Okay, something usually gets forgotten, but fewer things than if there wasn’t a list.) These master lists are the inspiration for the timelines you will find in every chapter. I suggest you photocopy them or use them as a guide to writing your own master prep list.
And, like me, find friends who want to help. If your friends are like mine, a cold beer goes a long way in soliciting their time. Those who feel less comfortable working with fire or food can pitch in by setting the table or getting prepared food out onto the table. People ask, “Can I do something?” not just to be polite but because doing something makes them feel involved, and makes the experience more fun.
I have live music at all of my parties, whether it’s a block party in front of the Filling Station or one of my kids’ birthday parties. If there are more than ten people, I hire a band, which is not as expensive as you might imagine. In every town and city across America, there are musicians who want to play to a crowd. Ask your friends if they know anyone. Ask live musicians playing on the street or in an outdoor market. Or go to your local guitar store, where musicians often post their services, and ask the guys working there; they’ll know someone. If live music isn’t an option, put together a good playlist.
Planning feasts is fun and creative, and for me, some of the most satisfying work of being a chef. When I’m watching my friends and family enjoy what I’ve created, that’s a magical moment, and makes all the time and effort worth it.
Do not be intimidated by cooking over a wood or charcoal fire. If you use good hardwood, stack the wood properly, and layer it with plenty of kindling, as I will instruct throughout the individual feasts, you’ll be fine. For some of the larger fires where you need to build up a large bed of embers, the preparation can take two to three hours, so you will need to adhere to the buddy system. One of you will stay on task with everything that needs to be done to get dinner on the table, and the other will be in charge of making sure the fire stays healthy. And have some cold water nearby to drink (being a pit master is a sweaty job), and get comfortable. Note that different types of wood give off different levels of heat. The best woods for cooking are hardwoods like oak, hickory, mesquite, and other dense fruitwoods. Avoid pine except as kindling.
■ If you are burning hardwood, stack the wood in a teepee shape and tuck kindling under the stack and between the pieces of wood. If you are using charcoal, to get the fire started, follow the instructions in Cooking with Charcoal and start the fire 11/2 hours ahead of cooking time.
■ Use a long-handled lighter to light the fire 2 to 3 hours before you plan to start cooking (refer to the specific recipes for times).
■ Let the fire burn, adding wood every 30 to 40 minutes, or as needed, to keep the fire at the desired temperature.
■ Burn the fire until the embers are glowing at the temperature you want.
■ As the fire burns, spread out the embers to create and as even a surface cooking area as possible. The goal is to create a bed of glowing hot embers capable of sustaining itself as you cook your feast.
■ If you find you need to add more wood after you’ve started cooking, add smaller pieces of wood to an easy-to-access area of the fire. When the wood has burned down to glowing embers, use your shovel to push them deeper into the cooking area.
■ As the embers die down and the heat is fading, stir them with a shovel or rake to help release more heat.
CHARCOAL |
|
1 Bag |
16–20 Lbs. |
2 Bags |
32–40 Lbs. |
4 Bags |
64–80 Lbs. |
8 Bags |
128–160 Lbs. |
16 Bags |
256–320 Lbs. |
32 Bags |
480–620 Lbs. |
HARDWOOD |
|||
1 Bundle |
30–35 Lbs. |
1 Cubic Ft. |
8–12 Pieces |
2 Bundles |
55–65 Lbs. |
2 Cubic Ft. |
16–24 Pieces |
4 Bundles |
115–125 Lbs. |
4 Cubic Ft. |
32–48 Pieces |
8 Bundles |
225–250 Lbs. |
8 Cubic Ft. |
64–80 Pieces |
16 Bundles |
450–500 Lbs. |
16 Cubic Ft. |
120–150 Pieces |
1/4 Cord |
900–1000 Lbs. |
32 Cubic Ft. |
240–380 Pieces |
1–3 SECOND - HIGH HEAT - 450° to 600°
4–5 SECOND - MED\HI HEAT - 375° to 450°
6–7 SECOND - MED HEAT - 325° to 375°
8–10 SECOND - LOW HEAT - 250° to 325°

The best way to test the temperature of a fire is with your hand. Place your palm at the level you will be putting your food. The length of time you can hold your hand there comfortably determines temperature.
HIGH HEAT, 450° TO 600°F (COUNT ONE, TWO, OR THREE MISSISSIPPI). Just after the wood turns to embers and glows bright, with flames still visible, the fire is too hot to cook with. The embers will be ready in about 10 minutes.
MEDIUM-HIGH HEAT, 375° TO 450°F (FOUR OR FIVE MISSISSIPPI). At this point, there will be no flames but the embers are fully glowing. This is the best temperature for direct grilling, which you will need for burgers and bratwursts. The embers will sustain themselves at this temperature for only about 15 minutes. Add more wood to the fire periodically to sustain this heat.
MEDIUM HEAT, 325° TO 375°F (SIX OR SEVEN MISSISSIPPI). Here the embers are starting to break down; you’ll see little or no glow, and mostly white ash. This is the sweet spot for indirect cooking, such as we use to smoke turkey. The heat will be strong enough to brown the outsides of meats over longer cooking times. The embers can sustain this temperature for 40 to 50 minutes.
LOW HEAT, 250° TO 325°F (EIGHT, NINE, OR TEN MISSISSIPPI). At this point the fire has died down and is good for smoking and making s’mores. If you still need to do high-heat cooking, you’ll need to build the fire back up by adding more wood and allowing the wood to burn down a bit.
To extinguish a fire, spread the fire out as much as possible, then douse it with water. The fire will reduce in temperature to about 100°F within 15 minutes. If you need to clear the space completely of the fire, wait another hour and then shovel the ashes into a steel trash can. The extinguished embers will remain hot; wait a full day before spreading them in the garden or disposing of them.
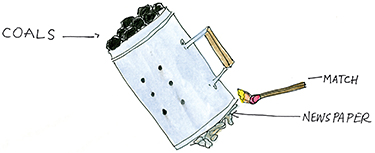
As much as I like wood, there is a place in the world for charcoal. The best charcoal is 100 percent mesquite, which imparts a slight smoke flavor. While it does not impart the same smoke flavor that wood does, the advantages of using charcoal are many. It’s less expensive than wood, easy to find—you can get lump charcoal at any grocery or hardware store—and much easier to light, especially if you use a charcoal chimney. Charcoal also burns at a more even temperature than wood, which means it’s easier to manage the heat. To use a chimney, crumple up a couple of sheets of newspaper and stuff them into the bottom compartment of the chimney. Fill the chimney with charcoal, light the newspaper, and set the chimney down on a surface that you don’t mind dirtying; the grill grate is a perfect solution. Let it burn until the charcoal at the bottom of the chimney is glowing. Put on a heavy glove and turn the coals out into your grill. Every 40 to 45 minutes add more charcoal to keep the fire going.
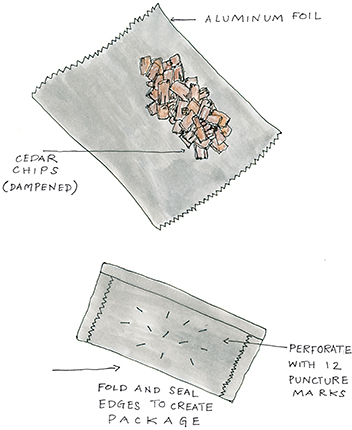
Wood chips are a great way to impart the smoky flavor you get from hardwood to your food when using a charcoal or gas grill. You can use wood chips in a smoker box (see Sources) or foil pouch, or throw them directly onto a charcoal fire. To use wood chips soak them in water for 30 minutes. After starting a charcoal fire or preheating a gas grill, close the lid and allow the grill chamber to heat up. Put a handful of the wet wood chips in the smoker box or wrap the wood chips in heavy-duty aluminum foil and poke holes in the top of the pouch (see diagram). Place the smoker box or foil pouch on the hottest part of the coals or to one side of the gas grill directly on the grate. Throw a handful of the chips directly on the fire. Close the lid again. When you see smoke coming from the grill, it’s time to put the food on. Refill the smoker box or add a fresh packet of wood chips whenever the white smoke subsides.
■ Fire extinguisher
■ Garden hose (make sure it’s working!)
■ Long-handled lighter or long kitchen matches
■ Shovel
■ Rake
■ Hoe
■ Large ice chests
■ Ice
■ Trash cans for garbage and recycling
■ Large heavy-duty trash bags
■ Heavy-duty heat-resistant gloves (enough pairs for you and your helpful friends)
■ Long-handled tongs
■ Spray bottle