Projects 1
CONSTRUCTING A ROASTING SHED
I saw my first cooking shed about 10 years ago while driving through the Black Mountains of North Carolina. They’re all made differently, and people can get pretty creative—I’ve seen some that were made by putting corrugated steel on the frame of a swing set. They can be outfitted in all sorts of ways, with roasting shelves where whole chickens or briskets can cook while a whole animal is being roasted, which is economical as it makes double use of the burning wood.
To make this sheet metal shed, I had the metal cut at a metal yard, and then worked with a welder to put it together. Below I give you a cut list and welding instructions so that you can do the same or weld it yourself.
Essentials for Making a Sheet Metal Shed
This list is for you if you are welding the shed yourself.
One SpitJack Rotisserie Kit XB125 (see Sources)
Measuring tape
MIG welder
1 spool (.35) bare welding wire
1 tank 75% argon and 25% gas mix
Wire brush
Heavy-duty gloves
Safety mask and welding gear
L-square
4-inch grinder with a .45 cutting disk
12 clamps
Fine point Sharpie
Power drill
3/16-inch steel drill bit
500 steel rivets, 3/16-inch gauge, 1/2 inch long
Rivet gun
Cooking Shed Cut List
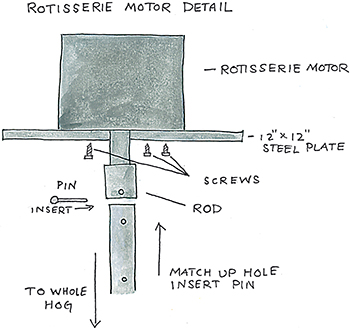
This roasting shed consists of three walls and a roof, framed with steel tubing and clad with sheet metal. Give this cut list to a metal yard or welder to cut for you. The SpitJack Rotisserie Motor will have three screws attached to its faceplate that you will use to attach it to the mounting plate. Take your rotisserie motor with you to the metal fabricator so they can easily confirm the positioning of the three holes needed to secure it to the mounting plate. (see diagram Rotisserie Motor Detail).
Fifteen 81-inch pieces 11/2-inch square tube steel
Eight 84-inch pieces 11/2-inch square tube steel
Two 69-inch pieces 11/2-inch square tube steel
Two 66-inch pieces 11/2-inch square tube steel
Two 10-inch pieces 11/2-inch square tube steel
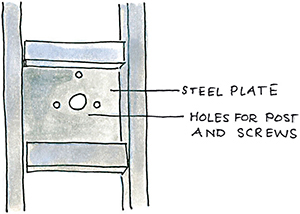
One 1/8-inch-thick 1-foot square steel plate with centered 1-inch hole and three 5/8-inch holes
Twelve 3-inch pieces 1-inch square tube steel peg
Two 84-inch pieces 11/2-inch flat steel
Two 69-inch pieces 11/2-inch flat steel
One .040 thickness 24-by-84-inch sheet aluminum sheet metal
Three .040 thickness 48-by-84-inch sheets aluminum sheet metal
Two .040 thickness 341/2-by-84-inch sheets aluminum sheet metal
One .040 thickness 30-by-84-inch sheet aluminum sheet metal
One .040 thickness 42-by-84-inch sheet aluminum sheet metal
Welder’s Instructions
When welding the frame, use a MIG welder to weld every joint. A MIG welder consists of a handle with a trigger that controls feeding the wire from a spool to the weld joint. The weld is made using a very small electrode that is fed continuously; all you have to do is control the pace and amount of weld being done.
TACK WELD
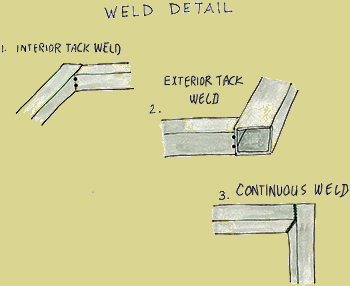
A tack weld is used to hold pieces of steel together temporarily while you produce a stronger continuous weld. To create a tack weld, position the tip of the welder 1/8 to 1/4 inch away from the surface you are welding; pull the trigger for about 2 seconds to allow the molten puddle to form a small weld bead to join the two pieces of steel together. There are two different types of tack welds, an interior tack weld (see diagram 1, Weld Detail) and an exterior tack weld (see diagram 2, Weld Detail).
CONTINUOUS WELD
A continuous weld (see diagram 3) is used to create a strong weld that will stand the test of time. To create a smooth continuous weld bead, position the tip of the welder 1/8 to 1/4 inch away from the surface you are welding, pull the trigger on the welding gun, and slowly guide the tip of the welding gun along the area that you are welding. Control the thickness of the bead by moving the gun faster for a thinner-looking bead or slower for a thicker-looking bead.
Note: Let all welds cool for 10 minutes before attempting to move the object you are welding.
1. Set up the welder to weld 1/8-inch steel and set the wire feed to 250 inches per minute (this measures how fast the wire will come out of the welder). Attach the ground clamp (this comes with the MIG welder) and turn on the welder. Open the valve on the gas tank (this also comes with the MIG welder). Adjust the flowmeter (this measures the level of gas the welder emits) to 20 cubic feet per hour. Use the instructions that come with your MIG welder to set the voltage as recommended for 1/8-inch-thick tube steel.
2. Clean all the surface areas on the 11/2-inch square tube steel to be welded with a steel brush and organize them into lengths.

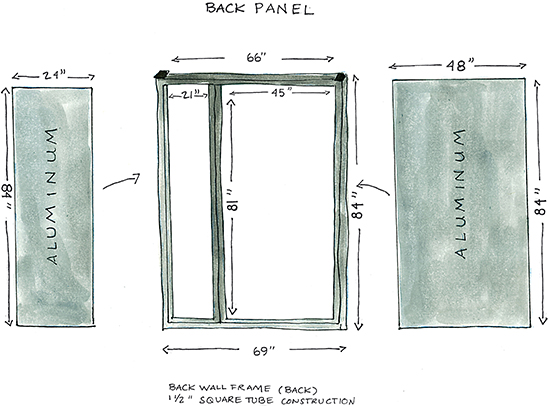
3. Find a flat surface to lay out your first frame, starting with the Back Panel. Lay down two 84-inch lengths of 11/2-inch tube steel parallel to each other and lay the two 66-inch lengths of 11/2-inch tube steel perpendicular so that the end of each piece butts up to the ends of the 84-inch lengths to create a rectangle (see diagram Back Panel). Align the tubes in the exact position you plan to weld them, and clamp the frame into position.
4. Wearing gloves and welding gear, choose an inside corner to start your tack welds. Position yourself so you can see the wire coming out of the welding torch and point it so you are lined up to create your first interior tack weld 1/4 inch down from the top edge of the tube steel. Make another tack weld an inch below from the first weld to create two small interior tack welds. Repeat on all three remaining inside corners.
5. Using the L-square, square up the frame.
6. Create two exterior tack welds on the outside corners (see diagram Weld Detail 2. Exterior Tack Weld).
7. Lay the panel down on a flat surface and align two 81-inch pieces of tube steel across the frame as they are positioned in the diagram. Clamp them together in position. These will act as crossbar supports for the frame. Create two interior tack welds at every inside corner.
8. With the frame still lying flat, create a continuous weld around three seams (or sides) of the steel tubing at each point of contact (see diagram Weld Detail 3, Continuous Weld). Let cool 10 minutes and then flip the frame to complete the final continuous welds on the other side.
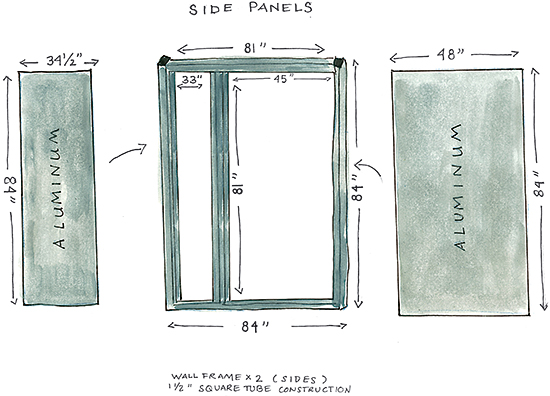
9. On the same flat surface, lay out your first side panel frame. Lay down two 84-inch lengths of 11/2-inch tube steel parallel to each other and lay the two 81-inch lengths of 11/2-inch tube steel perpendicular so that the end of each piece butts up to the ends of the 84-inch lengths to create a rectangle (see diagram Side Panel).
10. Repeat the same process following steps 4 through 9 to create the frame for the second side panel. Note: The side panels have 3 lengths of 81-inch tube steel crossbars for support instead of 2.
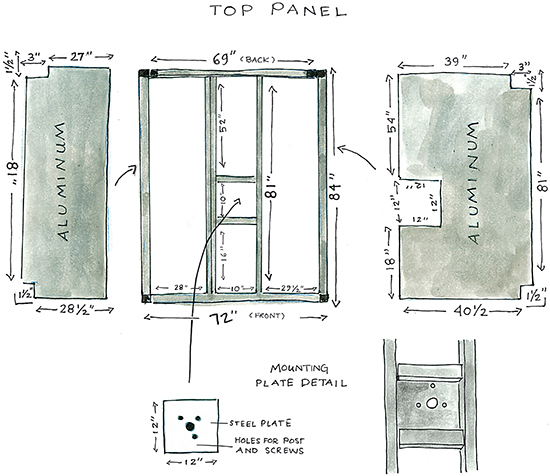
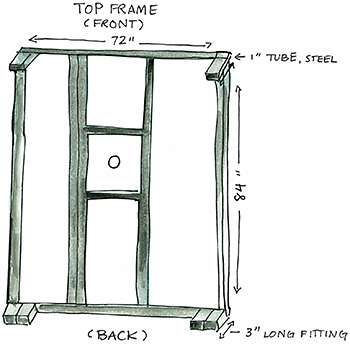
11. For the last panel frame, the top panel, lay down two 84-inch lengths of 11/2-inch tube steel parallel to each other and lay the two 69-inch lengths of 11/2-inch tube steel perpendicular so that the end of each piece butts up to the ends of the 84-inch lengths to create a rectangle (see diagram Top Panel). Repeat steps 4 through 11.
12. For the top panel you will also need to install a mounting plate for the rotisserie motor. Align the two 10-inch lengths of tube steel perpendicular to the 81-inch tube steel crossbars as they are positioned in the diagram and clap them into place (diagram Top Panel). Adhere with tack welds, followed with a continuous weld on all three sides of the steel tubing along each point of contact. Cool and then flip the frame and create a continuous weld bead on the last side.
13. Clamp the 1-foot square 1/8-inch steel plate to the bottom of the top panel frame. Attach using tack welds spaced out every 2 inches followed with a continuous weld along each point of contact (diagram Top Panel).
14. Lay the top panel flat, with what will be the underside facing up. Adhere four of the 3-inch lengths of 1-inch tube steel to each corner, using two tack welds at each point of contact. These will later act as pegs to hold the shed together. Create a continuous weld around all four sides at the base where the 1-inch tube steel pegs contact the frame. Adhere two of the remaining 3-inch pegs 1/8 inch inside the newly installed corner pegs located at what will be the back (short side) of the roasting shed (see diagram Peg Fittings Details).
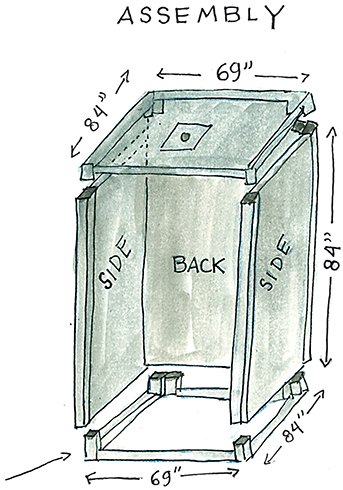
15. To create a base mounting frame (see diagram Assembly, below) to hold the shed together, lay the two 84-inch lengths of 11/2-inch flat steel down on your work area. Mount two of the remaining 3-inch pegs onto each end, flush with the corner, using tack welds followed by a continuous weld around the base on all four sides. Lay one of the 69-inch lengths of 11/2-inch flat steel down on your work area. Mount the remaining two 3-inch pegs and follow the same procedure of using tack welds followed by a continuous weld around the base on all four sides. (One 69-inch length of flat sheet metal has no pegs on it.)
16. Lay down the 69-inch strips, pegs facing up, parallel to one another and lay the two 84-inch strips perpendicular to the 69-inch strips to create a rectangle. Using two tack welds at each point of contact, weld the tubing together.
17. Using the L-square, square up the rectangle, then make a continuous weld along the seam at each corner. Flip the rectangle and make a continuous weld on the other side of each seam.
18. Make the cuts to the sheet metal intended for the top panel using the cutting disk (see diagram Top Panel). Note: A good metal manufacturer can make these cuts for you at the time of order.
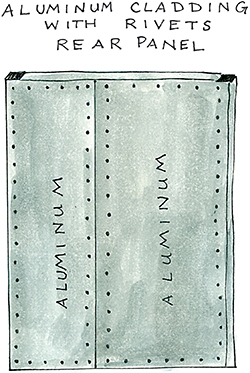
19. To clad the panel frames, start with the rear panel frame; this is the smallest of the three wall frames. With the frame lying down, use a grinder to smooth any of the welds that will interfere with the sheet metal lying flat. To begin, lay the 48-by-84-inch piece of sheet metal on top of the frame and align it against one side. Clap the sheet metal to the frame to hold it in place (see diagram Back Panel). Lay the 24-by-84-inch piece of sheet metal next to the 48-inch sheet, align it into place, and clamp it. The frame will now be completely covered on the interior side by sheet metal.
20. Starting 1 inch from one corner and 1/2 inch from the edge, mark the sheet metal at 3-inch intervals all the way around the four sides of the wall.
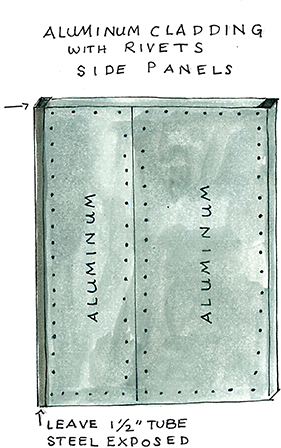
21. Next, clad the two side panel frames, each with one 351/2-by-84-inch and one 48-by-84-inch piece of sheet metal (see diagram Side Panels). Clamp and mark them in the same way.
22. Clad the top panel with one 30-by-84-inch and one 42-by-84-inch piece of sheet metal (see diagram Top Panel).
23. Working with one panel frame at a time, use a 3/16-inch steel drill bit to drill a pilot hole through the clamped sheet metal and into the steel frame at each point that you marked.
24. Load the rivet gun with 1/2-inch (3/16-gauge) steel rivets. Insert a rivet into each hole.
25. Repeat, drilling the pilot holes and inserting the rivets into the remaining panels to secure the sheet metal to the frames. Remove the clamps.
26. To assemble the shed, lay the base on a flat space, away from any trees or other fire hazards, where you plan on doing your cooking. Note that the shorter side with only 2 pegs will be the front or the entrance to the shed, so situate the base mounting frame accordingly.
27. Slide the rear panel, cladding facing inward, onto the back of the frame (the short side of the frame that has pegs), inserting the pegs on the base into the open tube steel on the rear panel frame (see diagram Assembly).
28. Repeat, sliding the side panels, cladding facing inward, onto the sides of the frame in the same way. Lay the top panel on the frame, inserting the pegs on the top panel into the open tube steel on the rear and side panels.
29. To mount the rotisserie, remove the three screws from the faceplate where the rod projects out. Place the rotisserie motor on top of the mounting plate so that the rod is pointing down through the 1-inch hole and the rest of the screw holes are lined up. Thread the screws through the underside of the mounting plate and secure it to the rotisserie motor.