1. Lay one piece of plywood flat. Using the T-square and carpenter’s pencil, measure and mark the plywood to create sections A, C, and Bottom (see Plywood Cut Chart, below).
Bottom (26 by 61 inches)
A (18 by 61 inches)
C (18 by 271/2 inches)
2. Repeat with the second sheet of plywood to create sections B and D.
3. Wearing protective eyewear, use a circular saw to cut the plywood following the marks you just made.
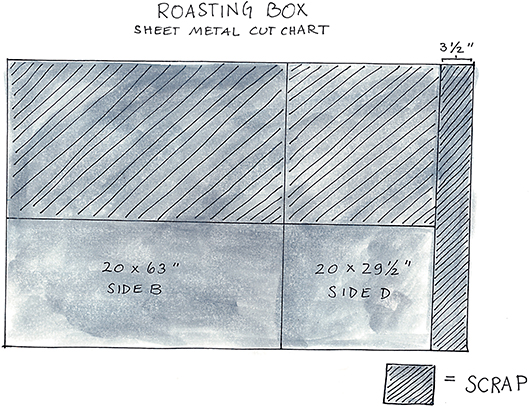
4. Unless you had the sheet metal cut to size, lay one piece of sheet metal flat. Using the T-square and carpenter’s pencil, measure and mark the sheet metal as in the Sheet Metal Cut Charts.
Bottom (28 by 63 inches)
A and B (20 by 63 inches)
C and D (20 by 291/2 inches)
5. Wearing leather gloves and protective eyewear, and using sheet metal cutters or a blade made for cutting metal on the circular saw, follow the markings as a guide to cut the sheet metal.

6. Lay the first piece of sheet metal flat. Starting 1/2 inch from any corner and 5/8 inch from the edge (see panel assembly diagram), mark the sheet metal, using a Sharpie, at 2-inch intervals along all four sides of each piece of sheet metal. Do the same on all the remaining pieces of sheet metal. It is important that spacing is accurate.
7. To assemble the panels, lay the bottom piece of plywood down on a flat surface. Roll the ceramic fiber paper out on top of the plywood, if using. Use the staple gun to staple the paper in place. Flip the plywood over. Using a utility knife and the sides of the plywood as a guide, cut the paper to the size of the plywood.
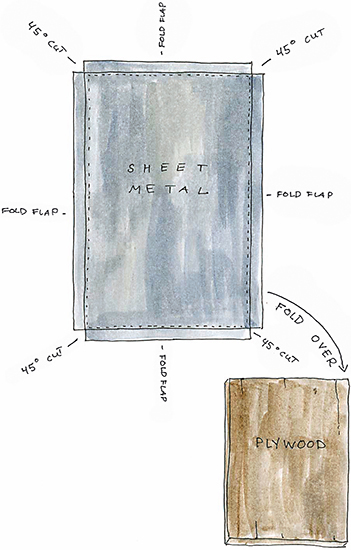
8. Lay the corresponding bottom sheet of plywood with the paper facing up. Lay the sheet metal on top of the plywood, centering it so you have an even 1-inch border of metal around the plywood.

9. Use the sheet metal cutters to cut the metal at each corner at a 45-degree angle from the corner of the sheet metal to the corresponding corner of the plywood (see panel assembly diagram).
10. Using your gloved hands and starting on one of the short sides, bend the sheet metal around the edges of the plywood; as you work your way along the edge, use a short piece of 2-by-4 and a rubber mallet to tap the sheet metal, flattening it against the plywood.
11. Secure the sheet metal onto the edge of the plywood with the roofing nails, starting at one corner and continuing along the edge at 2-inch intervals.
12. Repeat, wrapping and securing the sheet metal on the other three sides. 13. Wrap the other pieces of plywood (A, B, C, and D) with the corresponding pieces of sheet metal (A, B, C, D).
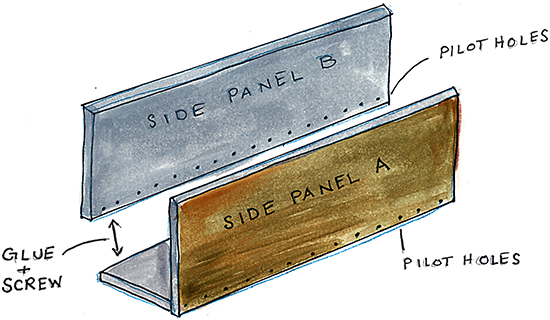
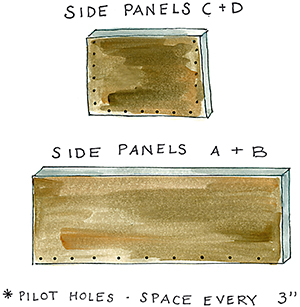
14. One at a time, lay the panels down, wood side facing up. Starting 1 inch in from the bottom corner of one long edge and 1/2 inch from the bottom edge, use your carpenter’s pencil to mark the wood side of each of the panels (A, B, C, and D) at 3-inch intervals (see diagram). These marks are where you will drill pilot holes. Using the same process of marking at 3-inch intervals, mark up both edges of the wood sides of panels C and D.
15. Using a 3/16-inch drill bit, drill a pilot hole through the panel at each mark (see diagram).
16. To assemble the box, first find a friend to help you hold the pieces in place while you put the box together.
17. Lay the bottom on your work surface.
18. Apply a thin bead of metal epoxy bonding adhesive to one of the long edges of the bottom.
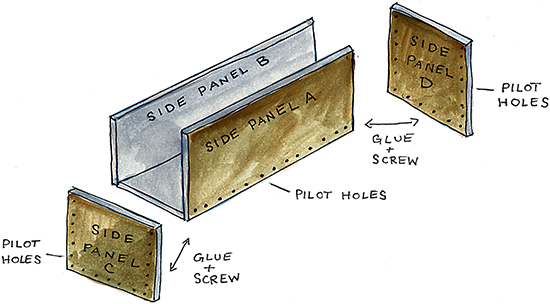
19. With the wood side facing out, position panel A with the drill holes flush with the edge of the bottom to which you applied the epoxy (see diagram).
20. With a friend helping you hold the vertical panel in place, use the drill to screw the deck screws into the pilot holes, attaching panel A to the bottom. Repeat, adhering panel B in the same way.
21. Adhere the two short sides (panels C and D), drilling the screws along both the bottoms and up the sides of the panels to create a box (see diagram, above).
22. Using a caulking gun, seal the inside seams with high-temperature food-safe silicone sealant.
23. Drop the fire pan onto the top of the box; it should wedge in perfectly. Drop the grate into the fire pan.
YOUR CAJA GRANDE IS NOW READY TO USE, BUT IF YOU WANT TO GET FANCY, YOU CAN MAKE IT MORE MOVABLE.
Install one heavy-duty locking caster at each corner along the bottom.
Attach heavy-duty handles to the two short ends to use to pull the box.
Decorate, stain, or embellish your box in whatever way you want. To write “lamb,” I created a stencil with masking tape and stained around it.