Chapter 3
Collecting and Protecting the Evidence
IN THIS CHAPTER
 Checking out the crime scene
Identifying types of evidence
Obtaining a search warrant
Gathering and preserving evidence
Figuring out where the body went
Crime scenes are like puzzles and, when investigators are lucky, the pieces fit neatly together. In other cases, determining what happened is like trying to create a picture from two or three different puzzles where you have plenty of pieces, but they don’t fit. And investigators often have to deal with pieces that just aren’t there.
Because solving a crime and convicting a perpetrator depend upon evidence, investigators take a methodical approach to finding and handling evidence at crime scenes. They work hard to protect the evidence and to leave nothing important behind. Throughout the process, investigators formulate theories about what happened. If they do their jobs well, they end up with a complete picture of the crime. In this chapter, I fill you in on exactly how investigators deal with evidence and crime scenes.
Assessing the Scene of the Crime
From the moment the first police officer arrives at the scene, he follows a strict set of procedural guidelines designed to protect him and everyone else who’s present; guard evidence against damage, contamination, or loss; and document everything that occurs at the scene. Following these procedures and maintaining control of the scene until the crime-scene investigators arrive offer the best chance of getting the evidence needed to identify and convict the perpetrator. Failure to follow these directives can result in the crime remaining unsolved or a known perpetrator walking free.
Distinguishing between primary and secondary crime scenes
There may be more to a crime scene than first meets the eye. In fact, more than one crime scene may exist, depending upon how the crime was committed, not to mention where. Crime scenes, therefore, are considered either primary or secondary. The primary crime scene is where a crime actually occurred. A secondary crime scene is in some way related to the crime but is not where the actual crime took place.
 In a bank robbery, for example, the bank is the primary scene, but the get-away car and the thief’s hideout are secondary scenes. In the case of a killer who commits a murder in someone’s home but transports the victim’s body to a river for disposal, the victim’s home is the primary scene, and the killer’s vehicle and the point along the river where the body was dumped are secondary scenes.
Primary scenes typically yield more usable evidence than do secondary scenes, but not always. Sometimes the only crime scene investigators have to work with is a secondary scene, such as the place where a serial killer dumps a victim’s body, for example. Under these circumstances, investigators may not know where the actual murder took place and therefore use evidence they find at the secondary scenes to help them identify the killer or locate the primary scene. They may be able to use fibers from an expensive or unusual carpet they found on the victim to identify the manufacturer, the seller, and ultimately a list of buyers or locations where that particular product has been installed. Doing so can greatly narrow the focus of the investigation and lead police to the primary crime scene and the perpetrator.
Arriving at a crime scene
Regardless of whether the first officer to arrive at a crime scene found out about the crime via a phone call to the station, a radio call from a dispatcher, or directly from a concerned person, the officer must make every effort to detain the person who initially reported the crime and not allow that individual access to the crime scene. Anyone who reports a crime may have witnessed the incident or may have seen or heard something suspicious.
However, because the officer has no way of knowing whether the person reporting the crime is a witness or a suspect, allowing the informant access to the crime scene can mean losing or contaminating the evidence. After all, a perpetrator may
- Believe that reporting the crime makes him less likely to be a suspect
- Attempt to destroy or remove evidence
Neither of these situations is uncommon, so the officer who arrives first needs to approach the crime scene in a logical and organized manner, protecting the evidence and other people who may be there. Otherwise, harm may come to the officer, fellow officers, victims, witnesses, suspects, and even the perpetrator, or evidence may be damaged or destroyed.
The officer who responds first must make personal safety a primary concern and ensure that the perpetrator or perpetrators no longer are present or a threat. Whenever a perpetrator is present, the officer arrests and secures that person. Thereafter, the officer assists any victims who are present, offers first aid as needed, and mobilizes emergency medical services. After these important tasks are completed, the officer begins preserving the crime scene.
Additionally, the officer may need to detain suspects and witnesses and keep them separate to avoid collusion, meaning that the detainees work together to create a story to tell police. However, at this stage, the officer may not know who is who: A witness may become a suspect, and a suspect may actually be a useful witness. Furthermore, the officer may have no reason or legal right to detain some witnesses and thus must obtain accurate identification and contact information from each person who leaves the area.
 At the heart of crime-scene protection is the principle of exchange. Locard’s Exchange Principle (see Chapter 1) states that when any two people come in contact with each other, they exchange or transfer trace materials, such as hair, fibers, and prints. Every person who enters the crime scene can leave behind evidence of his presence; take away crucial trace evidence on his shoes, clothes, or hands; or otherwise damage or alter any evidence that remains. Thus, access to the scene must be restricted immediately and denied to all witnesses and suspects.
Preserving and processing the scene
The size of a crime scene can vary greatly and the police must be prepared to quickly determine its boundaries. This task is not as easy as it seems. A crime scene may be a single room, an entire house, everything on a property, or even a whole neighborhood. And that’s just the primary scene.
At a minimum, the crime scene includes
- The exact spot where the offense took place
- Areas from which the site can be entered and exited
- Locations of key pieces of evidence, such as the body in a murder, a safe or cabinet in a burglary, or an entire structure in a suspicious fire
A crime scene can be cordoned off using crime-scene tape, barricades, automobiles, or even by police officers standing guard. Only personnel who are absolutely necessary for processing the scene are allowed in. This restriction often is more difficult to accomplish than you may think. A victim’s family members or neighbors may be emotionally unstable and thus difficult to remove from the area. And, of course, members of the press often have clever ways of gaining access to a crime scene, to say nothing of a captain or other high-ranking official trying to push her way past a lowly patrol officer who’s following orders to keep everyone without a reason for being there away from the scene. Furthermore, you can never underestimate the meanderings of the curious bystander.
After the scene is secured, the first officer to arrive establishes a security log, which basically is a sign-in sheet that must be signed by any and all visitors to the scene. This kind of crowd control helps the investigation in many ways, not the least of which is limiting the number of people who must be examined when stray fingerprints and shoeprints are found. If investigators can be ruled out, the print or prints remaining may point to the perpetrator.
A crime-scene investigator begins by doing a walk-through examination, getting a feel for the scene and organizing an approach to collecting evidence. During this overview, the crime-scene investigator typically doesn’t examine any particular pieces of evidence, but rather looks at the big picture before beginning the tedious work of evidence examination and collection.
Documenting the procedure
While a crime scene is being processed, everything that transpires is documented in notes, sketches, and photographs, and perhaps even videoed. This documentation includes not only the scene and the evidence, but also the surrounding area, particularly the perpetrator’s possible entry and exit points.
A designated note taker keeps an accurate account of all activities in and around the crime scene. Sometimes a tape recorder is used, and the verbal notes are transcribed later. Regardless of how they’re taken, the notes must be detailed, including an overall description of the scene; an accurate list describing what each piece of evidence is; when, where, and by whom it was found; and who transported it to the crime lab. The note taker also identifies and comments on every photo that is taken at the scene.
Photographs of the scene need to be taken as soon as possible so that they show the scene preserved in an unaltered condition. Photos must be taken prior to moving or removing any evidence (or the body, if there is one). Taking several overview images of the area is a good idea, and if the scene happens to be outdoors, pictures of surrounding areas should be taken from multiple angles and points of view. Close-ups of each item of evidence, and, in murder cases, any and all visible injuries to the corpse (while it’s still at the crime scene), are critical. Video possesses the advantage of including sound so that comments can be preserved. But whenever video is used, still photos nevertheless need to be taken because they offer much greater detail resolution.
Photos also are taken of any injured parties, including the suspect. Full-body and close-up shots of any injuries are obtained. Whether these pictures are taken at the scene or at the hospital (or even in the operating room) depends upon the nature of the injuries. Bumps, bruises, and scratches can be photographed at the scene, but photos of injuries such as gunshot and knife wounds probably have to wait until the victim is transported to the hospital.
In photographs where the size of the object or evidence being recorded is important, the photographer includes a point of reference. A ruler is ideal, but another common object, such as a cigarette pack, a ballpoint pen, or a car key, for example, works in a pinch.
Sketches also are extremely important, because they show the relationship of each item of evidence to other items or to the body (see Figure 3-1). Each piece of evidentiary material is mapped, or located by its distance from two fixed points, such as a wall, a lamppost, or a sidewalk. Doing so provides exact graphic coordinates of each item. Sketches made at the scene may be rough, but they need to be accurate. They can be redrawn later for clarity and aesthetics. Several computer programs are available that help generate clear drawings.
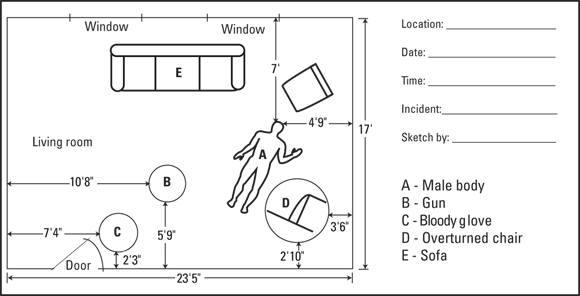
Illustration by Nan Owen.
FIGURE 3-1: Crime-scene sketches must be clear and show the coordinate positions of each item of evidence.
Reconstructing the crime scene
After doing an initial walk-through of the crime scene, the investigator begins mentally formulating a hypothesis of the crime, focusing on the likely sequence of events and the locations and positions of everyone present during the crime. Information like the following may be critical in determining the truthfulness of a suspect or the reliability of a witness:
- Shoeprints may reveal a perpetrator’s every step.
- Fingerprints may indicate the things the perpetrator touched.
- Tool marks may signify points of entry or where safes or locked cabinets were pried open.
- Blood spatters, bullet trajectories, the angle and severity of blows and stabs, and the nature of the victim’s injuries can reveal the actual and relative positions of the assailant, victim, and anyone else who was present during a crime.
- The physical changes that take place in a corpse (see Chapter 11) may indicate whether the body was moved several hours after death.
The investigator looks at each piece of physical evidence to assess whether it supports this theory, considering information obtained not only at the scene but also from the crime lab, medical reports of anyone who was injured, and the medical examiner’s autopsy examination. Anything that doesn’t fit in with or justify the investigator’s theory of the crime must be reconciled; otherwise, the theory must change. As a result, the reconstruction of a crime scene is constantly evolving as more evidence is uncovered.
The investigator continually tests the developing crime theory against the evidence and avoids making any assumptions, no matter how logical they may seem. An investigator may logically believe that a piece of evidence ended up where it did because of a suspect’s actions, but if the hard evidence doesn’t support this belief, the theory must be held suspect.
If a gun is found just outside the rear door of a house where a homicide took place, logic suggests that the assailant dropped the gun while escaping. Although that’s certainly a possibility, without solid evidence, ruling out other possibilities may be difficult. For all investigators know, the gun had been tossed there in an attempt to make a domestic homicide look like a murder committed by a burglar whom the victim supposedly caught in the act. Evidence like the spouse’s fingerprints on the gun or the victim’s blood on the spouse’s shoes may, of course, change the theory, but until all evidence in a reconstruction is considered and explained, investigators can’t reach any absolute conclusions.
Recognizing a staged crime scene
Staging is when someone who’s committed a crime attempts to make the scene look like something that it isn’t. The most common staging scenario occurs when someone tries to make a murder look like a suicide or an accident. The suspect may move the body or clean certain areas. Say, for example, a husband strikes his wife in the head with a blunt object, killing her. Then he cleans up the bedroom, moves her body into the bathroom, places her in the tub, and calls the paramedics, claiming that she fell while bathing.
Other common examples of staged crime scenes include the following:
- A murderer breaks a window or pries a lock and makes sure a prized piece of insured jewelry is missing in an effort to stage the crime so that it looks a burglar killed the victim.
- One spouse secretly feeds a deadly quantity of alcohol and sedatives to the other and then forges a suicide note in an attempt to make homicide look like suicide.
- A person committing insurance fraud stages a breaking and entering: Jewelry is missing, a window has been pried open, and of course, the jewelry was insured.
- A perpetrator sets a fire (thus committing arson) to cover up another crime, perhaps a murder, embezzlement, or even a burglary. The perpetrator hopes that the fire, which becomes a staged crime scene, destroys evidence of the underlying crime.
Classifying the Evidence
Evidence is anything that can be used to determine whether a crime has been committed. Evidence may link a suspect to a scene, corroborate or refute an alibi or statement, identify a perpetrator or victim, exonerate the innocent, induce a confession, or direct further investigation.
All evidence is not created equal. In fact, evidence is divided into numerous categories depending on its characteristics and reliability. For example, an eyewitness account falls into a different classification than left-behind hair or a piece of clothing.
Determining whether evidence is direct or circumstantial
Evidence can be either direct or circumstantial. Direct evidence establishes a fact. Examples of direct evidence are eyewitness statements and confessions. Circumstantial evidence, on the other hand, requires that a judge and/or jury make an indirect judgment, or inference, about what happened. For example, if a fingerprint or hair found at the crime scene matches that of a suspect, jurors may infer that the print or hair is indeed that of the defendant, and because it was found at the crime scene, links the defendant to the scene.
Circumstantial evidence is not absolute proof; instead, it provides a general idea of what happened. Most often, evidence identified through forensic science is circumstantial, though direct evidence such as witness and victim statements or suspect confessions may impact the ME’s interpretation of test results or his reconstruction of the crime scene.
 Circumstantial evidence often is much more reliable than direct evidence. Eyewitnesses are notoriously bad at identifying suspects or recalling events. After all, people tend to interpret what happened instead of simply playing it back like a film loop.
Furthermore, circumstantial evidence is more objective and is more likely to provide a reliable answer. An eyewitness may be wrong as much as half the time, but fingerprints and DNA evidence can, more often than not, accurately distinguish the individual in question from the other 7 billion people on Earth.
Discerning physical from biological evidence
Forensic evidence can be divided into two basic categories: physical and biological. Physical evidence may take the form of nonliving or inorganic items, such as fingerprints, shoe and tire impressions, tool marks, fibers, paint, glass, drugs, firearms, bullets and shell casings, documents, explosives, and petroleum byproducts or distilled fire accelerants. Biological evidence, on the other hand, includes organic things like blood, saliva, urine, semen, hair, and botanical materials, such as wood, plants, pollens and yes, Clarice, moth cocoons.
Understanding reconstructive evidence
Any evidence that helps law enforcement officers better grasp what happened at the crime scene is considered reconstructive evidence. Broken glass or pried-open doors and windows often reveal a perpetrator’s points of entry and exit, and determining whether a window was broken from the inside or the outside tells which way the perpetrator went through it. Evidence derived from shoeprints, blood spatters, or the trajectory of bullets may pinpoint where in the room everyone was located and exactly how and in what sequence the events of the crime occurred. Whether the victim was attacked from the front or from behind, whether the life was taken quickly or after a struggle, and whether the prime suspect was at the scene at the time of the murder are important aspects in creating a clearer picture of the crime scene.
Another way of looking at reconstructive evidence is that it helps the crime-scene investigator determine who did what, where, when, and how. It may also help determine who is being truthful and who isn’t.
Identifying associative evidence
Associative evidence, in a nutshell, ties a suspect to the crime scene, the victim, or some other bit of evidence. Fingerprints, footprints, hair, fibers, blood and other bodily fluids, knives, bullets, guns, paint, and many other objects and substances, even soil, can link a suspect to the scene.
Associative evidence also can have the opposite effect, proving a suspect’s fingerprints, hair, or blood are not the same as those found at the crime scene, and thus someone else may have committed the crime.
Differentiating class and individual evidence
In general, all forms of evidence have class or individual characteristics. Class characteristics are not unique to a particular object but place the particular bit of evidence into a group of objects. Individual characteristics narrow down the evidence to a single, individual source.
The type of handgun with which a victim is shot is a class characteristic. For example, if the bullet came from a .38 caliber handgun, every .38 caliber handgun on the planet is the possible murder weapon. However, finding a suspect’s fingerprint (an individual characteristic) on a .38 caliber handgun suggests that this .38, to the exclusion of all others, was the murder weapon. This is particularly true if the killing bullet can also be matched to this particular .38.
Alternatively, blood recovered from a crime scene that tests show is type B (a class characteristic) could have come from any of the tens of millions of people who share this blood type. If the suspect has type B blood, he remains a suspect. From there, DNA (an individual characteristic) from the suspect and DNA from the blood evidence are tested to determine conclusively whether they match. If, however, the suspect’s blood is type A, he then is excluded as the source of the blood.
A single piece of class evidence rarely can be used to convict someone, but it can be and often is used to exonerate someone. However, when multiple types of class evidence associate one suspect with the crime and crime scene, the weight of that evidence can make for a stronger case, which is what happened to Wayne Williams.
 In December 1981, Williams was tried for the Atlanta Child Murders based largely on class fiber evidence. Multiple fibers, 28 different types in all, were found on several of the victims. These fibers chemically and optically matched fibers taken from Williams’s home and cars. Blue, yellow, white, and yellow-green fibers of various synthetic types were similar to fibers taken from Williams’s kitchen and backroom carpets, bedspread, throw rug, and car liner. Hairs matching those of his dog also were found. Williams was convicted.
In the case against Wayne Williams, the sheer number of the pieces of class evidence made coincidence extremely unlikely. The odds that someone else left behind that particular combination of fibers and hair are astronomical. Although class evidence isn’t absolute proof that a suspect is connected with a particular location and each bit of class evidence taken separately may not be strong, a large number of matching pieces of class evidence significantly boosts the probability that a suspect was present at the crime scene. A handful of class evidence is statistically equal to a single fingerprint.
The most individualizing types of evidence are fingerprints and DNA, because they’re pretty much like snowflakes in that no two people have the same prints or, with the exception of identical twins, the same DNA. Impression evidence such as marks left on a fired bullet (see Chapter 18), shoeprints, tire tracks, and toolmarks may be unique and therefore have individual characteristics. Fracture or tear patterns can be individualizing; the way glass breaks, paper tears, and cloth rips is unique in each situation. When a piece of glass taken from a crime scene and a piece of glass removed from a suspect’s broken headlight fit neatly together like the pieces of a jigsaw puzzle, the pieces share a common source.
The overriding principle in analyzing individual characteristics is that no two things are exactly alike. No two guns mark a bullet the same way. No two pieces of glass fracture in the same manner. No two pairs of shoes or sets of car tires wear in exactly the same way.
Analyzing the evidence
Forensic analysis of most physical and biological evidence is conducted for two purposes: identification and comparison. Identification determines what exactly a particular item or substance is. Is that white powder cocaine? Is that brown stain dried blood? After testing, a forensic examiner may state that the substance in question is present, not present, or that testing was inclusive and the presence of the substance can’t be ruled in or ruled out.
Comparisons are made to find out whether a known and a suspect item or substance share a common origin. Did the fingerprint, hair, or blood come from the suspect? Does the paint smudge found on a hit-and-run victim’s clothing match that of the suspect’s car? After comparing a crime-scene fingerprint to one obtained from a suspect, the examiner may state that the two match, keeping the suspect in the hot seat, or that they don’t match, thus exonerating the suspect as a source for the print. The examiner also may find the comparison inclusive, perhaps because the crime-scene print was of poor quality. When that happens, the suspect is neither cleared nor condemned.
Crime-scene investigators use evidence to create linkage, that is, a connection between a suspect and a person, place, or object. Finding a victim’s hair on the clothing of the suspect, for example, suggests that they had some degree of contact and thus links the two together. A suspect’s fingerprint, blood, or semen at the scene of a robbery, murder, or rape strongly links the suspect to the crime scene. A murder weapon on which a suspect’s fingerprints are found requires a great deal of explaining. Each circumstance links elements (person, place, or object) of the crime to the suspect.
Investigators also attempt to link multiple crime scenes to a single perpetrator. For example, if a particular shoe impression or an identical fingerprint is found at two or more scenes, this evidence may link the scenes to a single suspect. Even if investigators don’t have a suspect, such a linkage allows them to use other clues at the various scenes to create a better picture of the perpetrator they seek.
The skill of a crime-scene investigator in collecting evidence and the precision of the analytical procedures of the crime lab work in tandem to establish these links. When successful, evidence may find its way into court and result in a conviction.
Locating the Evidence
Locating evidence can be straightforward: Someone calls the police to report a burglary, and when the police arrive the victim invites them in and shows them the location of the pried-open window, the family safe, and the perpetrator’s escape route. But, in other cases, the probable location of the evidence is not always associated with a crime scene, and police are not invited into the area where the evidence may be located.
For example, the murder weapon or other important evidence such as the victim’s blood or hair may be in the suspect’s home or car. Such items may provide important circumstantial evidence that the suspect is indeed the perpetrator of the crime. However, to enter and search the suspect’s residence or vehicle, investigators need a reason for the search that is acceptable to a judge and, ultimately, a search warrant.
Obtaining a search warrant
The Fourth Amendment to the United States Constitution protects citizens “against unreasonable searches and seizures,” which means that police personnel and crime-scene investigators need a warrant before they can search for evidence. This warrant must be specific about the time and place of the search, the items investigators are looking for, and it must be obtained on the basis of probable cause, a solid legal reason approved by a judge. Only a law enforcement officer can obtain a search warrant. Attorneys and private investigators can’t, and neither can you.
The steps that are required to obtain a valid search warrant are
-
Preparing an affidavit.
This affidavit must describe the location to be searched, the items to be searched for, and the reasons why the officer expects the items are at the location (probable cause).
-
Preparing the warrant.
This step results in the official document that the judge must sign giving permission for the search to take place.
-
Getting the warrant signed.
The officer must present the warrant and affidavit to the judge. If the judge thinks probable cause for the search exists, he signs the warrant, making it official.
Sounds simple enough, doesn’t it? Often it is, but at other times, obtaining a search warrant can be difficult. Probable cause can be one of the first issues to raise a flag. The officer must have a strong, concrete reason for believing that the items to be searched for are at a specific location. A mere hunch or suspicion won’t work. Say, for instance, that an arms dealer has a safe house from which he sells his wares, and police have observed known arms sellers coming and going with boxes and crates that potentially contain guns. Maybe police even know to whom one of the middlemen has sold illegal weapons. When combined, these factors are more than a hunch and provide solid evidence that packages arriving at and leaving from the house contain weapons.
Another problem is that the warrant must state exactly what police are looking for. Thus, police tend to add any and all items they think may be present. If police happen to find other evidence while they’re conducting a legitimate search for the items listed in the warrant, then that evidence can, in most cases, be seized.
If the object of the search warrant is a gun crate, police can search only areas in which such a crate can be concealed. Rooms, attics, closets, and basements are searchable, but a kitchen drawer is not. So, if police open a drawer and find a gun, they can neither seize it nor use it in court. As a result, police try to include a number of small items in the warrant, because doing so enables them to conduct a much more extensive search. In the case of the arms dealer, police may include drugs, which can be hidden almost anywhere, in the warrant. If the judge believes police have probable cause to search for drugs, police then can look through the kitchen drawers and even the breadbox.
Creating yet another difficulty, the area to be searched must be explicitly defined. If a search warrant identifies a house, but doesn’t specifically mention that the garage and storage shed can be searched, then those areas are off limits. If the warrant lists a garage but not the car inside, then the garage can be searched but not the car.
Searching without a warrant
Certain special circumstances allow police to search without a warrant. The Supreme Court has allowed warrantless searches to stand in the following situations:
- Emergent situations: When an emergency exists and someone’s life or health is in danger, police may enter a building or other structure (including a vehicle) without a warrant. Any evidence that is found under such circumstance may be admissible in court. However, police officers cannot make an emergency entrance, leave, and return at a later date to search for evidence. This second entry requires a warrant.
- Impending loss of evidence: This exception applies in situations where a suspect or some other agent or outside influence, such as a structure fire, threatens to destroy evidence.
- Lawful arrest: Whenever someone has been arrested lawfully, the suspect and any property in the suspect’s immediate control, such as a home or a vehicle, can be searched for evidence.
- Consented search: No warrant is needed when the parties who are subjected to a search of their person or property have given police their consent.
Collecting and Preserving the Evidence
Without evidence, even a heinous crime may go unpunished. Attorneys are called upon to prove beyond reasonable doubt that defendants committed the crimes with which they are charged, and that’s no easy feat even in the best circumstances. Without evidence, it’s virtually impossible. That’s why protecting the scene and the evidence is of paramount importance.
In fact, the care (or lack of it) that is taken in handling evidence directly impacts law enforcement’s ability to successfully investigate and prosecute a crime. Evidence can be damaged, contaminated, or even lost, and thus rendered useless to the crime lab and probably inadmissible in court. Even the most expensively equipped and sophisticated crime lab has little use for damaged or altered evidence, because courts rarely allow such evidence to be presented to the jury.
The size, budget, and organization of the crime lab or law enforcement agency often determine who is responsible for collecting evidence (see Chapter 2). Regardless of who actually gathers evidentiary materials, those people nevertheless need to be well schooled in proper techniques.
Searching the area
The first step in gathering evidence is finding it, and that means taking an orderly approach to searching the crime scene. Many items, such as corpses and weapons, may be readily visible, but others, particularly smaller materials or bits of trace evidence, require diligence on the part of investigators. In homicides, investigators target points of entry and exit and the area near the body; in robberies, open safes, cabinets, or drawers are good starting points.
The way investigators search for evidence depends upon the size and physical layout of the area in question. Scanning the floor of a broom closet for fiber evidence is much different than searching a half-acre lot for a shell casing. Yet in both situations the search must be thorough and orderly.
When searching a crime scene for trace evidence (see Chapter 17), investigators typically follow a geometric pattern (see Figure 3-2). They may use a crisscrossing grid, a shoulder-to-shoulder linear pattern, or expanding or contracting spiral patterns. The spiral may begin at the body or the cracked safe and move outward, or it may begin at the periphery of the crime scene and circle inward toward the spot where the actual criminal act took place. Larger areas are first divided into quadrants or zones so that each smaller area can be scanned using one of these methods. The goal is to carefully search every square inch of the target area.

Illustration by Nan Owen.
FIGURE 3-2: The pattern used to conduct a search depends on the size and location of the area being searched.
Gathering the evidence
When collecting evidence, investigators start with evidence that is particularly fragile or that is likely to be lost, damaged, or contaminated, such as blood, fibers, hair, fingerprints, shoeprints, and tire tracks. This method is particularly useful when gathering evidence from outdoor crime scenes, where wind and rain can complicate matters.
Investigators use the following techniques for gathering delicate evidence:
- Fingerprints are photographed and then lifted, or transferred to a material that investigators can take with them to the crime lab. Chapter 5 gives you the whole scoop on how investigators find and collect fingerprints.
- Toolmarks and shoeprints or tire impressions also are photographed before being lifted or cast (see Chapter 7).
- Fibers and hair are searched for with alternative light sources and gathered with tweezers.
- Carpets and furniture are vacuumed, using a fresh vacuum cleaner bag for each area. This often yields hair, fibers, and other trace material that escaped the investigator’s eye at the scene.
Packaging the evidence
After evidence has been found and gathered, it must be protected. Each piece of evidence gathered is packaged separately to avoid damage and cross-contamination. Most dry trace evidence is placed in druggist’s folds, which are small, folded papers. Envelopes, canisters, plastic pill bottles, and paper or plastic bags may also be used. Documents are sealed in plastic covers before they’re transported to the lab.
Liquid evidence, on the other hand, usually is put into unbreakable, airtight, sealed containers. The same is true for solid forms of evidence that may contain volatile evidence, such as charred remnants of a fire that are believed to contain residues of hydrocarbon accelerants (substances such as gasoline or kerosene that make a fire burn faster and hotter and are commonly used by arsonists). Left unsealed, these residues can evaporate before they are tested. Clean paint cans and tightly sealed jars work well for evidence in solid form.
Moist or wet biological evidence must be placed in nonairtight containers so that it can air dry; otherwise, the moisture can cause mold, mildew, and bacterial growth, which, in turn, lead to decay and ultimately destroy the sample. Bloody clothing often is hung up and allowed to thoroughly air dry. After the biological evidence is dry, it is repackaged into sealed containers.
Sometimes removing evidence from the scene without damaging it is difficult or even impossible. A tool mark on the sill of a window that’s been pried open can be processed at the scene, or the entire window or frame may be removed and taken to the lab. Similarly, bullet holes in a concrete wall may be processed on-site, or a portion of the wall may be carefully removed for later laboratory evaluation.
Collecting control samples
Another important aspect of collecting evidence is properly obtaining control samples, which are samples taken from a known source against which the examiner can compare samples taken from the crime scene.
Control samples may come from the victim, from the suspect, or from items found at the scene. A fiber found at the scene is most valuable when control fibers are available from the floor mats of the suspect’s vehicle. That way, the known or control sample taken from the car can be compared with the unknown sample discovered at the crime scene. A match either puts the suspect at the scene or the victim in the suspect’s car. Control samples of blood taken from the victim and the suspect can be compared with blood from an unknown bloodstain found at the scene to determine whether either of them shed the blood.
Control samples sometimes are materials that are identical to those on which evidence was found. For example, a sample of charred carpet that is suspected of containing residue from a fluid used to start a fire is best compared against the same kind of carpet that is known to be free of the suspect materials. A carpet sample taken from an area left undamaged by the fire can often provide the known sample. If a suspicious chemical is present in the charred carpet but not in the known sample, the laboratory examiner can be more certain that it is indeed a foreign chemical and not a component of the carpet or its adhesive.
Protecting the chain of custody
Without a continuous record showing that evidence has been kept safe and secure from the crime scene to the lab and ultimately the courtroom, evidence may be rendered inadmissible in court. Any competent defense attorney would rightly question the authenticity and integrity of any evidence for which outside contamination cannot be ruled out. That’s why every person who handles the evidence must be accounted for and recorded as a link in this unbroken chain of custody, from crime scene to courtroom.
Whoever finds an item of evidence marks it for identification, which sometimes consists of writing or scratching his or her initials onto the item itself. Of course, this method is appropriate only when it won’t damage the evidence or alter any of its specific identifying characteristics. For example, an investigator may scratch his or her initials on the side of a shell casing found at the scene. In court, the investigator can positively identify the shell casing as the exact one uncovered at the scene.
Not all evidence can be marked directly, however. An investigator probably wouldn’t mark a bullet by scratching initials into it, because doing so can alter the striations on the side of the bullet that are used to identify the gun from which it was fired. Altering the bullet makes matching it with the gun more difficult. Therefore, evidence like a bullet is placed into an evidence bag, which is marked and initialed by the person who finds it. The identifying information on the evidence bag includes the case number, the name and description of the item, the name and initials of the person who found it, the names of any witnesses to the discovery and recovery, and the date, time, and location of the find.
Some items require special packaging before being placed in an evidence bag. For example, a blood sample may be taken using a moist, cotton-tipped swab. After drying, the swab is placed into a sealed glass tube, and the tube is marked with the collector’s initials and date. The tube is placed into an evidence bag, which is similarly marked. The collector can then reasonably testify that that is the sample he obtained by identifying his initials on the sample tube and the evidence bag.
Each person who accepts an item of evidence initials or signs and dates the evidence bag and is then responsible for maintaining its integrity until it is passed along to the next person (or link in the chain). Here’s how it works:
- A police officer finds a shell casing at the scene of a homicide; he collects it, marks it, places it into a marked evidence bag, and then signs it over to one of the crime-scene investigators.
- The investigator transports the evidence to the lab and signs it over to the crime lab technician.
- After the item is tested and evaluated, the lab technician signs the evidence over to the police department’s custodian of evidence (the officer in charge of the secured evidence lock-up area at the police department).
- The custodian of evidence places the evidence in a secured area until it’s needed again. From there, it may be signed over to the prosecuting attorney for presentation in court.
If the chain of custody remains intact, each witness, from the officer who found it to the custodian of evidence, can testify that the item presented in the courtroom is indeed the item that was collected at the scene and tested by the lab.
Locating a Missing Corpse
No body means no crime, right? Maybe so, but more often it means a body was well hidden. When a body (and the critical evidence it provides) can’t be found, investigators rely on a few time-tested techniques for unearthing it. This branch of forensics is a particularly interesting one, and it’s growing all the time.
When looking for a body, investigators use any and all evidence to narrow the search area, and statements by witnesses can be crucial. For example, a witness may have spotted a suspect’s vehicle or found some of the victim’s clothing in a remote area, pointing the investigation to a particular direction.
Investigators use a number of low- and high-tech methods when searching for a body that has gone missing, including
- Looking downhill: Say that a body is believed to have been buried near a remote roadway where the terrain rises above the road on one side and falls away on the other. When that’s the case, investigators search downhill, because carrying a body downhill is much easier than carrying it uphill. It’s just that simple.
-
Checking out variations in the terrain: Freshly turned dirt, trenches, and elevations or depressions in the terrain may be helpful. Fresh graves tend to be elevated above the surrounding area, and older ones are often depressed because the soil covering the corpse settles naturally and as the body decays and the skeletal remains collapse, it settles further.
Interestingly, the depth of the depression is greater whenever the body is buried deeply, which is likely because larger amounts of dirt have been turned and are then subject to a greater degree of settling. Another factor may be that with deeper graves, the increased weight of the dirt over the corpse causes earlier and more complete skeletal collapse. - Using tracking dogs: Tracking dogs, when provided with an article of the victim’s clothing, may be able to follow a scent trail to the burial site. Specially trained cadaver dogs search for the scent of decaying flesh. They often can locate bodies in shallow graves or even in water. Deeper graves, however, can be more problematic.
- Looking for changes in vegetation: Turning the soil during the digging process changes the soil conditions in the area covering the grave, as does the presence of a body. These changes in the compaction, moisture, aeration, and temperature of the soil may attract plant species that differ from those surrounding the gravesite. Similarly plants that are typical for a given area may be more abundant or grow thicker and richer because of changes in soil conditions. Not to mention that the decaying body can serve as a fertilizer, This kind of change may be visible, particularly from the air.
- Checking out the scene from the air: Aerial reconnaissance and photography, often coupled with thermal imaging, can be helpful. Freshly turned dirt loses heat faster than normally compacted soils and appears colder when scanned by such a device. Alternatively, a decaying body releases heat, which may reveal a measurable thermal difference when compared with the surrounding area.
- Searching for byproducts of decay: If an area is suspected of containing a body, it can be searched with special devices that locate sources of heat, nitrogen, and other byproducts of the decaying process or that measure changes in the physical properties of the soil. Ground-penetrating radar can essentially see into the ground and often locate a buried body.
- Measuring the electricity: Measurement of electrical conductivity can prove helpful. A buried body often adds moisture to the soil, and the moisture increases the soil’s electrical conductivity. Two metal electrodes are placed in the soil, and an electrical current is passed between them and measured. Changes in this current may indicate where the body is buried.
- Putting magnetic fields to work: A simple metal detector can locate the victim’s jewelry or belt buckle. A special device for measuring the magnetic properties of soil may also be helpful. Soil generally contains small amounts of iron and thus has a low level of magnetic reaction. Because the area where a body is buried has proportionally less soil, it exhibits an even lower level of magnetic reactivity. A magnetometer passed above the soil can help locate any areas that have low magnetic reactivity.